The post Creamy Korean Udon with Eggs and Mushrooms appeared first on I Forgot Salt!.
]]>
Another near-month has gone by without a post, which seems to be something of a trend lately. It seems like no matter how motivated I am to cook, photograph, and post, something always comes up. When The Summer From Hell ended and we got engaged, I thought life would calm down, but one semester rolled into the next as time is wont to do. No rest for the wicked or the weary in this house! Both Alex and I ended up getting terribly ill in mid-October, too, and we’re just now getting over the last remnants of passing it back and forth between us more than once.
Without the ability or will to cook while severely under the weather, I spent my free time looking for new ways to improve this website. I pulled out the Craigslist-acquired DSLR I bought before travelling in 2016 and spent more than a few afternoons watching YouTube videos about the many settings and modes I’d never thought to explore, and got halfway through putting together a handmade photography board with my mom before falling sick a second time.
I also took a step away from planning meals on the fly and really sat down to think about what I wanted to cook when I finally got better. The result was a notebook full of ideas with no real way to test them, but now that I’ve finally finished this round of classes and have a few days off before we drive up to New England (a new Christmas tradition), I have plenty of free time!

This delicious korean-style udon recipe is one of those aforementioned flashes of half-fevered inspiration, although it’s technically a second iteration. My first attempt involved a dish so mushy and disintegrated that the entire thing ended up looking like a bowl of orange porridge, and I overcooked the eggs so terribly that they ended up nearly blackened on one side. Not my finest moment, for sure. The flavors were all there, though, and with a few tweaks (and a resolution not to walk away from the stove while cooking) round two was a major success!
This recipe makes 2 servings.
Ingredients:
- 1 lb (about 1 package) udon noodles
- 15-20 baby bella mushrooms
- 4 eggs
- 2 red bell peppers
- 1 cup coconut cream
- 1/2 cup Parmesan cheese
- 1/4 cup gochujang
- 1/4 cup kimchi
- 2 tbsp light oil
- 1 1/2 tbsp miso paste
- 1 tbsp peanut butter (smooth)
- 1 tbsp (about 4 cloves) garlic
- 1 tbsp (about 1 inch) ginger
- 1 tsp white pepper
- 1 tsp gochugaru/red pepper flakes
- 1 tsp sesame oil
Directions:
- Slice bell peppers in half and remove cores. Place halves skin-side up on a nonstick or parchment-lined baking sheet. Broil on high for 10-15 minutes, or until the skin has begun to bubble. Remove from oven and allow to cool slightly.
- Add roasted red peppers, gochujang, kimchi, miso paste, peanut butter, garlic, ginger, and white pepper to a blender or food processor. Blend until relatively smooth.
- Using a fine mesh strainer, strain the liquid from the blended sauce into a medium-sized pot or high-walled pan. Reserve the strained solids and set aside.
- Bring strained sauce to a boil, then reduce heat to simmer. Add coconut cream and stir until blended. Simmer for an additional 3-5 minutes, or reduce to low until all other elements are prepared.
- Prepare udon noodles according to package directions, strain, and toss with sesame oil. Set aside.
- In a small saute pan, add the strained sauce solids, 1 tsp light oil, and mushrooms. Fry on medium-high heat for 5-7 minutes, or until the mushrooms have begun to crisp. Remove from heat and set aside.
- In a large nonstick skillet, add the remaining light oil and heat to high. When the oil has begun to lightly sizzle, crack 1 egg into the pan and fry for 2-3 minutes, or until the whites have completely cooked but the yolk remains runny. Repeat with the three remaining eggs. (Note: The eggs will bubble and pop while frying, so I recommend tilting the pan away from you as you’re cooking. Don’t step away from the stove! Eggs cook very quickly and will easily burn if left unattended.)
- Add gochugaru and cooked udon noodles to the warm sauce, and toss to coat completely. Serve topped with fried mushrooms, 1/4 cup Parmesan cheese, and two fried eggs each. Enjoy!
This recipe reheats reasonably well in the microwave, although I would not recommend storing cooked eggs in the fridge overnight. The noodle and mushroom portion, however, could be a great lunch option if you’re looking for something different!
This recipe was also inspired by PureWow’s Gochujang Zoodles, largely because I’d never even considered using kimchi as anything other than a topping or side dish before coming across their recipe on Pinterest. Go check it out!


Creamy Korean Udon with Fried Eggs and Mushrooms
Equipment
- fine mesh strainer
- blender/food processor
Ingredients
- 1 lb udon noodles about 1 package
- 15-20 baby bella mushrooms
- 4 eggs
- 2 red bell peppers
- 1 cup coconut cream
- 1/2 cup Parmesan cheese
- 1/4 cup gochujang
- 1/4 cup kimchi
- 2 tbsp light oil
- 1 1/2 tbsp miso paste
- 1 tbsp peanut butter smooth
- 1 tbsp garlic about 4 cloves
- 1 tbsp ginger about 1 inch
- 1 tsp white pepper
- 1 tsp gochugaru/red pepper flakes
- 1 tsp sesame oil
Instructions
- Slice bell peppers in half and remove cores. Place halves skin-side up on a nonstick or parchment-lined baking sheet. Broil on high for 10-15 minutes, or until the skin has begun to bubble. Remove from oven and allow to cool slightly.
- Add roasted red peppers, gochujang, kimchi, miso paste, peanut butter, garlic, ginger, and white pepper to a blender or food processor. Blend until relatively smooth.
- Using a fine mesh strainer, strain the liquid from the blended sauce into a medium-sized pot or high-walled pan. Reserve the strained solids and set aside.
- Bring strained sauce to a boil, then reduce heat to simmer. Add coconut cream and stir until blended. Simmer for an additional 3-5 minutes, or reduce to low until all other elements are prepared.
- Prepare udon noodles according to package directions, strain, and toss with sesame oil. Set aside.
- In a small saute pan, add the strained sauce solids, 1 tsp light oil, and mushrooms. Fry on medium-high heat for 5-7 minutes, or until the mushrooms have begun to crisp. Remove from heat and set aside.
- In a large nonstick skillet, add the remaining light oil and heat to high. When the oil has begun to lightly sizzle, crack 1 egg into the pan and fry for 2-3 minutes, or until the whites have completely cooked but the yolk remains runny. Repeat with the three remaining eggs.*
- Add gochugaru and cooked udon noodles to the warm sauce, and toss to coat completely. Serve topped with fried mushrooms, 1/4 cup Parmesan cheese, and two fried eggs each. Enjoy!
Notes
The post Creamy Korean Udon with Eggs and Mushrooms appeared first on I Forgot Salt!.
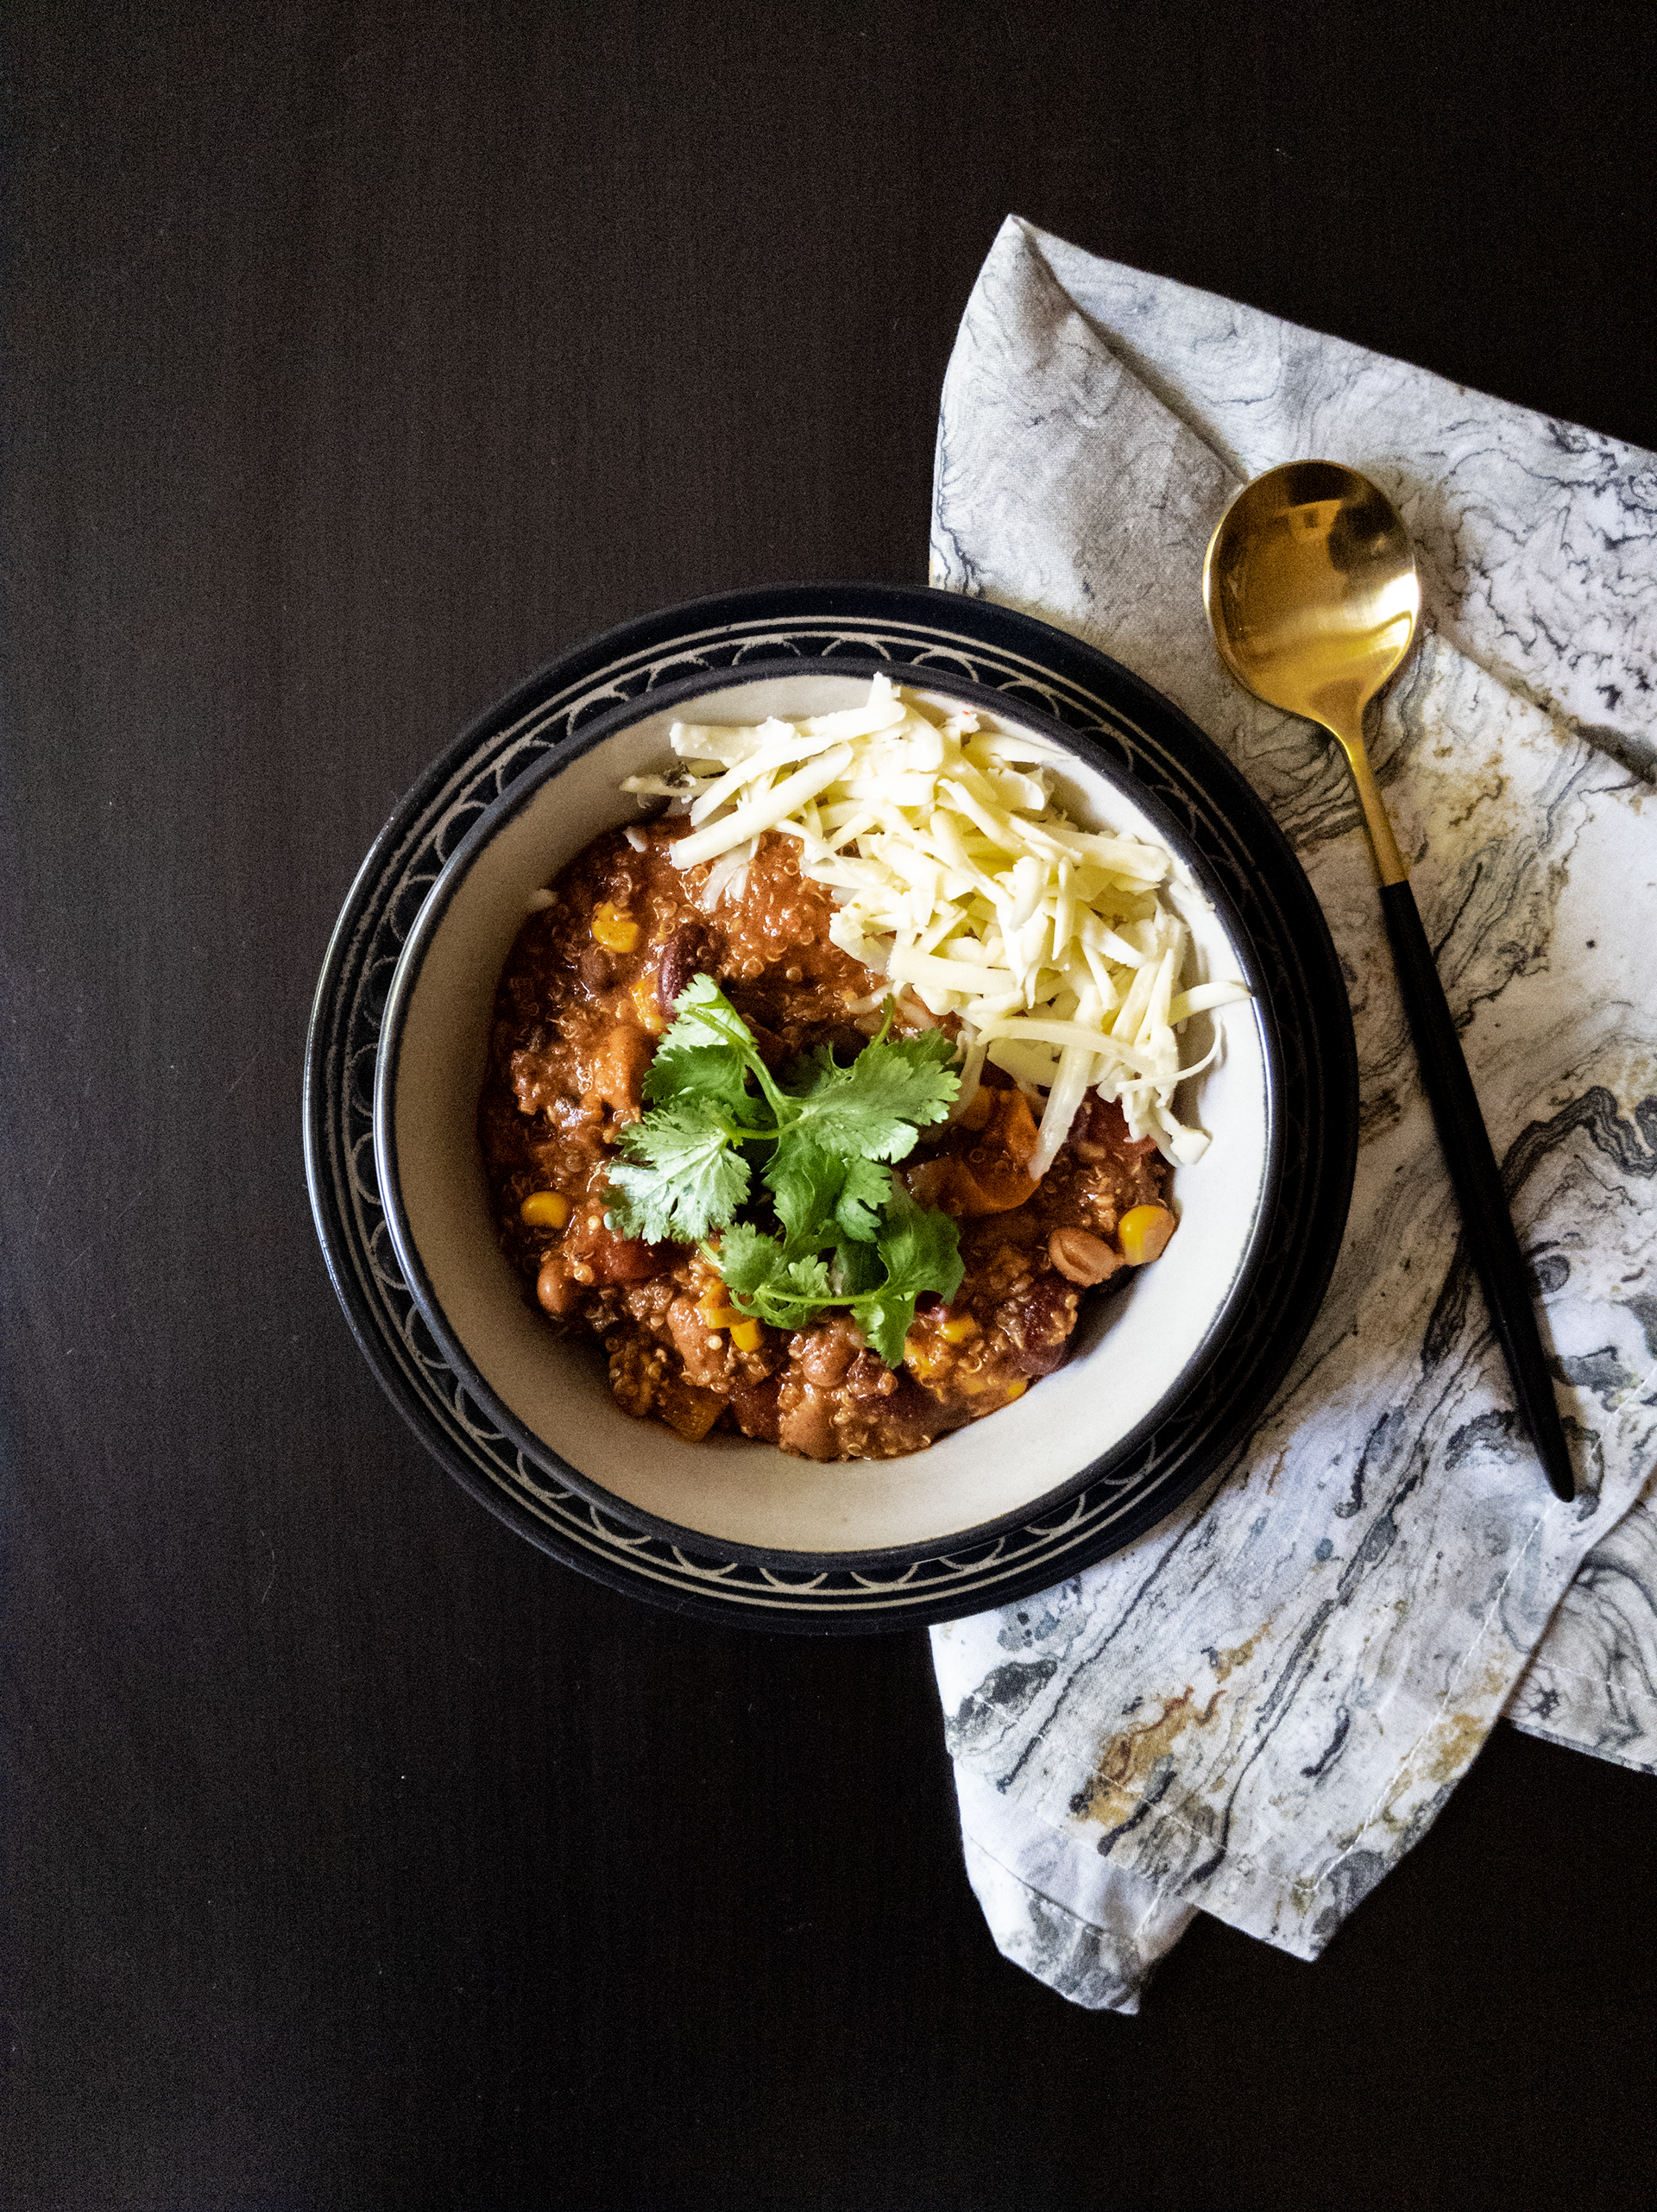
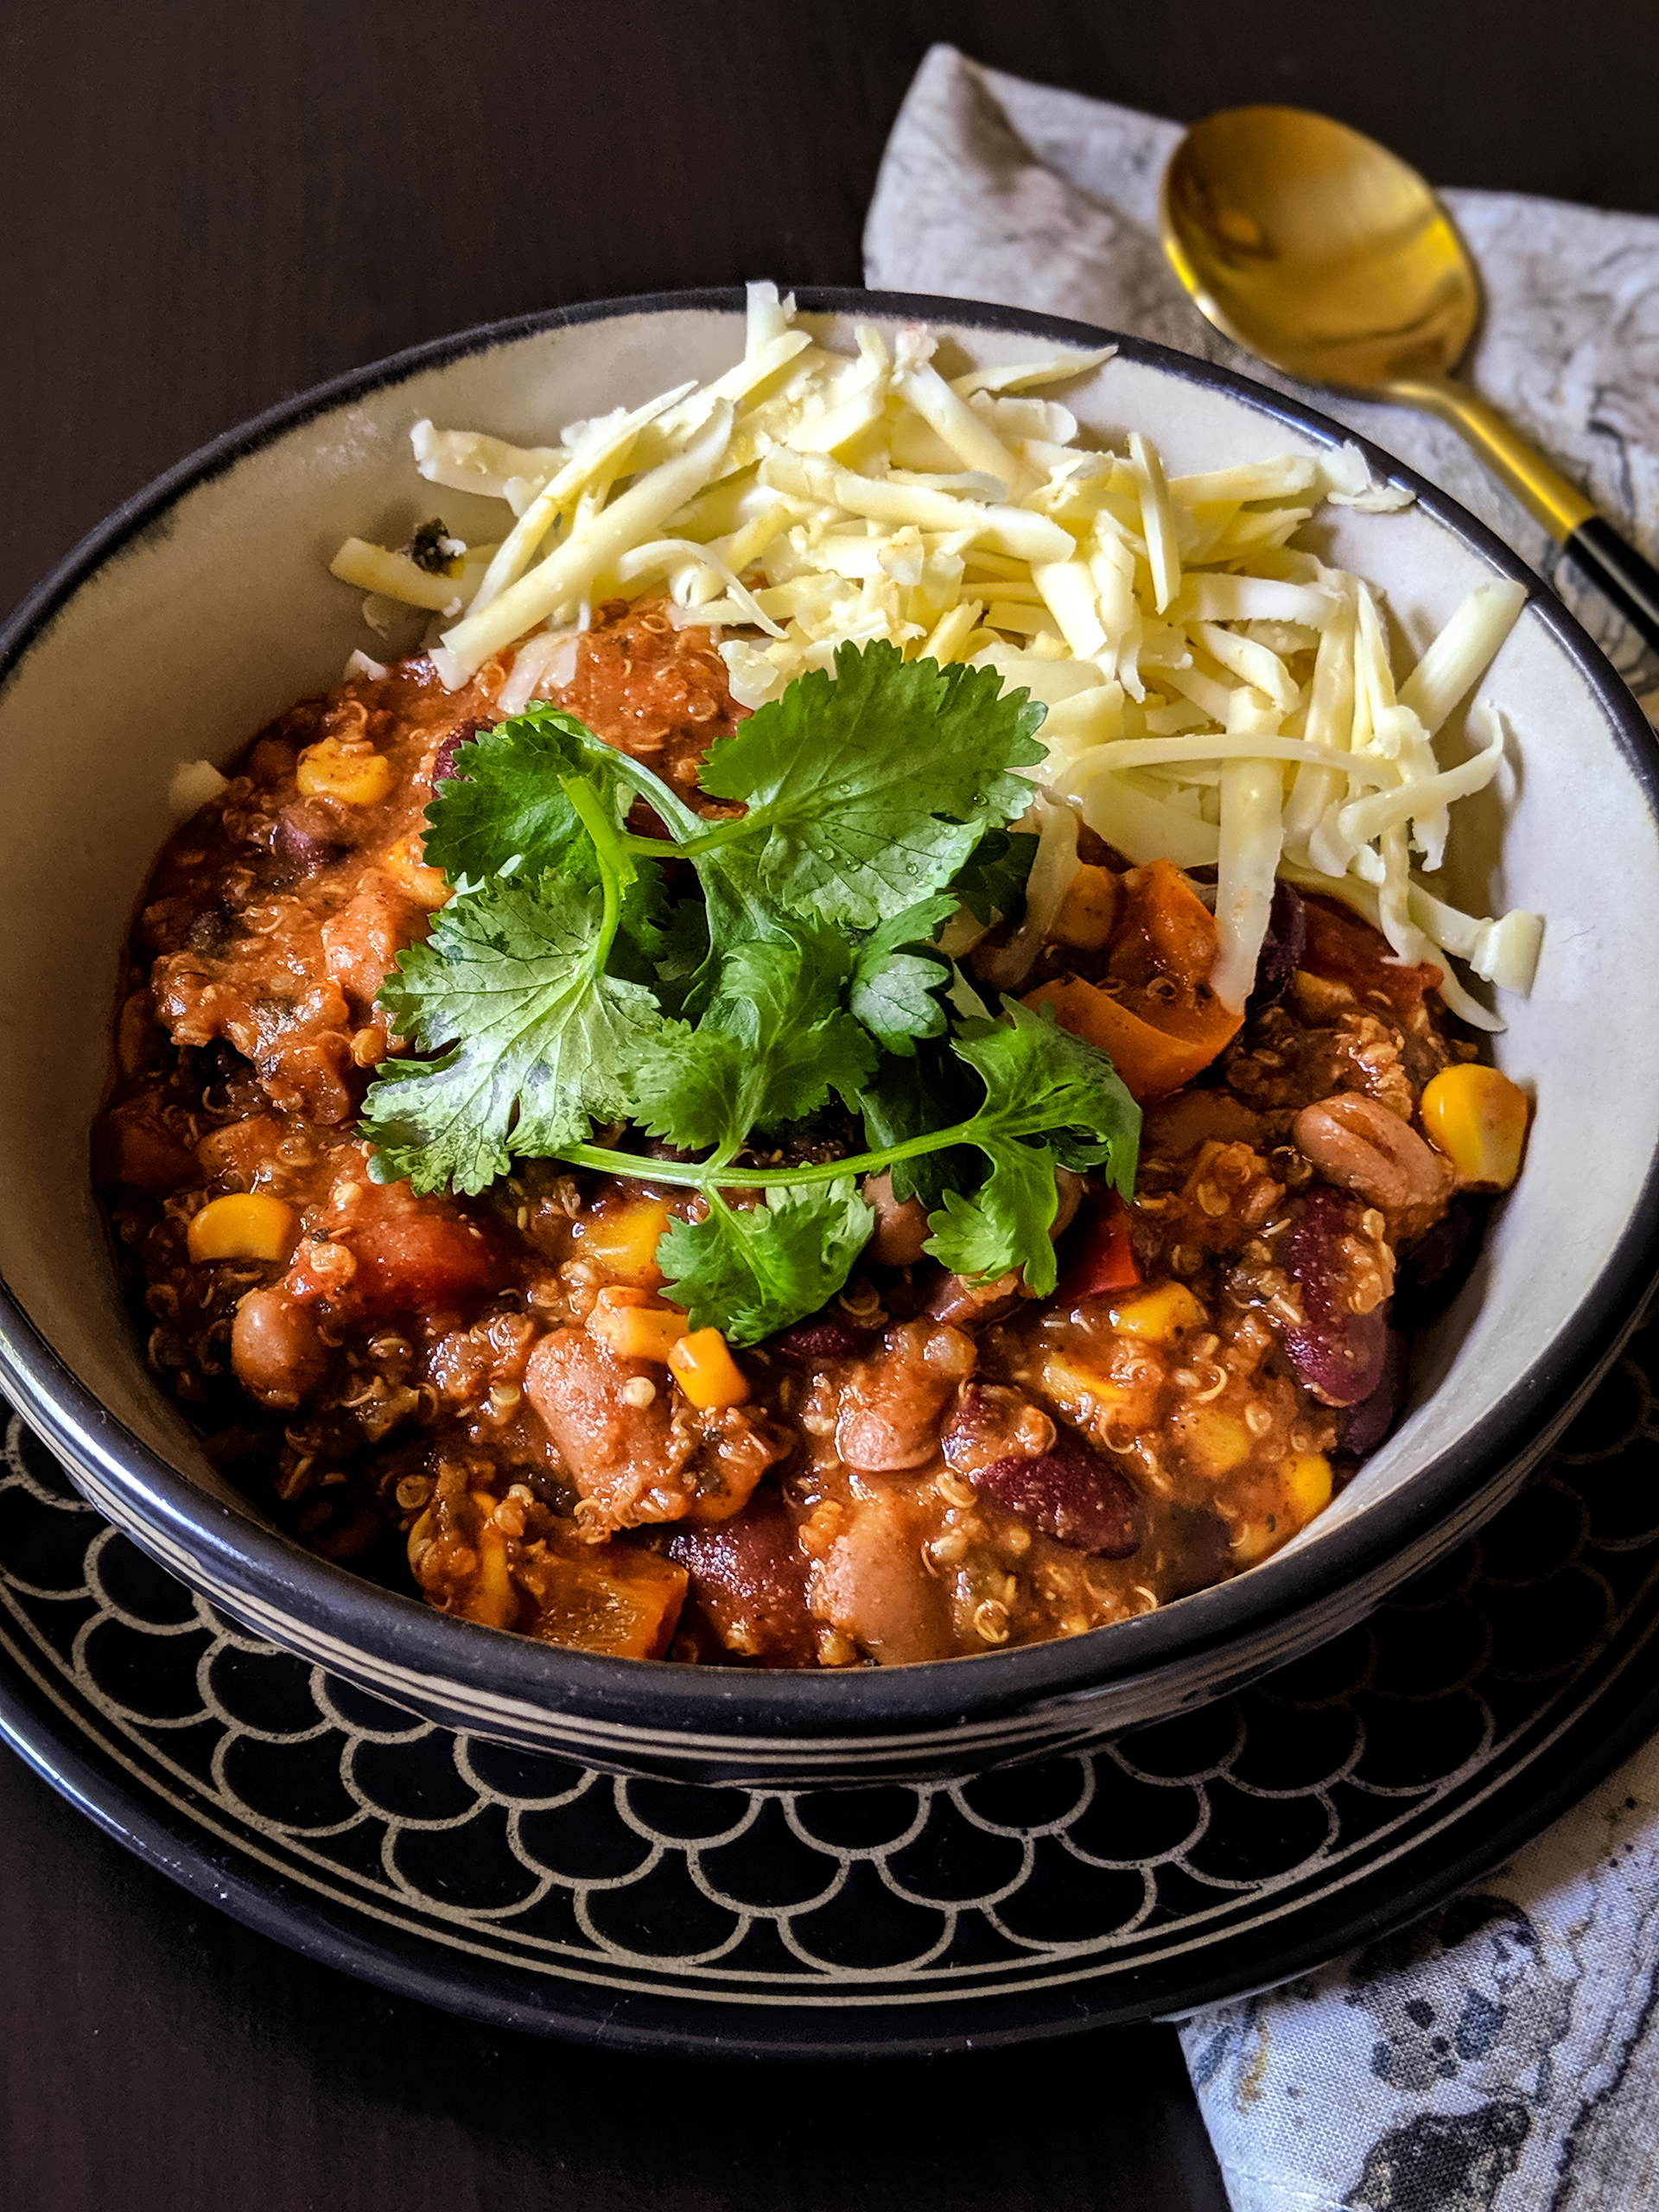
]]>The post Slow Cooker Vegetarian Chili appeared first on I Forgot Salt!.
]]>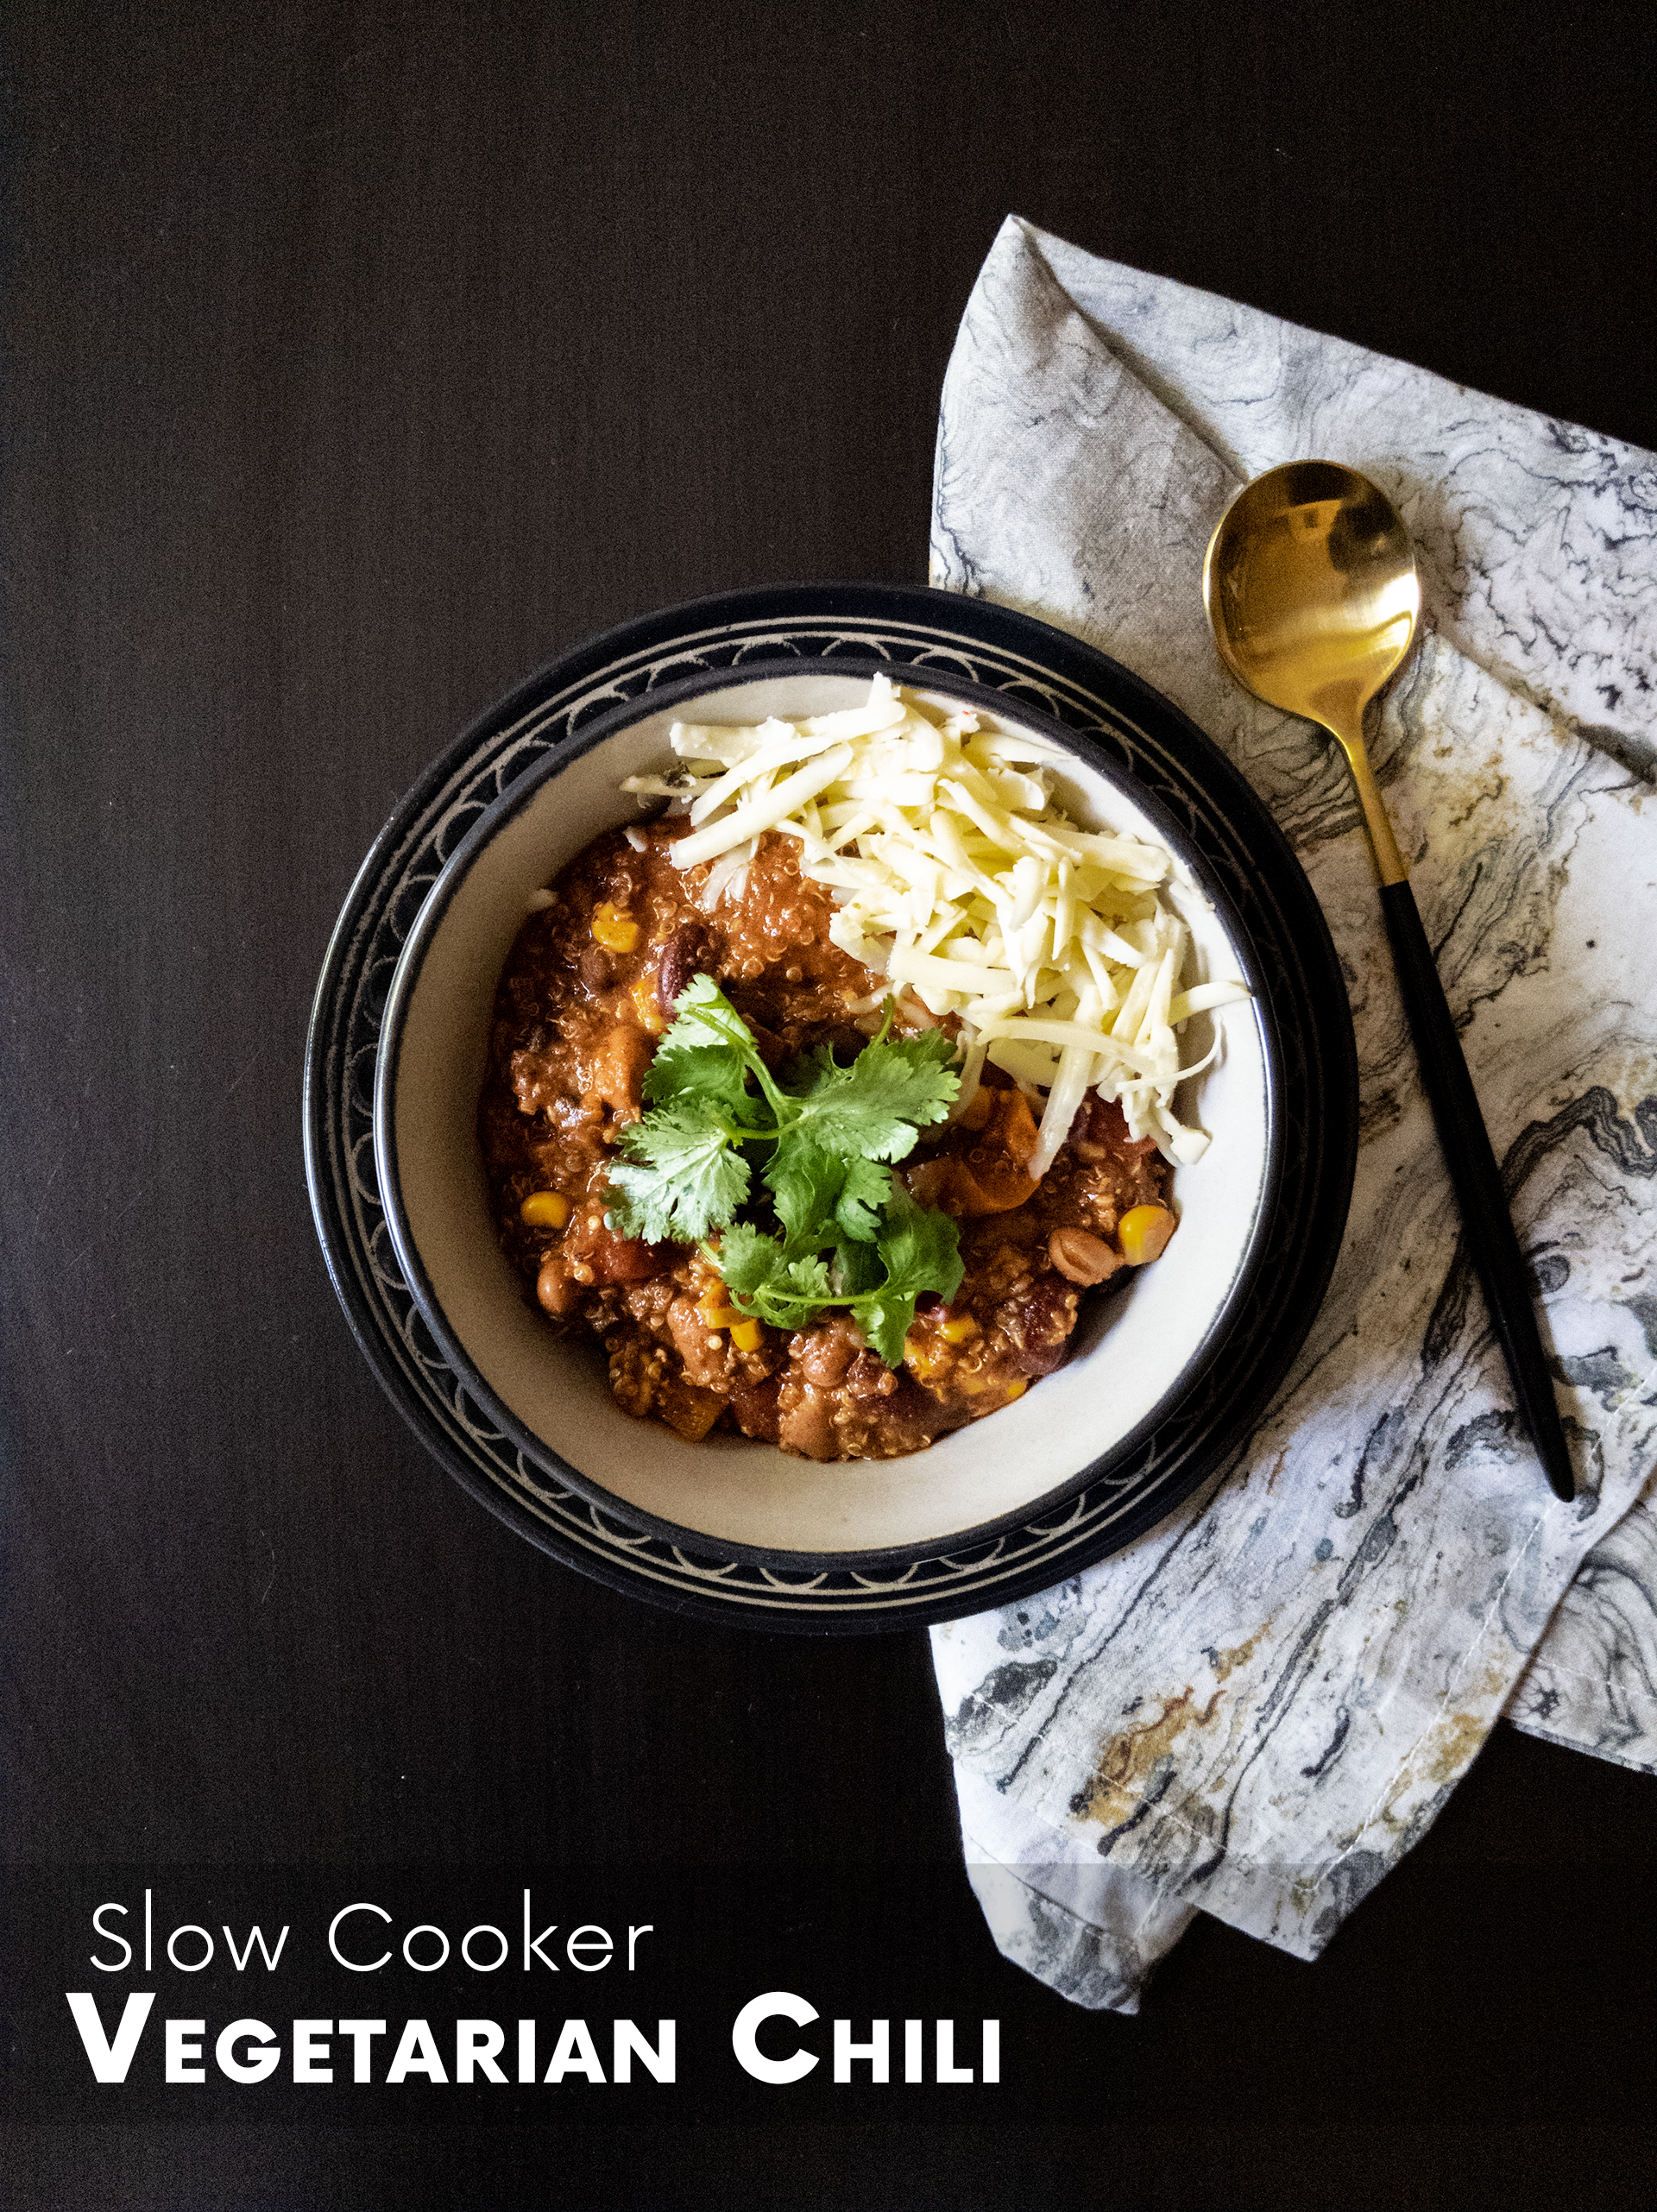
In the spirit of full disclosure, I made this dish two weeks in a row and we literally ate it every day for lunch. At the end of the second week, Alex and I looked at each other and had to have a serious discussion about whether or not we wanted it again–that’s just how damn good this chili is. I have a feeling it’s going to get us through the fall… and then probably winter, too. It all came about because we went up north a few weeks ago for my sister-in-law’s baby shower, and her sister (who is a vegetarian) brought chili to the potluck. Despite being a former long-time vegetarian myself, I’d never had anything like it before, and absolutely had to try my hand at making a version at home. I regret not getting her recipe, but this turned out absolutely delicious all on its own!
This recipe makes eight servings.
Ingredients:
- 1 can (15oz) black beans, rinsed and drained
- 1 can (15oz) pinto beans, rinsed and drained
- 1 can (15oz) dark red kindey beans, rinsed and drained
- 1 can (15oz) sweet corn, rinsed and drained
- 1 can (15oz) fire roasted diced tomatoes, with liquid
- 2 bell peppers, diced
- 2 cups vegetable stock
- 1.5 cups brown ale beer
- 1 cup uncooked quinoa
- 1/2 cup fresh cilantro leaves
- 1/4 cup light brown brown sugar
- 1/4 cup jalapenos, diced
- 2 tbsp chipotle peppers in adobo, minced
- 2 tbsp salt
- 2 tbsp minced garlic
- 2 tbsp chili powder
- 2 tbsp cumin
- 2 tbsp dried onion
- 1 tbsp paprika
- 1 tbsp oregano
- 1 tbsp basil
- 1/2 tbsp coriander
- 1/2 tbsp cayenne pepper
- 1/2 tbsp chipotle powder
- 1/2 tbsp white pepper
- 1/2 tbsp black pepper
- 1/2 tbsp ground ginger
- 1 tsp cinnamon
- 2 tsp lime juice
Directions:
- Dice/mince bell peppers, jalapenos, chipotle peppers, and garlic as needed. Rinse and drain all beans and corn.
- Combine all ingredients except lime juice in slow cooker or crockpot (I used an 8qt Instant Pot) and cook on low for 7 hours or high for 3.5 hours.
- When ready to serve, stir in lime juice. Serve with shredded pepper jack cheese, additional cilantro, Greek yogurt, crushed tortilla chips, and/or additional lime juice.
This recipe reheats wonderfully in the microwave, and keeps in the fridge for up to a week. In fact, it’s almost tastier the second day, because the flavors have even longer to sit and mingle! Like I mentioned in the forward, I’ve meal-prepped this chili for two weeks in a row, and it’s one of the heartiest and most delicious lunches I’ve made ever!

Slow Cooker Vegetarian Chili
Ingredients
- 1 can black beans 15oz, rinsed and drained
- 1 can pinto beans 15oz, rinsed and drained
- 1 can dark red kindey beans 15oz, rinsed and drained
- 1 can sweet corn 15oz, rinsed and drained
- 1 can fire roasted diced tomatoes 15oz, with liquid
- 2 bell peppers diced
- 2 cups vegetable stock
- 1½ cups brown ale beer
- 1 cup quinoa uncooked
- ½ cup fresh cilantro leaves
- ¼ cup light brown brown sugar
- ¼ cup jalapenos diced
- 2 tbsp chipotle peppers in adobo minced
- 2 tbsp salt
- 2 tbsp garlic minced
- 2 tbsp chili powder
- 2 tbsp cumin
- 2 tbsp dried onion
- 1 tbsp paprika
- 1 tbsp oregano
- 1 tbsp basil
- ½ tbsp coriander
- ½ tbsp cayenne pepper
- ½ tbsp chipotle powder
- ½ tbsp white pepper
- ½ tbsp black pepper
- ½ tbsp ground ginger
- 2 tsp lime juice
Instructions
- Dice/mince bell peppers, jalapenos, chipotle peppers, and garlic as needed. Rinse and drain all beans and corn.
- Combine all ingredients except lime juice in slow cooker or crockpot (I used an 8qt Instant Pot) and cook on low for 7 hours or high for 3½ hours.
- When ready to serve, stir in lime juice. Serve with shredded pepper jack cheese, additional cilantro, Greek yogurt, crushed tortilla chips, and/or additional lime juice.
The post Slow Cooker Vegetarian Chili appeared first on I Forgot Salt!.
]]>The post Chipotle Black Bean and Chorizo Breakfast Burritos appeared first on I Forgot Salt!.
]]>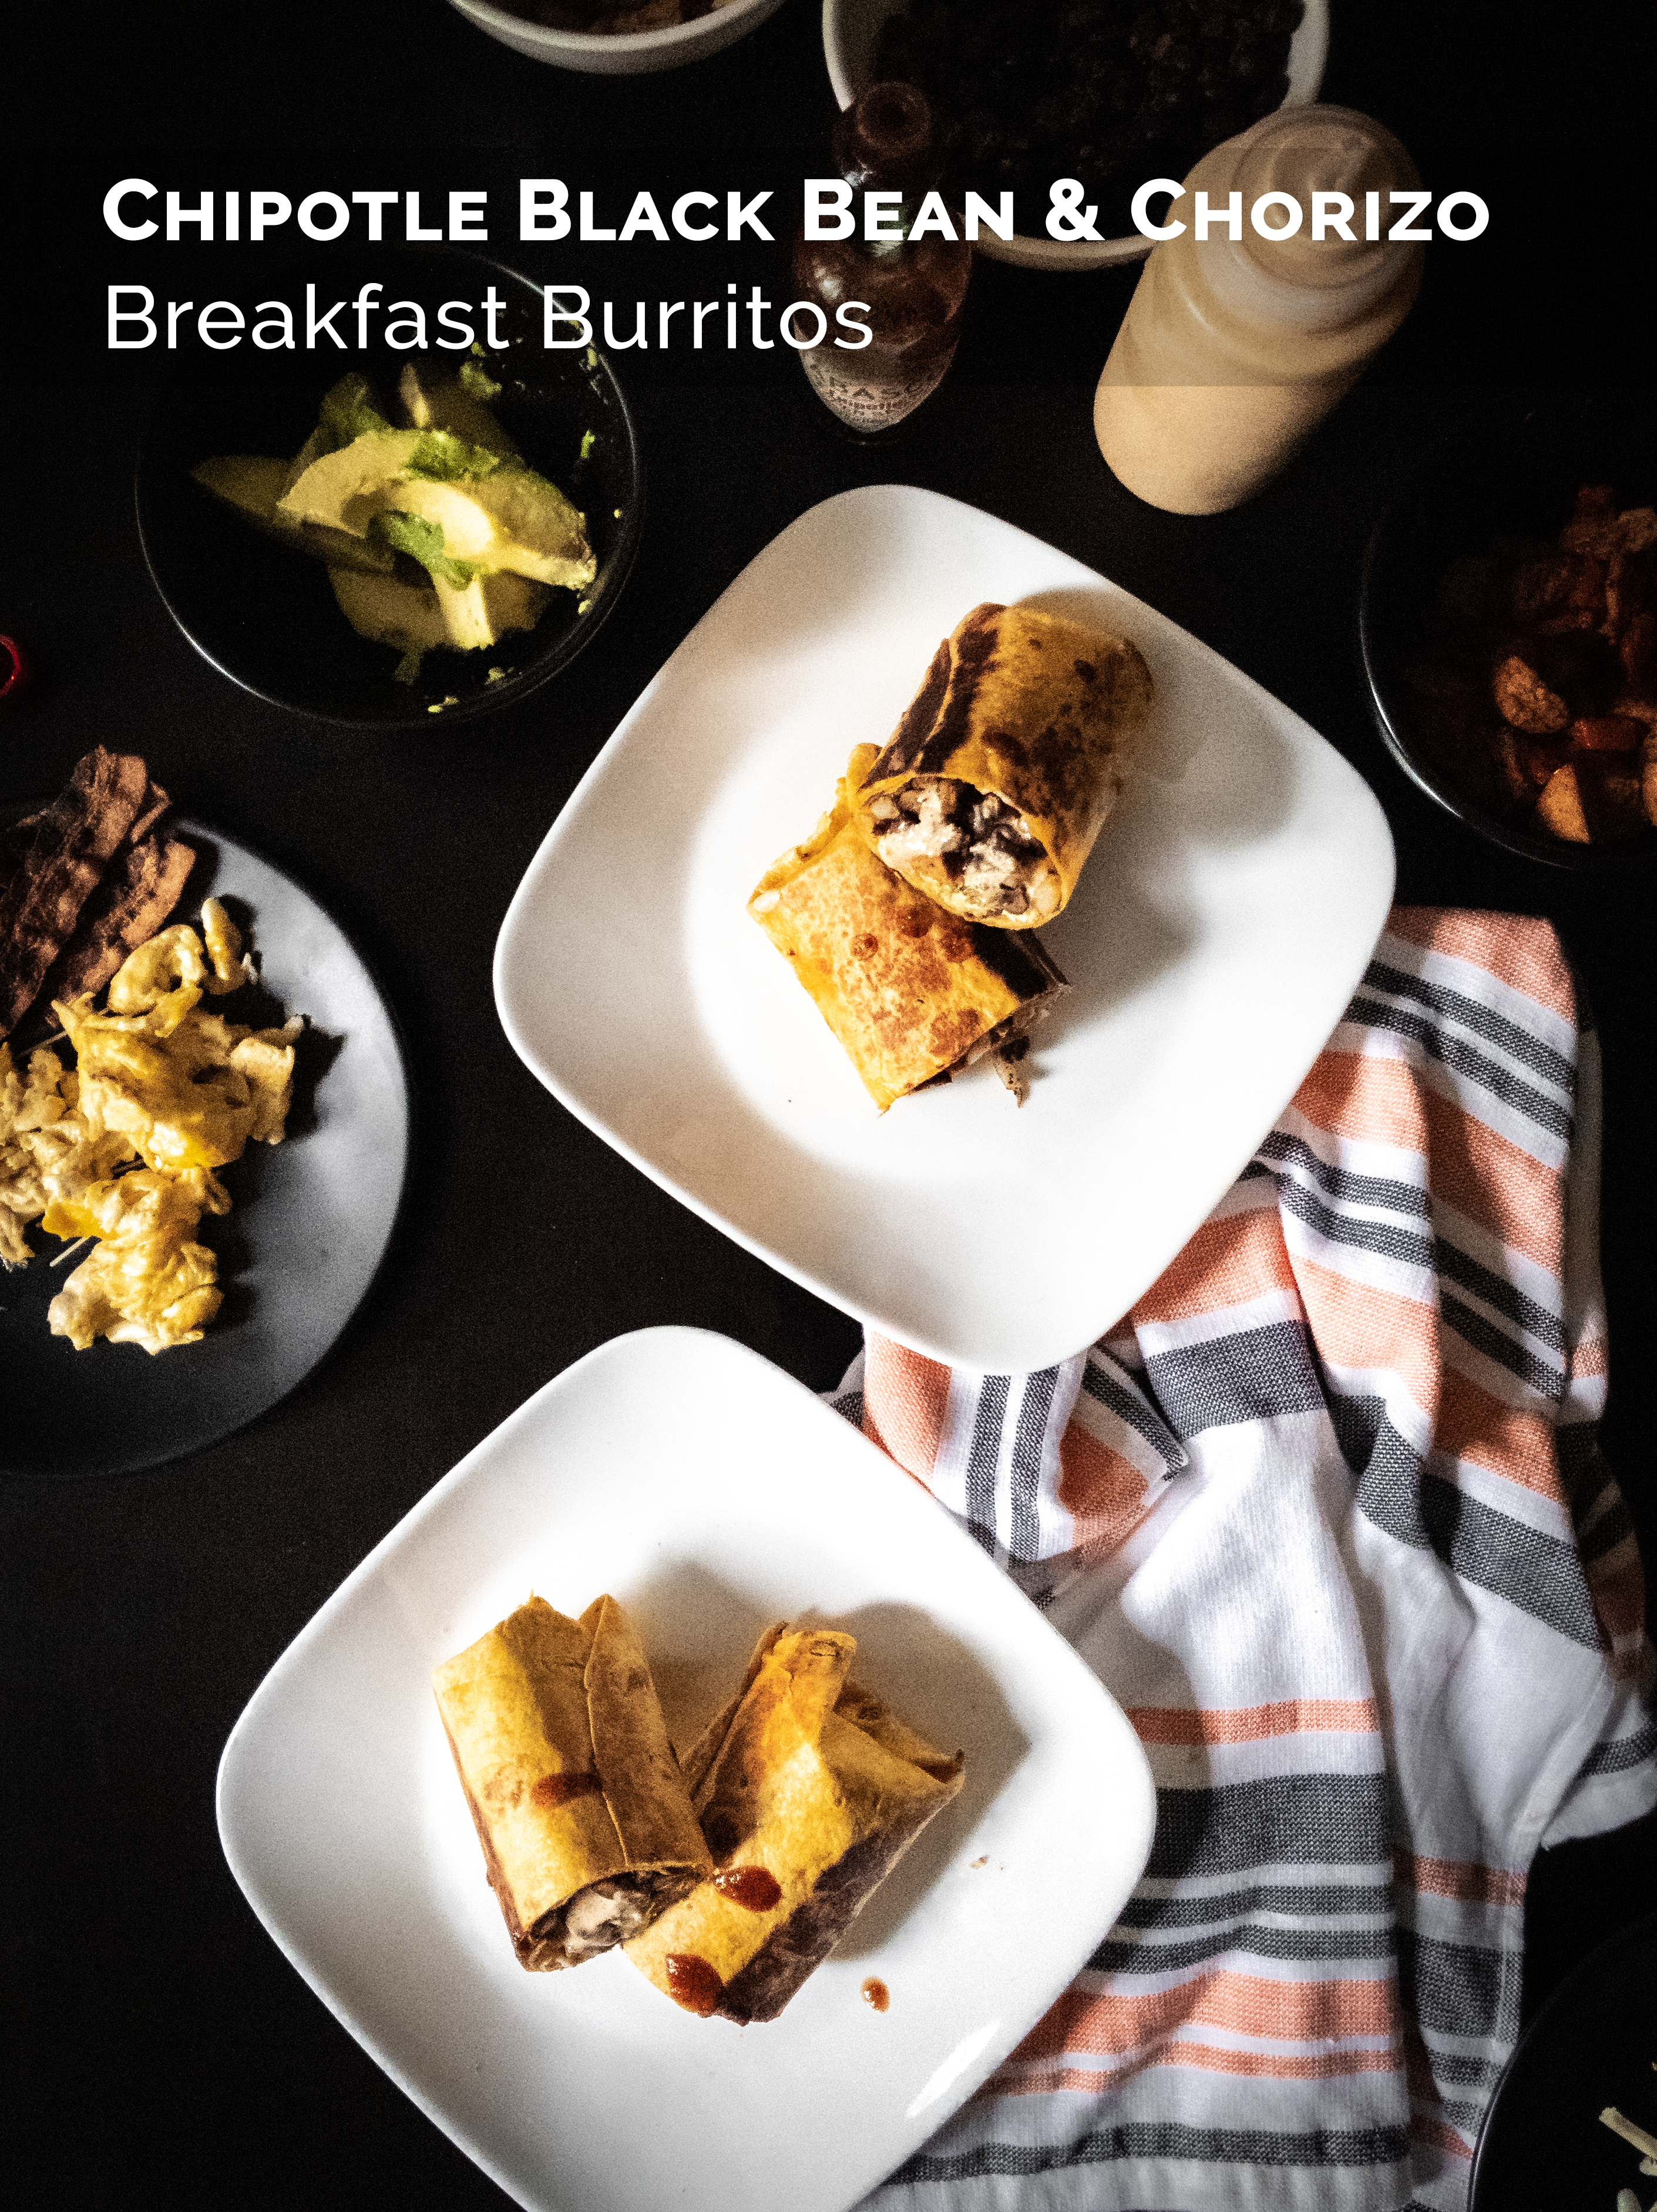
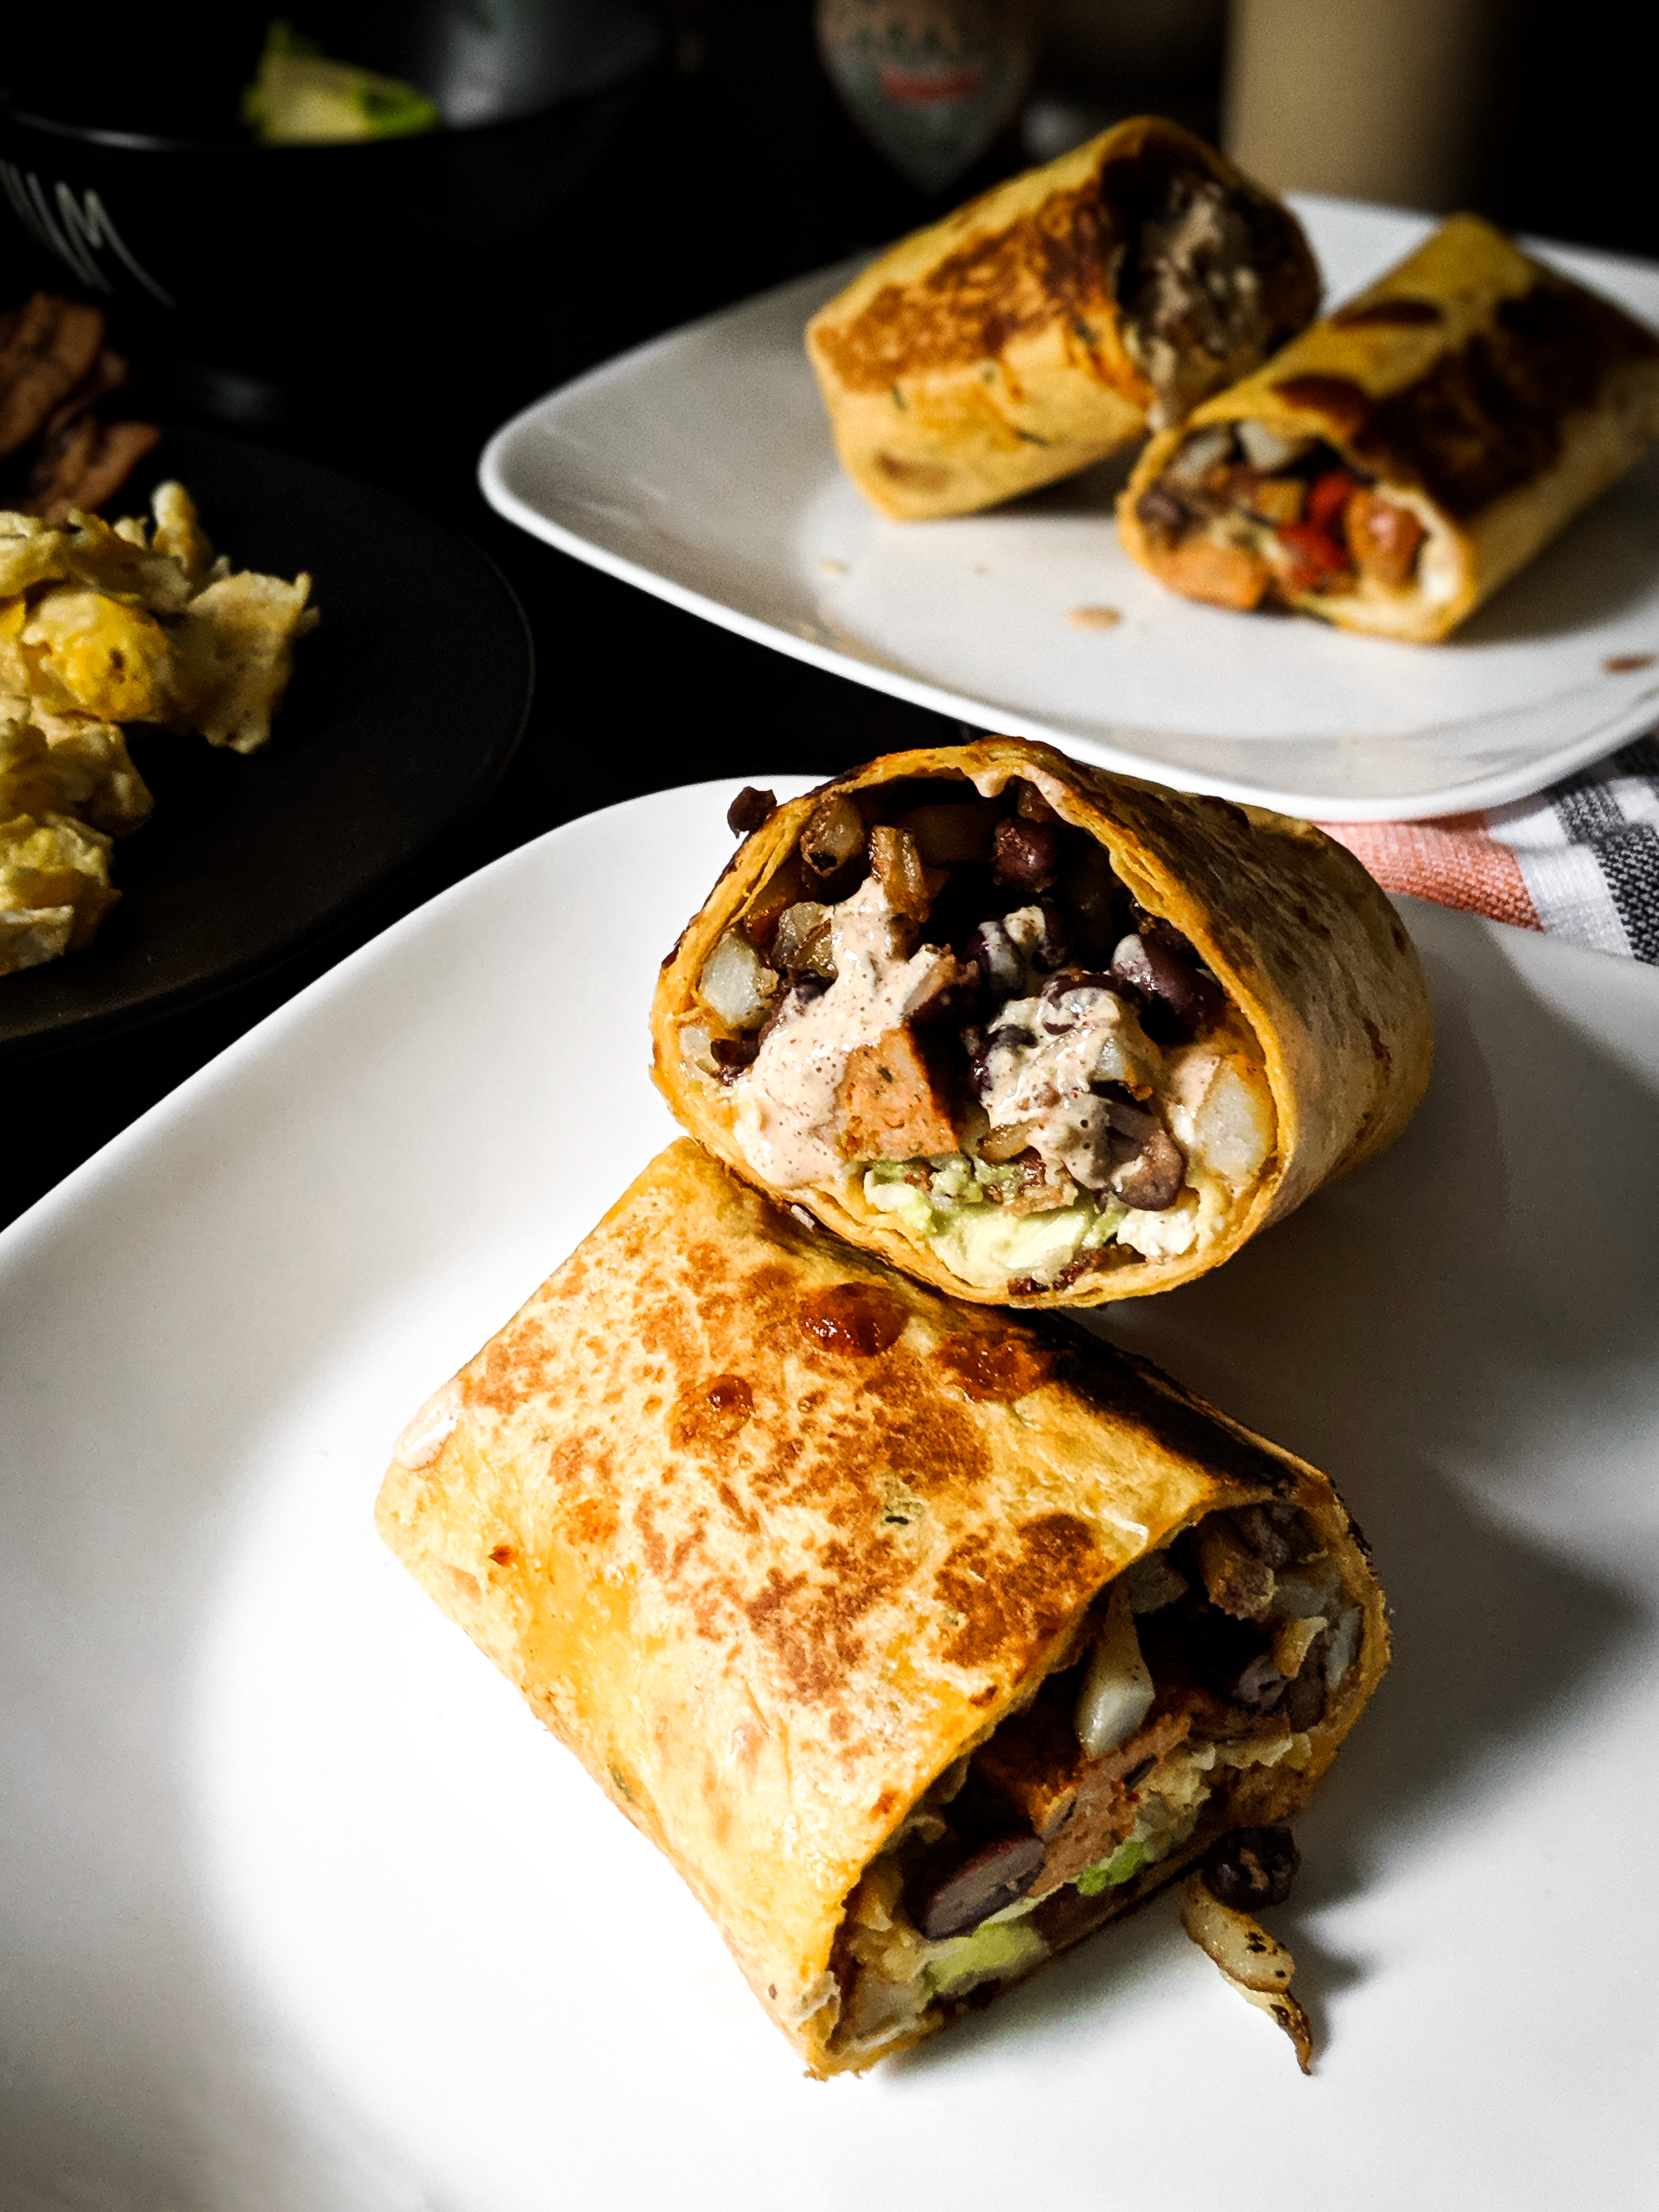
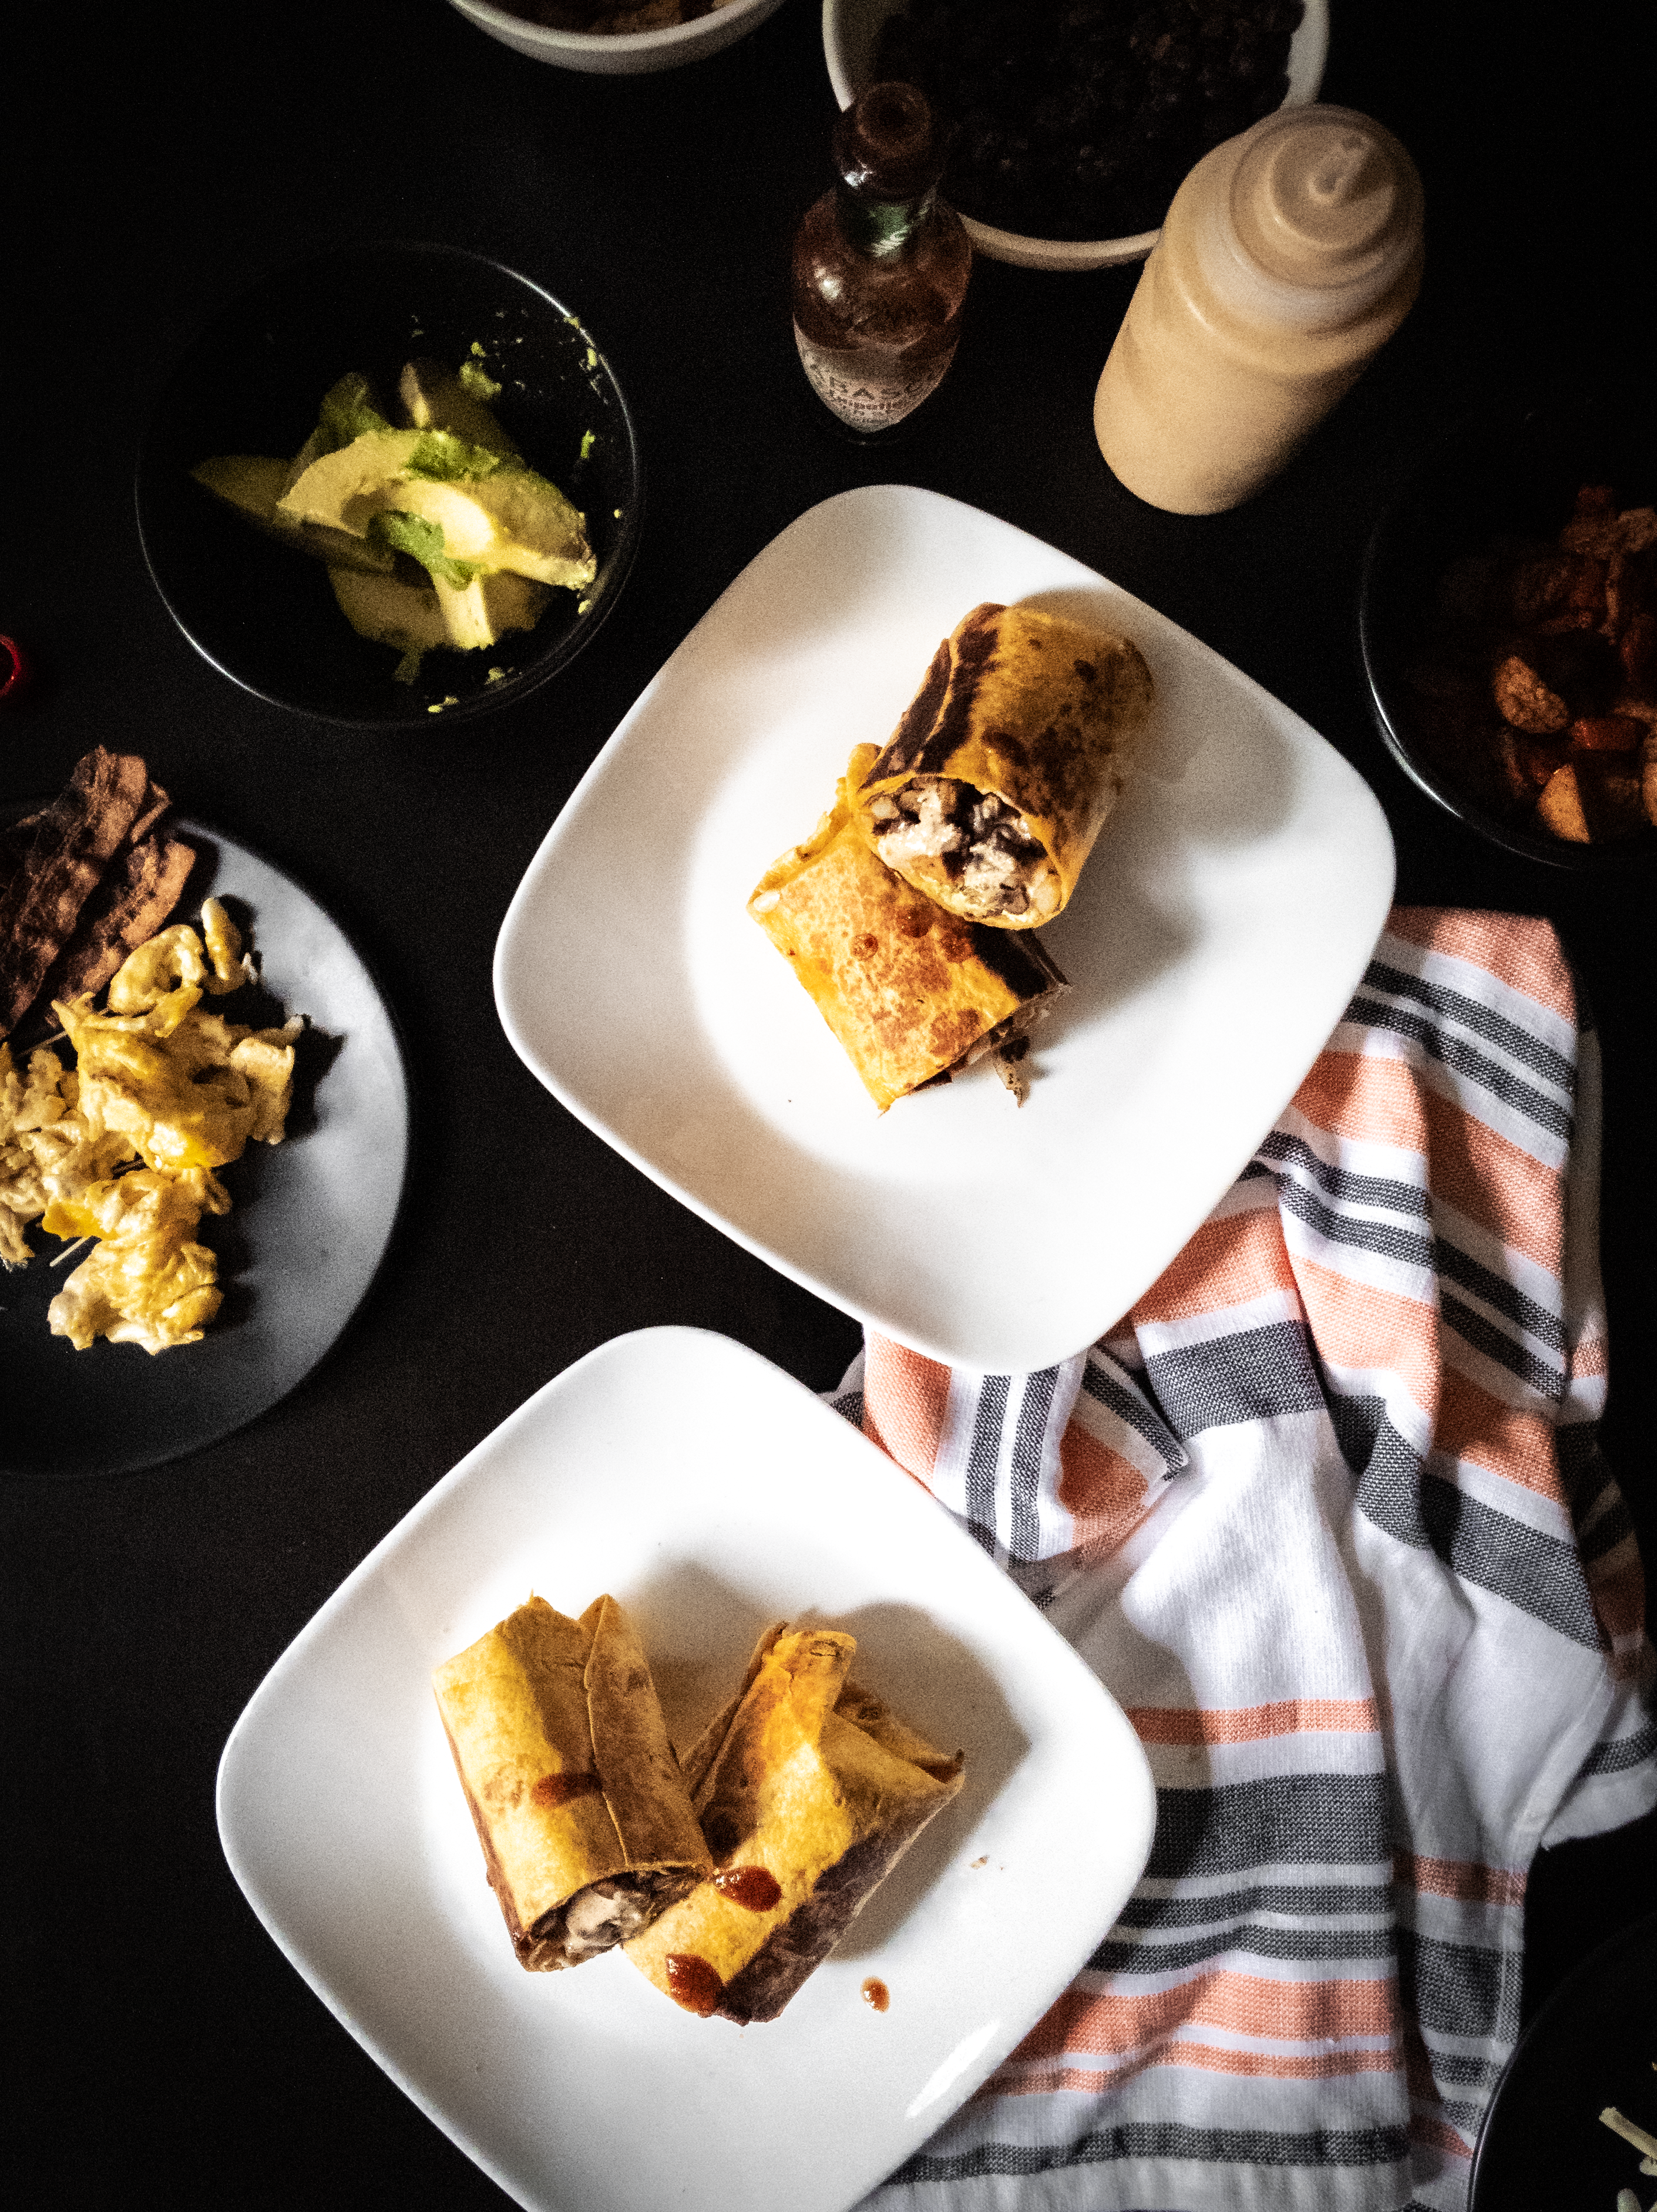
I have been wanting to try my hand at breakfast for a good while, but hadn’t had the opportunity to do so until this past Friday. Alex usually makes a sandwich before work because it’s easy, and I just drink tea because I can’t be bothered to cook before noon. Given that breakfast burritos are one of my favorite foods, though, I’m shocked it took me this long to consider making them–and even more shocked that I didn’t think of just… making a huge batch and freezing each one, which is what I did this weekend! We’ve had delicious microwavable breakfasts all week, and I will definitely be experimenting more with the idea in the future.
This recipe makes 15 breakfast burritos.
Ingredients:
- 1lb chicken chorizo sausage
- 16oz black beans, canned
- 15 10in tortillas (I used jalapeno cheddar wraps)
- 15 strips bacon
- 10-12 eggs
- 3 red bell peppers
- 2 avocados, sliced
- 2 russet potatoes
- 1 cup pepper jack cheese
- ½ cup water
- 3 tbsp fajita seasoning, divided (see my recipe here)
- 4 tbsp butter, divided
- 1 tsp chipotle powder
- 1 tsp salt
- 1 tsp black pepper
- 1 tsp garlic powder
Directions:
- Wash and roughly dice potatoes and bell peppers. Set aside.
- Drain and rinse black beans. Add to a small saucepan with water, chipotle powder, and 2 tbsp fajita seasoning. Heat on medium heat for 15-20 minutes or until fully cooked through, then remove from stove and set aside for later assembly.
- Add diced potatoes to a large nonstick pan with 2 tbsp butter, salt, black pepper, and garlic powder. Heat on medium-high for 20-30 minutes, or until all potatoes are browned and crispy. Remove to a bowl and set aside for later assembly.
- In the same pan, cook bacon strips until crispy on medium-high heat. (NOTE: You may have to do this in two batches.) Remove to a plate and set aside for later assembly, leaving the grease in the pan.
- In the same pan, add chorizo sausage and diced bell peppers with remaining 1 tbsp fajita seasoning as desired. Break up the sausage with a spatula so that you have bite-sized chunks. Cook on medium-high heat for 15-20 minutes or until the sausage is browned and cooked through, and the bell peppers have become soft. Remove to a bowl and set aside for assembly.
- Mop up any unwanted grease from the pan with a paper towel.
- In a small mixing bowl, crack all eggs. Whisk until the yolks and whites are mostly combined. Turn the heat in the pan to medium, and add remaining 2 tbsp butter. When the butter had begun to bubble, add the eggs into the hot skillet. Immediately begin pushing the edges inward and stirring. Cook for 2-3 minutes or until scrambled eggs are mostly cooked, then remove from heat and let rest in the hot pan for a few minutes to finish cooking through. Remove to a plate and set aside for assembly.
- Assemble burritos on 10in tortillas with about 1.5 tbsp of each filling ingredient (chorizo and peppers, potatoes, beans, avocados, bacon, eggs, and pepper jack cheese) lined up on one side. Roll burritos and tuck in the ends, then place seam-side down on a hot, dry, nonstick skillet. “Grill” for 3-5 minutes, then rotate so that the opposite side can crisp up as well.
- Serve immediately with your favorite hot sauce or chipotle mayo, or freeze them to reheat throughout the week. To freeze them, let each burrito cool to room temperature, then wrap completely in a damp paper towel. Wrap the damp-paper-towel burrito in aluminum foil, then stack in your freezer.
This recipe lasts great throughout the week, and reheats beautifully if you use the damp-paper-towel method and microwave them directly from frozen. To reheat them, simply unwrap the burrito from the foil and place the frozen paper towel in the microwave for 60 seconds, flip over, then for another 60 seconds.
Chipotle Black Bean and Chorizo Breakfast Burritos
Ingredients
- 1 lb chicken chorizo sausage
- 16 oz black beans canned
- 15 tortillas 10 inch
- 15 strips bacon
- 10-12 eggs
- 3 red bell peppers
- 2 avocados sliced
- 2 russet potatoes
- 1 cup pepper jack cheese
- ½ cup water
- 3 tbsp fajita seasoning divided
- 4 tbsp butter divided
- 1 tsp chipotle powder
- 1 tsp salt
- 1 tsp black pepper
- 1 tsp garlic powder
Instructions
- Wash and roughly dice potatoes and bell peppers. Set aside.
- Drain and rinse black beans. Add to a small saucepan with water, chipotle powder, and 2 tbsp fajita seasoning. Heat on medium heat for 15-20 minutes or until fully cooked through, then remove from stove and set aside for later assembly.
- Add diced potatoes to a large nonstick pan with 2 tbsp butter, salt, black pepper, and garlic powder. Heat on medium-high for 20-30 minutes, or until all potatoes are browned and crispy. Remove to a bowl and set aside for later assembly.
- In the same pan, cook bacon strips until crispy on medium-high heat.* Remove to a plate and set aside for later assembly, leaving the grease in the pan.
- In the same pan, add chorizo sausage and diced bell peppers with remaining 1 tbsp fajita seasoning as desired. Break up the sausage with a spatula so that you have bite-sized chunks. Cook on medium-high heat for 15-20 minutes or until the sausage is browned and cooked through, and the bell peppers have become soft. Remove to a bowl and set aside for assembly.
- Mop up any unwanted grease from the pan with a paper towel.
- In a small mixing bowl, crack all eggs. Whisk until the yolks and whites are mostly combined. Turn the heat in the pan to medium, and add remaining 2 tbsp butter. When the butter had begun to bubble, add the eggs into the hot skillet. Immediately begin pushing the edges inward and stirring. Cook for 2-3 minutes or until scrambled eggs are mostly cooked, then remove from heat and let rest in the hot pan for a few minutes to finish cooking through. Remove to a plate and set aside for assembly.
- Assemble burritos on 10in tortillas with about 1.5 tbsp of each filling ingredient (chorizo and peppers, potatoes, beans, avocados, bacon, eggs, and pepper jack cheese) lined up on one side. Roll burritos and tuck in the ends, then place seam-side down on a hot, dry, nonstick skillet. “Grill” for 3-5 minutes, then rotate so that the opposite side can crisp up as well.
- Serve immediately with your favorite hot sauce or chipotle mayo, or freeze them to reheat throughout the week. To freeze them, let each burrito cool to room temperature, then wrap completely in a damp paper towel. Wrap the damp-paper-towel burrito in aluminum foil, then stack in your freezer.
Notes
- * You may have to do this in two batches.
The post Chipotle Black Bean and Chorizo Breakfast Burritos appeared first on I Forgot Salt!.
]]>The post Arugula and Roasted Red Pepper Sheet Pan Pizza appeared first on I Forgot Salt!.
]]>
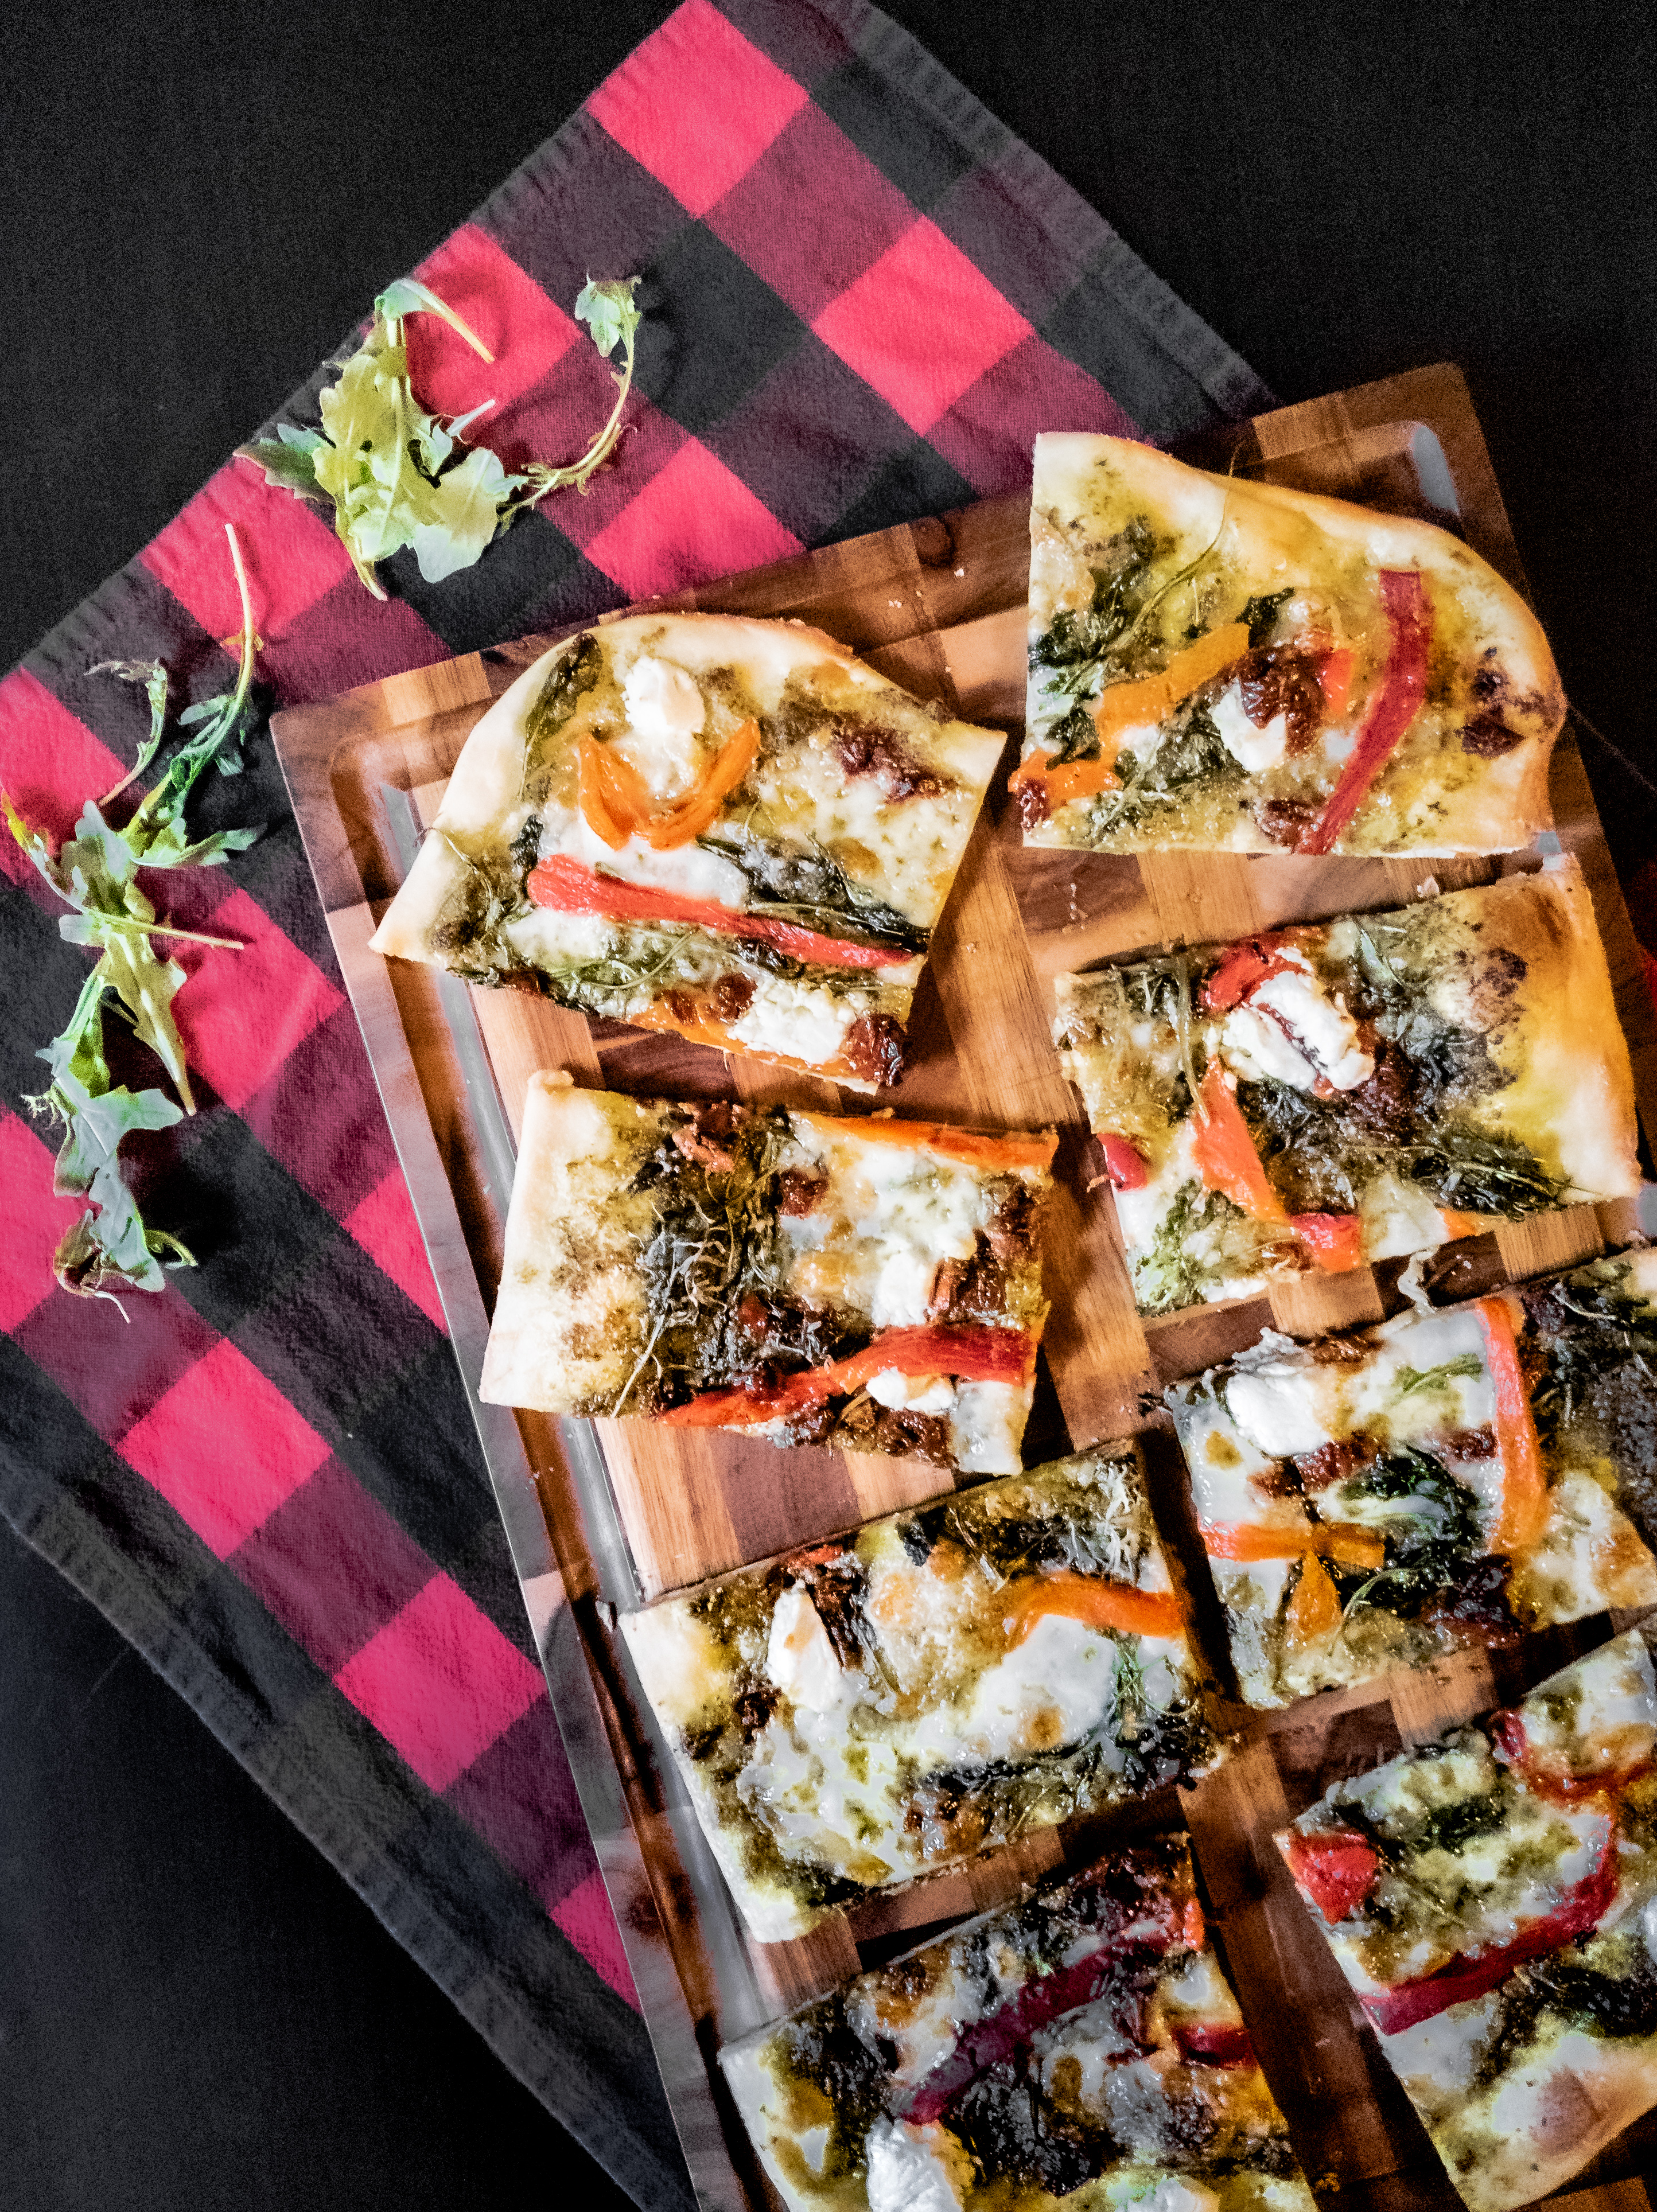
I have decided to get back into meal planning. Things fell off a little bit over the summer when I was unbelievably busy, and when I went grocery shopping every two weeks I found myself just shoving things into the cart without any real intention to make something specific. This led to an almost bi-weekly fridge purge, and I ended up throwing away half of the things I bought because they went bad before I had the chance to use them. Meal planning helps mitigate that, and it’s nice because then I don’t have to think too hard about cooking. Anyway–we decided to do a pizza night sometime this week, and this was the result.
This recipe makes two to four servings, or eight pieces of pizza.
Ingredients:
- 1 lb pre-made, uncooked pizza dough
- 2 cups fresh arugula
- 2 red bell peppers
- ½ lb mozzarella cheese, sliced into rounds
- 1/3 cup soft goat cheese
- ¼ cup parmesan cheese
- ¼ cup pesto
- 2 tbsp minced sun-dried tomatoes
- 2 tbsp olive oil
- ½ tsp basil
- ½ tsp parsley
- ½ tsp oregano
- ½ tsp thyme
- ¼ salt
- ½ black pepper
Directions:
- If using a frozen ball of dough, let sit out at room temperature for about 30 mins to thaw and gently rise.
- Slice stems and remove cores from red bell peppers. Cut each pepper in half top-to-bottom so you end up with four large, relatively flat pieces of bell pepper.
- Lay pepper halves on a baking sheet skin-side up. Broil on high for 3-5 minutes, or until the peppers have softened and begun to blacken. Remove from the oven and slice into thin strips.
- Preheat oven to 450F.
- On a clean, cool baking sheet, add a layer of 1 tbsp olive oil. Gently flatten and spread out your pizza dough until you have a thin sheet on your pan, roughly ¼ inch thick.
- Top pizza dough with pesto as a base, and add spices (basil, parsley, oregano, thyme, salt, and pepper). Layer on cheeses, arugula, sliced roasted peppers, and minced sun-dried tomatoes as desired.
- Bake pizza for 15-17 minutes, or until the crust has browned and the cheese has melted. (NOTE: Depending on the age and quality of your oven, you may need to rotate the pan to ensure even baking on both sides.) Remove carefully, slice, and enjoy!
This recipe keeps for about 24hrs and reheats just about as well as any other store-bought or homemade pizza. I recommend setting your oven to 400F, layering some fresh cheese on top, and baking it for 3-5 minutes for the best second-day results. You could also add fresh cheese and broil it for a few minutes, as well!


Arugula and Roasted Red Pepper Sheet Pan Pizza
Ingredients
- 1 lb pizza dough uncooked
- 2 cups arugula fresh
- 2 red bell peppers
- ½ lb mozzarella cheese sliced into rounds
- 1/3 cup soft goat cheese
- ¼ cup parmesan cheese
- ¼ cup pesto
- 2 tbsp sun-dried tomatoes minced
- 2 tbsp olive oil
- ½ tsp basil
- ½ tsp parsley
- ½ tsp oregano
- ½ tsp thyme
- ¼ salt
- ½ black pepper
Instructions
- If using a frozen ball of dough, let sit out at room temperature for about 30 mins to thaw and gently rise.
- Slice stems and remove cores from red bell peppers. Cut each pepper in half top-to-bottom so you end up with four large, relatively flat pieces of bell pepper.
- Lay pepper halves on a baking sheet skin-side up. Broil on high for 3-5 minutes, or until the peppers have softened and begun to blacken. Remove from the oven and slice into thin strips.
- Preheat oven to 450F.
- On a clean, cool baking sheet, add a layer of 1 tbsp olive oil. Gently flatten and spread out your pizza dough until you have a thin sheet on your pan, roughly ¼ inch thick.
- Top pizza dough with pesto as a base, and add spices (basil, parsley, oregano, thyme, salt, and pepper). Layer on cheeses, arugula, sliced roasted peppers, and minced sun-dried tomatoes as desired.
- Bake pizza for 15-17 minutes, or until the crust has browned and the cheese has melted.* Remove carefully, slice, and enjoy!
Notes
- * Depending on the age and quality of your oven, you may need to rotate the pan to ensure even baking on both sides.
The post Arugula and Roasted Red Pepper Sheet Pan Pizza appeared first on I Forgot Salt!.
]]>The post Spicy Miso Portobello Burgers with Pickled Asian Slaw and Sweet Chili Burger Sauce appeared first on I Forgot Salt!.
]]>
Update 12/30/20: This post has been changed from the original 2019 version to reflect my current recipe.
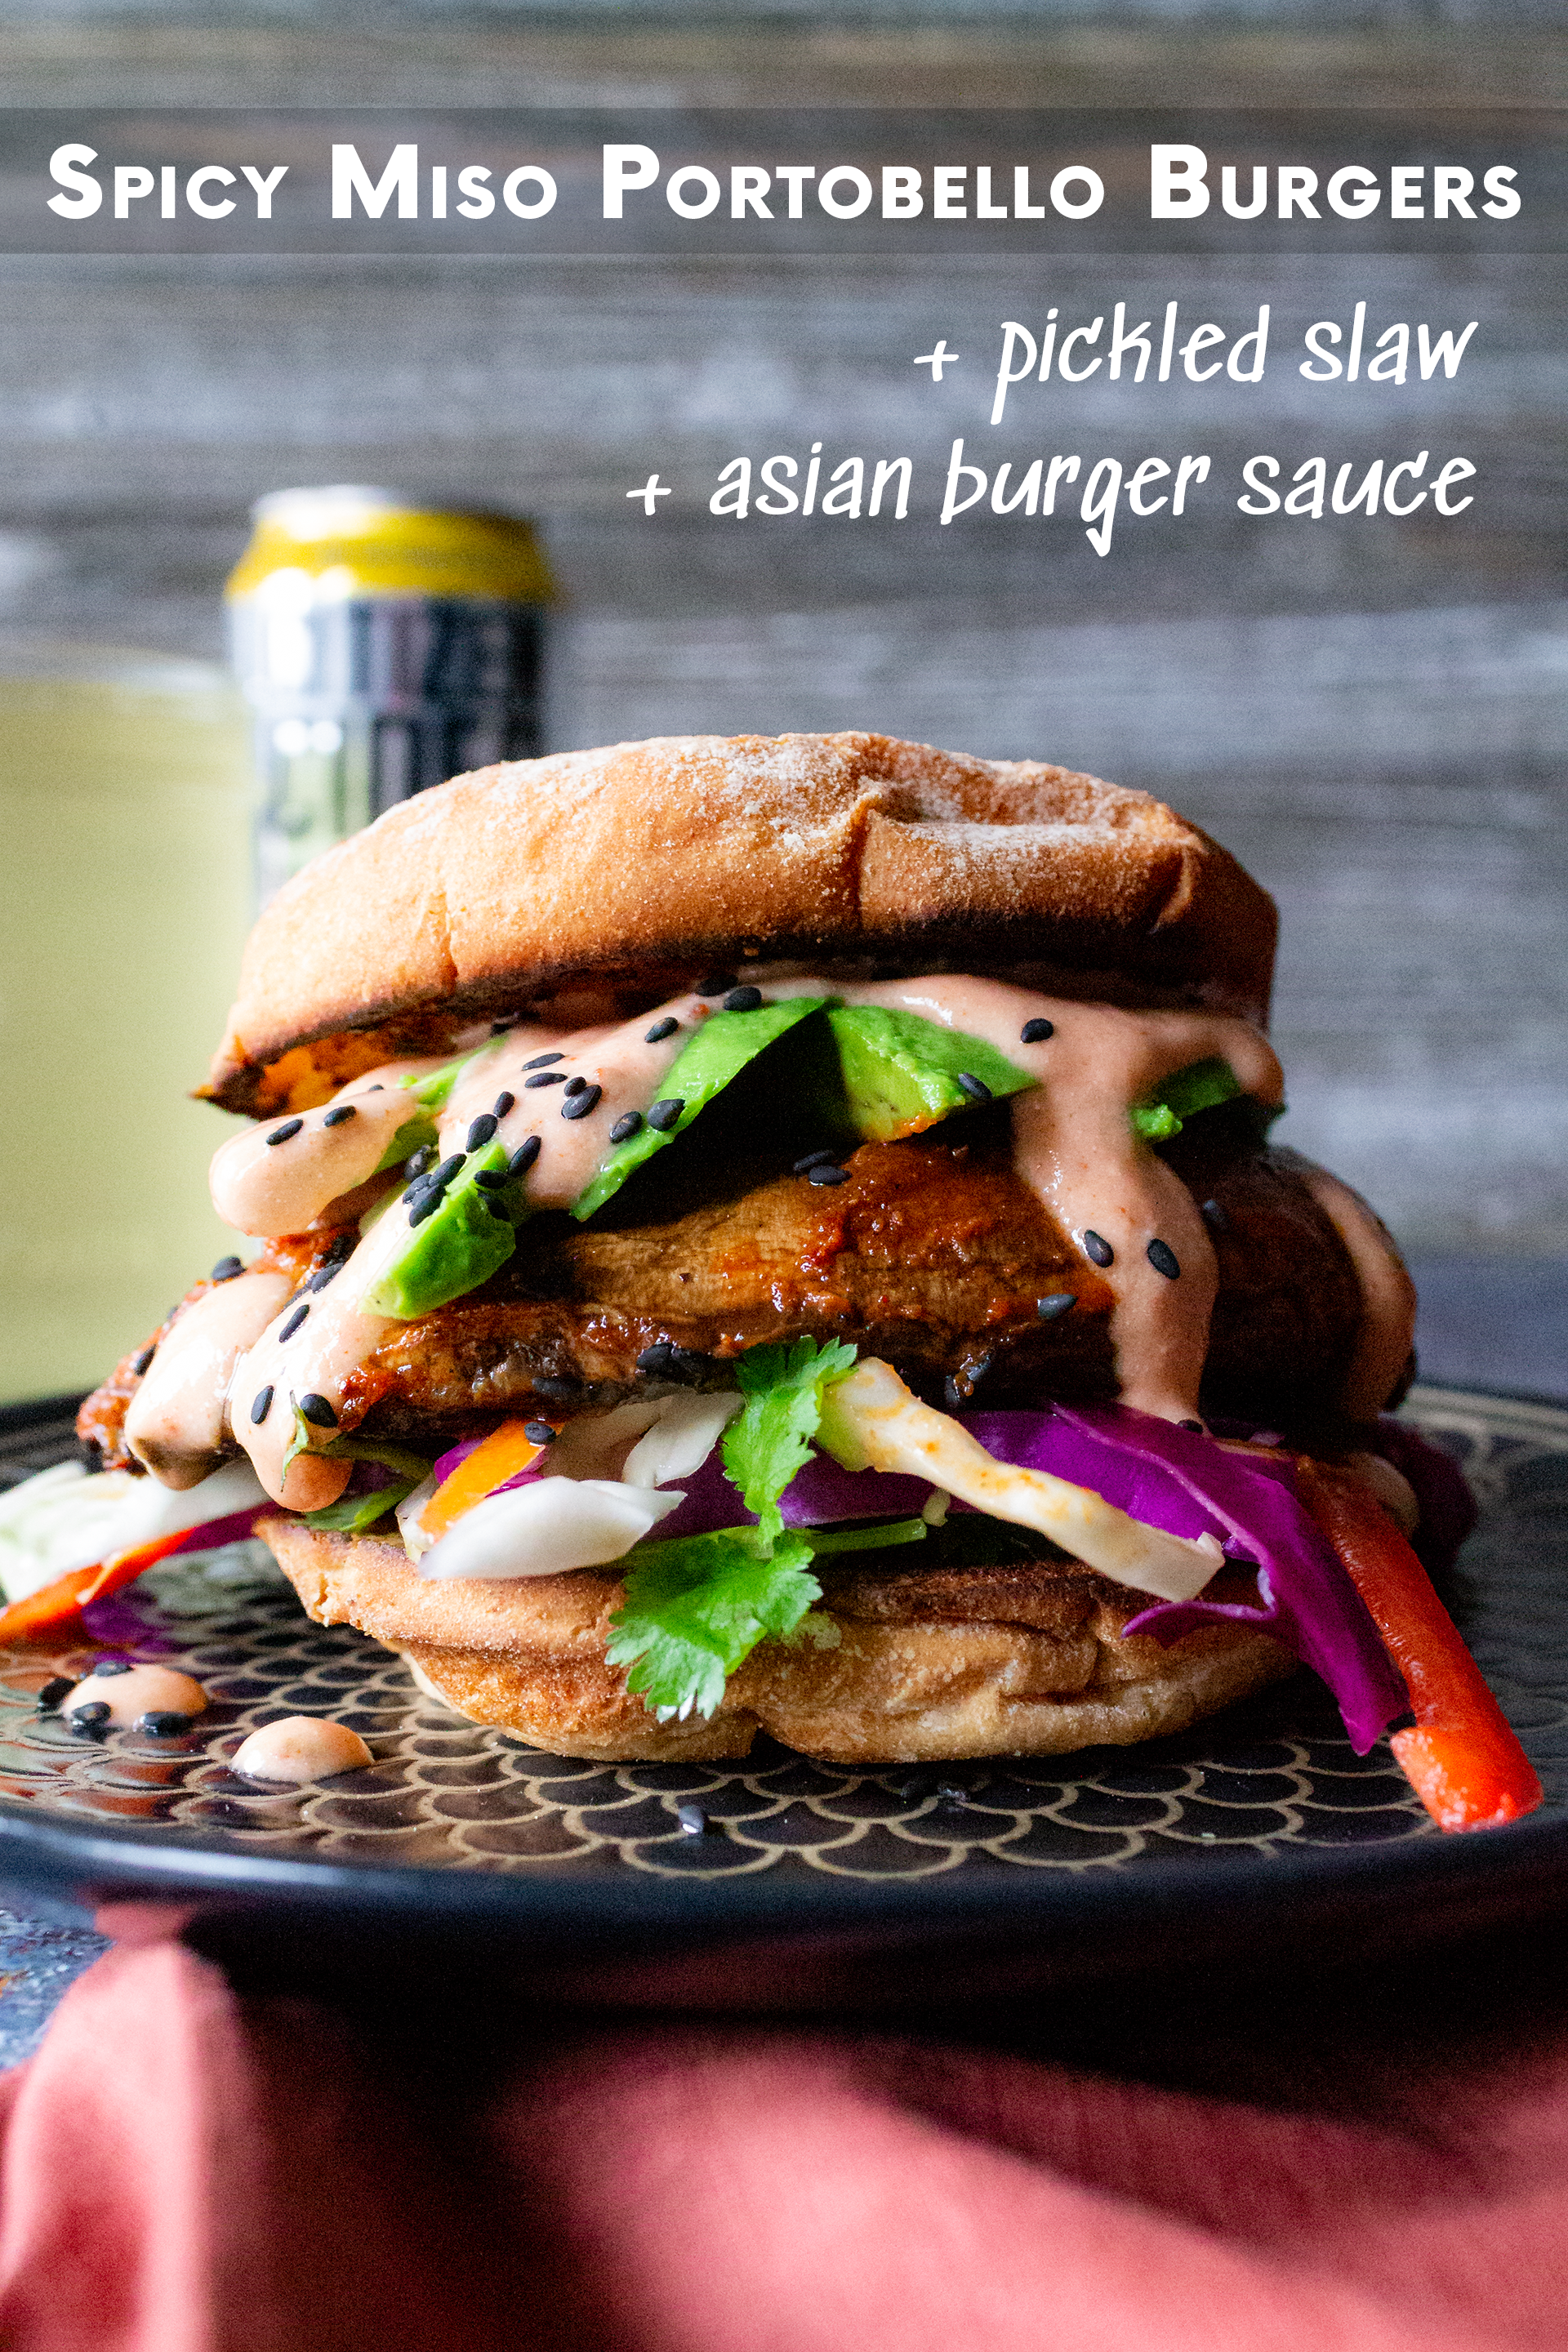
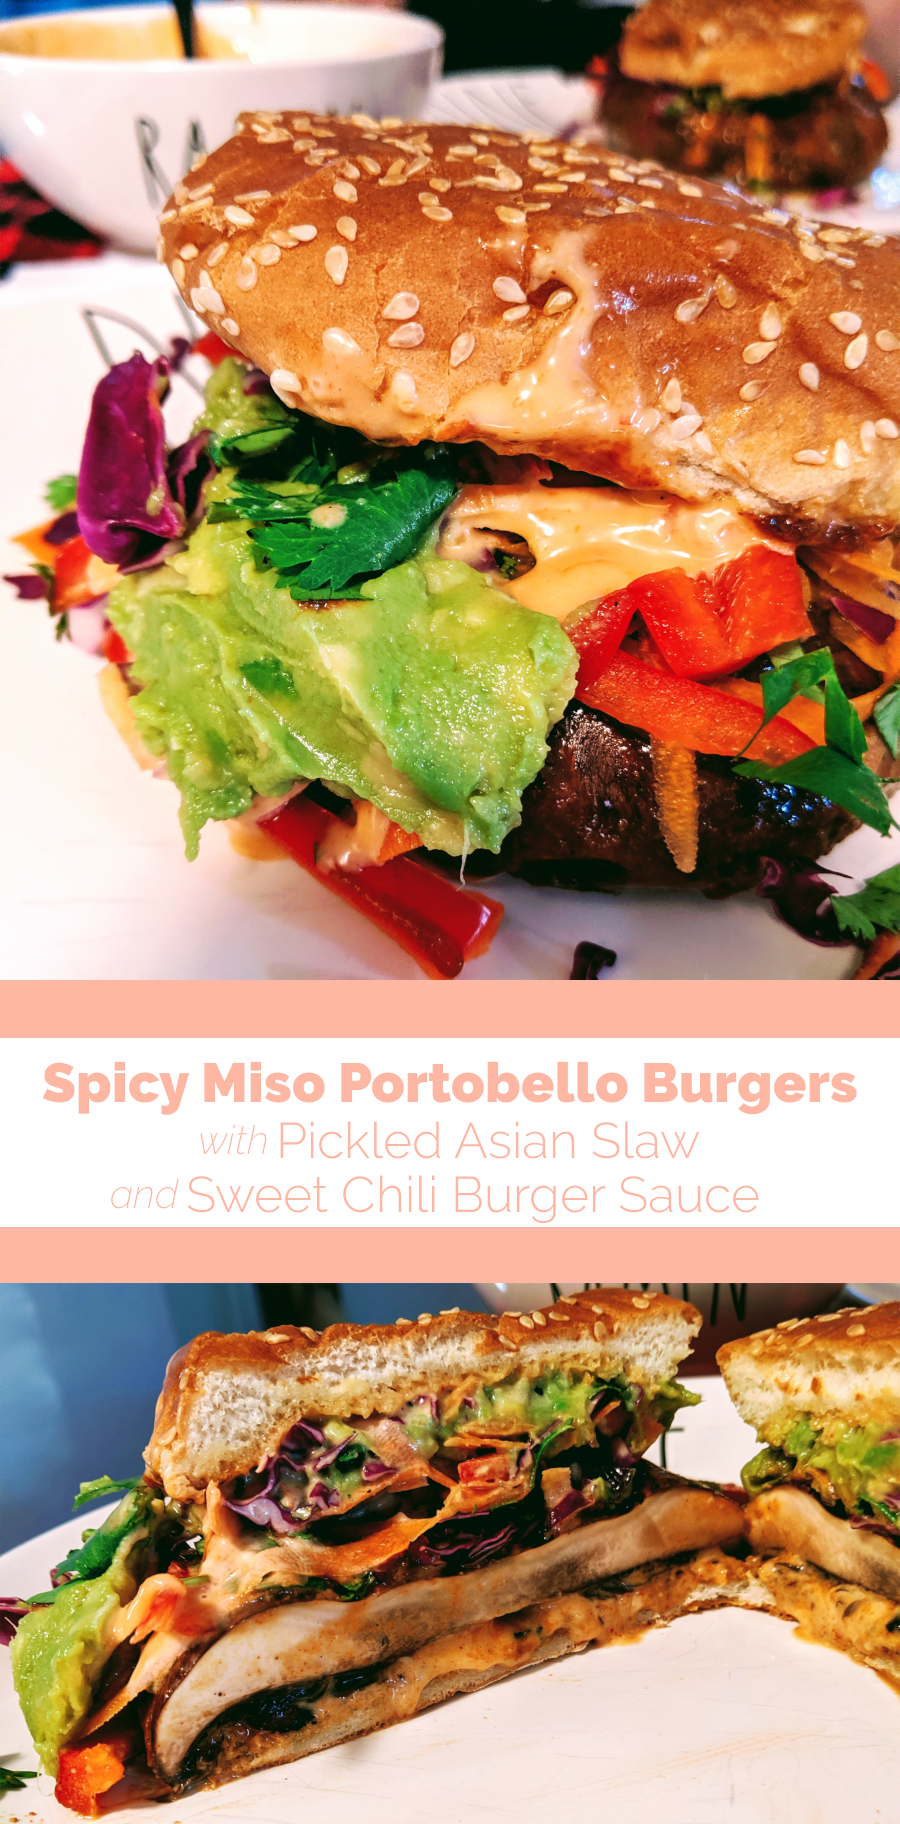
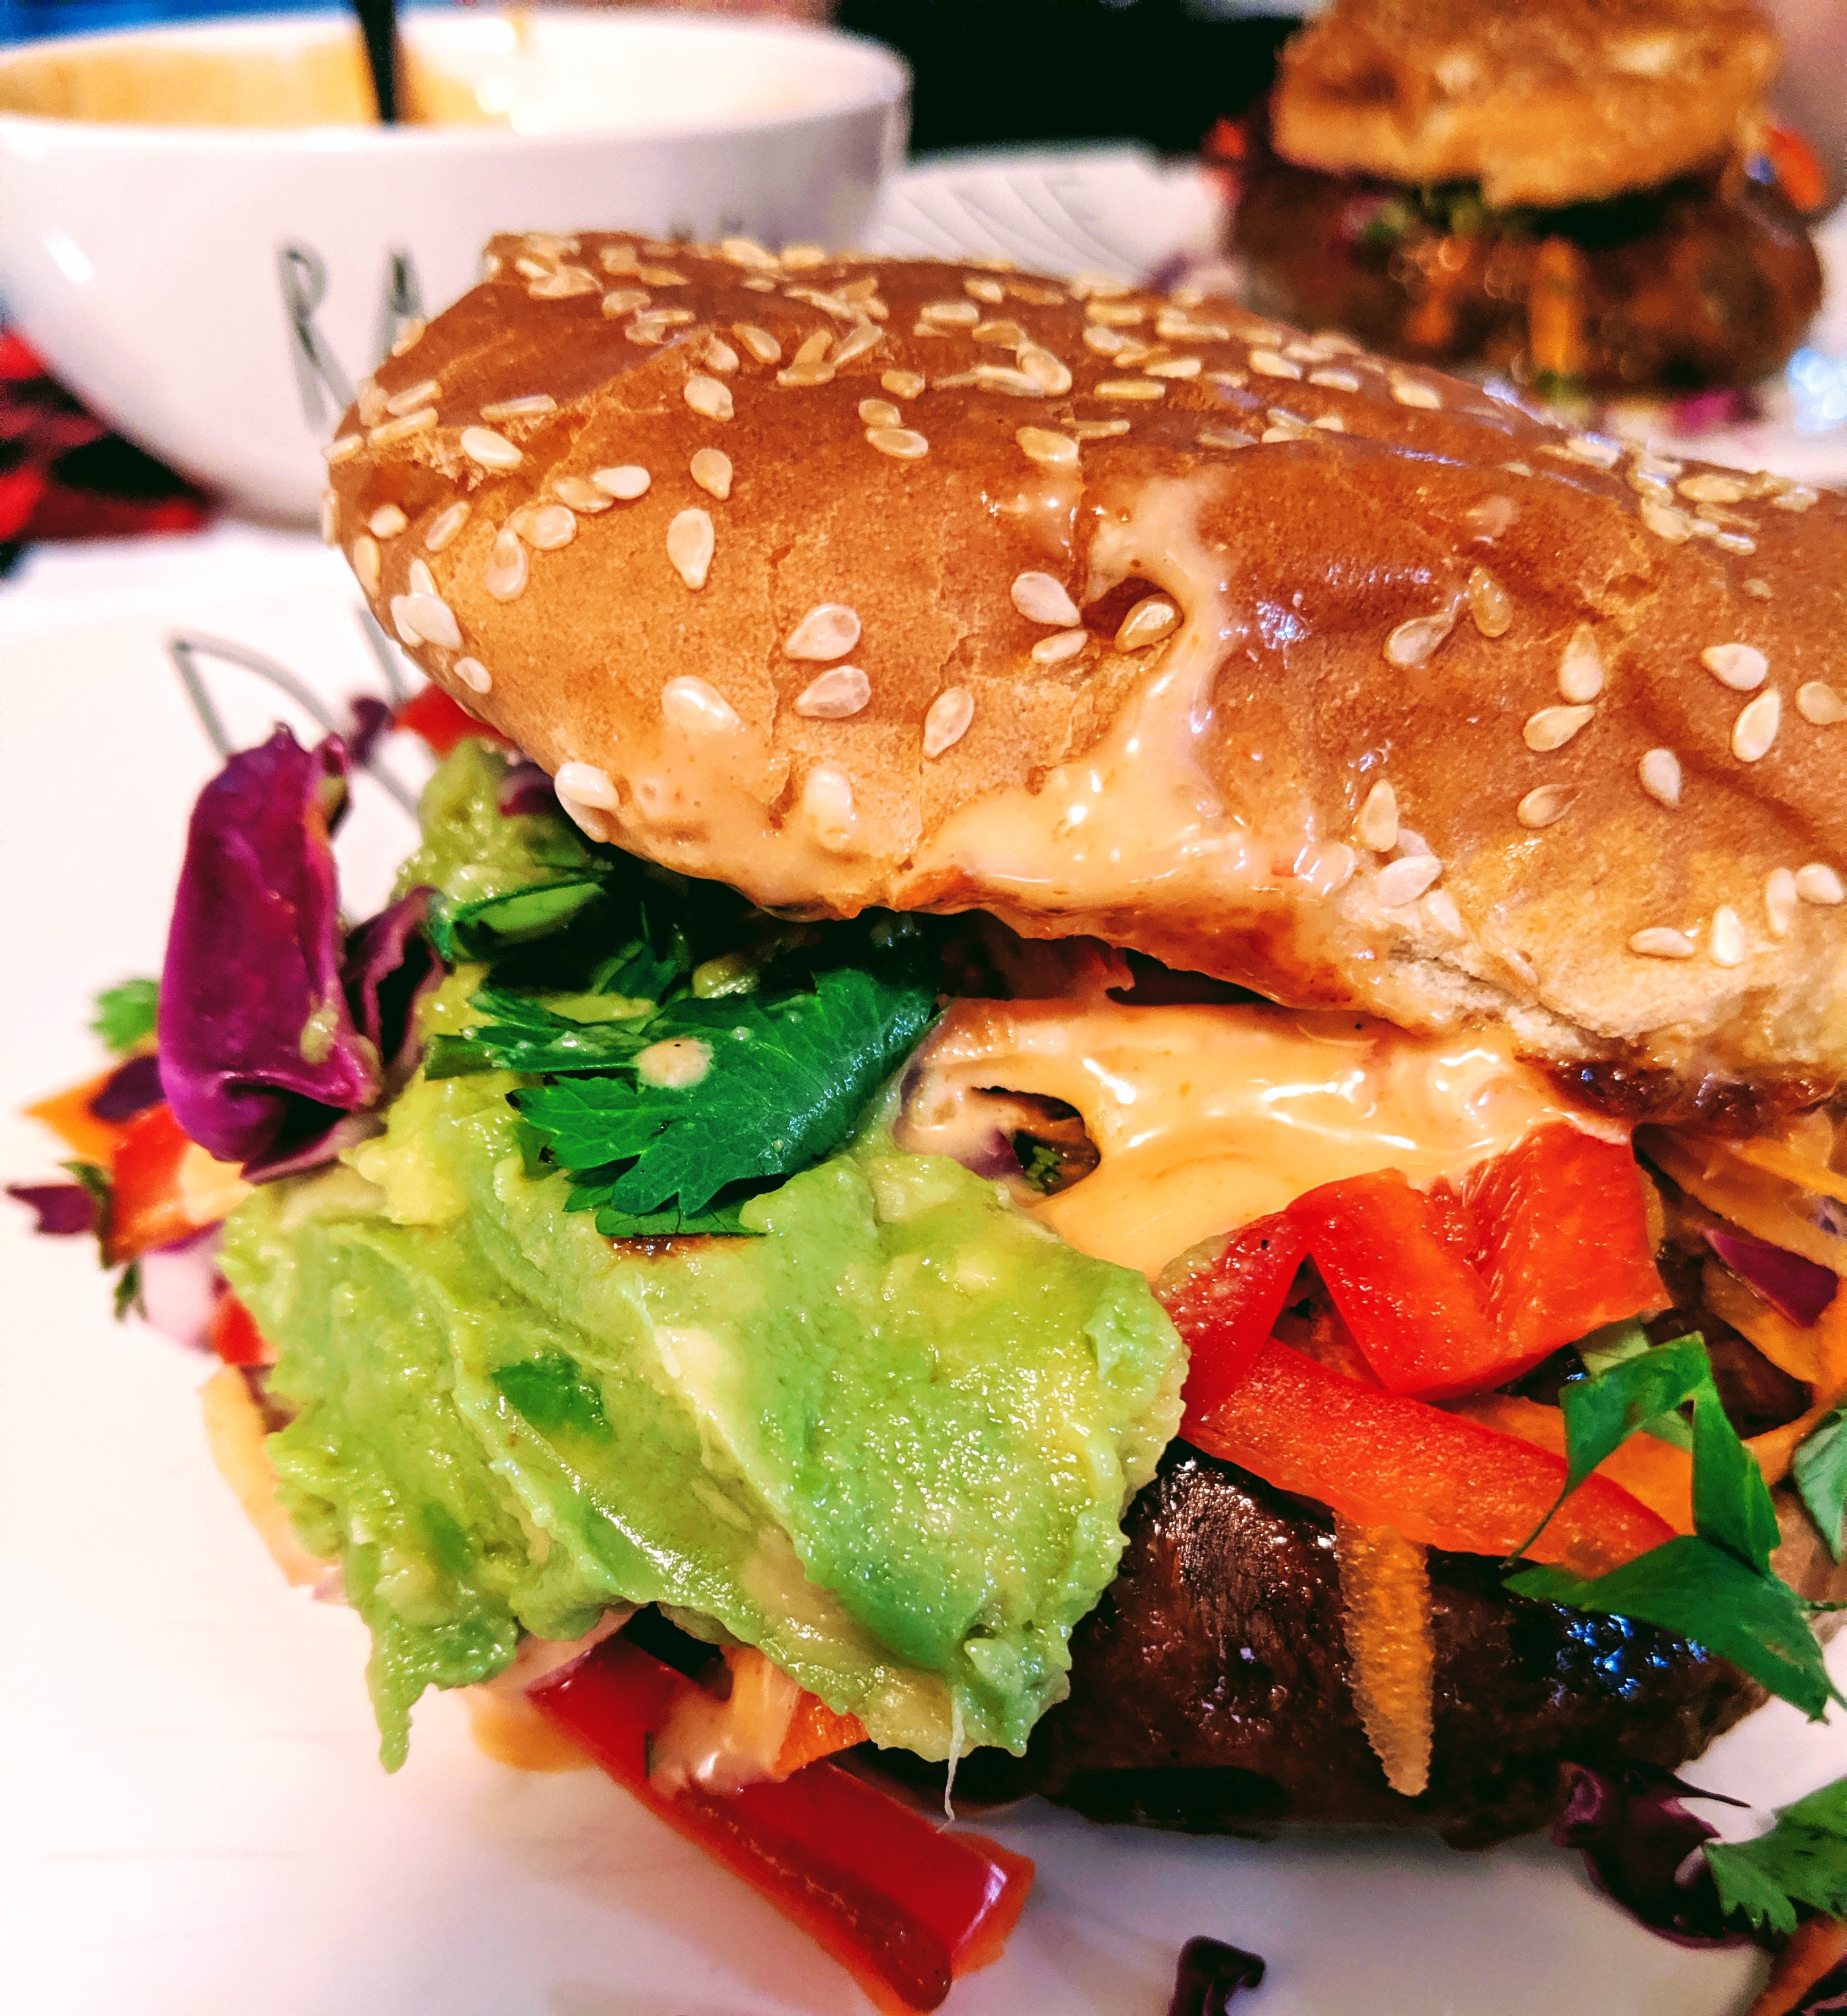
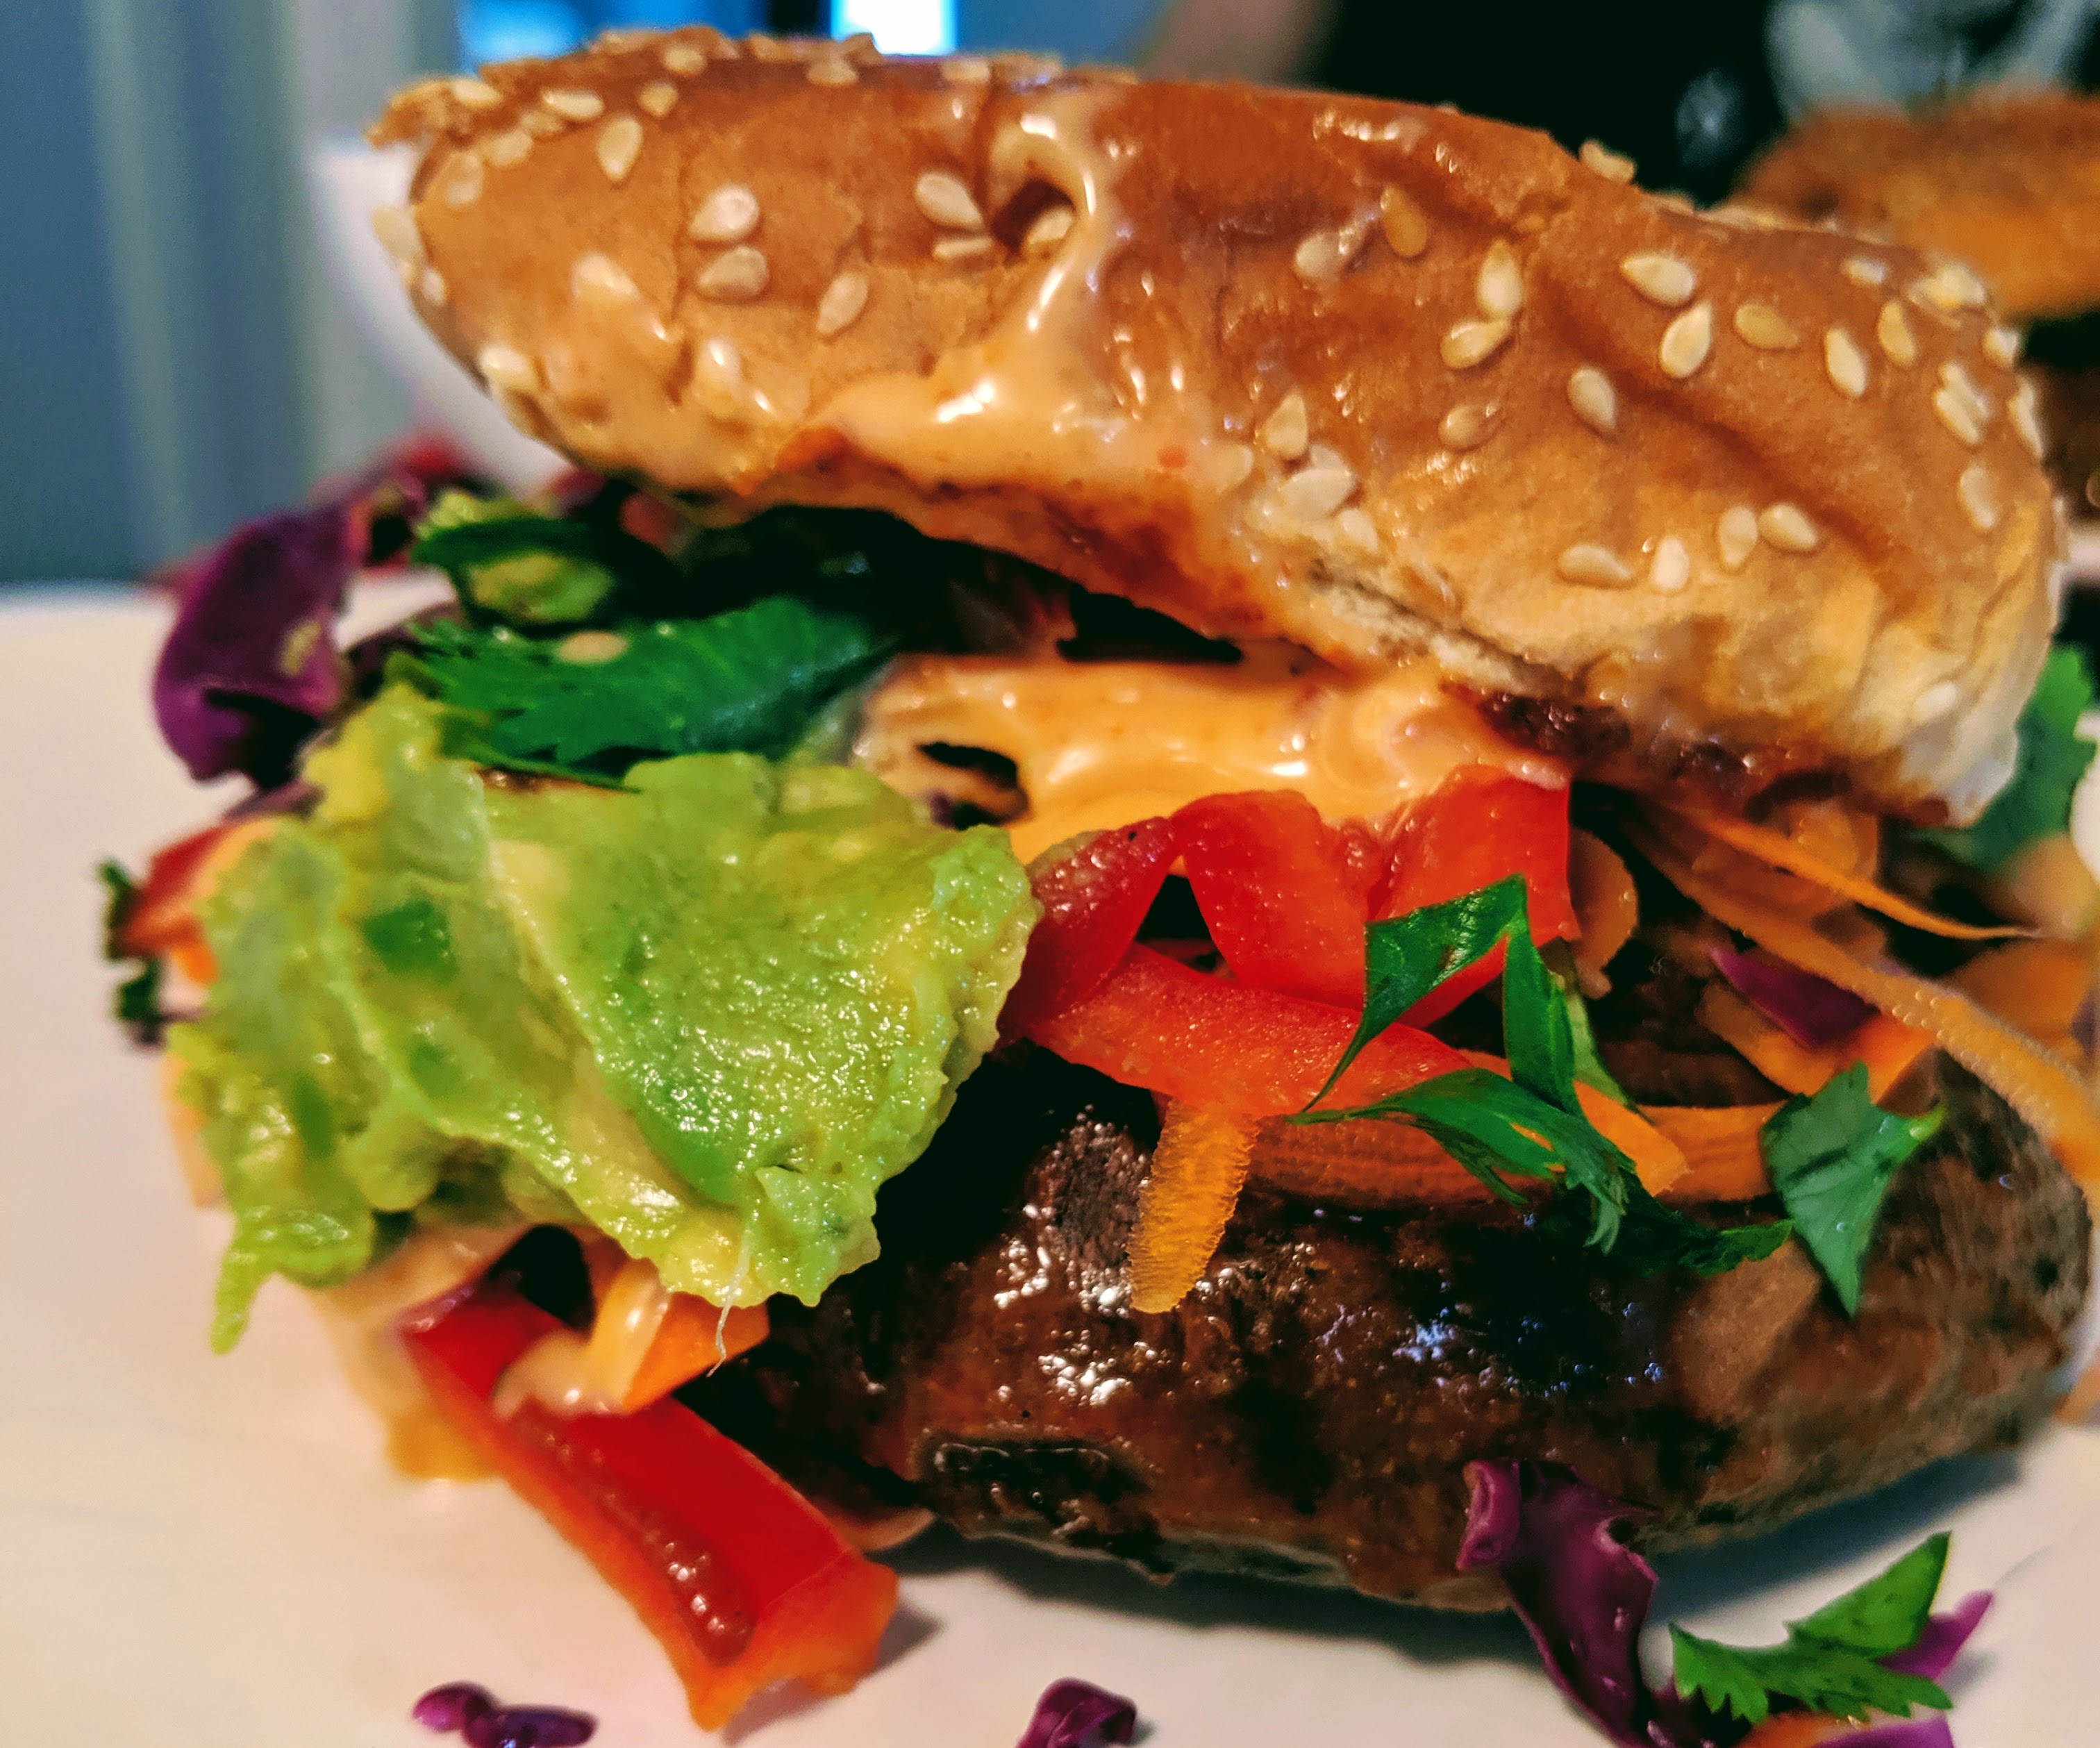
I’ve made these portobello burgers quite a few times now, and to be quite honest they’re one of the best things we’ve had in a long, long time. In fact, they may have just replaced our weekly Curry Night! I’m still flabbergasted I got the resident carnivore to say he felt like he’d eaten an actual burger, and both times I’ve cooked these we’ve gone back for seconds.
This recipe makes four burgers, and is split into three parts (”patty”, slaw, sauce).
Mushroom Ingredients:
- 4 portobello caps
- 1/3 cup white miso paste
- 1/4 cup water
- 2 tbsp gochujang (or sriracha)
- 2 tsp minced ginger
- 2 tsp sesame oil
- 1/2 tsp white pepper
- 1/2 tsp garlic powder
Pickled Slaw Ingredients:
- 1 cup rice vinegar
- 1/3 cup red cabbage
- 1/3 cup white cabbage
- 2 red bell peppers
- 1 medium carrot
- ¼ cup fresh cilantro
Sauce Ingredients:
- 1/3 cup mayonnaise (or vegan mayo)
- 1 tbsp Thai sweet chili sauce (see my recipe here!)
- 1 tbsp sriracha
- 1 tbsp honey/maple syrup
- 1 tsp sesame seeds
Directions:
- Shred or slice cabbage, peppers, and carrots. Add to a large bag or bowl with rice vinegar and sesame seeds. Shake or toss to ensure everything is coated. Seal and store slaw in the fridge until ready to serve.
- In a small bowl, combine mayonnaise, sweet chili sauce, sriracha, and sweetener of choice. Stir and set burger sauce aside until ready to serve.
- In a large bowl, combine miso paste, water, gochujang, ginger, garlic, sesame oil, and white pepper. Whisk or stir with a fork until a smooth paste has formed.
- Wash and remove stems from Portobello caps, dab dry with a paper towel, and then add to the paste. Using a spoon or basting brush, gently coat the underside and top of each mushroom cap with the paste, ensuring even coverage. Store in the fridge for up to 3 hours to marinate.
- Heat griddle or nonstick pan on medium-high/high. When hot, place mushroom caps top-down and sear for 2-3 minutes or until a brown crust has formed, then flip. Baste with remaining marinade as desired. Do not cook longer than 5-7 minutes maximum to prevent mushrooms from becoming too soft.
- Remove and place on a wire rack to drain excess liquid and to prevent the undersides from steaming.
- Assemble Portobello burgers on a toasted bun with avocado, sweet chili burger sauce, and pickled slaw.
While I would not recommend storing a completed burger, the mushrooms can last in the fridge for 24 hours (the marinade is very salty and may make the mushrooms too salty to eat after much longer); the sauce can be kept for a week; and the pickled slaw should last for up to a week.
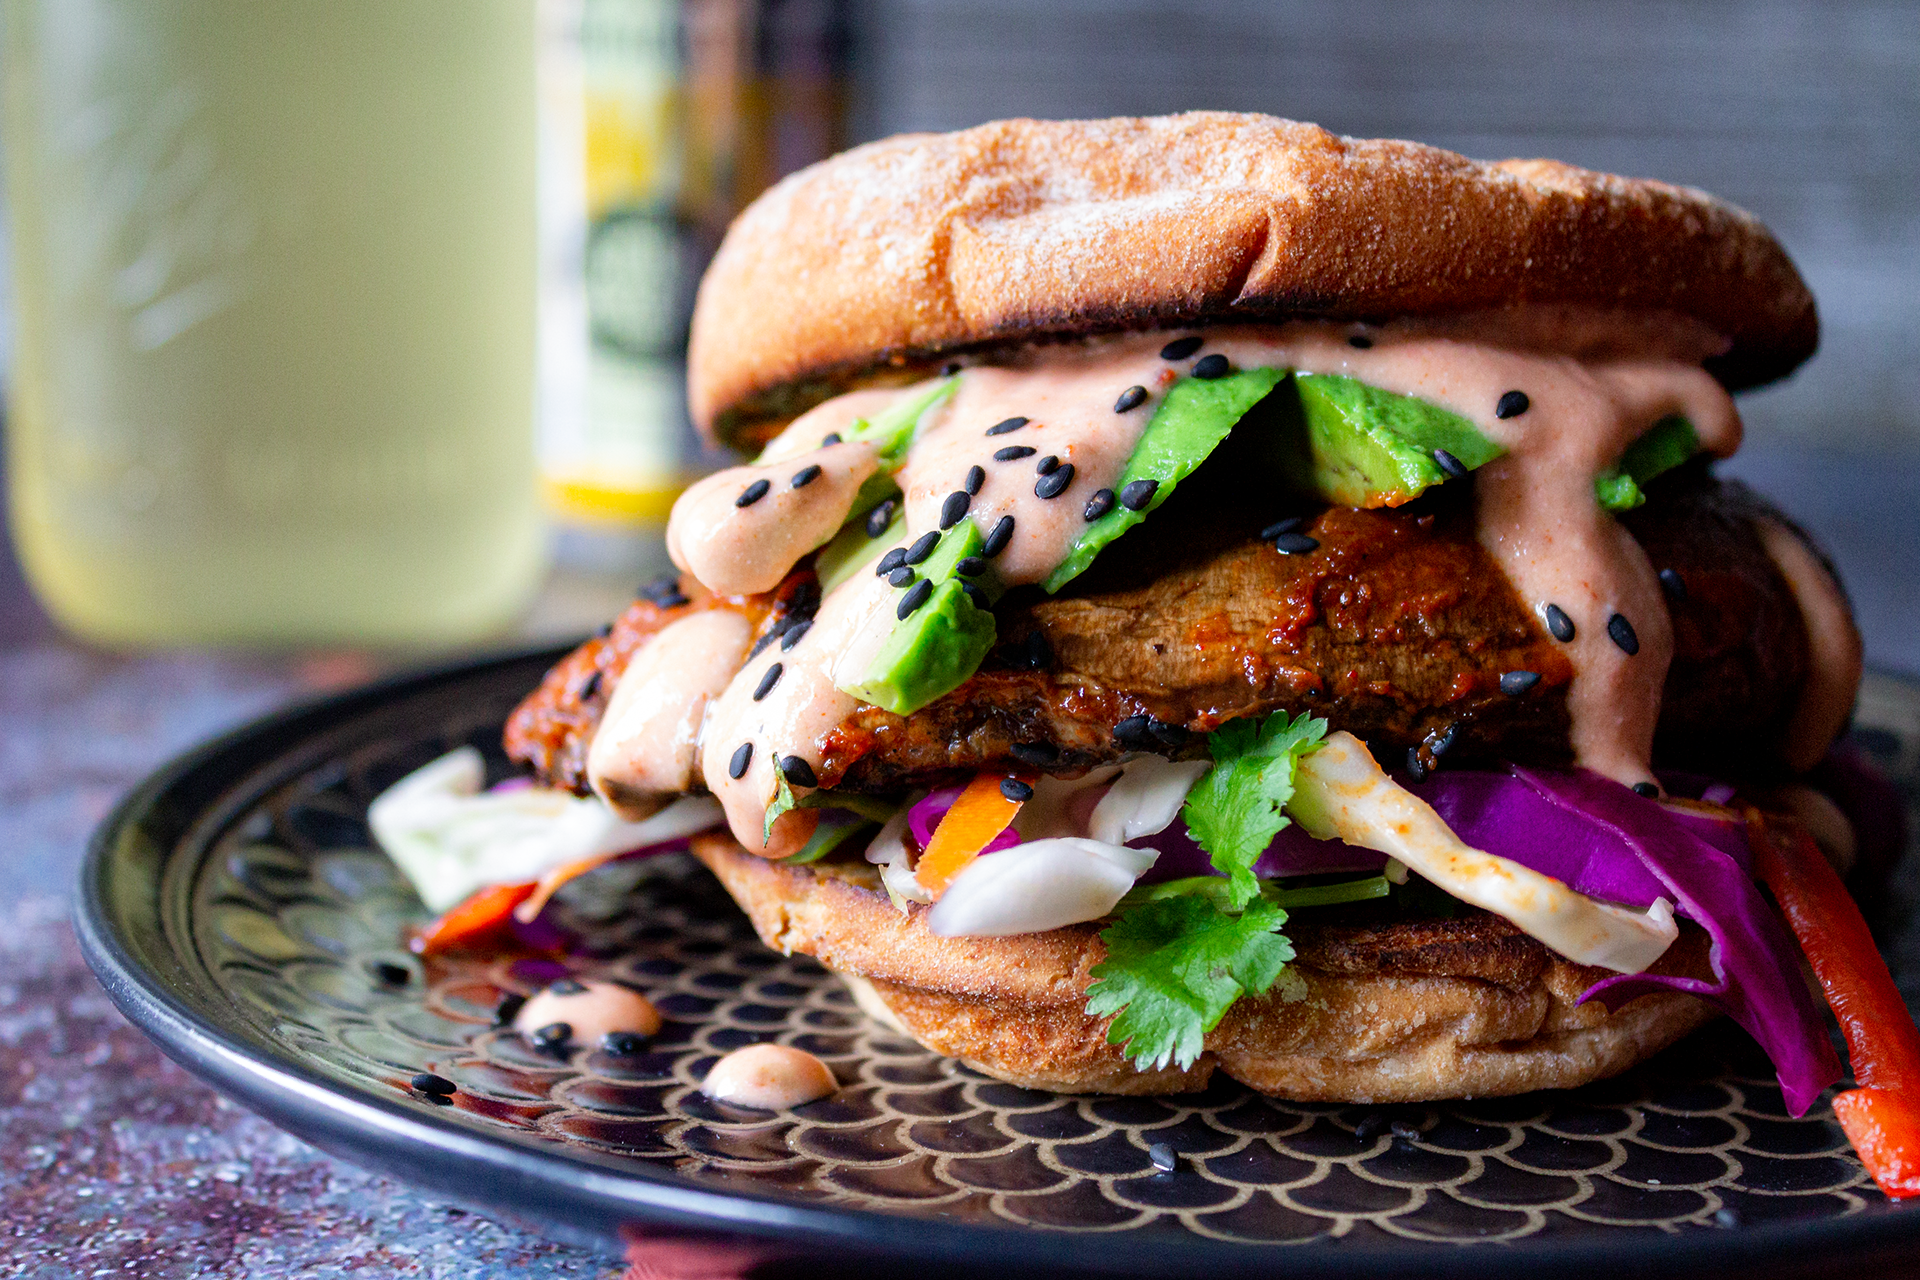


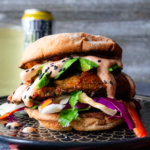
Spicy Miso Portobello Burgers with Pickled Asian Slaw and Sweet Chili Burger Sauce
Ingredients
Mushroom Ingredients:
- 4 portobello caps
- 1/3 cup white miso paste
- ¼ cup water
- 2 tbsp gochujang/sriracha
- 2 tsp ginger minced
- 2 tsp sesame oil
- ½ tsp white pepper
- ½ tsp garlic powder
Pickled Slaw Ingredients:
- 1 cup rice vinegar
- 1/3 cup red cabbage shredded
- 1/3 cup white cabbage shredded
- 2 red bell peppers thinly sliced
- 1 medium carrot thinly sliced
- ¼ cup fresh cilantro
- 1 tsp sesame seeds
Sauce Ingredients:
- 1/3 cup mayonnaise
- 1 tbsp Thai sweet chili sauce
- 1 tbsp sriracha
- 1 tbsp honey/maple syrup
Instructions
- Shred or slice cabbage, peppers, and carrots. Add to a large bag or bowl with rice vinegar and sesame seeds. Shake or toss to ensure everything is coated. Seal and store slaw in the fridge until ready to serve.
- In a small bowl, combine mayonnaise, sweet chili sauce, sriracha, and sweetener of choice. Stir and set burger sauce aside until ready to serve.
- In a large bowl, combine miso paste, water, gochujang, ginger, garlic, sesame oil, and white pepper. Whisk or stir with a fork until a smooth paste has formed.
- Wash and remove stems from Portobello caps, dab dry with a paper towel, and then add to the paste. Using a spoon or basting brush, gently coat the underside and top of each mushroom cap with the paste, ensuring even coverage. Store in the fridge for up to 3 hours to marinate.
- Heat griddle or nonstick pan on medium-high/high. When hot, place mushroom caps top-down and sear for 2-3 minutes or until a brown crust has formed, then flip. Baste with remaining marinade as desired. Do not cook longer than 5-7 minutes maximum to prevent mushrooms from becoming too soft.
- Remove and place on a wire rack to drain excess liquid and to prevent the undersides from steaming.
- Assemble Portobello burgers on a toasted bun with avocado, sweet chili burger sauce, and pickled slaw.

The post Spicy Miso Portobello Burgers with Pickled Asian Slaw and Sweet Chili Burger Sauce appeared first on I Forgot Salt!.
]]>