The post Chicken and Vegetable Hibachi-Style Meal Prep appeared first on I Forgot Salt!.
]]>
In a strange twist, I completely forgot about making this for Alex’s lunches two weekends ago. We spent the entire week–which just so happened to also be the first week of my summer semester–babysitting my parents’ dog at their house, followed by an equally hectic Memorial Day weekend running around town. All’s well that ends well, though, and this coming weekend should be… absolutely bat-shit insane with us both heading down to Virginia Beach on a business trip for his company followed by my first midterm of the semester at 8:30 on Monday morning. Oh boy! When this is all over, I’ll have forgotten what it feels like to have some quiet time just like I forgot about making this recipe.
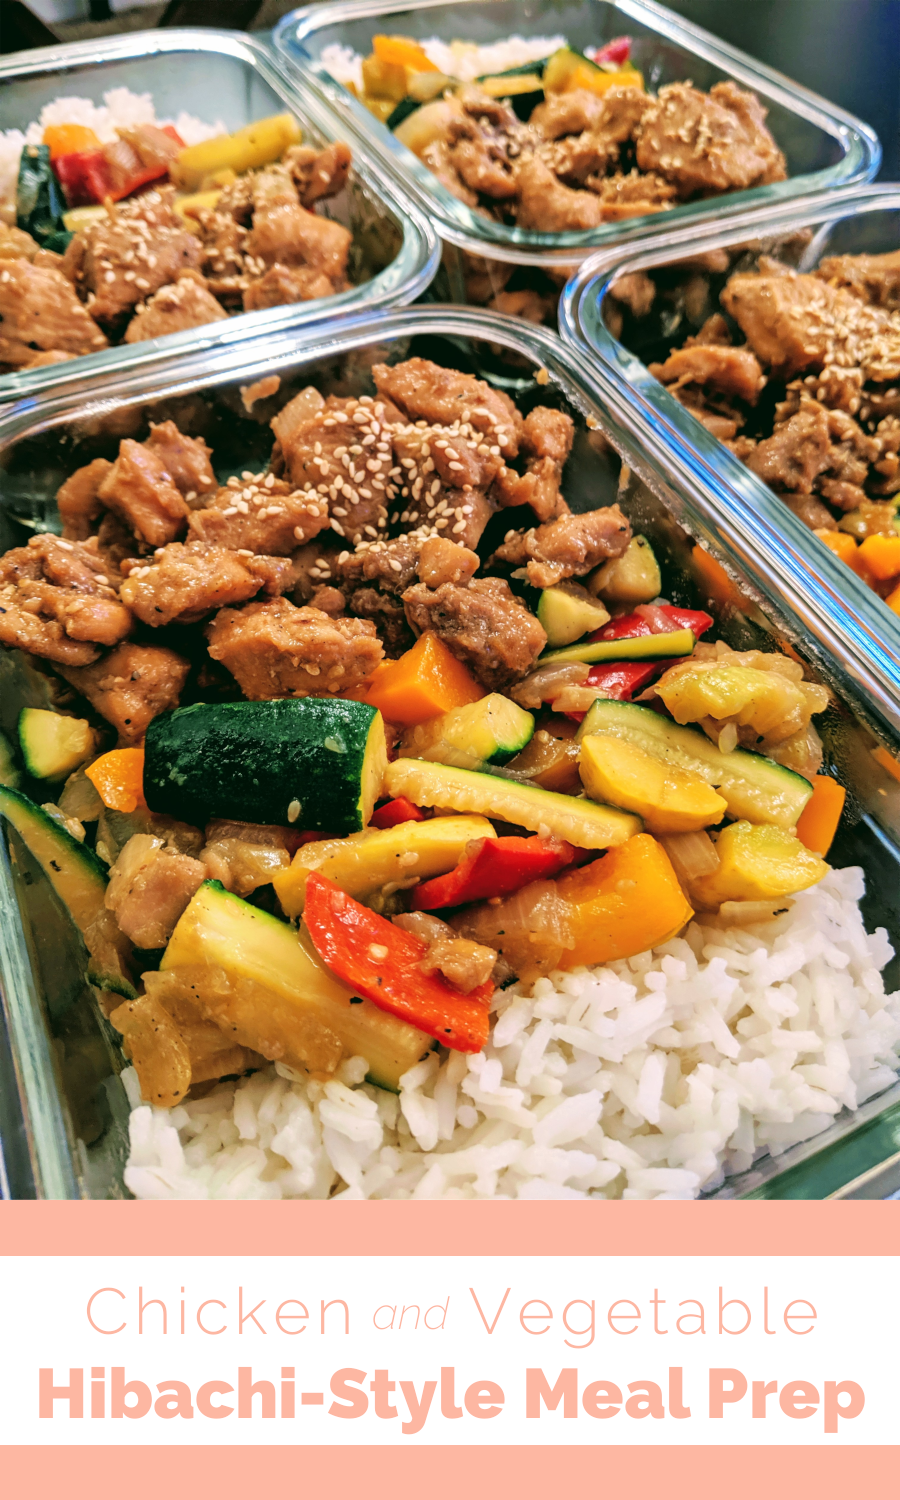
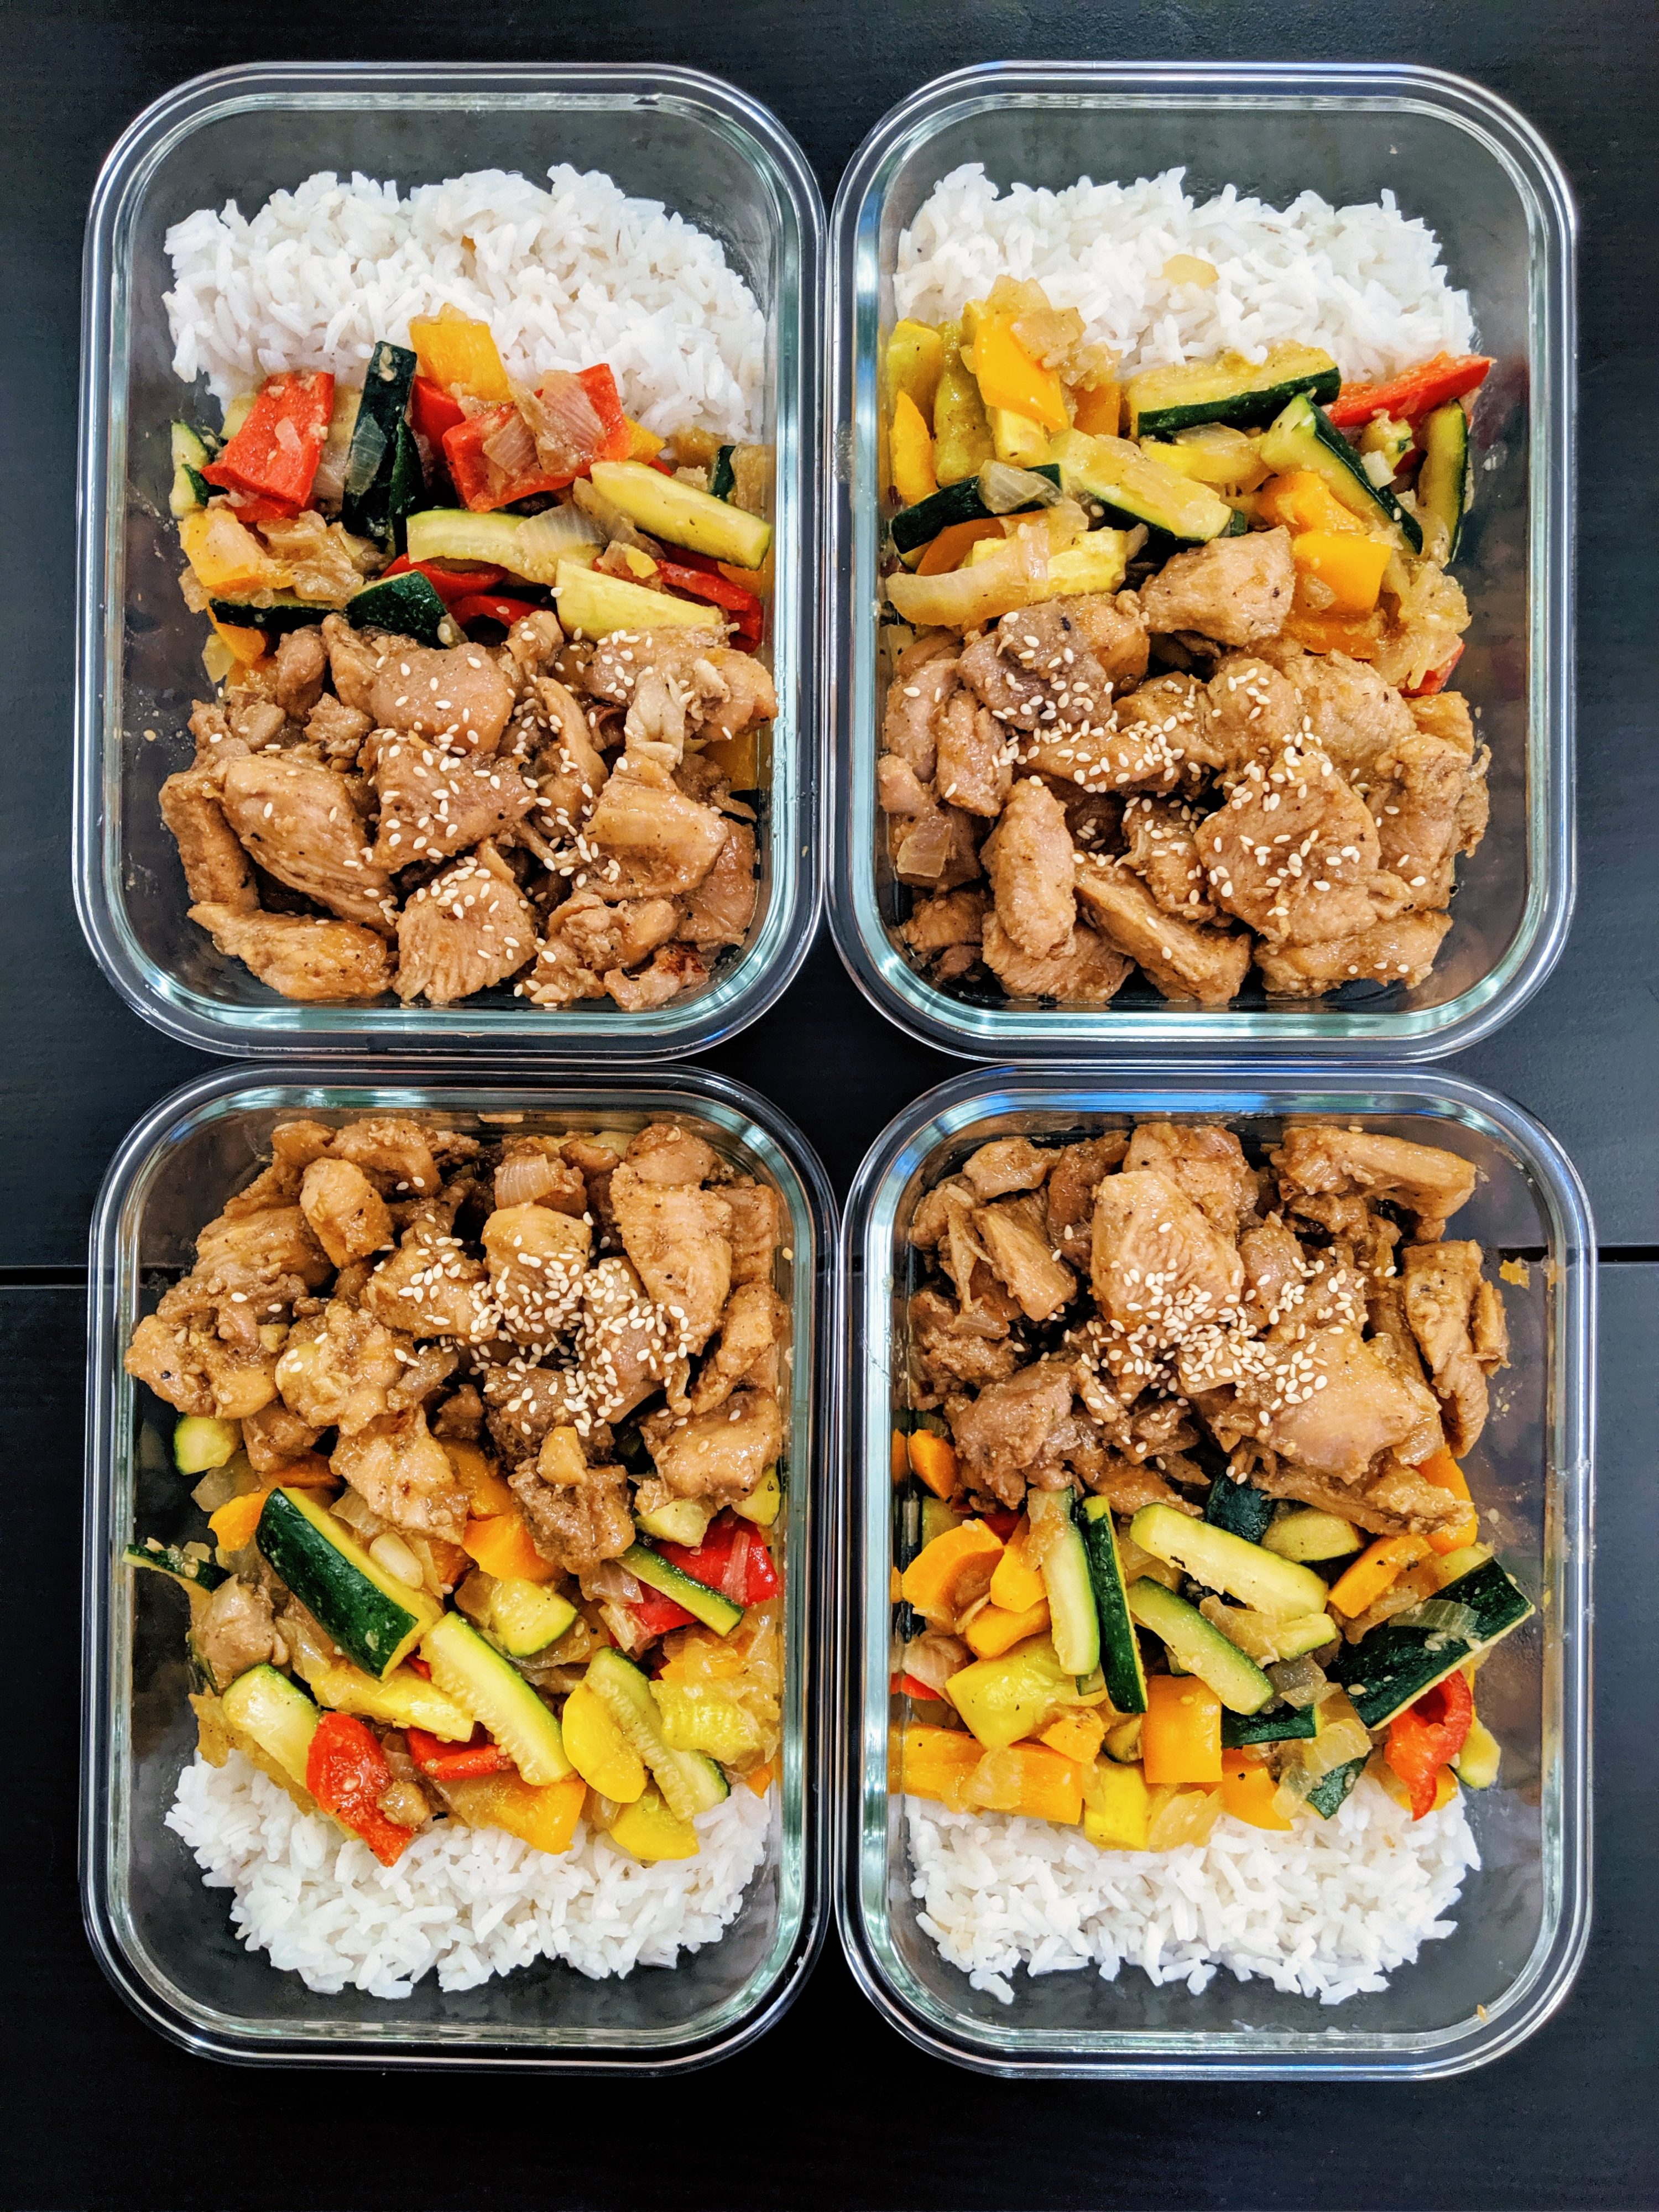
This recipe makes four servings.
Ingredients:
- 6-8 chicken thighs
- 1 white onion
- 4 zucchini
- 2 yellow squash
- 4 bell peppers (orange and red)
- 4 tbsp soy sauce, divided
- 2 tbsp butter
- 2 tbsp minced garlic
- 2 tbsp minced ginger
- 2 tsp white pepper
- 2 tsp salt
- 2 tsp black pepper
Directions:
- Chop vegetables (and roughly mince onion into small pieces) and set aside.
- Slice chicken thighs into bite-sized pieces and add to a large wok or skillet pan with butter, minced garlic, minced ginger, white pepper, salt, black pepper, and 2 tbsp soy sauce.
- Cook on high heat until all chicken is cooked through with browned edges and most liquid has evaporated, about 10-15 minutes.
- Remove chicken and set aside.
- Add vegetables to the still-hot wok or skillet along with remaining 2 tbsp soy sauce (to “deglaze” any fond on the pan left from the chicken). Cook until onions have softened significantly and the other vegetables have become brighter in color, about 10 minutes.
- Serve with your choice of rice and garnish with sesame seeds as desired.
This recipe keeps well in the fridge for a week and reheats well in the microwave. Enjoy!

Chicken and Vegetable Hibachi-Style Meal Prep
Ingredients
- 6-8 chicken thighs
- 1 white onion
- 4 zucchini
- 2 yellow squash
- 4 bell peppers orange and red
- 4 tbsp soy sauce divided
- 2 tbsp butter
- 2 tbsp garlic minced
- 2 tbsp ginger minced
- 2 tsp white pepper
- 2 tsp salt
- 2 tsp black pepper
Instructions
- Chop vegetables (and roughly mince onion into small pieces) and set aside.
- Slice chicken thighs into bite-sized pieces and add to a large wok or skillet pan with butter, minced garlic, minced ginger, white pepper, salt, black pepper, and 2 tbsp soy sauce.
- Cook on high heat until all chicken is cooked through with browned edges and most liquid has evaporated, about 10-15 minutes.
- Remove chicken and set aside.
- Add vegetables to the still-hot wok or skillet along with remaining 2 tbsp soy sauce (to “deglaze” any fond on the pan left from the chicken). Cook until onions have softened significantly and the other vegetables have become brighter in color, about 10 minutes.
- Serve with your choice of rice and garnish with sesame seeds as desired.
The post Chicken and Vegetable Hibachi-Style Meal Prep appeared first on I Forgot Salt!.
]]>The post Cowboy Butter Basted Grilled Strip Steak appeared first on I Forgot Salt!.
]]>
I can’t actually say whether this recipe was a complete success or not because, well, I’m not a huge fan of beef! Alex seemed to enjoy it, though, and finished the entire thing in record time, so I’ll take that as a win. Making the compound butter was pretty neat and I’d like to experiment with more things like that in the future, perhaps with fish. We’ll see!
This recipe makes one serving.
Ingredients:
- 1 steak
- 3 zucchini
- 1 tbsp light oil
- 4 tsp salt, divided
- 3 tsp black pepper, divided
- 4 tbsp butter
- 1 tbsp minced garlic
- 2 tsp Dijon mustard
- 1 tsp lemon zest
- ½ tsp paprika
- ½ tsp parsley
- ½ tsp thyme
- ¼ tsp cayenne
Directions:
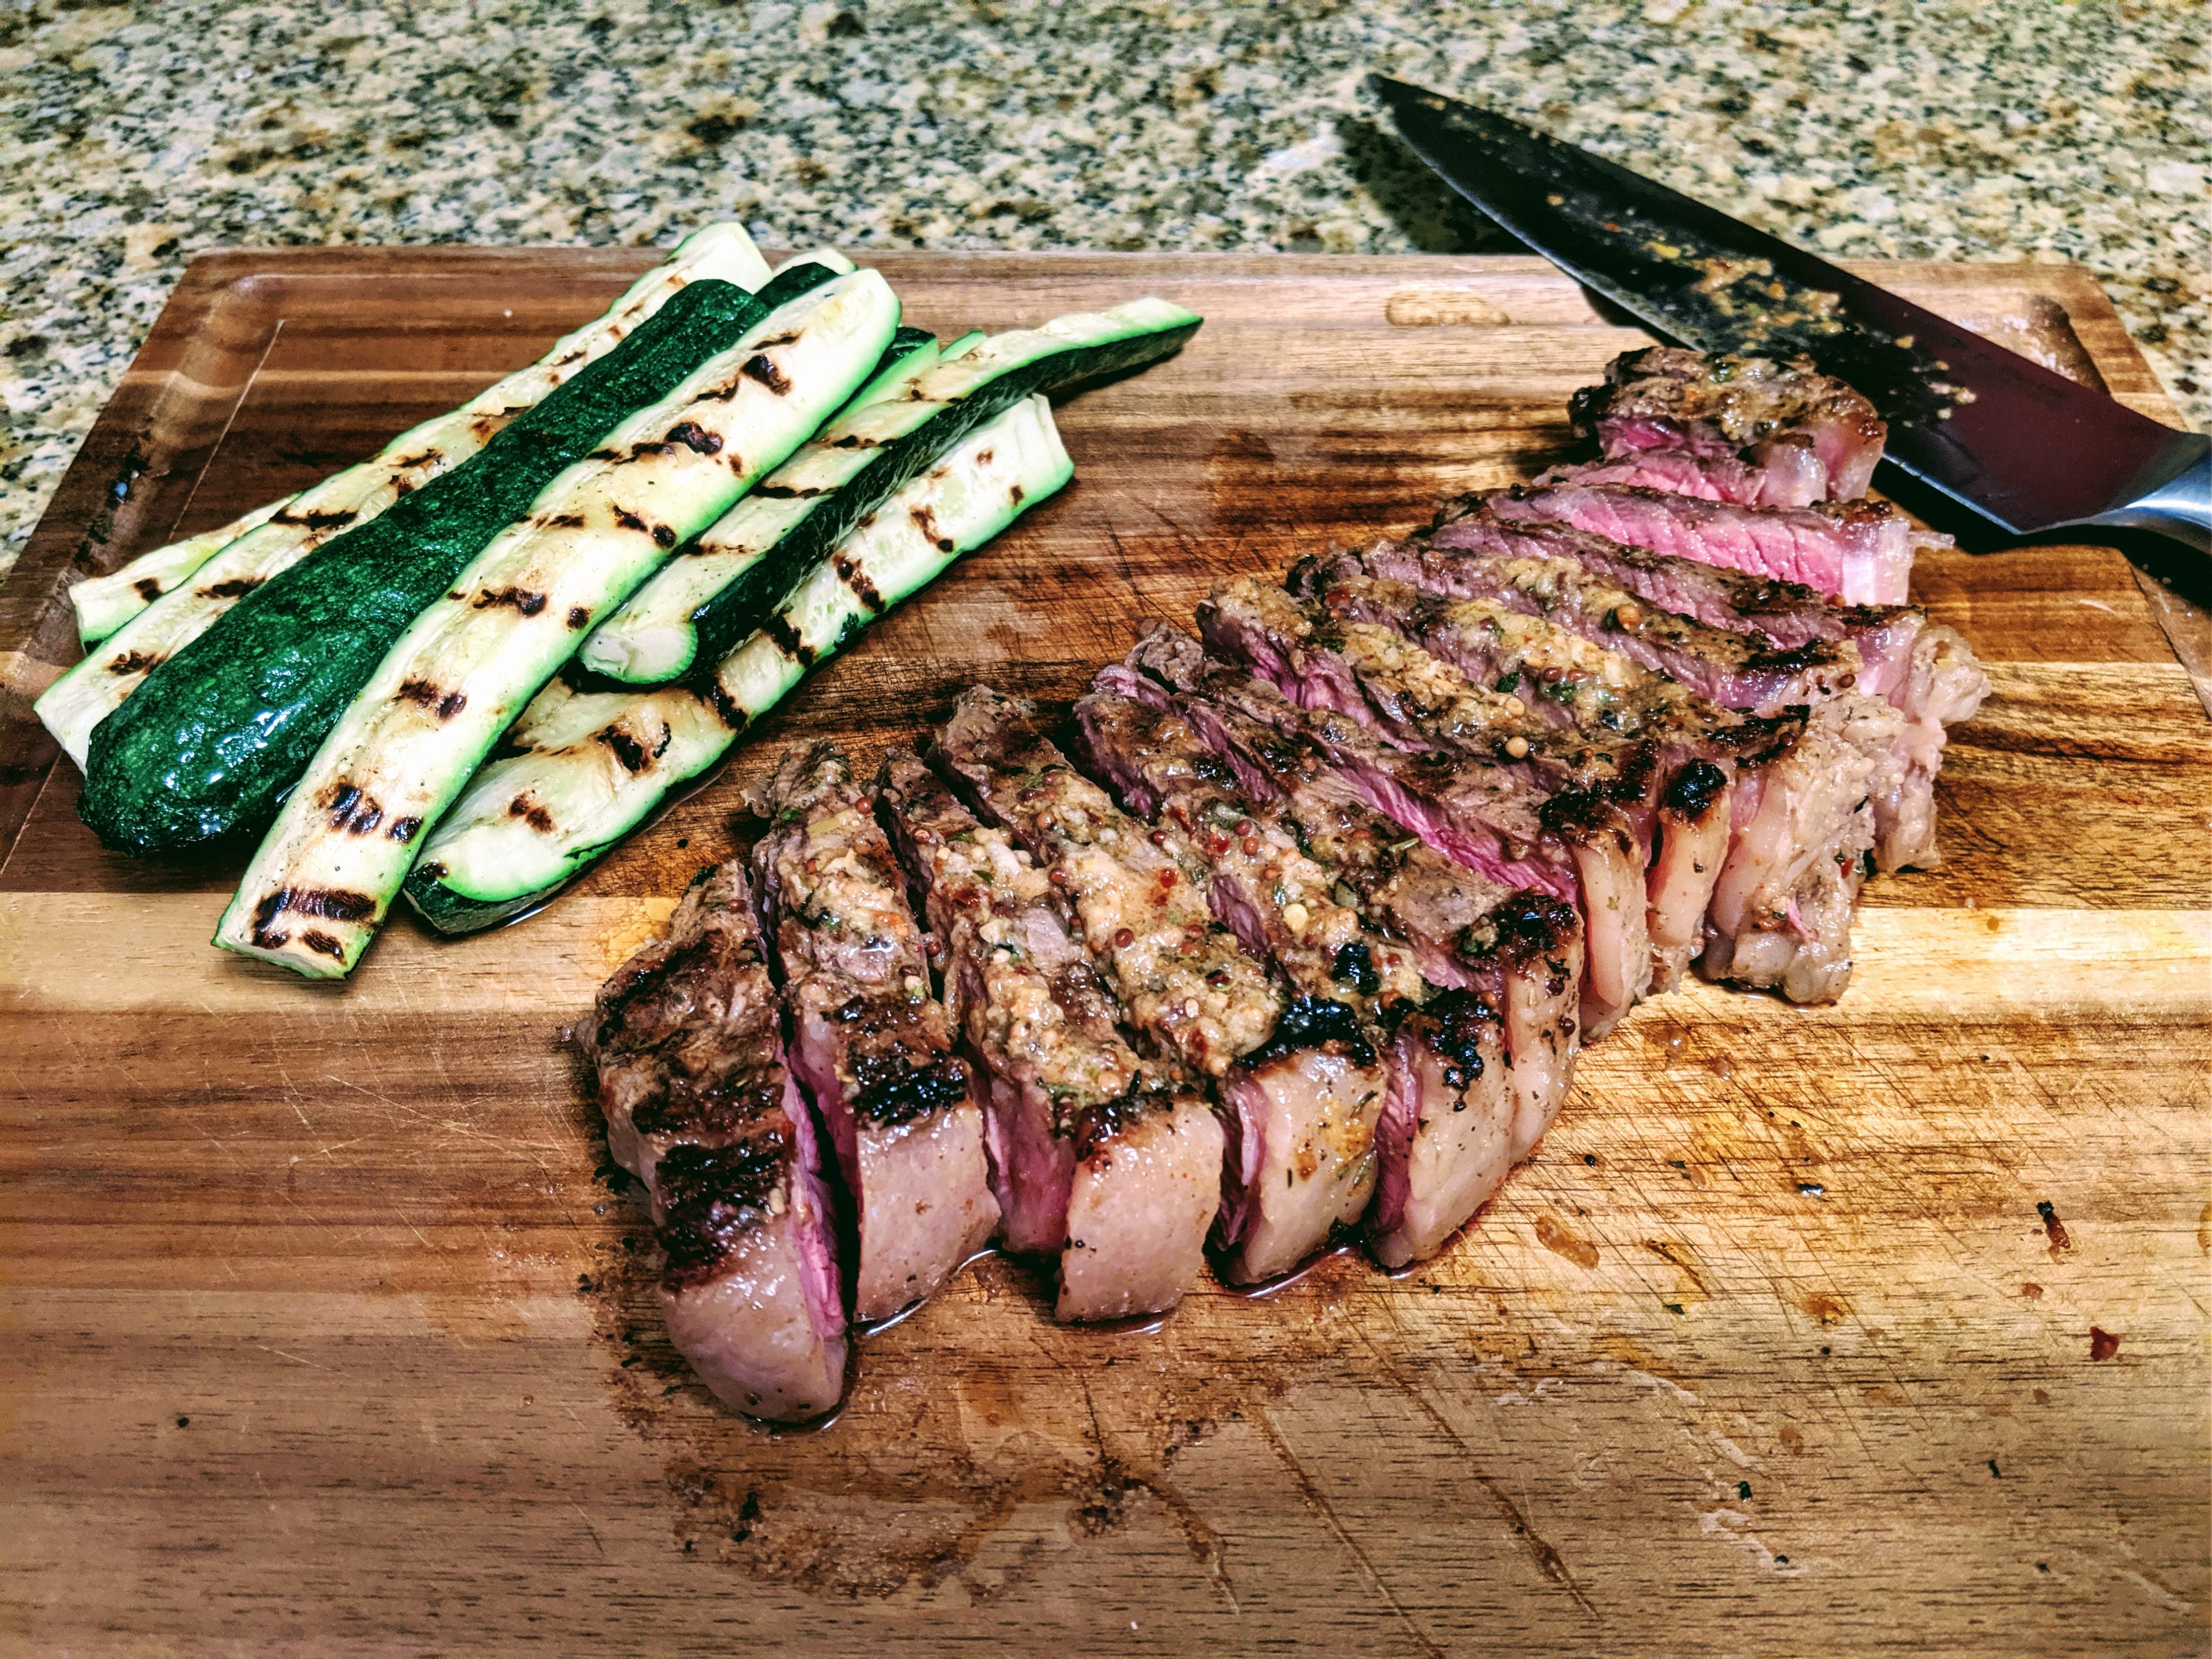
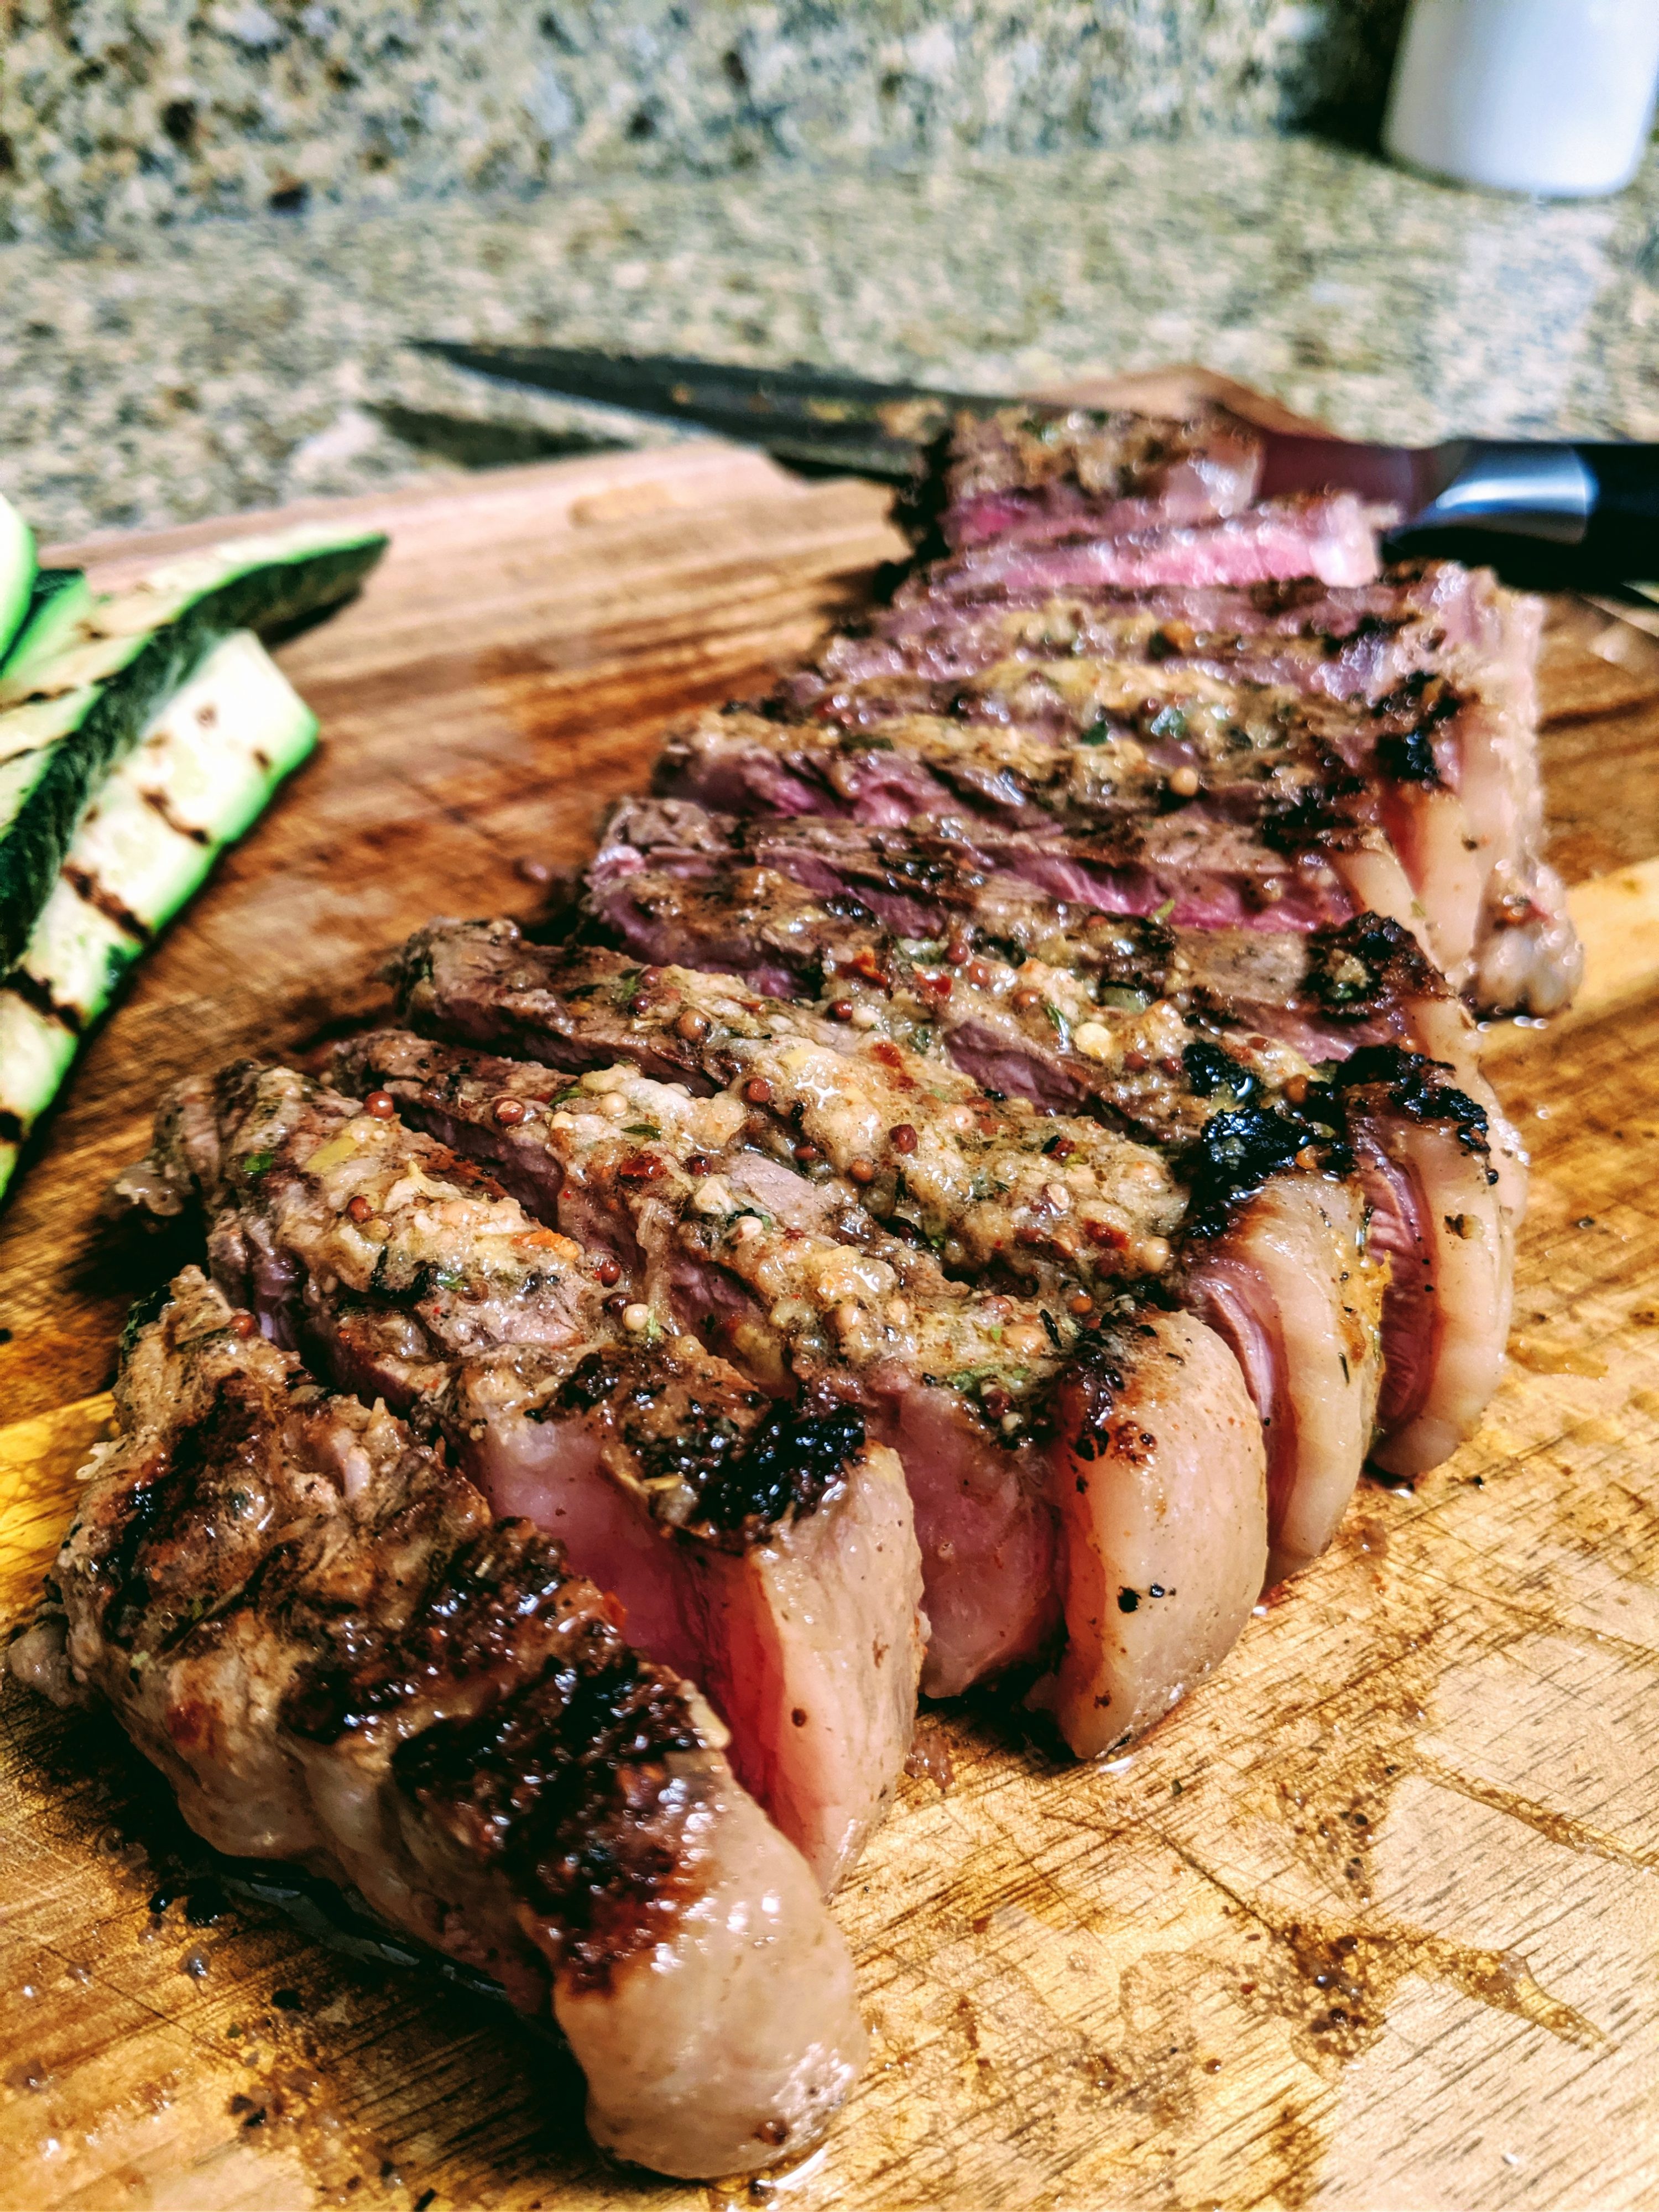
- Thoroughly coat each side of your steak with 1 tsp salt and 1 tsp pepper (for a total of 2 tsp on each side) and let rest at room temperature for a few minutes.
- Slice zucchini into quarters and coat with light oil and 1 tsp salt.
- In a small bowl, add butter, garlic, Dijon mustard, paprika, parsley, thyme, cayenne, remaining 1 tsp black pepper, and remaining 1 tsp salt. Stir until combined.
- Coat one side of your steak with the butter mixture and lay uncoated-side-down on a heated grill, along with your zucchini.
- Cover and when butter has completely melted, about 3-5 minutes, flip and repeat by coating the other side. Repeat every 3-5 minutes, basting each side, until the steak has reached an internal temperature of 130F-140F for rare or medium rare. Remember to rotate zucchini so that all pieces have grill marks on each side.
- Remove vegetables and steak from grill and let steak rest for at least 10 minutes covered in aluminum foil. Slice and serve with additional compound butter as desired!
I’m not sure how well this keeps overnight as we had no leftovers, but I assume it would last at least 24 hours in the fridge from past experience.
I used whole grain Heady Topper Mustard in this recipe, but it’s very hard to get anywhere outside specialty places in Vermont. Regular whole grain or Dijon mustard works just fine!


Cowboy Butter Basted Grilled Strip Steak
Ingredients
- 1 steak
- 3 zucchini
- 1 tbsp light oil
- 4 tsp salt divided
- 3 tsp black pepper divided
- 4 tbsp butter
- 1 tbsp minced garlic
- 2 tsp Dijon mustard
- 1 tsp lemon zest
- ½ tsp paprika
- ½ tsp parsley
- ½ tsp thyme
- ¼ tsp cayenne
Instructions
- Thoroughly coat each side of your steak with 1 tsp salt and 1 tsp pepper (for a total of 2 tsp on each side) and let rest at room temperature for a few minutes.
- Slice zucchini into quarters and coat with light oil and 1 tsp salt.
- In a small bowl, add butter, garlic, Dijon mustard, paprika, parsley, thyme, cayenne, remaining 1 tsp black pepper, and remaining 1 tsp salt. Stir until combined.
- Coat one side of your steak with the butter mixture and lay uncoated-side-down on a heated grill, along with your zucchini.
- Cover and when butter has completely melted, about 3-5 minutes, flip and repeat by coating the other side. Repeat every 3-5 minutes, basting each side, until the steak has reached an internal temperature of 130F-140F for rare or medium rare. Remember to rotate zucchini so that all pieces have grill marks on each side.
- Remove vegetables and steak from grill and let steak rest for at least 10 minutes covered in aluminum foil. Slice and serve with additional compound butter as desired!
The post Cowboy Butter Basted Grilled Strip Steak appeared first on I Forgot Salt!.
]]>The post Slow Cooker Butter Chicken Curry appeared first on I Forgot Salt!.
]]>
I decided to shake things up a little for Monday’s weekly curry night, so I pulled out the Crock-Pot and literally half of the spices in my pantry in pursuit of something that was neither spicy nor Thai. I’m back on a low-carb kick, so instead of making rice I steamed some frozen cauliflower with lime zest as the dinner side dish. Honestly, it was one of the best things I’ve made in a long time, and both Alex and I went back for second later in the night–kept warm by the glorious slow cooker. I might start using it more often, but it was torture enough yesterday smelling the delicious spices all afternoon.
This recipe makes four servings.
Ingredients:
- 4-6 chicken thighs
- 16 oz (1 can) coconut milk
- 6 oz (1 can) tomato paste
- 8 tbsp (1 stick) butter
- 3-4 tbsp minced garlic
- 1 tbsp light oil
- 2 tsp salt
- 2 tsp garam masala
- 1 tsp paprika
- 1 tsp coriander
- 1 tsp chili powder
- 1 tsp tumeric
- 1 tsp white pepper
- 1 tsp cumin
- 1 tsp dried onion
- ½ tsp cinnamon
- ½ tsp ground ginger
- ½ tsp cayenne
- ¼ cup cilantro leaves, chopped
Directions:
- Combine all ingredients except for the cilantro leaves in a slow cooker and cook on high for 4 hours.
- Using two forks, shred the cooked chicken breasts.
- Add fresh cilantro leaves and stir to combine.
- Cook on high for an additional 30 minutes to 1 hour. Serve!
This recipe keeps for at least 24 hours in the fridge, but I can’t strictly verify how long it lasts because we ate literally all of it in a single night.


Slow Cooker Butter Chicken Curry
Ingredients
- 16 oz coconut milk
- 6 oz tomato paste
- 8 tbsp butter
- 3-4 tbsp garlic minced
- 1 tbsp light oil
- 2 tsp salt
- 2 tsp garam masala
- 1 tsp paprika
- 1 tsp coriander
- 1 tsp chili powder
- 1 tsp tumeric
- 1 tsp white pepper
- 1 tsp cumin
- 1 tsp dried onion
- ½ tsp cinnamon
- ½ tsp ground ginger
- ½ tsp cayenne
- ¼ cup cilantro leaves chopped
Instructions
- Combine all ingredients except for the cilantro leaves in a slow cooker and cook on high for 4 hours.
- Using two forks, shred the cooked chicken breasts.
- Add fresh cilantro leaves and stir to combine.
- Cook on high for an additional 30 minutes to 1 hour. Serve!
The post Slow Cooker Butter Chicken Curry appeared first on I Forgot Salt!.
]]>The post Goat Cheese, Spinach, and Pepper Stuffed Bacon-Wrapped Chicken appeared first on I Forgot Salt!.
]]>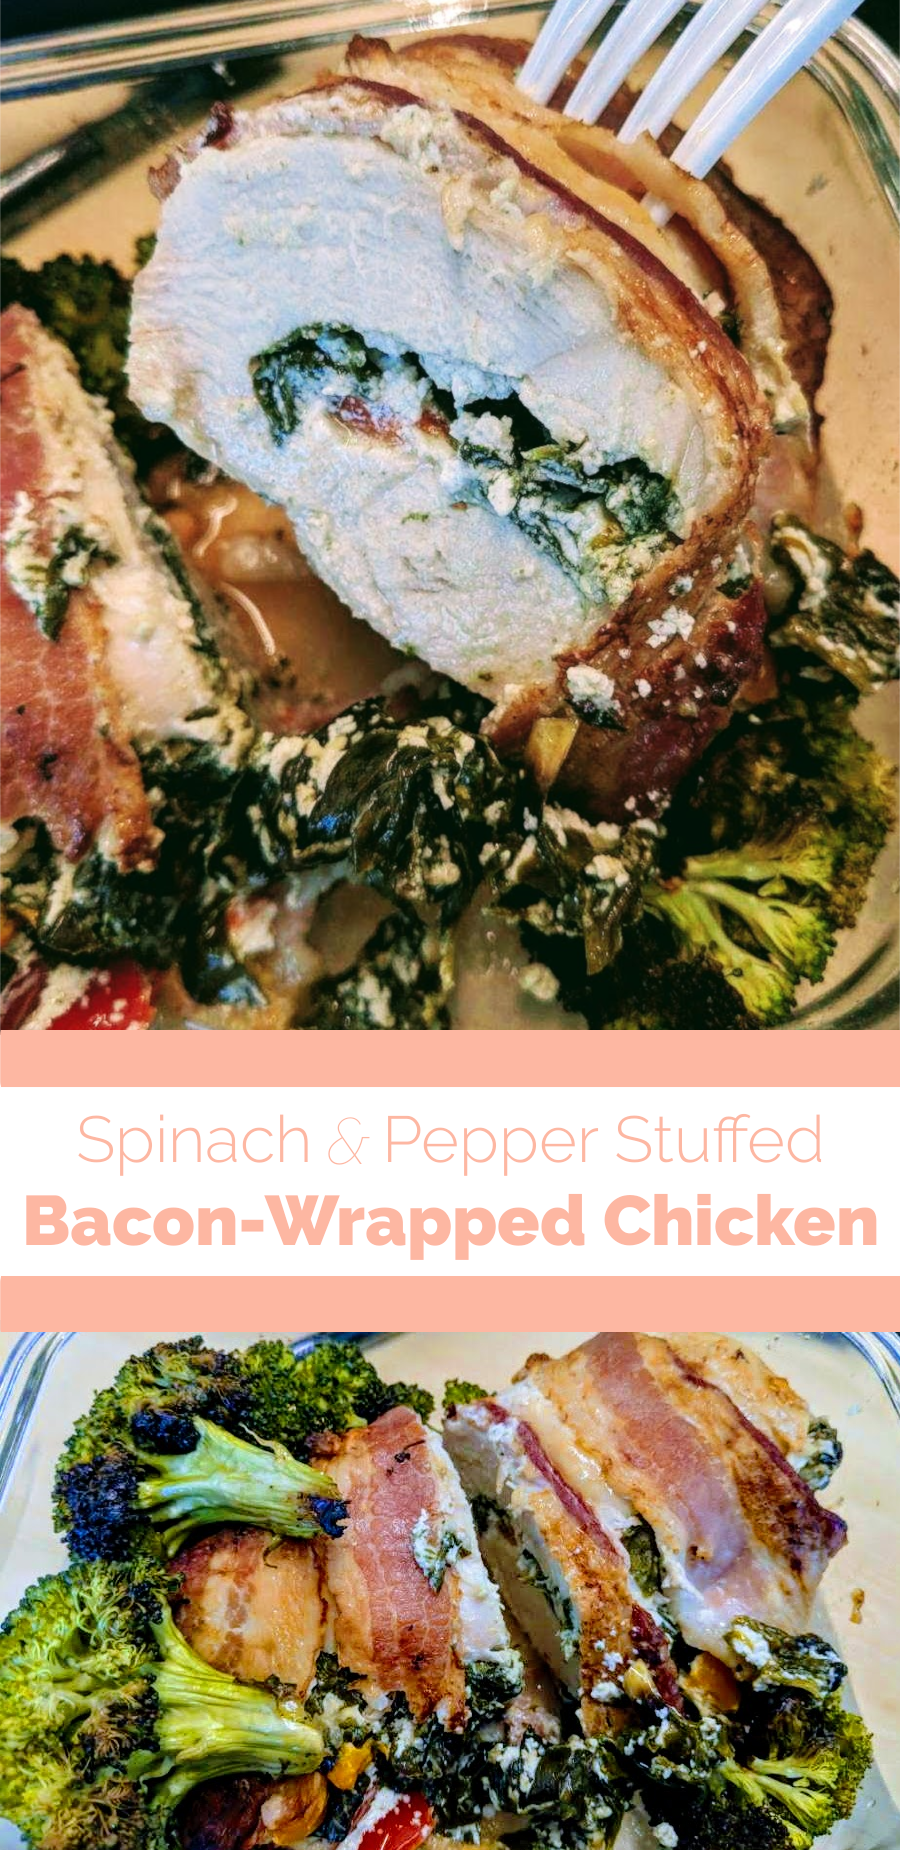
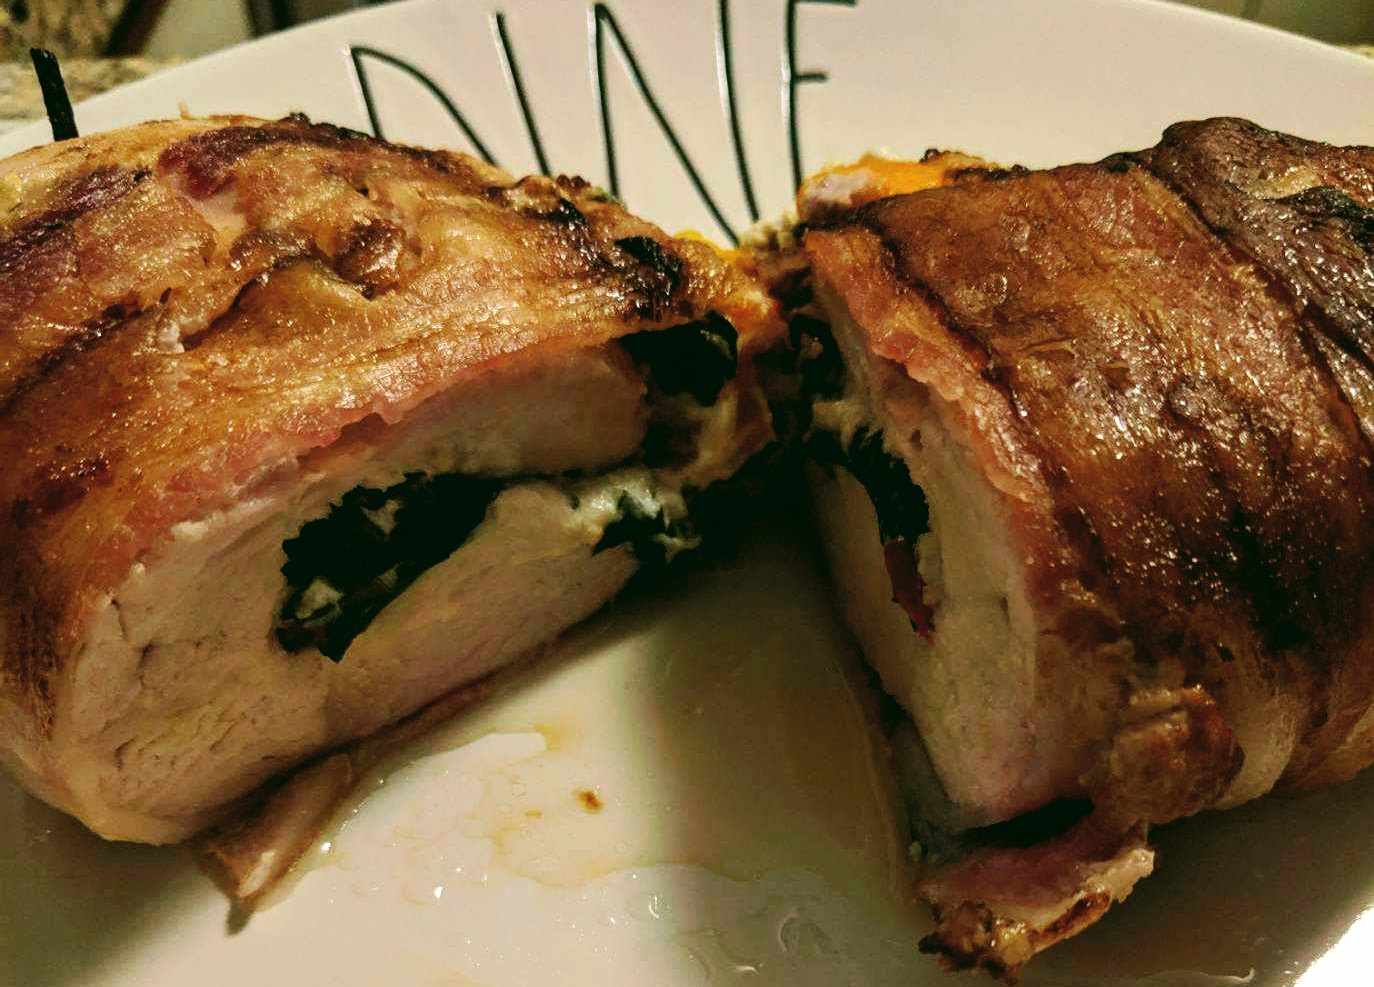
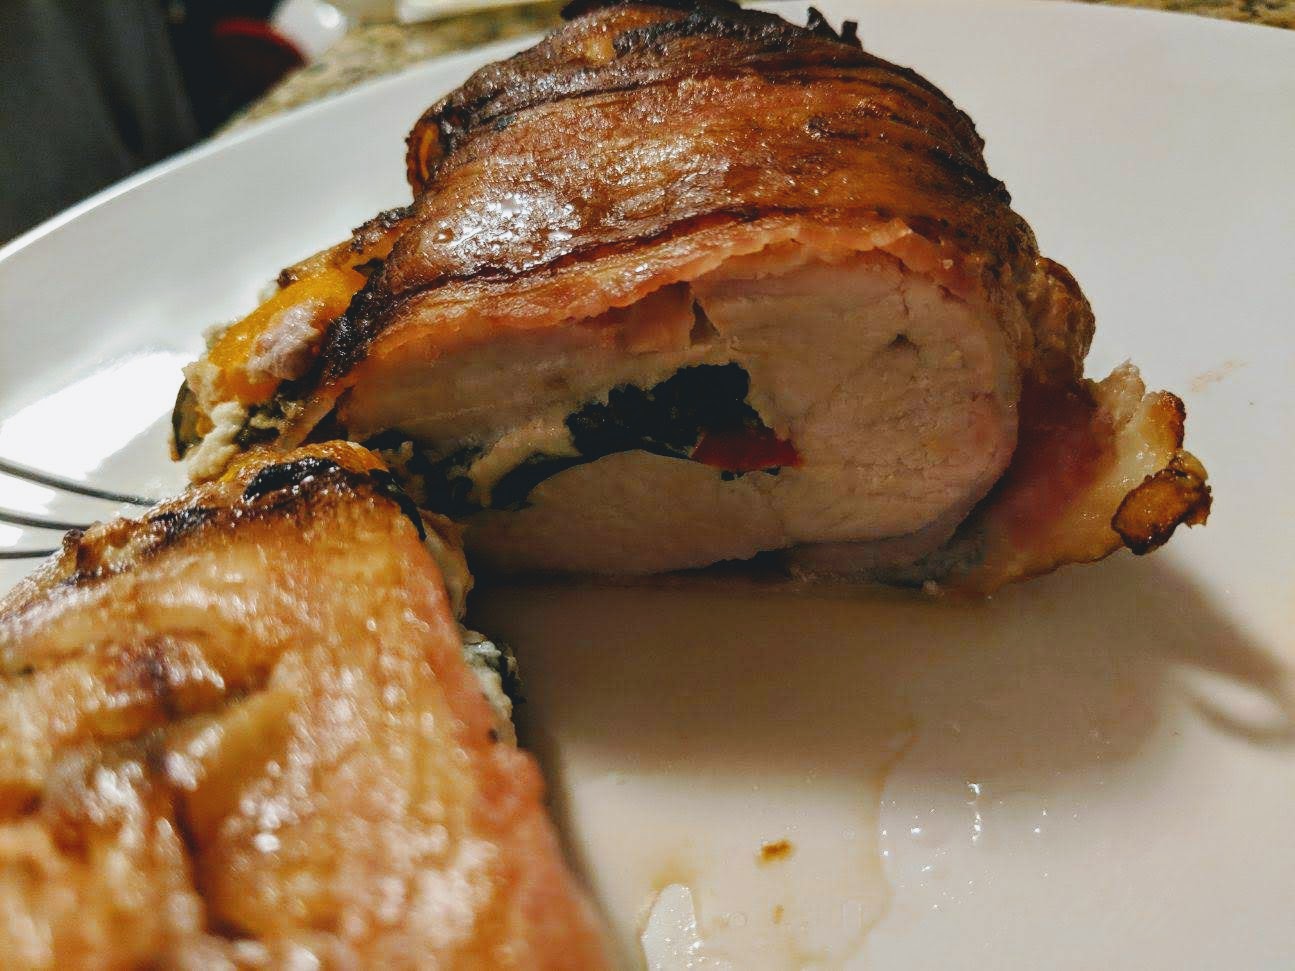
This entire meal was a trip from start to finish, I can assure you of that. I didn’t start cooking until late into the evening due to a series of… delays (aka getting sucked into playing The Last of Us for literally the entire day), and Alex was trying to keg two of his beers (a black IPA and an experimental IPA) at the same time. We have a tiny apartment to begin with, and The Great Kitchen Sink War of 2019 left our carpet stained with spilled beer and our stomachs empty until around 10:30PM as we battled over a measly five feet of countertop space. At the end of it all, though, we had a good meal and a good laugh, so that’s just another lesson learned about the growing pains that come with living with your significant other (and the dangers of waiting until the last minute to do something that’ll take a decent chunk of time). Plan ahead, people!
This recipe makes six servings.
Ingredients:
- 6 chicken breasts
- 2 packages (about 1lb) soft goat cheese
- 5 cups (about 6 oz) fresh spinach, stems removed
- 5 bell peppers
- 18-20 strips (about 1lb) bacon
- 2 tbsp minced garlic
- 1 tsp oregano
- 1 tsp basil
- 1 tsp parsley
- 1 tsp salt
- 1 tsp black pepper
- ¾ tsp garlic powder
- 2 tbsp olive oil, divided
- 3 cups broccoli (optional)
Directions:
- Preheat oven to 425F.
- Toss broccoli (if using) in salt, black pepper, and 1 tbsp olive oil.
- Core and halve peppers lengthwise. Lay peppers and broccoli (if using) on two baking sheets, pressing the peppers down so they lay relatively flat.
- Roast vegetables for 20-25 minutes, or until they have begun to brown.
- Remove and set broccoli aside (it’s done). Slice roasted peppers into strips.
- In a large bowl, combine sliced roasted peppers, spinach, goat cheese, garlic, oregano, basil, parsley, and remaining 1 tbsp olive oil. Mix with your hands until all ingredients are mixed and the spices have evenly distributed throughout the filling.
- Slice each chicken breast from the side, taking care not to cut any in half, so that a “pocket” forms.
- Add ¾-1 cup filling to each “pocket”, depending on the size of your chicken breasts. (NOTE: Don’t worry if it looks like your filling is spilling out. The bacon helps keep everything inside, and when the spinach wilts in the oven it will be less bulky.)
- Wrap 3-4 strips of bacon tightly around each chicken breast, tucking the ends underneath. (NOTE: If you need to, you can use toothpicks or broken soaked skewers to hold everything together, but I had no problem because I opened a fresh package of bacon that was still very pliable. If you’re using bacon with solidified fat, you might need these extra tools.)
- Lay each assembled chicken breast on a baking sheet. Sprinkle 1/8 tsp garlic powder and a pinch of salt onto each.
- Bake at 425F for 15 minutes. Flip and bake for an additional 20 minutes.
- If desired, flip again and broil on high for 3-4 minutes, or until the bacon begins to crisp. Serve with previously-roasted broccoli or your side of choice!
This recipe keeps well in the fridge, and lasts up to 5 days in a sealed container. It reheats well in the microwave (as you can see in the above pictures–I didn’t take any decent ones the night I made this so Alex took some at work!). Enjoy!

Goat Cheese, Spinach, and Pepper Stuffed Bacon-Wrapped Chicken
Ingredients
- 6 chicken breasts
- 1 lb soft goat cheese
- 5 cups fresh spinach stems removed
- 5 bell peppers
- 18-20 strips bacon
- 2 tbsp garlic minced
- 1 tsp oregano
- 1 tsp basil
- 1 tsp parsley
- 1 tsp salt
- 1 tsp black pepper
- ¾ tsp garlic powder
- 2 tbsp olive oil divided
- 3 cups broccoli optional
Instructions
- Preheat oven to 425F.
- Toss broccoli (if using) in salt, black pepper, and 1 tbsp olive oil.
- Core and halve peppers lengthwise. Lay peppers and broccoli (if using) on two baking sheets, pressing the peppers down so they lay relatively flat.
- Roast vegetables for 20-25 minutes, or until they have begun to brown.
- Remove and set broccoli aside (it’s done). Slice roasted peppers into strips.
- In a large bowl, combine sliced roasted peppers, spinach, goat cheese, garlic, oregano, basil, parsley, and remaining 1 tbsp olive oil. Mix with your hands until all ingredients are mixed and the spices have evenly distributed throughout the filling.
- Slice each chicken breast from the side, taking care not to cut any in half, so that a “pocket” forms.
- Add ¾-1 cup filling to each “pocket”, depending on the size of your chicken breasts.*
- Wrap 3-4 strips of bacon tightly around each chicken breast, tucking the ends underneath. **
- Lay each assembled chicken breast on a baking sheet. Sprinkle 1/8 tsp garlic powder and a pinch of salt onto each.
- Bake at 425F for 15 minutes. Flip and bake for an additional 20 minutes.
- If desired, flip again and broil on high for 3-4 minutes, or until the bacon begins to crisp. Serve with previously-roasted broccoli or your side of choice!
Notes
- *Don’t worry if it looks like your filling is spilling out. The bacon helps keep everything inside, and when the spinach wilts in the oven it will be less bulky.
- **If you need to, you can use toothpicks or broken soaked skewers to hold everything together, but I had no problem because I opened a fresh package of bacon that was still very pliable. If you’re using bacon with solidified fat, you might need these extra tools.
The post Goat Cheese, Spinach, and Pepper Stuffed Bacon-Wrapped Chicken appeared first on I Forgot Salt!.
]]>The post Creamy Cajun Shrimp with Roasted Vegetables Meal Prep appeared first on I Forgot Salt!.
]]>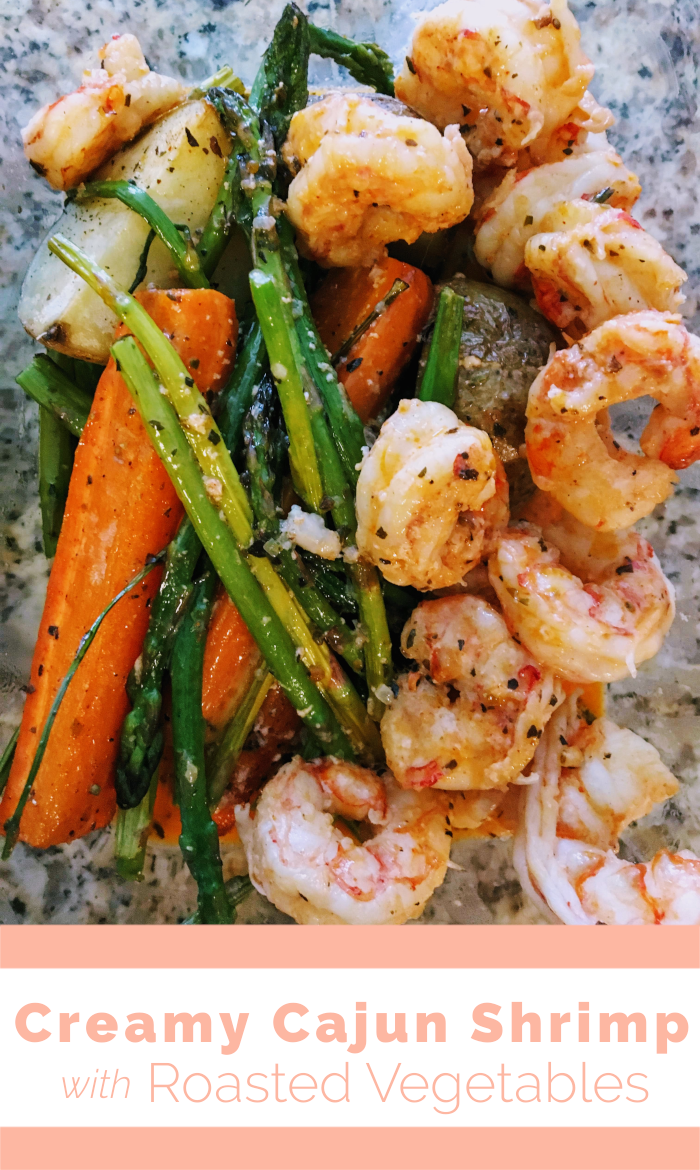
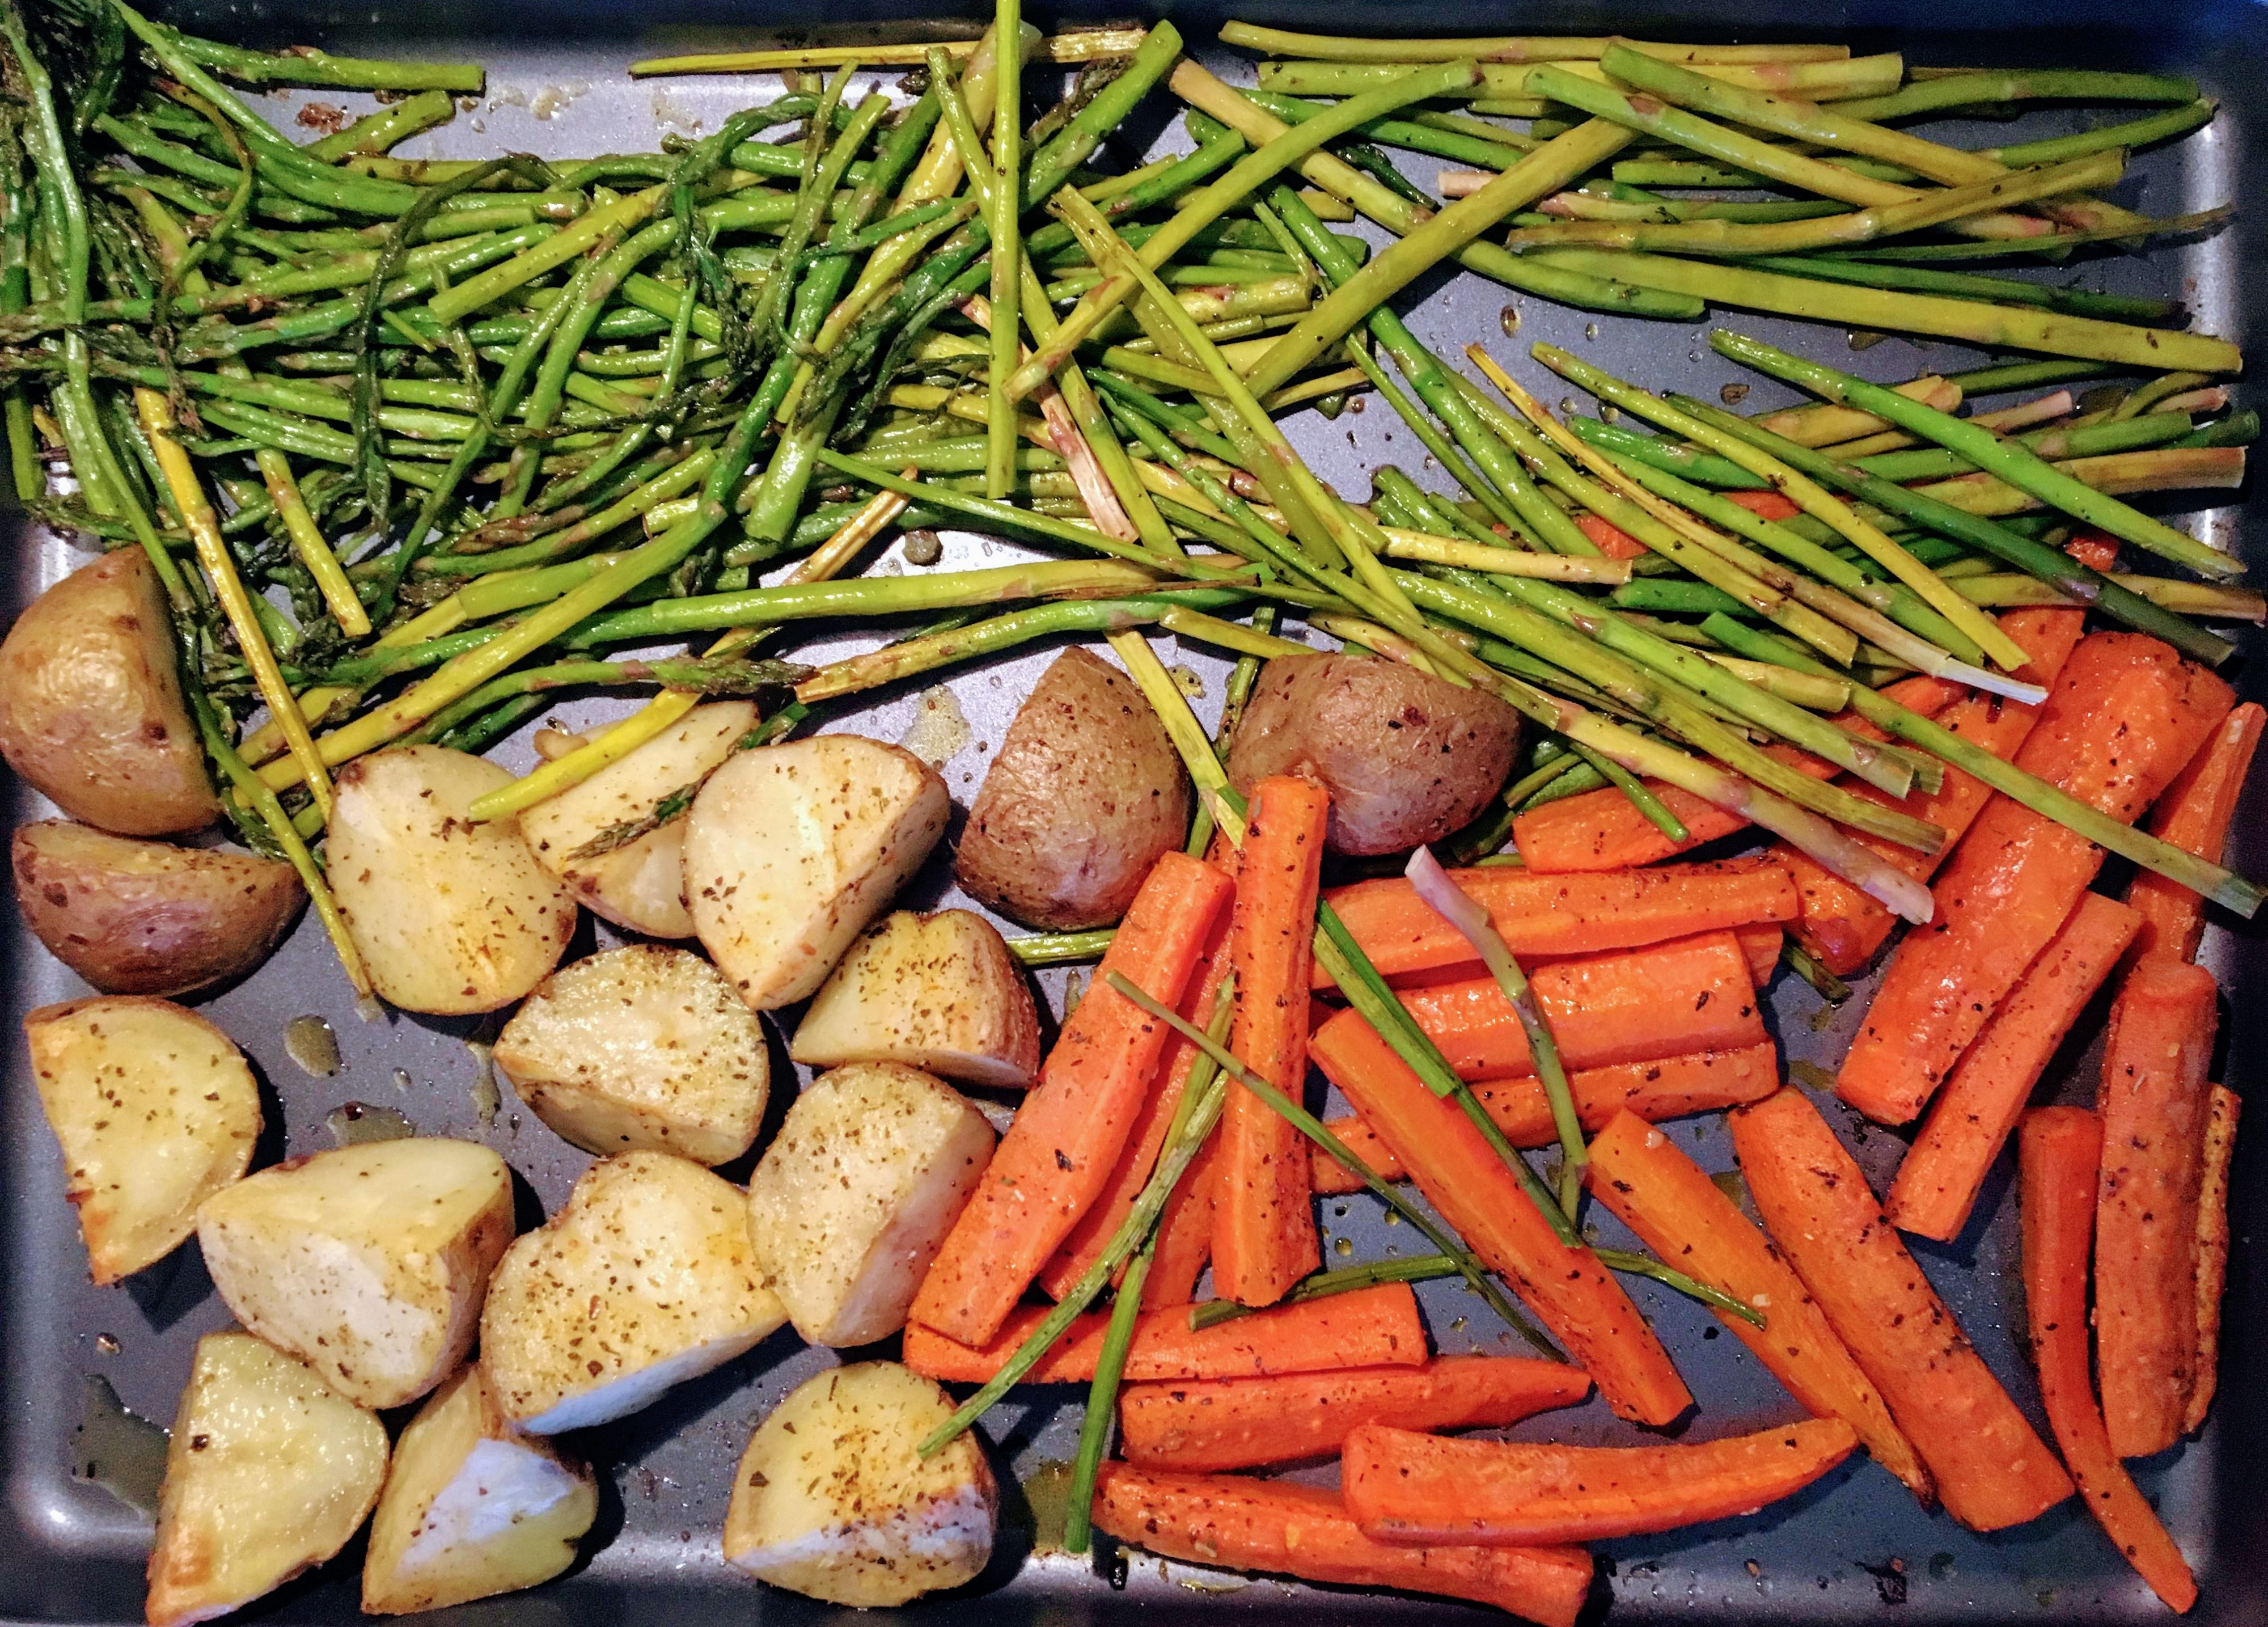
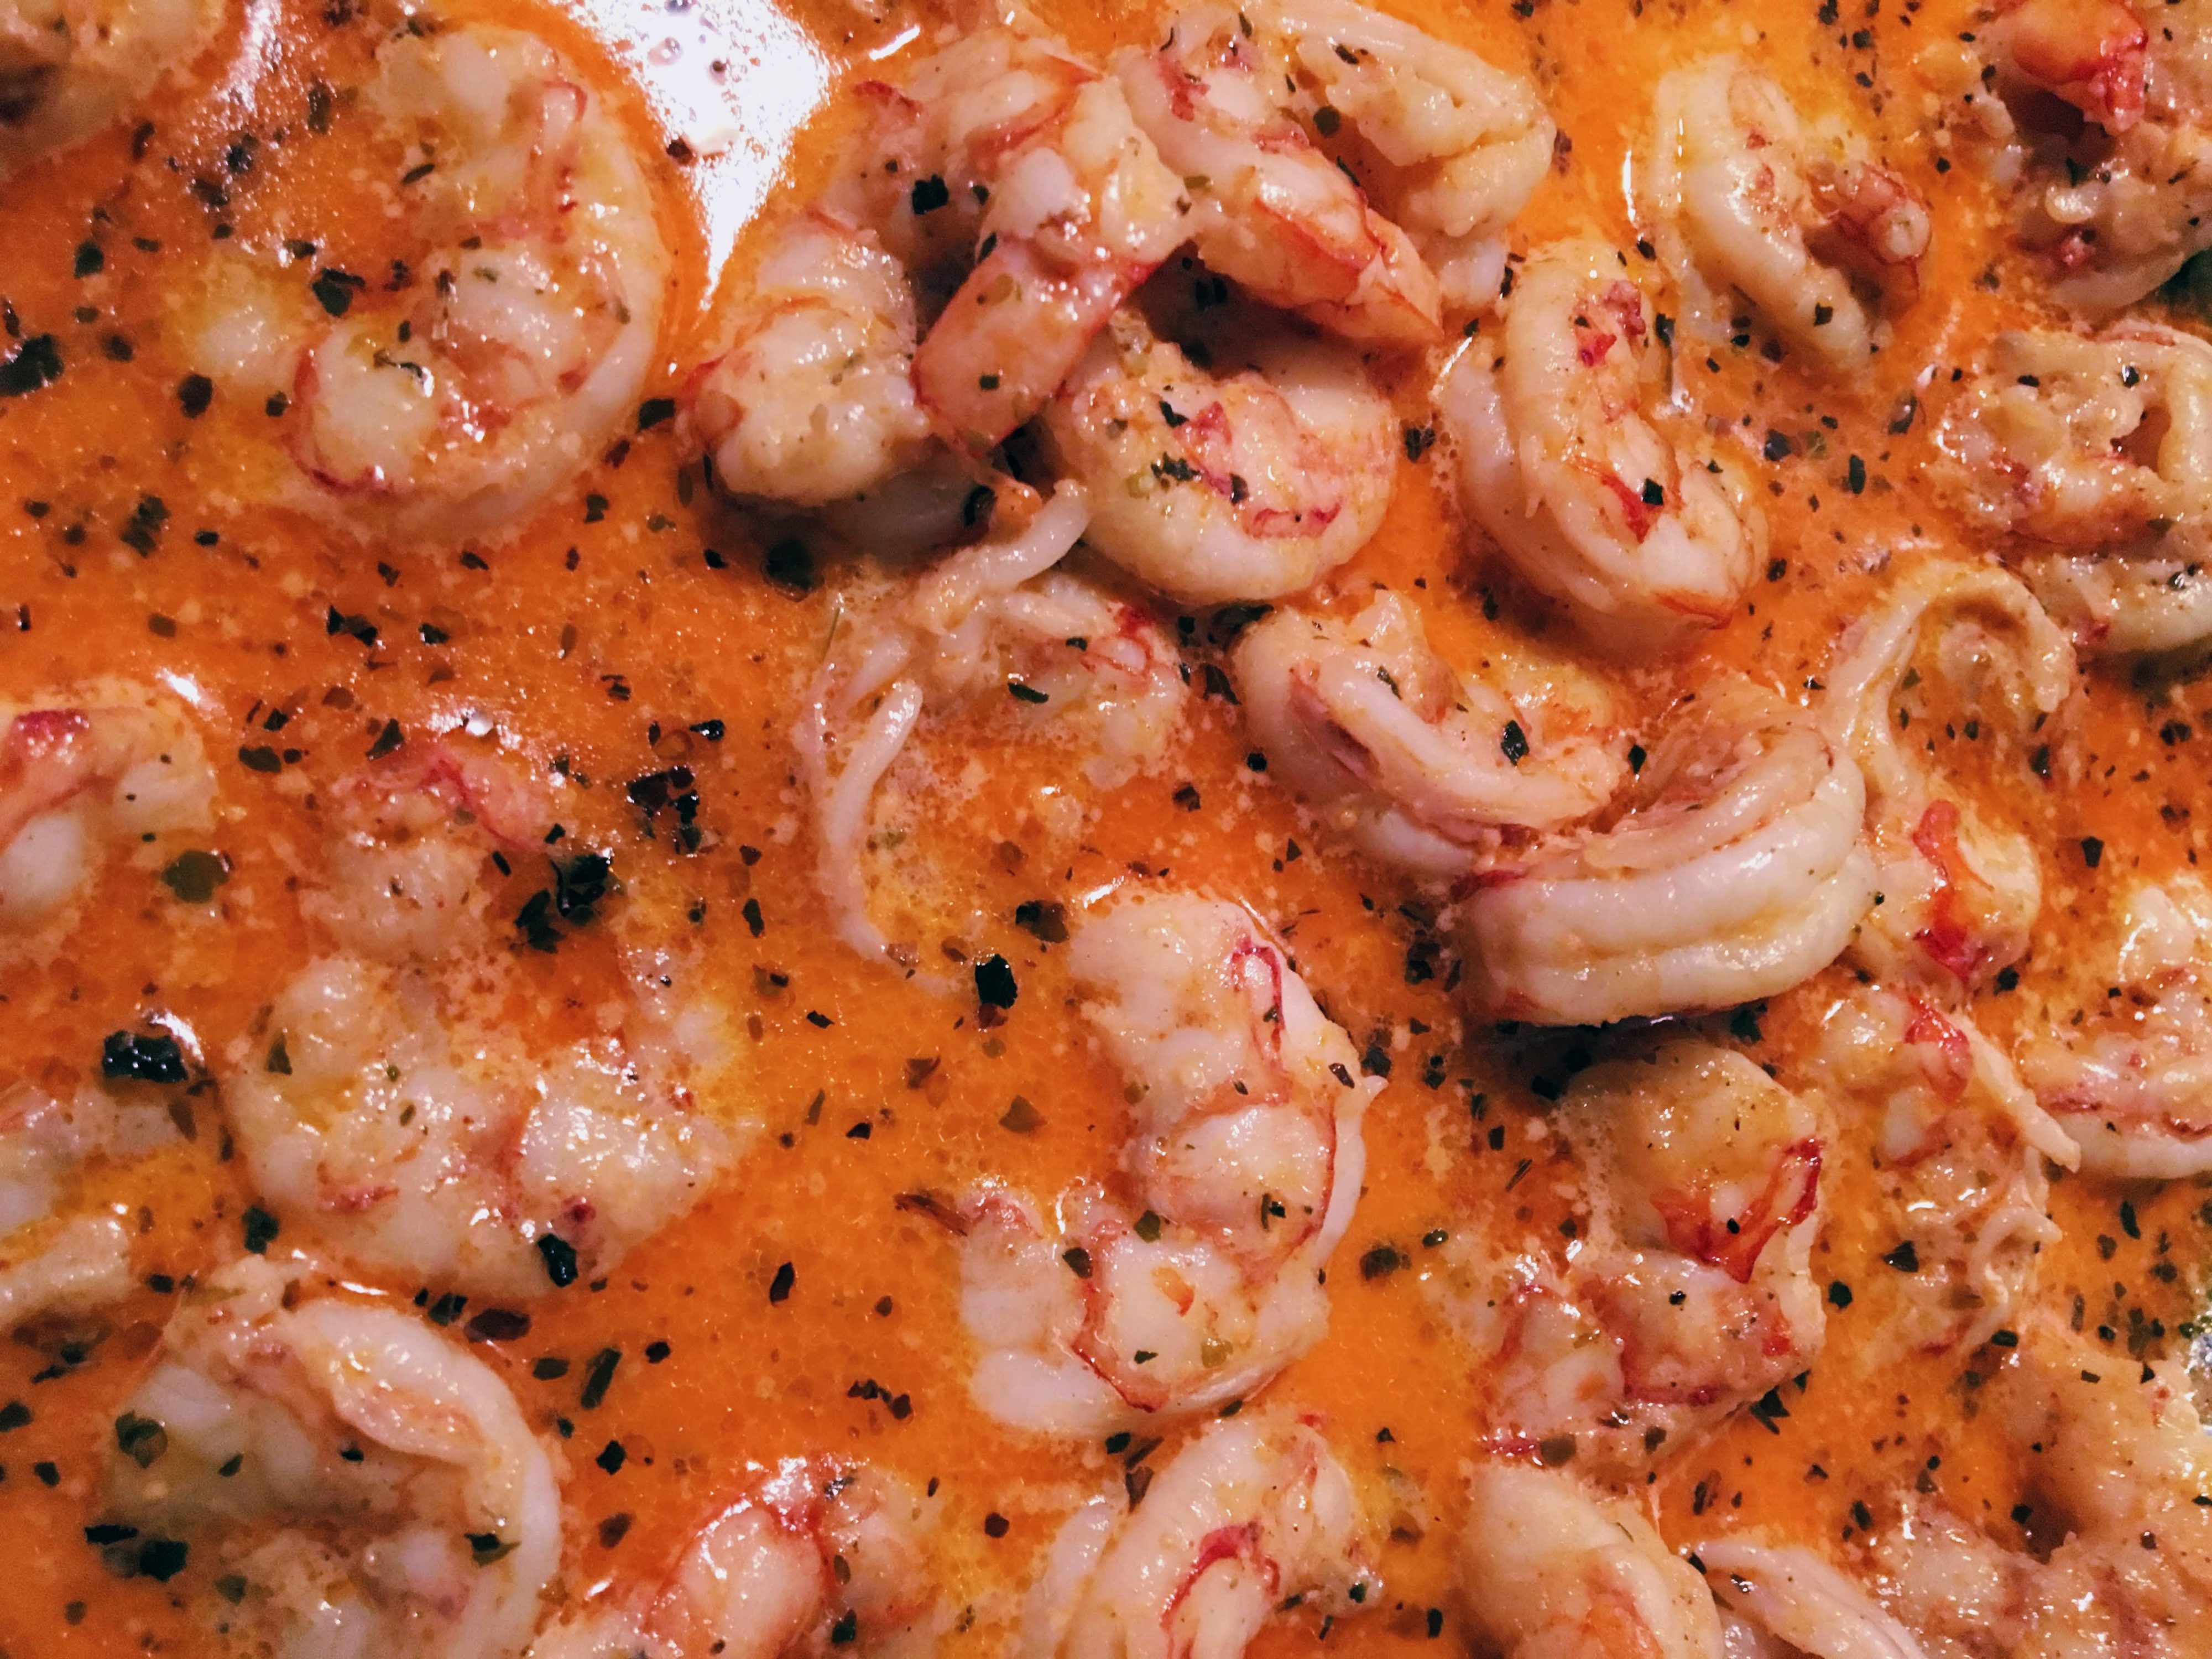
Another week has come and gone, which means another Sunday spent cooking. After the success of my roasted red pepper shrimp pasta last month, we picked up another package of fancy shrimp from Trader Joe’s while we were out and about, and that became the base of this meal. You don’t have to go out of your way to pick up a special ingredient, though! This works just as well with regular shrimp; I just happened to have the Argentinian reds on hand. Plus, you can use any vegetables you happen to have in your fridge for your side dish. It’s a very versatile recipe!
This recipe makes four servings.
Ingredients:
- 2 lbs (about 40-50) shrimp, peeled and deveined
- 3 medium potatoes
- 3 large carrots
- 1 lb (about 1 bunch) asparagus
- 1 tbsp olive oil
- 4 tsp Cajun seasoning (see my recipe here!), divided
- 1 tbsp minced garlic
- 6 tbsp butter
- ¼ cup heavy cream
Directions:
- Preheat your oven to 400F.
- Wash and slice your vegetables, cutting your potatoes into quarters, carrots into eighths, and asparagus into halves.
- Add vegetables to a large mixing bowl and toss with olive oil and 2 tsp Cajun seasoning.
- Spread carrots and potatoes on a large nonstick baking sheet, keeping the asparagus aside. Bake carrots and potatoes for 20 minutes.
- Remove pan from oven and add asparagus. Return pan to the oven and bake for an additional 20 minutes.
- While your vegetables are roasting, heat a large skillet pan on medium high heat. Add butter, minced garlic, and remaining 2 tsp Cajun seasoning. Cook until butter is melted and spices fragrant.
- Add shrimp to skillet with melted “compound butter” and pan-fry until cooked all the way through.
- Remove cooked shrimp and set aside, leaving any remaining juices and spices in the pan. Add heavy cream to the hot pan and stir to combine. Simmer for 3-4 minutes, then remove from heat and return shrimp to the pan with the cream sauce. Toss to coat.
- Serve immediately with roasted vegetables, or divide into meal prep containers. If desired, pour leftover cream sauce over meals.
This recipe keeps in the fridge for a week, and reheats well in the microwave.

Creamy Cajun Shrimp with Roasted Vegetables Meal Prep
Ingredients
- 40-50 shrimp peeled and deveined
- 3 potatoes medium
- 3 carrots large
- 1 bunch asparagus
- 1 tbsp olive oil
- 4 tsp Cajun seasoning divided
- 1 tbsp garlic minced
- 6 tbsp butter
- ¼ cup heavy cream
Instructions
- Preheat your oven to 400F.
- Wash and slice your vegetables, cutting your potatoes into quarters, carrots into eighths, and asparagus into halves.
- Add vegetables to a large mixing bowl and toss with olive oil and 2 tsp Cajun seasoning.
- Spread carrots and potatoes on a large nonstick baking sheet, keeping the asparagus aside. Bake carrots and potatoes for 20 minutes.
- Remove pan from oven and add asparagus. Return pan to the oven and bake for an additional 20 minutes.
- While your vegetables are roasting, heat a large skillet pan on medium high heat. Add butter, minced garlic, and remaining 2 tsp Cajun seasoning. Cook until butter is melted and spices fragrant.
- Add shrimp to skillet with melted “compound butter” and pan-fry until cooked all the way through.
- Remove cooked shrimp and set aside, leaving any remaining juices and spices in the pan. Add heavy cream to the hot pan and stir to combine. Simmer for 3-4 minutes, then remove from heat and return shrimp to the pan with the cream sauce. Toss to coat.
- Serve immediately with roasted vegetables, or divide into meal prep containers. If desired, pour leftover cream sauce over meals.
The post Creamy Cajun Shrimp with Roasted Vegetables Meal Prep appeared first on I Forgot Salt!.
]]>The post Pan-Roasted Swordfish Steaks with Zucchini and Green Beans appeared first on I Forgot Salt!.
]]>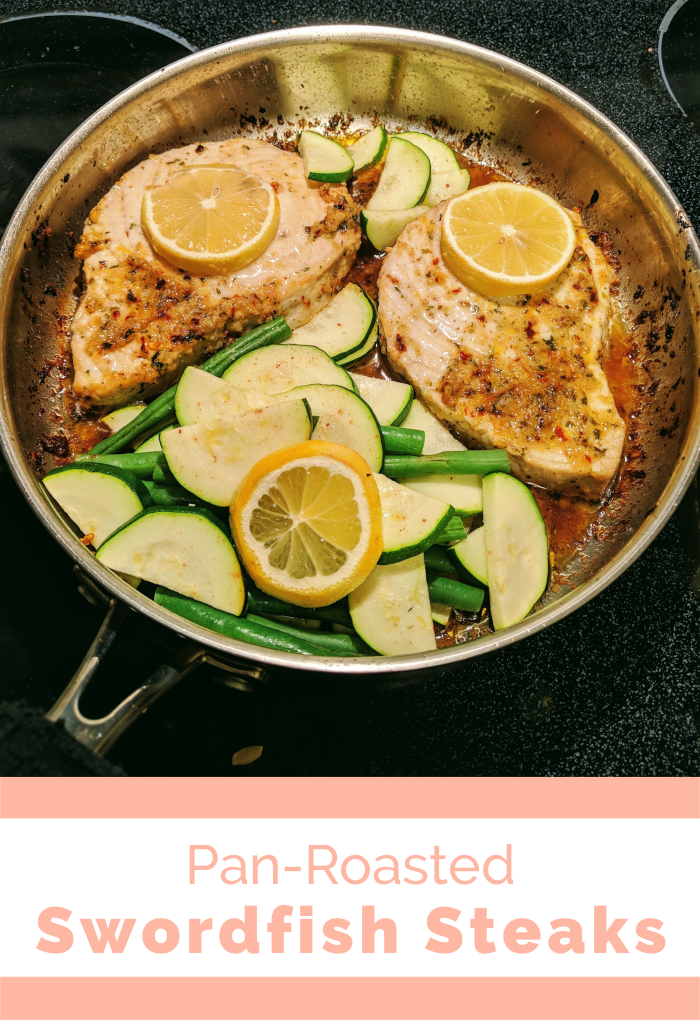
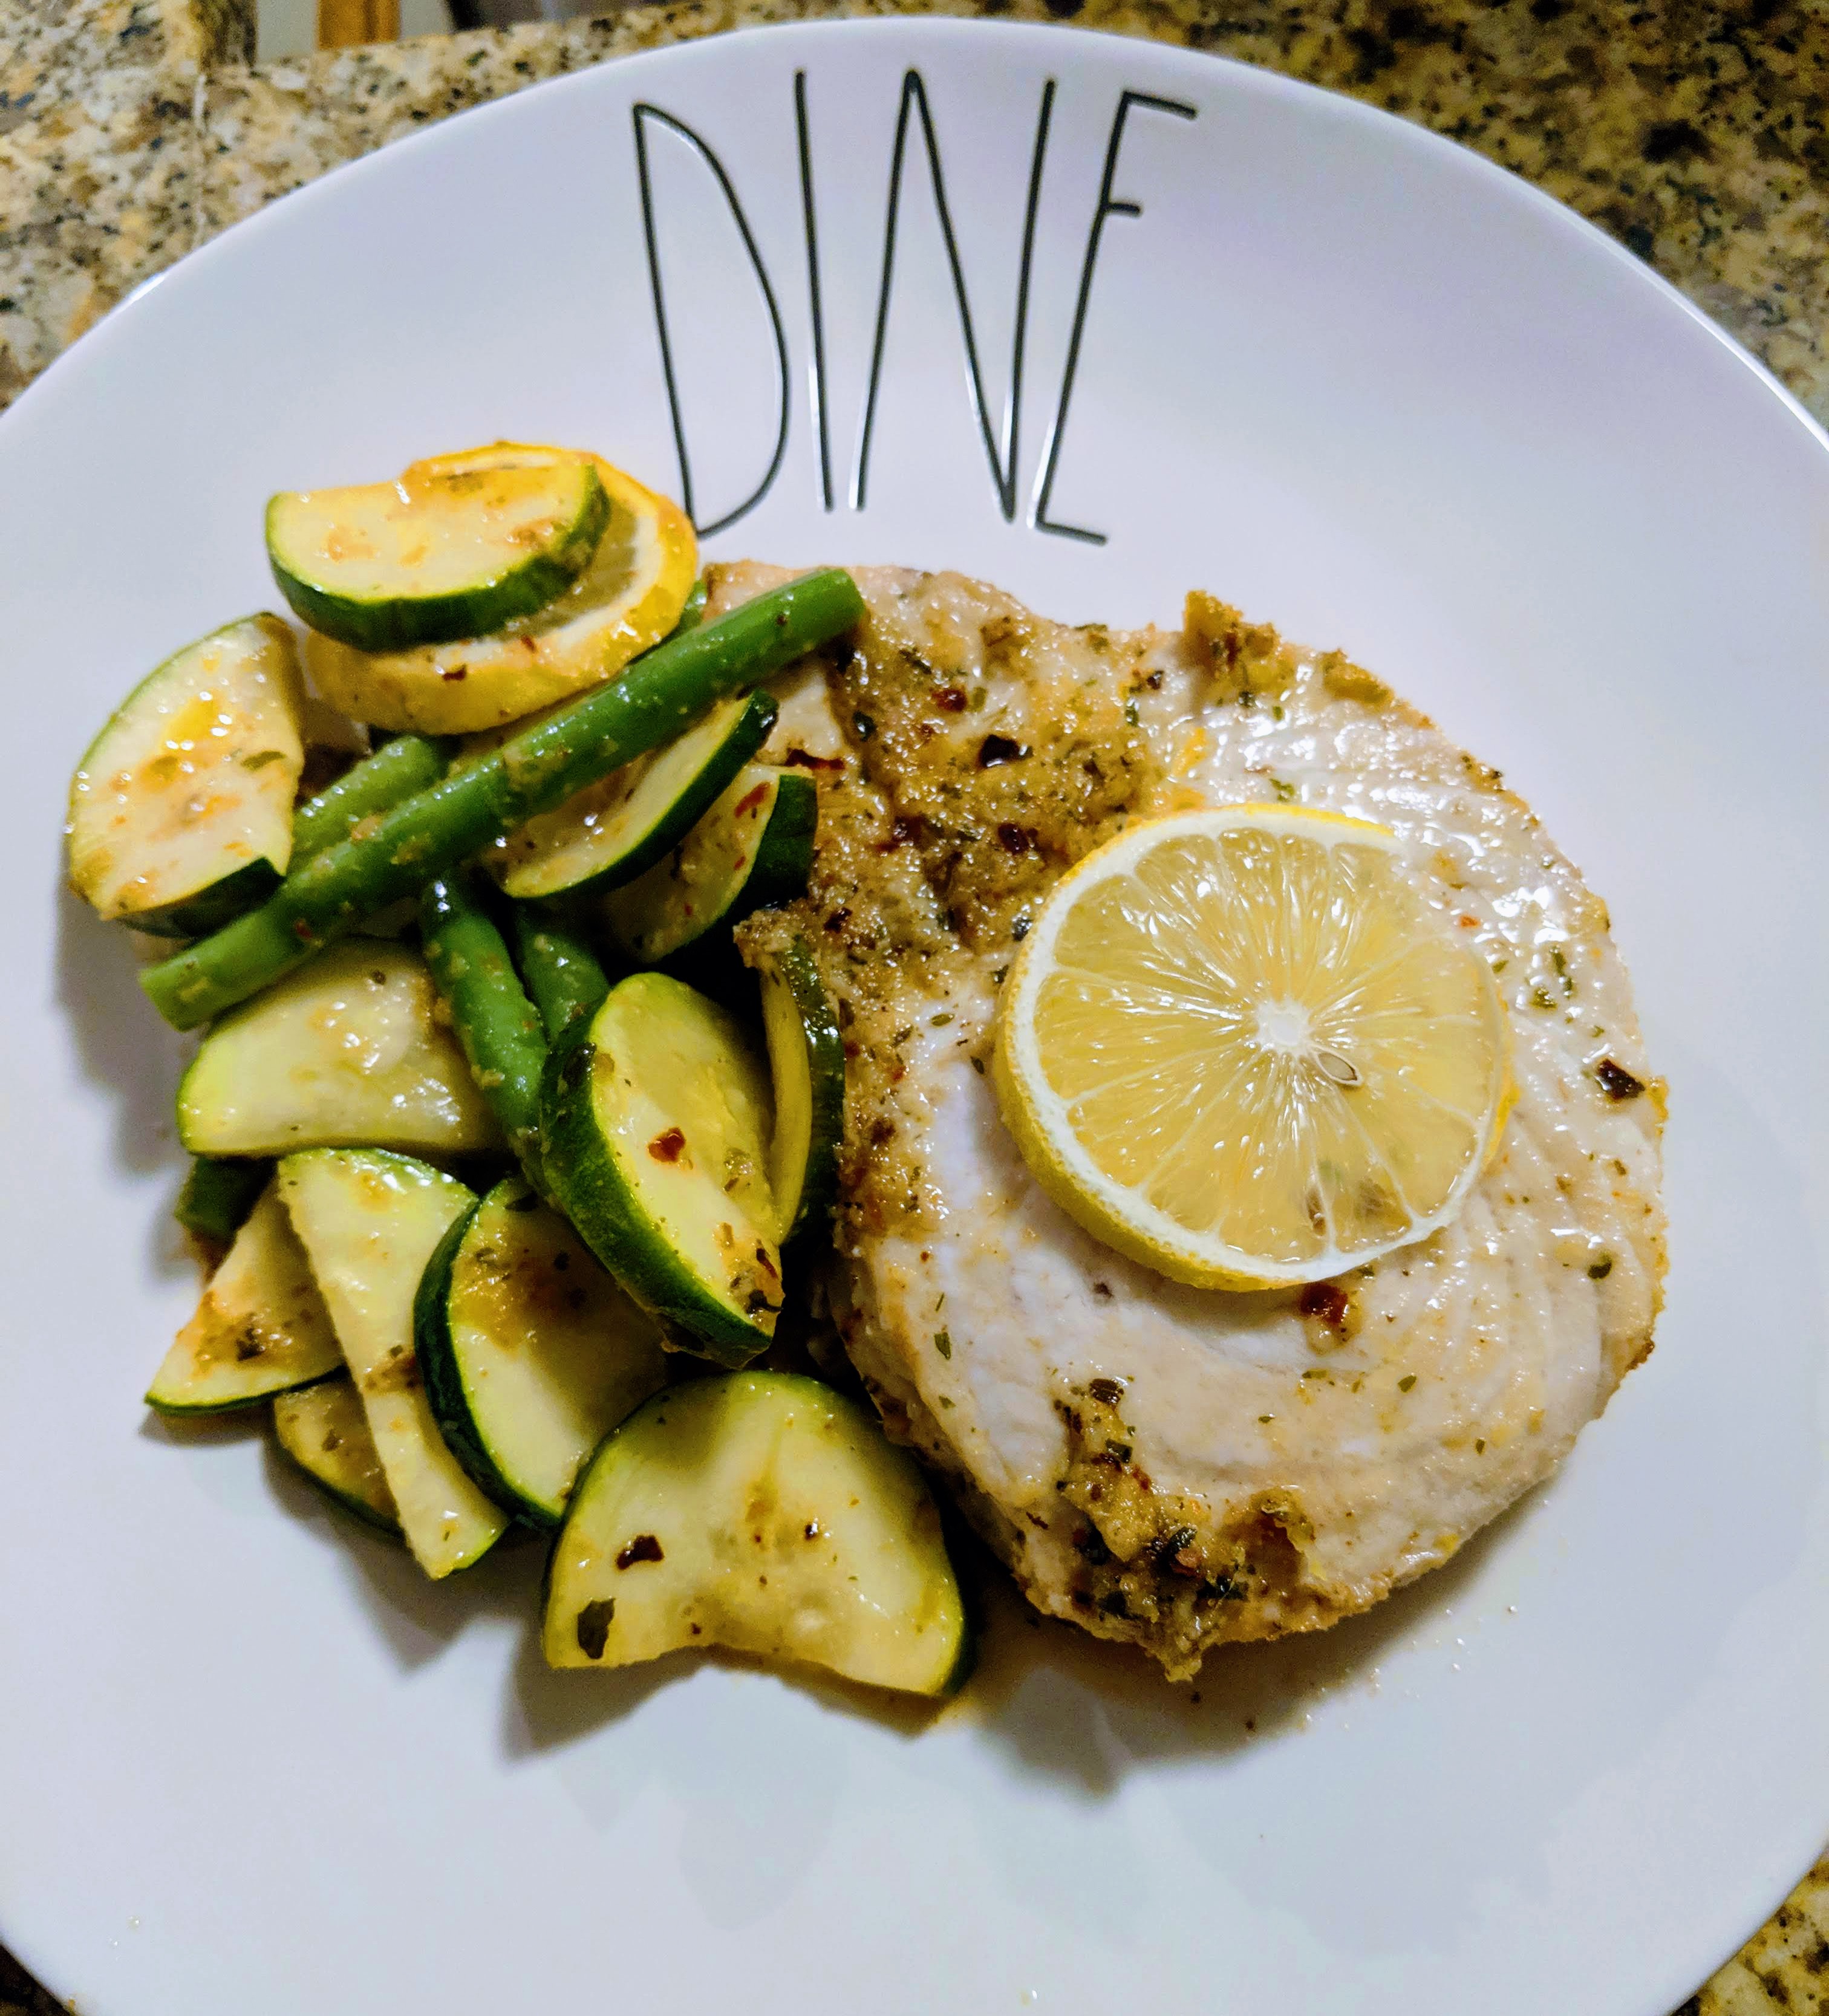
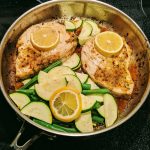
Every now and then I’ll splurge when grocery shopping. This weekend we came across fresh swordfish at Wegman’s, and decided to purchase some as a nice treat. It’s surprisingly hard to find down here–especially at a reasonable price–and while I’d only ever had it at fancy restaurants on special occasions, it was a nice taste of home for Alex. Being from an Italian family in New England, he was raised on a veritable plethora of seafood I would consider “exotic”, and it’s been exciting for me to try things I’d never been exposed to growing up.
If you can’t find swordfish in your area or would prefer a cheaper alternative, this will also work for any thick cut of white fish you have! This recipe is also a great low-carb meal, clocking in at about 4 carbs per serving.
This recipe makes 2 servings.
Ingredients:
- 2 ½ lb swordfish steaks
- 6 tbsp butter
- 1 tbsp minced garlic
- 1 tbsp minced ginger
- 1 tbsp dried parsley
- 1 tbsp dried oregano
- ½ tbsp dried red pepper flakes
- 2 tsp salt, divided
- 1 tbsp lemon zest (about 1 lemon)
- 1 tbsp lemon juice (about ½ lemon)
- ½ lemon, sliced
- 1 medium zucchini, sliced
- ½ cup fresh green beans
Directions:
- Preheat oven to 400F.
- In a small microwave-safe bowl, melt 6 tbsp butter. When liquid, add garlic, ginger, parsley, oregano, red pepper flakes, lemon zest, lemon juice, and 1 tsp salt. Mix thoroughly until combined.
- Heat a large oven-safe (cast iron or stainless steel) skillet pan on medium/medium-high heat. When warm, add butter mixture.
- Add swordfish steaks and sear on one side until browned, about 2-3 minutes. Flip and sear remaining side for an additional 2-3 minutes, basting with hot melted butter mixture to coat the cooked side with herbs and spices.
- Move seared fish steaks to one side of the pan and add sliced green beans and zucchini. Sprinkle remaining 1 tsp salt over vegetables. Top with sliced lemon.
- Place entire pan in the heated oven for 10-12 minutes, or until the internal temperature has reached 145F. (NOTE: Unlike most other seafood, swordfish is prone to host bacteria and parasites that are gross and terrifying. It’s very important that you cook it all the way through to the correct internal temperature. Also, do not ever Google anything related to fish parasites. I almost went back to vegetarianism after reading the article headlines alone.)
- When finished baking, remove fish and toss cooked vegetables in browned herb butter leftover in the pan until coated. Serve.
This recipe does not keep well in the fridge, so be sure to eat everything you cook!
Pan-Roasted Swordfish Steaks with Zucchini and Green Beans
Ingredients
- 2 ½ lb swordfish steaks
- 6 tbsp butter
- 1 tbsp garlic minced
- 1 tbsp ginger minced
- 1 tbsp dried parsley
- 1 tbsp dried oregano
- ½ tbsp dried red pepper flakes
- 2 tsp salt divided
- 1 tbsp lemon zest about 1 lemon
- 1 tbsp lemon juice about ½ lemon
- ½ lemon sliced
- 1 medium zucchini sliced
- ½ cup fresh green beans
Instructions
- Preheat oven to 400F.
- In a small microwave-safe bowl, melt 6 tbsp butter. When liquid, add garlic, ginger, parsley, oregano, red pepper flakes, lemon zest, lemon juice, and 1 tsp salt. Mix thoroughly until combined.
- Heat a large oven-safe (cast iron or stainless steel) skillet pan on medium/medium-high heat. When warm, add butter mixture.
- Add swordfish steaks and sear on one side until browned, about 2-3 minutes. Flip and sear remaining side for an additional 2-3 minutes, basting with hot melted butter mixture to coat the cooked side with herbs and spices.
- Move seared fish steaks to one side of the pan and add sliced green beans and zucchini. Sprinkle remaining 1 tsp salt over vegetables. Top with sliced lemon.
- Place entire pan in the heated oven for 10-12 minutes, or until the internal temperature has reached 145F.*
- When finished baking, remove fish and toss cooked vegetables in browned herb butter leftover in the pan until coated. Serve.
Notes
- *Unlike most other seafood, swordfish is prone to host bacteria and parasites that are gross and terrifying. It’s very important that you cook it all the way through to the correct internal temperature. Also, do not ever Google anything related to fish parasites. I almost went back to vegetarianism after reading the article headlines alone.
The post Pan-Roasted Swordfish Steaks with Zucchini and Green Beans appeared first on I Forgot Salt!.
]]>The post Low-Carb Keto Crispy Popcorn Chicken appeared first on I Forgot Salt!.
]]>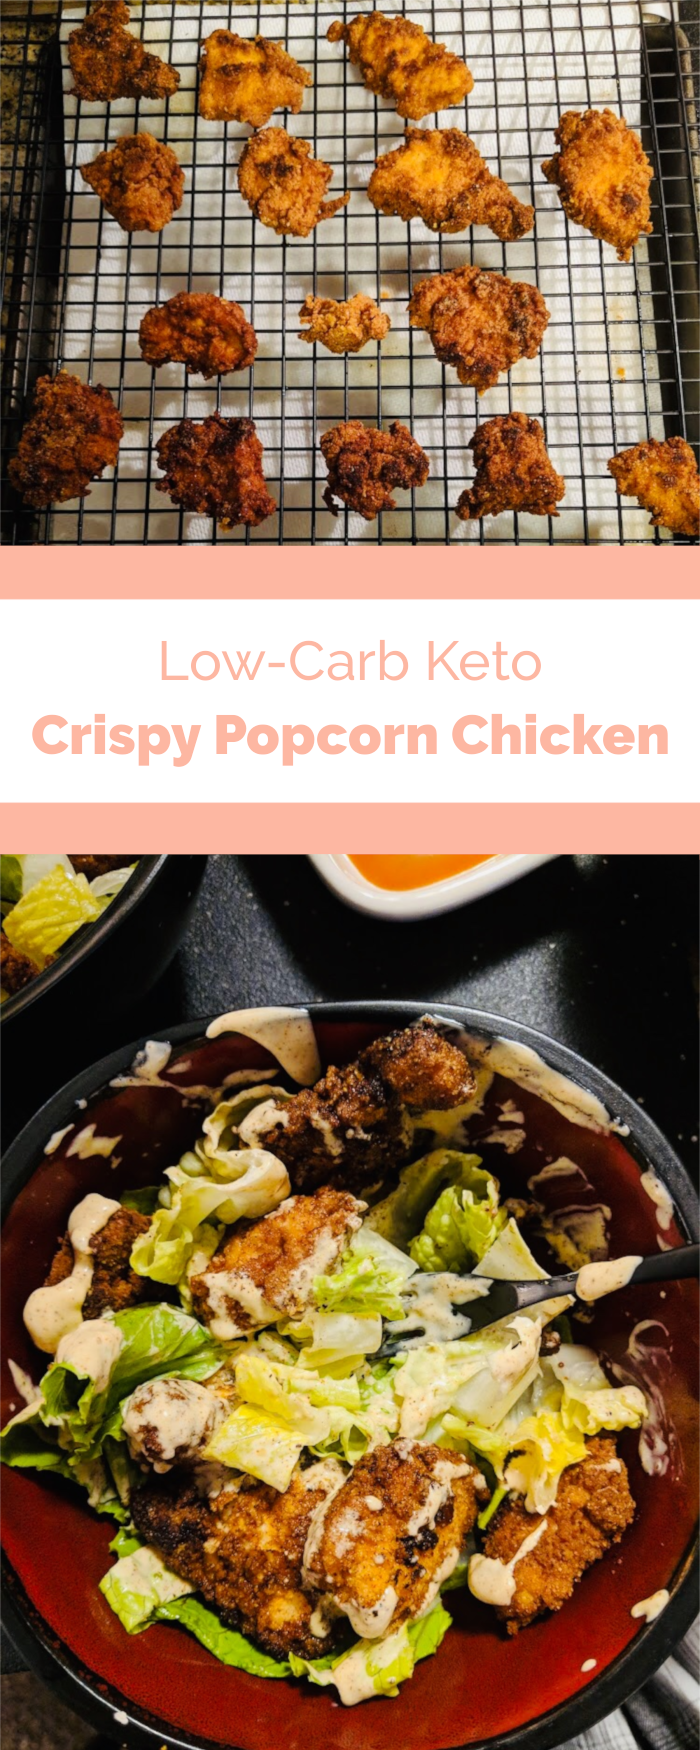
I actually made this recipe a few weeks ago, back when I was on my salad kick. I thought I had forgotten to take any pictures, but it turns out Alex had me covered! I’ve since moved away from making really intense low-carb meals (and transitioned to a lazy keto approach) but this was one of my more exciting achievements while deep into the diet. These popcorn chicken bites are great as a standalone snack or as part of a meal!
This meal comes out to about 2 carbs per popcorn chicken piece, so 12 carbs per serving of 6 popcorn chicken “nuggets”.
This recipe makes 24 pieces, depending on the size of your chicken breasts.
Ingredients:
- 2 large chicken breasts
- 3 eggs
- ¼ cup heavy cream
- 2 cups sieved (or super fine) almond flour
- 2 tsp paprika
- 2 tsp garlic powder
- 1 tsp salt
- ½ tsp black pepper
- 1 tsp cayenne pepper (optional)
- 1 – 2 ½ cups avocado or coconut oil, depending on pan size
Directions:
- Slice chicken into bite-sized pieces, about 1 – 1 ½ inch chunks.
- In a large bowl, mix eggs and heavy cream. Stir until completely combined.
- Add chicken to the cream/egg marinade and mix until each piece is completely covered. Set aside in the fridge for 1 hour or up to overnight.
- When your chicken is done marinating, add flour, paprika, garlic, salt, black pepper, and cayenne pepper (optional). Mix lightly to combine.
- In a large stainless steel skillet pan, heat enough oil to cover the bottom of the pan to about an inch.
- When your oil is hot, transfer each individual piece of chicken from the marinade to the dry ingredient mixture (this is called “dredging”, I believe), making sure it is completely covered. Shake off any excess flour and carefully place into the oil. Repeat until your pan is full.
- Cook each piece of chicken 2-3 minutes on each side, for a total of 5-6 minutes depending on the size of your chicken. Carefully remove from the hot oil and place on a wire rack or a plate lined with paper towels to soak up any excess oil. Repeat until you’ve cooked all of your chicken in batches.
- Serve with your favorite dipping sauce or as protein for a salad!
This recipe keeps for three days in the refrigerator, and reheats well in the microwave or broiler.


Low-Carb Keto Crispy Popcorn Chicken
Ingredients
- 2 chicken breasts large
- 3 eggs
- ¼ cup heavy cream
- 2 cups almond flour sieved or super fine
- 2 tsp paprika
- 2 tsp garlic powder
- 1 tsp salt
- ½ tsp black pepper
- 1 tsp cayenne pepper optional
- 1 – 2 ½ cups avocado or coconut oil depending on pan size
Instructions
- Slice chicken into bite-sized pieces, about 1 – 1 ½ inch chunks.
- In a large bowl, mix eggs and heavy cream. Stir until completely combined.
- Add chicken to the cream/egg marinade and mix until each piece is completely covered. Set aside in the fridge for 1 hour or up to overnight.
- When your chicken is done marinating, add flour, paprika, garlic, salt, black pepper, and cayenne pepper (optional). Mix lightly to combine.
- In a large stainless steel skillet pan, heat enough oil to cover the bottom of the pan to about an inch.
- When your oil is hot, transfer each individual piece of chicken from the marinade to the dry ingredient mixture (this is called “dredging”, I believe), making sure it is completely covered. Shake off any excess flour and carefully place into the oil. Repeat until your pan is full.
- Cook each piece of chicken 2-3 minutes on each side, for a total of 5-6 minutes depending on the size of your chicken. Carefully remove from the hot oil and place on a wire rack or a plate lined with paper towels to soak up any excess oil. Repeat until you’ve cooked all of your chicken in batches.
- Serve with your favorite dipping sauce or as protein for a salad!
The post Low-Carb Keto Crispy Popcorn Chicken appeared first on I Forgot Salt!.
]]>The post Slow Cooker Chicken Tikka Masala Curry appeared first on I Forgot Salt!.
]]>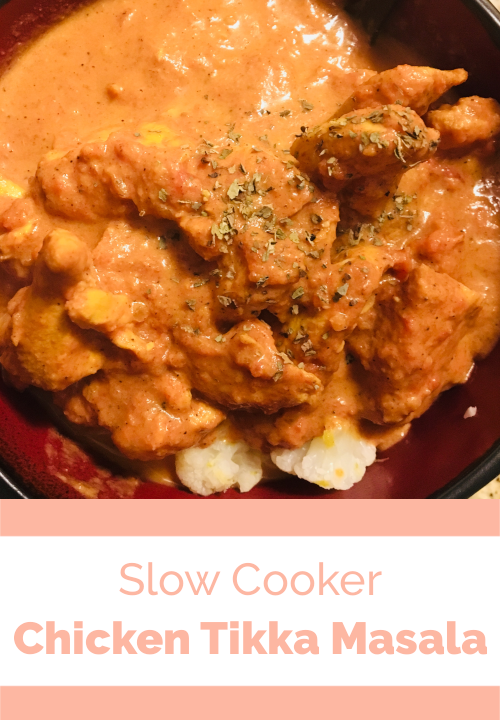
If you know me, you know that I’m a huge fan of curries. They’re incredibly simple to make and they always taste delicious. Although Thai red curry is my absolute favorite, the classic Indian and British butter chicken and chicken tikka masala dishes are tied for a close second. In fact, Monday curry nights at my house actually started with frozen chicken tikka from the grocery store (before I realized how easy all of it is to cook). Originally, my plan for yesterday’s dinner was to make it on the stove like a normal person, but I took a nasty fall in the kitchen Sunday night and had neither the will nor energy to stand in front of a stock pot for two hours when the time for curry came knocking. Instead, I pulled out the slow cooker and sat in a chair while I (quite literally) threw everything together.
Chicken tikka masala is another great low-carb option for anyone on a health kick this year (as most curries are) clocking in at 7.5 net carbs when served without a starch or side and 9 net carbs when served with ½ cup cauliflower rice.
This recipe makes four to five servings.
Ingredients:
- 3-4 chicken breasts
- 1 can (about 28 oz) crushed tomatoes
- 2 tbsp minced garlic
- 2 tbsp minced ginger
- 3 tbsp olive oil
- 2 tbsp garam masala
- 2 tsp cumin
- 2 tsp paprika
- 2 tsp onion powder
- 2 tsp salt
- 1 tsp tumeric
- 1 tsp black pepper
- 1 tsp dried basil
- ¾ tsp cinnamon
- ½ tsp cayenne pepper
- 1 cup heavy cream
- 1 tbsp cornstarch
- 2 tbsp (about 1 lime) lime juice
Directions:
- Slice chicken breasts into bite size pieces, about 1 inch chunks.
- Lightly grease the inside of your crock pot or slow cooker with olive oil.
- Add chicken, tomatoes, minced garlic, minced ginger, garam masala, cumin, paprika, onion powder, salt, tumeri, black pepper, basil, cinnamon, and cayenne pepper into the slow cooker. Stir to combine.
- Cook on low for 8 hours or high for 4 hours (I did the latter).
- After the timer finishes, add cream and cornstarch to the slow cooker, stir, and cook for an additional 30 minutes.
- Add lime juice and stir. Serve over rice or riced cauliflower.
This recipe keeps for up to 3 days in the fridge, and reheats great in the microwave. (In fact, I just ate my leftover portion before writing this!)


Slow Cooker Chicken Tikka Masala
Ingredients
- 3-4 chicken breasts
- 1 can crushed tomatoes about 28 oz
- 2 tbsp minced garlic
- 2 tbsp minced ginger
- 3 tbsp olive oil
- 2 tbsp garam masala
- 2 tsp cumin
- 2 tsp paprika
- 2 tsp onion powder
- 2 tsp salt
- 1 tsp tumeric
- 1 tsp black pepper
- 1 tsp dried basil
- ¾ tsp cinnamon
- ½ tsp cayenne pepper
- 1 cup heavy cream
- 1 tbsp cornstarch
- 2 tbsp lime juice about 1 lime
Instructions
- Slice chicken breasts into bite size pieces, about 1 inch chunks.
- Lightly grease the inside of your crock pot or slow cooker with olive oil.
- Add chicken, tomatoes, minced garlic, minced ginger, garam masala, cumin, paprika, onion powder, salt, tumeri, black pepper, basil, cinnamon, and cayenne pepper into the slow cooker. Stir to combine.
- Cook on low for 8 hours or high for 4 hours (I did the latter).
- After the timer finishes, add cream and cornstarch to the slow cooker, stir, and cook for an additional 30 minutes.
- Add lime juice and stir. Serve over rice or riced cauliflower.
The post Slow Cooker Chicken Tikka Masala Curry appeared first on I Forgot Salt!.
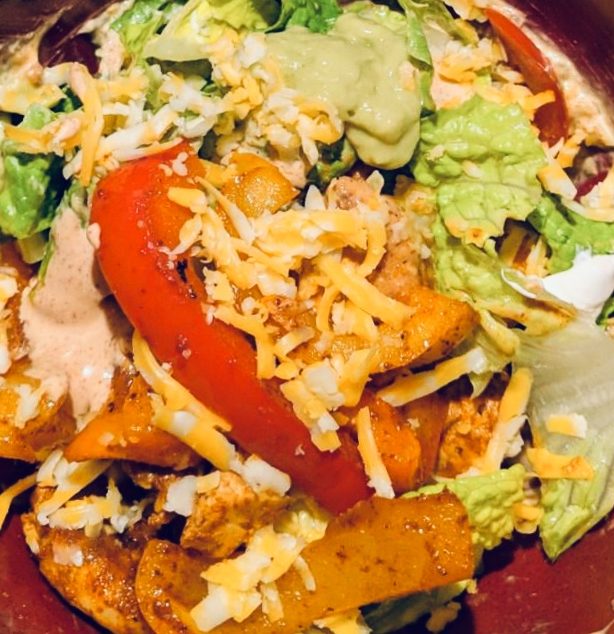
]]>The post Southwest Chicken Salad appeared first on I Forgot Salt!.
]]>
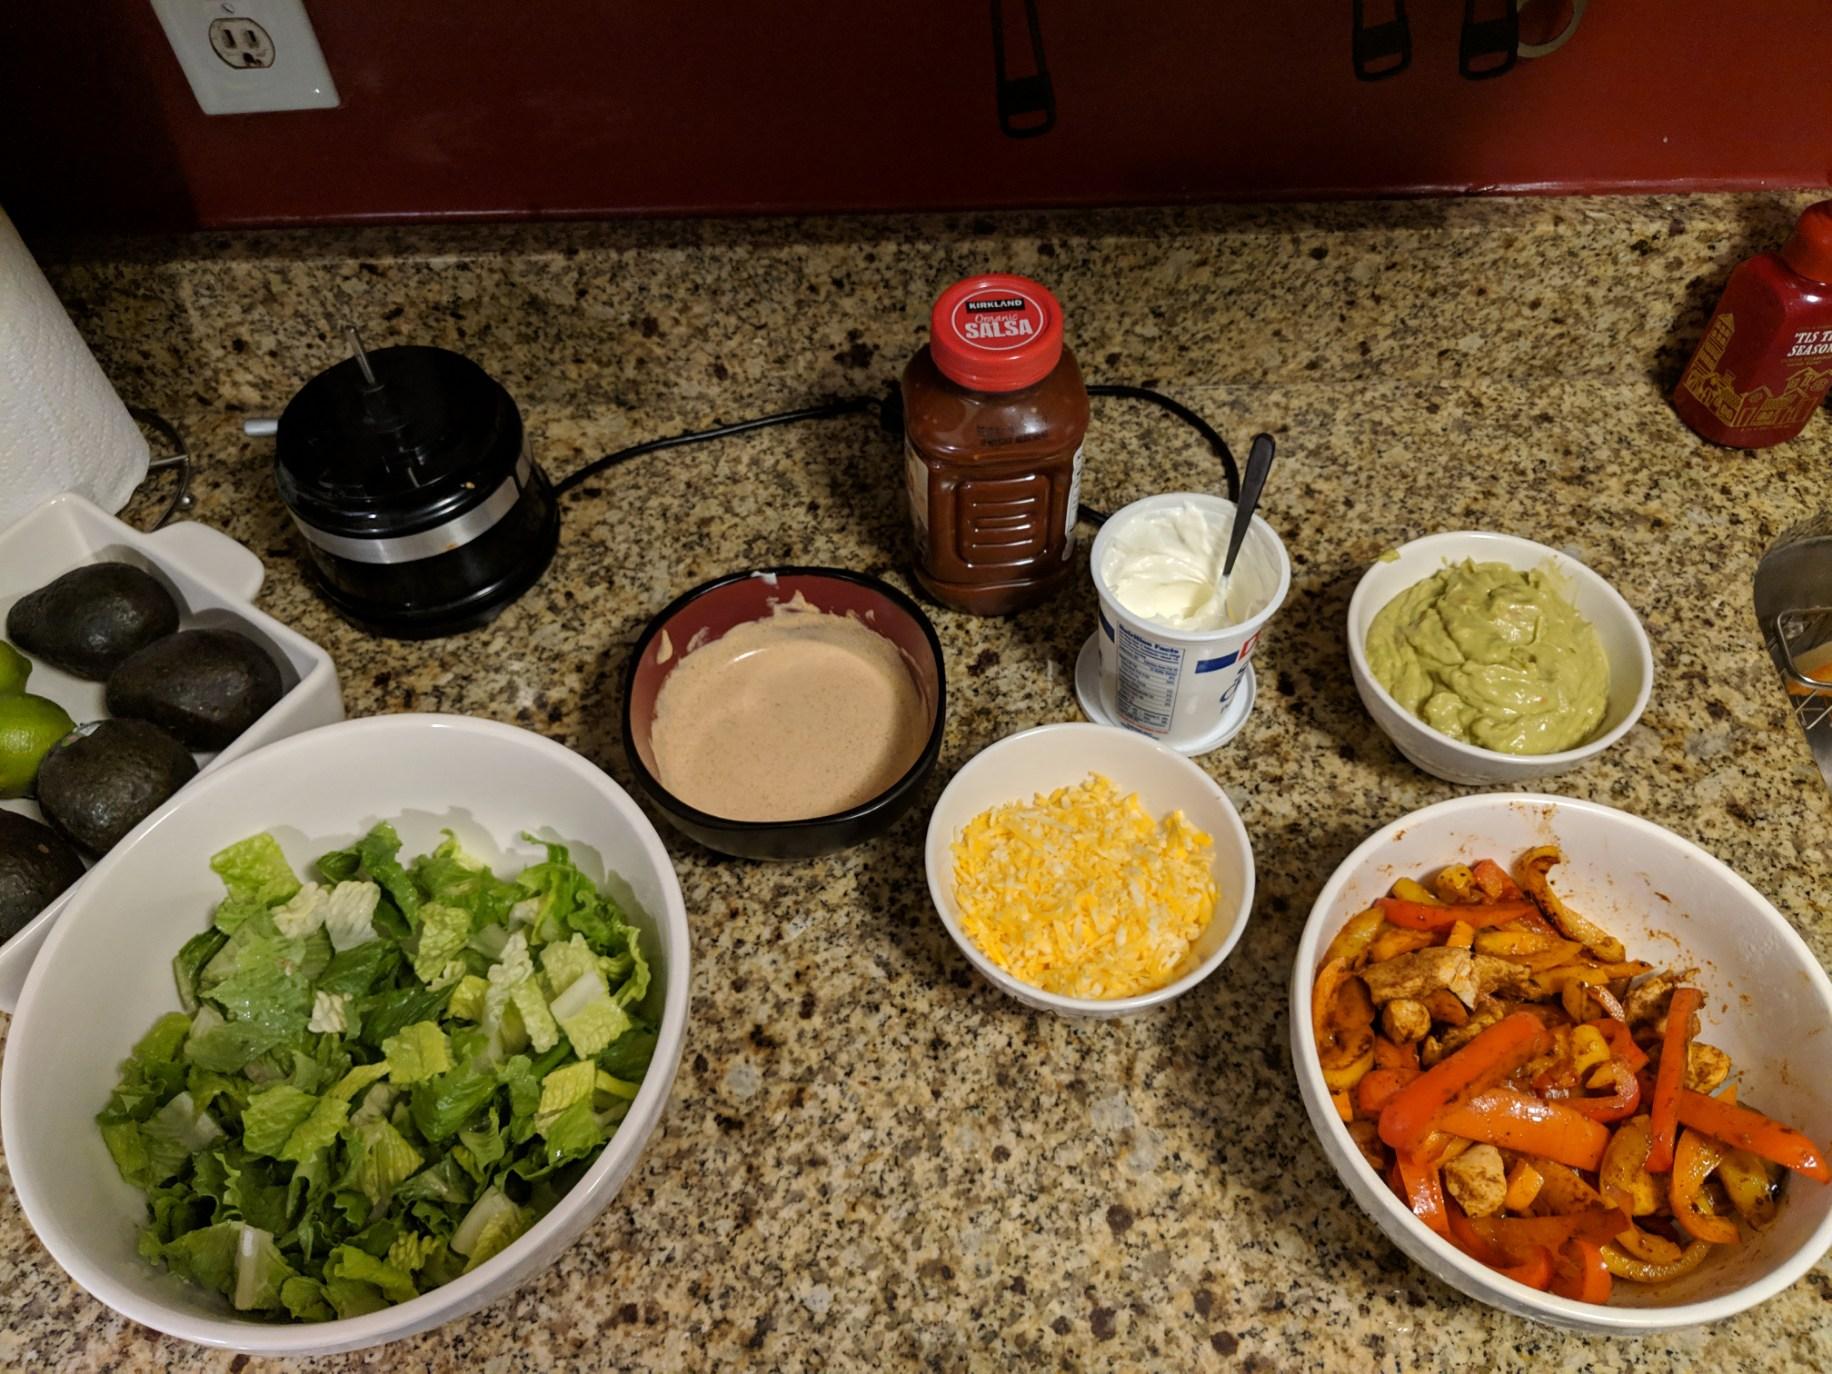
I’m on something of a salad kick lately, probably as a result of my well-intentioned (but likely misguided) New Year’s resolution to “be healthier”. It’s appropriately vague so I don’t feel too terrible about standing in line at Chipotle for the second day in a row, but achievable enough to have me picking lettuce over that devilish rice they serve. In order to save my boyfriend from a third trip to the restaurant in as many days (it’s walking distance from our apartment and I have almost no will-power when it comes to good food) I decided to make my own version of their chicken salads for dinner last night. This is by no means a copycat recipe–although I’ll definitely be trying that sometime soon–but it satisfied my craving nicely both yesterday and with leftovers for lunch this afternoon.
It’s also a great low-carb meal, clocking in at just 7 carbs per serving if you use Hellmann’s Real Mayonnaise (or any other 0 carb mayo) for the dressing, and even less if you substitute a low-carb sour cream.
This recipe makes 4 servings.
Ingredients:
- 6 – 8 chicken tenderloins
- 2 ripe avocados
- 1 medium ripe tomato, diced
- 2 tsp garlic powder
- 4 tsp salt (divided)
- 4 tbsp sour cream
- 2 tbsp lime juice
- 2 bell peppers (red, orange, or yellow)
- 1/3 cup mayonnaise
- 3 tsp fajita seasoning (see my recipe here!) (divided)
- 1 tsp apple cider vinegar
- 1 tsp light oil
- 4 tbsp salsa
- ¾ cup shredded colby jack cheese
- 6 cups chopped lettuce
Directions:
- Chop lettuce, set aside. Slice (or dice) peppers, set aside. Grate cheese, set aside.
- Skin and slice ripe avocado; dice tomato. Add avocado, garlic powder, diced tomato, sour cream, lime juice, and 2 tsp salt to a food processor and blend until smooth (or add to a large mixing bowl and stir with a fork). Set aside. You’ve got guacamole!
- Mix mayonnaise, apple cider vinegar, and 1.5 tsp fajita seasoning in a bowl. Mix until blended together and set aside. You’ve got salad dressing!
- Slice chicken into 1 inch cubes.
- Add light oil to large pan and heat on medium-high heat. Add chicken and remaining 1.5 tsp fajita seasoning. Toss to coat.
- Cook until chicken is slightly browned and remove from heat. Set aside.
- If desired, add peppers to the same pan (without cleaning the remaining oil/seasoning mixture left over) and cook lightly. Diced peppers work best for this method. You can definitely leave them raw, though, and the dish tastes just as great!
- Combine lettuce, peppers, cheese, and chicken. Serve and garnish with guacamole, salsa, and salad dressing.
You can also make a great vegetarian version of this salad by leaving out the chicken and frying mushrooms or pressed tofu in it’s place! It’s definitely a versatile recipe that can be tweaked to fit multiple dietary restrictions!
This recipe keeps great overnight as long as the garnishes are kept in a separate container. Mixing them together before storage makes the salad soggy (although still edible), so for the best leftover results be sure to have a few tupperware containers handy!

Southwest Chicken Salad
Ingredients
- 6 – 8 chicken tenderloins
- 2 ripe avocados
- 1 medium ripe tomato diced
- 2 tsp garlic powder
- 4 tsp salt divided
- 4 tbsp sour cream
- 2 tbsp lime juice
- 2 bell peppers red, orange, or yellow
- 1/3 cup mayonnaise
- 3 tsp fajita seasoning divided
- 1 tsp apple cider vinegar
- 1 tsp light oil
- 4 tbsp salsa
- ¾ cup shredded colby jack cheese
- 6 cups chopped lettuce
Instructions
- Chop lettuce, set aside. Slice (or dice) peppers, set aside. Grate cheese, set aside.
- Skin and slice ripe avocado; dice tomato. Add avocado, garlic powder, diced tomato, sour cream, lime juice, and 2 tsp salt to a food processor and blend until smooth (or add to a large mixing bowl and stir with a fork). Set aside. You’ve got guacamole!
- Mix mayonnaise, apple cider vinegar, and 1.5 tsp fajita seasoning in a bowl. Mix until blended together and set aside. You’ve got salad dressing!
- Slice chicken into 1 inch cubes.
- Add light oil to large pan and heat on medium-high heat. Add chicken and remaining 1.5 tsp fajita seasoning. Toss to coat.
- Cook until chicken is slightly browned and remove from heat. Set aside.
- If desired, add peppers to the same pan (without cleaning the remaining oil/seasoning mixture left over) and cook lightly. Diced peppers work best for this method. You can definitely leave them raw, though, and the dish tastes just as great!
- Combine lettuce, peppers, cheese, and chicken. Serve and garnish with guacamole, salsa, and salad dressing.
The post Southwest Chicken Salad appeared first on I Forgot Salt!.
]]>The post Teriyaki Shrimp Stir-Fry appeared first on I Forgot Salt!.
]]>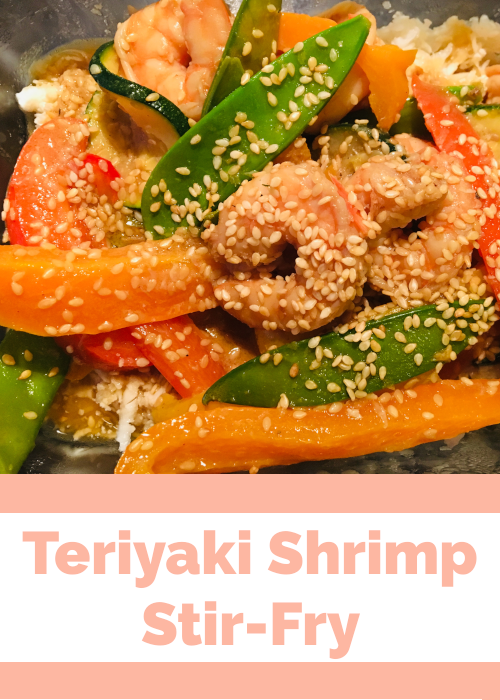
Every Sunday evening (or the Sunday evenings that I have time) I meal-prep lunches for my boyfriend. He’s the household guinea pig for new recipes that I may or may not enjoy myself, and has had to suffer through the likes of experimental orange steak, peanut butter fried rice, and hellfire Szechuan steak with 25 dried chilies. Sometimes, though, I try to be nice, so last night I whipped a huge batch of teriyaki shrimp stir-fry. It’s mild with a little bit of tang–the perfect (and palatable) meal to eat every day for an entire week.
If made with 1 cup cauliflower rice, a single serving of this meal comes out to about 10 net carbs sans cornstarch in the sauce.
This recipe serves four to five when paired with rice or riced cauliflower!
Ingredients:
- 21-25 large shrimp, raw
- 3 bell peppers (red, orange, or yellow), sliced
- 1 zucchini, sliced ¼ in thick
- 1.5 cups snow peas
- ¾ cup soy sauce
- 1.5 tbsp mirin
- 1 tbsp sriracha
- 1.5 tbsp rice vinegar
- 1.5 tbsp light brown sugar
- 2 tbsp minced garlic
- 2 tbsp minced ginger
- 2 tsp white pepper (divided)
- pinch black pepper
- 1 tsp salt
- 1 tsp garlic powder
- 1 tbsp sesame oil
- 2 tbsp water
- 1 tsp cornstarch + ¼ cup water (optional)
Directions:
- Add soy sauce, mirin, sriracha, rice vinegar, brown sugar, minced garlic, minced ginger, black pepper, and 1 tsp white pepper to a medium bowl and stir until combined. (This is your teriyaki sauce.)
- Add sesame oil to a large skillet, pot, or wok and on medium-high heat. When sizzling, add all vegetables, garlic powder, 1 tsp white pepper, salt, and water. Stir to coat and cover for 5-7 minutes or until vegetables are brightly colored.
- Remove vegetables and set aside.
- Add shrimp and teriyaki sauce to the same hot pan/pot/wok. Cook for 10-12 minutes or until shrimp are pink and plump.
- Remove shrimp only (leaving sauce) and set aside with vegetables.
- Simmer sauce until thick. (Add 1 tsp cornstarch + ¼ cup water if it’s not thickening/you’re impatient like me.)
- Remove from heat. Return vegetables and shrimp to the pan/pot/wok with the thickened sauce and toss until coated.
- Serve with rice or riced cauliflower, garnished with sesame seeds or chopped scallions.
This meal can either be eaten immediately or stored in individual containers foor lunch throughout the week. It keeps for up to six days in the refrigerator and reheats fabulously! Enjoy!

Teriyaki Shrimp Stir-Fry
Ingredients
- 21-25 large shrimp raw
- 3 bell peppers red, orange, or yellow, sliced
- 1 zucchini sliced ¼ in thick
- 1½ cups snow peas
- ¾ cup soy sauce
- 1½ tbsp mirin
- 1 tbsp sriracha
- 1½ tbsp rice vinegar
- 1½ tbsp light brown sugar
- 2 tbsp minced garlic
- 2 tbsp minced ginger
- 2 tsp white pepper divided
- pinch black pepper
- 1 tsp salt
- 1 tsp garlic powder
- 1 tbsp sesame oil
- 2 tbsp water
- 1 tsp cornstarch + ¼ cup water optional
Instructions
- Add soy sauce, mirin, sriracha, rice vinegar, brown sugar, minced garlic, minced ginger, black pepper, and 1 tsp white pepper to a medium bowl and stir until combined.
- Add sesame oil to a large skillet, pot, or wok and on medium-high heat. When sizzling, add all vegetables, garlic powder, 1 tsp white pepper, salt, and water. Stir to coat and cover for 5-7 minutes or until vegetables are brightly colored.
- Remove vegetables and set aside.
- Add shrimp and teriyaki sauce to the same hot pan/pot/wok. Cook for 10-12 minutes or until shrimp are pink and plump.
- Remove shrimp only (leaving sauce) and set aside with vegetables.
- Simmer sauce until thick. (Add 1 tsp cornstarch + ¼ cup water if it’s not thickening/you’re impatient like me.)
- Remove from heat. Return vegetables and shrimp to the pan/pot/wok with the thickened sauce and toss until coated.
- Serve with rice or riced cauliflower, garnished with sesame seeds or chopped scallions.
The post Teriyaki Shrimp Stir-Fry appeared first on I Forgot Salt!.
]]>