The post Vegan Buffalo Jackfruit Dip + Garlic Herb Dippers appeared first on I Forgot Salt!.
]]>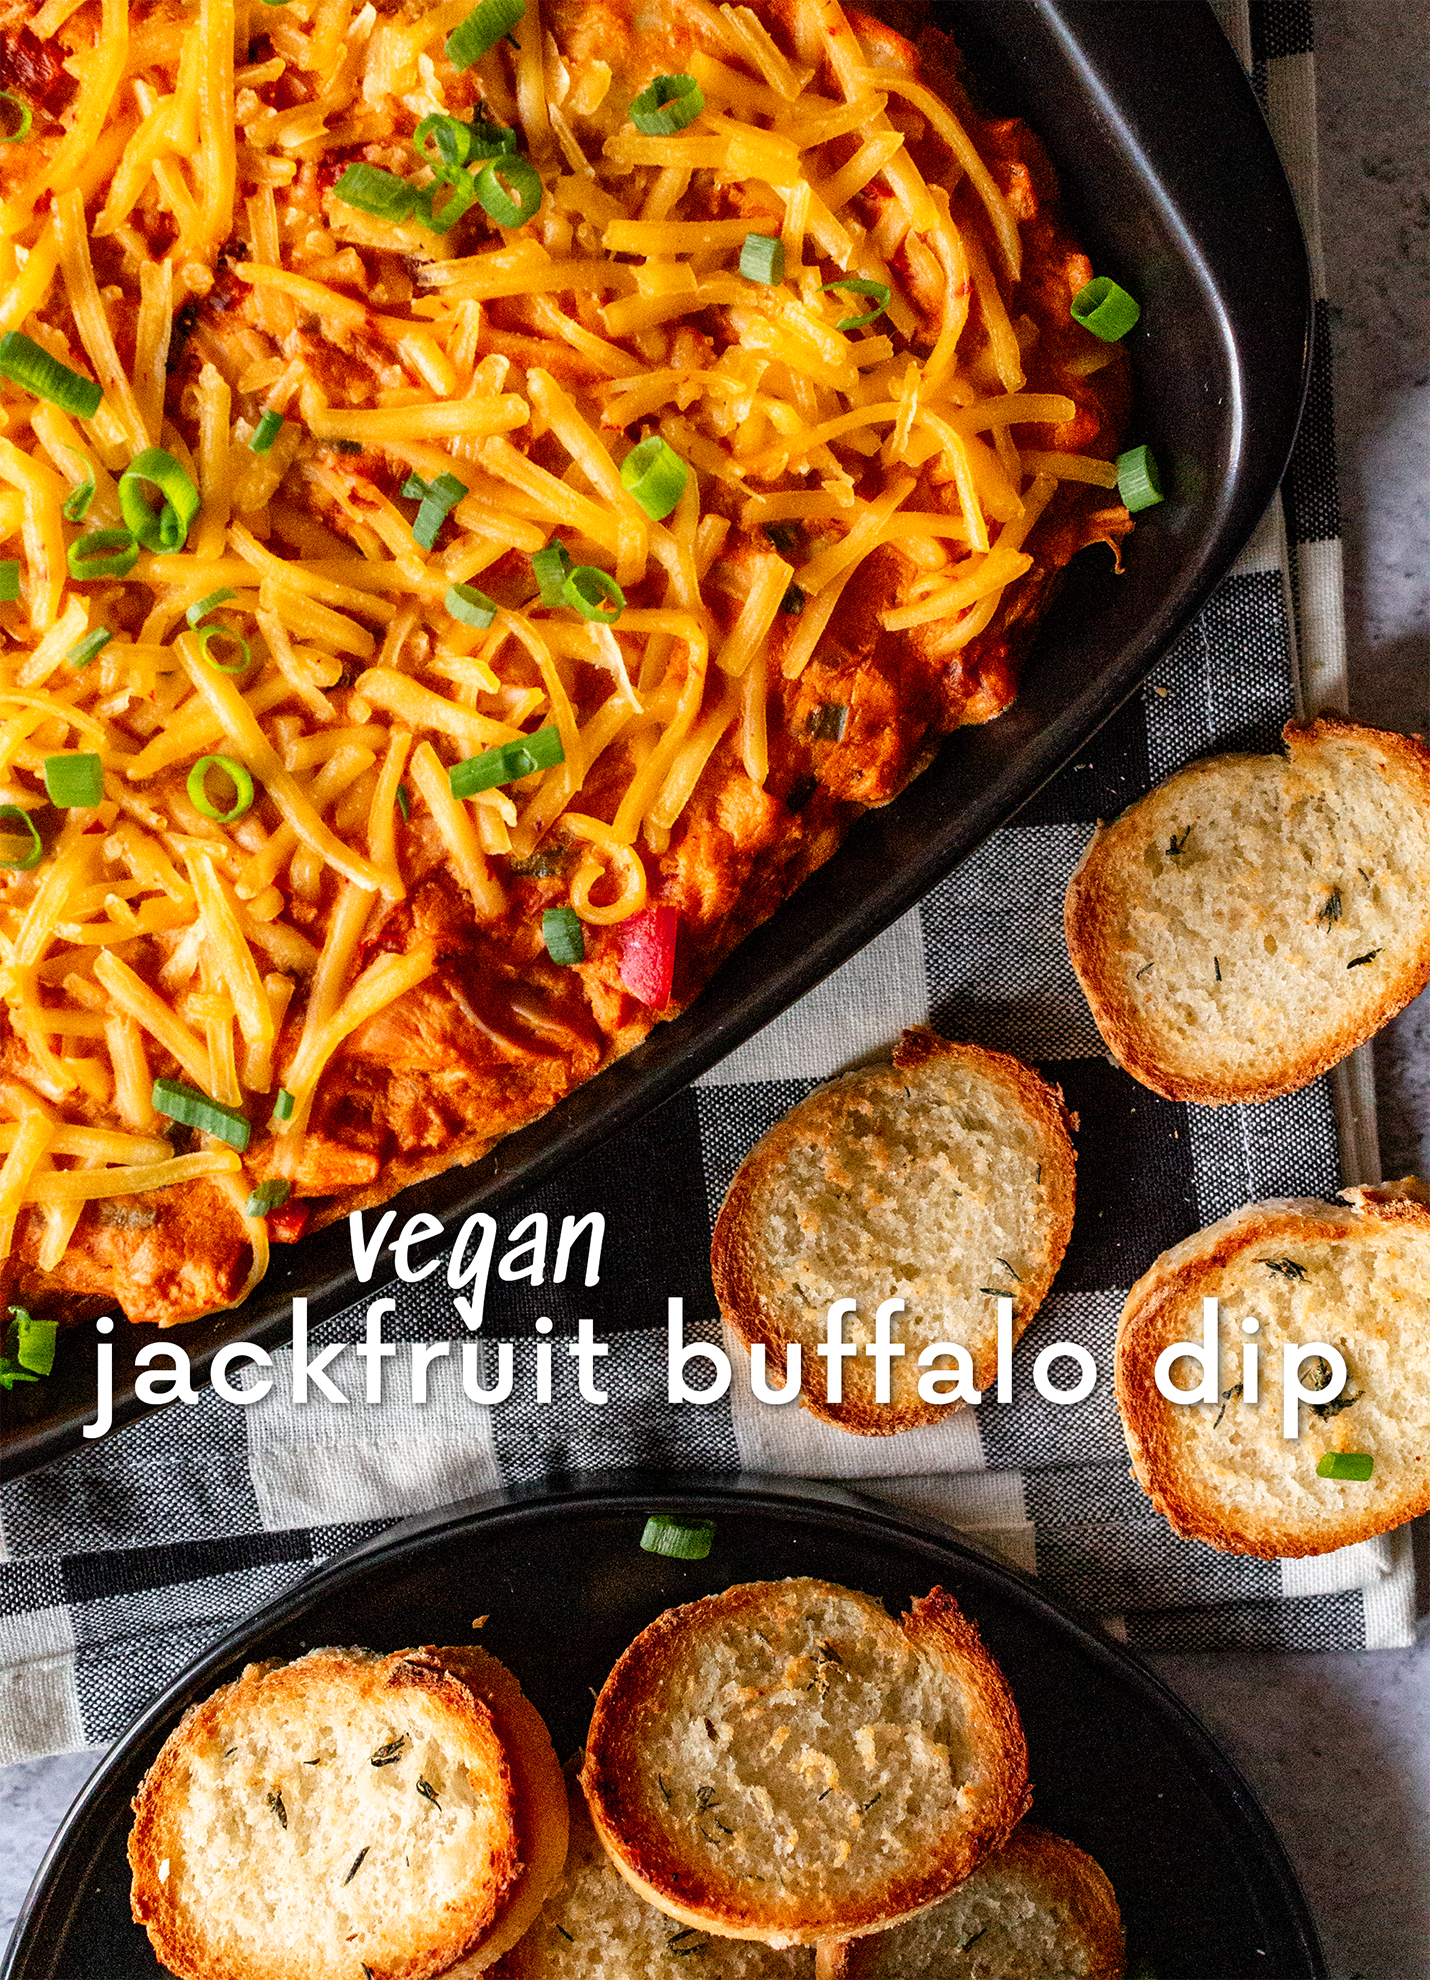
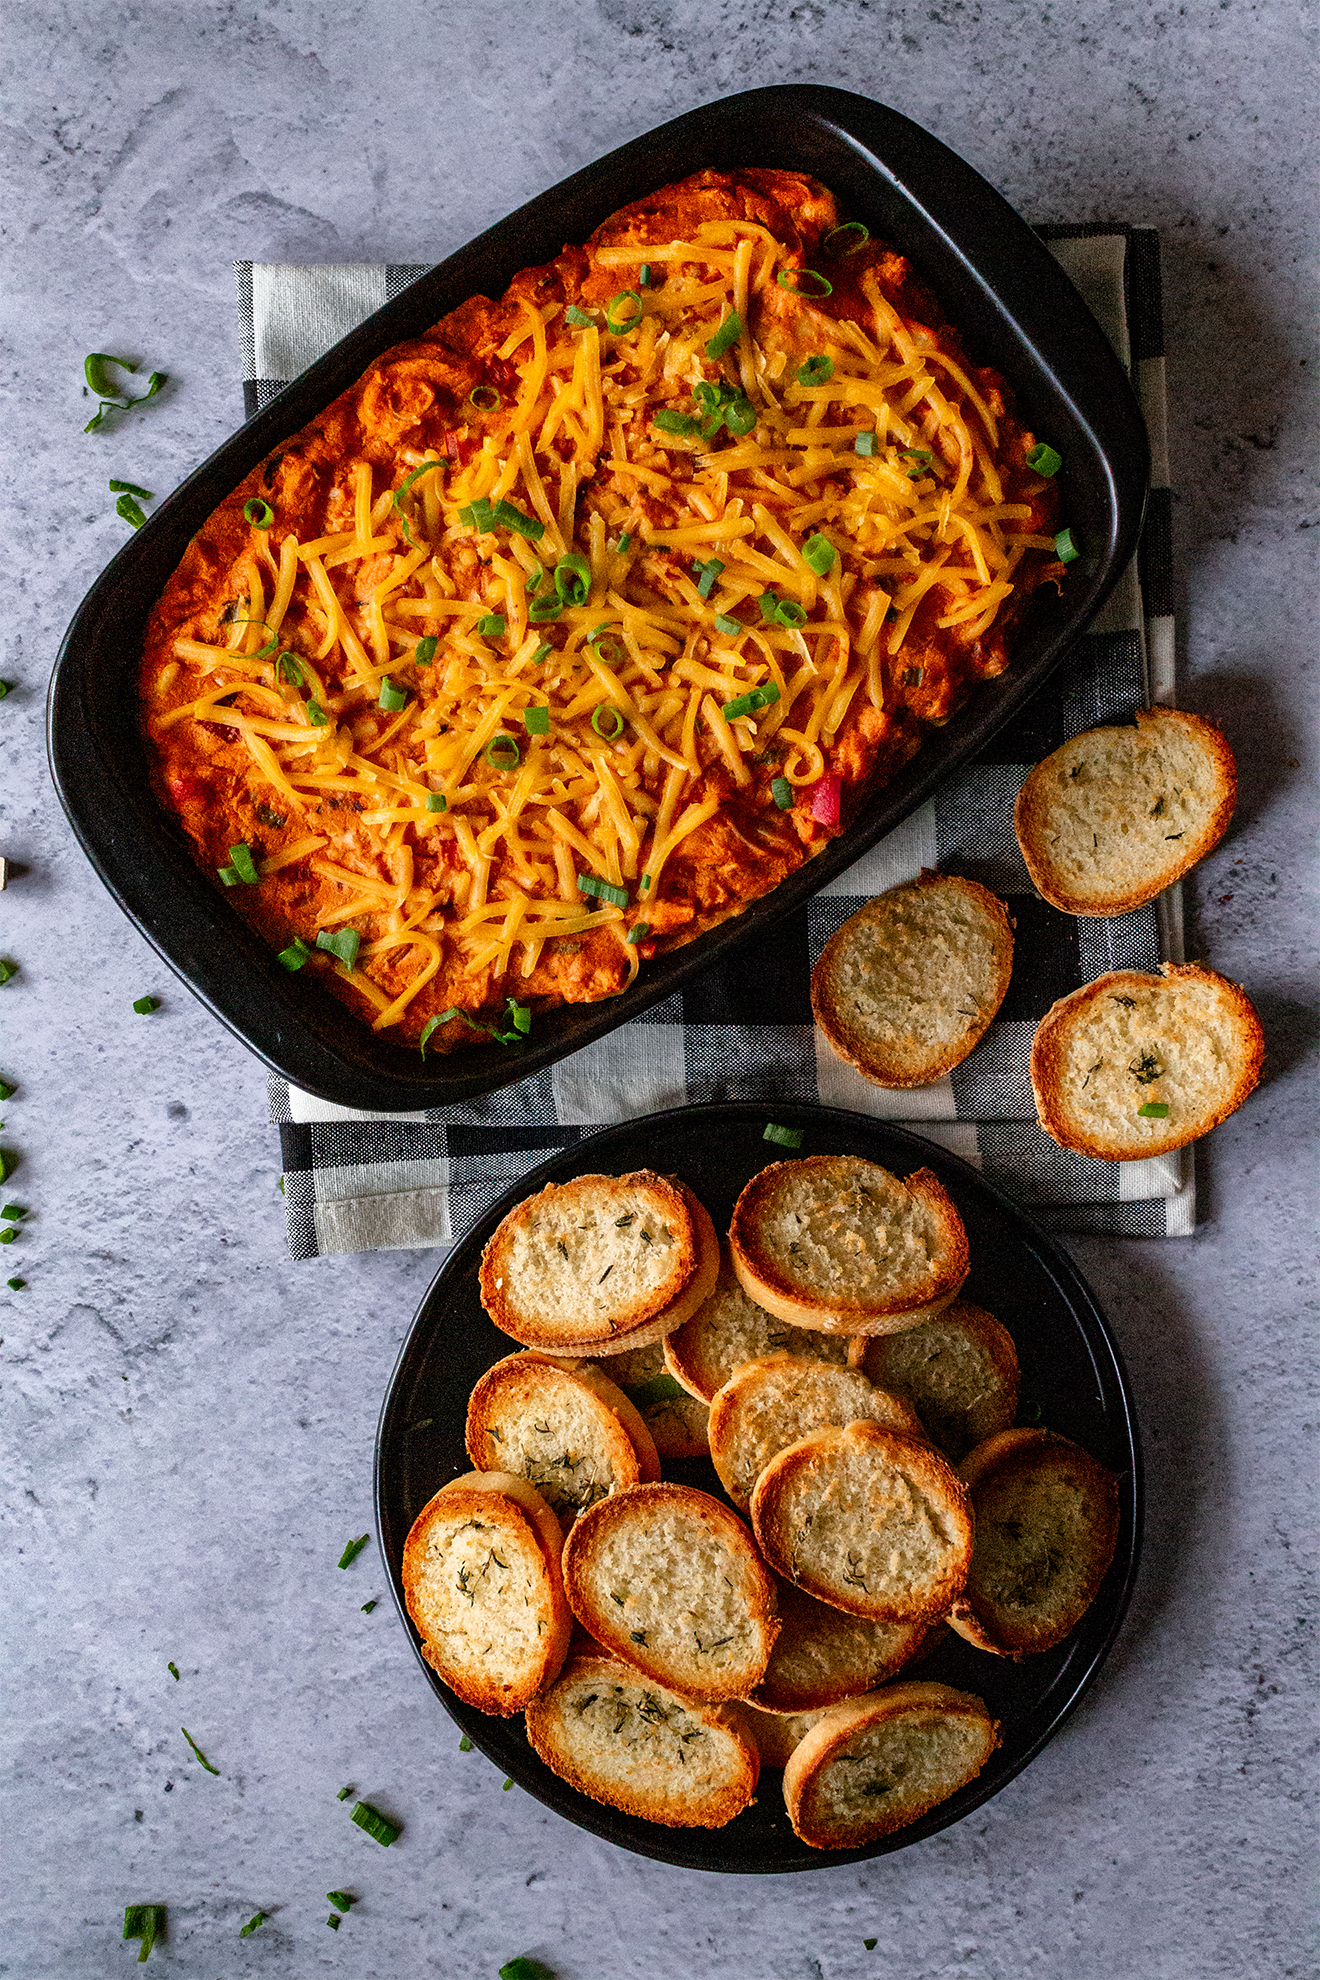
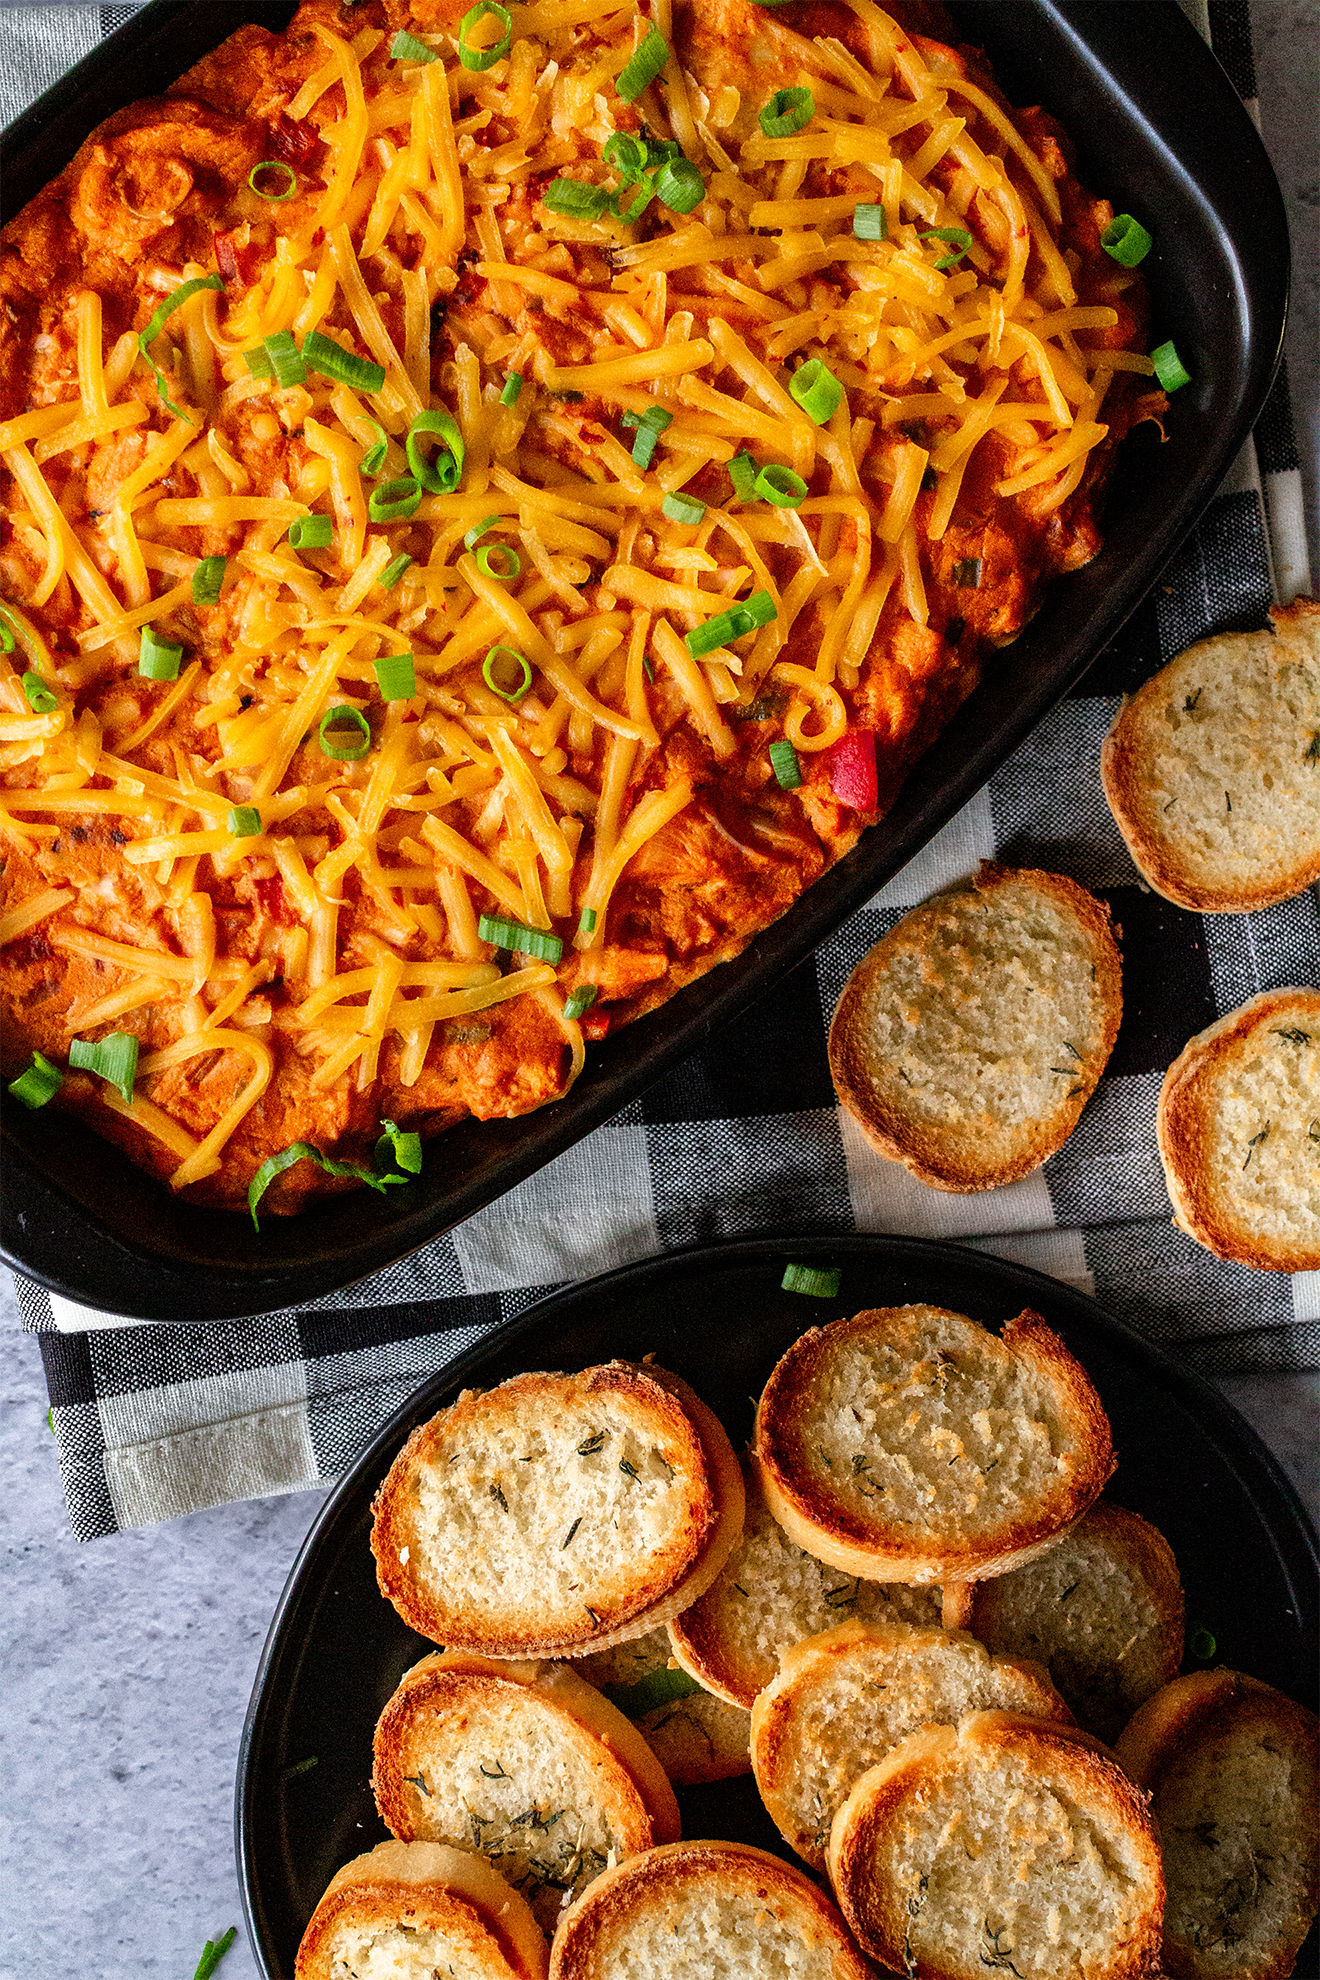
Absolutely obsessed with this vegan buffalo jackfruit dip, a new and improved, vegan-ized version of my bacon buffalo chicken dip from a few years ago. Honestly, jackfruit is one of the best culinary discoveries I’ve made in the last year, and I feel like I’ve started using it in just about everything! Tacos, curries, sandwiches, and dips–you name it, I’ve probably put jackfruit in it. This recipe, however, remains one of my favorites! And it appeals to both meat-eaters and vegans alike with its creamy, rich texture and deliciously spicy taste.
The garlic herb dippers also pair especially well with their crispy tops and soft, buttery bottoms for maximum texture harmony. I hope you try this awesome vegan buffalo jackfruit dip at your next party–or just make it for yourself and spend three days eating it out of a Tupperware container like an animal (speaking from experience, of course).
Ingredients:
Vegan Buffalo Jackfruit Dip
- 14-16oz jackfruit
- 8oz tofu, silken
- 2-3 cups Frank’s buffalo sauce (or your choice)
- 1/2 cup raw cashews
- 1/2 cup onion, diced
- 1 red bell pepper, diced
- 1-2 jalapeños, diced (adjust to desired spice)
- 1/3 cup vegan cheddar, shredded
- 1/3 cup vegan mozzarella, cubed
- 3 tbsp nutritional yeast
- 2 tbsp butter
- 1 tbsp olive oil
- 1 tsp garlic powder
- 1/2 tsp paprika
- 1/2 tsp chipotle powder
- 1/2 tsp cayenne pepper
- 1/2 tsp salt
- 1/4 tsp mustard powder
Garlic Herb Dippers
- 2 tsp garlic powder
- 6 tbsp butter
- 2 tbsp thyme, fresh
- 1 large baguette
Directions:
Vegan Buffalo Jackfruit Dip
- Boil cashews in water for 1 hour. Drain cashews and add to a blender with silken tofu and nutritional yeast. Blend until smooth and set aside.
- Heat a small sauce pot on medium/medium-low, and add buffalo sauce, 2 tbsp butter, 1 tsp garlic powder, paprika, chipotle powder, cayenne pepper, and mustard powder. Simmer for 2-3 minutes, stirring consistently, until butter has melted and spices have become fully incorporated. Reduce to low/remove from heat and set aside.
- Heat olive oil in a large skillet on medium/medium-high, and add diced onion, bell pepper, jalapeño, and salt. Sauté for 3-5 minutes or until vegetables have become browned and fragrant.
- Add jackfruit, rinsed and drained if necessary, and sauté with vegetables for an additional 3-5 minutes or until cooked through. Then, reduce heat to low, and add buffalo sauce mixture to the pan. Stir until everything is incorporated, about 1-2 minutes, and remove from heat.
- To a large mixing bowl, add buffalo vegetable sauté, tofu cashew cream, cheddar shreds, and cubed mozzarella. Fold gently with a spatula to ensure everything is incorporated, then transfer to a casserole or baking dish.
- Top with additional cheddar shreds and bake at 350F for 15 minutes. Remove from oven and set aside to cool for 5-10 minutes before serving warm from the dish.
Garlic Herb Dippers
- To make the crostini, slice a baguette into thin rounds. Layer on a parchment paper-lined baking sheet.
- In a small bowl, melt 6 tbsp butter and combine with 2 tsp garlic powder and fresh thyme. Brush over baguette rounds.
- Broil rounds on high (or bake at 525F) for 3-4 minutes, or until the tops have become browned and crisp while the undersides are still warm and soft.

Vegan Buffalo Jackfruit Dip with Garlic Herb Dippers
Ingredients
Vegan Buffalo Jackfruit Dip
- 14-16 oz jackfruit
- 8 oz tofu silken
- 2-3 cups Frank’s buffalo sauce or your choice
- 1/2 cup raw cashews
- 1/2 cup onion diced
- 1 red bell pepper diced
- 1-2 jalapeños diced (adjust to desired spice)
- 1/3 cup vegan cheddar shredded
- 1/3 cup vegan mozzarella cubed
- 3 tbsp nutritional yeast
- 2 tbsp butter
- 1 tbsp olive oil
- 1 tsp garlic powder
- 1/2 tsp paprika
- 1/2 tsp chipotle powder
- 1/2 tsp cayenne pepper
- 1/2 tsp salt
- 1/4 tsp mustard powder
Garlic Herb Dippers
- 2 tsp garlic powder
- 6 tbsp butter
- 2 tbsp thyme fresh
- 1 large baguette
Instructions
Vegan Buffalo Jackfruit Dip
- Boil cashews in water for 1 hour. Drain cashews and add to a blender with silken tofu and nutritional yeast. Blend until smooth and set aside.
- Heat a small sauce pot on medium/medium-low, and add buffalo sauce, 2 tbsp butter, 1 tsp garlic powder, paprika, chipotle powder, cayenne pepper, and mustard powder. Simmer for 2-3 minutes, stirring consistently, until butter has melted and spices have become fully incorporated. Reduce to low/remove from heat and set aside.
- Heat olive oil in a large skillet on medium/medium-high, and add diced onion, bell pepper, jalapeño, and salt. Sauté for 3-5 minutes or until vegetables have become browned and fragrant.
- Add jackfruit, rinsed and drained if necessary, and sauté with vegetables for an additional 3-5 minutes or until cooked through. Then, reduce heat to low, and add buffalo sauce mixture to the pan. Stir until everything is incorporated, about 1-2 minutes, and remove from heat.
- To a large mixing bowl, add buffalo vegetable sauté, tofu cashew cream, cheddar shreds, and cubed mozzarella. Fold gently with a spatula to ensure everything is incorporated, then transfer to a casserole or baking dish.
- Top with additional cheddar shreds and bake at 350F for 15 minutes. Remove from oven and set aside to cool for 5-10 minutes before serving warm from the dish.
Garlic Herb Dippers
- To make the crostini, slice a baguette into thin rounds. Layer on a parchment paper-lined baking sheet.
- In a small bowl, melt 6 tbsp butter and combine with 2 tsp garlic powder and fresh thyme. Brush over baguette rounds.
- Broil rounds on high (or bake at 525F) for 3-4 minutes, or until the tops have become browned and crisp while the undersides are still warm and soft.
The post Vegan Buffalo Jackfruit Dip + Garlic Herb Dippers appeared first on I Forgot Salt!.
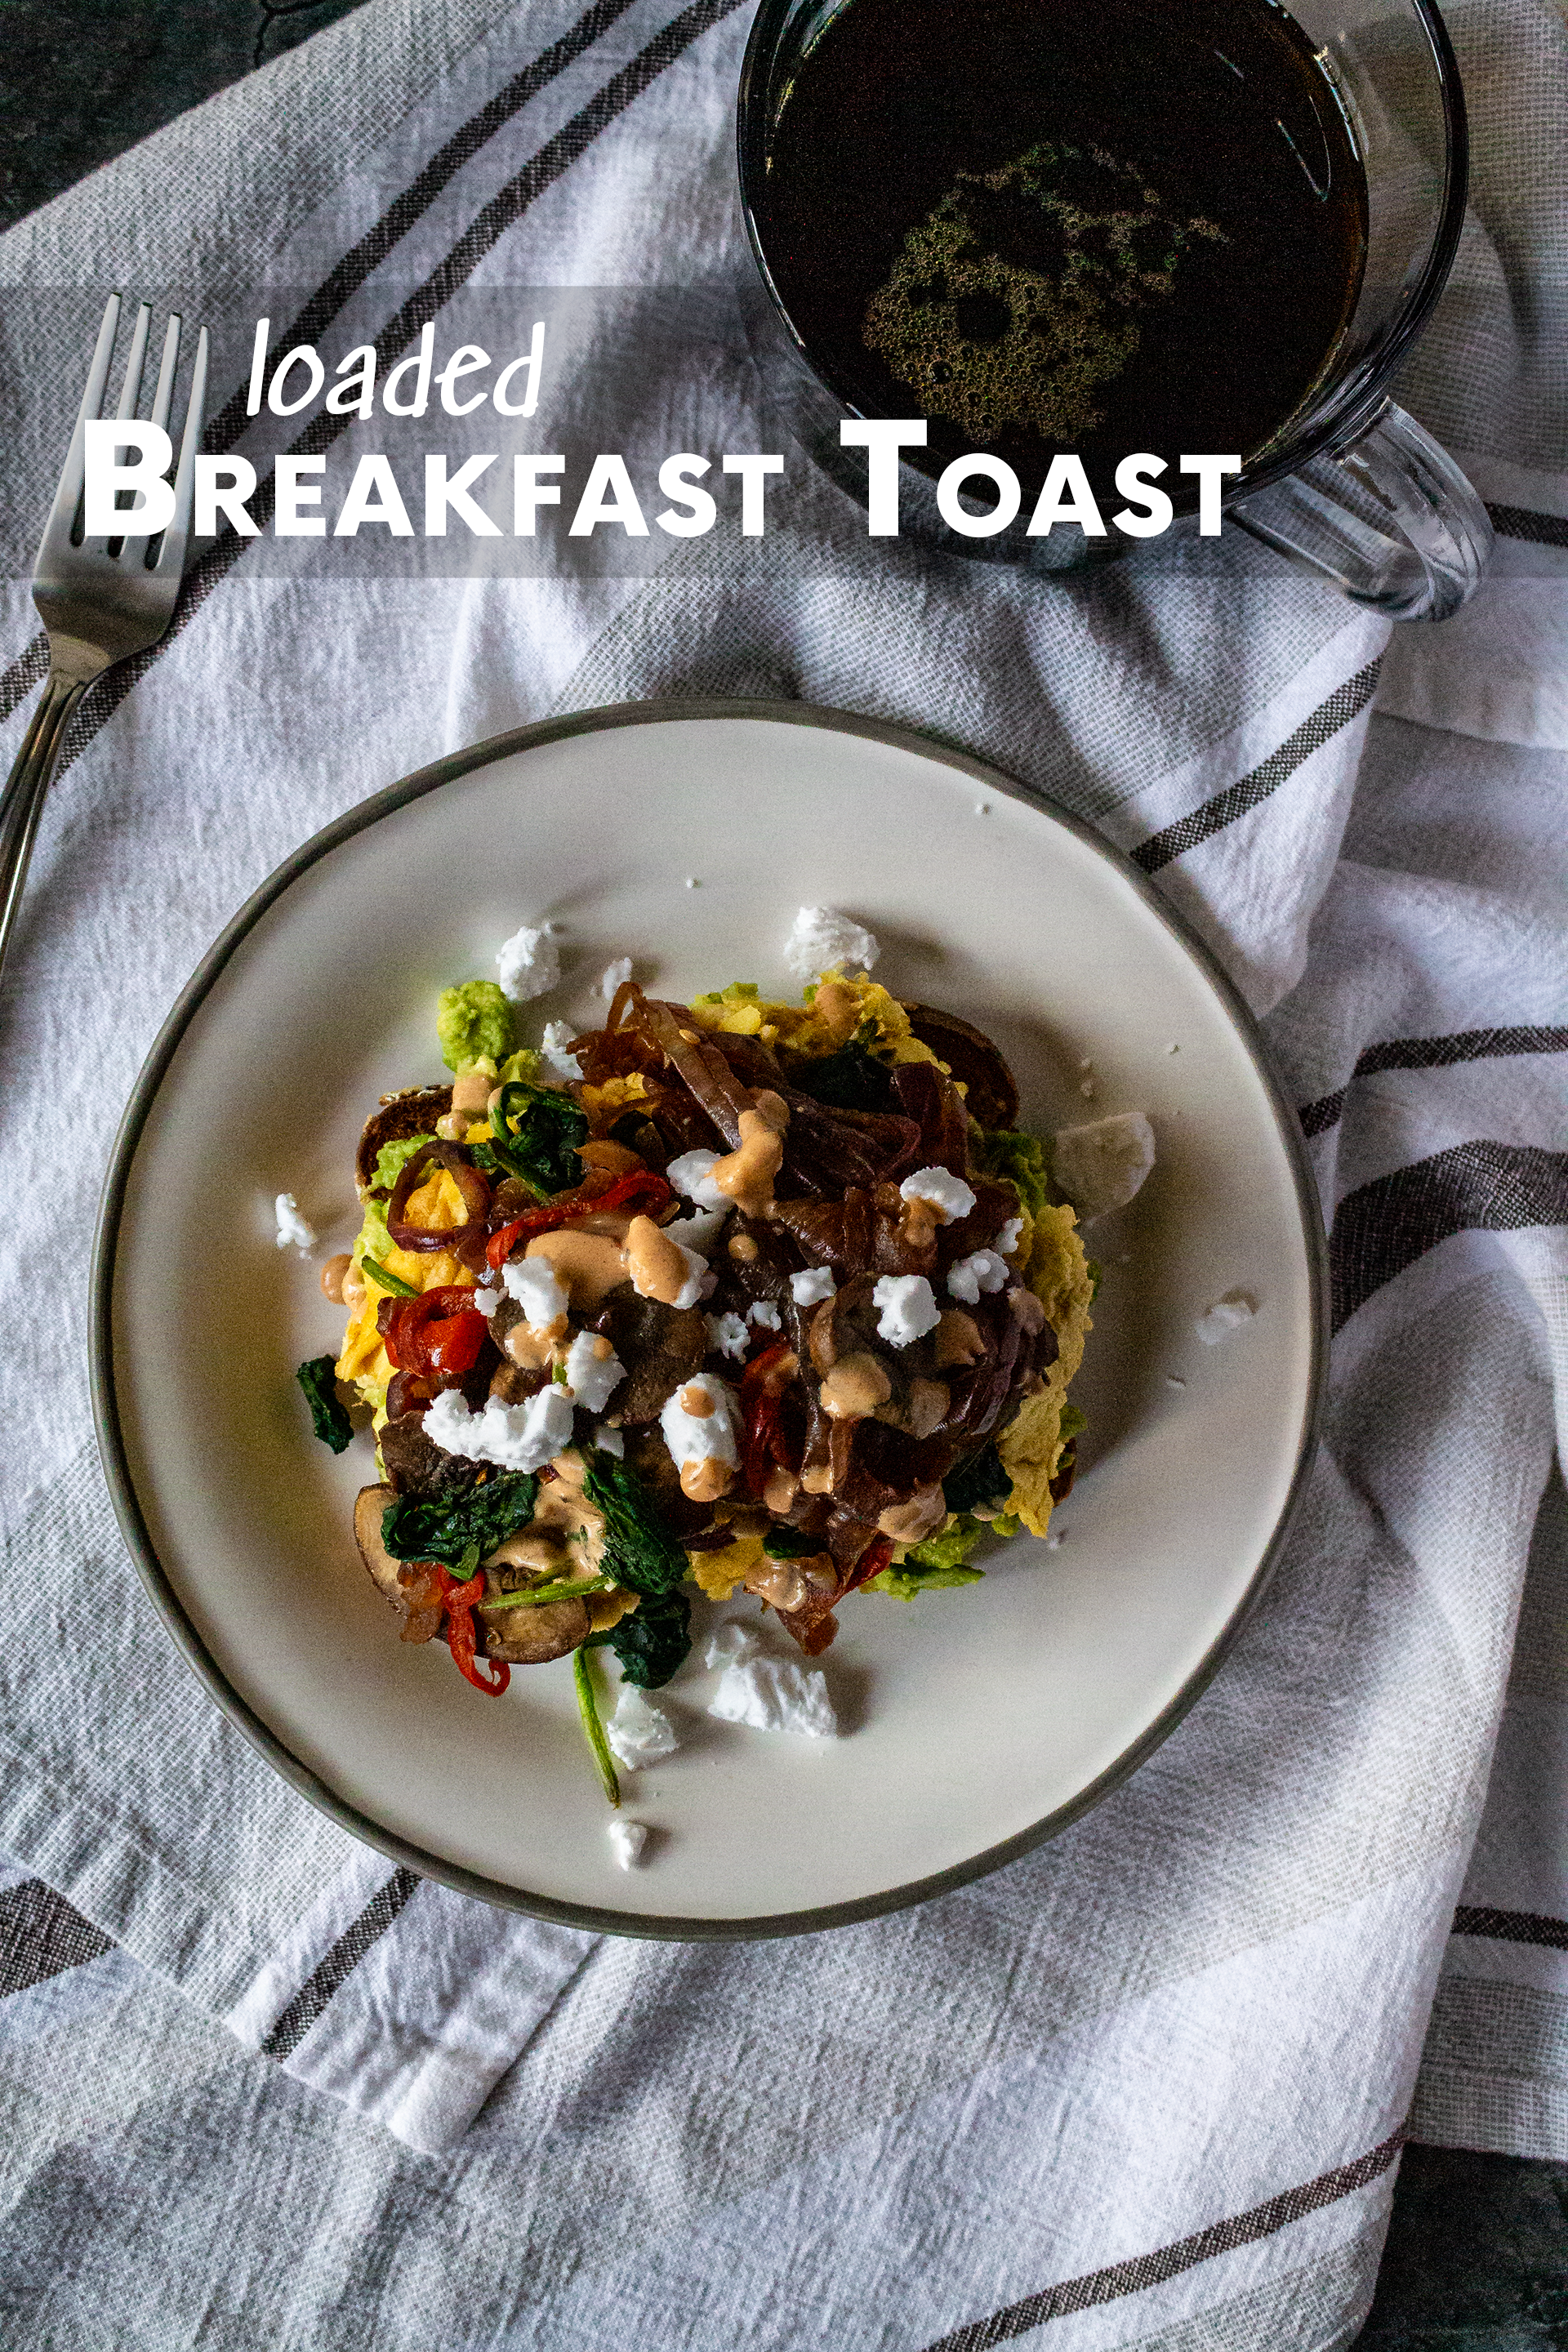
]]>The post Loaded Breakfast Toast appeared first on I Forgot Salt!.
]]>
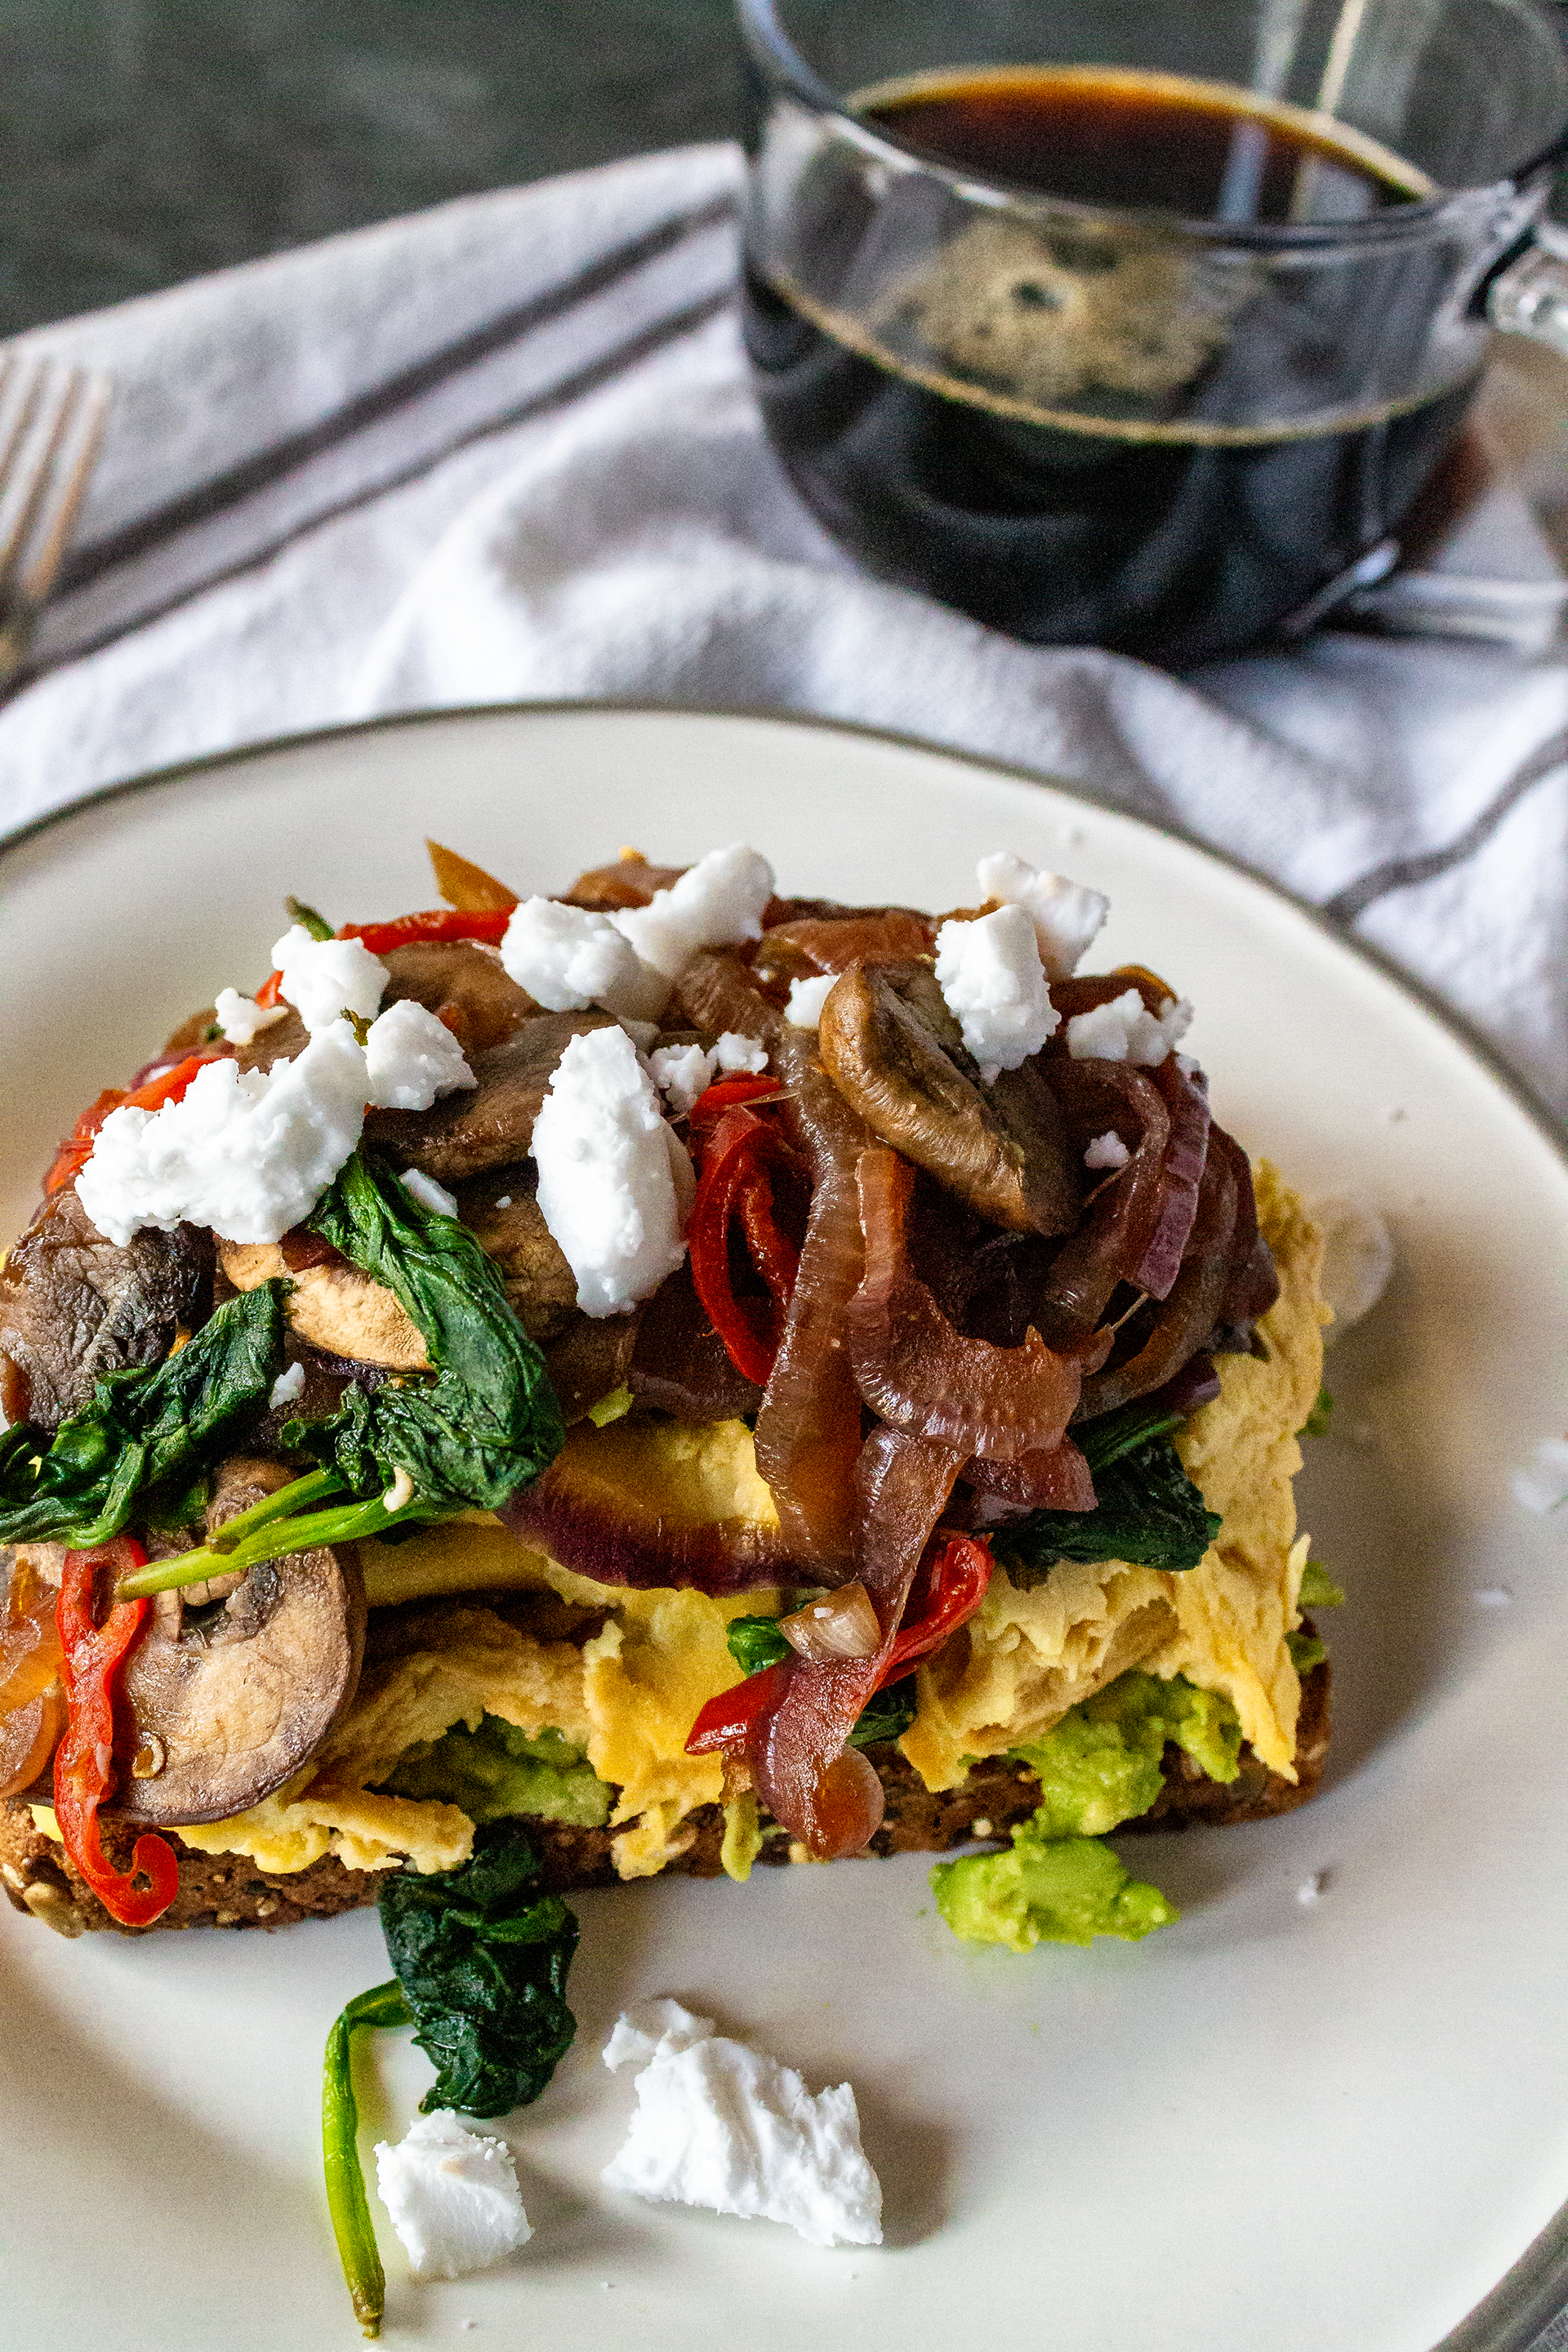
Although I’ve posted some avocado toast recipes before, this absolute monster of a breakfast toast carried me through my last semester of 2020. What a year–I can’t believe it’s almost over. We’re nearly free from this absolute catastrophe! It’s hard to fathom that another year has come and gone, while at the same time I feel like I’ve aged a decade since January. I’m sure the feeling is mutual. Despite the chaos, however, I feel like 2020 has been one of my most productive and accomplished years in quite a while, even with what seems like the end of the world constantly looming on the horizon.
As I’ve mentioned in previous posts, Alex and I made some very radical changes in our lives, from larger things changing jobs (him) to entering university (me) to moving even farther south (both of us) to smaller, more individual improvements like switching to a plant-based diet (me), taking up running (him), and making a conscious effort to read more books (both of us). In the grand scheme of things–even our lowest points–I think we have come out of 2020 as better, stronger people.
That doesn’t mean this year wasn’t difficult, however. Our lowest points were indeed low, but I think we’re lucky enough to be able to dwell on not on the negatives but on the positives of 2020 in retrospective. While we will be looking back on this year as a true dumpster fire, I want to try not to forget about the good things that happened in spite of so much strife. I am tentatively putting some of my hopes in 2021, but will be satisfied as long as we make it through intact.
Now, onto a lighter note and the actual breakfast toast recipe…

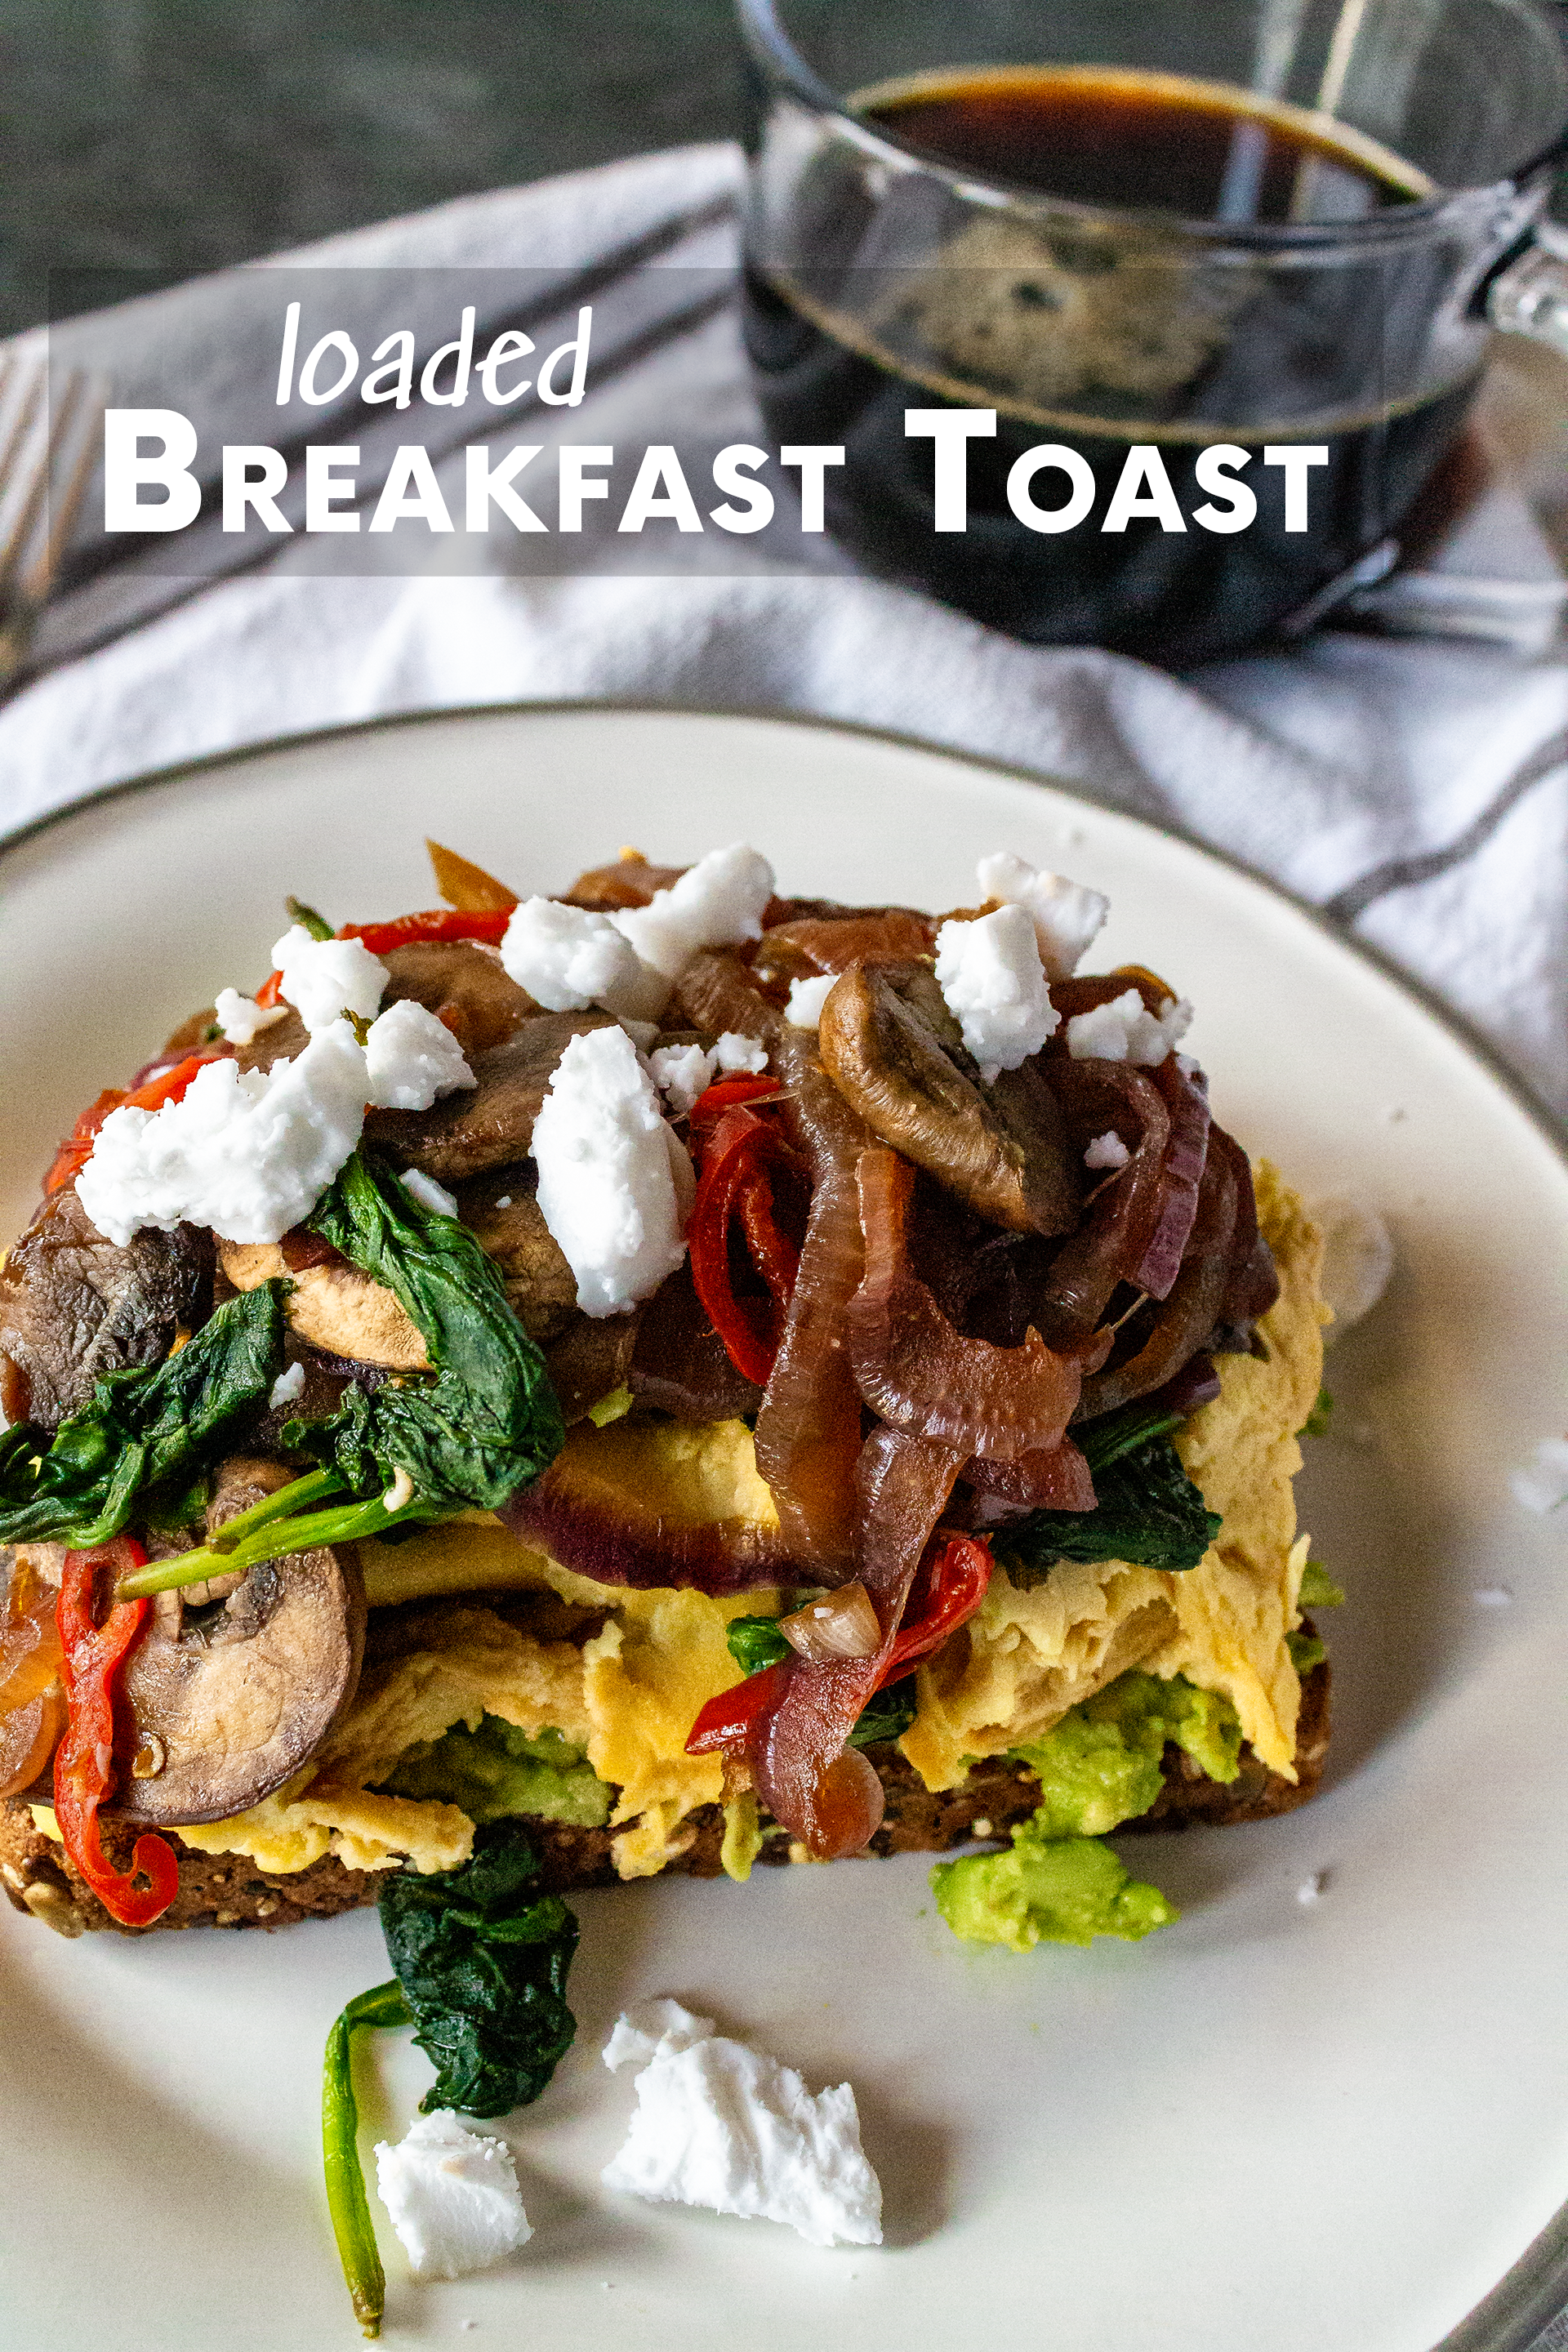
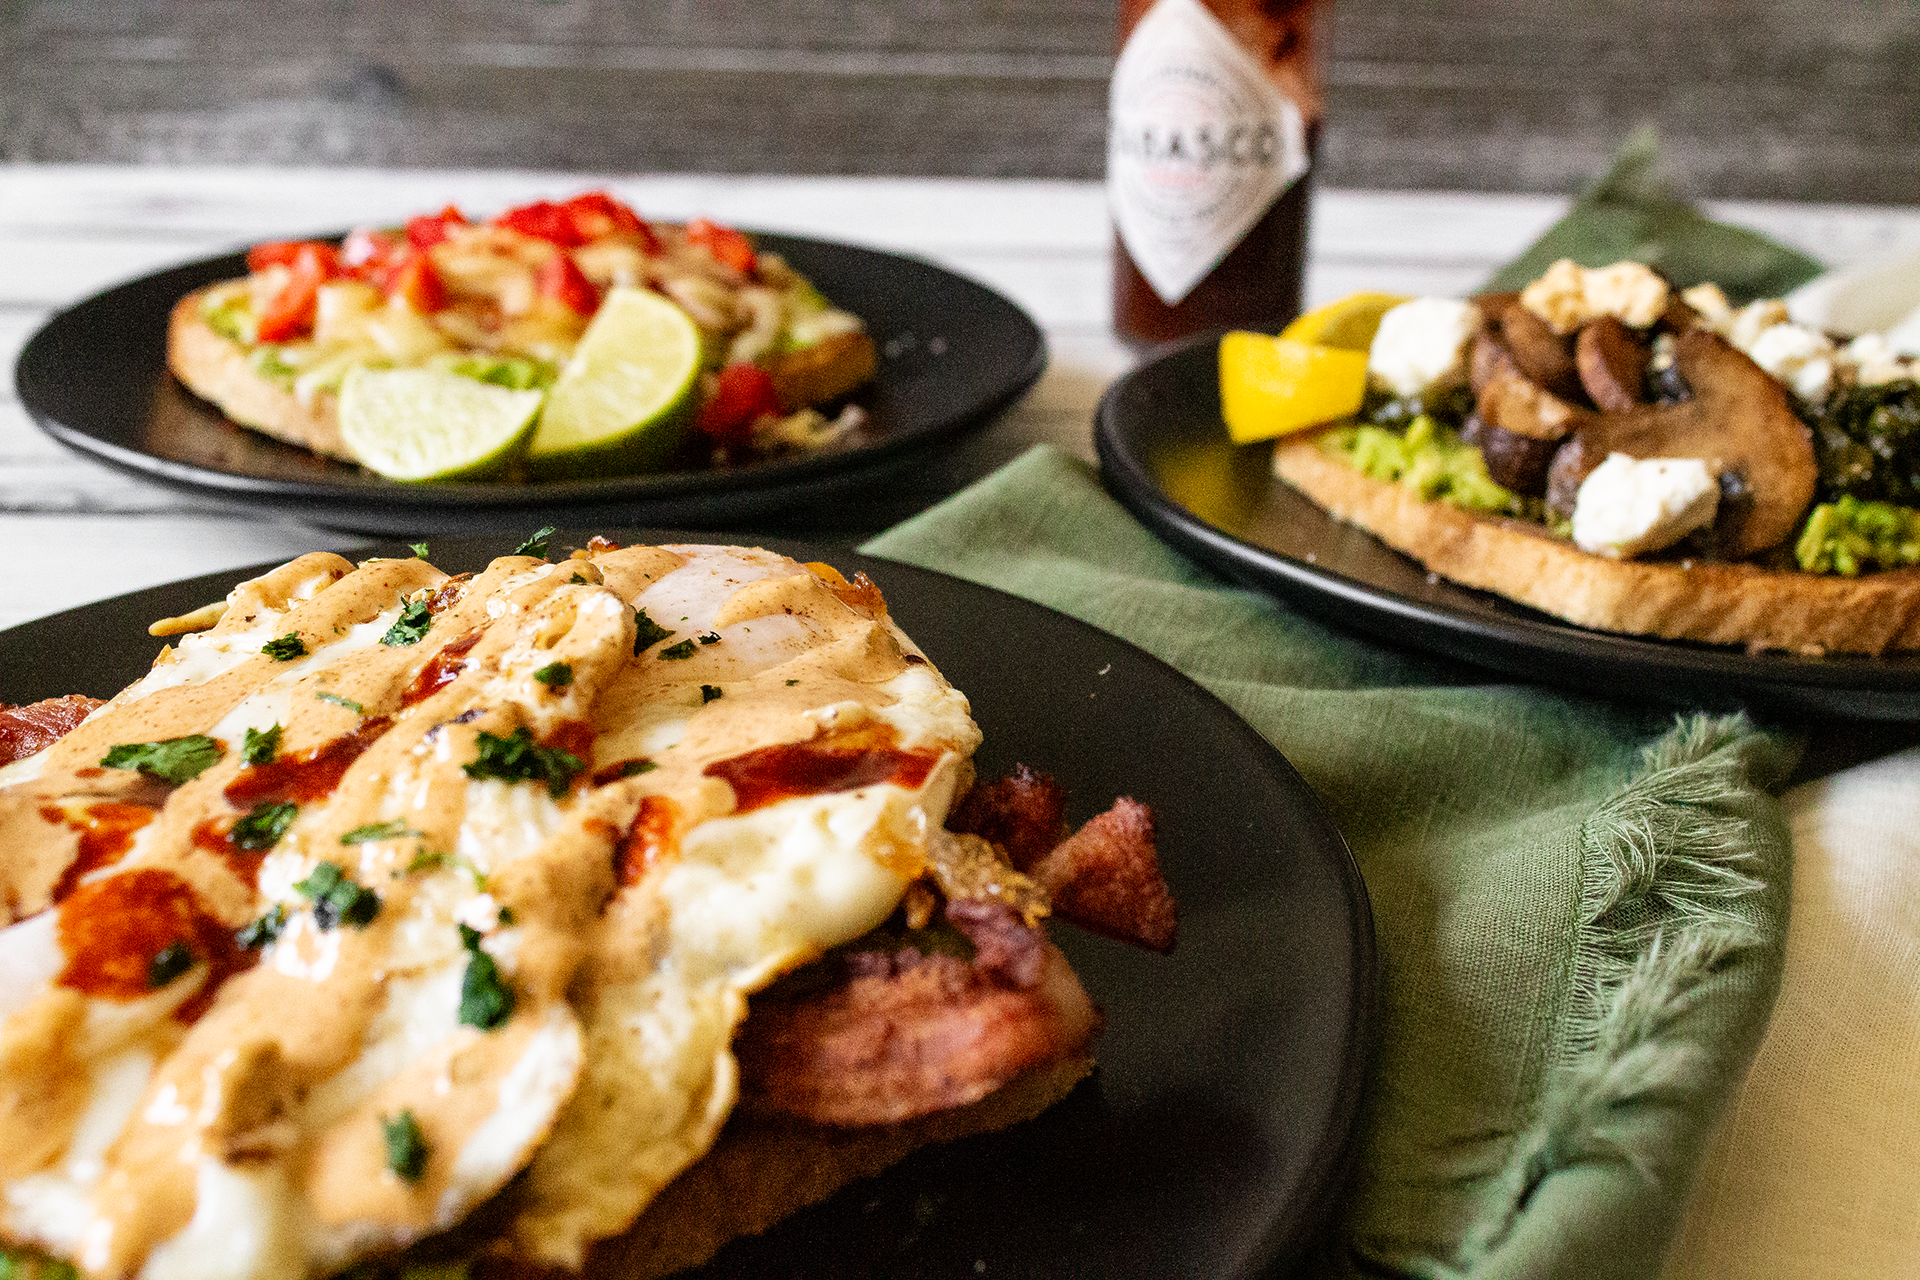
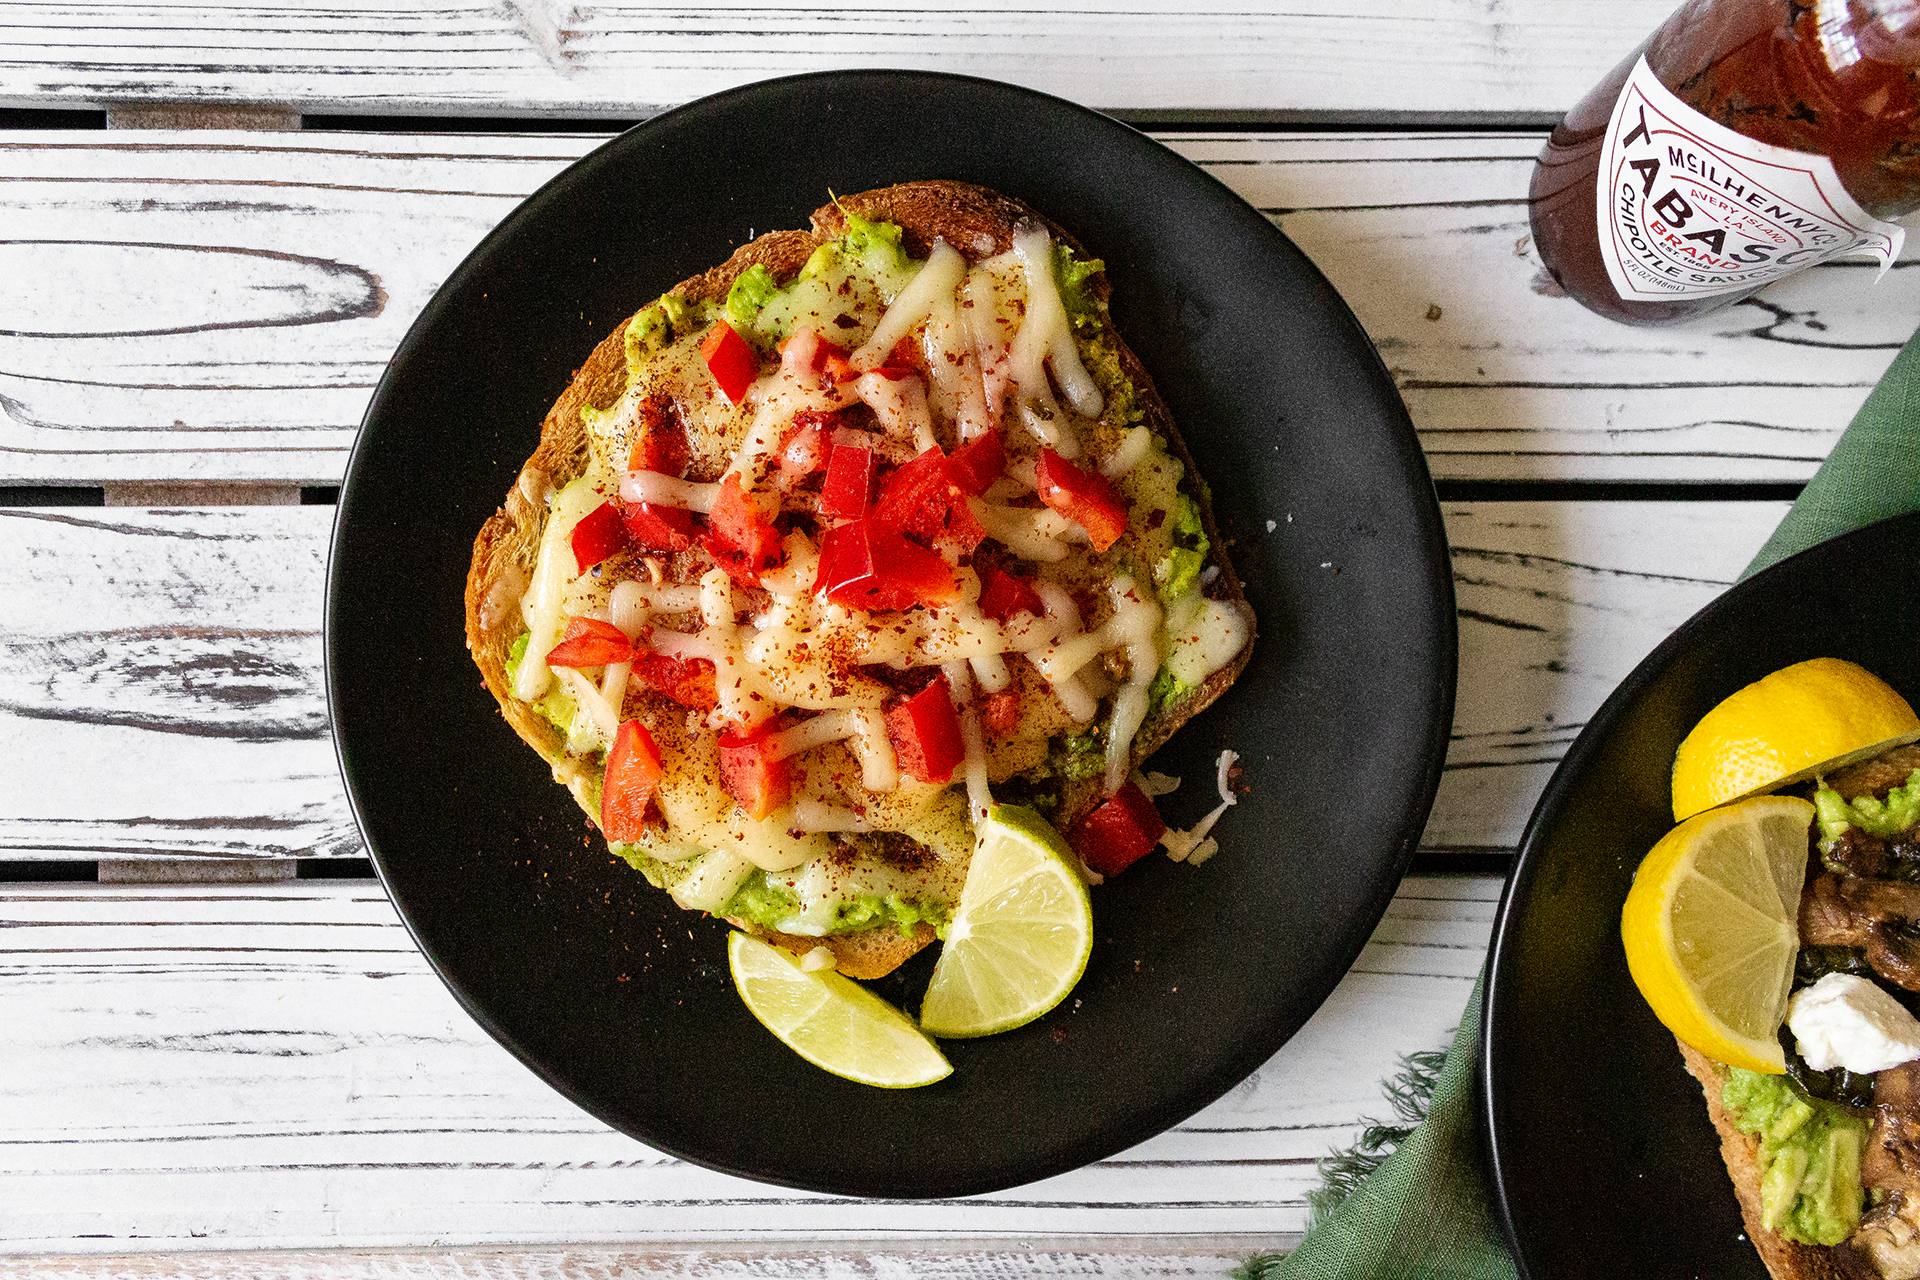
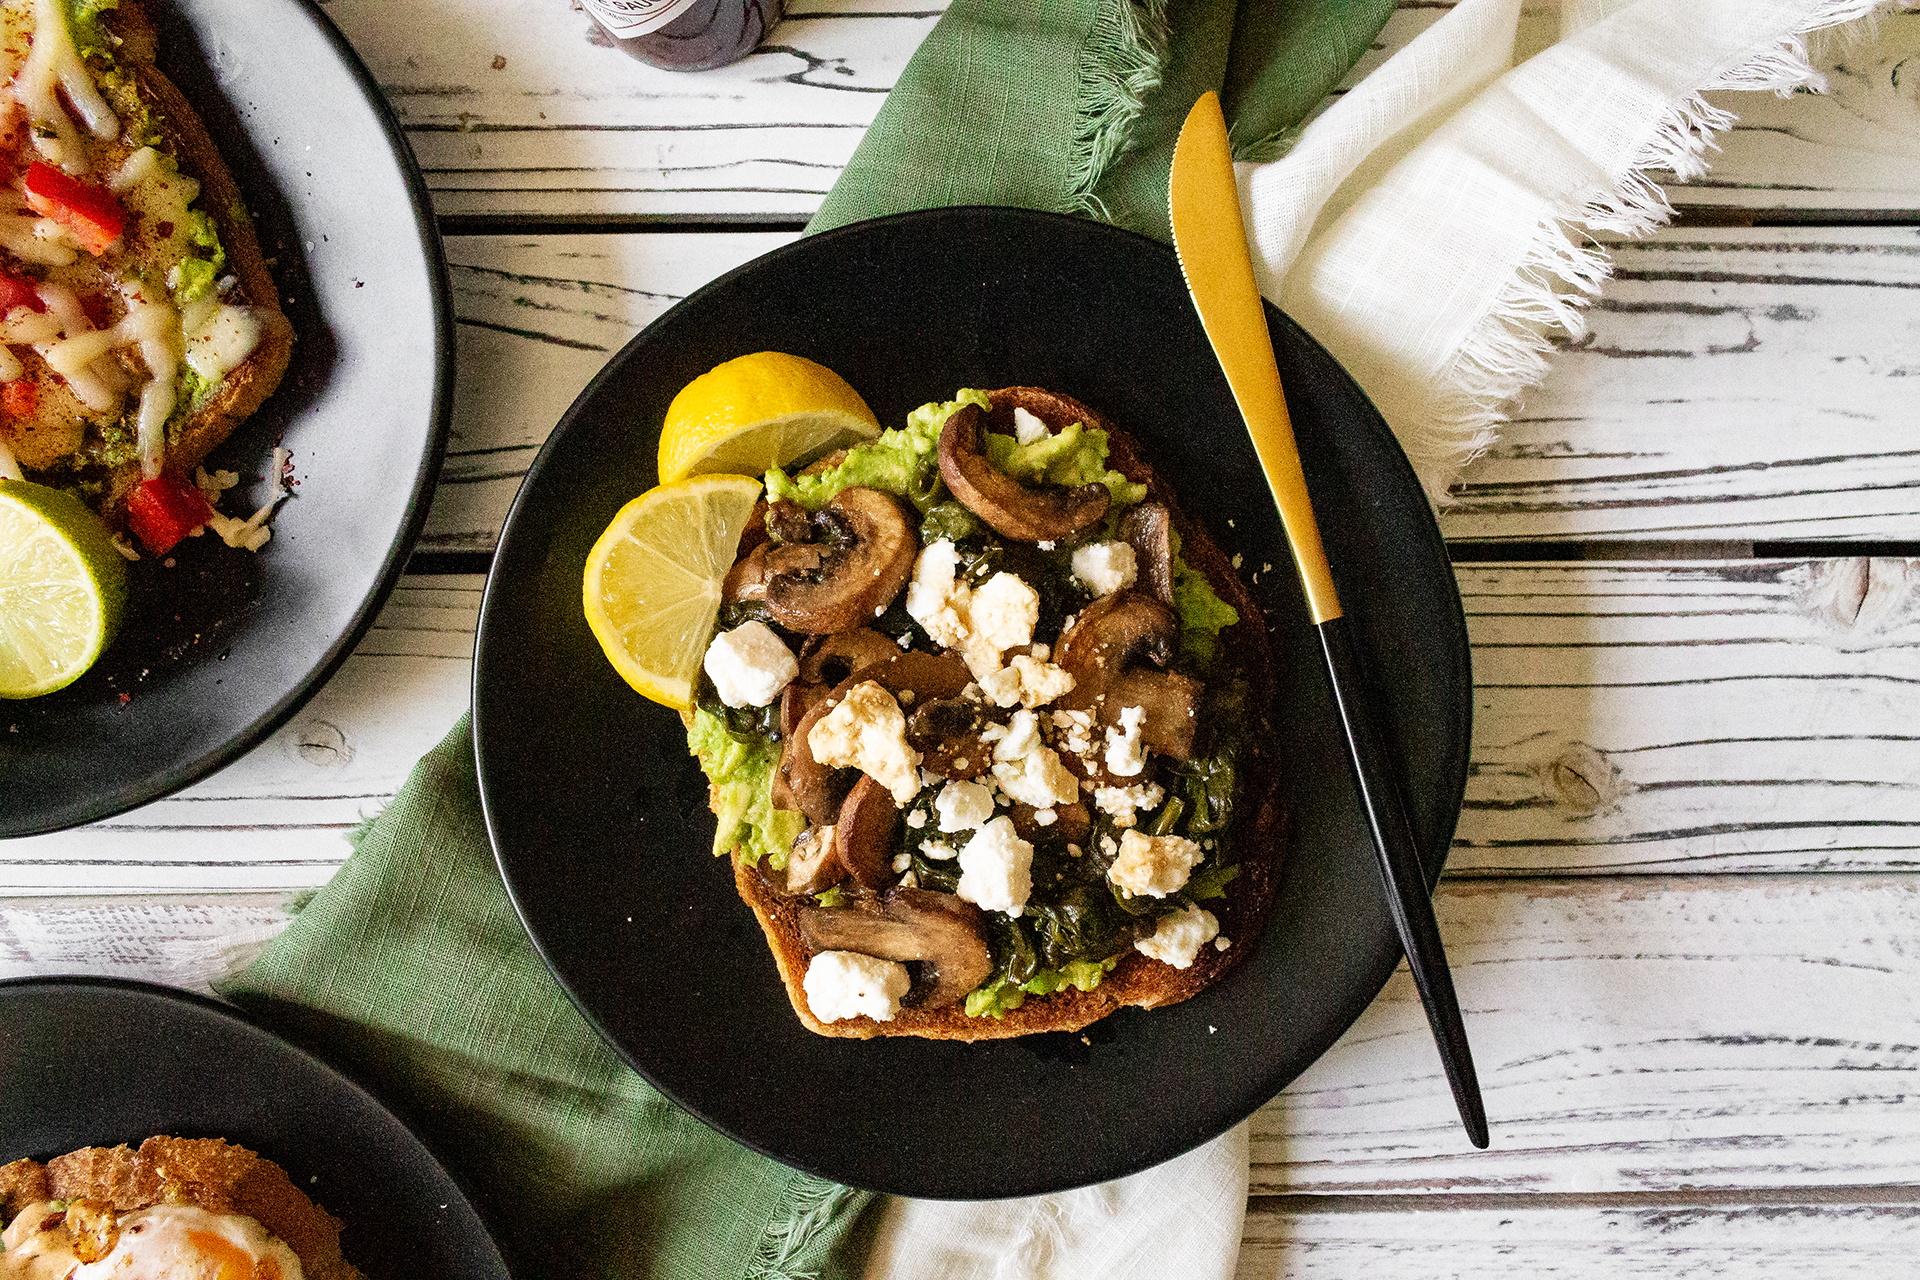
It is absolutely no secret that I love avocado toast, and this loaded “breakfast toast” version has become my go-to for a late morning meal or brunch if I need something to get me through an afternoon of online classes. The salty-sourness of the soy sauce and balsamic vinegar compliments the relatively sweet feta cheese so well. All of that veggie goodness layered atop protein-packed eggs/egg substitute (like JUST Egg or my tofu scramble) and an avocado chock full of healthy fats makes for a wonderfully nourishing start to the day. Structurally, I’ve found that whole grain or hearty sourdough bread holds up best under all of the weight, but white bread makes for an indulgent and delicious alternative as well. This recipe is so versatile, you can change almost any element and it will still taste great! Also, as an aside–yes, this can be made completely vegan. I’ve recently discovered Violife’s feta alternative (pictured) and I’m obsessed.
Ingredients:
- 2 slices toast, buttered
- 1 cup scrambled eggs, egg substitute, or tofu scramble
- 1/4 cup feta cheese
- 1 avocado
- 1/2 cup baby bella mushrooms, sliced
- 1/2 cup onion, sliced
- 1/4 cup mini sweet peppers, sliced
- 1 cup spinach
- 2 tsp soy sauce
- 1 tsp balsamic vinegar
- 1/2 tsp lemon juice
- 1/4 tsp salt
- 1/4 tsp black pepper
Directions:
- Toast two slices of bread in a pan with butter, under the broiler, or in a toaster. Set aside.
- Mash 1 fresh avocado in a small bowl with salt, pepper, and lemon juice. Set aside.
- Prep and cook scrambled eggs, egg substitute, or tofu scramble as desired. Set aside.
- Heat a nonstick pan on medium-high heat. Add peppers and sauté for 1-2 minutes, or until softened and fragrant.
- Add mushrooms, onion, soy sauce, and balsamic vinegar and cook for an additional 3-5 minutes, or until vegetables have browned and most liquid has evaporated.
- Add spinach and sauté for about 1 minute, or until wilted. Set aside to assemble.
- Layer toast with avocado, egg/egg substitute, vegetable sauté, feta cheese, and your favorite hot sauce or crema.
Although I wouldn’t recommend storing an assembled toast in the fridge for fear of the bread becoming irreparably soggy, the individual components keep really well on their own. The lemon juice keeps the avocado from becoming brown, and the vegetable sauté can last several days and still taste great. More than once I’ve overestimated how much I want to eat in a single sitting and saved the toppings for another day.

Loaded Breakfast Toast
Ingredients
- 2 slices toast buttered
- 1 cup scrambled eggs egg substitute, or tofu scramble
- 1/4 cup feta cheese
- 1 avocado
- 1/2 cup baby bella mushrooms sliced
- 1/2 cup onion sliced
- 1/4 cup mini sweet peppers sliced
- 1 cup spinach
- 2 tsp soy sauce
- 1 tsp balsamic vinegar
- 1/2 tsp lemon juice
- 1/4 tsp salt
- 1/4 tsp black pepper
Instructions
- Toast two slices of bread in a pan with butter, under the broiler, or in a toaster. Set aside.
- Mash 1 fresh avocado in a small bowl with salt, pepper, and lemon juice. Set aside.
- Prep and cook scrambled eggs, egg substitute, or tofu scramble as desired. Set aside.
- Heat a nonstick pan on medium-high heat. Add peppers and sauté for 1-2 minutes, or until softened and fragrant.
- Add mushrooms, onion, soy sauce, and balsamic vinegar and cook for an additional 3-5 minutes, or until vegetables have browned and most liquid has evaporated.
- Add spinach and sauté for about 1 minute, or until wilted. Set aside to assemble
- .Layer toast with avocado, egg/egg substitute, vegetable sauté, feta cheese, and your favorite hot sauce or crema.

The post Loaded Breakfast Toast appeared first on I Forgot Salt!.
]]>The post Avocado Toast Three Ways appeared first on I Forgot Salt!.
]]>
Like any good, self-respecting millennial, I am obsessed with avocado toast. After figuring out the trick to keeping avocados fresh for a few weeks at a time (the fridge, you fool!), I took it upon myself to end every Wegman’s trip with enough unripe organic avocados to shame even the most dedicated of Portland hipsters. What can I say? I’m a woman of taste, and that taste revolves almost entirely around mushy green superfoods. Breakfast, brunch, lunch, dinner, or a midnight snack–if there’s a slice of bread and half of one of Mexico’s greatest agriculture contributions to the modern world rolling around in plastic wrap (I know, not the most environmentally friendly; I really need to get some of that cool beeswax paper), I’ll have my hands on a slice of avo-toast the minute hunger hits.
One of the best things about avocado toast–like all bread-based, sandwich-adjacent foods–is its unending versatility. You can literally open your fridge or pantry, stack whatever you find onto the bread/butter/avocado base, and end up with something absolutely delicious. Over the course of my whirlwind romance with The Reason Millennials Can’t Afford to Buy Homes (Fox New’s finest piece of journalism to date, for sure), I’ve indulged in everything from The Basic Bitch (simple salt and pepper, maybe a bit of lemon juice) to God’s Greatest Mistake (leftover Chinese take-out on sourdough, smothered in a runny fried egg), and every iteration I’ve devoured has been undeniably delicious. Just before sitting down to type this out, even, I took a break to feast on two slices of my current favorite combination, I Wouldn’t Put Effort Into This Even If You Paid Me (feta cheese and chipotle mayo, a bit of lime juice if I’m really feeling zesty) just to set the mood.
Truly, avocado toast has come to define the American millennial generation more than any other cultural touchstone in the last fifteen years. More controversial than Britney Spears, more despised than Twilight, more universal than the iPhone, and more uniting than the PSL (seriously–everyone loves those things), it is the stuff of legends. Every decade has a defining moment, a cornerstone that lingers beyond the test of time to become some immortal thing still playing an active role in people’s lives today, so many years after its heyday. The 1960s had The Beatles, the 1970s had high-waisted jeans, the 1980s had Super Mario Bros, the 1990s had Friends, and the early 2000’s had The Greatest American Financial Crisis Since World War II. And I believe the 2010s will be remembered for one thing and one thing alone: our Lord and Savior, avocado toast.
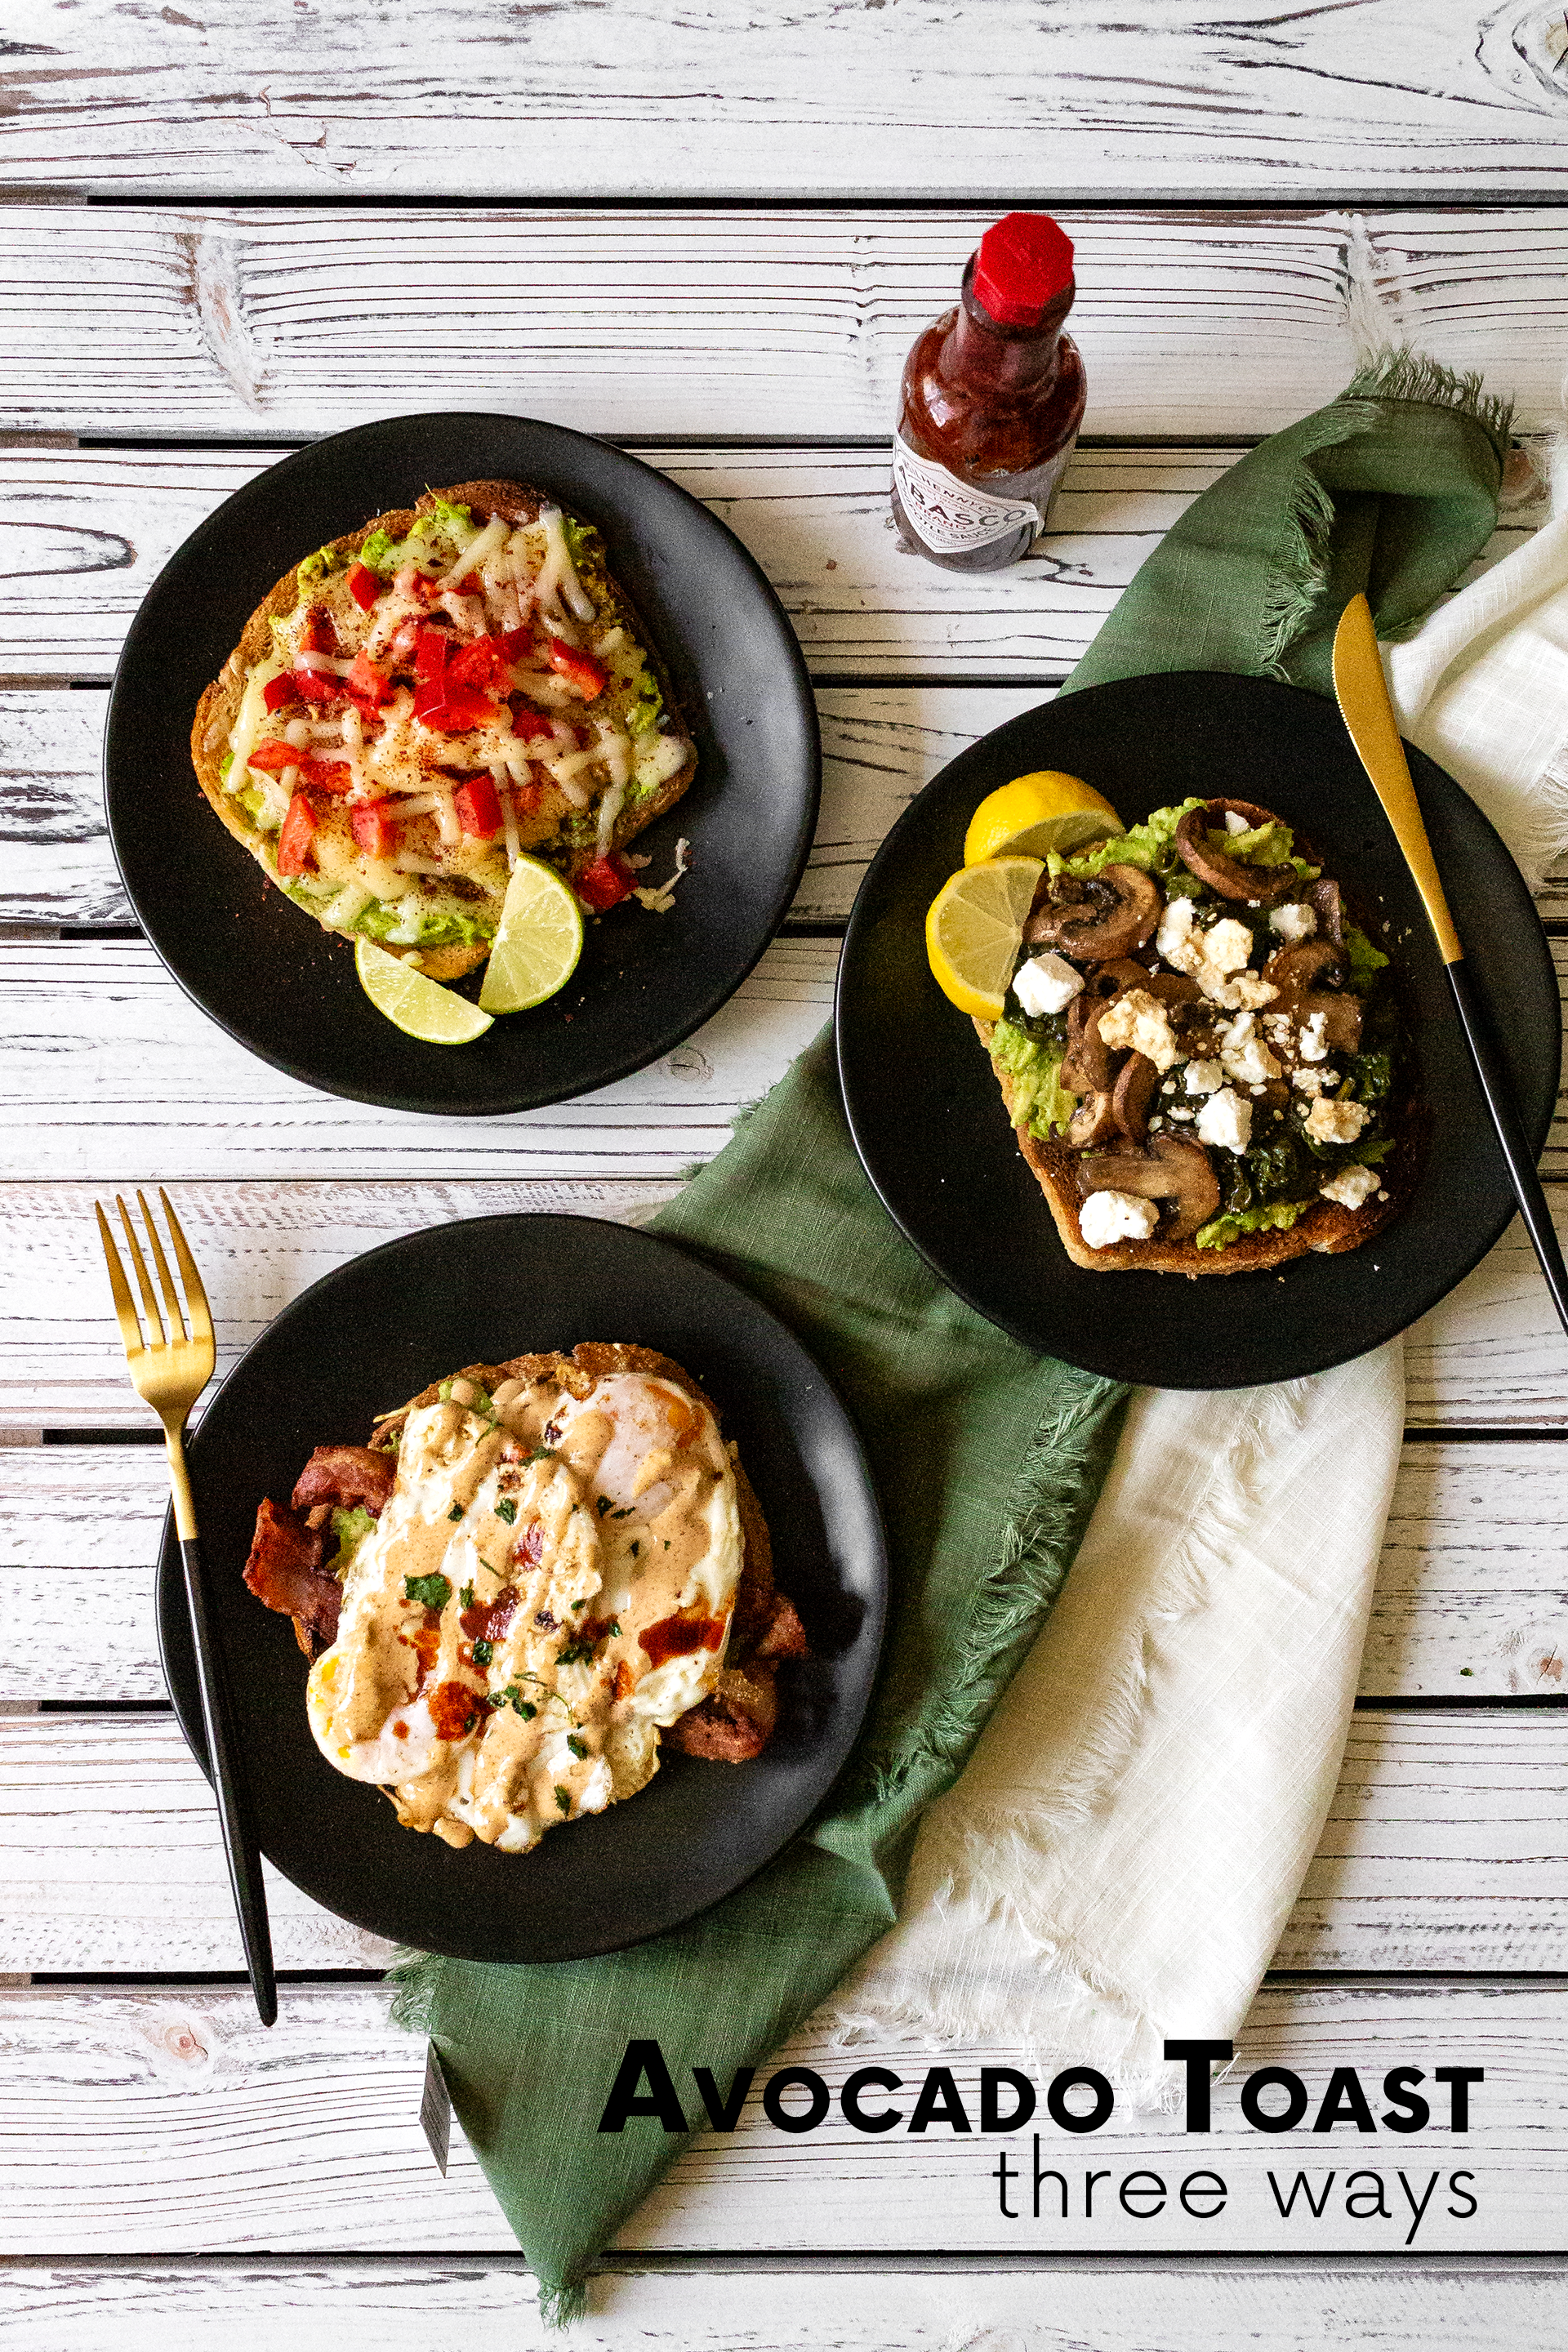
So, without further ado, I present three easy and delicious versions of this most blessed dish: I’m Only Dedicating Ten Minutes To My Lunch, Just A Little Bit Pretentious, and The Hangover: Part IV.
I’m Only Dedicating Ten Minutes To My Lunch
Ingredients:
- 1 slice bread
- butter (to toast)
- 1/2 ripe avocado
- 1/3 cup shredded pepperjack cheese
- 1/4 cup diced red bell pepper
- 1/2 tsp chili powder
- lime juice (to taste)
Directions:
- In a small bowl, thoroughly mash 1/2 ripe avocado.
- Generously coat one side of the bread slice with butter. Place on a nonstick baking sheet and broil on LOW for 3-5 minutes, or until golden brown.
- Remove from oven, flip, and spread avocado on the soft/untoasted side of the bread.
- Top with cheese, bell pepper, and chili powder. Return to oven and broil on LOW for additional 2-4 minutes, or until cheese has melted.
- Garnish with lime juice and enjoy while warm.
Just A Little Bit Pretentious
Ingredients:
- 1 slice bread
- butter (to toast)
- 1/2 ripe avocado
- 1/2 cup raw, fresh spinach
- 1/3 cup sliced mushrooms
- 1/4 cup feta cheese
- 2-3 tbsp balsamic vinegar
- salt (to taste)
- black pepper (to taste)
- lemon juice (to taste)
Directions:
- In a nonstick skillet heated to medium-high, add mushrooms, spinach, balsamic vinegar, salt, and black pepper. Pan fry for 5-7 minutes, or until spinach has wilted and mushrooms have browned. Set aside.
- In a small bowl, thoroughly mash 1/2 ripe avocado.
- Generously coat one side of the bread slice with butter. Place on a nonstick baking sheet and broil on LOW for 3-5 minutes, or until golden brown.
- Remove from oven, flip, and spread avocado on the soft/untoasted side of the bread.
- Top with sauteed mushrooms/spinach, feta cheese, and lime juice. Can be enjoyed either warm or room-temperature.

The Hangover: Part IV
Ingredients:
- 1 slice bread
- butter (to toast)
- 1/2 ripe avocado
- 2-3 slices raw, thick-cut bacon
- 2 large eggs
- 2 tbsp chipotle mayo
- 1 tsp chipotle Tabasco sauce
- 1/2 tsp cilantro
Directions:
- In a large nonstick skillet, pan fry 2-3 slices thick-cut bacon until crispy.
- Without removing any rendered bacon fat from the pan (no matter how much is left; Kirkland Signature usually yields about 1/4 cup per 5 slices of bacon), crack one egg directly into the hot pan and position so that the how oil pools across the top of the whites. Fry until bubbling and crispy on the bottom, then repeat with the second egg.
- Meanwhile, in a small bowl, thoroughly mash 1/2 ripe avocado.
- Generously coat one side of the bread slice with butter. Place on a nonstick baking sheet and broil on LOW for 3-5 minutes, or until golden brown.
- Remove from oven, flip, and spread avocado on the soft/untoasted side of the bread.
- Top with bacon, fried eggs, chipotle mayo, hot sauce, and cilantro. Serve immediately, while eggs are still hot. (Best eaten with a knife and fork.)


Avocado Toast: I’m Only Dedicating Ten Minutes To My Lunch
Ingredients
- 1 slice bread
- butter to toast
- 1/2 ripe avocado
- 1/3 cup shredded pepperjack cheese
- 1/4 cup diced red bell pepper
- 1/2 tsp chili powder
- lime juice to taste
Instructions
- In a small bowl, thoroughly mash 1/2 ripe avocado.
- Generously coat one side of the bread slice with butter. Place on a nonstick baking sheet and broil on LOW for 3-5 minutes, or until golden brown.
- Remove from oven, flip, and spread avocado on the soft/untoasted side of the bread.
- Top with cheese, bell pepper, and chili powder. Return to oven and broil on LOW for additional 2-4 minutes, or until cheese has melted.
- Garnish with lime juice and enjoy while warm.
Avocado Toast: Just A Little Bit Pretentious
Ingredients
- 1 slice bread
- butter to toast
- 1/2 ripe avocado
- 1/2 cup raw fresh spinach
- 1/3 cup sliced mushrooms
- 1/4 cup feta cheese
- 2-3 tbsp balsamic vinegar
- salt to taste
- black pepper to taste
- lemon juice to taste
Instructions
- In a nonstick skillet heated to medium-high, add mushrooms, spinach, balsamic vinegar, salt, and black pepper. Pan fry for 5-7 minutes, or until spinach has wilted and mushrooms have browned. Set aside.
- In a small bowl, thoroughly mash 1/2 ripe avocado.
- Generously coat one side of the bread slice with butter. Place on a nonstick baking sheet and broil on LOW for 3-5 minutes, or until golden brown.
- Remove from oven, flip, and spread avocado on the soft/untoasted side of the bread.
- Top with sauteed mushrooms/spinach, feta cheese, and lime juice. Can be enjoyed either warm or room-temperature.

Avocado Toast: The Hangover: Part IV
Ingredients
- 1 slice bread
- butter to toast
- 1/2 ripe avocado
- 2-3 slices raw thick-cut bacon
- 2 large eggs
- 2 tbsp chipotle mayo
- 1 tsp chipotle Tabasco sauce
- 1/2 tsp cilantro
Instructions
- In a large nonstick skillet, pan fry 2-3 slices thick-cut bacon until crispy.
- Without removing any rendered bacon fat from the pan*, crack one egg directly into the hot pan and position so that the how oil pools across the top of the whites. Fry until bubbling and crispy on the bottom, then repeat with the second egg.
- Meanwhile, in a small bowl, thoroughly mash 1/2 ripe avocado.
- Generously coat one side of the bread slice with butter. Place on a nonstick baking sheet and broil on LOW for 3-5 minutes, or until golden brown.
- Remove from oven, flip, and spread avocado on the soft/untoasted side of the bread.
- Top with bacon, fried eggs, chipotle mayo, hot sauce, and cilantro. Serve immediately, while eggs are still hot. (Best eaten with a knife and fork.)
Notes
The post Avocado Toast Three Ways appeared first on I Forgot Salt!.
]]>The post Buffalo Chicken and Blue Cheese Sheet Pan Pizza appeared first on I Forgot Salt!.
]]>
Like I mentioned a few posts ago, pizza night is likely going to become a regular thing in our household, like the late and great Monday curry dinners. It’s fun and delicious, and one of the few things Alex and I can really sit down and do together amid our increasingly busy schedules. He’s also been a great sport about helping me take pictures of things–holding lights, adding a glass here or plate there, straightening the garnish–and I’m grateful for all of his help. What a guy! Plus, he gets delicious food out of the whole thing, so everyone wins!
This recipe makes eight pieces of pizza.
Ingredients:
- 1 lb pre-made, uncooked pizza dough
- 1 cup spinach
- 1 red bell pepper, thinly sliced
- 1 cup shredded rotisserie chicken
- ½ cup buffalo wing sauce, divided
- 1/3 lb mozzarella cheese, sliced into rounds
- 1/3 cup blue cheese crumbles
- ¼ cup soft goat cheese
- ¼ cup minced sun-dried tomatoes
- 1 tbsp minced garlic
- 1 tbsp olive oil
- 2 tsp salt
Directions:
- If using frozen dough, let sit out at room temperature to thaw and rest.
- Preheat oven to 450F.
-
On a clean, cool baking sheet, add a layer of 1 tbsp olive oil. Gently flatten and spread out your pizza dough until you have a thin sheet on your pan, roughly ¼ inch thick.
- Top pizza with majority of the buffalo sauce as the base, add salt and garlic, then layer on shredded chicken, spinach, tomatoes, and sliced red bell pepper. Top with mozzarella, goat, and blue cheeses.
- Bake for 17-20 minutes, or until crust has browned and cheese has melted. Serve with remaining buffalo sauce drizzled on top.
This recipe keeps for about 24hrs and reheats just about as well as any other store-bought or homemade pizza. I recommend setting your oven to 400F, layering some fresh cheese on top, and baking it for 3-5 minutes for the best second-day results. You could also add fresh cheese and broil it for a few minutes, as well!


Buffalo Chicken and Blue Cheese Sheet Pan Pizza
Ingredients
- 1 lb pizza dough uncooked
- 1 cup spinach
- 1 red bell pepper thinly sliced
- 1 cup rotisserie chicken shredded
- ½ cup buffalo wing sauce divided
- 1/3 lb mozzarella cheese sliced into rounds
- 1/3 cup blue cheese crumbles
- ¼ cup soft goat cheese
- ¼ cup sun-dried tomatoes minced
- 1 tbsp garlic minced
- 1 tbsp olive oil
- 2 tsp salt
Instructions
- If using frozen dough, let sit out at room temperature to thaw and rest.
- Preheat oven to 450F.
- On a clean, cool baking sheet, add a layer of 1 tbsp olive oil. Gently flatten and spread out your pizza dough until you have a thin sheet on your pan, roughly ¼ inch thick.
- Top pizza with majority of the buffalo sauce as the base, add salt and garlic, then layer on shredded chicken, spinach, tomatoes, and sliced red bell pepper. Top with mozzarella, goat, and blue cheeses.
- Bake for 17-20 minutes, or until crust has browned and cheese has melted. Serve with remaining buffalo sauce drizzled on top.
The post Buffalo Chicken and Blue Cheese Sheet Pan Pizza appeared first on I Forgot Salt!.
]]>The post Arugula and Roasted Red Pepper Sheet Pan Pizza appeared first on I Forgot Salt!.
]]>
I have decided to get back into meal planning. Things fell off a little bit over the summer when I was unbelievably busy, and when I went grocery shopping every two weeks I found myself just shoving things into the cart without any real intention to make something specific. This led to an almost bi-weekly fridge purge, and I ended up throwing away half of the things I bought because they went bad before I had the chance to use them. Meal planning helps mitigate that, and it’s nice because then I don’t have to think too hard about cooking. Anyway–we decided to do a pizza night sometime this week, and this was the result.
This recipe makes two to four servings, or eight pieces of pizza.
Ingredients:
- 1 lb pre-made, uncooked pizza dough
- 2 cups fresh arugula
- 2 red bell peppers
- ½ lb mozzarella cheese, sliced into rounds
- 1/3 cup soft goat cheese
- ¼ cup parmesan cheese
- ¼ cup pesto
- 2 tbsp minced sun-dried tomatoes
- 2 tbsp olive oil
- ½ tsp basil
- ½ tsp parsley
- ½ tsp oregano
- ½ tsp thyme
- ¼ salt
- ½ black pepper
Directions:
- If using a frozen ball of dough, let sit out at room temperature for about 30 mins to thaw and gently rise.
- Slice stems and remove cores from red bell peppers. Cut each pepper in half top-to-bottom so you end up with four large, relatively flat pieces of bell pepper.
- Lay pepper halves on a baking sheet skin-side up. Broil on high for 3-5 minutes, or until the peppers have softened and begun to blacken. Remove from the oven and slice into thin strips.
- Preheat oven to 450F.
- On a clean, cool baking sheet, add a layer of 1 tbsp olive oil. Gently flatten and spread out your pizza dough until you have a thin sheet on your pan, roughly ¼ inch thick.
- Top pizza dough with pesto as a base, and add spices (basil, parsley, oregano, thyme, salt, and pepper). Layer on cheeses, arugula, sliced roasted peppers, and minced sun-dried tomatoes as desired.
- Bake pizza for 15-17 minutes, or until the crust has browned and the cheese has melted. (NOTE: Depending on the age and quality of your oven, you may need to rotate the pan to ensure even baking on both sides.) Remove carefully, slice, and enjoy!
This recipe keeps for about 24hrs and reheats just about as well as any other store-bought or homemade pizza. I recommend setting your oven to 400F, layering some fresh cheese on top, and baking it for 3-5 minutes for the best second-day results. You could also add fresh cheese and broil it for a few minutes, as well!


Arugula and Roasted Red Pepper Sheet Pan Pizza
Ingredients
- 1 lb pizza dough uncooked
- 2 cups arugula fresh
- 2 red bell peppers
- ½ lb mozzarella cheese sliced into rounds
- 1/3 cup soft goat cheese
- ¼ cup parmesan cheese
- ¼ cup pesto
- 2 tbsp sun-dried tomatoes minced
- 2 tbsp olive oil
- ½ tsp basil
- ½ tsp parsley
- ½ tsp oregano
- ½ tsp thyme
- ¼ salt
- ½ black pepper
Instructions
- If using a frozen ball of dough, let sit out at room temperature for about 30 mins to thaw and gently rise.
- Slice stems and remove cores from red bell peppers. Cut each pepper in half top-to-bottom so you end up with four large, relatively flat pieces of bell pepper.
- Lay pepper halves on a baking sheet skin-side up. Broil on high for 3-5 minutes, or until the peppers have softened and begun to blacken. Remove from the oven and slice into thin strips.
- Preheat oven to 450F.
- On a clean, cool baking sheet, add a layer of 1 tbsp olive oil. Gently flatten and spread out your pizza dough until you have a thin sheet on your pan, roughly ¼ inch thick.
- Top pizza dough with pesto as a base, and add spices (basil, parsley, oregano, thyme, salt, and pepper). Layer on cheeses, arugula, sliced roasted peppers, and minced sun-dried tomatoes as desired.
- Bake pizza for 15-17 minutes, or until the crust has browned and the cheese has melted.* Remove carefully, slice, and enjoy!
Notes
- * Depending on the age and quality of your oven, you may need to rotate the pan to ensure even baking on both sides.
The post Arugula and Roasted Red Pepper Sheet Pan Pizza appeared first on I Forgot Salt!.
]]>The post Cheesy Jalapeno No-Knead Beer/Soda Bread appeared first on I Forgot Salt!.
]]>
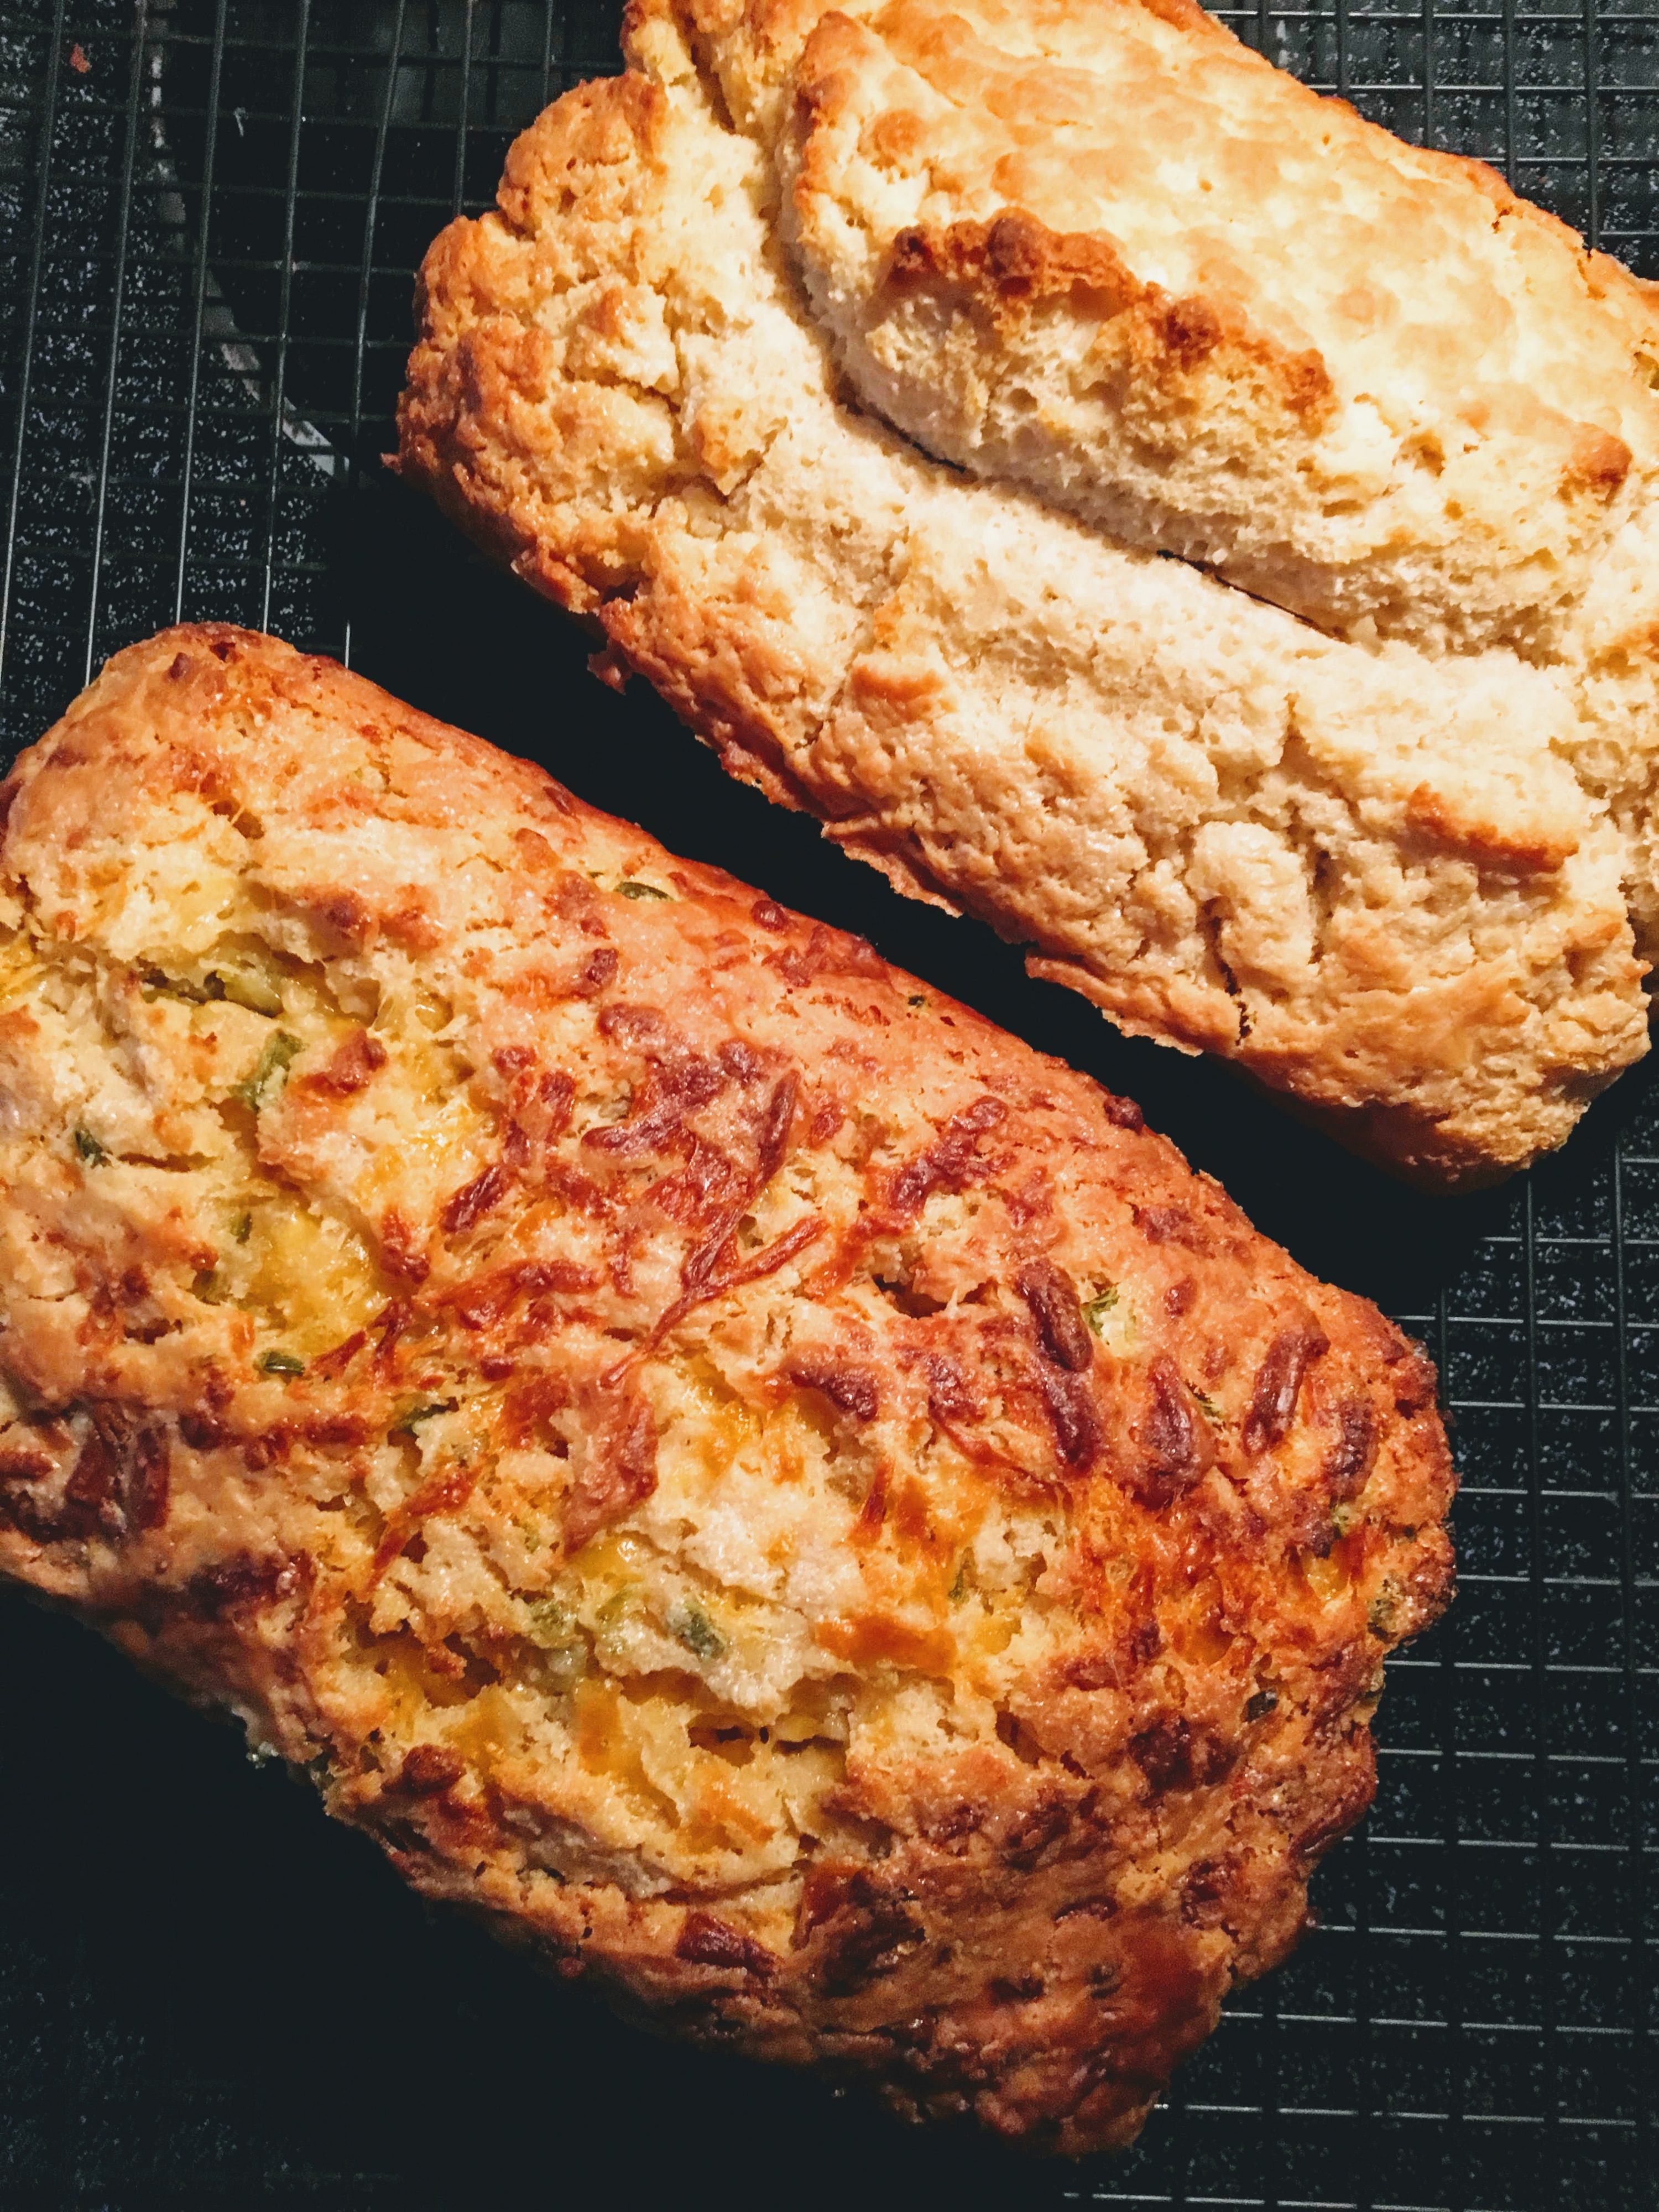
For better or worse, we were hit with another snow storm today, so I’ve been stuck inside cleaning. Now, I say “snow storm,” but because we live in the south it’s more like “an inch of snow was enough to shut down the entire city”. Either way I didn’t have much to do. I was struck with the desire to make something while waiting out the excitement of dumpling hot pot for dinner tonight, so I decided to try my hand (again) at baking bread. Until I figure out what went wrong last time, though, I’m not going to mess with yeast for a while. Thus, beer bread was the perfect answer. I actually made two loaves–this and a “regular” beer loaf (see image below), but this one was by far my favorite.
This recipe makes about 7-9 slices, depending on how thick you cut it.
Ingredients:
- 3 cups all-purpose flour
- 3 tsp baking powder
- 1 tsp salt
- ¼ cup sugar
- ¼ cup minced pickled jalapeños
- 1 cup shredded colby jack cheese
- 1 can (12oz) beer or soda
- 4 tbsp (about ½ stick) butter
Directions:
- Preheat oven to 375F.
- Grease edges and corners of 8×4 bread pan
- Melt 4 tbsp butter in a small bowl and set aside.
- In a medium-sized bowl, mix flour, salt, sugar, and baking powder until combined. Add cheese and jalapeños and mix until combined.
- Add beer and stir with a large spatula or spoon until a wet, sticky dough forms.
- Transfer dough to greased loaf tin and evenly spread so it covers all corners.
- Pour melted butter over the dough in the pan.
- Bake for 50-60 minutes, or until a knife stuck in the dough comes out clean.
- Cool for 5 minutes before removing from pan. Serve with butter and enjoy!
This recipe keeps for a week if covered in an air-tight container!
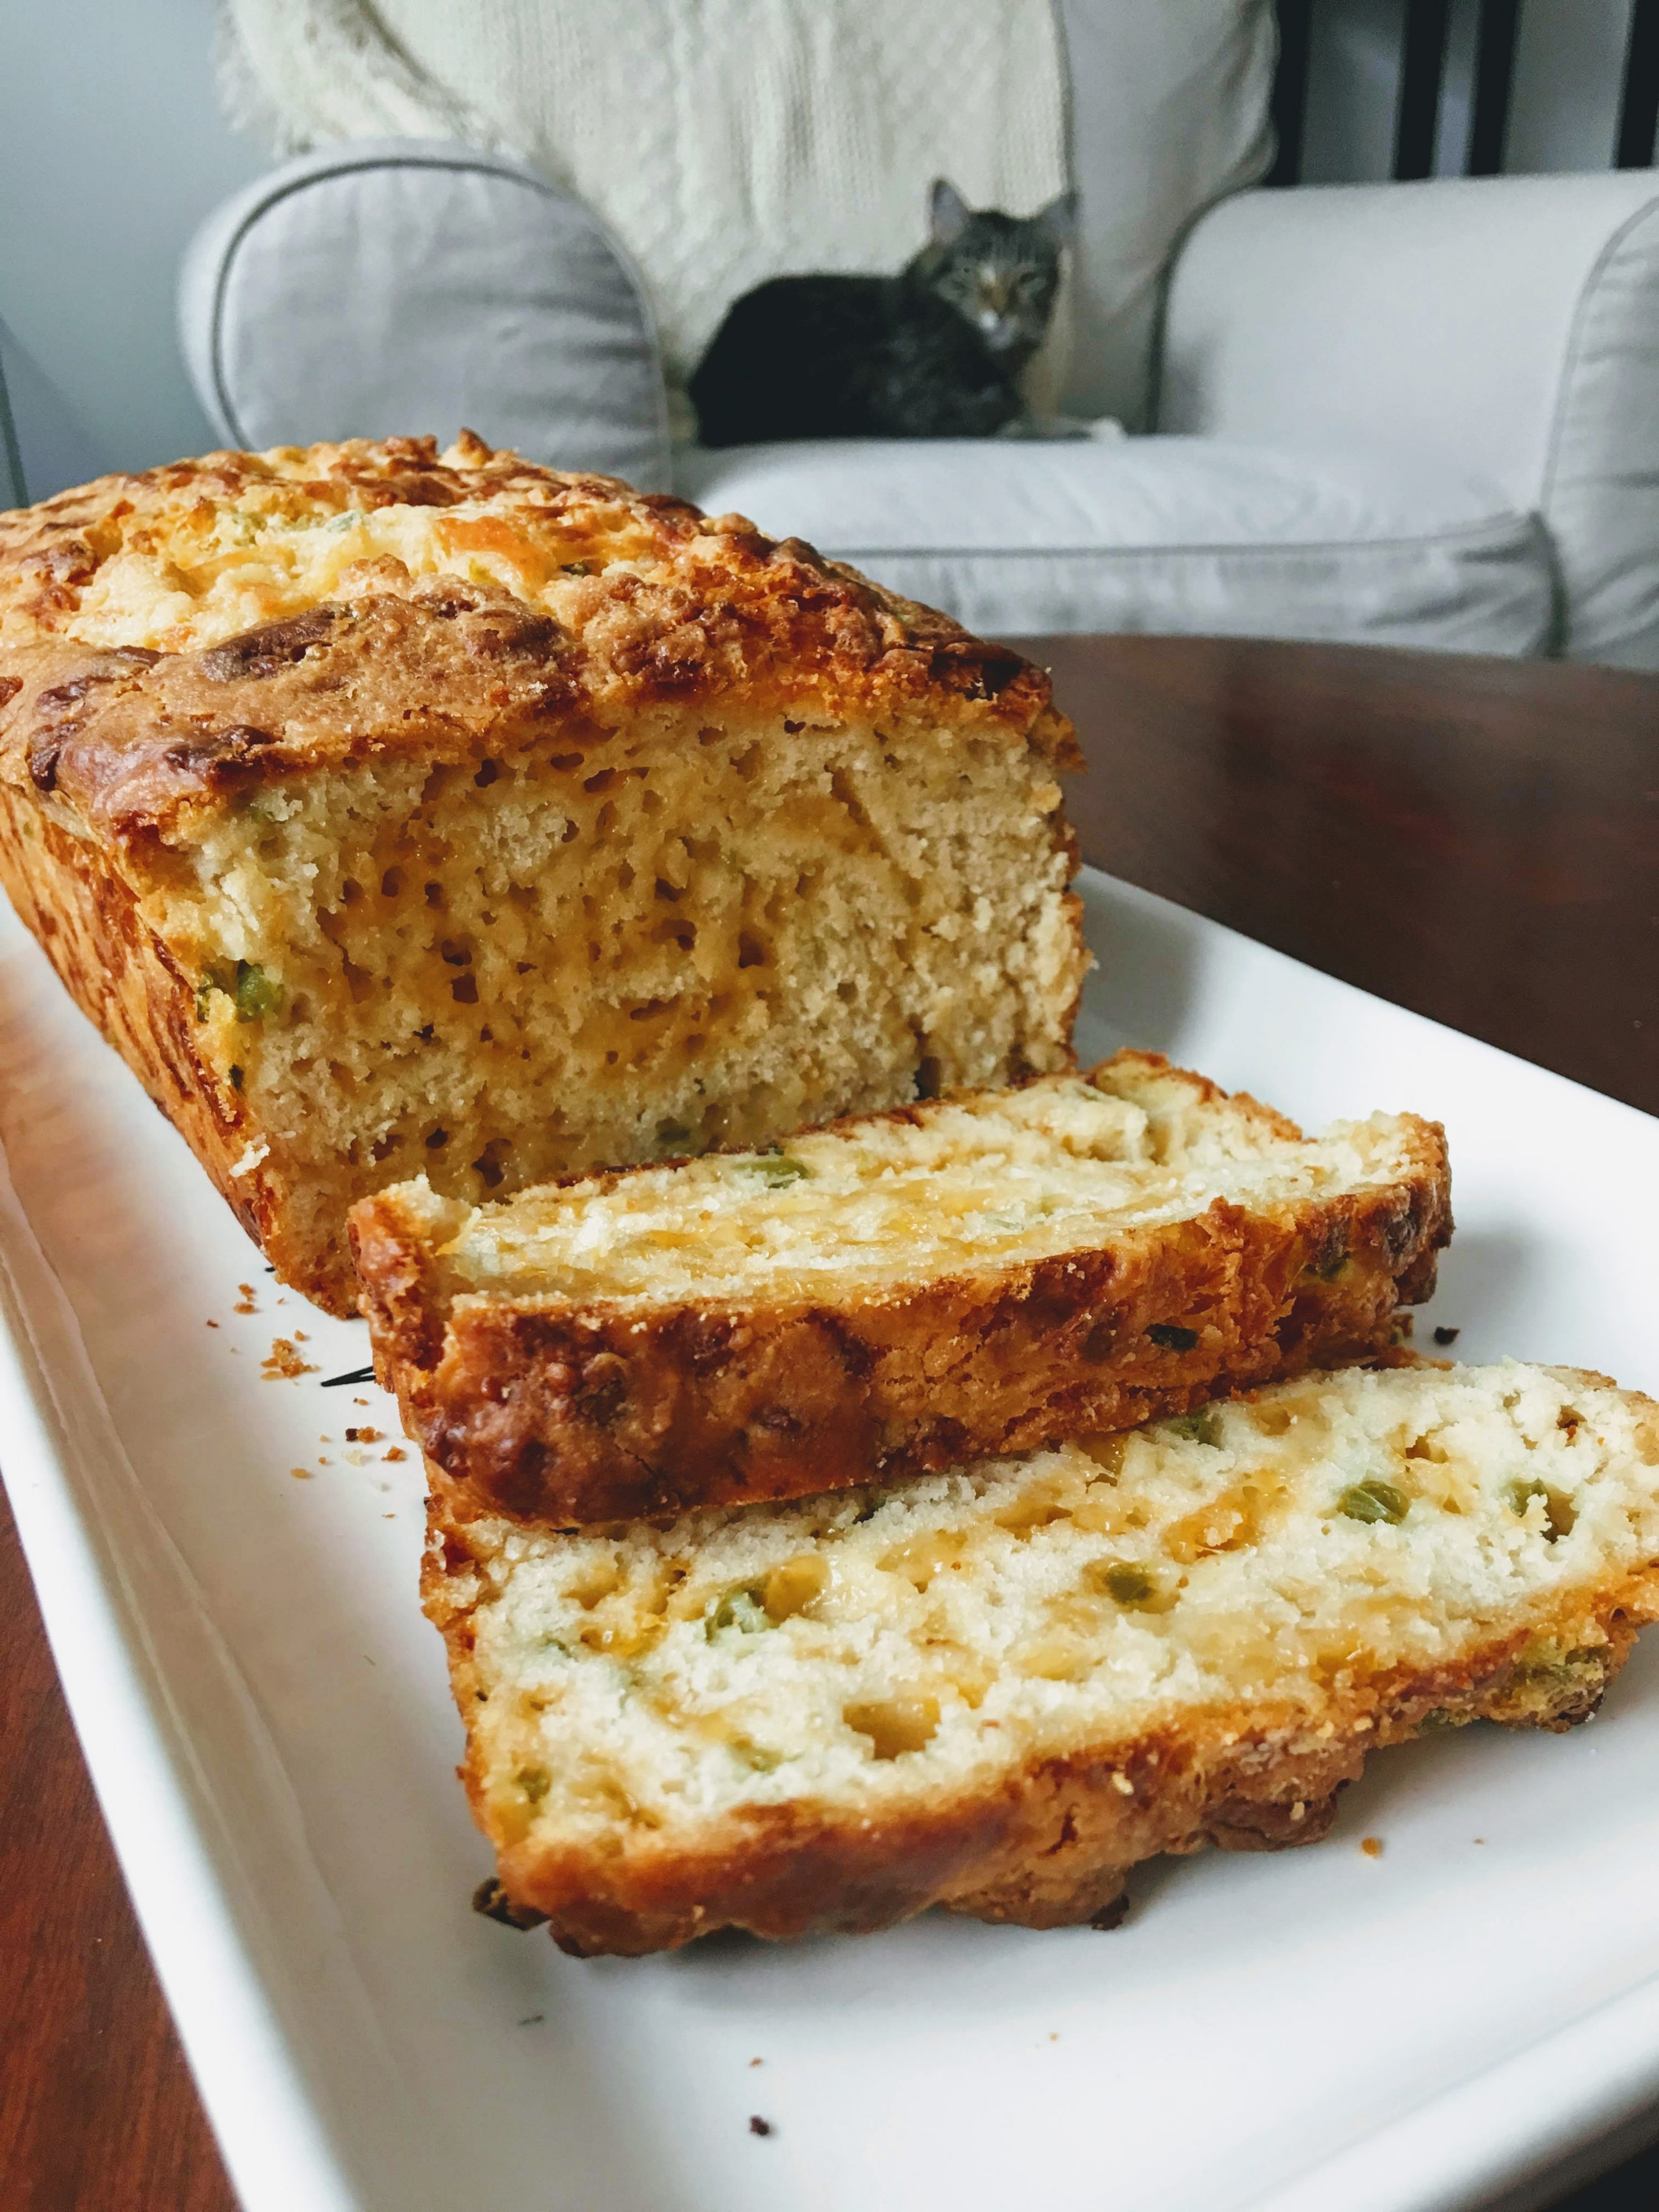

Cheesy Jalapeño No-Knead Beer/Soda Bread
Ingredients
- 3 cups flour all-purpose
- 3 tsp baking powder
- 1 tsp salt
- ¼ cup sugar
- ¼ cup pickled jalapeños minced
- 1 cup colby jack cheese shredded
- 1 can beer or soda
- 4 tbsp butter
Instructions
- Preheat oven to 375F.
- Grease edges and corners of 8×4 bread pan
- Melt 4 tbsp butter in a small bowl and set aside.
- In a medium-sized bowl, mix flour, salt, sugar, and baking powder until combined. Add cheese and jalapeños and mix until combined.
- Add beer and stir with a large spatula or spoon until a wet, sticky dough forms.
- Transfer dough to greased loaf tin and evenly spread so it covers all corners.
- Pour melted butter over the dough in the pan.
- Bake for 50-60 minutes, or until a knife stuck in the dough comes out clean.
- Cool for 5 minutes before removing from pan. Serve with butter and enjoy!
The post Cheesy Jalapeno No-Knead Beer/Soda Bread appeared first on I Forgot Salt!.
]]>The post Easy Homemade Flour Tortillas appeared first on I Forgot Salt!.
]]>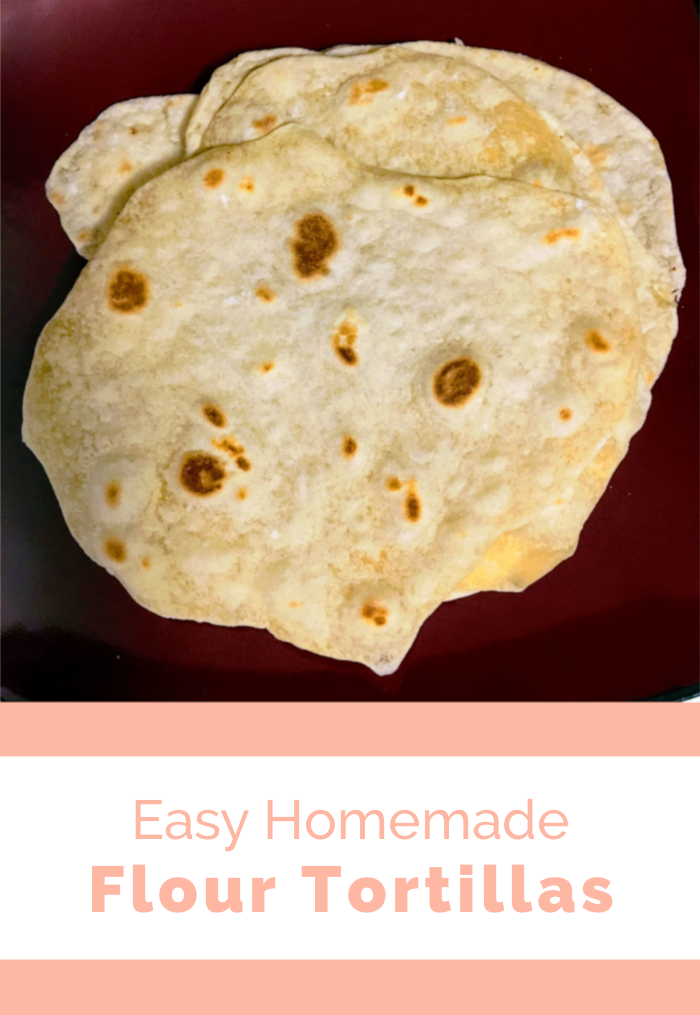
This week’s theme for recipes seems to be “you’d have to pay me to go to the grocery store right now–I’ll just do it myself,” which I’m actually pretty okay with. Although snagging a $2 package of 10 store-brand flour tortillas might not break the bank for some, I realized this morning that a 5lb bag of flour costs about the same ($2.50) and you could make about 85 tortillas instead. Granted, you might not need that many, but if you’re trying to stretch your budget this could be a good way to eat something delicious and homemade without spending too much money. Plus, you can use your extra flour to make all kinds of other great things! And as an added bonus double-whammy, it only took me about 20 minutes to make 14 tortillas because there’s no yeast or rising/”proving” involved. Good stuff.
This recipe makes 14 tortillas!
Ingredients:
- 2 cups all-purpose flour
- ¾ cup water
- 3 tbsp olive oil
- 2 tsp salt
Directions:
- In a large bowl, add your dry ingredients (flour and salt) and mix them until the salt is evenly distributed throughout. Add wet ingredients (water and oil) and mix until a lump of dough begins to form.
- Knead dough for a 5 minutes, adding additional flour (too wet) or water (too dry) a little at a time as needed. Knead until a soft but not sticky dough has formed, about the consistency of pizza dough or slime. It shouldn’t stick to your fingers when you touch it, but if you grabbed half and let the rest hang down it should stretch easily with gravity, if that makes sense.
- Cover with a towel or plastic wrap and let rest for 10 minutes.
- Meanwhile, heat a non-stick pan (or well-greased stainless steel/cast iron pan) on medium-high heat.
- When your dough has finished resting, tear off a piece about an inch in diameter and roll it in your palm to form a small ball. Flatten it gently, pinching the sides until you have a disc the size of a pizza bagel bite or the bottom of a 1/3 cup measuring cup (those are the best comparisons I can think of).
- Place dough disc onto a well-foured surface and roll with a rolling pin, wine bottle, glass jar–whatever–until you have a very thin, vaguely-tortilla-shaped piece of dough about 1/8th inch thick.
- Transfer to hot pan and cook for about 1 minute, or until bubbles have begun to form on the surface. Flip and cook on the other side for about 30 seconds, then transfer to a plate.
- Repeat until you have run out of dough.
This recipe keeps in a sealed container for about a week in the fridge or up to six months frozen, and reheats well in the microwave. To reheat, wrap the tortillas in a damp paper towel and place in a sealed container (like a tortilla holder or covered glass bowl) in the microwave for about 45 seconds. They should come out soft and steamy and ready to eat! If your tortillas dry out, don’t worry–just cut them up and make tortilla chips by baking or frying them!


Ingredients
- 2 cups flour all-purpose
- ¾ cup water
- 3 tbsp olive oil
- 2 tsp salt
Instructions
- In a large bowl, add your dry ingredients (flour and salt) and mix them until the salt is evenly distributed throughout. Add wet ingredients (water and oil) and mix until a lump of dough begins to form.
- Knead dough for a 5 minutes, adding additional flour (too wet) or water (too dry) a little at a time as needed. Knead until a soft but not sticky dough has formed, about the consistency of pizza dough or slime. It shouldn’t stick to your fingers when you touch it, but if you grabbed half and let the rest hang down it should stretch easily with gravity, if that makes sense.
- Cover with a towel or plastic wrap and let rest for 10 minutes.
- Meanwhile, heat a non-stick pan (or well-greased stainless steel/cast iron pan) on medium-high heat.
- When your dough has finished resting, tear off a piece about an inch in diameter and roll it in your palm to form a small ball. Flatten it gently, pinching the sides until you have a disc the size of a pizza bagel bite or the bottom of a 1/3 cup measuring cup (those are the best comparisons I can think of).
- Place dough disc onto a well-foured surface and roll with a rolling pin, wine bottle, glass jar–whatever–until you have a very thin, vaguely-tortilla-shaped piece of dough about 1/8th inch thick.
- Transfer to hot pan and cook for about 1 minute, or until bubbles have begun to form on the surface. Flip and cook on the other side for about 30 seconds, then transfer to a plate.
- Repeat until you have run out of dough.
The post Easy Homemade Flour Tortillas appeared first on I Forgot Salt!.
]]>The post Homemade Pretzel Bites with Sriracha Beer Cheese appeared first on I Forgot Salt!.
]]>
I’m a sucker for anything cheesy, and beer cheese is a particularly guilty pleasure of mine. It’s quick and easy to make, and it tastes absolutely delicious with everything from tortilla chips to French fries to the soft pretzels I’ll be posting about today. I’ve already written down a recipe for spent grain pretzels, but this one is for mall-style soft pretzels made with regular flour and is easily accessible for everyone. It’s a great snack to munch on during a video game binge (Kingdom Hearts 3, anyone?) or while watching the Superbowl, and is a definite crowd-pleaser because who doesn’t love bread and cheese? Losers, that’s who.
This recipe makes 24-28 soft pretzel bites and about 2 cups beer cheese.
Pretzel Bite Ingredients:
- 1 packet (2 ¼ tsp) dry active yeast
- 2 tbsp light brown sugar
- 1 ¾ cup warm water
- 7 tbsp melted butter
- 5 cups unbleached flour (all-purpose)
- 2 ½ tsp salt
- 10 cups cold water
- ½ cup baking soda
- 2 eggs
- 2 tbsp olive oil
Sriracha Beer Cheese Ingredients:
- 4 tbsp butter
- 2 tbsp unbleached flour (all-purpose)
- ½ cup heavy cream
- ¼ cup water
- 8 oz (about ¾ 12oz can or bottle) beer, any kind
- ¼ cup sriracha
- 2 cup grated pepper jack cheese
- 1 tsp salt
Pretzel Bite Directions:
- Add sugar, yeast, butter, and 1 ¾ cup warm water to the largest bowl you own and mix until combined. Let sit for 5-10 minutes, or until the yeast has formed decent foam raft on top of the liquid.
- Add flour, and salt. Mix with a spatula or your hands until a smooth dough has formed, about 15-20 minutes depending on how fast you work (aka how strong your arm is). Once the dough gets thick and begins to form a large singular mass, I recommend using a press-and-fold motion, scraping the sides every so often to make sure everything is properly combined. (NOTES: If necessary, add a little bit of water [dry dough] or flour [wet dough] while you’re kneading. You may also want to remove the dough from the bowl and knead it on lightly-floured surface if you don’t have the leverage to properly knead it in your bowl.)
- Knead until the dough is soft and elastic, but not sticky to the touch.
- Once you have a decent ball, add light oil along the edge of the bowl and roll your dough so that it is coated. Do not knead the oil into the dough! This is only to ensure that it doesn’t stick to the bowl while rising.
- Cover the bowl with a dishtowel or plastic wrap and set aside in a warm spot for 1 ½ – 3 hours, or until the dough doubles in size. (I usually put mine in the largest sunbeam I can find and move it as the hours go by so it stays warm.)
- Preheat your oven to 425F.
- Begin boiling 10 cups cold water in a medium sauce pot.
- Line 2 baking sheets with parchment paper.
- Tear off golf ball-sized chunks of your dough and roll into small balls with your hands. (NOTE: Be careful not to crush the dough too much while you’re tearing/rolling, because that will squish out all of the air bubbles that have formed inside the dough and result in a very dense pretzel.)
- Once the water has boiled, slowly add baking soda ¼ cup at a time. It will foam up, so be careful not to burn yourself!
- Boil your dough balls in the water/baking soda mixture in small batches for 30 seconds each batch, and remove carefully with a slotted spoon. (Tip: Line up your boiled dough on the baking sheets as soon as they’re out of the water, as they are very susceptible to sticking together when wet!)
- In a small bowl, beat 2 eggs. Brush the tops of your boiled dough balls with the egg wash. Season each with salt.
- Bake in the oven for 10-15 minutes, checking every so often to ensure that none are burning. The tops should be a nice golden brown!
- Remove from the oven and cool for 5 minutes. Serve while warm!
Sriracha Beer Cheese Directions:
- In a medium sauce pan on medium heat, melt butter until it has completely liquefied, stirring occasionally to ensure it does not burn.
- Once melted and lightly simmering, add flour, heavy cream, water, beer, and sriracha, stirring constantly as you add ingredients. Let simmer for 2-3 minutes.
- Remove from heat and immediately add cheese and salt, stirring constantly until it has completely melted and the sauce is smooth.
- Serve immediately and top with additional sriracha!
The pretzels will keep in the fridge for three days or frozen for up to six months, and reheat well in the microwave wrapped in a damp paper towel. The beer cheese keeps for up to a week, and reheats wonderfully in the microwave as well.


Homemade Pretzel Bites with Sriracha Beer Cheese
Ingredients
Pretzel Bite Ingredients:
- 1 packet 2 ¼ tsp dry active yeast
- 2 tbsp light brown sugar
- 1 ¾ cup warm water
- 7 tbsp melted butter
- 5 cups unbleached flour all-purpose
- 2 ½ tsp salt
- 10 cups cold water
- ½ cup baking soda
- 2 eggs
- 2 tbsp olive oil
Sriracha Beer Cheese Ingredients:
- 4 tbsp butter
- 2 tbsp unbleached flour all-purpose
- ½ cup heavy cream
- 8 oz beer any kind
- ¼ cup sriracha
- 1 cup pepper jack cheese grated
- 1 cup cheddar cheese grated
- 1 tsp salt
Instructions
Pretzel Bite Directions:
- Add sugar, yeast, butter, and 1 ¾ cup warm water to the largest bowl you own and mix until combined. Let sit for 5-10 minutes, or until the yeast has formed decent foam raft on top of the liquid.
- Add flour, and salt. Mix with a spatula or your hands until a smooth dough has formed, about 15-20 minutes depending on how fast you work (aka how strong your arm is). Once the dough gets thick and begins to form a large singular mass, I recommend using a press-and-fold motion, scraping the sides every so often to make sure everything is properly combined.*
- Knead until the dough is soft and elastic, but not sticky to the touch.
- Once you have a decent ball, add light oil along the edge of the bowl and roll your dough so that it is coated. Do not knead the oil into the dough! This is only to ensure that it doesn’t stick to the bowl while rising.
- Cover the bowl with a dishtowel or plastic wrap and set aside in a warm spot for 1 ½ – 3 hours, or until the dough doubles in size.**
- Preheat your oven to 425F.
- Begin boiling 10 cups cold water in a medium sauce pot.
- Line 2 baking sheets with parchment paper.
- Tear off golf ball-sized chunks of your dough and roll into small balls with your hands.***
- Once the water has boiled, slowly add baking soda ¼ cup at a time. It will foam up, so be careful not to burn yourself!
- Boil your dough balls in the water/baking soda mixture in small batches for 30 seconds each batch, and remove carefully with a slotted spoon.****
- In a small bowl, beat 2 eggs. Brush the tops of your boiled dough balls with the egg. Season each with salt.
- Bake in the oven for 10-15 minutes, checking every so often to ensure that none are burning. The tops should be a nice golden brown!
- Remove from the oven and cool for 5 minutes. Serve while warm!
Sriracha Beer Cheese Directions:
- In a medium sauce pan on medium heat, melt butter until it has completely liquefied, stirring occasionally to ensure it does not burn.
- Once melted and lightly simmering, add flour, cream, beer, and sriracha, stirring constantly as you add ingredients. Let simmer for 2-3 minutes.
- Remove from heat and immediately add cheese and salt, stirring constantly until it has completely melted and the sauce is smooth.
- Serve immediately and top with additional sriracha!
Notes
- *If necessary, add a little bit of water [dry dough] or flour [wet dough] while you’re kneading. You may also want to remove the dough from the bowl and knead it on lightly-floured surface if you don’t have the leverage to properly knead it in your bowl.
- **I usually put mine in a sunbeam.
- ***Be careful not to crush the dough too much while you’re tearing/rolling, because that will squish out all of the air bubbles that have formed inside the dough and result in a very dense pretzel.
- ****Line up your boiled dough on the baking sheets as soon as they’re out of the water, as they are very susceptible to sticking together when wet!
The post Homemade Pretzel Bites with Sriracha Beer Cheese appeared first on I Forgot Salt!.
]]>The post Spent Grain Pretzel Bites appeared first on I Forgot Salt!.
]]>
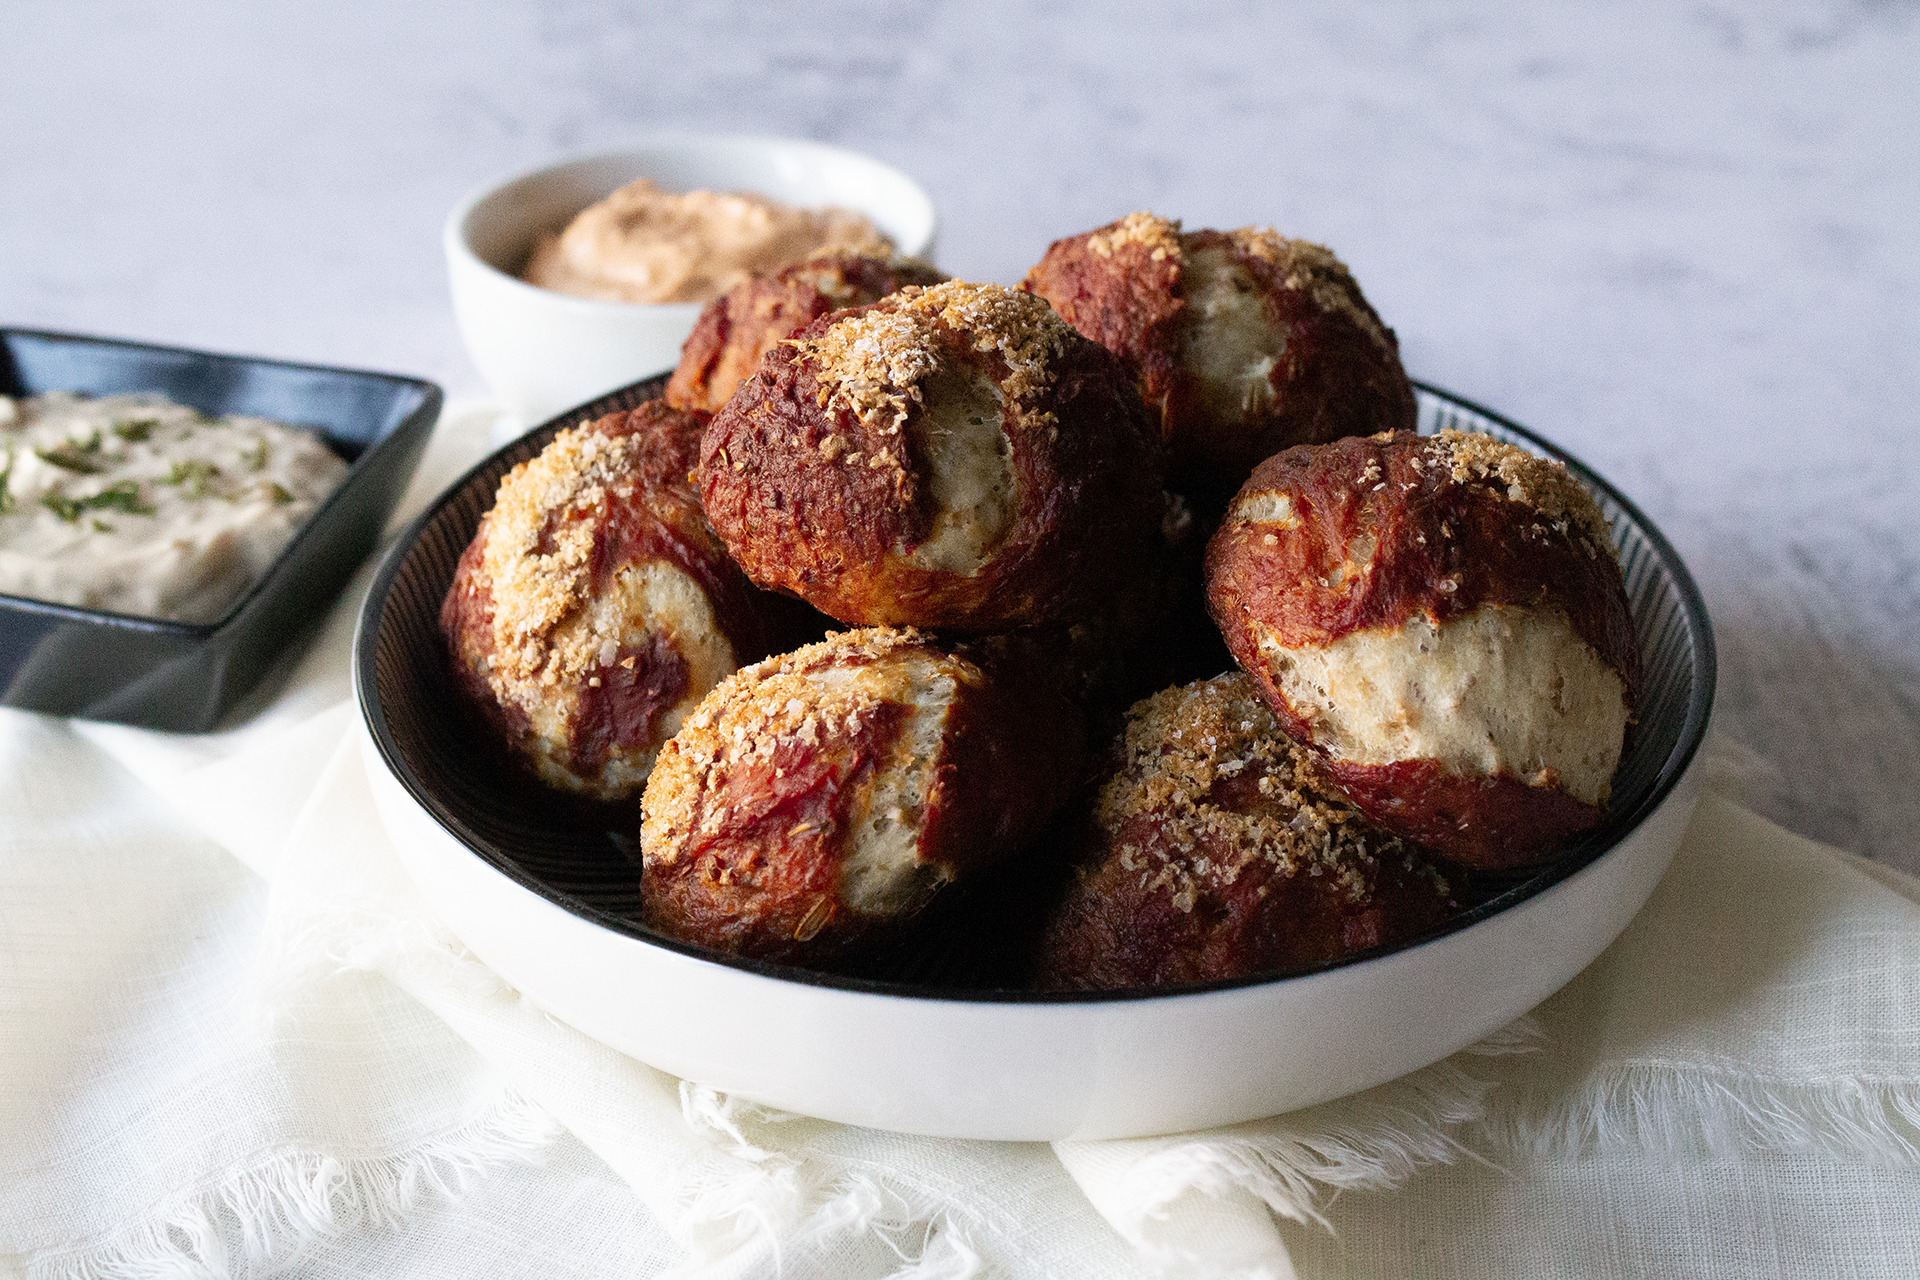
12/30/20 Update: This post has been updated from the original 2019 version to reflect my current recipe.
My boyfriend runs a small out-of-the-apartment microbrewery in his spare time, so we have a constant supply of spent grain. Usually, it goes straight from the Grainfather to the trash, but this weekend I decided to do something a little different. Inspired by my sister-in-law’s ingenuity in her own kitchen over the holidays, I saved a few cups of a 12:1 Briess 2-Row Pale/Caramel 40L (92% and 8%) mixture from the latest batch of our flagship IPA and dove back into bread-making for the first time in a several years. Honestly, I’d forgotten how fun and easy it is! And it’s always nice when something as versatile as spent grain takes on a new life rather than going to waste.
This recipe makes 28 pretzel bites!
Ingredients:
- 2 cups spent grains
- 1 1/2 cups all-purpose flour
- 1 1/2 cups whole-wheat flour
- 2 1/4 tsp dry active yeast
- 2 tbsp light brown sugar
- 2 cups lukewarm water
- 8 tbsp melted butter
- 3 tsp salt
- 2 tbsp olive oil
- 1 cup baking soda
- 1/4 cup milk
- 2 tbsp honey/maple syrup
- additional salt (to garnish)
Directions:
- Add sugar, yeast, cooled melted butter, and lukewarm water to a large mixing bowl and stir gently until most of the sugar has dissolved. Let sit for 5-10 minutes, or until a yeast raft has formed on the surface of your liquid.
- Add spent grain, all-purpose flour, whole-wheat flour and salt a little at a time to the wet ingredients. Mix with a spatula or your hands until a smooth dough has formed, about 15-20 minutes (or use the dough hook if you have a stand
mixer). Once the dough gets thick and begins to form a large singular mass, I recommend using a press-and-fold motion, scraping the sides every so often to make sure everything is properly combined. If necessary, add a little bit of water (dry dough) or flour (wet dough) while youÕre kneading to keep it workable. - Once you have a decent ball, add olive oil along the edge of the bowl and across the top of your dough ball. Do not knead the oil into the dough. Cover the bowl with a dishtowel or plastic wrap and set aside in a warm spot for 1 1/2 hours, or until the dough doubles in size.
- When the dough has finished rising, divide into golf ball-sized rounds and spread evenly on several parchment paper-lined baking sheets. Cover with a dishtowel and let rest for an additional 10-15 minutes to prove.
- Preheat your oven to 425F, and begin boiling 10-12 cups cold water in a medium sauce pot.
- When water has begun boiling, carefully add baking soda a little at a time to prevent overflow.
- Boil dough balls 4-5 at a time in the baking soda/water mixture for about 1 minute, then return to the baking sheet. Repeat until all dough balls have been boiled.
- In a small bowl, combine milk and sweetener of choice. Brush the tops of each dough ball with the wash and immediately season with coarse salt to garnish.
- Bake for 15-20 minutes or until golden brown and crusty on the outside.
- Remove to a wire rack, and let cool and rest for at least 5 minutes before serving. Serve with dip of choice.
This recipe goes great with sriracha beer cheese, Heady Topper mustard, sriracha, or your favorite dipping sauce!
The pretzels will keep in the fridge for three days, and warm well in the microwave!

Spent Grain Pretzel Bites
Ingredients
- 2 cups spent grains
- 1 1/2 cups all-purpose flour
- 1 1/2 cups whole-wheat flour
- 2 1/4 tsp dry active yeast
- 2 tbsp light brown sugar
- 2 cups lukewarm water
- 8 tbsp melted butter
- 3 tsp salt
- 2 tbsp olive oil
- 1 cup baking soda
- 1/4 cup milk
- 2 tbsp honey/maple syrup
- additional salt to garnish
Instructions
- Add sugar, yeast, cooled melted butter, and lukewarm water to a large mixing bowl and stir gently until most of the sugar has dissolved. Let sit for 5-10 minutes, or until a yeast raft has formed on the surface of your liquid.
- Add spent grain, all-purpose flour, whole-wheat flour and salt a little at a time to the wet ingredients. Mix with aspatula or your hands until a smooth dough has formed, about 15-20 minutes (or use the dough hook if you have a stand mixer). Once the dough gets thick and begins to form a large singular mass, I recommend using a press-and-fold motion, scraping the sides every so often to make sure everything is properly combined. If necessary, add a little bit of water (dry dough) or flour (wet dough) while youÕre kneading to keep it workable.
- Once you have a decent ball, add olive oil along the edge of the bowl and across the top of your dough ball. Do not knead the oil into the dough. Cover the bowl with a dishtowel or plastic wrap and set aside in a warm spot for 1 1/2 hours, or until the dough doubles in size.
- When the dough has finished rising, divide into golf ball-sized rounds and spread evenly on several parchment paper-lined baking sheets. Cover with a dishtowel and let rest for an additional 10-15 minutes to prove.
- Preheat your oven to 425F, and begin boiling 10-12 cups cold water in a medium sauce pot.
- When water has begun boiling, carefully add baking soda a little at a time to prevent overflow.
- Boil dough balls 4-5 at a time in the baking soda/water mixture for about 1 minute, then return to the baking sheet. Repeat until all dough balls have been boiled.
- In a small bowl, combine milk and sweetener of choice. Brush the tops of each dough ball with the wash and immediately season with coarse salt to garnish.
- Bake for 15-20 minutes or until golden brown and crusty on the outside.
- Remove to a wire rack, and let cool and rest for at least 5 minutes before serving. Serve with dip of choice.

The post Spent Grain Pretzel Bites appeared first on I Forgot Salt!.
]]>