The post Sweet Potato + Black Bean Enchiladas appeared first on I Forgot Salt!.
]]>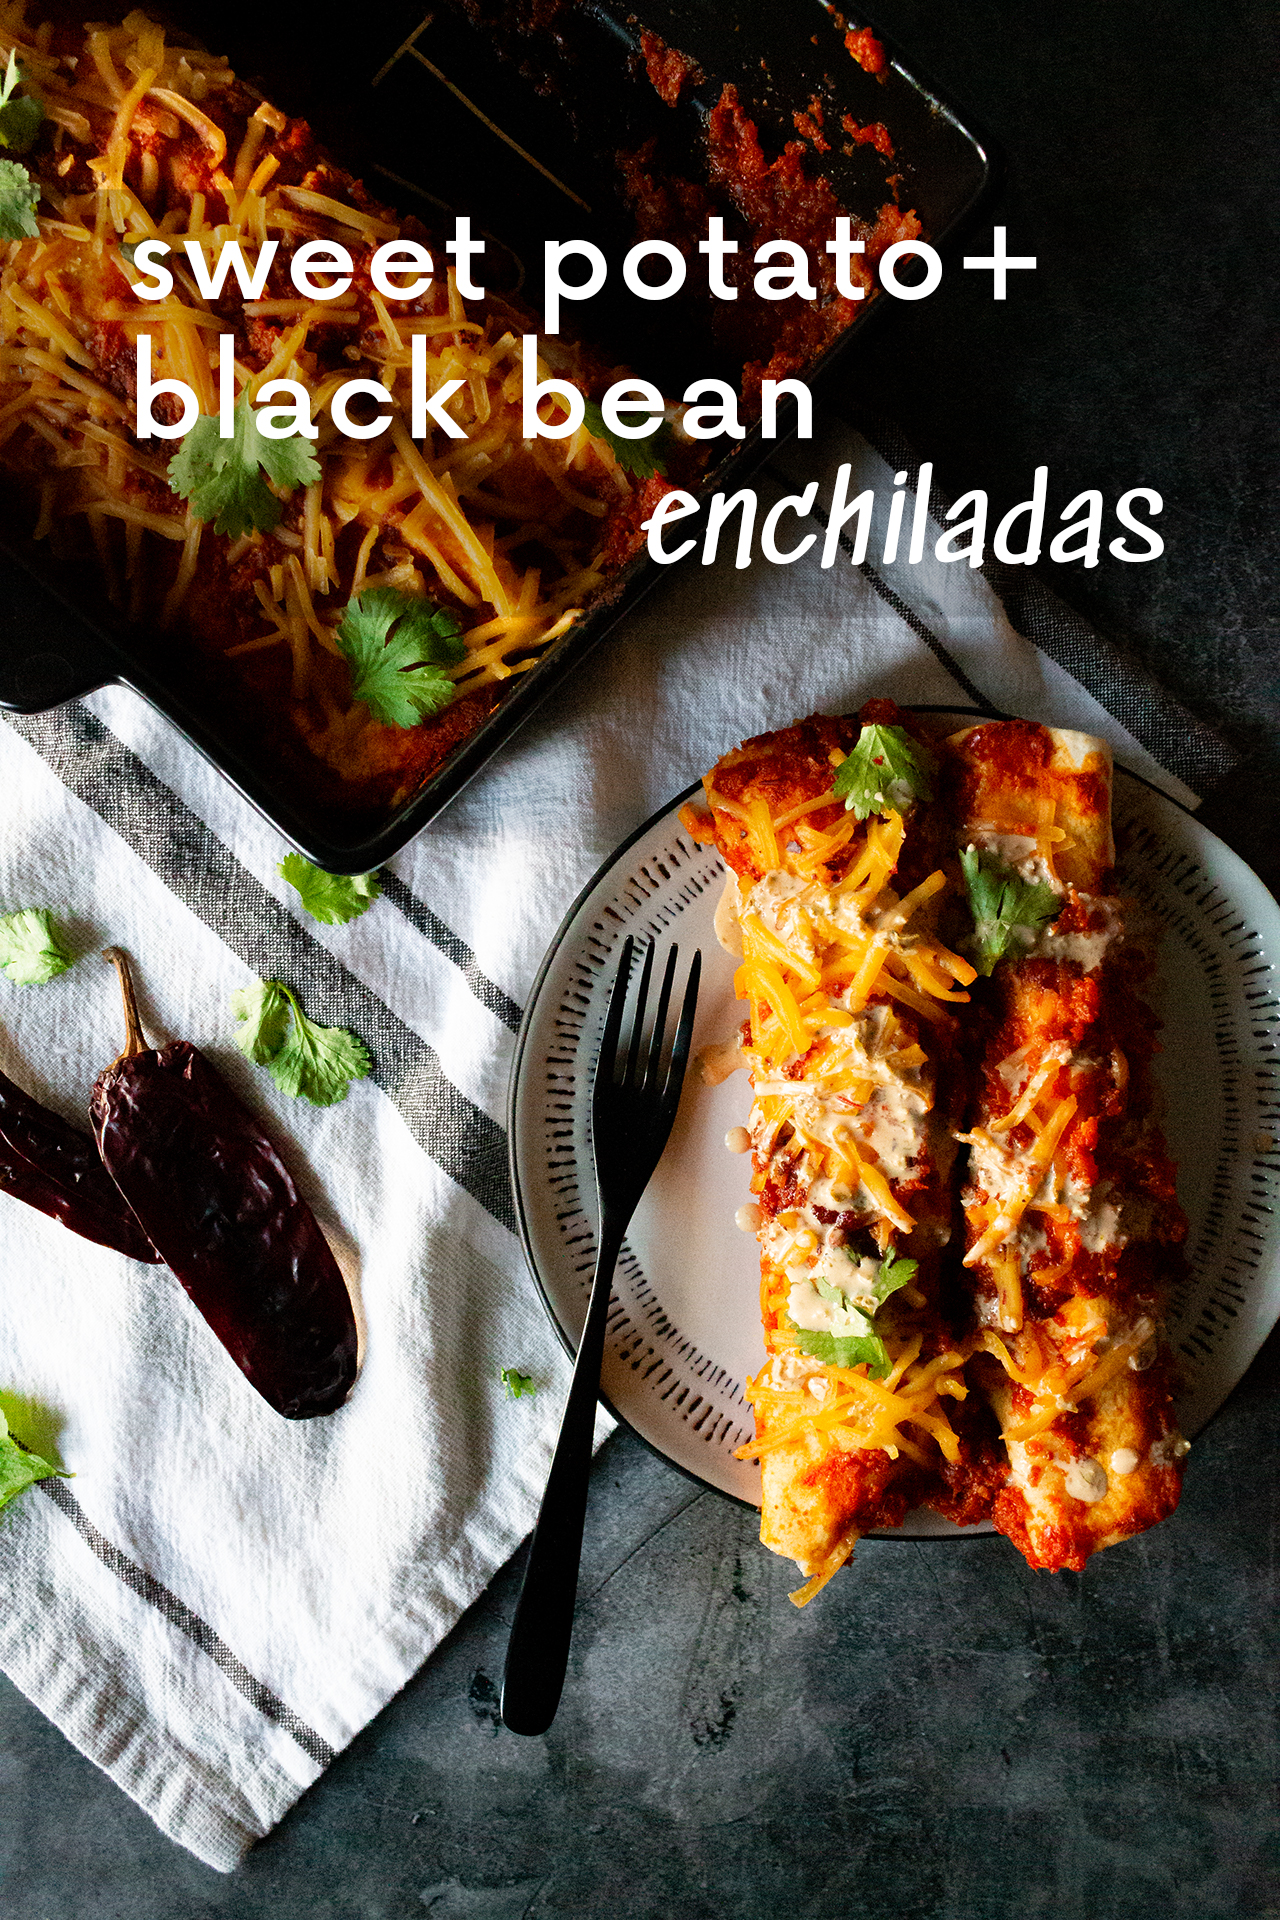
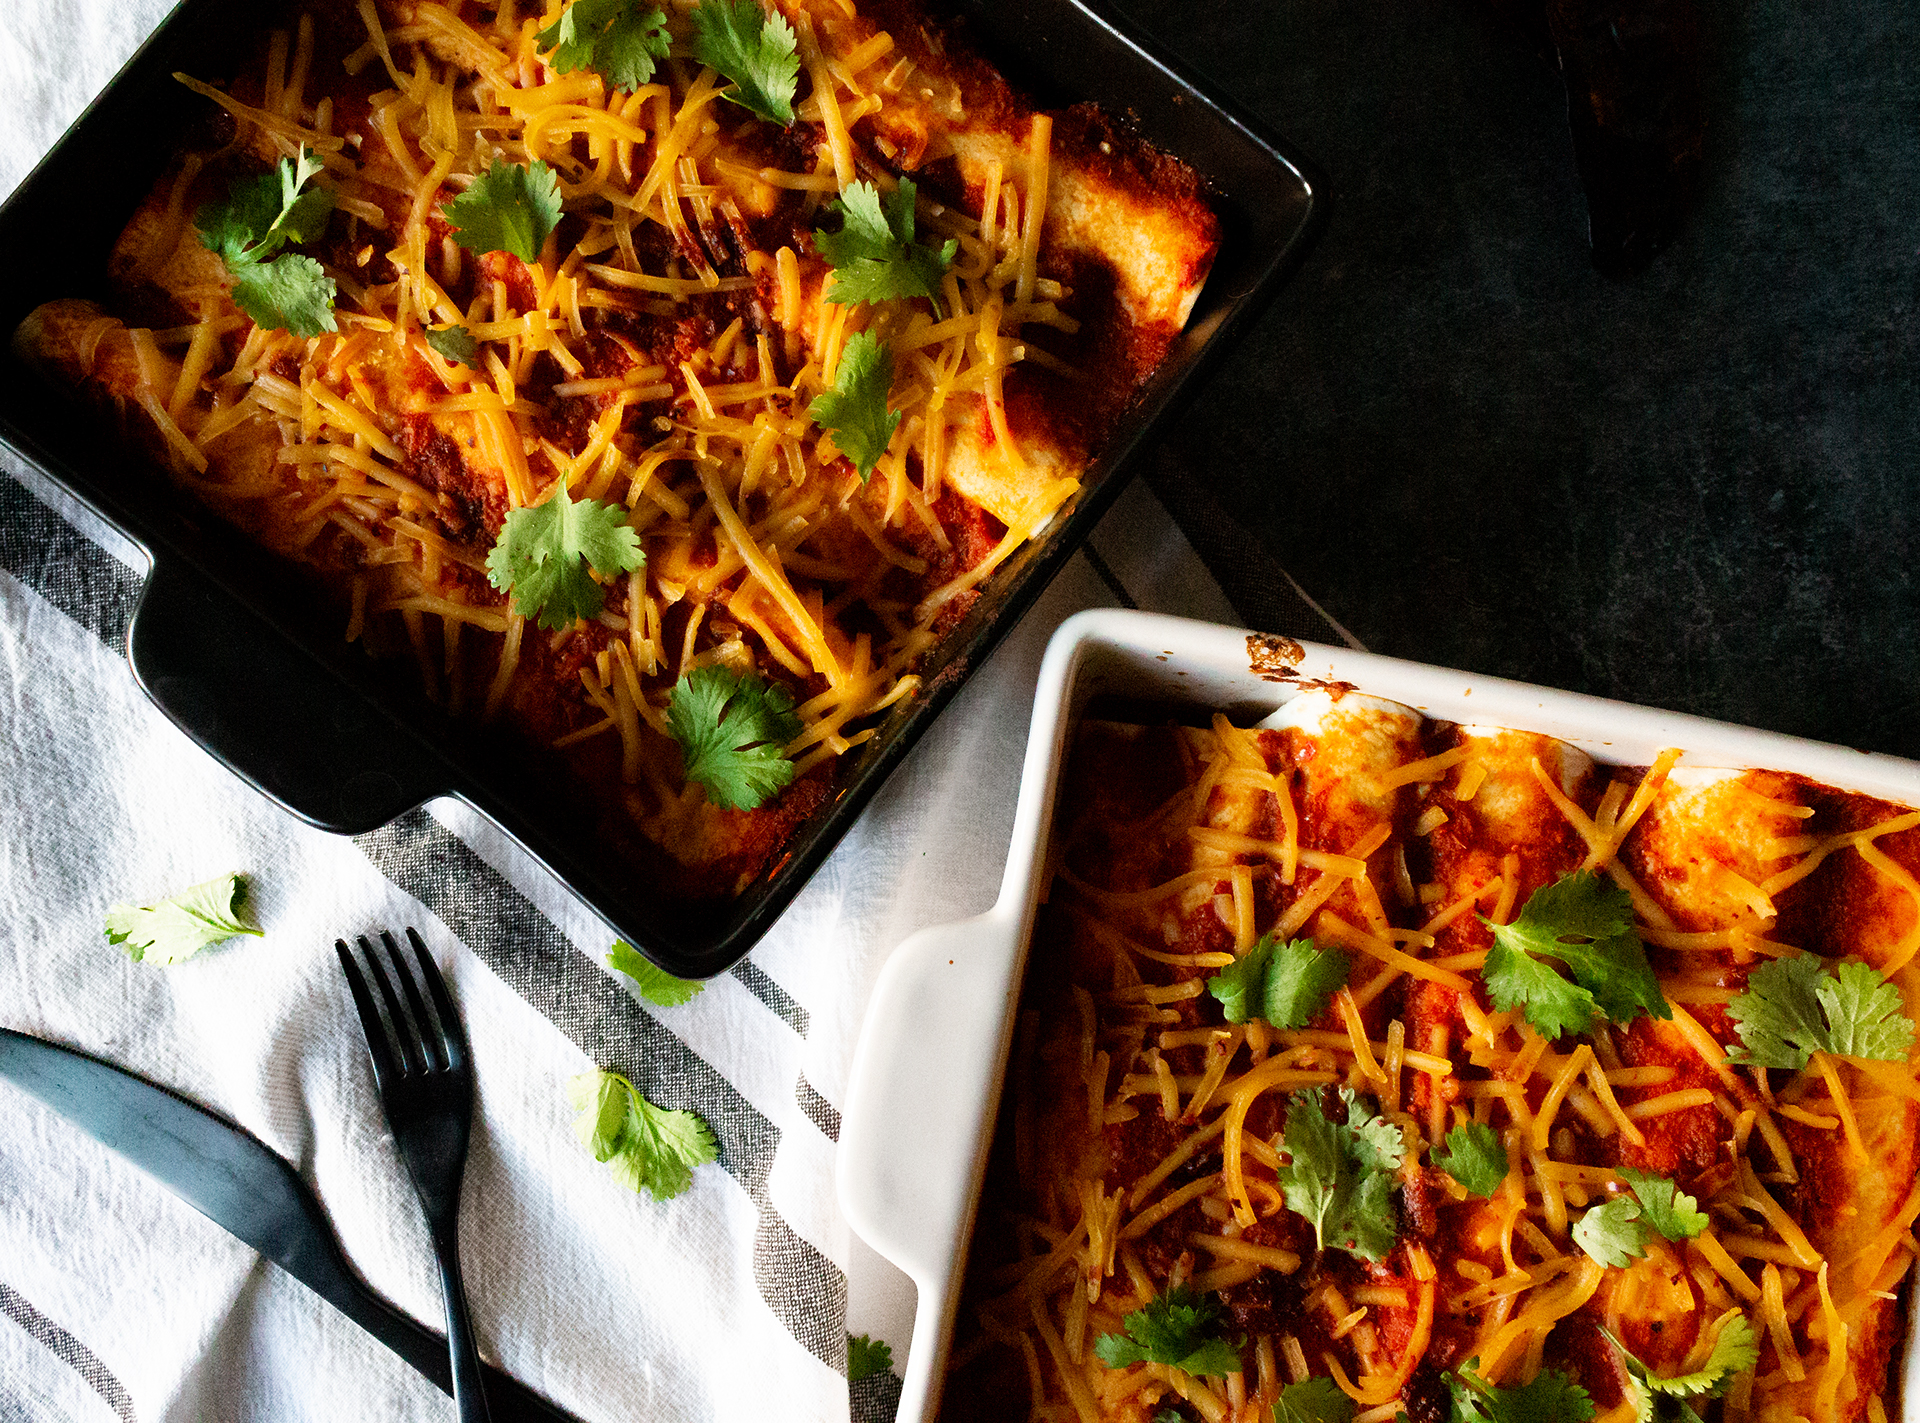
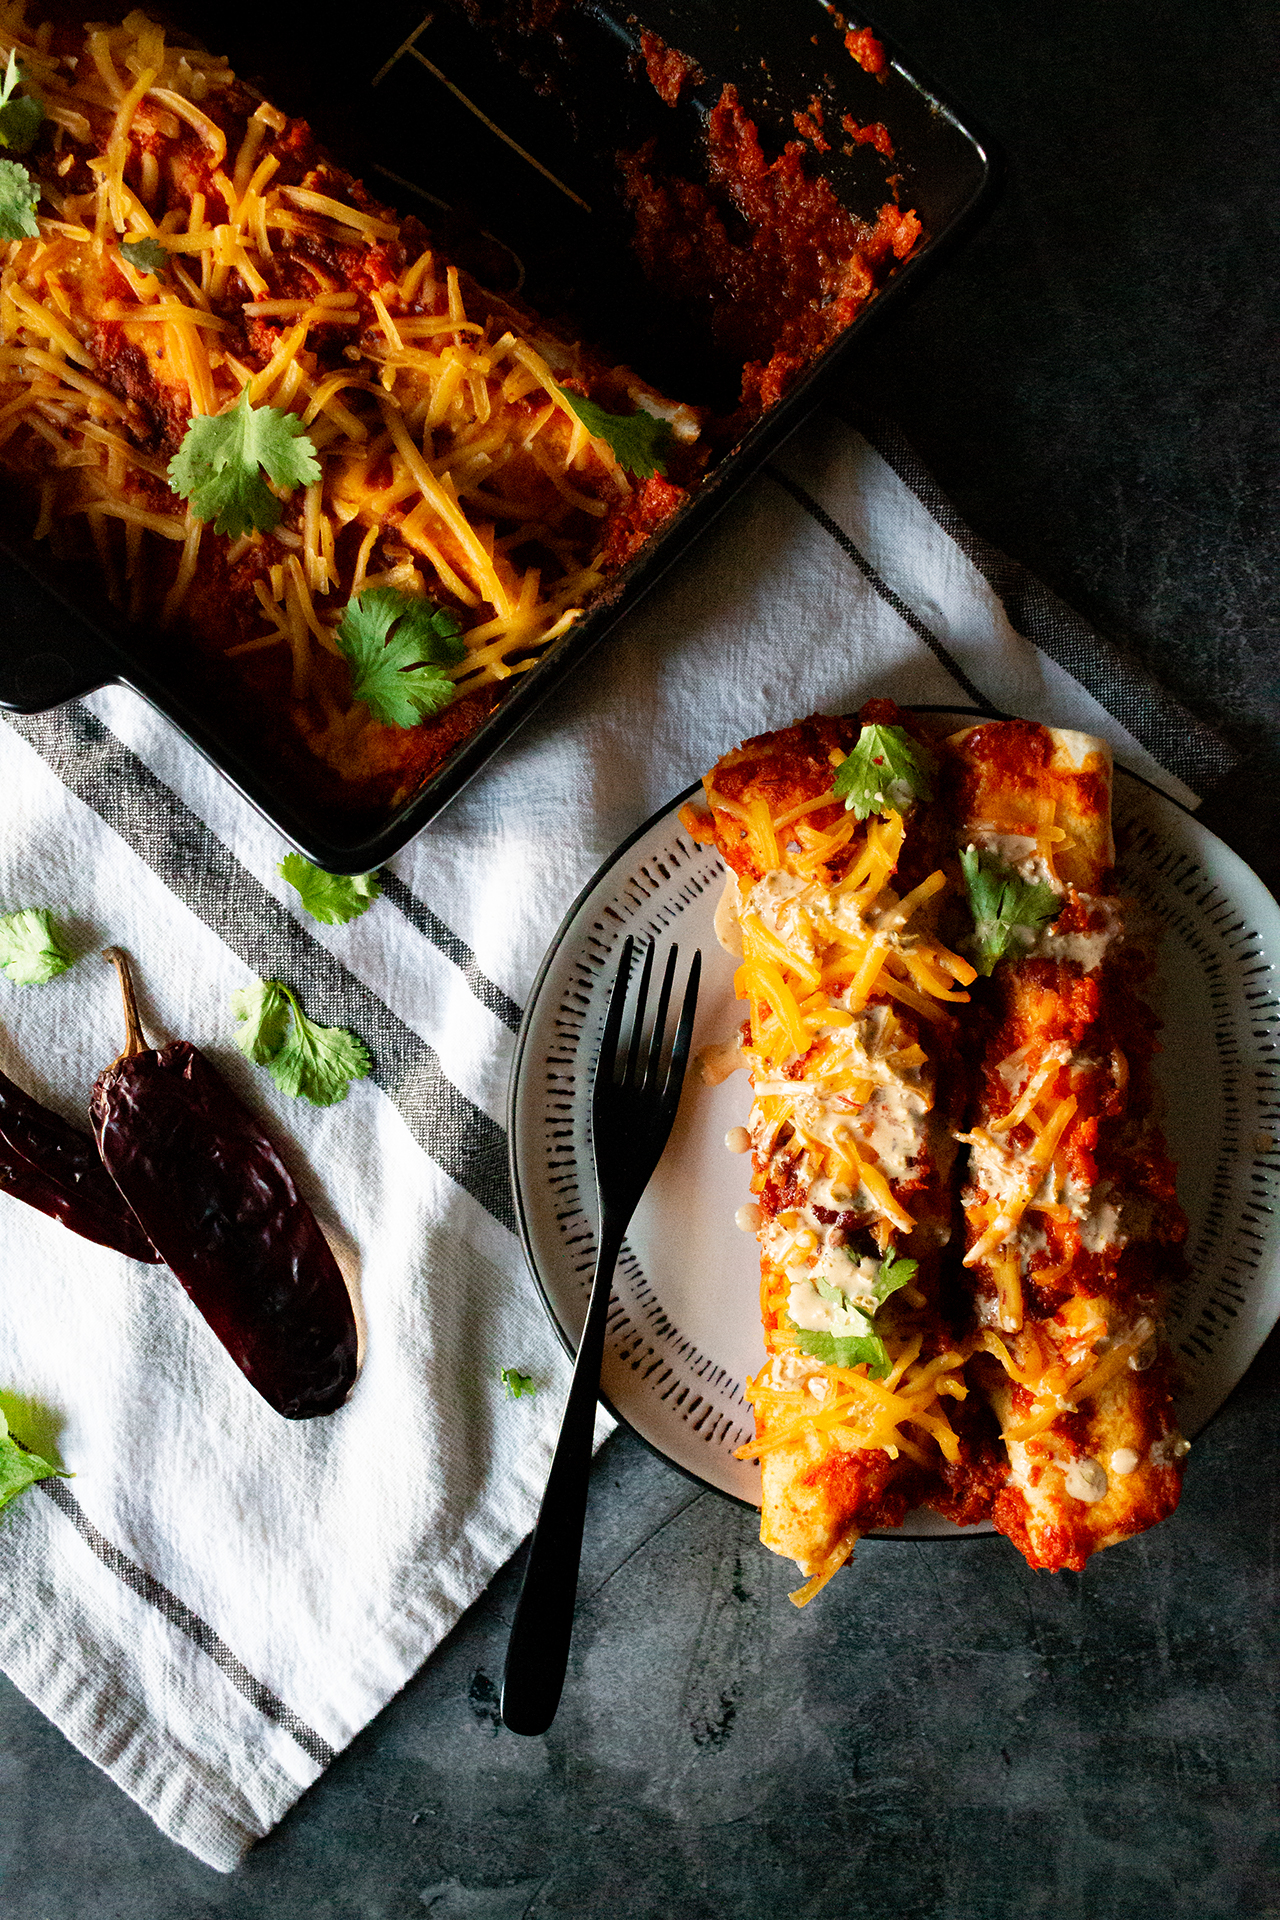
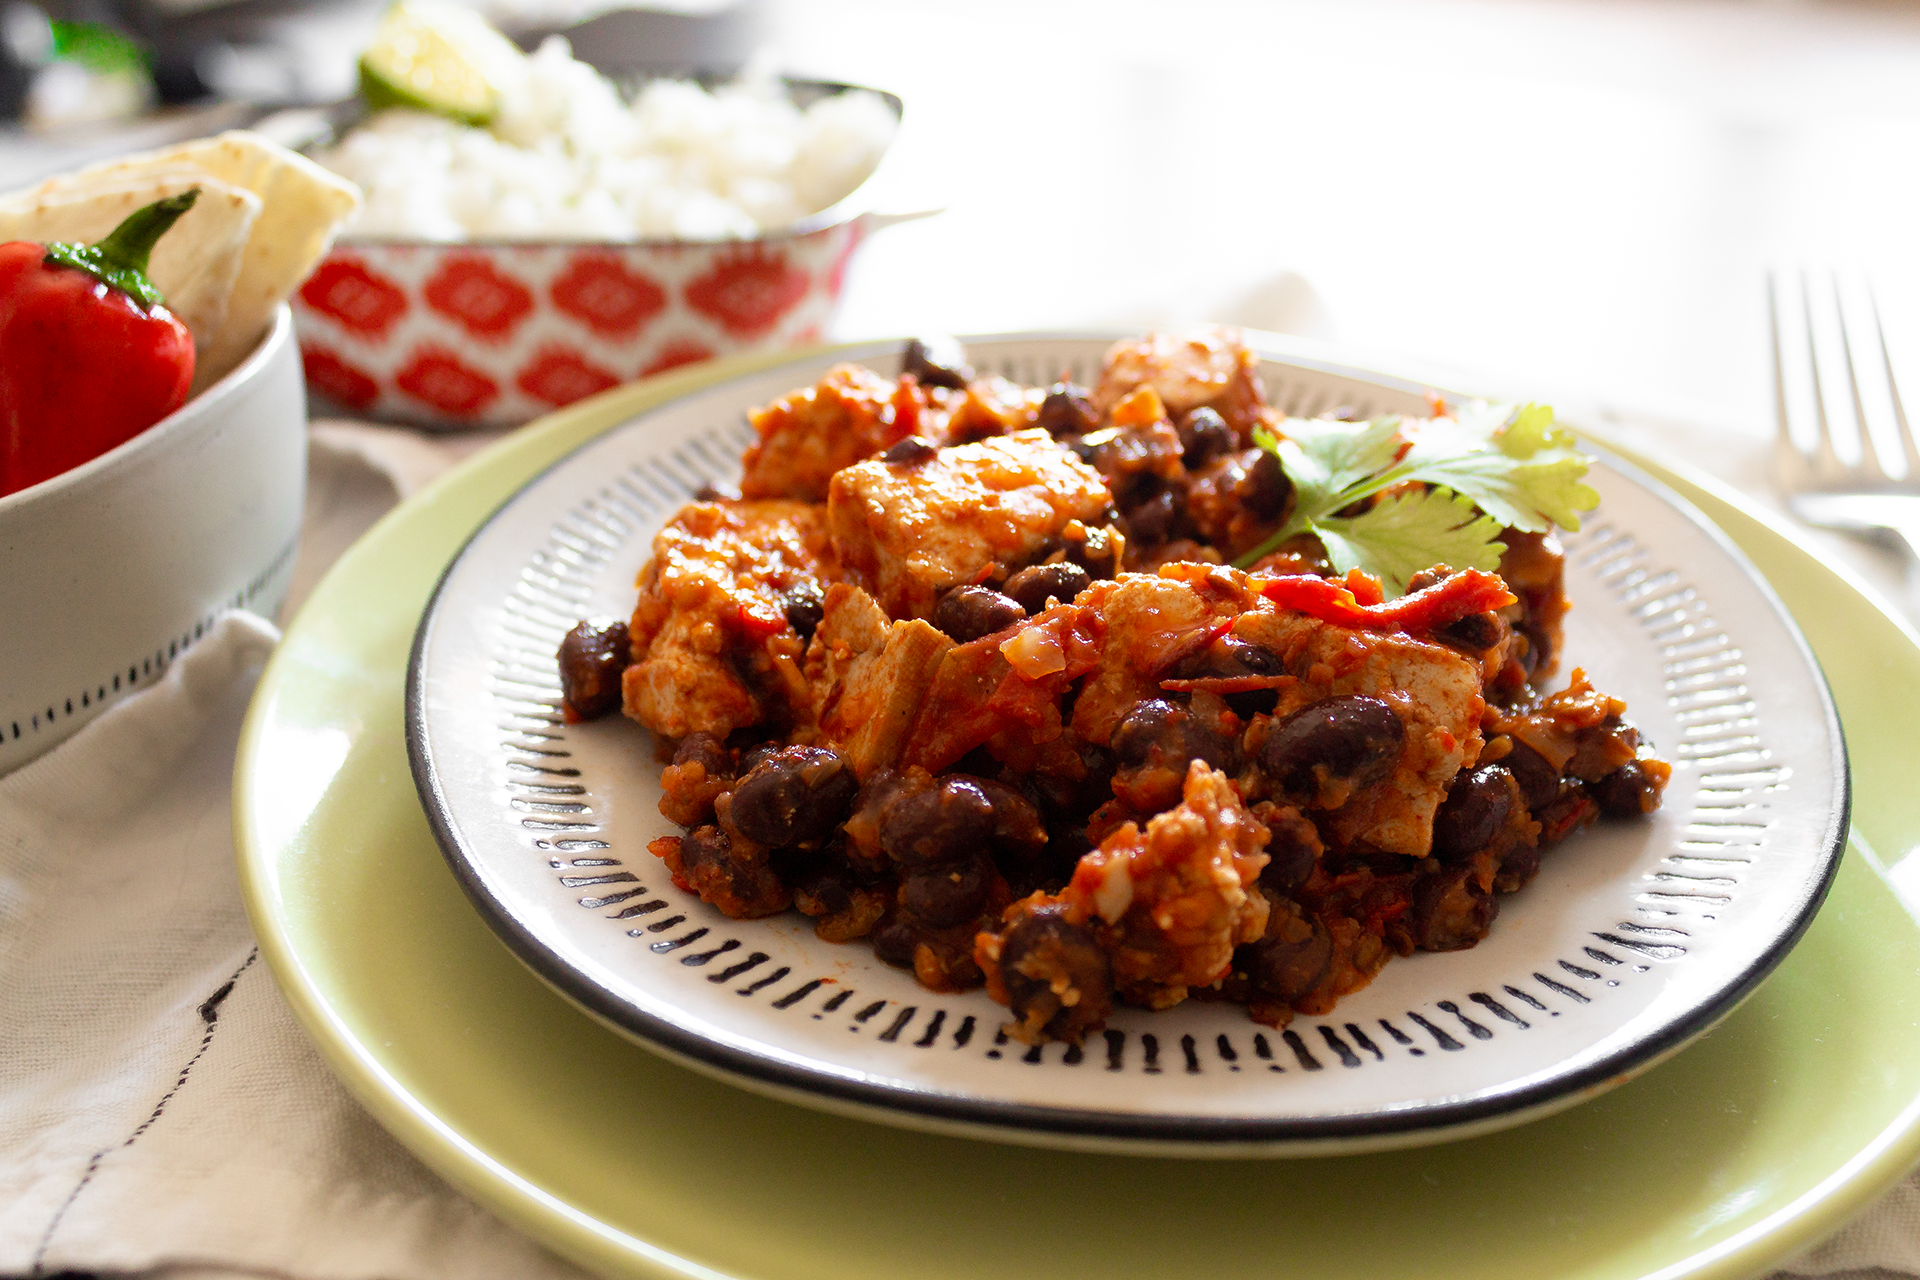
This sweet potato and black bean enchilada recipe took longer to “perfect” than any other recipes I’ve tried to make. If anything, the fact that these turned out so tasty in the end is a testament to the merits of hard work and not giving up even when you think you’re just not cut out for something. With a soft, hearty filling and a rich chipotle sauce, these sweet potato and black bean enchiladas are absolutely to die for–both the soft middle sections, and the gloriously crispy end pieces. Two enchiladas are enough to completely fill me up, and the leftovers taste just as delicious whether you microwave them whole or break them up to sauté.
In addition to these sweet potato and black bean enchiladas, I also have a chorizo and potato (omnivore/meat-eater) recipe that I always make alongside this one for Alex. Those delicious morsels are in the white baking pan (pictured below), but I don’t have any particularly stunning photos of them so that recipe will have to wait until I can break out the camera again.
I hope you decide to make this recipe for your next Taco Tuesday, or on a Friday night when the weather is nice. When eaten hot, they’re great to have on a cooler evening. But don’t let that stop you from enjoying them during the summer, too! I’d also recommend pairing these with my tomatillo salsa verde if you don’t want to add more of the rich enchilada sauce onto your plate. It compliments the flavors of these black bean enchiladas really well!
Ingredients:
Sweet Potato + Black Bean Enchiladas Sauce
- 8-10 dried guajillo chilis
- 2-3 large tomatoes
- 1 onion, yellow
- 1 tbsp cocoa powder
- 4 cloves garlic
- 1 + 1/4 tsp salt
- 1/4 tsp black pepper
- 2 tbsp + 1/2 tsp olive oil
Sweet Potato + Black Bean Enchiladas Filling
- 1/2 onion, red
- 2 tsp lime juice
- 2 cloves garlic
- 1/2 tsp salt
- 1 tbsp olive oil
- 1 tbsp fajita seasoning
- 2 cups black beans
- 1 large sweet potato, peeled
- 1/4 cup + 1/4 cup water
- 5 flour tortillas
- 1/4 cup vegan pepperjack, shredded
Directions:
Sweet Potato + Black Bean Enchiladas Sauce
- Cut the stems and scrape the seeds from the dried chilis. Soak in boiling water for at least 30 minutes, drain, pat dry, and set aside.
- Preheat oven to 425F.
- Make a roasting pouch with all 6 gloves of garlic, 1/4 tsp salt, 1/4 tsp black pepper, and 1/2 tsp olive oil. Slice tops from tomatoes and quarter 1 whole yellow onion.
- Lay vegetables and pouch on a lined baking sheet cut-size up and sprinkle with 2 tbsp olive oil and 1 tsp salt. Roast for 20-25 minutes.
- Add roasted tomatoes, roasted onion, 4 roasted garlic cloves, soaked guajillo chilis, cocoa powder, and lime juice to a blender and blend until relatively smooth.
- Transfer blended enchilada sauce to a small saucepan and bring to boil, then reduce to simmer. Simmer until sauce has thickened slightly, about 5-7 minutes. Set aside.
Sweet Potato + Black Bean Enchiladas Filling
- To make the frijoles con camotes filling, finely dice 1/2 red onion, sweet potato, and the remaining 1 roasted garlic clove.
- Add to a large skillet with black beans, 1/4 cup water, and remaining 1 tbsp fajita seasoning. Cover and cook on medium-high until all water has evaporated and sweet potatoes have steamed, about 3-5 minutes, then stir and add remaining 1/4 cup water.
- Cover until all water has evaporated, then sauté for an additional 2-3 minutes until lightly browned. Set aside.
- Begin assembling enchiladas in one or two casserole dishes, depending on size. Add a layer of 1/2 cup enchilada sauce to the bottom, then wrap roughly 1/4 cup filling of choice into a flour tortilla and add to the dish seam-side down.
- Repeat until dish is filled, then layer on an additional 1 cup enchilada sauce and 1/4 cup cheese.
- Lower oven temperature to 350F and bake for 10-15 minutes, or until cheese is melted and the edges have become browned and crispy. Serve topped with sour cream, avocado, cilantro, and jalapeno cream.


Sweet Potato + Black Bean Enchiladas
Ingredients
Sweet Potato + Black Bean Enchilada Sauce
- 8-10 dried guajillo chilis
- 2-3 large tomatoes
- 1 onion yellow
- 1 tbsp cocoa powder
- 4 cloves garlic
- 1 salt + 1/4 tsp
- 1/4 tsp black pepper
- 2 tbsp olive oil + 1/2 tsp
Black Bean + Sweet Potato Enchilada Filling
- 1/2 onion red
- 2 tsp lime juice
- 2 cloves garlic
- 1/2 tsp salt
- 1 tbsp olive oil
- 1 tbsp fajita seasoning
- 2 cups black beans
- 1 large sweet potato peeled
- 1/4 cup water + 1/4 cup
- 5 flour tortillas
- 1/4 cup vegan pepperjack shredded
Instructions
Sweet Potato + Black Bean Enchilada Sauce
- Cut the stems and scrape the seeds from the dried chilis. Soak in boiling water for at least 30 minutes, drain, pat dry, and set aside.
- Preheat oven to 425F.
- Make a roasting pouch with all 6 gloves of garlic, 1/4 tsp salt, 1/4 tsp black pepper, and 1/2 tsp olive oil. Slice tops from tomatoes and quarter 1 whole yellow onion.
- Lay vegetables and pouch on a lined baking sheet cut-size up and sprinkle with 2 tbsp olive oil and 1 tsp salt. Roast for 20-25 minutes.
- Add roasted tomatoes, roasted onion, 4 roasted garlic cloves, soaked guajillo chilis, cocoa powder, and lime juice to a blender and blend until relatively smooth.
- Transfer blended enchilada sauce to a small saucepan and bring to boil, then reduce to simmer. Simmer until sauce has thickened slightly, about 5-7 minutes. Set aside.
Black Bean + Sweet Potato Enchilada Filling
- To make the frijoles con camotes filling, finely dice 1/2 red onion, sweet potato, and the remaining 1 roasted garlic clove.
- Add to a large skillet with black beans, 1/4 cup water, and remaining 1 tbsp fajita seasoning. Cover and cook on medium-high until all water has evaporated and sweet potatoes have steamed, about 3-5 minutes, then stir and add remaining 1/4 cup water.
- Cover until all water has evaporated, then sauté for an additional 2-3 minutes until lightly browned. Set aside.
- Begin assembling enchiladas in one or two casserole dishes, depending on size. Add a layer of 1/2 cup enchilada sauce to the bottom, then wrap roughly 1/4 cup filling of choice into a flour tortilla and add to the dish seam-side down.
- Repeat until dish is filled, then layer on an additional 1 cup enchilada sauce and 1/4 cup cheese.
- Lower oven temperature to 350F and bake for 10-15 minutes, or until cheese is melted and the edges have become browned and crispy. Serve topped with sour cream, avocado, cilantro, and jalapeno cream.
The post Sweet Potato + Black Bean Enchiladas appeared first on I Forgot Salt!.
]]>The post Chickpea No-Tuna Salad Sandwich appeared first on I Forgot Salt!.
]]>
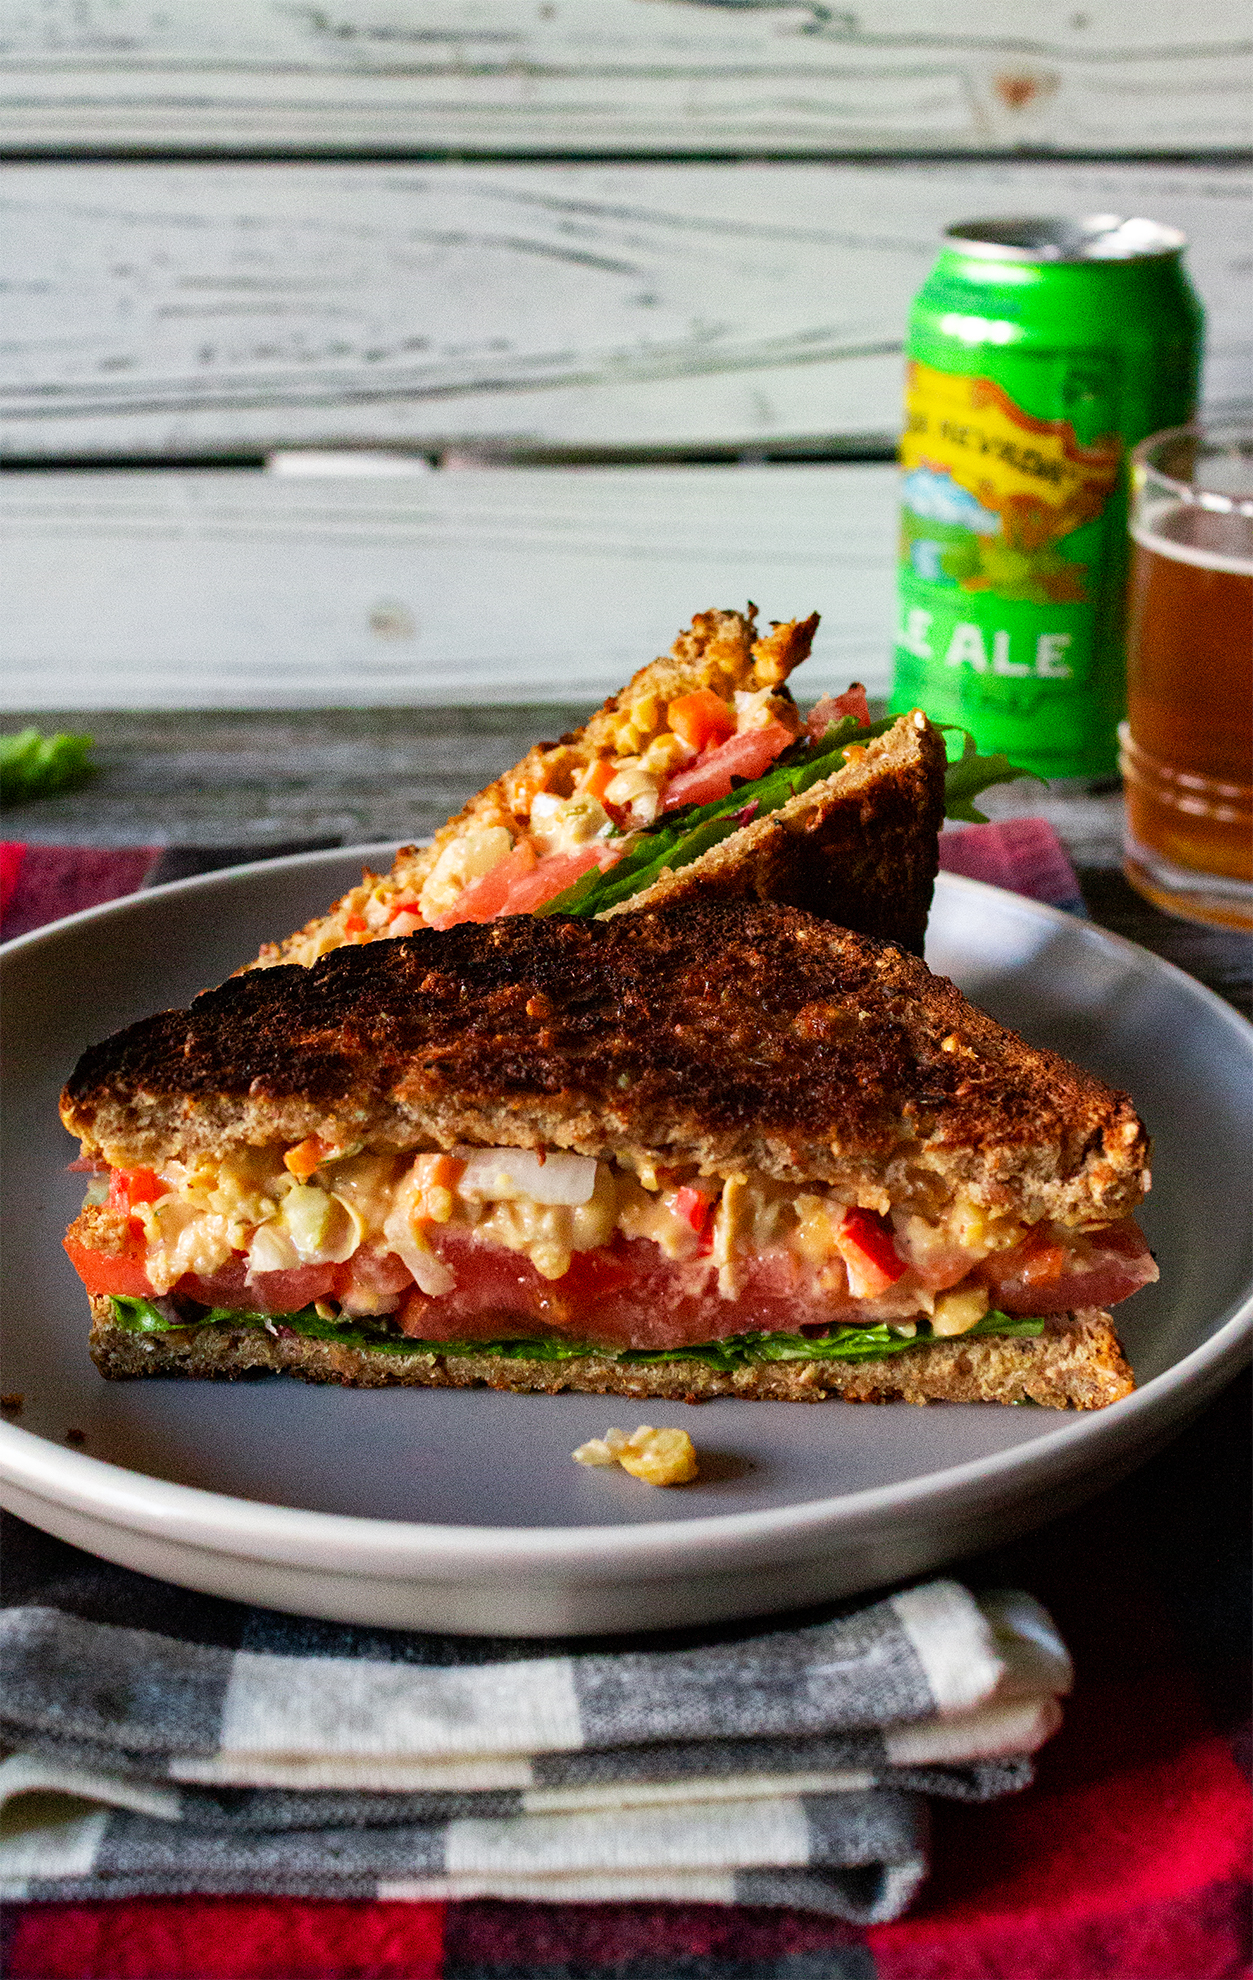
This chickpea salad sandwich filling is great to make ahead and eat throughout the week with fresh toast, and even works well as a car food! This past Halloween, Alex and went on an impromptu road trip down the Blue Ridge Parkway, and I threw a Tupperware of this and a loaf of bread into our cooler before we set off. It made for a delicious post-hike picnic lunch even without the fixings, and having a homemade meal on-hand helped the already awesome day feel even more special.
The creamy, crunchy texture of this chickpea salad sandwich the perfect cool lunch for a hot day, whether that be picnicking in the park or going on a hike . It’s one of my favorite summer foods, packing a crisp protein punch to fuel you through the afternoon. Chickpea salad sandwiches also pair great with your favorite cold beer or a glass of chilled ice tea. Yum!
For another picnic-friendly recipe, check out my onigiri rice balls snack, which I will be updating soon with a sautéed tahini shiitake mushroom filling!
This recipe makes 4 sandwiches.
Ingredients:
- 2 cups chickpeas
- 1/2 cup mayonnaise
- 1/3 cup celery, diced
- 1/3 cup carrot, diced
- 1/3 cup bell pepper, diced
- 1/4 cup red onion, diced
- 2 tbsp spicy mustard
- 1 tbsp Frank’s buffalo sauce (or hot sauce of your choice)
- 1 tsp lemon juice
- 1/2 tsp dill
- 1/4 tsp garlic powder
- 1/4 tsp + 1/4 tsp salt
- 1/4 tsp black pepper
- 1/4 tsp cayenne pepper
- 1/2 cup lettuce
- 1/2 cup tomato, sliced
- 8 slices bread, toasted with butter
Directions:
- Smash chickpeas with a fork or potato masher until largely broken up with some whole or “chunky” chickpeas remaining for texture.
- Finely dice celery, carrot, bell pepper, and red onion.
- Add chickpeas, mayonnaise, celery, carrot, onion, bell pepper, mustard, lemon juice, buffalo sauce, and spices (dill, garlic powder, salt, black pepper, and cayenne pepper). Mix thoroughly until everything is incorporated. Store covered in the fridge until ready to serve.
- Toast bread with butter. Slice tomatoes and sprinkle with remaining 1/4 tsp salt. Assemble sandwiches with “tuna” salad, lettuce, and salted tomatoes.

Chickpea No-Tuna Salad Sandwiches
Ingredients
- 2 cups chickpeas
- 1/2 cup mayonnaise
- 1/3 cup celery diced
- 1/3 cup carrot diced
- 1/3 cup bell pepper diced
- 1/4 cup red onion diced
- 2 tbsp spicy mustard
- 1 tbsp Frank’s buffalo sauce or hot sauce of your choice
- 1 tsp lemon juice
- 1/2 tsp dill
- 1/4 tsp garlic powder
- 1/4 tsp salt + 1/4 tsp reserved
- 1/4 tsp black pepper
- 1/4 tsp cayenne pepper
- 1/2 cup lettuce
- 1/2 cup tomato sliced
- 8 slices bread toasted with butter
Instructions
- Smash chickpeas with a fork or potato masher until largely broken up with some whole or “chunky” chickpeas remaining for texture.
- Finely dice celery, carrot, bell pepper, and red onion.
- Add chickpeas, mayonnaise, celery, carrot, onion, bell pepper, mustard, lemon juice, buffalo sauce, and spices (dill, garlic powder, salt, black pepper, and cayenne pepper). Mix thoroughly until everything is incorporated. Store covered in the fridge until ready to serve.
- Toast bread with butter. Slice tomatoes and sprinkle with remaining 1/4 tsp salt. Assemble sandwiches with “tuna” salad, lettuce, and salted tomatoes.
The post Chickpea No-Tuna Salad Sandwich appeared first on I Forgot Salt!.
]]>The post Bang Bang Shrimp + Tofu appeared first on I Forgot Salt!.
]]>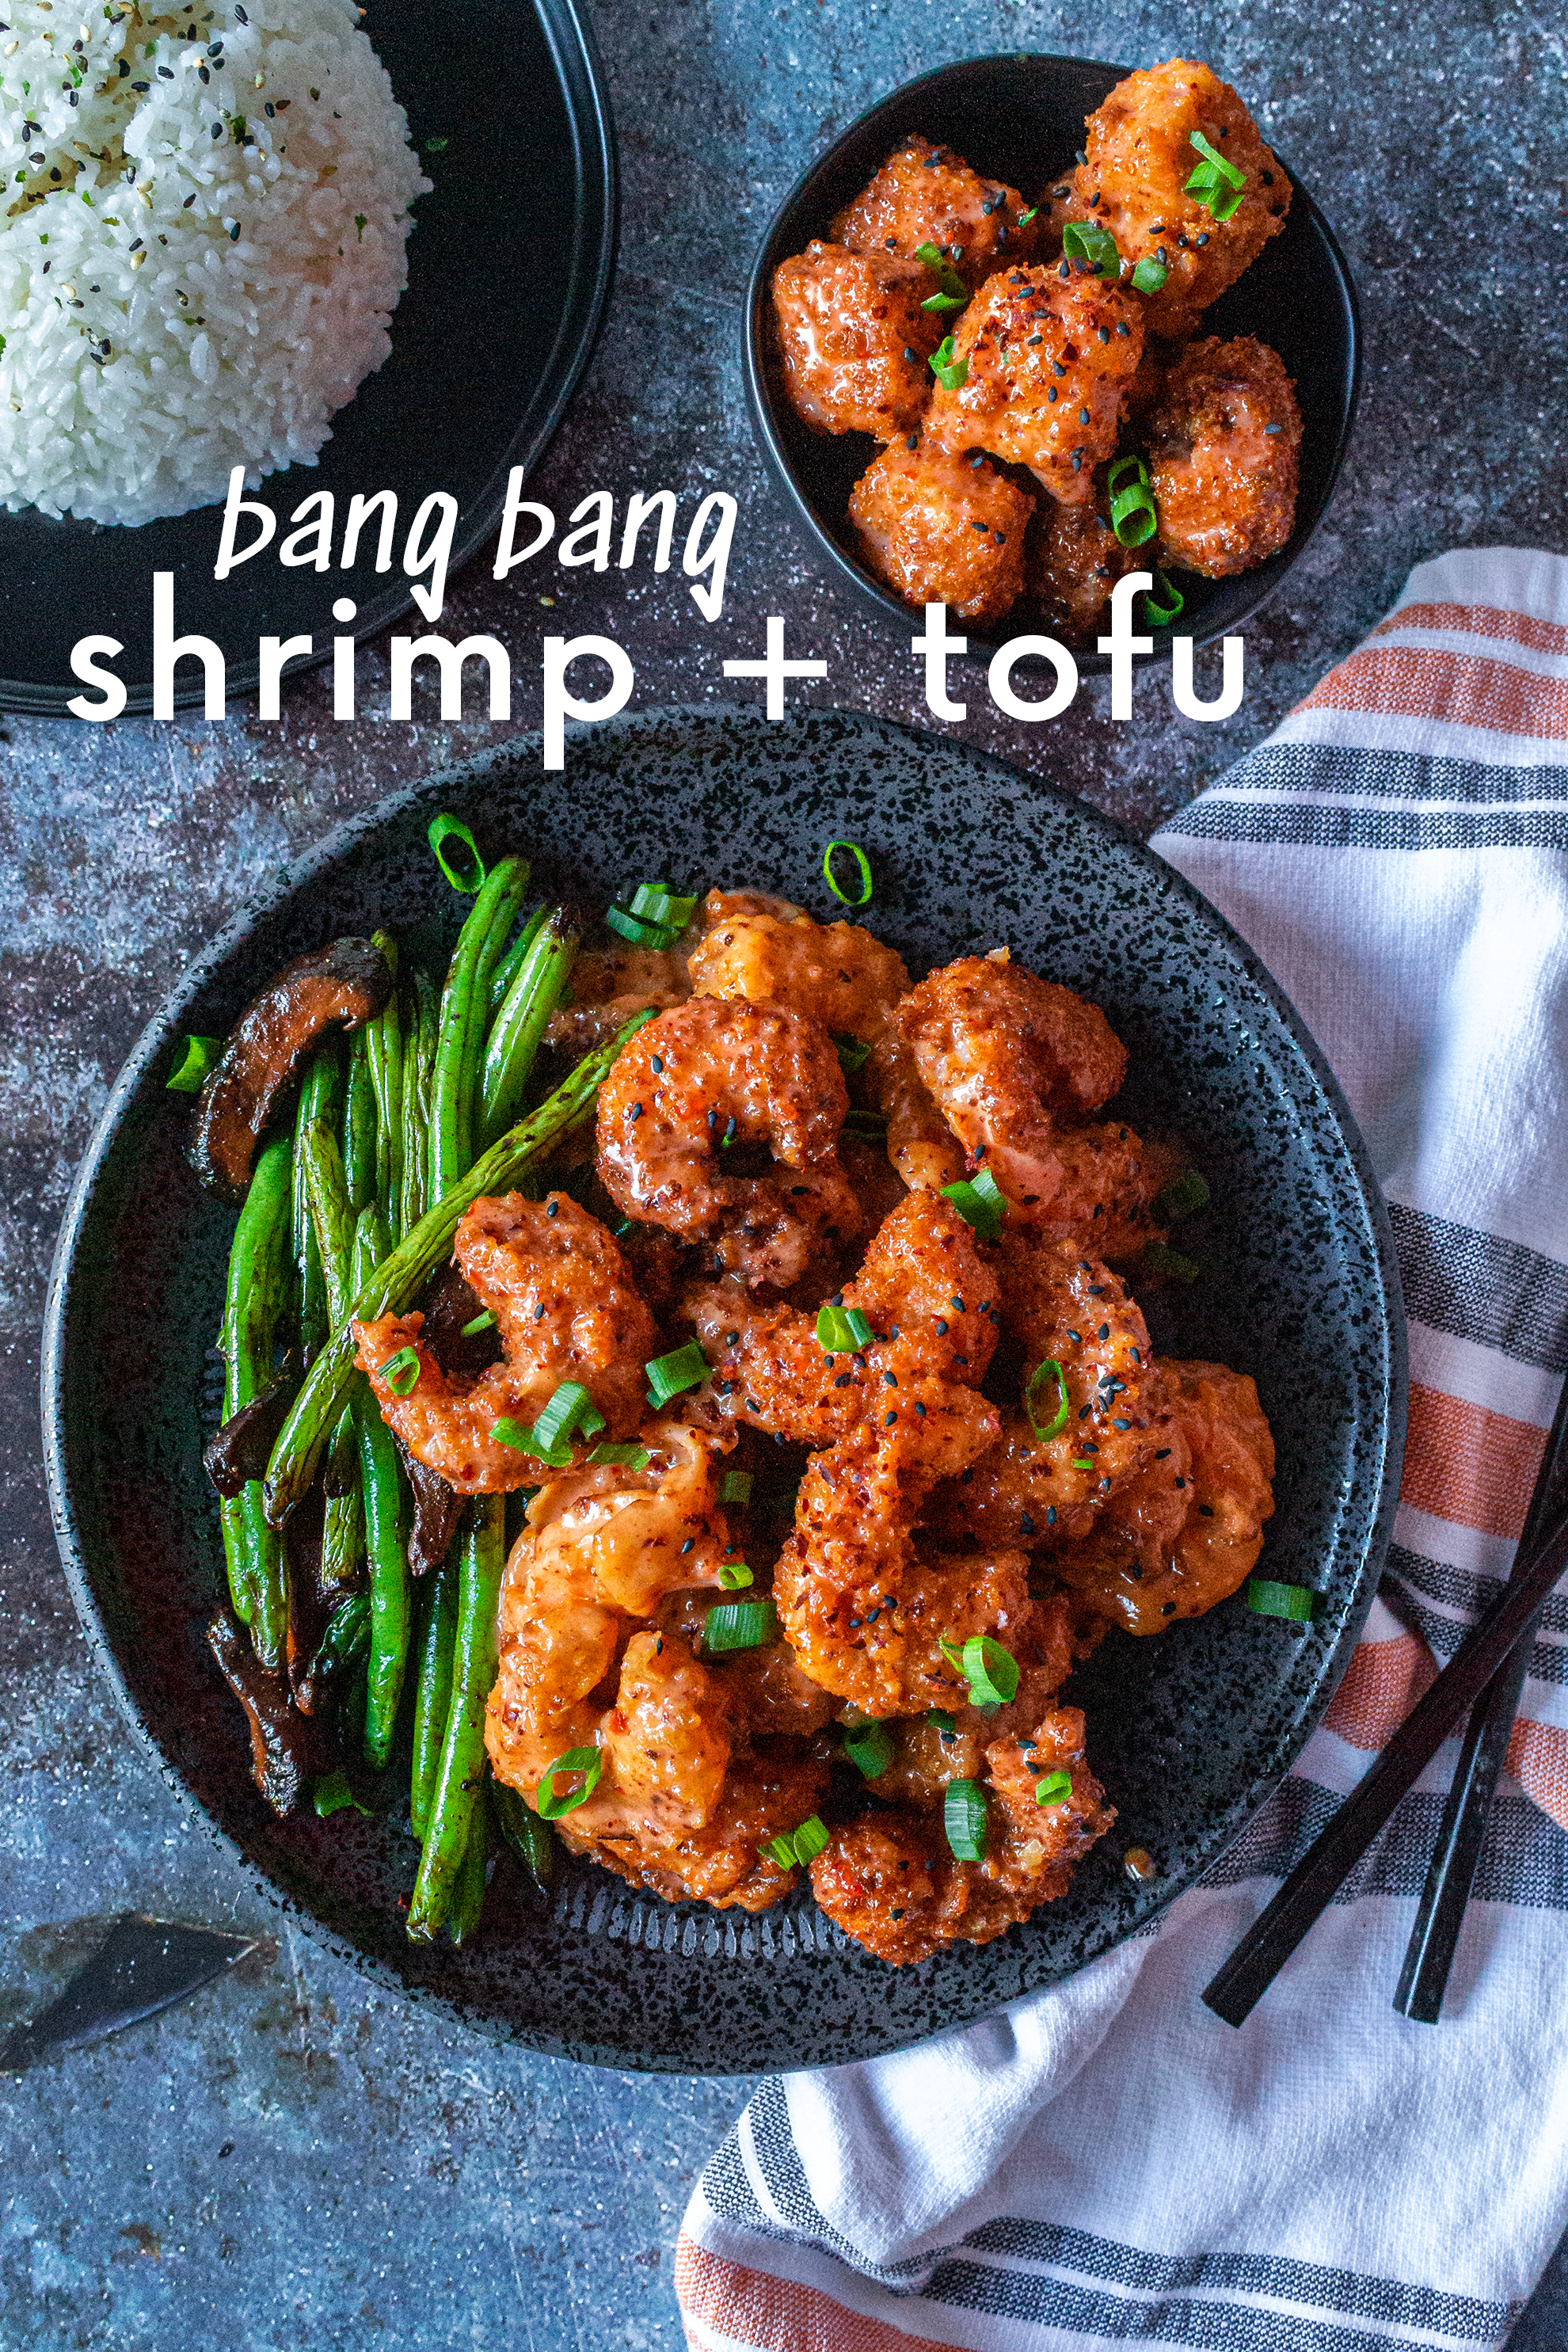
With almost absolute certainty, I think I can say that the pictures I took of this bang bang tofu and shrimp recipe are my favorites of all time… up to this point, at least. Sometimes I’m baffled by how far both my cooking and my food photography have come since late 2018 when I started documenting my recipes. My biggest growth came during lockdown, as all of the additional free time at home (and the much larger kitchen after Alex and I moved) made it much easier to experiment without feeling guilty about “wasting” time and resources. The best thing to come out of lockdown as a whole, though, was the cookbook I wrote, photographed, and self-published this past fall (more information to come on that later). I developed this bang bang tofu and shrimp recipe specifically for that, although I’d made an “unimproved” version of it several times before really sitting down to hammer (pun intended) out the details.
One of the most interesting things about “bang bang” anything is the common misconception that it’s, well, an actual dish. In developing my own version of bang bang tofu and shrimp, I went down a bit of a rabbit hole to figure out exactly where the concept originated. Most people know that the restaurant Bonefish Grill has a version of bang bang shrimp as an appetizer on their menu, but because of the inclusion of Thai sweet chili sauce in many recipes it’s a common misconception that the dish is actually Thai in origin. In fact, the only “bang bang” dish that existed before Bonefish Grill’s test kitchen brought it to life was a Sichuan Chinese dish called bang bang chicken–which is actually something completely different!
Although there are many different stories about how the dish got its name (a mistranslation of “bon bon” to “bang bang”? A reference to the mallet-smashing chicken preparation? Or a reference to the dish’s punching flavor?), one thing remains true: bon bon/bang bang/strange flavor chicken is nothing like what most Americans have come to associate with the bright orange, deep-fried restaurant-style alternative. (Perhaps I’ll do a full dive into the original dish sometime–with a vegan alternative, of course).
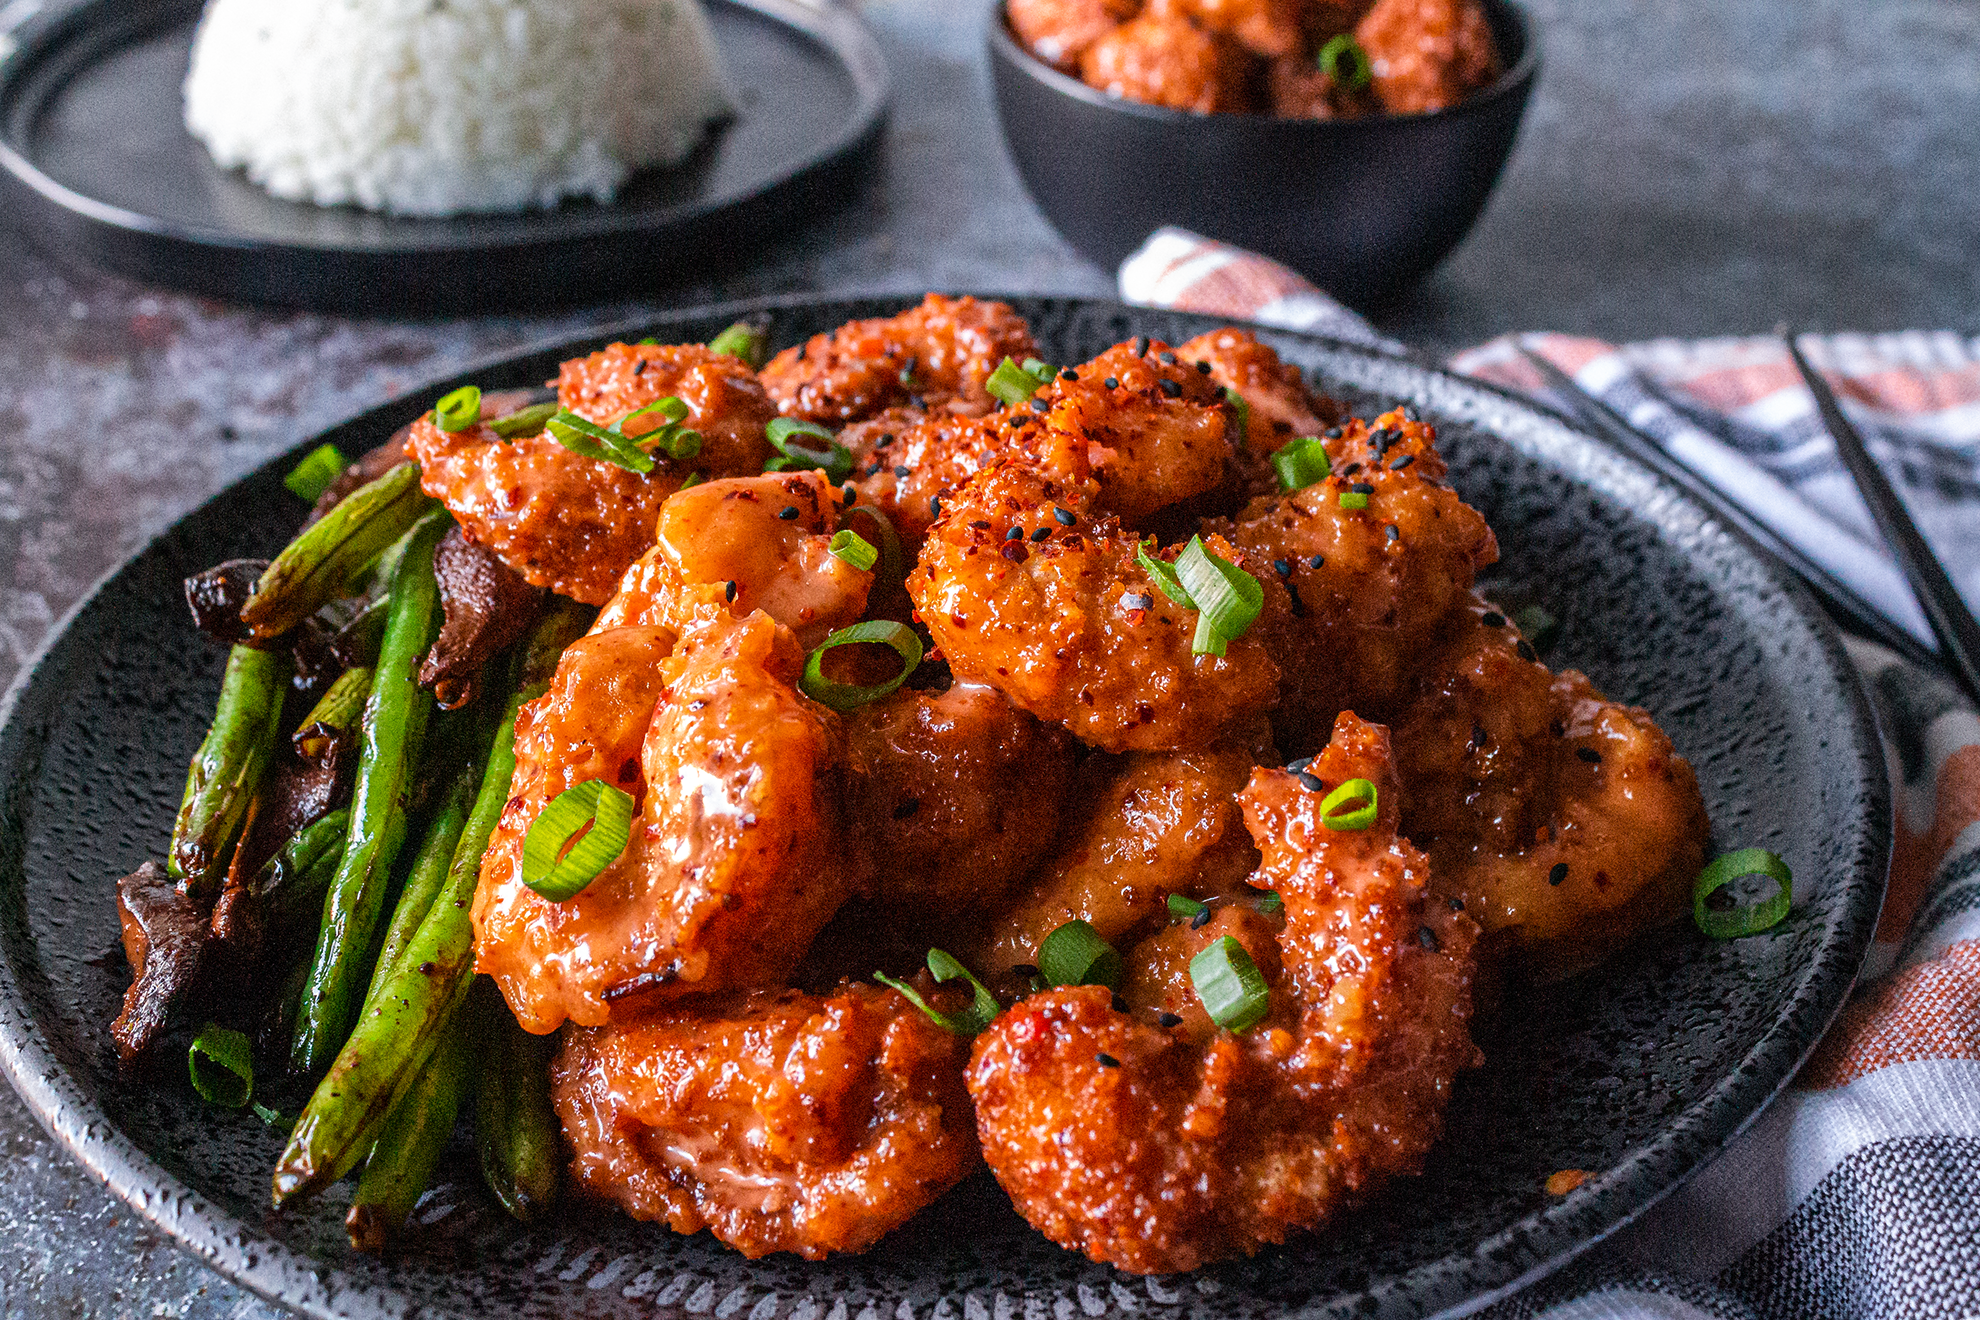
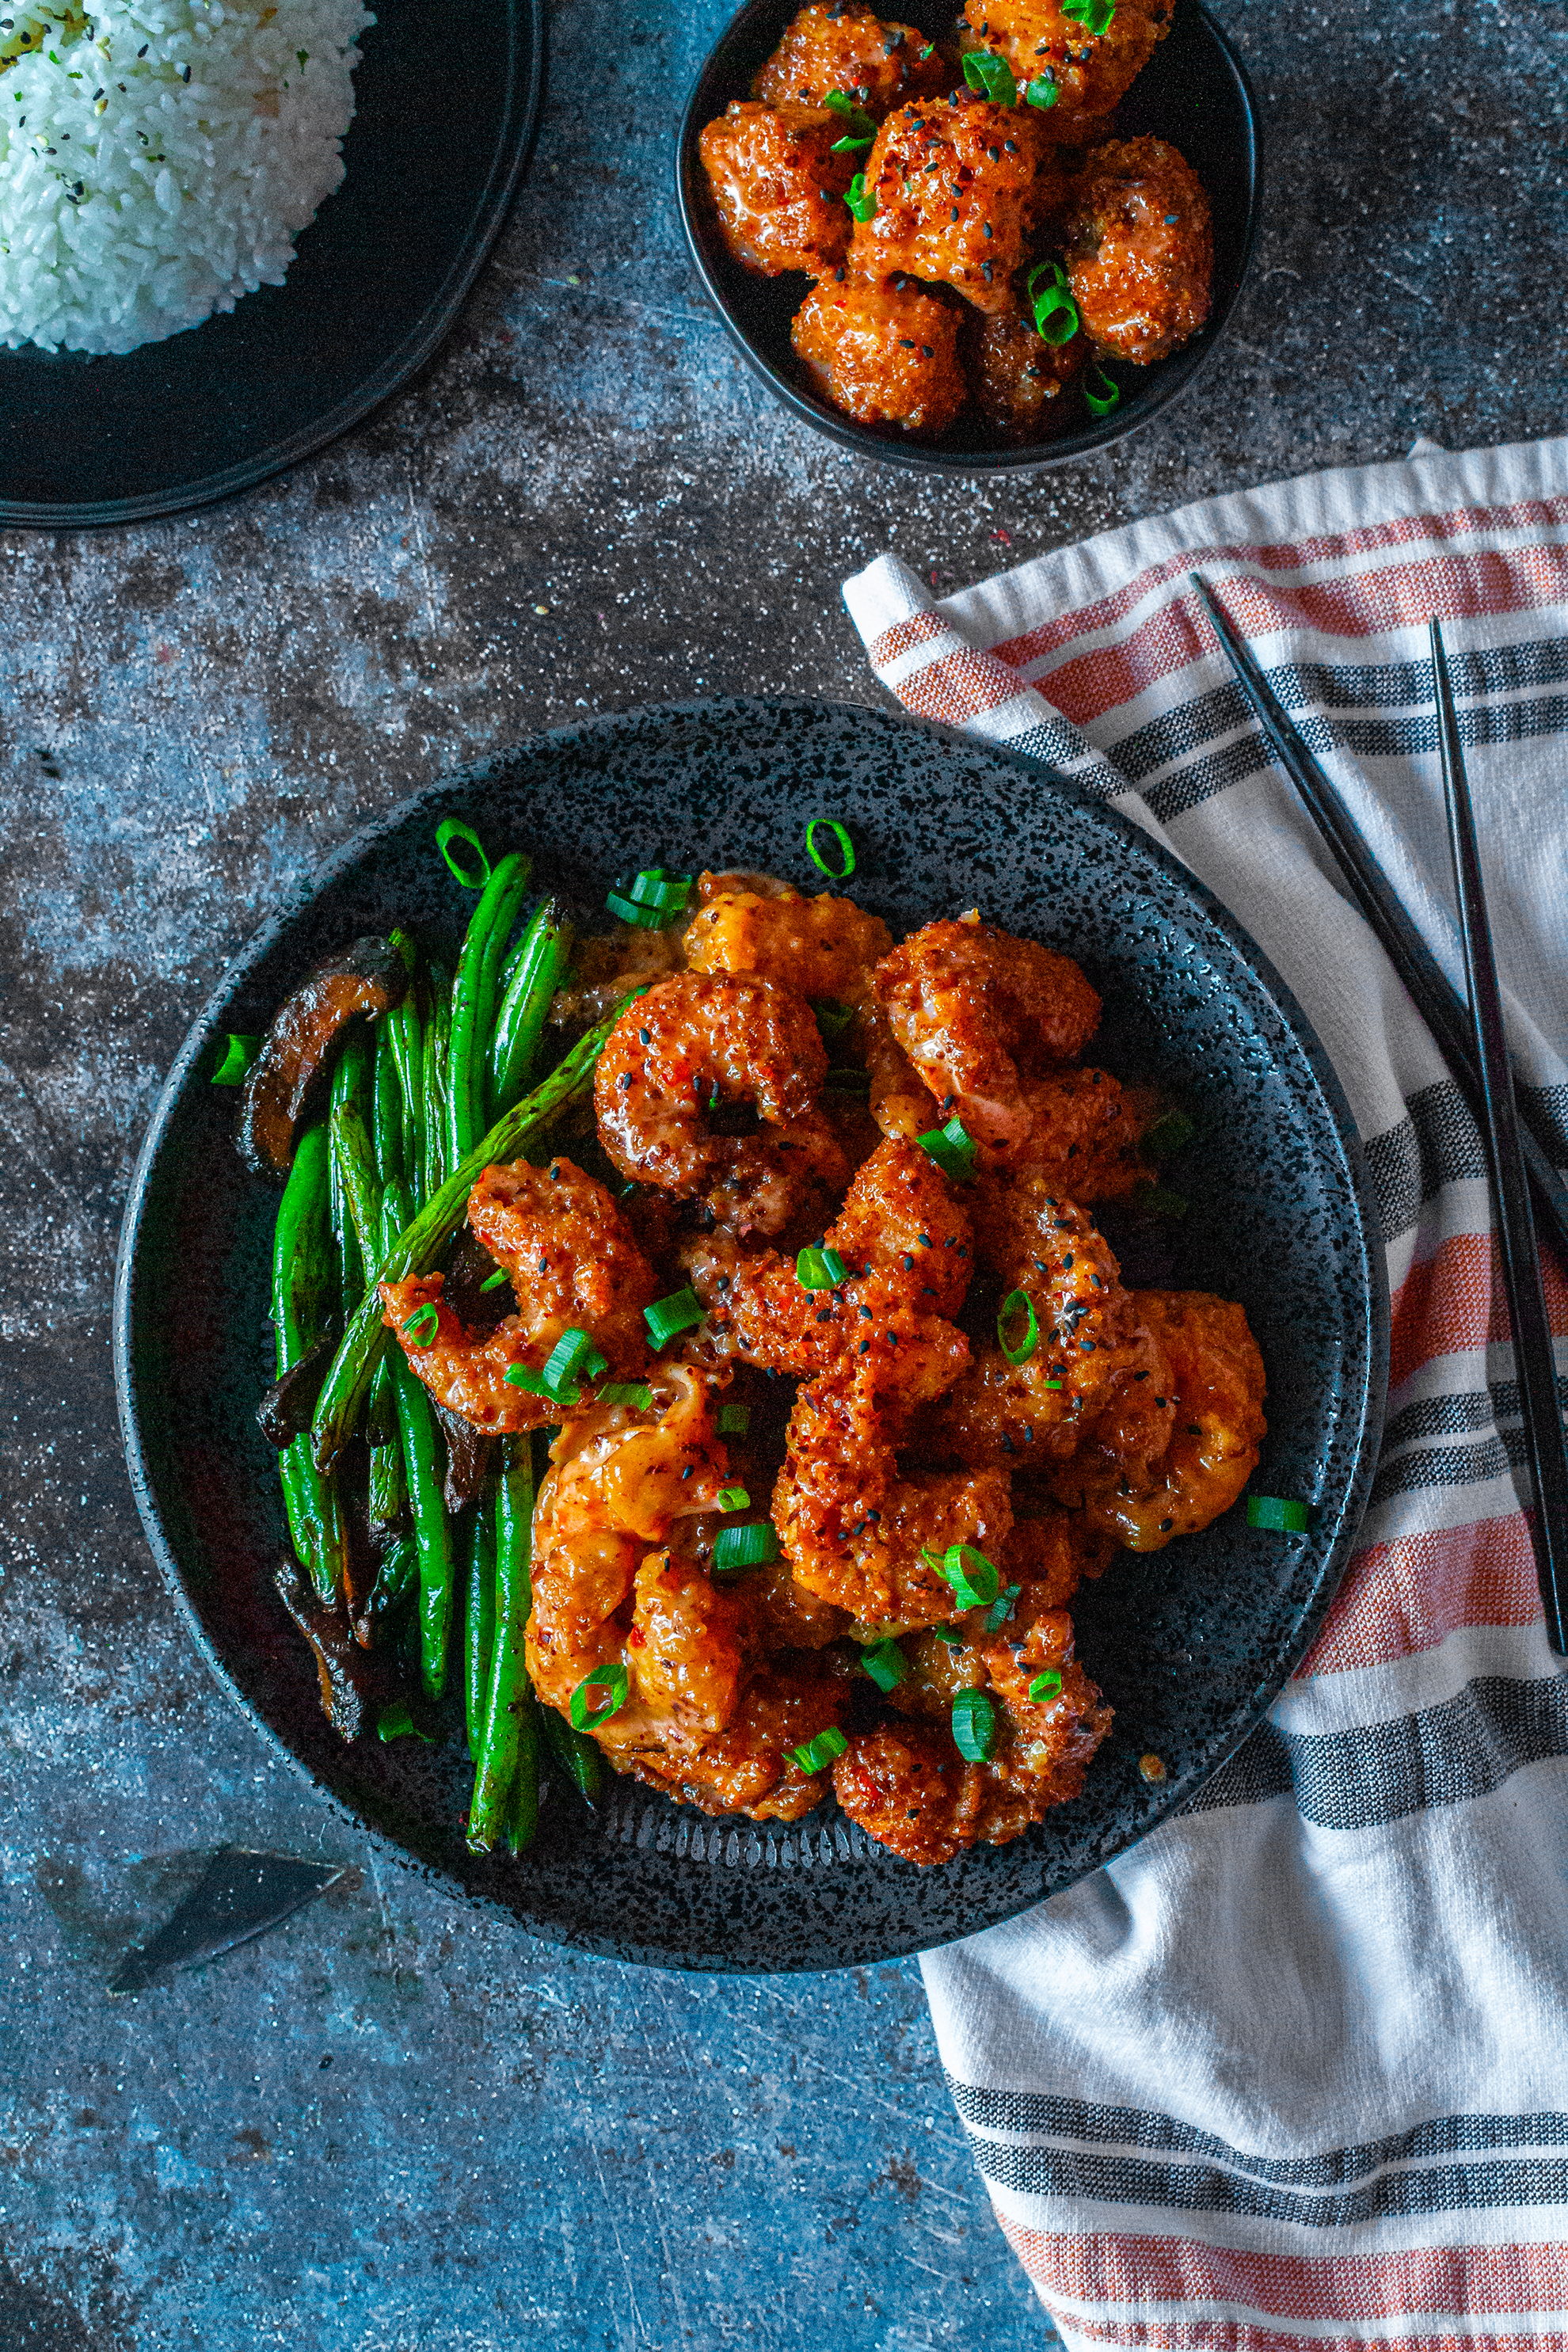
Setting aside the “original” dish, though, this restaurant style vegan bang bang tofu and shrimp is a sweet, tangy, crunchy, spicy mouthful of beautifully-hued deliciousness. When the garlicky-hot marinade comes together with the sweet, creamy sauce, you end up with something truly special beyond what you’d find at your average seafood fusion place. Although bang bang tofu and shrimp works amazingly as a main dish–especially when served with a fresh, salty side like blistered green beans (recipe to come)–it also makes for a wonderful appetizer, as well! Just serve it up with some toothpicks and tiny plates, and you’ll be the life of the party.
This recipe makes four servings (two tofu, two shrimp)
Ingredients:
- 10-15 shrimp, peeled and deveined
- 8oz tofu, firm or extra firm
- 2 tbsp + 2 tbsp + 1/4 cup sriracha
- 1 tsp + 1 tsp sesame oil
- 1/4 tsp + 1/4 tsp coriander
- 1/4 tsp + 1/4 tsp cumin
- 1/4 tsp + 1/4 tsp cayenne pepper
- 1/4 tsp + 1/4 tsp garlic powder
- 1/4 tsp + 1/4 tsp onion powder
- 1/4 tsp + 1/4 tsp turmeric
- 1/4 tsp + 1/4 tsp white pepper
- 1/4 tsp + 1/4 tsp salt
- 1 cup + 2 cups all-purpose flour
- 2 cup water, cold
- 1 cup ice cubes
- 2 cups panko breadcrumbs
- 1/2 cup mayonnaise
- 1/3 cup almond yogurt, plain
- 1/3 cup Thai sweet chili sauce (see my recipe here)
- 1/4 cup maple syrup
- 2 tbsp red pepper flakes
- 2 tbsp sesame seeds
- oil (to deep fry)
Directions:
- Wrap tofu in a dishtowel and press with a heavy skillet or cookbooks for at least 30 minutes. Slice tofu into bite-sized pieces, about 1 inch.
- In each of two sealable containers add 2 tbsp sriracha, 1 tbsp sesame oil, and 1/4 tsp each of spices (coriander, cumin, cayenne pepper, garlic powder, onion powder, turmeric, white pepper, and salt). Stir to combine, and add shrimp and tofu into separate marinades. Stir again to coat, seal each container, and store in the fridge for at least 30 minutes.
- In a small mixing bowl, combine mayonnaise, yogurt, sweet chili sauce, red pepper flakes, maple syrup, sesame seeds, and remaining 1/4 cup sriracha. Stir to combine and set aside.
- Begin heating enough oil to deep fry in a high-walled pan or large pot to 350F.
- Set up breading station with three bowls. In one, add 1 cup plain flour; in the second, combine 2 cups flour, cold water, and ice cubes; in the third, add panko breadcrumbs.
- To fry, dredge marinated shrimp or tofu in the plain flour and shake off excess. Then, dip in the cold tempura batter and let the excess drip off. Finally, dredge in panko breadcrumbs and add to hot oil. Repeat until you have 4-6 of each in the hot oil, careful not to overcrowd the pan, and deep fry for about 3-4 minutes, flipping halfway through if necessary.
- Remove to a wire wrack over a paper-towel lined sheet pan to cool lightly and drain excess oil.
- When ready to serve, toss in prepared chili sauce (step 2) and top with additional sesame seeds, cilantro, and sliced green onions. Serve over rice with blistered soy green beans.

Bang Bang Tofu and Shrimp
Ingredients
- 10-15 shrimp peeled and deveined
- 8 oz tofu firm or extra firm
- 2 tbsp sriracha + 2 tbsp + 1/4 cup
- 1 tsp sesame oil + 1 tsp
- 1/4 tsp coriander + 1/4 tsp
- 1/4 tsp cumin + 1/4 tsp
- 1/4 tsp cayenne pepper + 1/4 tsp
- 1/4 tsp garlic powder + 1/4 tsp
- 1/4 tsp onion powder + 1/4 tsp
- 1/4 tsp turmeric + 1/4 tsp
- 1/4 tsp white pepper + 1/4 tsp
- 1/4 tsp salt + 1/4 tsp
- 1 cup all-purpose flour + 2 cups
- 2 cup water cold
- 1 cup ice cubes
- 2 cups panko breadcrumbs
- 1/2 cup mayonnaise vegan as needed
- 1/3 cup almond yogurt plain
- 1/3 cup Thai sweet chili sauce
- 1/4 cup maple syrup
- 2 tbsp red pepper flakes
- 2 tbsp sesame seeds
- oil to deep fry
Instructions
- Wrap tofu in a dishtowel and press with a heavy skillet or cookbooks for at least 30 minutes. Slice tofu into bite-sized pieces, about 1 inch.
- In each of two sealable containers add 2 tbsp sriracha, 1 tbsp sesame oil, and 1/4 tsp each of spices (coriander, cumin, cayenne pepper, garlic powder, onion powder, turmeric, white pepper, and salt). Stir to combine, and add shrimp and tofu into separate marinades. Stir again to coat, seal each container, and store in the fridge for at least 30 minutes.
- In a small mixing bowl, combine mayonnaise, yogurt, sweet chili sauce, red pepper flakes, maple syrup, sesame seeds, and remaining 1/4 cup sriracha. Stir to combine and set aside.
- Begin heating enough oil to deep fry in a high-walled pan or large pot to 350F.
- Set up breading station with three bowls. In one, add 1 cup plain flour; in the second, combine 2 cups flour, cold water, and ice cubes; in the third, add panko breadcrumbs.
- To fry, dredge marinated shrimp or tofu in the plain flour and shake off excess. Then, dip in the cold tempura batter and let the excess drip off. Finally, dredge in panko breadcrumbs and add to hot oil. Repeat until you have 4-6 of each in the hot oil, careful not to overcrowd the pan, and deep fry for about 3-4 minutes, flipping halfway through if necessary.
- Remove to a wire wrack over a paper-towel lined sheet pan to cool lightly and drain excess oil.
- When ready to serve, toss in prepared chili sauce (step 2) and top with additional sesame seeds, cilantro, and sliced green onions. Serve over rice with blistered soy green beans.
The post Bang Bang Shrimp + Tofu appeared first on I Forgot Salt!.
]]>The post Loaded Breakfast Toast appeared first on I Forgot Salt!.
]]>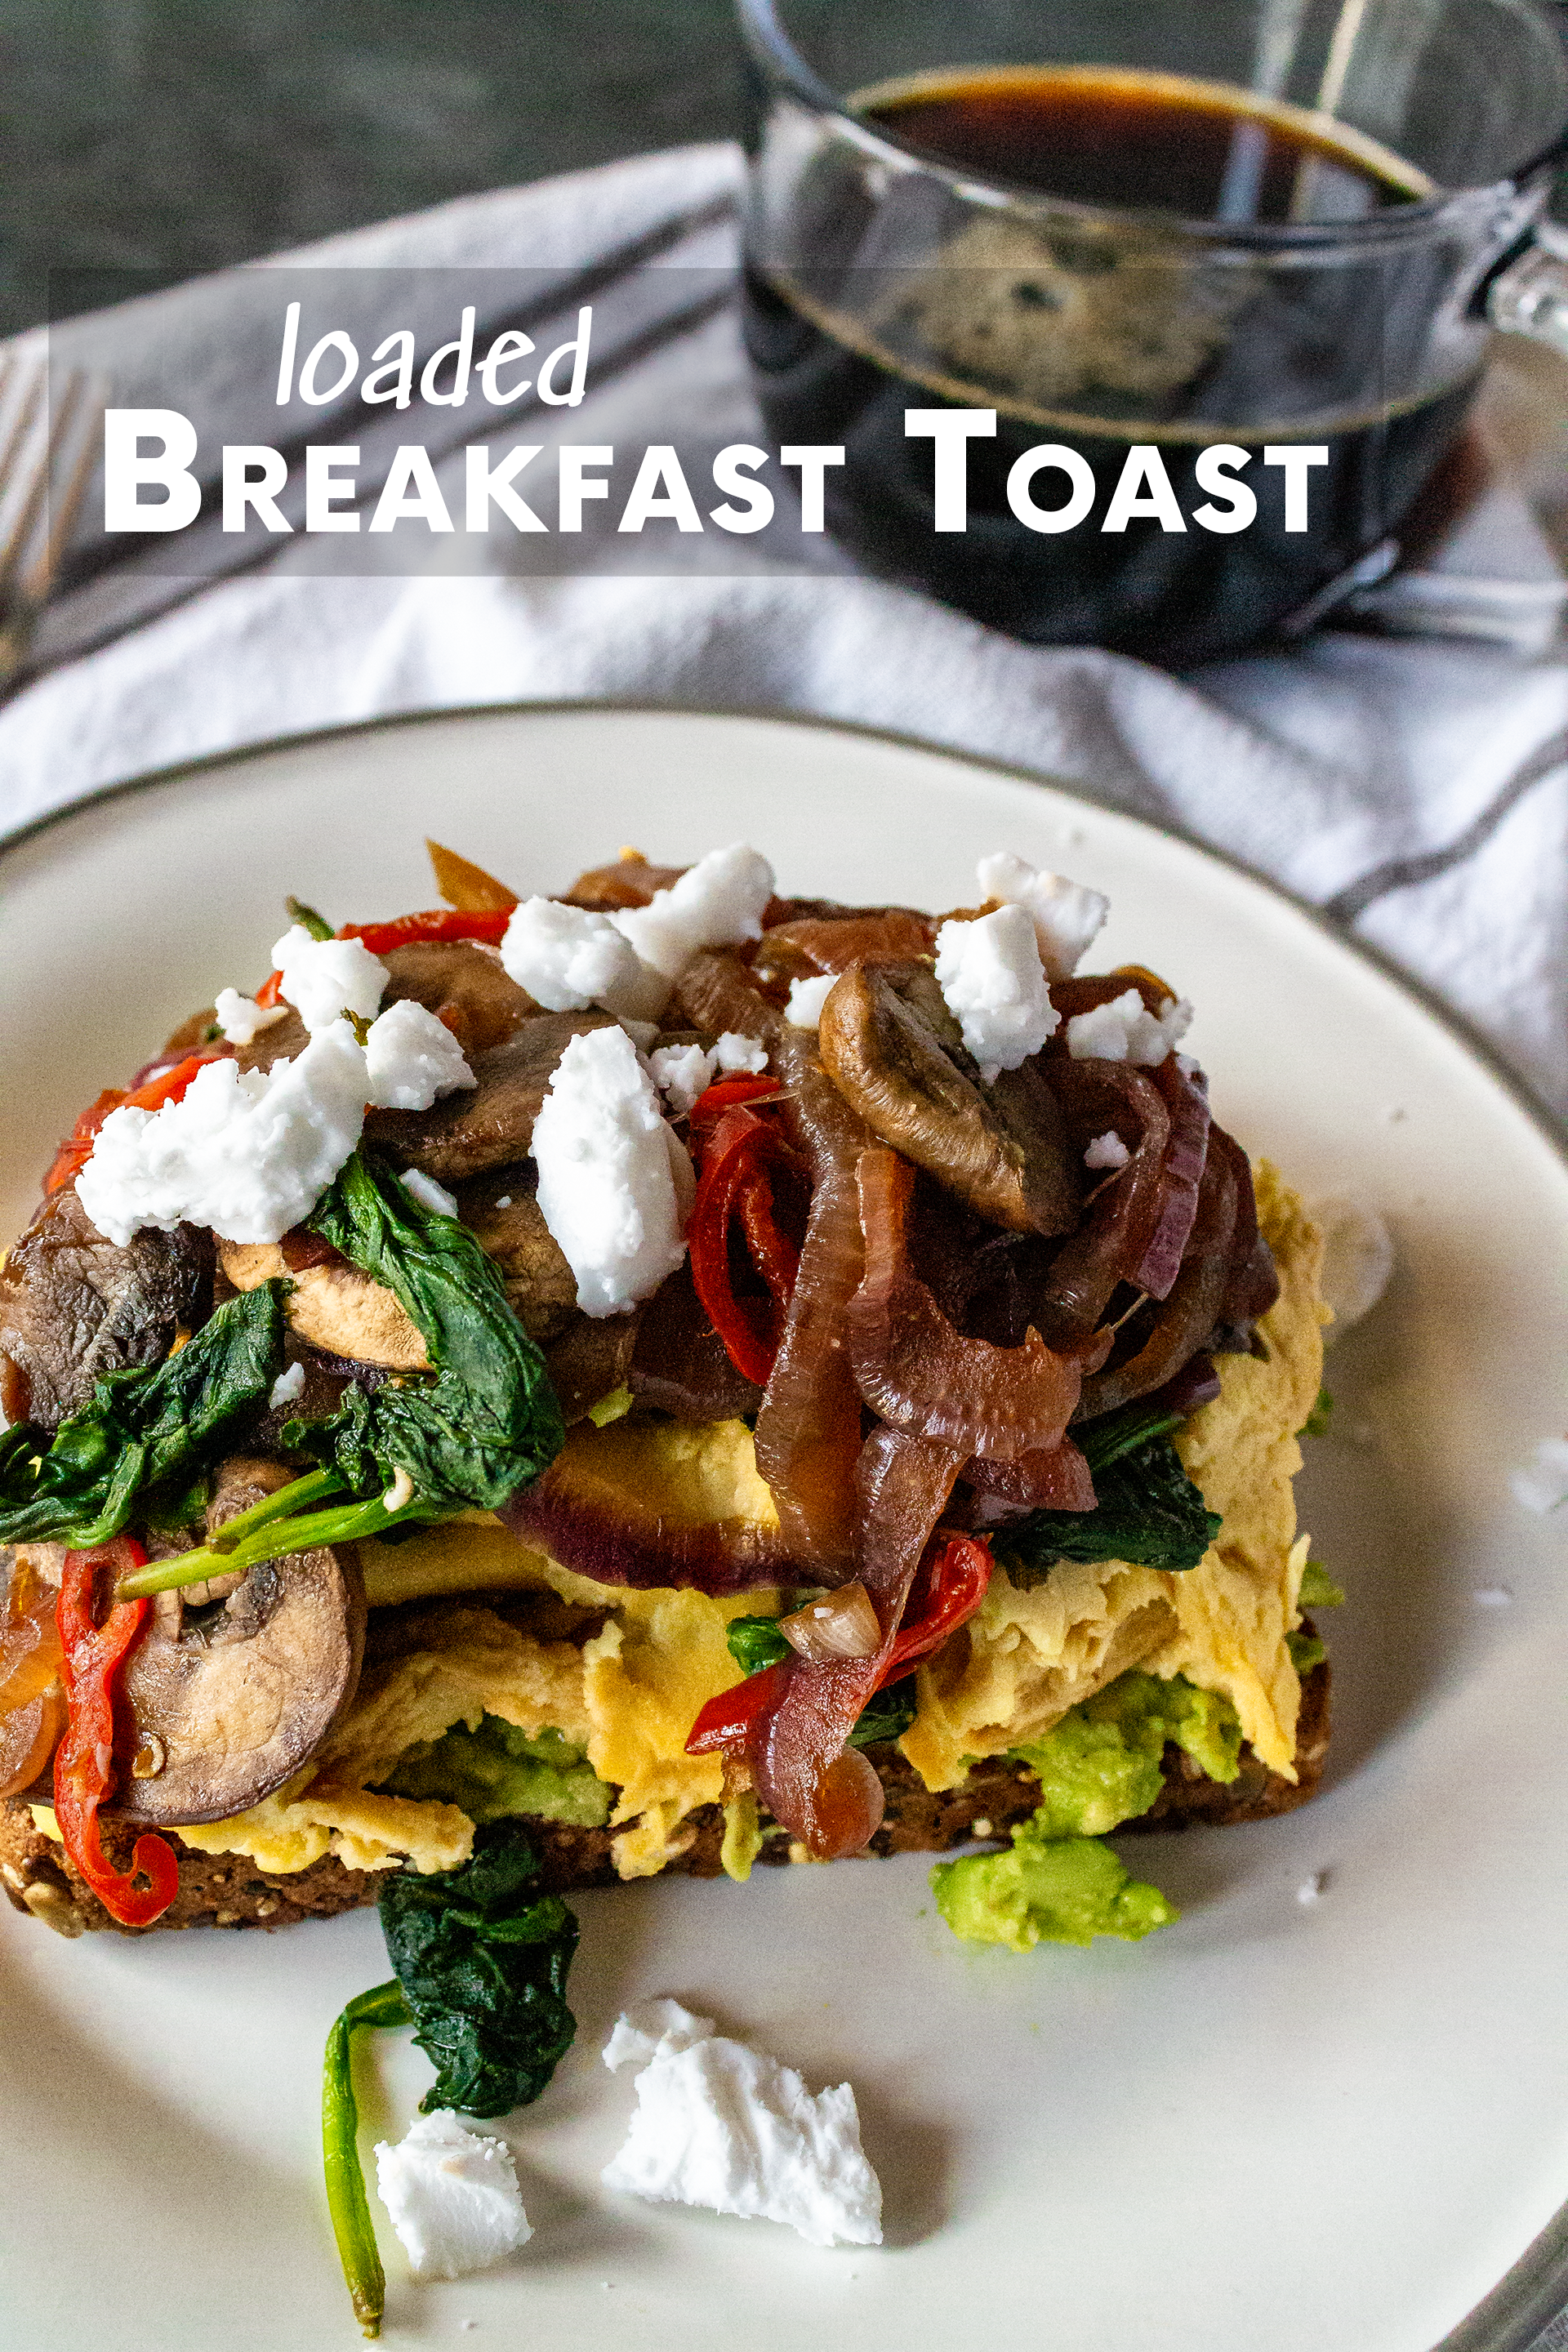
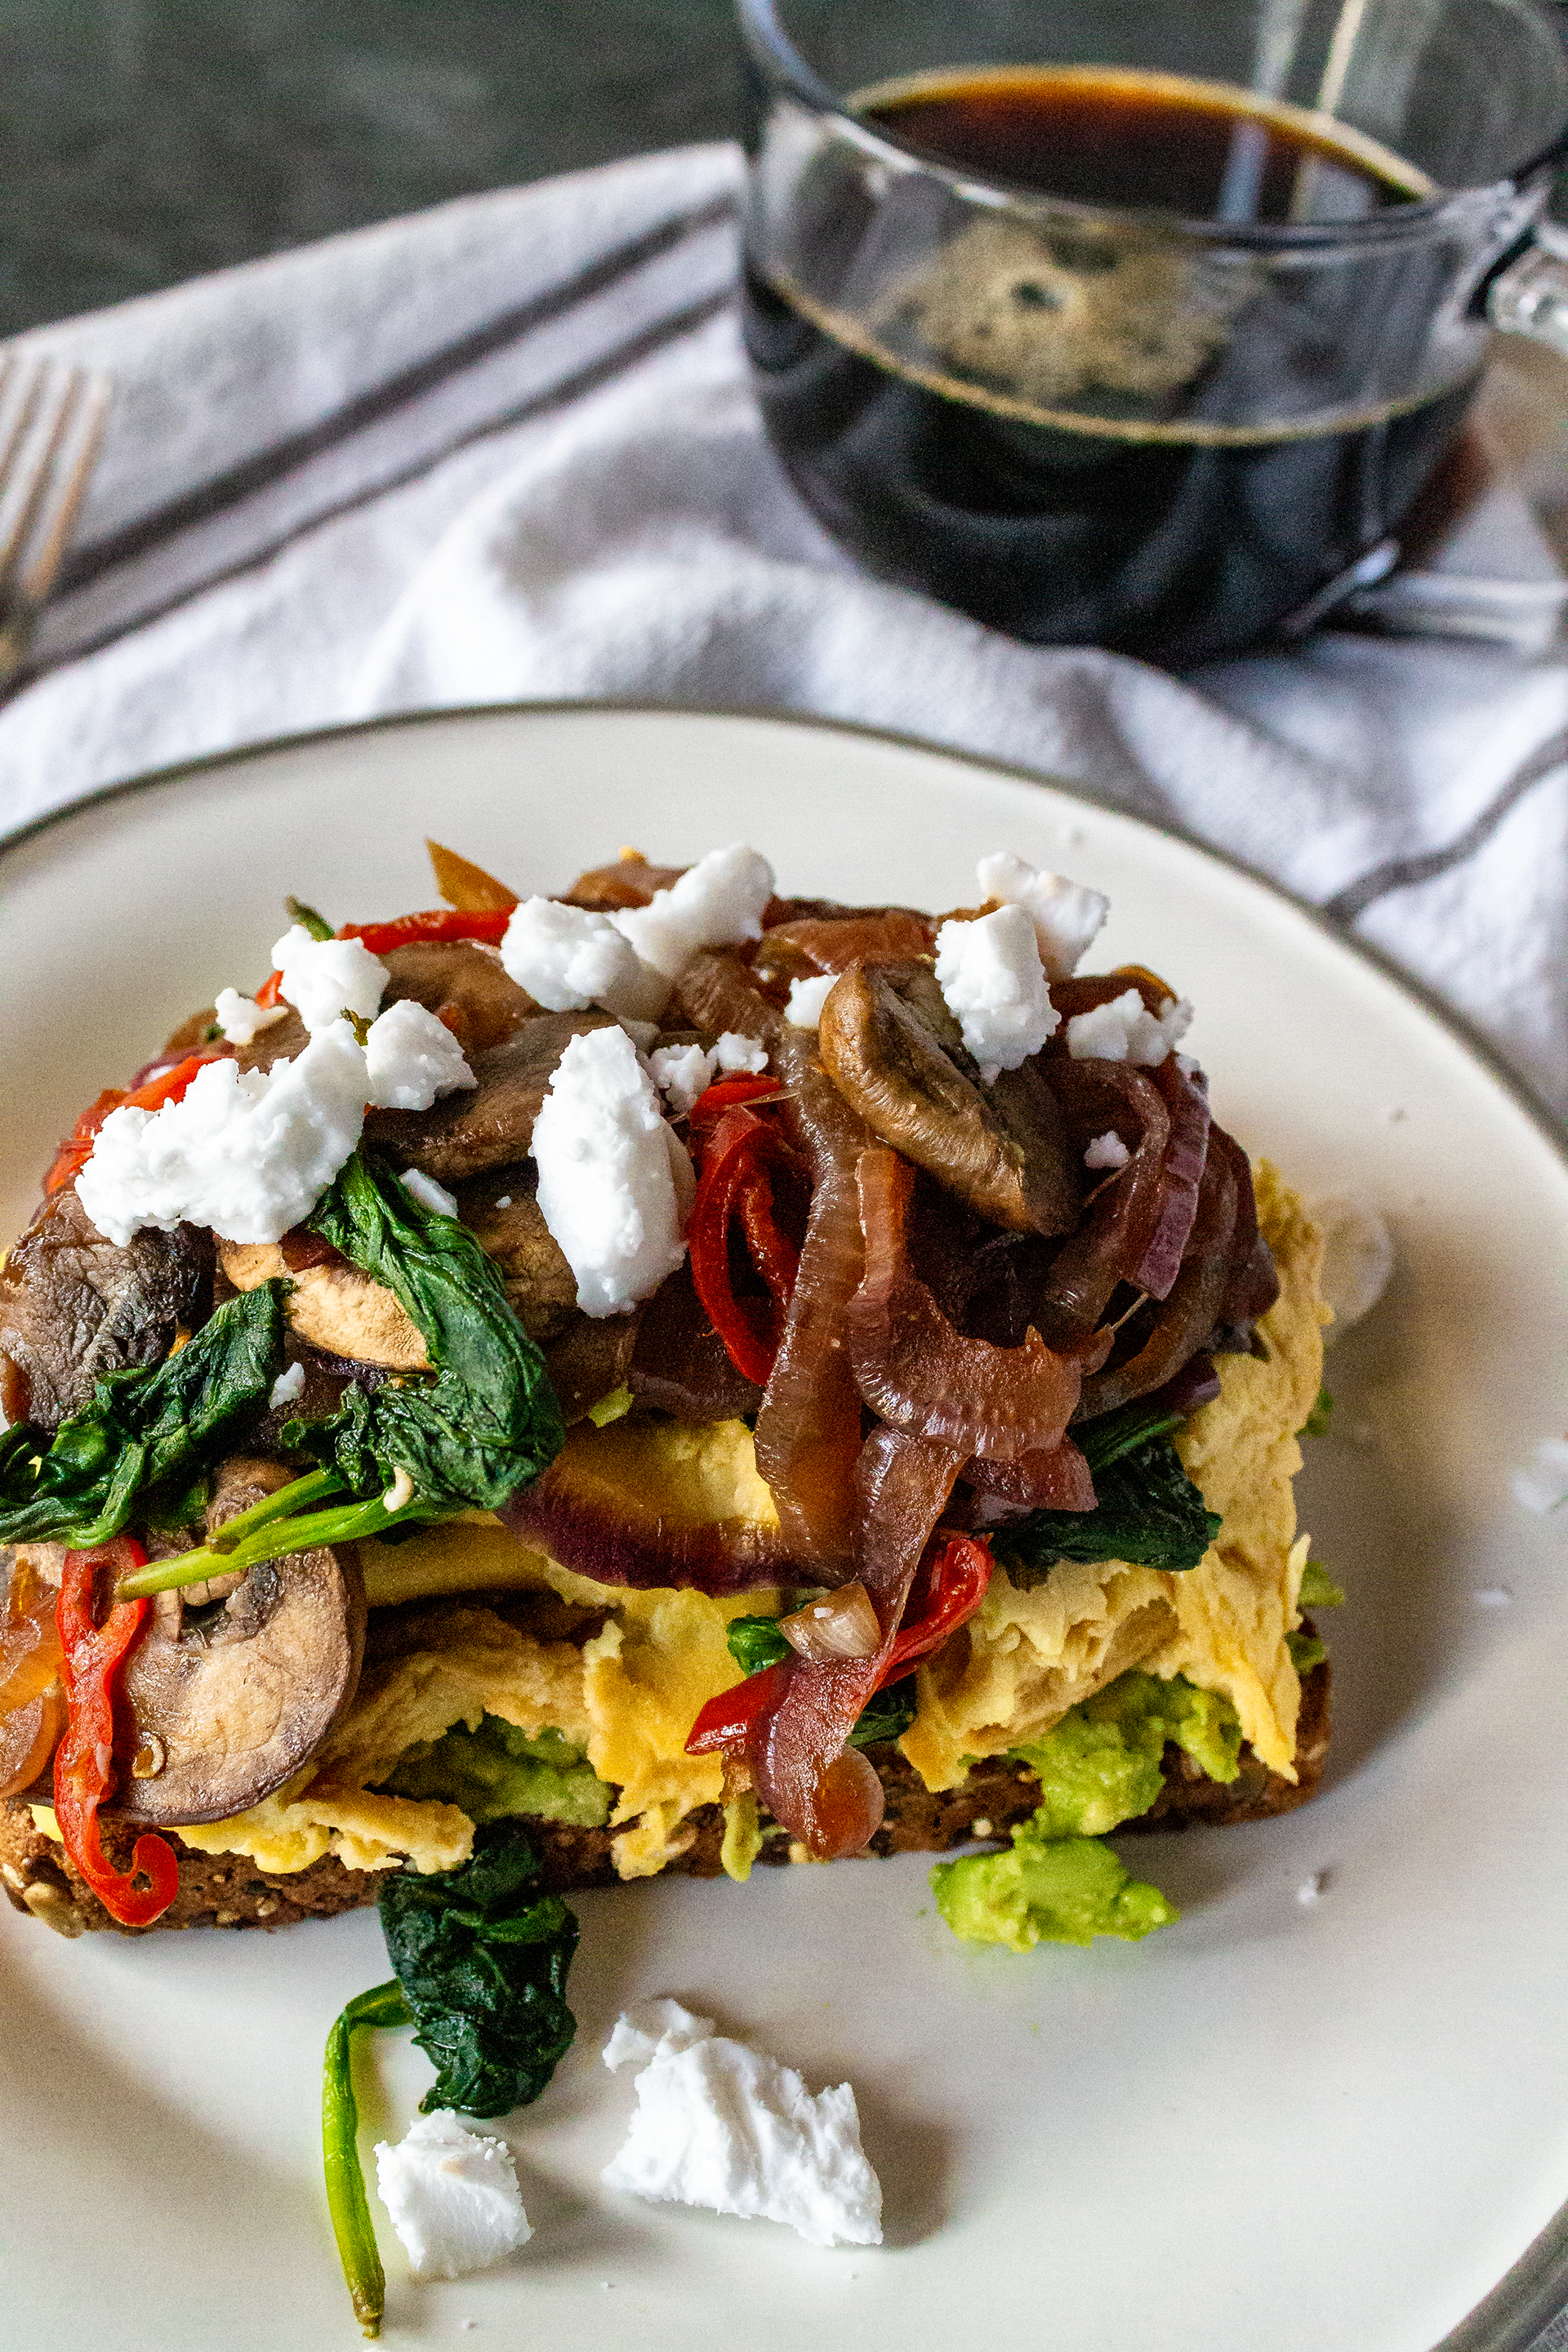
Although I’ve posted some avocado toast recipes before, this absolute monster of a breakfast toast carried me through my last semester of 2020. What a year–I can’t believe it’s almost over. We’re nearly free from this absolute catastrophe! It’s hard to fathom that another year has come and gone, while at the same time I feel like I’ve aged a decade since January. I’m sure the feeling is mutual. Despite the chaos, however, I feel like 2020 has been one of my most productive and accomplished years in quite a while, even with what seems like the end of the world constantly looming on the horizon.
As I’ve mentioned in previous posts, Alex and I made some very radical changes in our lives, from larger things changing jobs (him) to entering university (me) to moving even farther south (both of us) to smaller, more individual improvements like switching to a plant-based diet (me), taking up running (him), and making a conscious effort to read more books (both of us). In the grand scheme of things–even our lowest points–I think we have come out of 2020 as better, stronger people.
That doesn’t mean this year wasn’t difficult, however. Our lowest points were indeed low, but I think we’re lucky enough to be able to dwell on not on the negatives but on the positives of 2020 in retrospective. While we will be looking back on this year as a true dumpster fire, I want to try not to forget about the good things that happened in spite of so much strife. I am tentatively putting some of my hopes in 2021, but will be satisfied as long as we make it through intact.
Now, onto a lighter note and the actual breakfast toast recipe…

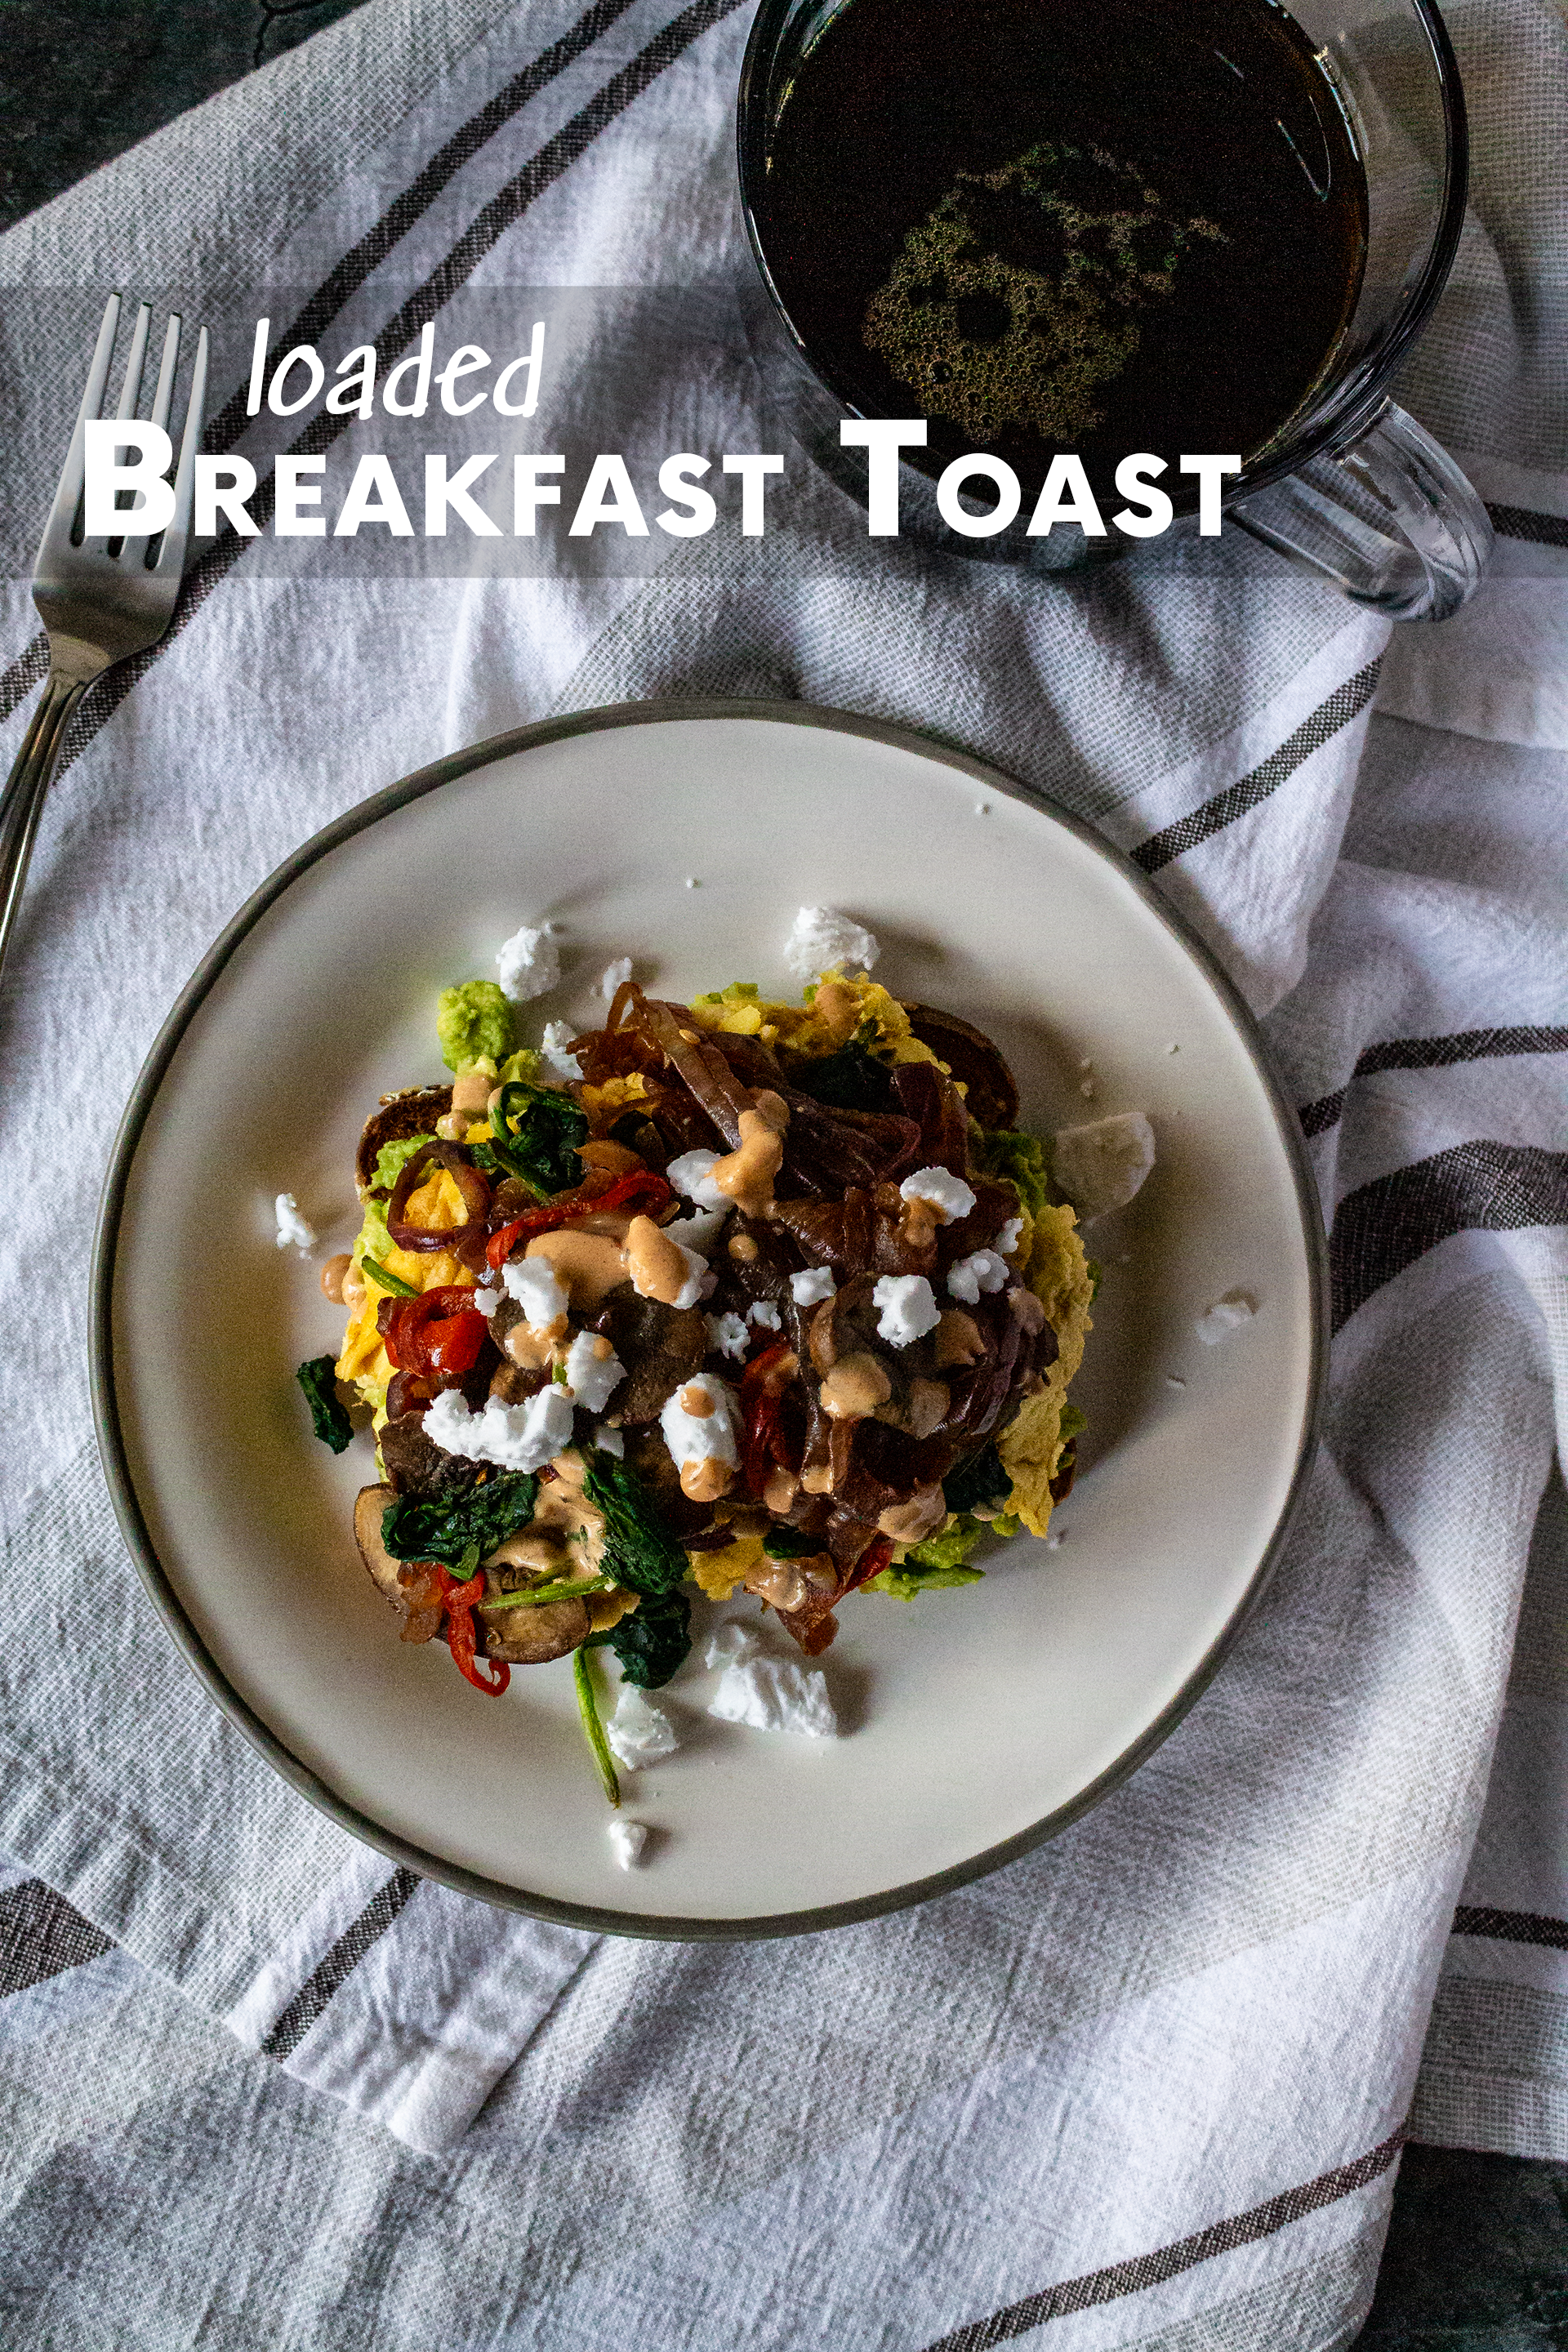
It is absolutely no secret that I love avocado toast, and this loaded “breakfast toast” version has become my go-to for a late morning meal or brunch if I need something to get me through an afternoon of online classes. The salty-sourness of the soy sauce and balsamic vinegar compliments the relatively sweet feta cheese so well. All of that veggie goodness layered atop protein-packed eggs/egg substitute (like JUST Egg or my tofu scramble) and an avocado chock full of healthy fats makes for a wonderfully nourishing start to the day. Structurally, I’ve found that whole grain or hearty sourdough bread holds up best under all of the weight, but white bread makes for an indulgent and delicious alternative as well. This recipe is so versatile, you can change almost any element and it will still taste great! Also, as an aside–yes, this can be made completely vegan. I’ve recently discovered Violife’s feta alternative (pictured) and I’m obsessed.
Ingredients:
- 2 slices toast, buttered
- 1 cup scrambled eggs, egg substitute, or tofu scramble
- 1/4 cup feta cheese
- 1 avocado
- 1/2 cup baby bella mushrooms, sliced
- 1/2 cup onion, sliced
- 1/4 cup mini sweet peppers, sliced
- 1 cup spinach
- 2 tsp soy sauce
- 1 tsp balsamic vinegar
- 1/2 tsp lemon juice
- 1/4 tsp salt
- 1/4 tsp black pepper
Directions:
- Toast two slices of bread in a pan with butter, under the broiler, or in a toaster. Set aside.
- Mash 1 fresh avocado in a small bowl with salt, pepper, and lemon juice. Set aside.
- Prep and cook scrambled eggs, egg substitute, or tofu scramble as desired. Set aside.
- Heat a nonstick pan on medium-high heat. Add peppers and sauté for 1-2 minutes, or until softened and fragrant.
- Add mushrooms, onion, soy sauce, and balsamic vinegar and cook for an additional 3-5 minutes, or until vegetables have browned and most liquid has evaporated.
- Add spinach and sauté for about 1 minute, or until wilted. Set aside to assemble.
- Layer toast with avocado, egg/egg substitute, vegetable sauté, feta cheese, and your favorite hot sauce or crema.
Although I wouldn’t recommend storing an assembled toast in the fridge for fear of the bread becoming irreparably soggy, the individual components keep really well on their own. The lemon juice keeps the avocado from becoming brown, and the vegetable sauté can last several days and still taste great. More than once I’ve overestimated how much I want to eat in a single sitting and saved the toppings for another day.

Loaded Breakfast Toast
Ingredients
- 2 slices toast buttered
- 1 cup scrambled eggs egg substitute, or tofu scramble
- 1/4 cup feta cheese
- 1 avocado
- 1/2 cup baby bella mushrooms sliced
- 1/2 cup onion sliced
- 1/4 cup mini sweet peppers sliced
- 1 cup spinach
- 2 tsp soy sauce
- 1 tsp balsamic vinegar
- 1/2 tsp lemon juice
- 1/4 tsp salt
- 1/4 tsp black pepper
Instructions
- Toast two slices of bread in a pan with butter, under the broiler, or in a toaster. Set aside.
- Mash 1 fresh avocado in a small bowl with salt, pepper, and lemon juice. Set aside.
- Prep and cook scrambled eggs, egg substitute, or tofu scramble as desired. Set aside.
- Heat a nonstick pan on medium-high heat. Add peppers and sauté for 1-2 minutes, or until softened and fragrant.
- Add mushrooms, onion, soy sauce, and balsamic vinegar and cook for an additional 3-5 minutes, or until vegetables have browned and most liquid has evaporated.
- Add spinach and sauté for about 1 minute, or until wilted. Set aside to assemble
- .Layer toast with avocado, egg/egg substitute, vegetable sauté, feta cheese, and your favorite hot sauce or crema.

The post Loaded Breakfast Toast appeared first on I Forgot Salt!.
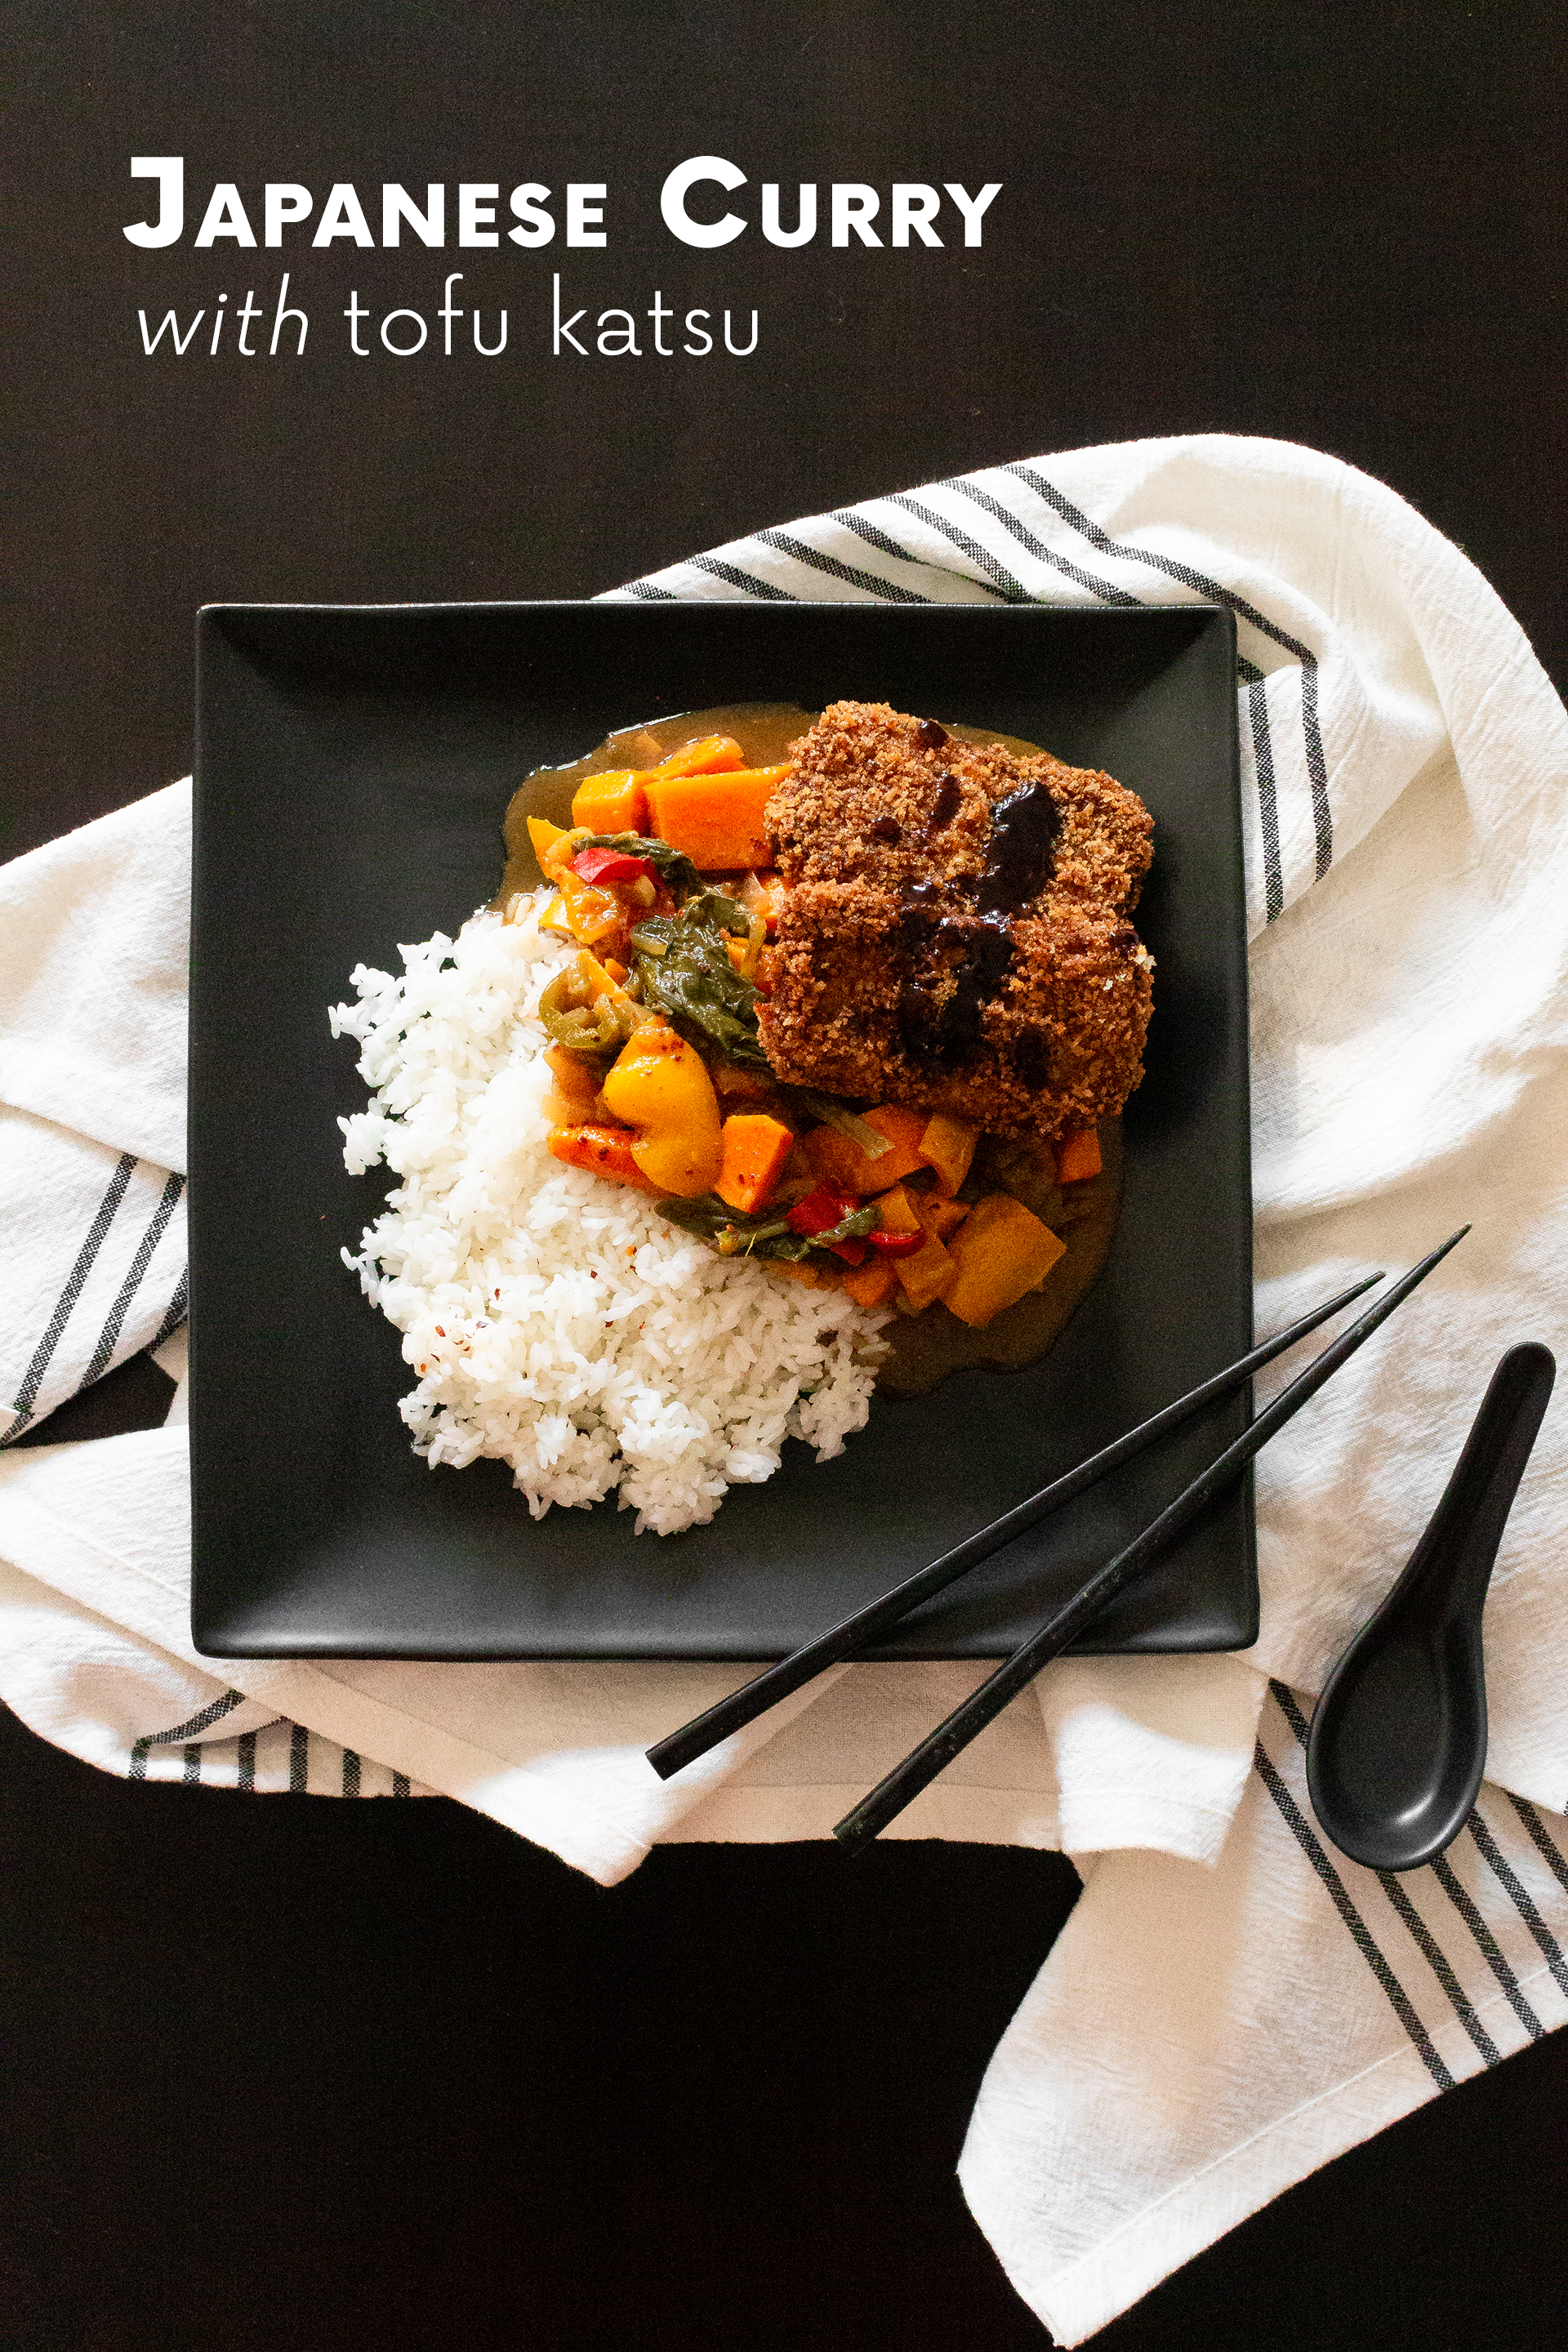
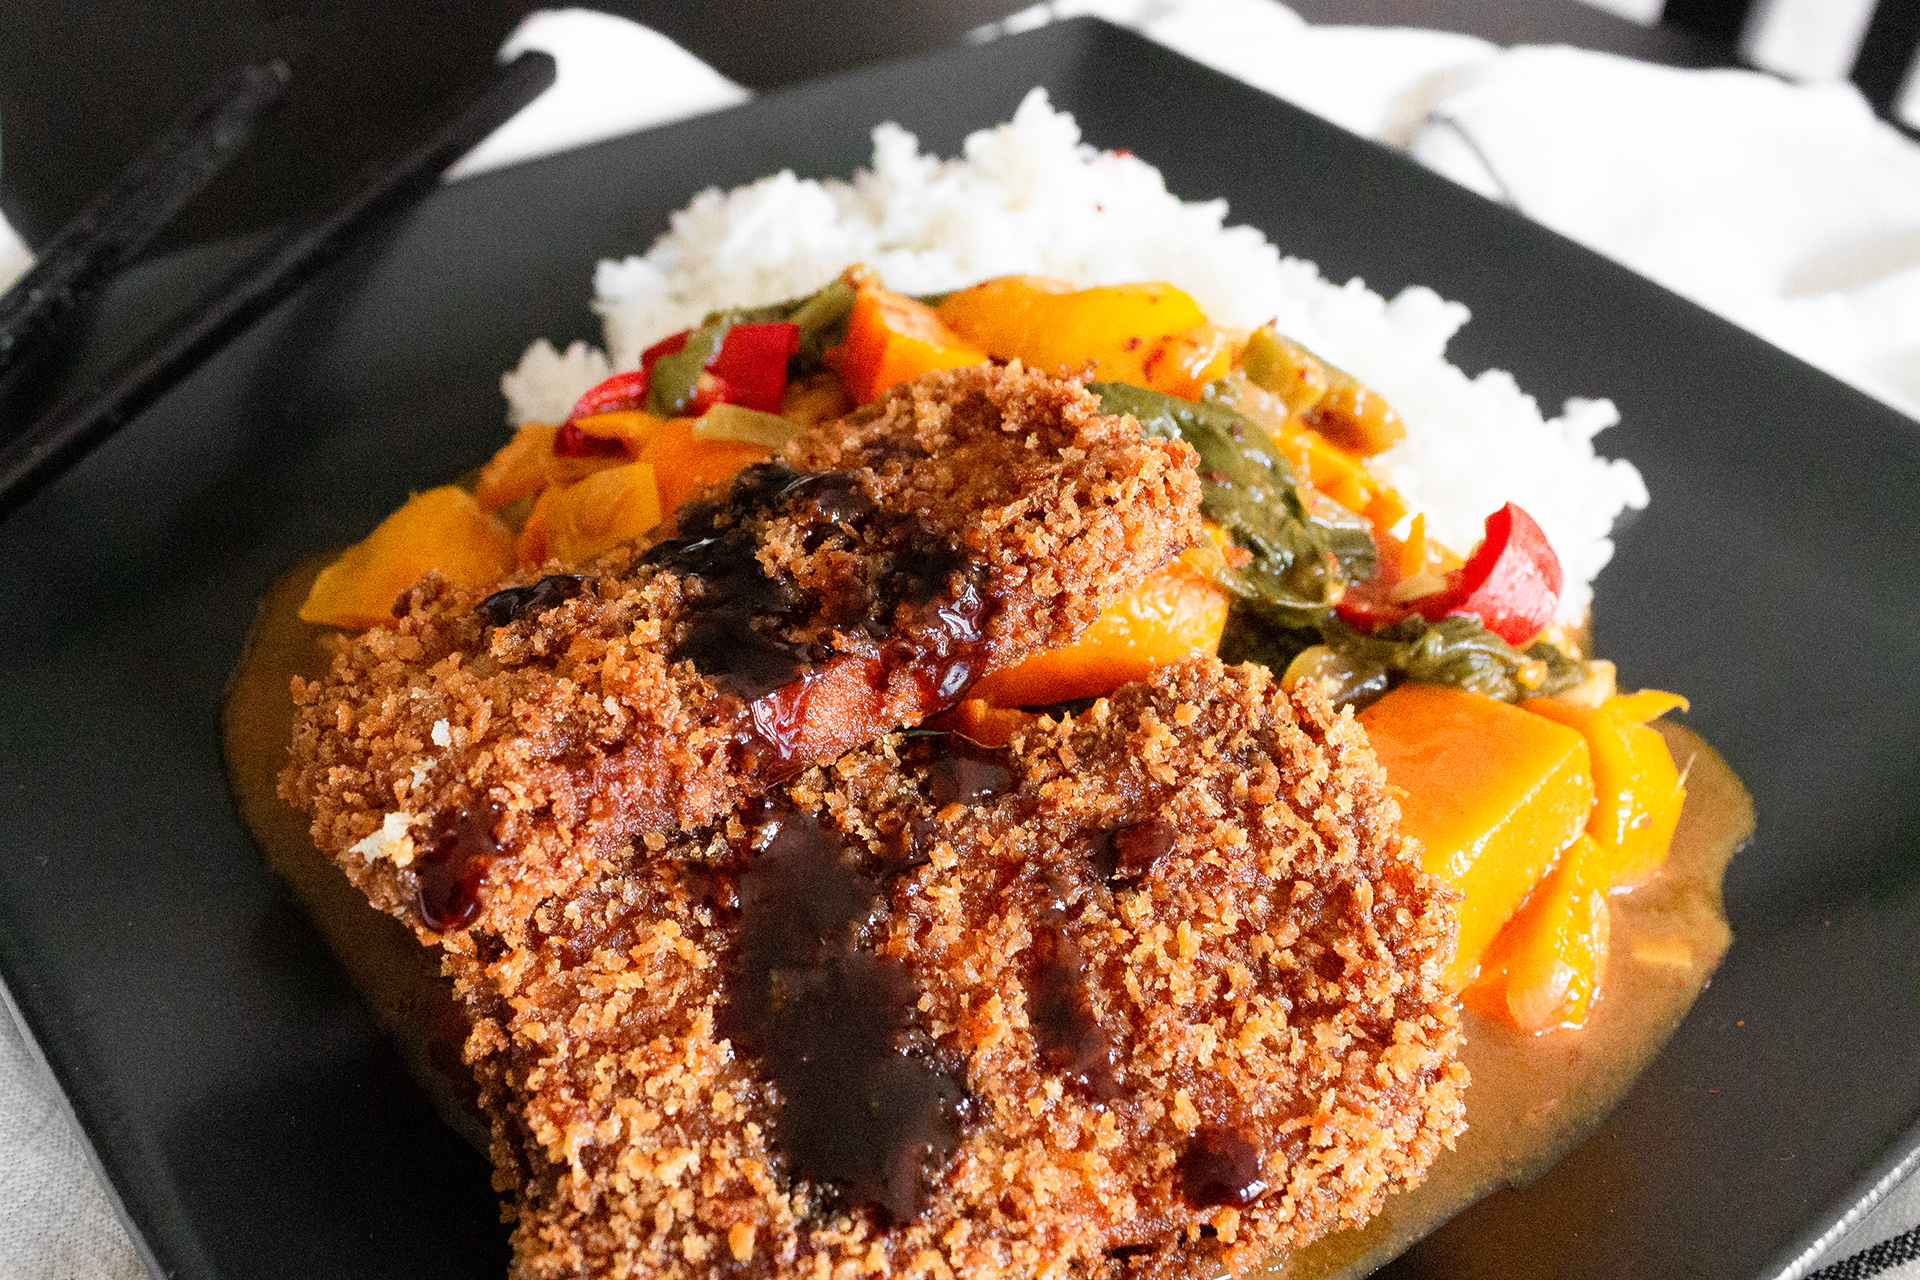
]]>The post Japanese Curry + Tofu Katsu appeared first on I Forgot Salt!.
]]>
No, I don’t have a problem–even though this tofu katsu curry is the fifth curry recipe I’ve uploaded onto this site, everything is totally fine. If you’ve read my most recent butternut squash and chickpea curry post, I’m sure you’re keenly aware that curry is both my favorite food and the perfect meal for… trying times, and if there’s one thing the past month has been it’s hectic. JMU decided to shut down in-person classes just six days after the start of the semester, and four weeks later have changed their minds again, making this one of the strangest falls I think I’ve ever experienced. Looking back to this time last year, Alex and I spent the majority of August, September, and October travelling back and forth between Virginia and New England (New Hampshire, Connecticut, and Vermont) every other weekend for a slew of family events and wedding planning, and then hosted a visit from his parents in mid-October. Throw in Thanksgiving, Christmas, and some local get-togethers with friends in-between and it’s safe to say that fall is and always has been our busiest season, socially. Honestly, that seems like a lifetime ago.
I like to think that we’ve adapted somewhat over the past few months of “social distancing”, and we’ve kept ourselves busy in as many ways possible. Aside from the obvious major life changes that always seem to get lost in the haze when reminiscing about this year (Alex’s new job, my new academic path, moving to a new town, etc.), we’ve made other adjustments, as well. We’ve both made a conscious effort to be healthier, especially now that we can’t get our exercise from wandering around Target for three hours every Saturday. Alex has started the couch-to-5K running program, I’ve done my best to pick up yoga and go on a four-hour “urban hike” once a week. We’ve also almost entirely eliminated restaurants from our diet, with a goal to only “eat out” (or get take-out) once per month, and that has also made us more conscious of the meals we cook at home. Although we’ve definitely been experimenting more with deep-frying (as evidenced with this tofu katsu curry recipe), we’ve also made a point to broaden the variety of vegetables, grains, and proteins in our respective diets.
Outside of “self-improvement”, though, we’ve also spent the majority of 2020 just thoroughly enjoying our hobbies. I have already surpassed my goal of reading one-hundred books by the end of the year, and I don’t see my pace slowing much between now and December. With three literature-heavy English courses this semester (studies of Shakespearean tragedies, comparative studies of childhood trauma in literature, and twentieth-century queer literature) and a never-ending stream of pre-ordered new releases arriving in the mail, I doubt I’ll run out of things to read anytime soon. We also clocked just under two-hundred hours on the JRPG Persona 5R and one-hundred-fifty hours on Animal Crossing: New Horizons over the course of the summer, and while Alex has moved on to Persona 4 Golden, I have begun a replay of Breath of the Wild in anticipation for the game’s prequel release in November. Our anime consumption skyrocketed, too, with entire weekends spent in a marathon-like haze of rewatching some of my older favorites that Alex hadn’t previously seen.
Admittedly, none of this has anything to do with tofu katsu curry, but it seems like I always get a little bit introspective in my curry posts. Something about the warm, spicy comfort food always puts me in the mood to reflect on things. This year has been one of gradual improvement in all things, and this tofu katsu curry is no exception. The first time I made it, I wasn’t really sure where to begin with the tofu katsu itself, so we ended up with giant chunks of oily, tough-to-chew protein with hardly any breading and even less flavor. On the second iteration, however, I made quite a few changes, and managed to produce something so good that I have now eaten the leftovers three days in a row.
One of my favorite parts about living in our new apartment is the space to experiment in the kitchen, and how that has translated into a willingness to test recipes multiple times before posting–especially more elaborate ones like this tofu katsu curry. In our old apartment, if a recipe wasn’t amazing the first time, more often than not I either abandoned the idea altogether or only attempted to remake it after months of psyching myself up. Now, with the freedom and flexibility of more counter space, a larger dishwasher, and excellent ventilation, cooking methods like deep frying and complex dishes with lots of moving parts have become so much easier to tweak to my liking. Off the top of my head, I can think of three multi-step recipes I have changed and remade at least twice, all of which I plan to reproduce again based on those notes: black bean and sweet potato enchiladas, jackfruit Korean BBQ tacos, and a steamed-egg and bacon breakfast burrito skillet (that can easily be made either entirely vegan or half/half). While my creativity in the kitchen has definitely expanded, the standards to which I hold my own cooking have begun to slowly but steadily raise. My goal for the upcoming fall season is find a balance between continual improvement and self-forgiveness for any mistakes I make, which seems like it could be a good outlook to have just as much in life as on the stove.
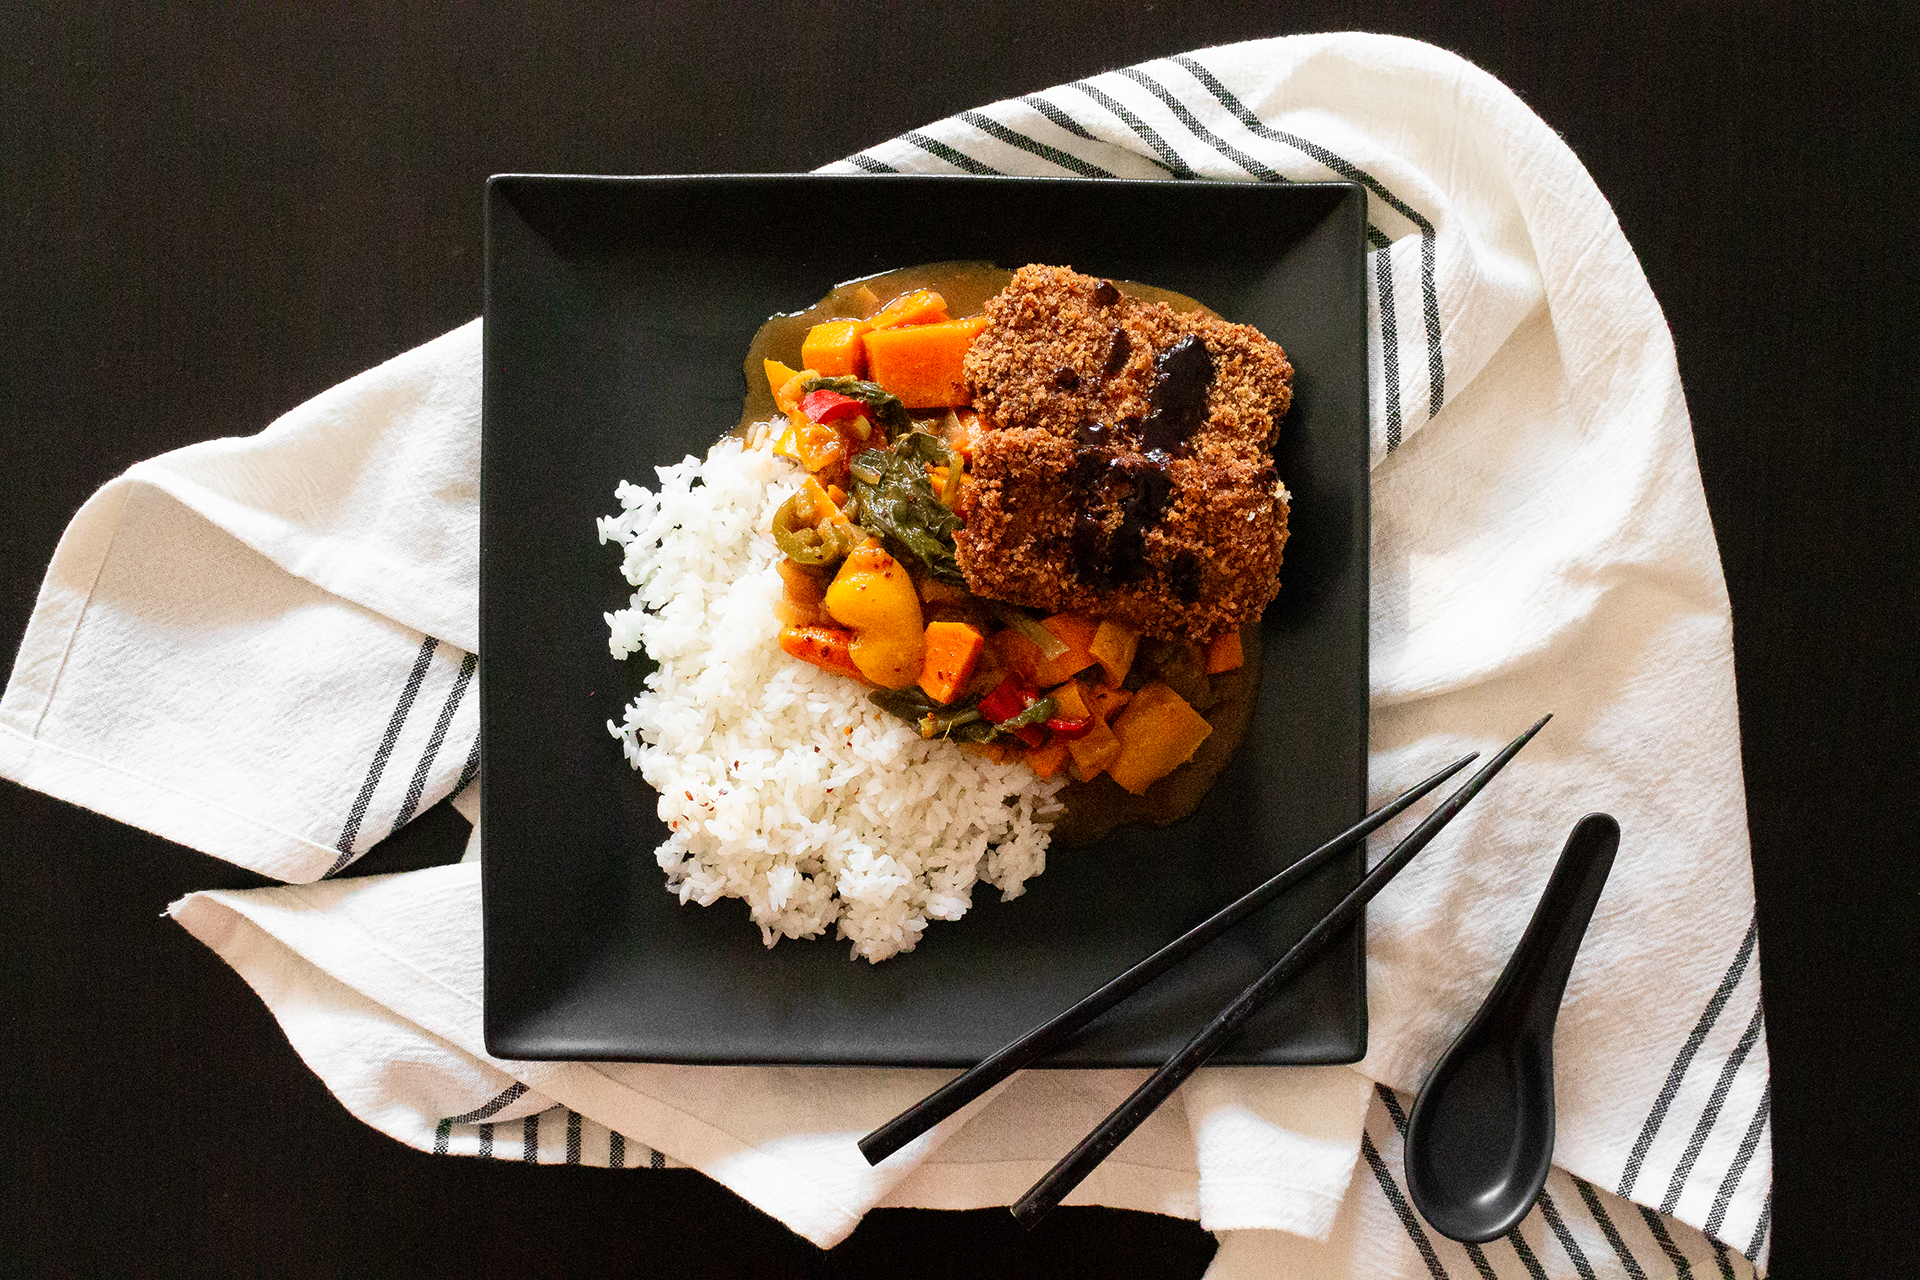
Japanese Curry
This recipe makes six servings.
Ingredients:
- 3 Japanese curry cubes (I used Vermont Curry brand)
- 1-2 large sweet potatoes
- 1-2 large russet potatoes
- 2-3 large carrots
- 2 large onions
- 2-3 bell peppers (red, yellow, or orange)
- 4 cups vegetable broth
- 2 cups spinach
- 1/4 cup applesauce (unsweetened)
- 2 tbsp apple cider vinegar
- 1 tbsp dark soy sauce
- 1 tbsp garlic, minced
- 1 tbsp ginger, minced
- 2 tsp garam masala
- 1 tsp cayenne pepper
- 1 tsp gochugaru/red pepper flakes
- 1 tsp sesame oil
- 1 tsp salt
Directions:
- Roughly chop all vegetables (potatoes, carrots, bell pepper, onion) and mince garlic and ginger as needed.
- In a large stock pot, heat sesame oil on medium-high. Add salt, garlic, ginger, and onion. Sauté until sizzling and fragrant, about 2-3 minutes.
- Add remaining vegetables and spices, sans curry cubes (garam masala, cayenne pepper, gochugaru/red pepper flakes) and sauté for an additional 4-5 minutes, stirring occasionally.
- Add vegetable broth, apple sauce, soy sauce (dark), vinegar, and curry cubes. Bring to a boil, stirring occasionally until curry cubes have completely dissolved, about 10-15 minutes.
- Cover and reduce to medium-low heat to simmer for an additional 25-30 minutes.
- Reduce heat to low and add spinach. Stir gently until spinach is completely wilted. Serve warm over rice with tofu katsu and tonkatsu sauce (see recipes below).
Tofu Katsu (deep-fried tofu cutlet)
This recipe makes six slices, three total servings.
Ingredients:
- 16oz firm/extra firm tofu
- 1/4 cup light soy sauce
- 2 tbsp sake
- 1 tbsp dark soy sauce
- 1 tbsp rice vinegar
- 1/2 tsp sesame oil
- 1.5 cups panko breadcrumbs
- 2 eggs OR 1/4 cup diluted egg replacer (I used Bob’s Red Mill with 2x water)
- vegetable oil for deep-frying
Directions:
- Press water from tofu for at least 30 minutes.
- Slice tofu width-wise into cutlets about 1/2-inch thick and gently set aside.
- In a small mixing bowl, combine marinade ingredients (light soy sauce, dark soy sauce, sake, rive vinegar, and sesame oil). Stir to combine.
- Place tofu in marinade, cover, and let sit for 6-24 hours. (Note: I have marinated both overnight and early in the morning in prep for dinner. Both work well.)
- When ready to fry, heat vegetable oil in a wide-bottomed, high-walled pot or pan to 350F. (Note: Do not begin frying at a lower heat–your batter/panko will fall off immediately and it will be a mess.)
- Dredge tofu slices in egg/diluted egg replacer, then in panko breadcrumbs until entirely coated. Gently place in hot frying oil.
- Fry for 3-4 minutes on each side, or until dark golden brown (see pictured) then remove to a wire rack or paper towel-lined tray.
- Repeat until all tofu pieces have been fried. Serve with rice, Japanese curry, and tonkatsu sauce (see attached recipes).
Tonkatsu Sauce (deep-fried cutlet sauce)
As most of the ingredients used in this version of a tonkatsu sauce recipe are the same as the tofu katsu marinade, you can use that as a base for this sauce. “Traditionally”, the Americanized version of this sauce is either purchased from a bottle or made with ingredients like ketchup and Worcestershire sauce, but I do not keep either of those in my fridge and do not make katsu often enough to justify buying either a store-bought version or the ketchup/Worcestershire sauce the Americanized version originally calls for. Instead, I tried to recreate something similar with what I already had on-hand. The sauce is supposed to be thick, salty, and sour to contrast the sweet/spicy flavors of the curry and lighten the deep-fried cutlet, and I think I was able to pull that off quite well with more “common” Asian pantry ingredients. Because it is so concentrated, only a little bit (about 1 tbsp, see pictures) is needed to really bring the whole meal together, so it makes more sense to use what I had rather than make a special trip to the store.
This recipe makes about 6floz, which is about 12 servings.
Ingredients:
- 1/4 cup light soy sauce
- 2 tbsp sake
- 2 tbsp oyster/mushroom sauce
- 1 tbsp dark soy sauce
- 2 tbsp lemon juice
- 1 tbsp rice vinegar
- 1 tsp brown sugar
- 1/8 tsp garlic powder
- 1/8 tsp onion powder
- 1/8 tsp mustard powder
- 1 tbsp cornstarch
Directions:
- In a small saucepan, combine light soy sauce and cornstarch and stir until all cornstarch has dissolved.
- Add all other ingredients and stir to combine.
- Bring to a boil and then reduce heat and simmer for 5-7 minutes, or until sauce has thickened considerably.
- Serve in small 1-1 1/2 tsp amounts atop tofu katsu (see attached recipe).
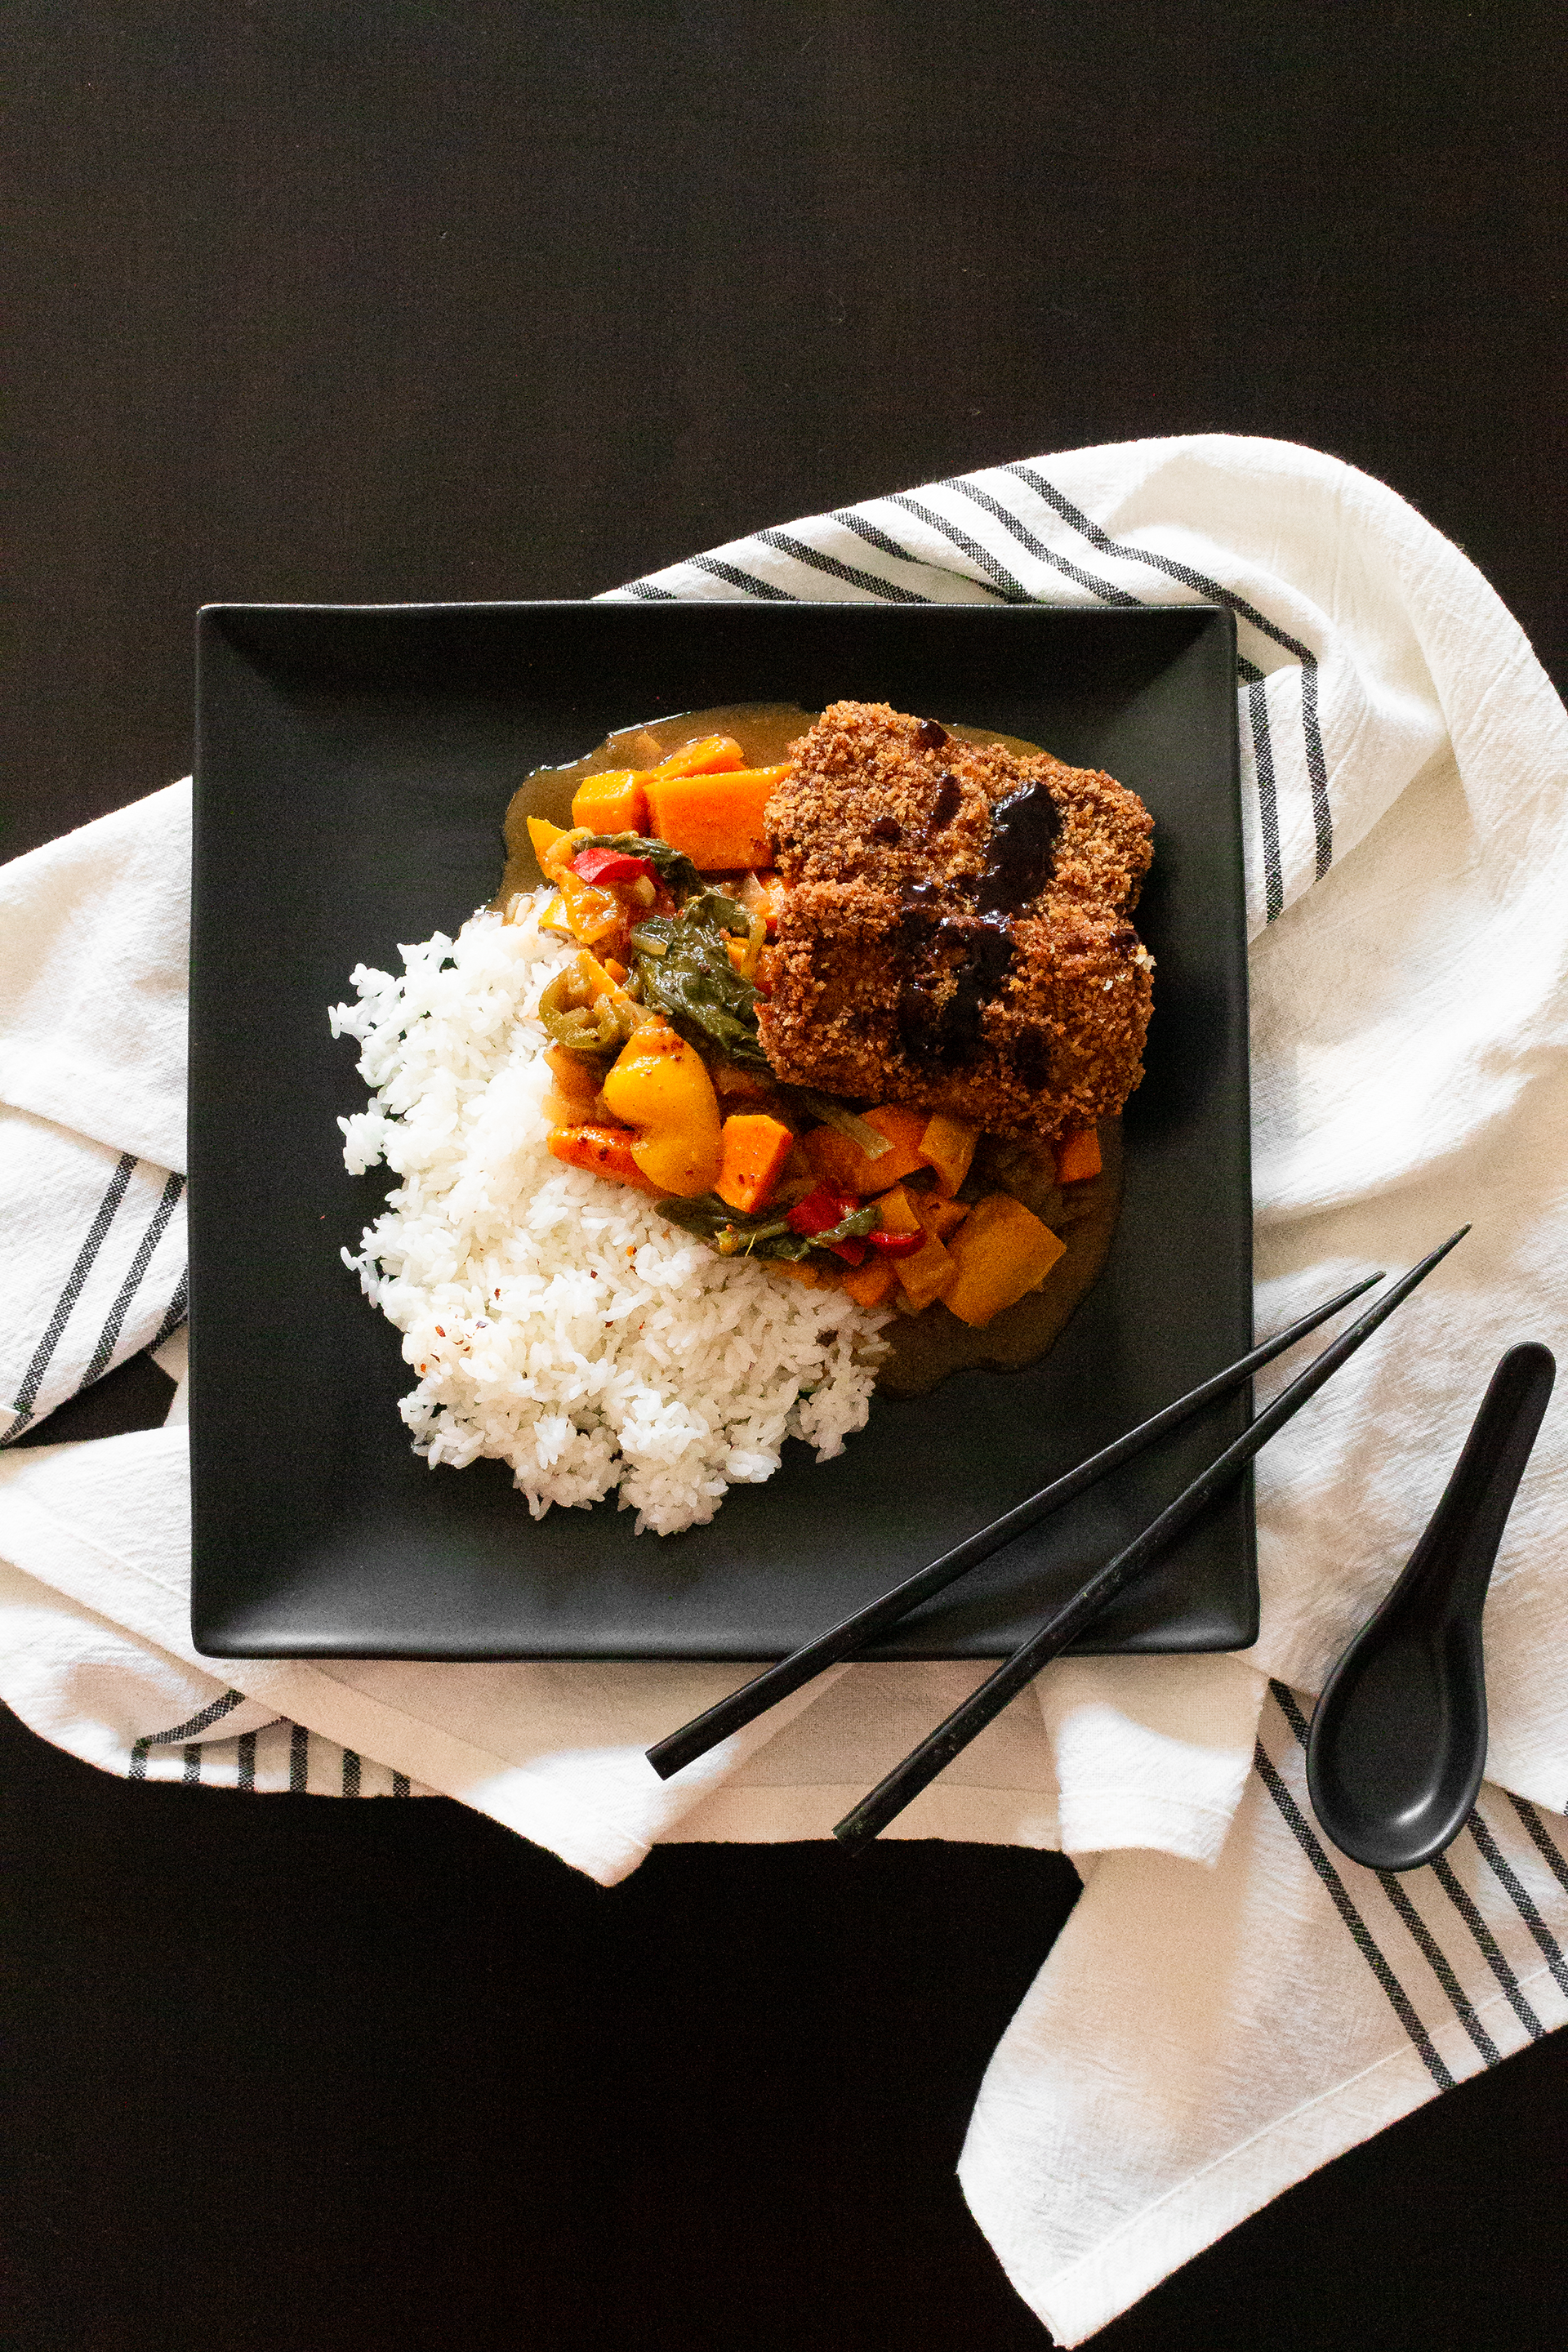
Tofu Katsu Curry
Ingredients
Japanese Curry
- 3 Japanese curry cubes (I used Vermont Curry brand)
- 1-2 large sweet potatoes
- 1-2 large russet potatoes
- 2-3 large carrots
- 2 large onions
- 2-3 bell peppers red, yellow, or orange
- 4 cups vegetable broth
- 2 cups spinach
- 1/4 cup applesauce unsweetened
- 2 tbsp apple cider vinegar
- 1 tbsp dark soy sauce
- 1 tbsp garlic minced
- 1 tbsp ginger minced
- 2 tsp garam masala
- 1 tsp cayenne pepper
- 1 tsp gochugaru/red pepper flakes
- 1 tsp sesame oil
- 1 tsp salt
Tofu Katsu
- 16 oz firm/extra firm tofu
- 1/4 cup light soy sauce
- 2 tbsp sake
- 1 tbsp dark soy sauce
- 1 tbsp rice vinegar
- 1/2 tsp sesame oil
- 1.5 cups panko breadcrumbs
- 2 eggs OR 1/4 cup diluted egg replacer
- vegetable oil for deep-frying
Tonkatsu Sauce
- 1/4 cup light soy sauce
- 2 tbsp sake
- 2 tbsp oyster/mushroom sauce
- 1 tbsp dark soy sauce
- 2 tbsp lemon juice
- 1 tbsp rice vinegar
- 1 tsp brown sugar
- 1/8 tsp garlic powder
- 1/8 tsp onion powder
- 1/8 tsp mustard powder
- 1 tbsp cornstarch
Instructions
Japanese Curry
- Roughly chop all vegetables (potatoes, carrots, bell pepper, onion) and mince garlic and ginger as needed.
- In a large stock pot, heat sesame oil on medium-high. Add salt, garlic, ginger, and onion. Sauté until sizzling and fragrant, about 2-3 minutes.
- Add remaining vegetables and spices, sans curry cubes (garam masala, cayenne pepper, gochugaru/red pepper flakes) and sauté for an additional 4-5 minutes, stirring occasionally.
- Add vegetable broth, apple sauce, soy sauce (dark), vinegar, and curry cubes. Bring to a boil, stirring occasionally until curry cubes have completely dissolved, about 10-15 minutes.
- Cover and reduce to medium-low heat to simmer for an additional 25-30 minutes.
- Reduce heat to low and add spinach. Stir gently until spinach is completely wilted. Serve warm over rice with tofu katsu and tonkatsu sauce (see recipes below).
Tofu Katsu
- Press water from tofu for at least 30 minutes.
- Slice tofu width-wise into cutlets about 1/2-inch thick and gently set aside.
- In a small mixing bowl, combine marinade ingredients (light soy sauce, dark soy sauce, sake, rive vinegar, and sesame oil). Stir to combine.
- Place tofu in marinade, cover, and let sit for 6-24 hours. (Note: I have marinated both overnight and early in the morning in prep for dinner. Both work well.)
- When ready to fry, heat vegetable oil in a wide-bottomed, high-walled pot or pan to 350F. (Note: Do not begin frying at a lower heat–your batter/panko will fall off immediately and it will be a mess.)
- Dredge tofu slices in egg/diluted egg replacer, then in panko breadcrumbs until entirely coated. Gently place in hot frying oil.
- Fry for 3-4 minutes on each side, or until dark golden brown (see pictured) then remove to a wire rack or paper towel-lined tray.
- Repeat until all tofu pieces have been fried. Serve with rice, Japanese curry, and tonkatsu sauce (see attached recipes).
Tonkatsu Sauce
- In a small saucepan, combine light soy sauce and cornstarch and stir until all cornstarch has dissolved.
- Add all other ingredients and stir to combine.
- Bring to a boil and then reduce heat and simmer for 5-7 minutes, or until sauce has thickened considerably.
- Serve in small 1-1 1/2 tsp amounts atop tofu katsu (see attached recipe).
The post Japanese Curry + Tofu Katsu appeared first on I Forgot Salt!.
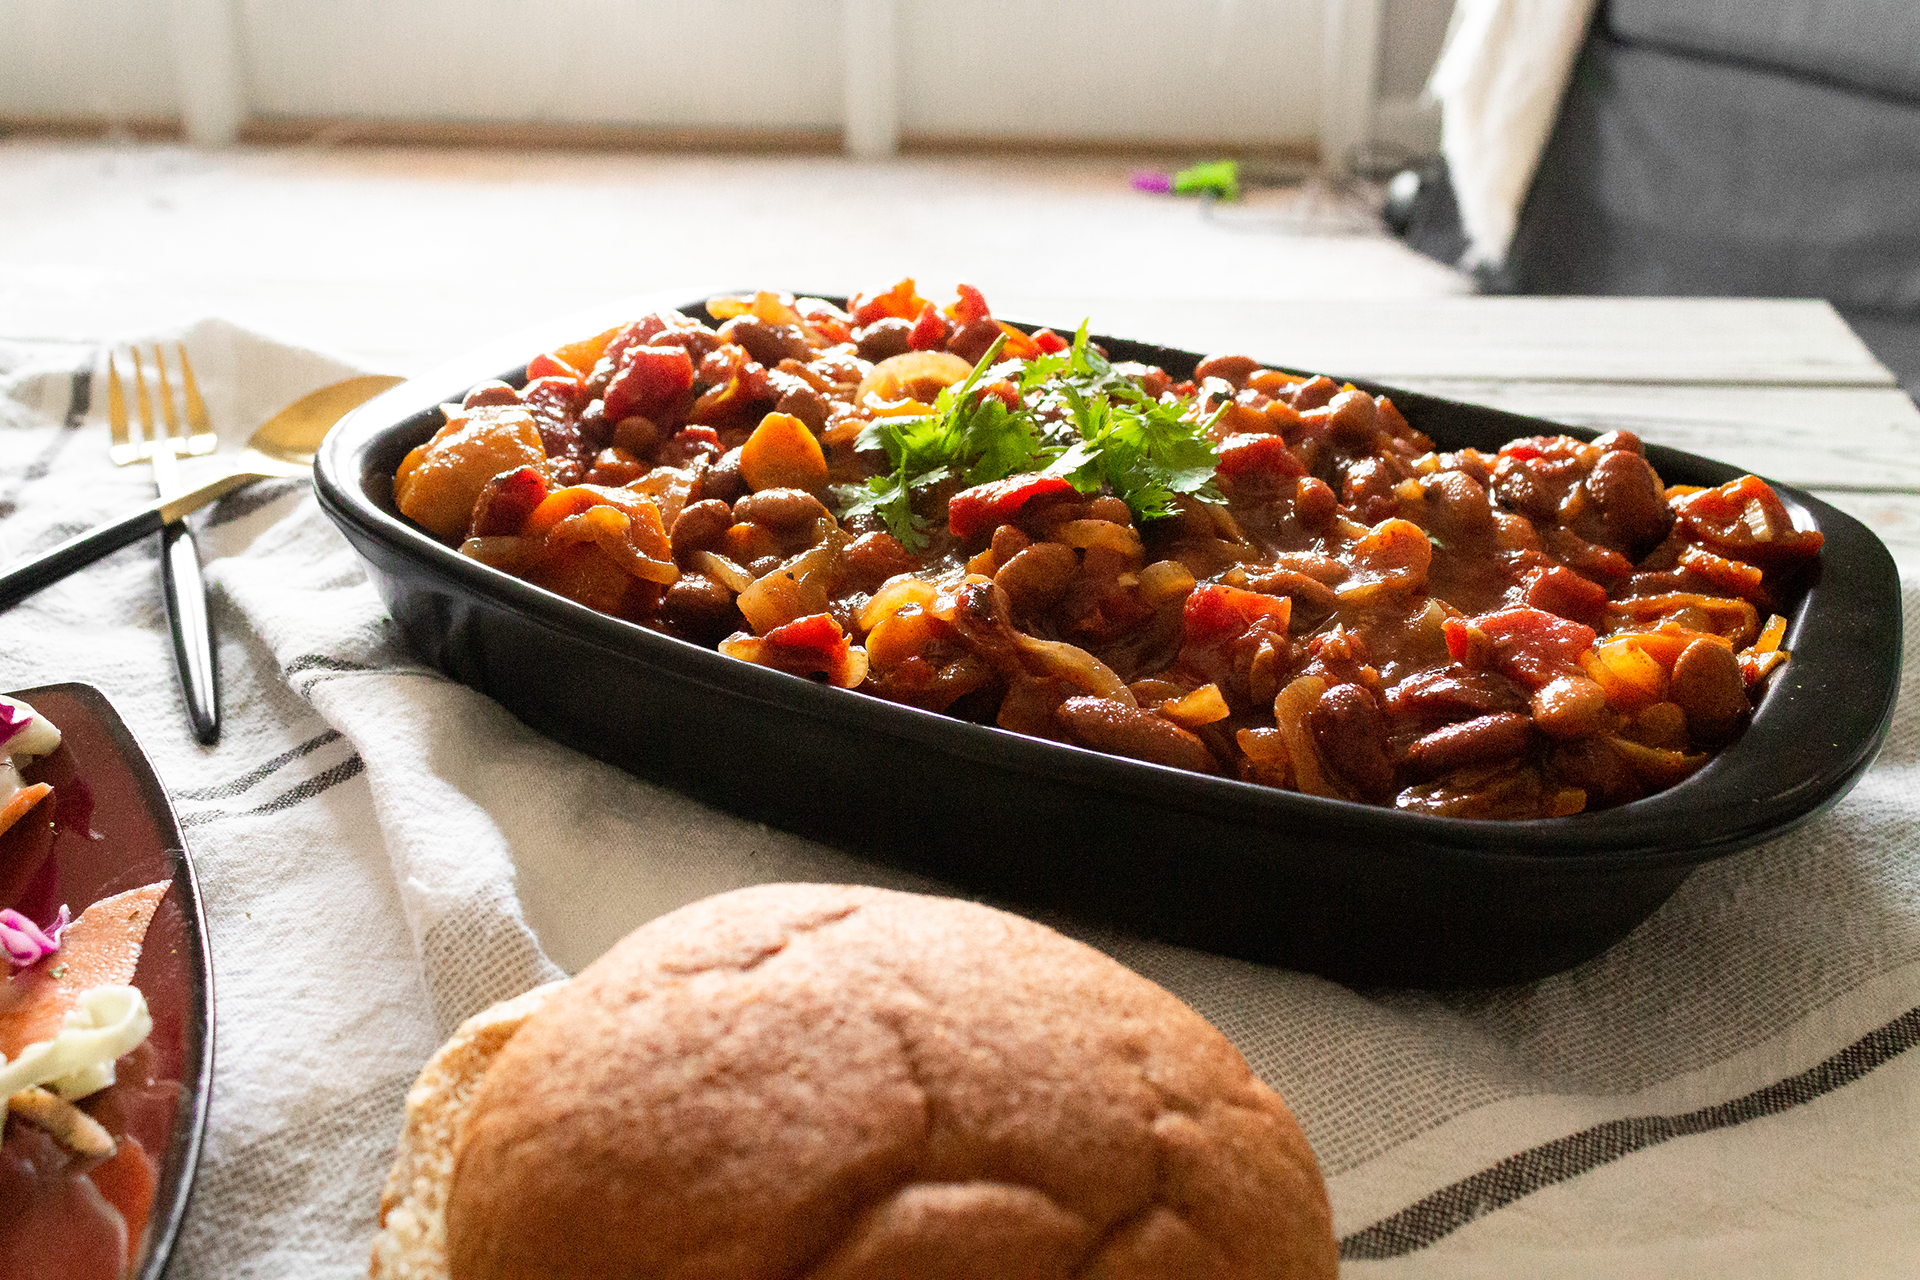
]]>The post Baked Beans + Coleslaw appeared first on I Forgot Salt!.
]]>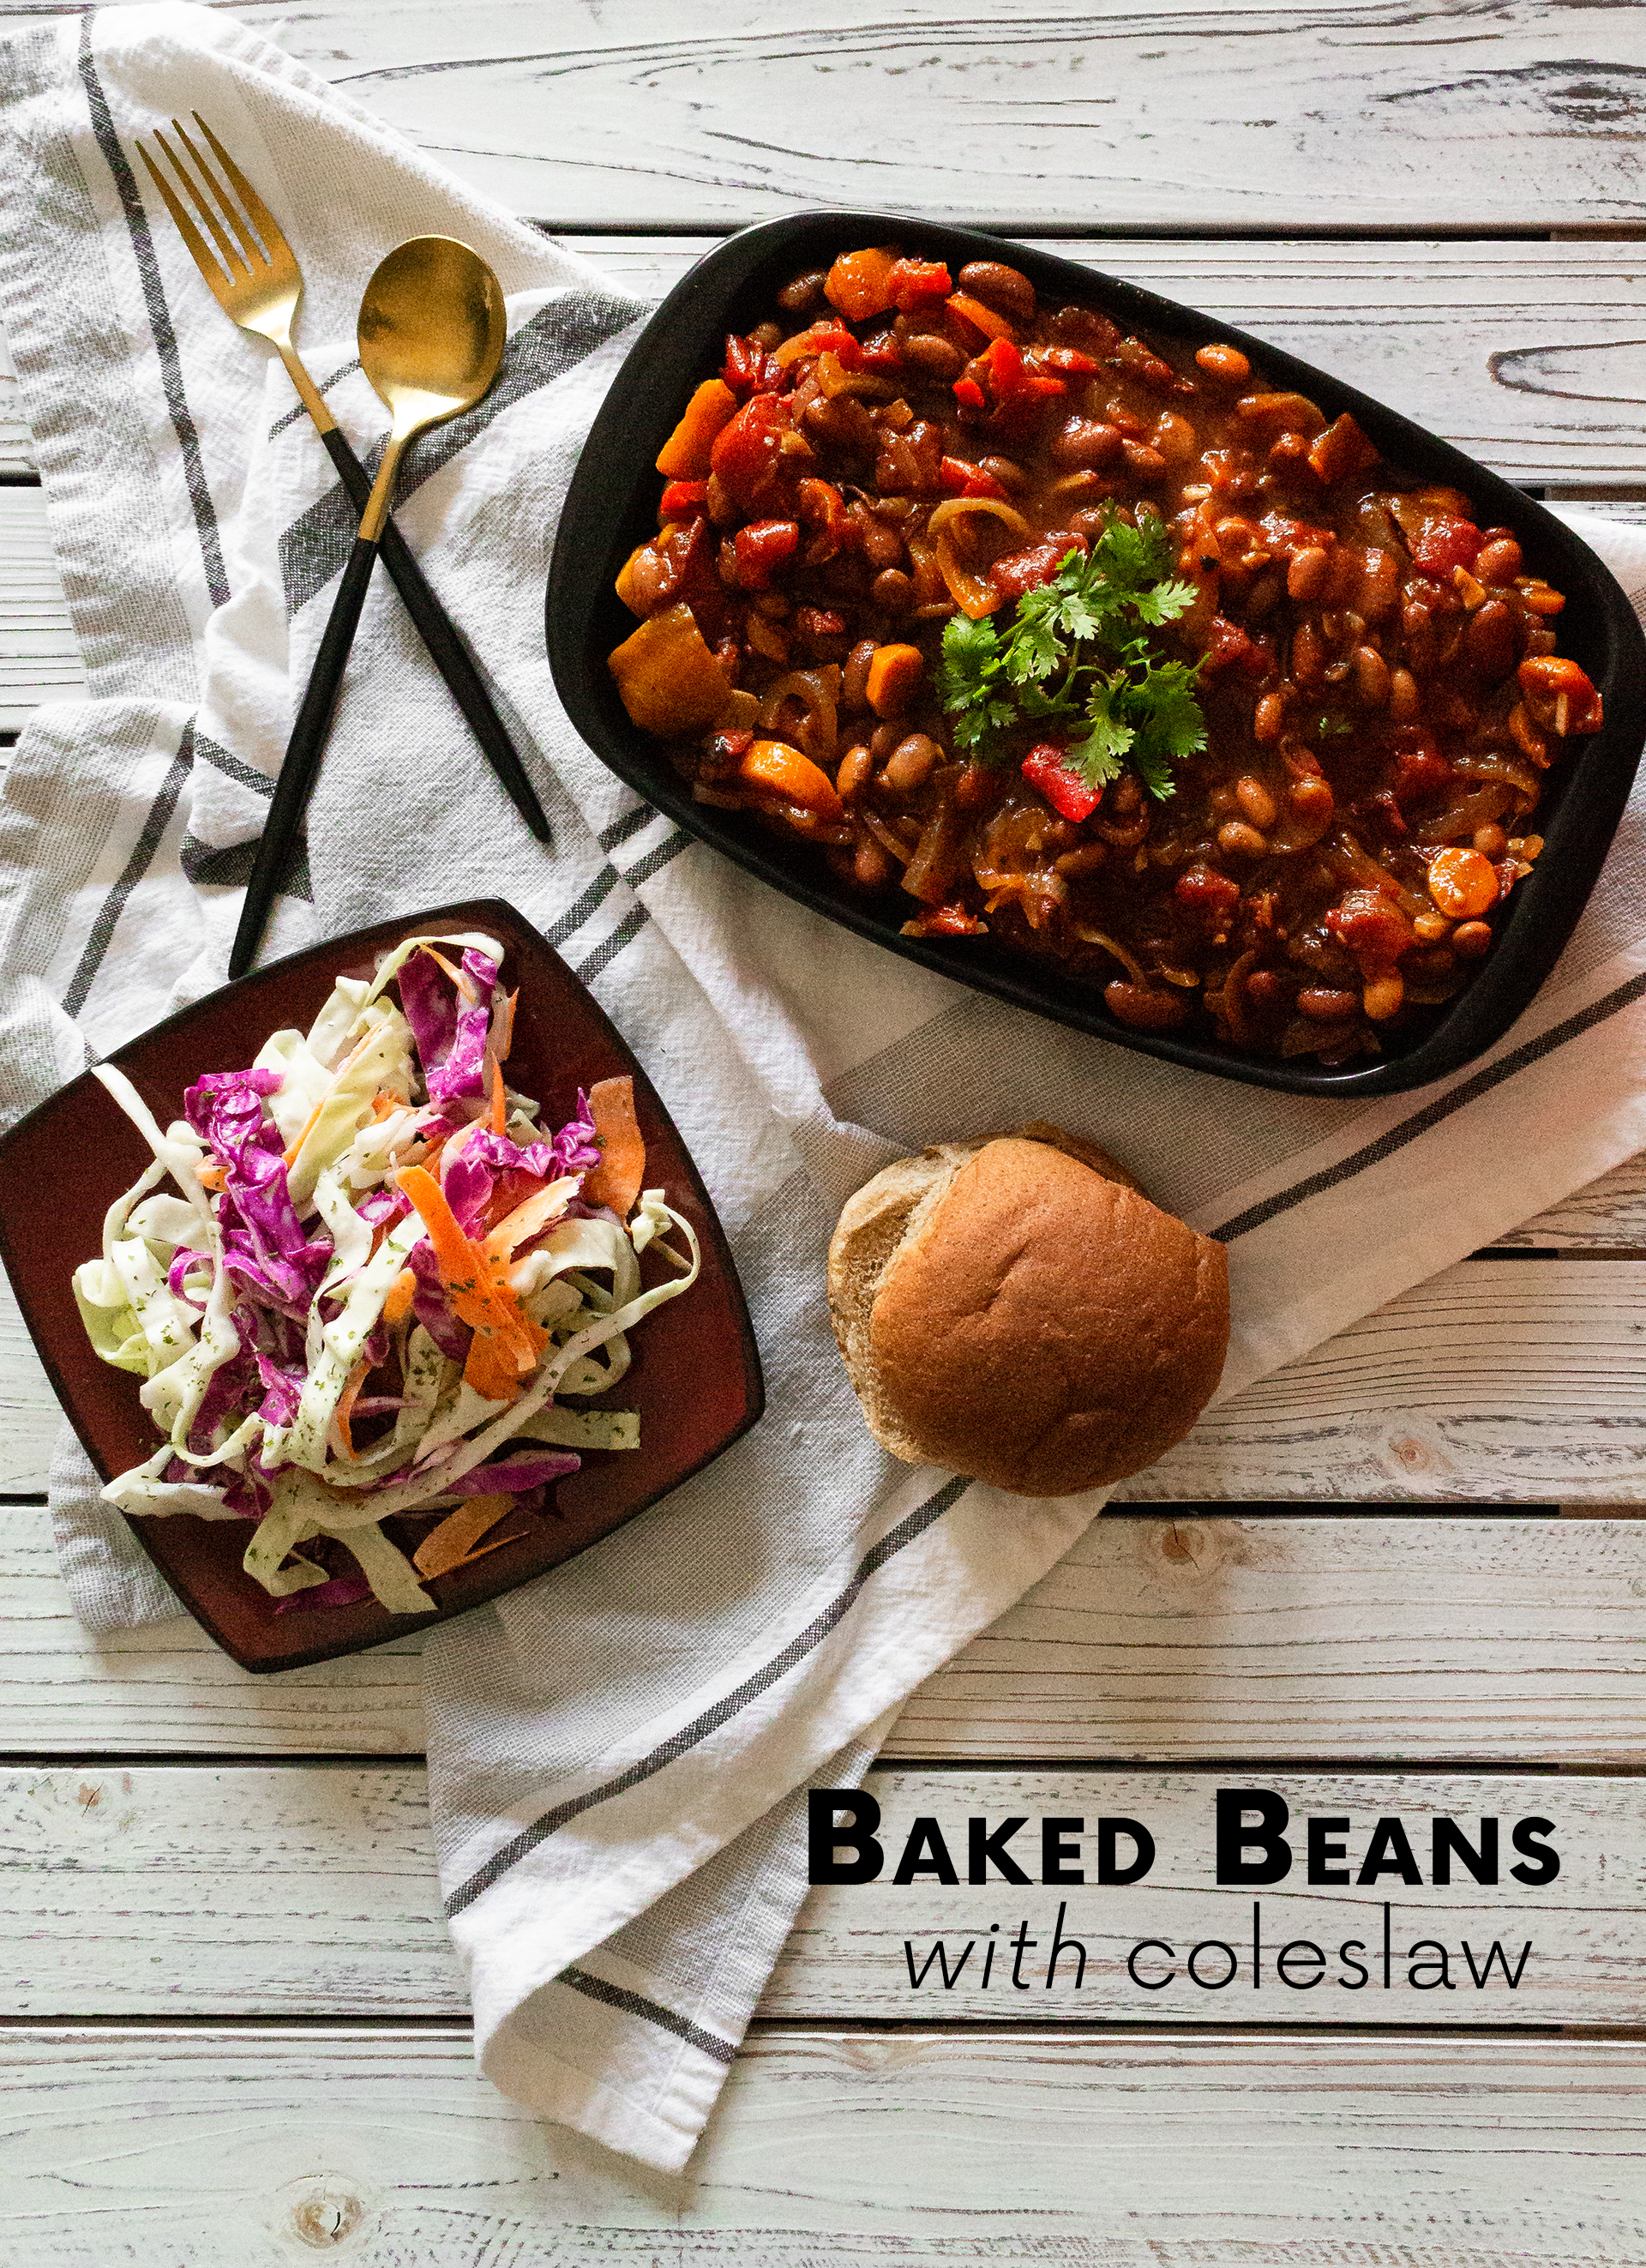
Fall is finally here, but that doesn’t mean I have to abandon the spirit of summer altogether. Unfortunately, we didn’t have many opportunities to visit friends or family for cook-outs, barbeques, or picnics this year, but we still made the most of the season at home. One of my favorite summer quarantine “date nights” involves recreating outdoor favorites inside, and although that means battling it out for control of the burger grill-pan more often than not, we still found time to try some other summer treats. Hot dogs, BBQ sandwiches, and breakfast-for-dinner all made an appearance over the past few months, and one of the few that lasted long enough for pictures (someday I’ll figure out how to stop eating my veggie burgers in under ten minutes) was this vegan baked beans and coleslaw combo. Together, they make a killer Sloppy Joe-style sandwich, complete with messy hands and the need for at least four napkins.
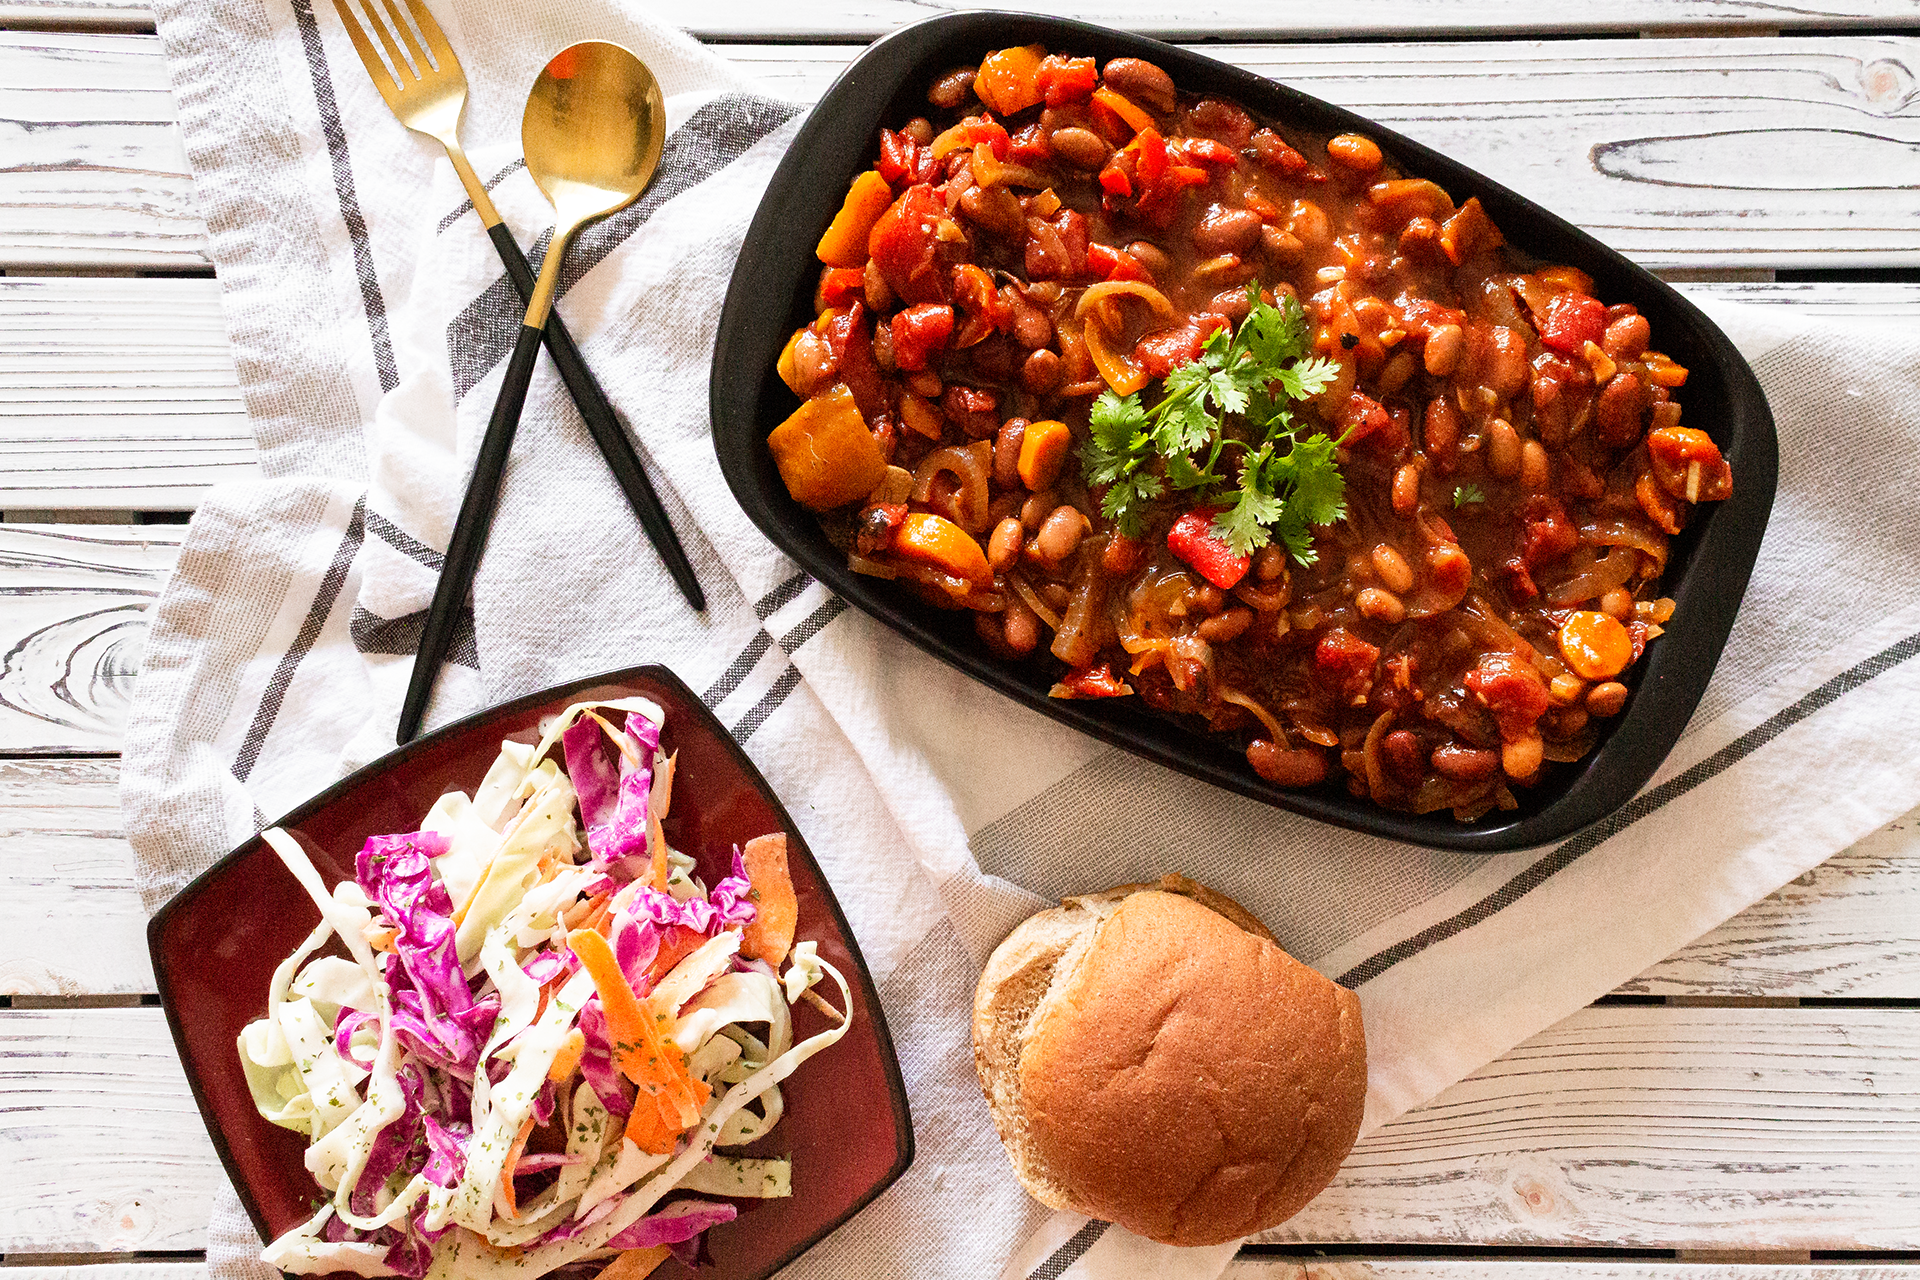
As has now become the norm here (and in my life), this recipe is entirely vegan. It was surprisingly easy (and fun!) to throw together a homemade ranch for the coleslaw portion of this recipe, and it has become a new salad dressing staple in our house alongside the roasted red pepper vinaigrette from my farmer’s market quinoa post. I’ve experimented with various slaws in the past (see the pickled Asian slaw from my miso portobella burger recipe) and I have to say–there’s nothing like a cool, crunchy side dish to really bring a meal together. I have a plan to bring the magic of homemade dressings and fresh cabbage together another day, too, with a peanut tofu salad recipe currently gathering dust in my dinner idea book, but (as with veggie burgers) the leftovers never last long enough to photograph. Maybe next time! For now, enjoy this vegan baked beans and coleslaw sandwich combo.
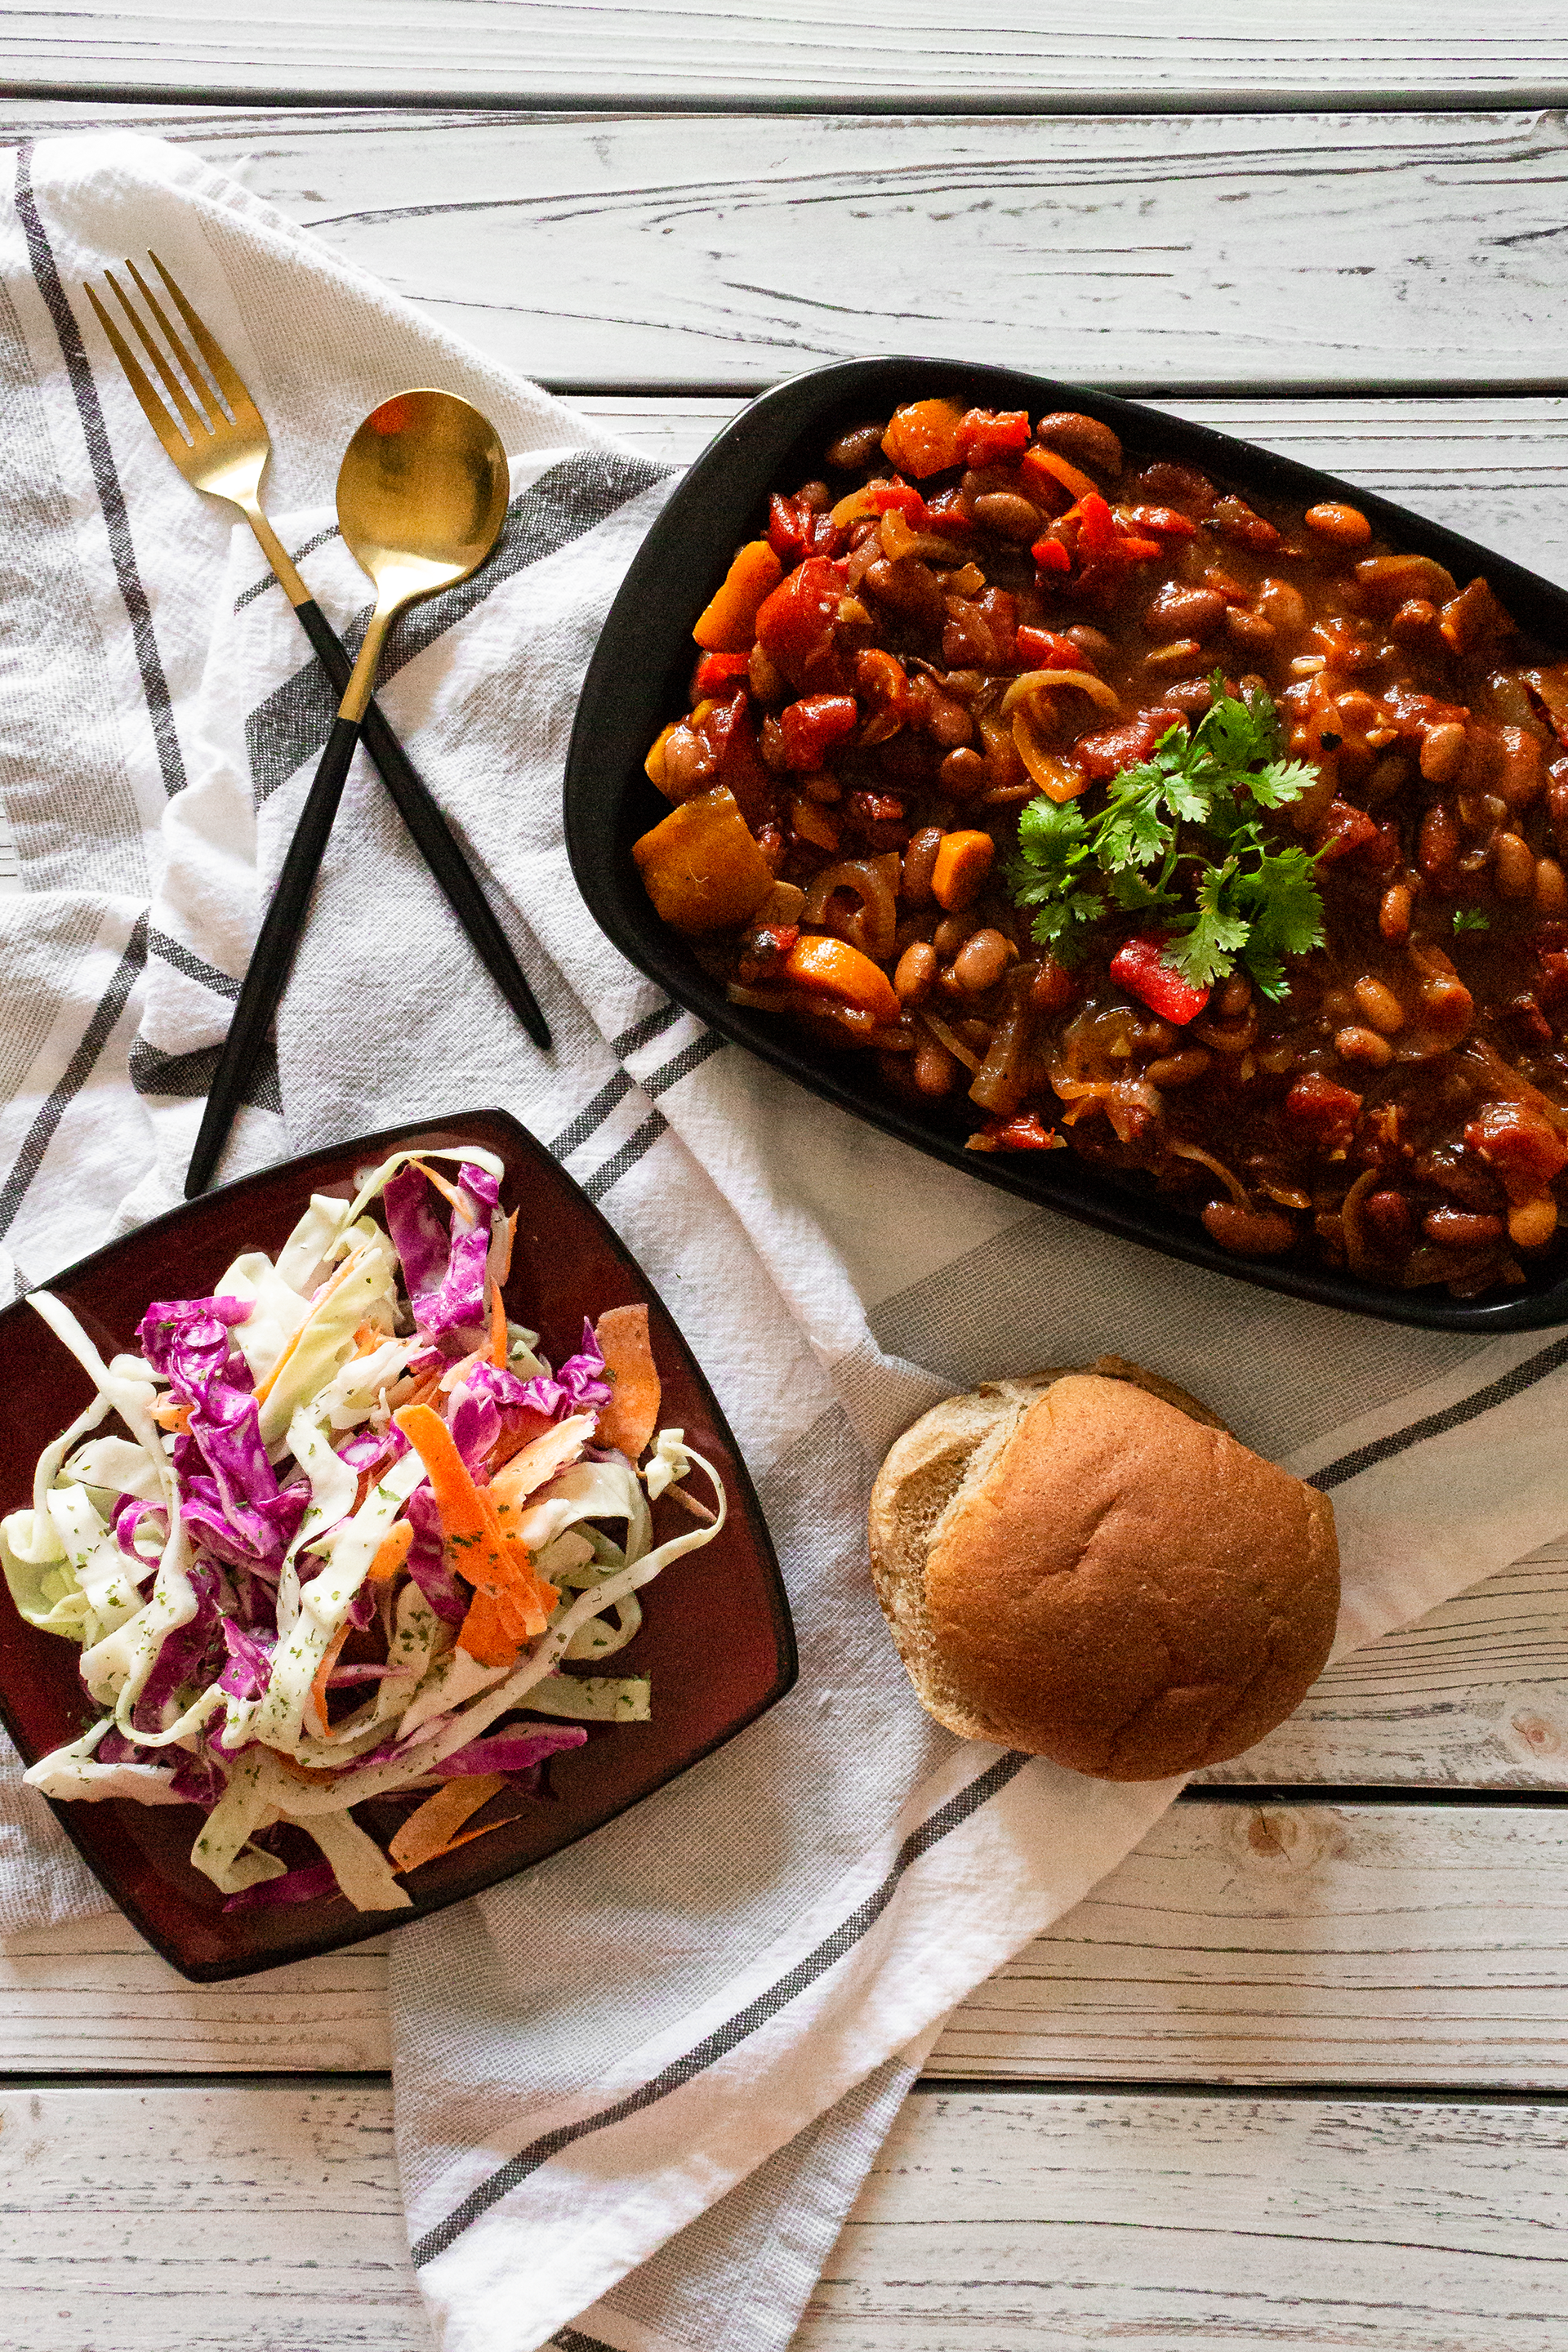
Baked Beans
This recipe makes six servings.
Ingredients:
- 15oz (1 can) pinto beans
- 15oz (1 can) dark red kidney beans
- 15oz (1 can) fire-roasted tomatoes
- 2 large carrots
- 2 medium onions
- 2 bell peppers
- 2 cups BBQ sauce (I used Stubb’s Spicy BBQ)
- 2 tbsp garlic, minced
- 2 tsp chili powder
- 1 tsp mustard powder
- 1 tsp paprika
- 1/2 tsp salt
Directions:
- Preheat oven to 350F.
- Roughly chop onions, carrots, bell peppers; mince garlic.
- Add chopped vegetables, garlic, tomatoes, and spices to a casserole dish. Stir to combine and coat. Bake for 20mins.
- Remove from oven and add beans and BBQ sauce. Stir to combine and coat. Return to oven and bake for an additional 40mins.
Coleslaw
This recipe makes six servings.
Ingredients:
- 2 cups green cabbage, shredded
- 2 cups purple cabbage, shredded
- 1 cup carrot, shredded/matchsticks
- 1/4 cup mayonnaise
- 2 tbsp plain yogurt
- 2 tbsp dill pickle juice
- 1 tbsp cider vinegar
- 1 tsp dill
- 1/2 tsp garlic powder
- 1/2 tsp onion powder
- 1/4 tsp salt
- 1/4 tsp black pepper
- 1/4 tsp mustard powder
Directions:
- Shred vegetables and set aside. Combine remaining ingredients in a small bowl and stir to incorporate.
- Add vegetables and dressing to a large mixing bowl and toss to coat.
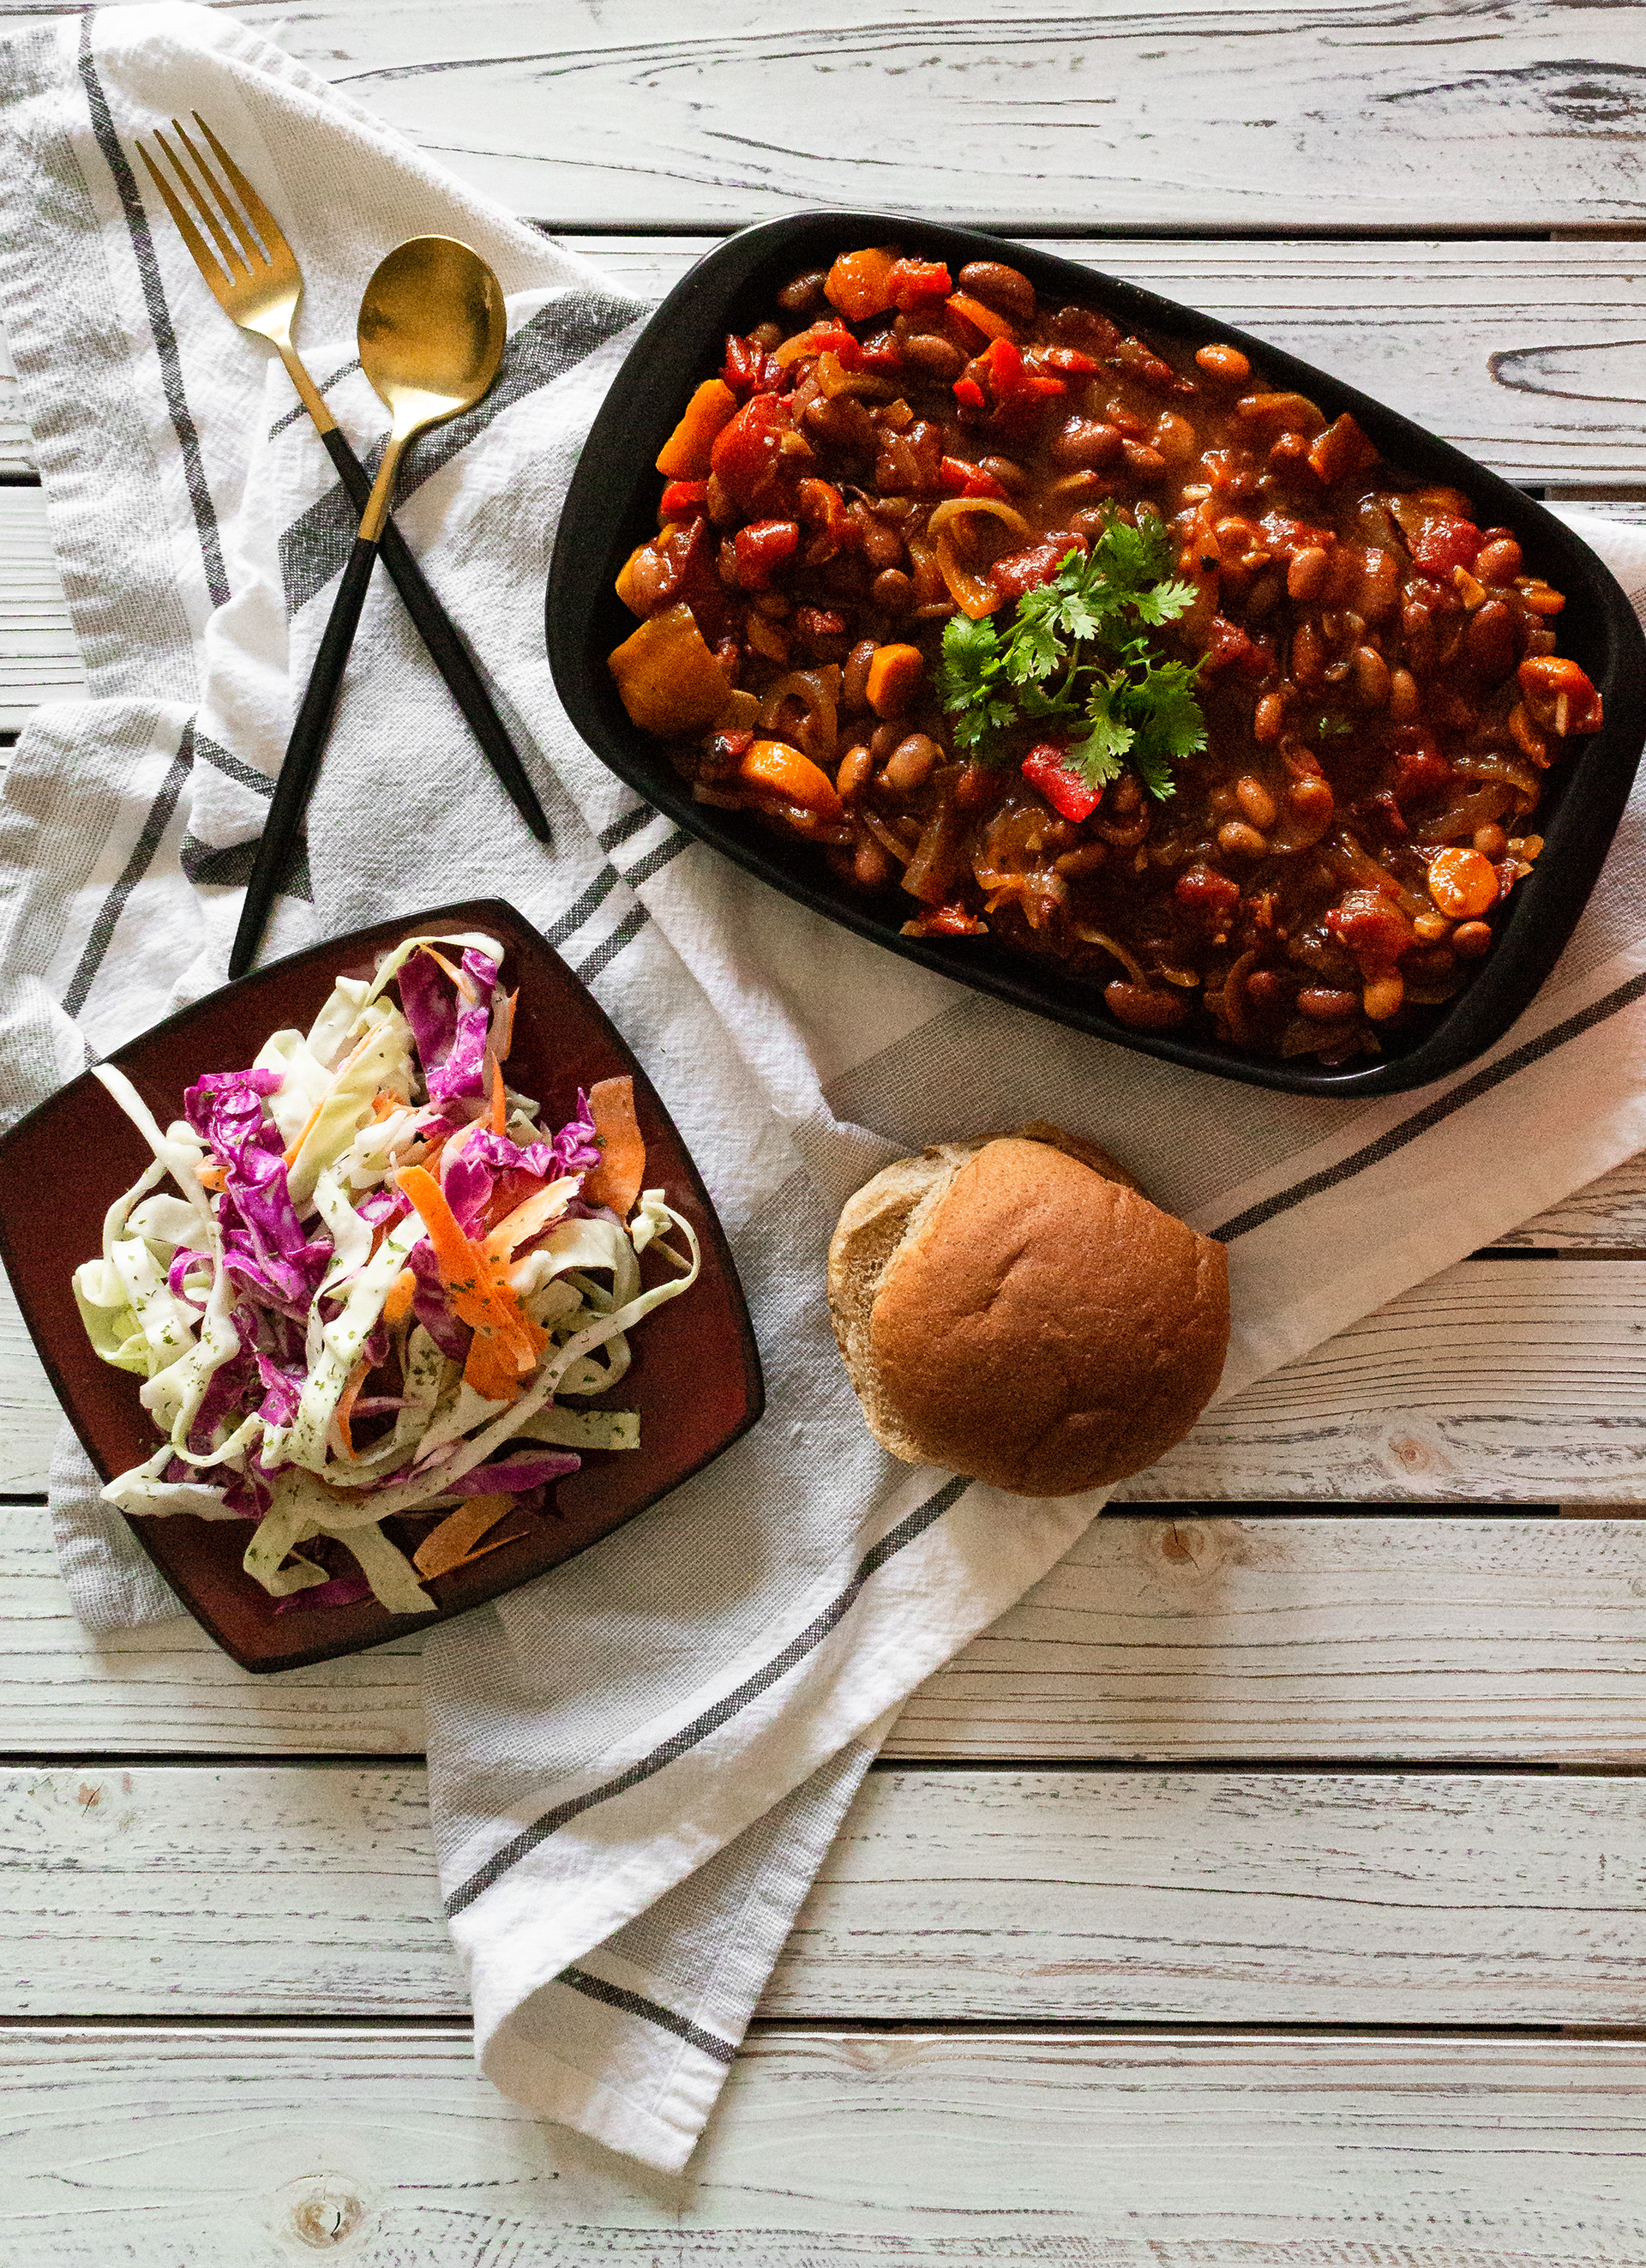
Baked Beans with Coleslaw
Ingredients
Baked Beans
- 15 oz pinto beans 1 can
- 15 oz dark red kidney beans 1 can
- 15 oz fire-roasted tomatoes 1 can
- 2 large carrots
- 2 medium onions
- 2 bell peppers
- 2 cups BBQ sauce
- 2 tbsp garlic minced
- 2 tsp chili powder
- 1 tsp mustard powder
- 1 tsp paprika
- 1/2 tsp salt
Coleslaw
- 2 cups green cabbage shredded
- 2 cups purple cabbage shredded
- 1 cup carrot shredded/matchsticks
- 1/4 cup mayonnaise
- 2 tbsp plain yogurt
- 2 tbsp dill pickle juice
- 1 tbsp cider vinegar
- 1 tsp dill
- 1/2 tsp garlic powder
- 1/2 tsp onion powder
- 1/4 tsp salt
- 1/4 tsp black pepper
- 1/4 tsp mustard powder
Instructions
Baked Beans
- Preheat oven to 350F.
- Roughly chop onions, carrots, bell peppers; mince garlic.
- Add chopped vegetables, garlic, tomatoes, and spices to a casserole dish. Stir to combine and coat. Bake for 20mins.
- Remove from oven and add beans and BBQ sauce. Stir to combine and coat. Return to oven and bake for an additional 40mins.
Coleslaw
- Shred vegetables and set aside. Combine remaining ingredients in a small bowl and stir to incorporate.
- Add vegetables and dressing to a large mixing bowl and toss to coat.
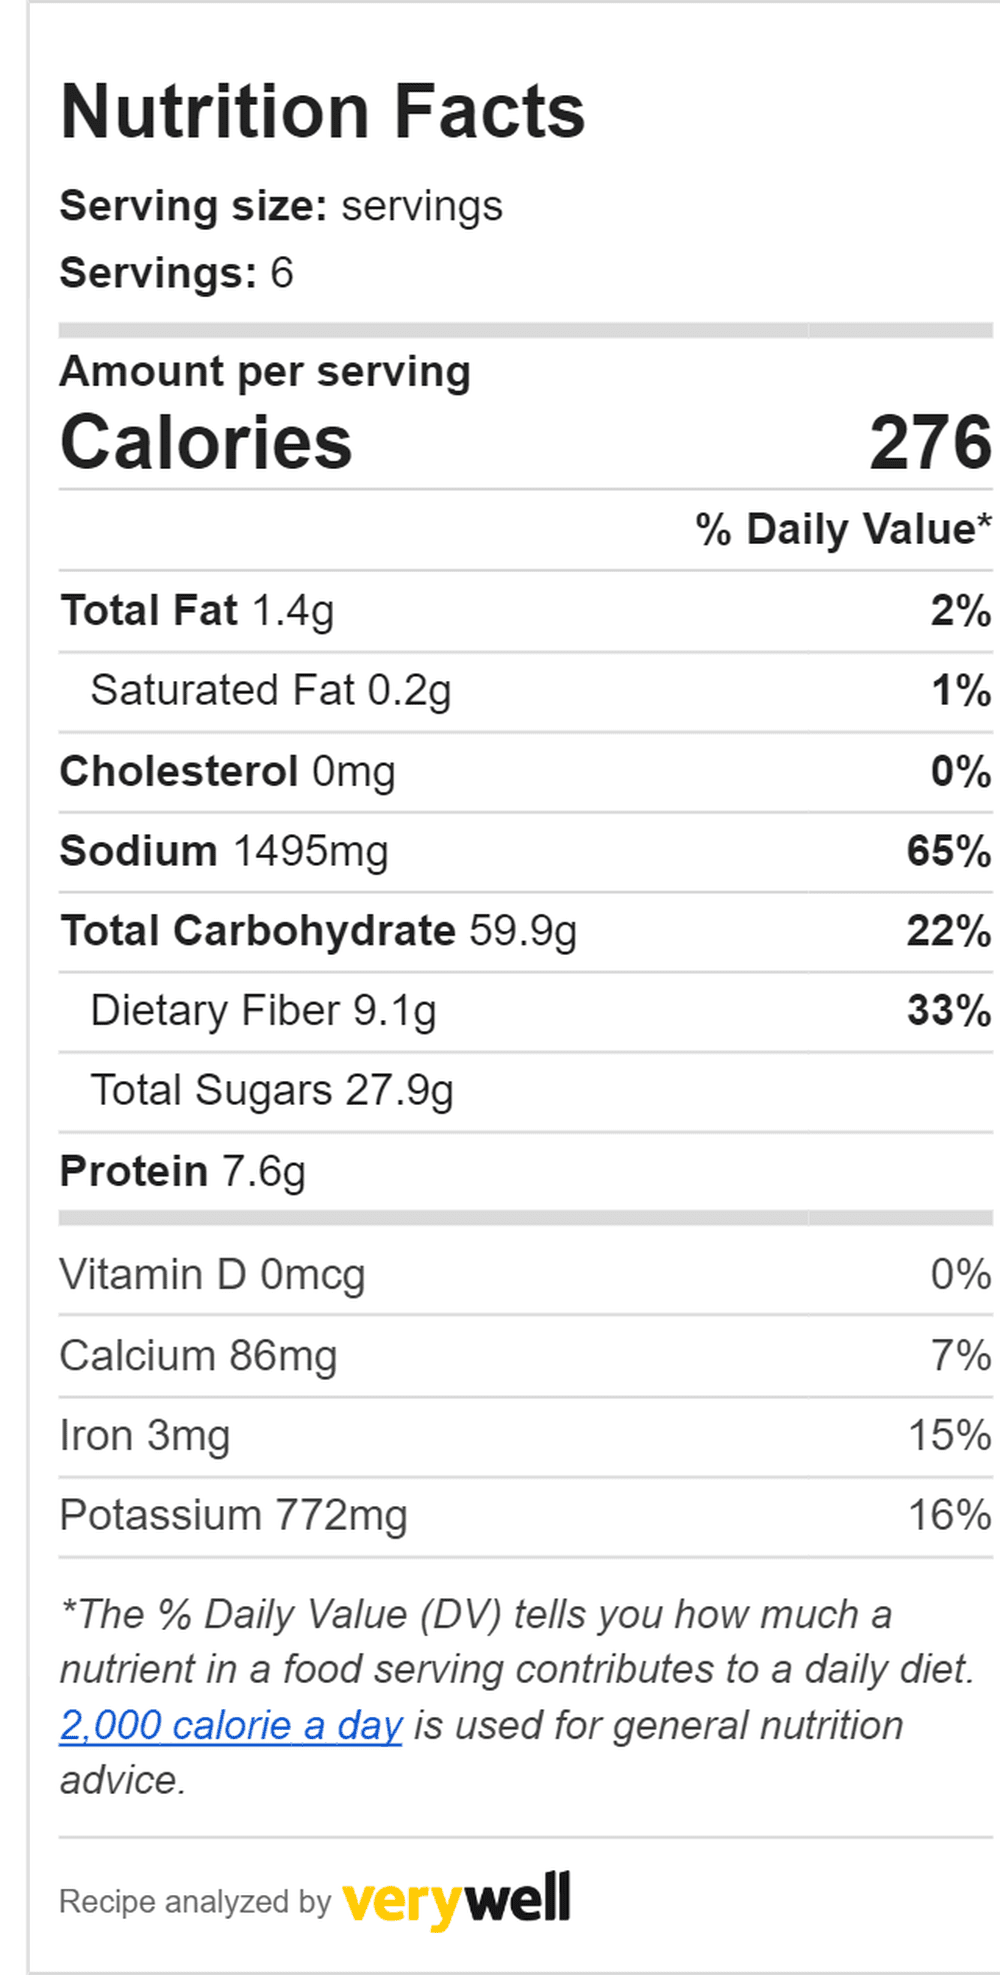
Baked Beans nutritional information. 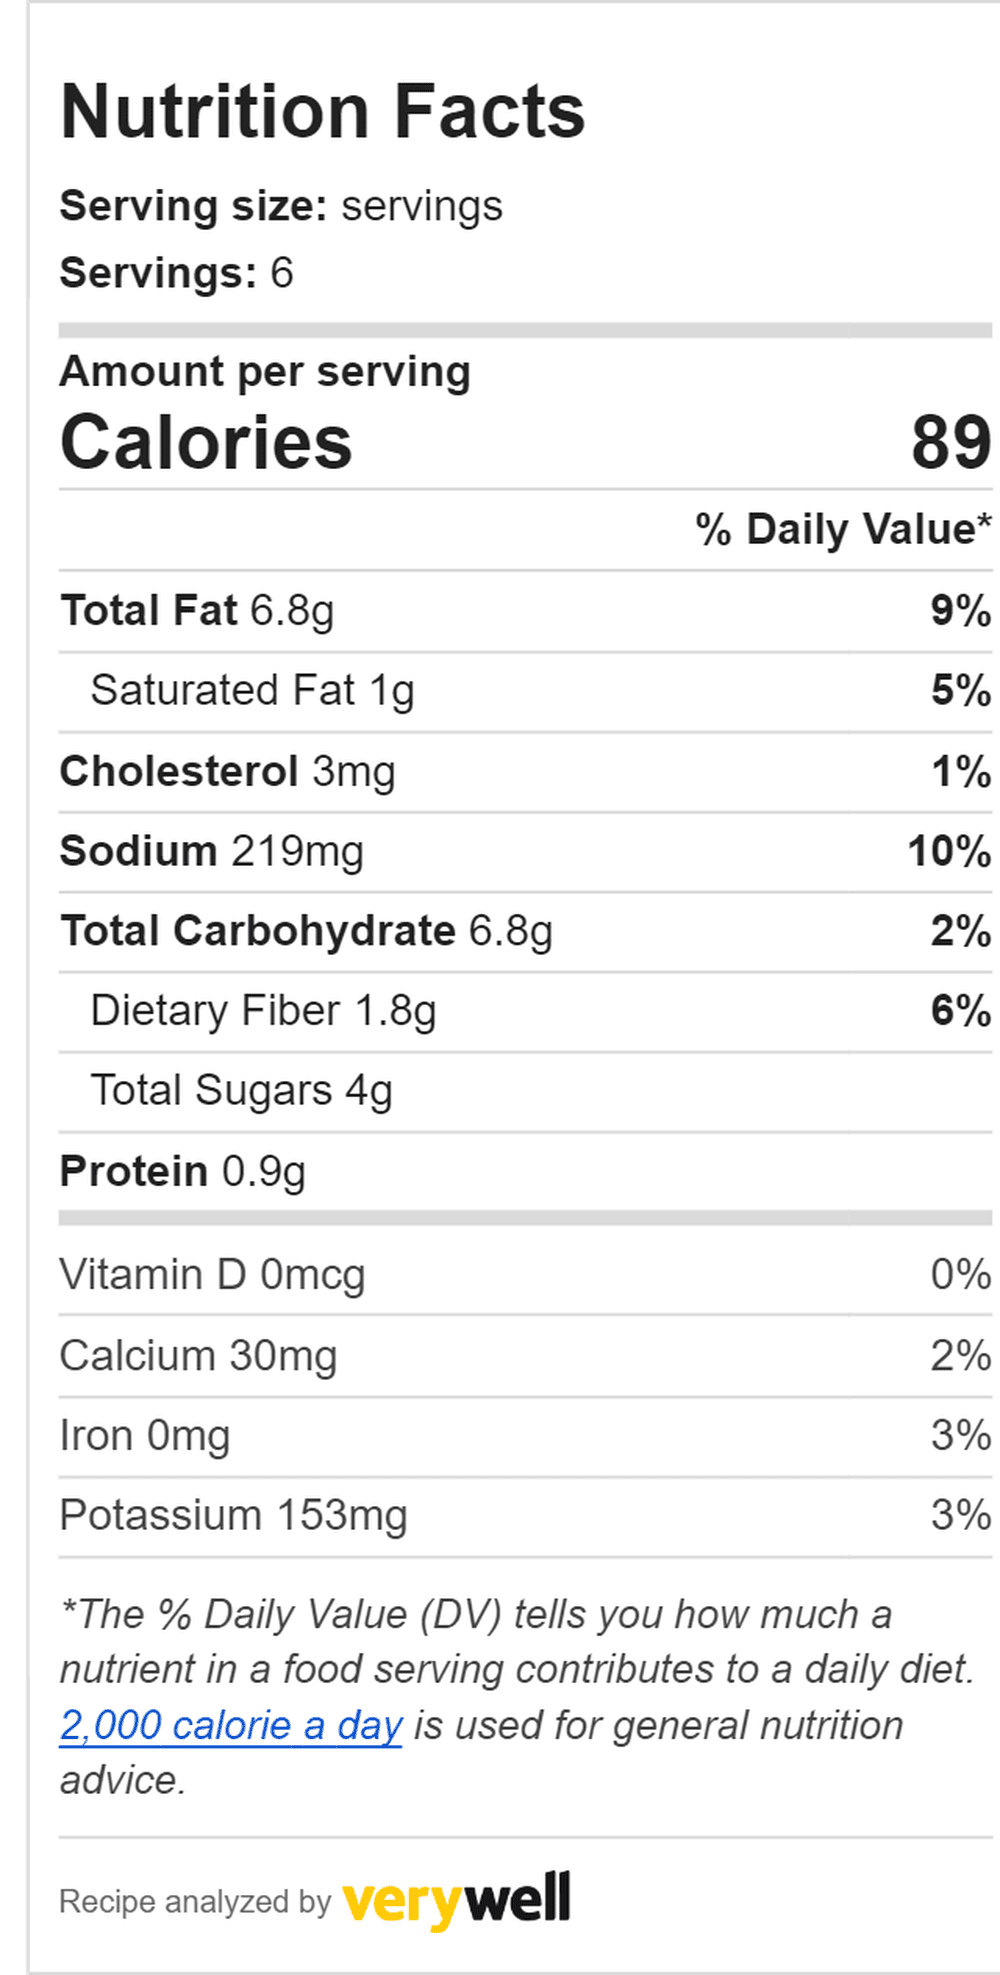
Coleslaw nutritional information.
The post Baked Beans + Coleslaw appeared first on I Forgot Salt!.
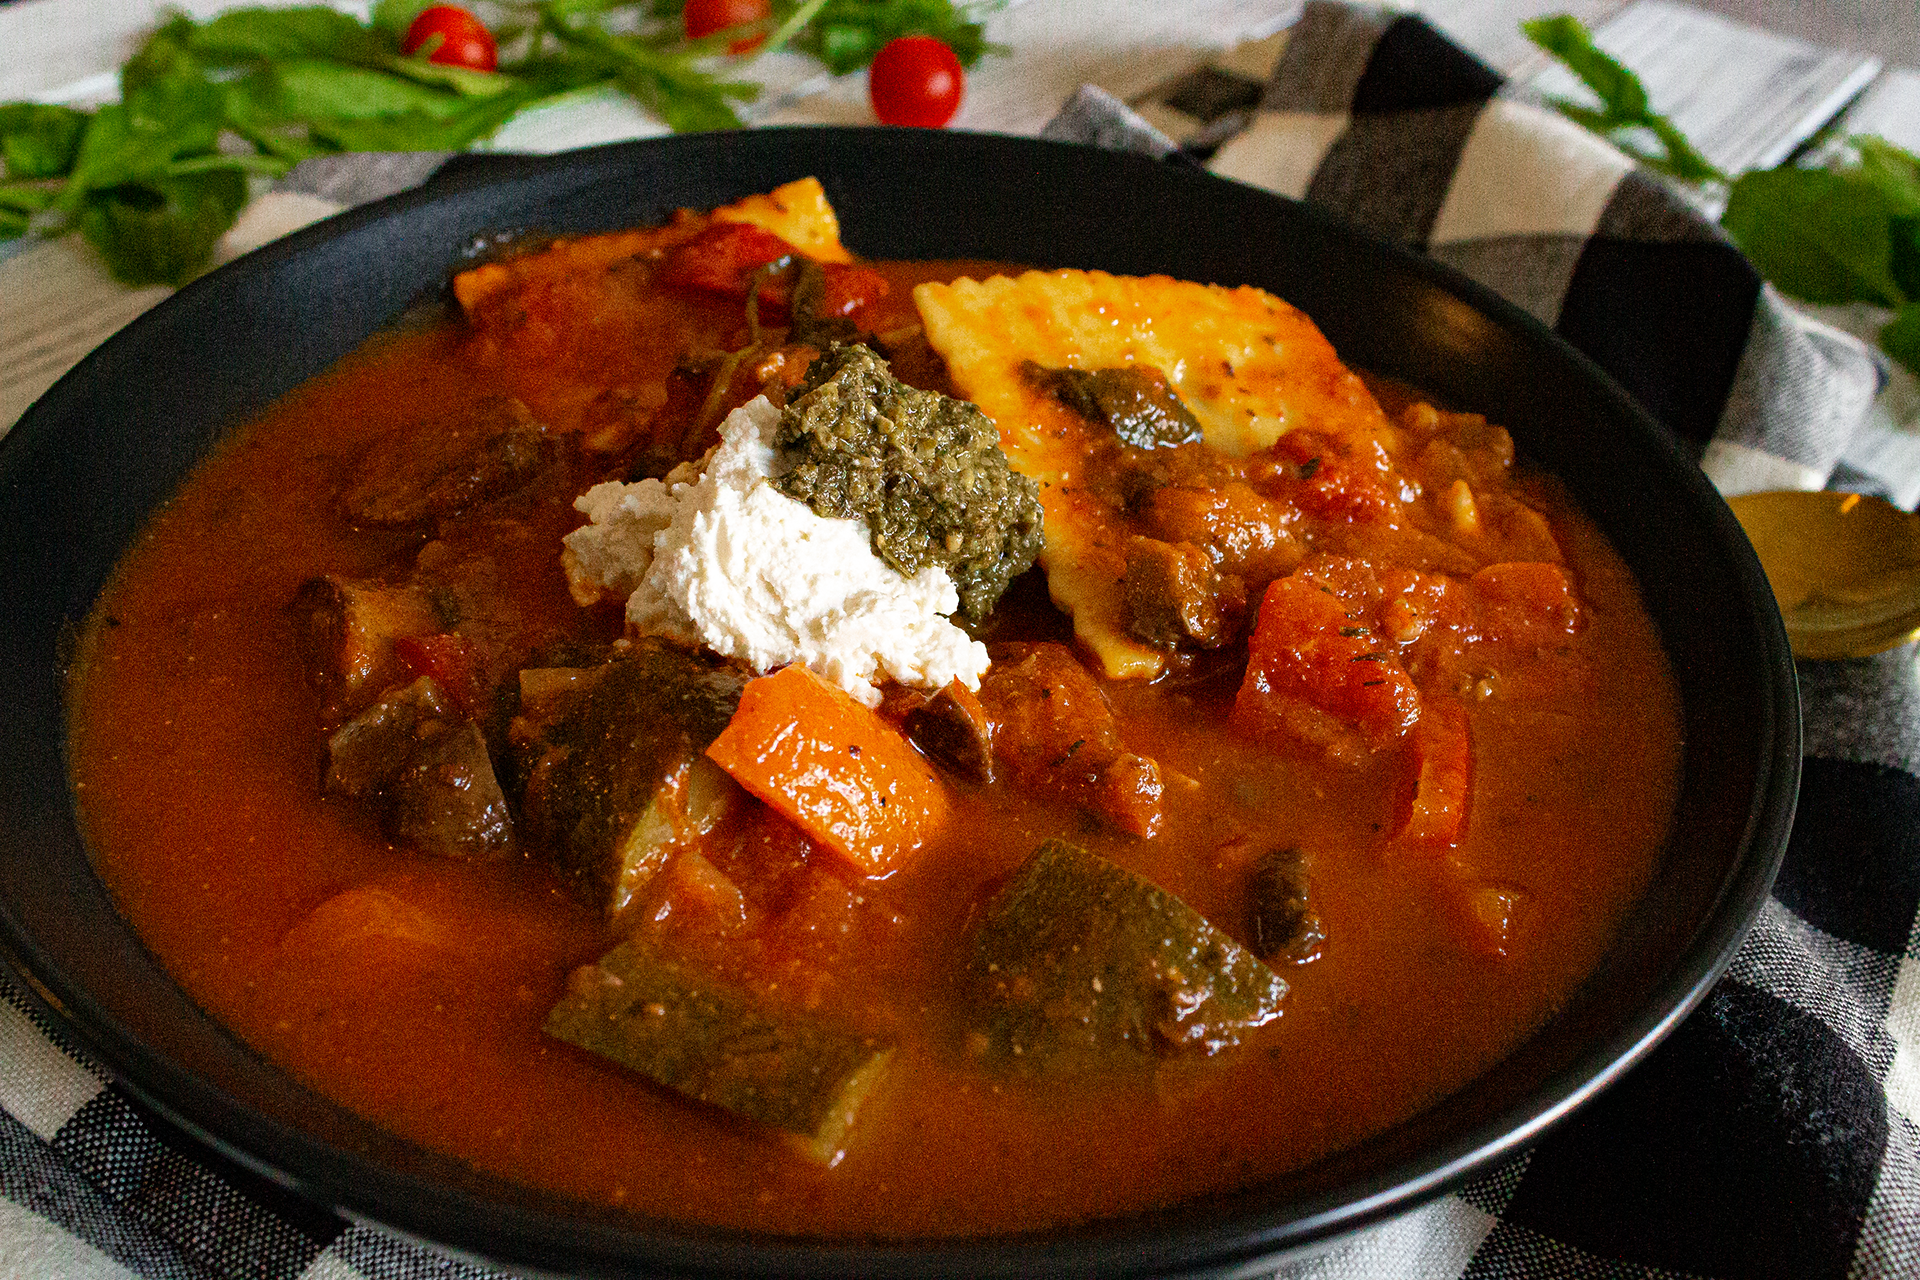
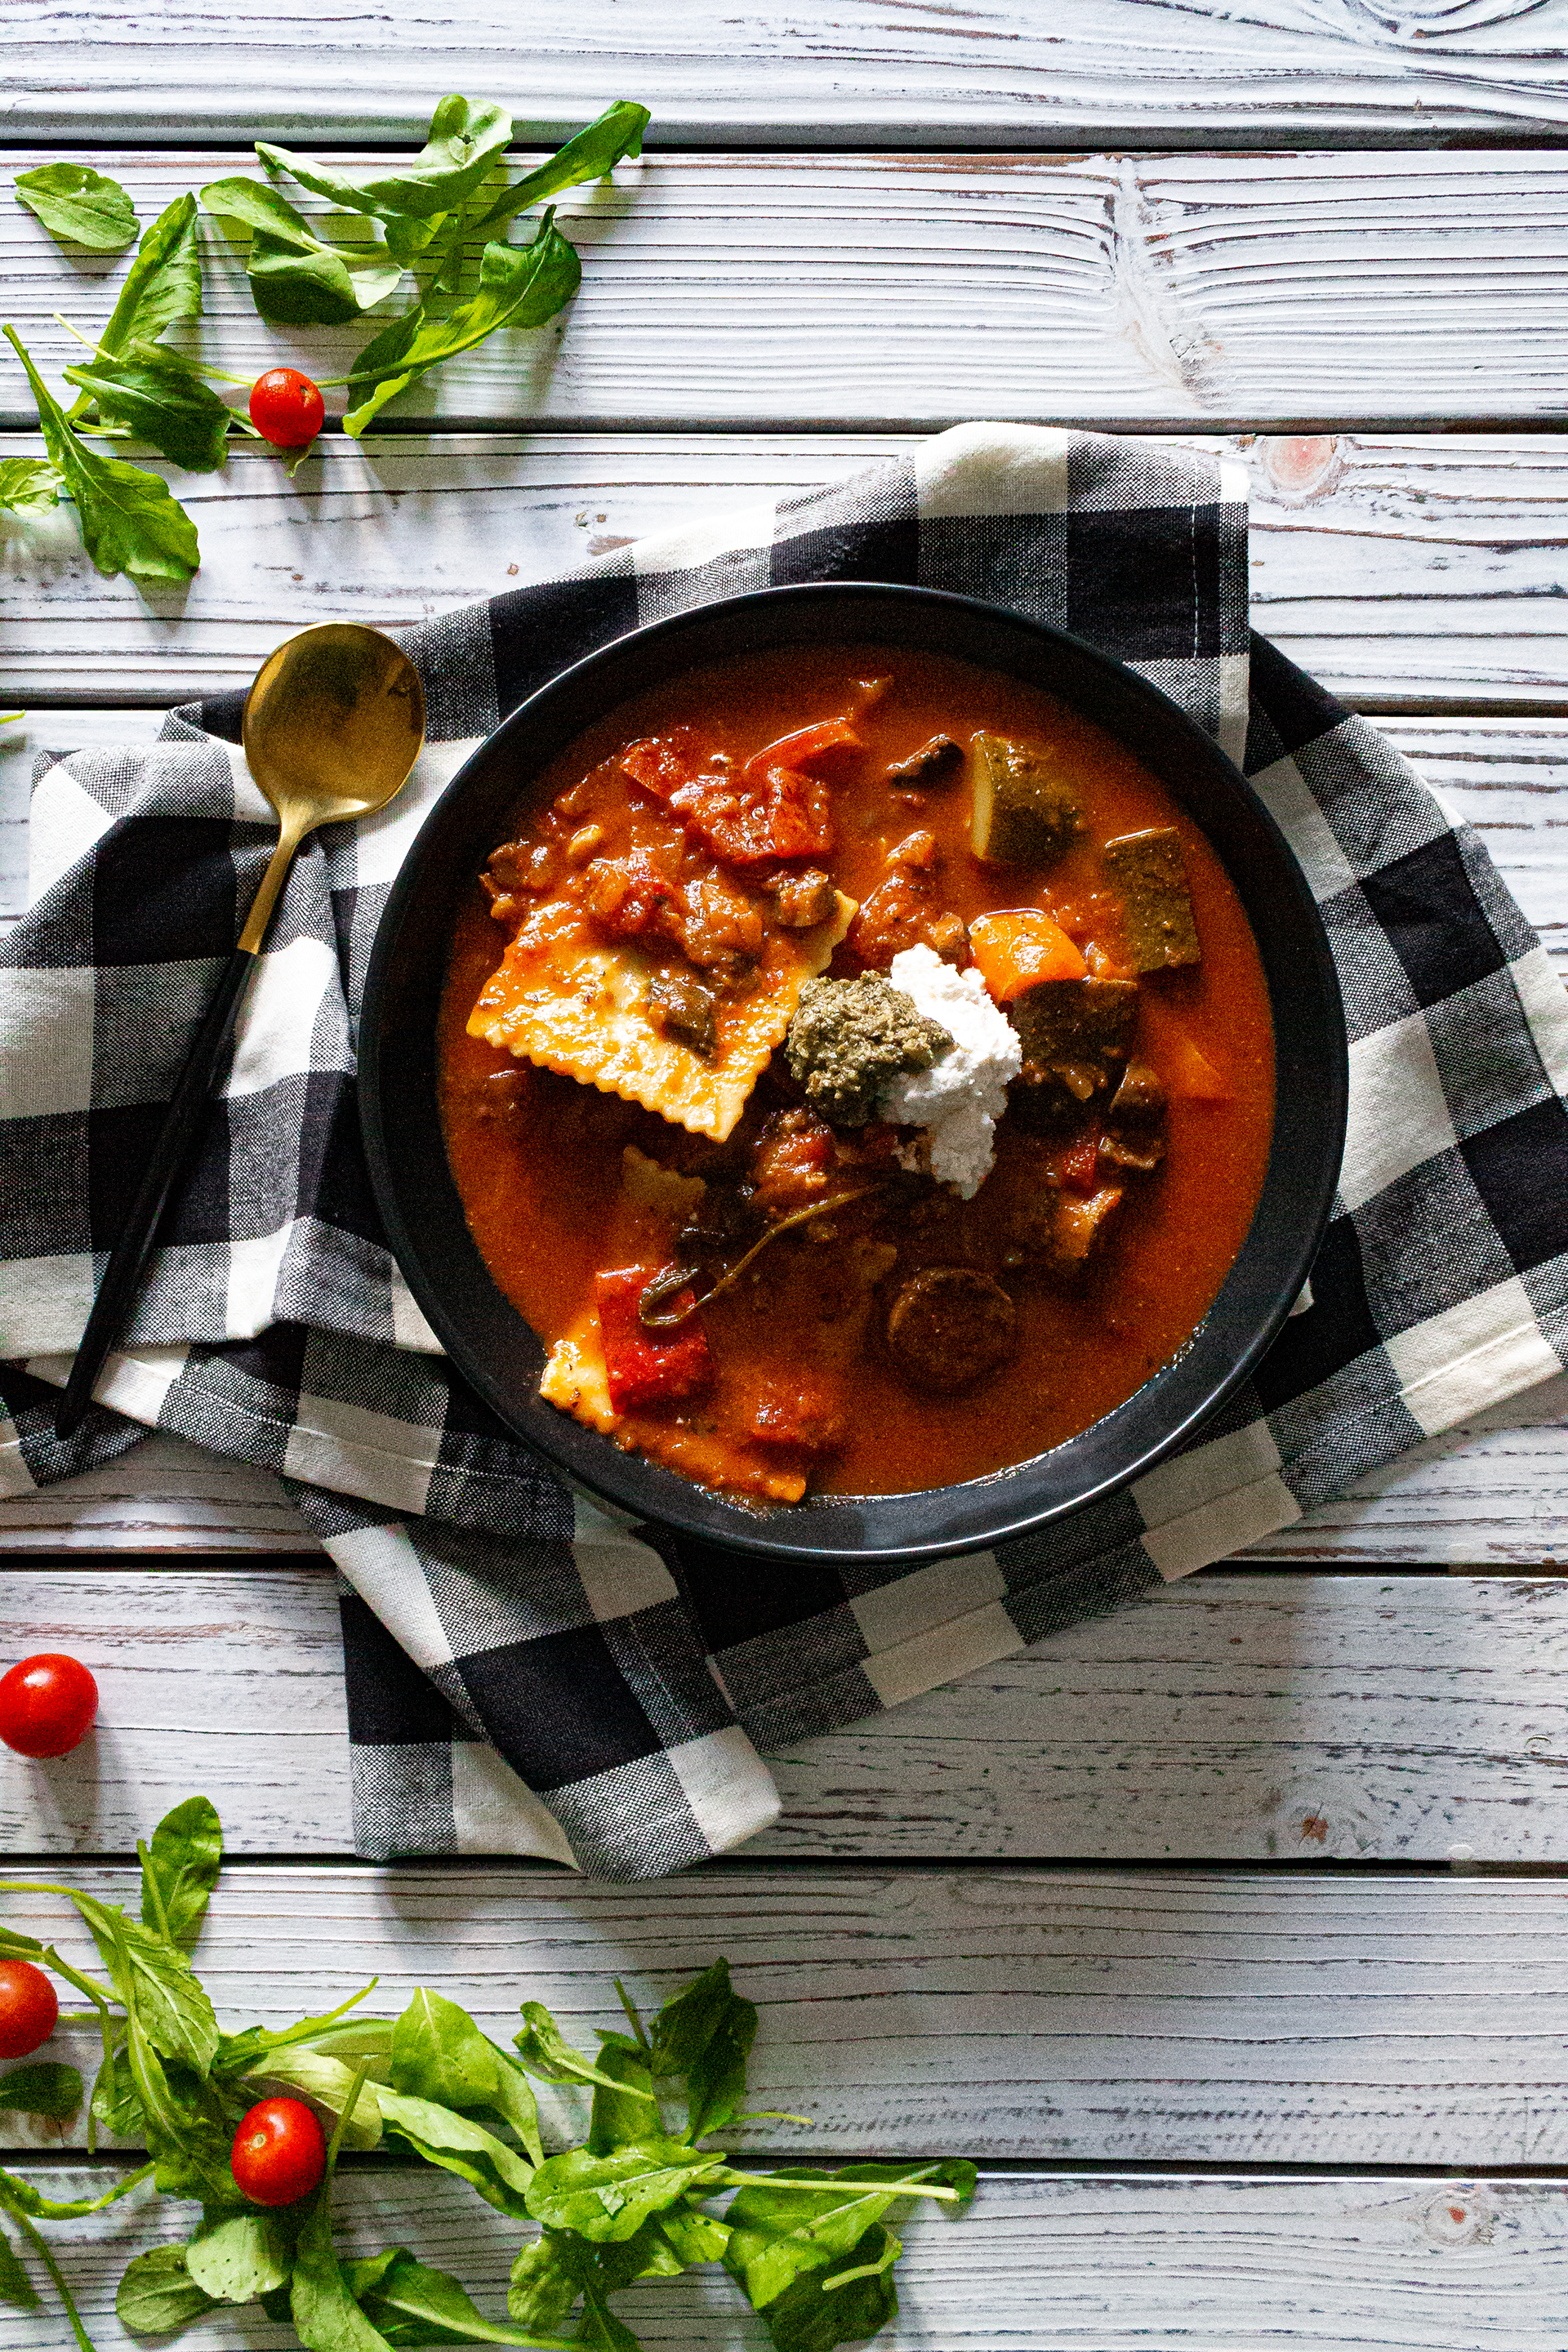
]]>The post Sausage + Ravioli Vegetable Stew appeared first on I Forgot Salt!.
]]>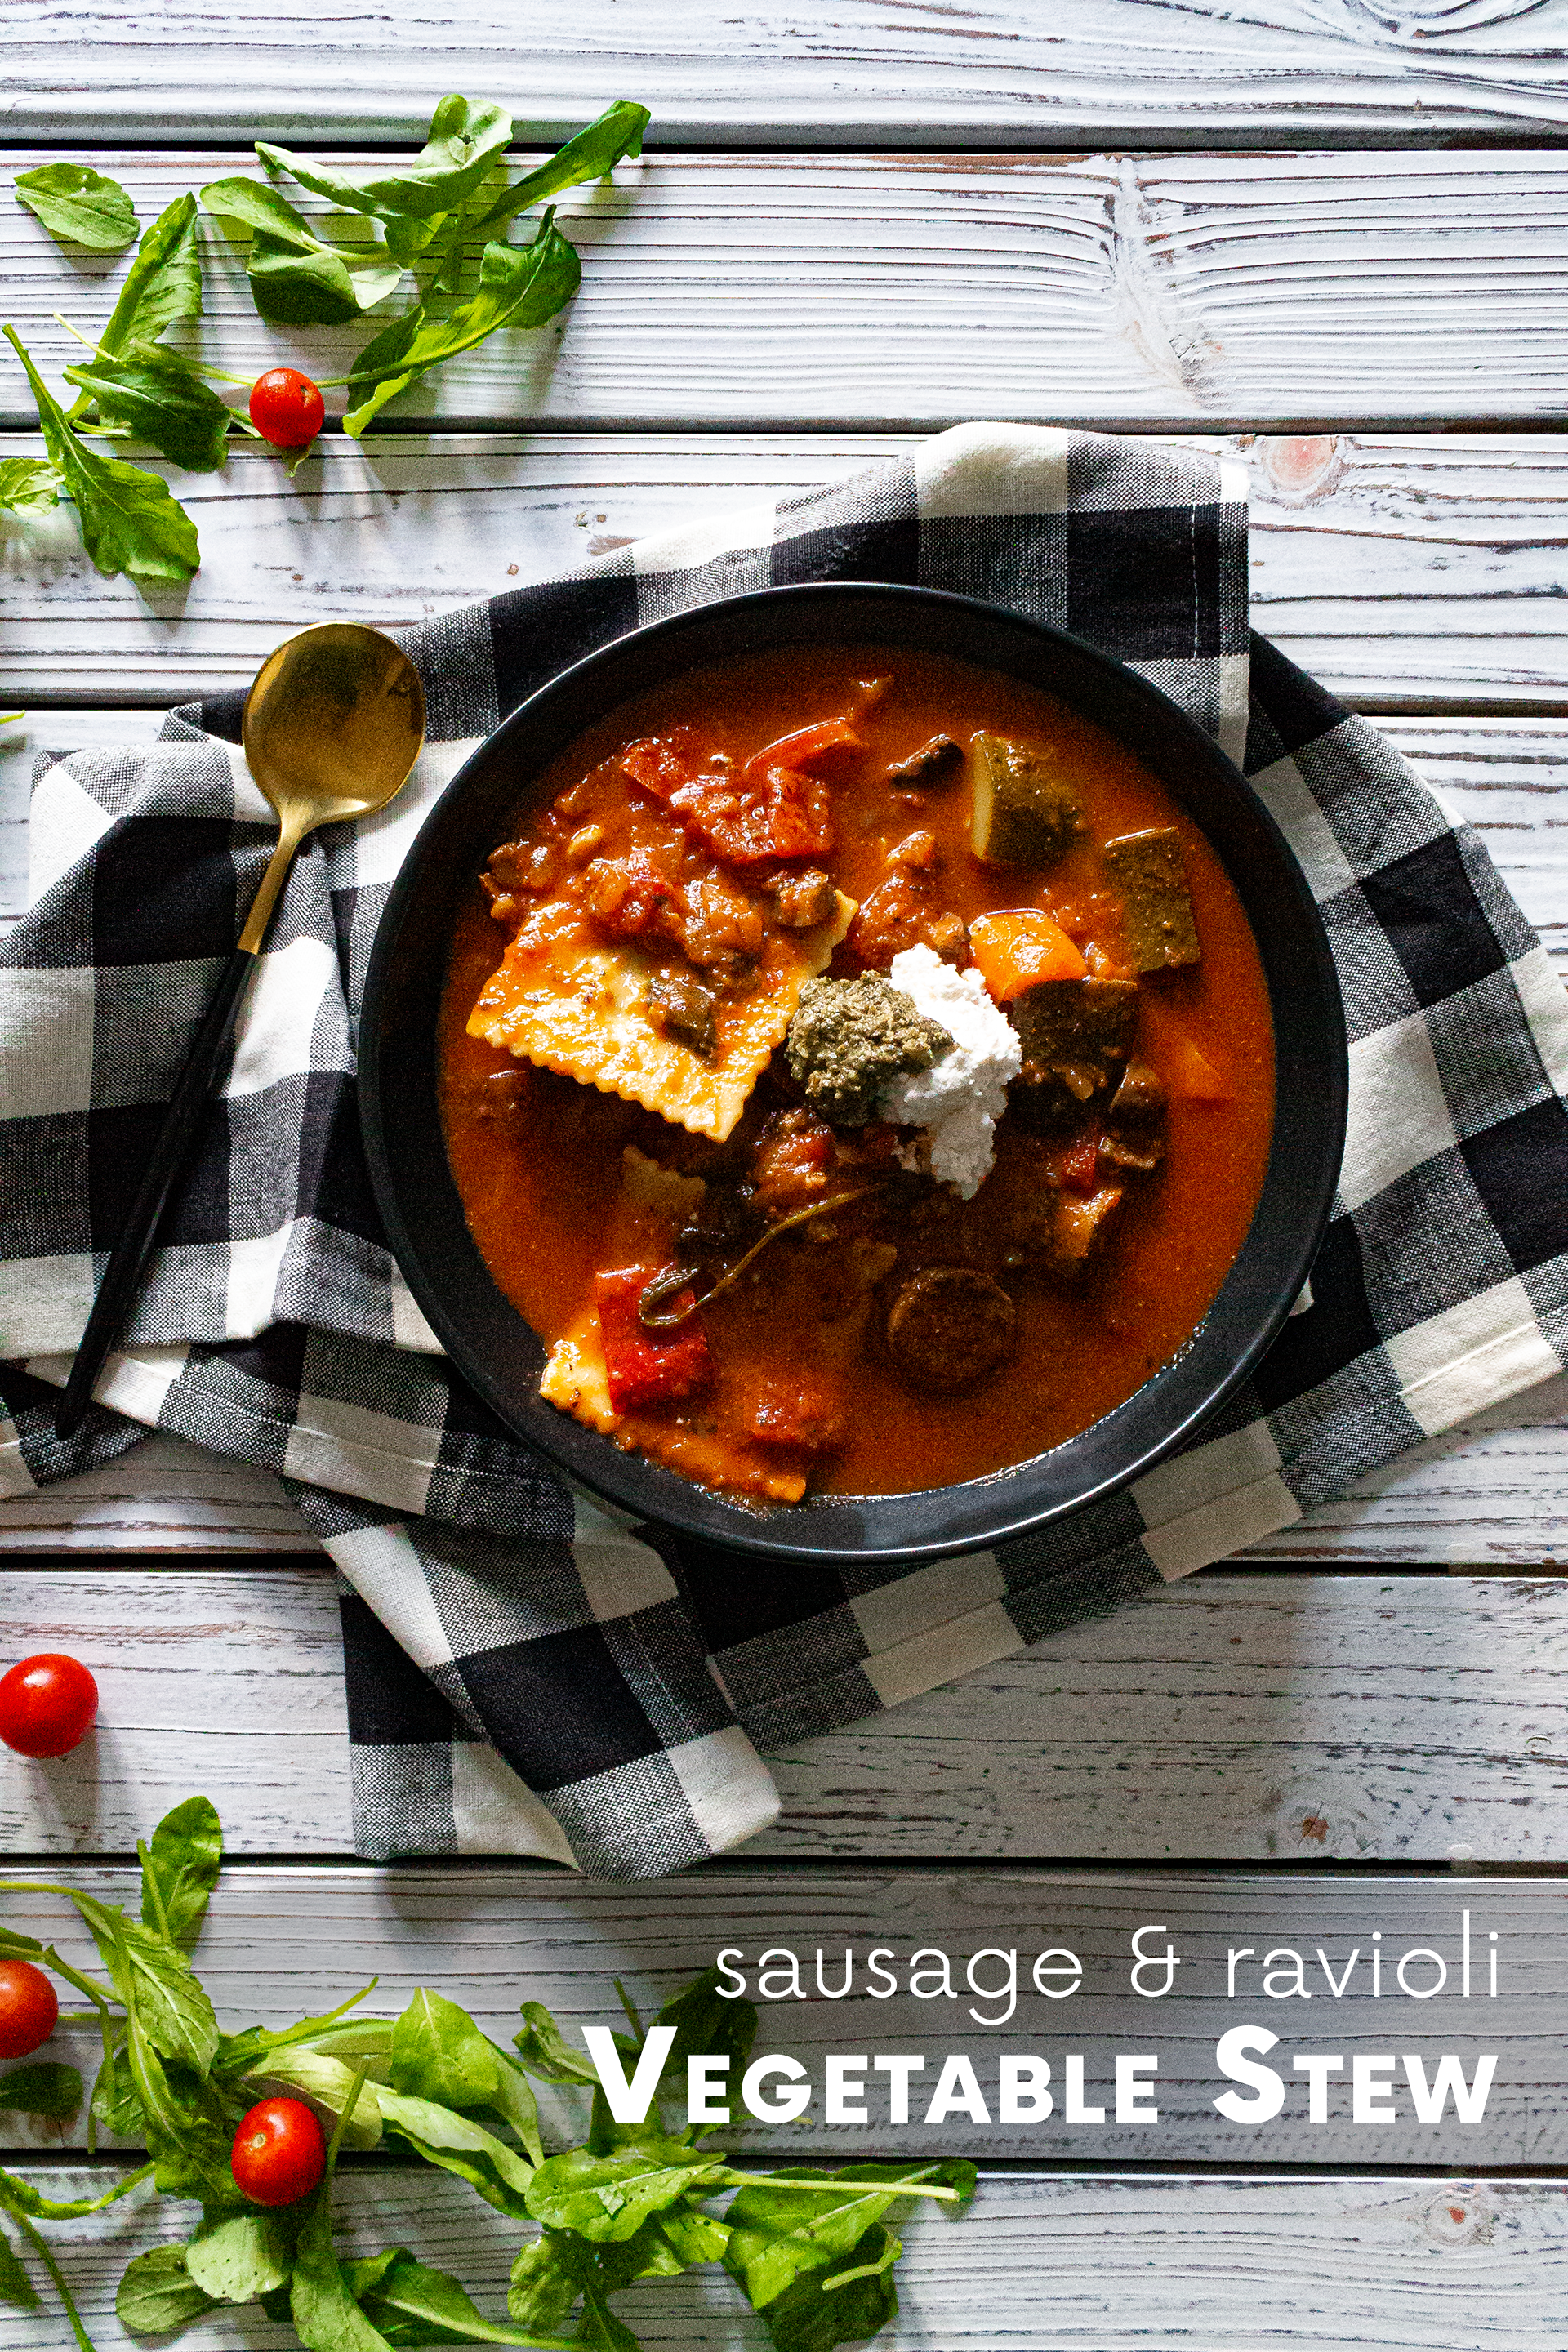
Guess what? This sausage and ravioli stew recipe is completely vegan! Yes, you heard that right–with a few special ingredients, you can make a hearty, meaty, cheesy sausage and ravioli stew that is both satisfying for the carnivores in your house and completely plant-based. I’m incredibly lucky to have access to some great vegan alternatives at my local co-op, and they make all the difference in pulling this meal together. Of course, there are always workarounds for those who prefer to forgo meat and dairy alternatives in favor of a fully whole-foods, plant-based diet, but I’m of the mind to embrace what I can find and cook with it when I can, especially since I live with a self-proclaimed carnivore. If you can’t find the specific vegan alternatives that I mention here, you are more than welcome to substitute whatever you do have access to and this recipe will still taste delicious!
(Disclaimer: I am not affiliated with or sponsored by any of these brands.)
The products I used when making the version of this recipe that’s pictured are:
- Muir Glen Portabella Mushroom Tomato Pasta Sauce
- Tofurky Plant-Based Artisan Spinach Pesto Sausage
- Kite Hill Mushroom Ravioli with Almond Milk Ricotta
- Kite Hill Spinach Ravioli with Almond Milk Ricotta
- Kite Hill Almond Milk Ricotta
Honestly, though, if you can’t find these brands or you just don’t feel like stocking up on a bunch of new ingredients, just use what you have! Got a box of dry pasta sitting in your pantry? Use that! A container of plain yogurt in your fridge? Boom, there’s your creamy “cheese” stir-in. The great thing about stews–especially ones like this, which are honestly supposed to be filled with whatever you can find–is that they’re incredibly versatile. There’s a reason that every cowboy movie, fantasy epic, and adventure novel features stew in some capacity, and I can think of at least three major pieces of media with characters eating it for lunch or dinner right off the top of my head, even. (“Red Dead Redemption II”, “Breath of the Wild”, and “The Secret World of Arrietty”, in case you’re wondering. Actually, I’m pretty sure every Studio Ghibli movie has characters eating stew at some point, but I’m getting way off track.)
This was such a great meal to eat on during the sporadic cool, rainy weather we’ve been getting up here in the mountains lately. Even now, as I’m typing this out, the temperature is a crisp 67F in spite of the summer season. Fall really is gearing up to take over, meaning vegetable and ravioli stews like this, warm curries of any kind (see my recipes for Thai Red Curry, Butter Chicken, Indian Squash & Chickpea Curry, and Japanese Curry TBP), and rich chilis (see my Vegan Chili recipe) are going to be back in season soon. This is one of my times to cook, because it’s the part of the year when spicy, hot dishes are in abundance–and if there’s one thing I love, it’s spicy food. I’m hoping to really up my game this fall and winter with a revamp of my (very, very) old Pho recipe, a Thai green curry, at least one lentil experiment, and a few more Instant Pot recipes (dirty rice, perhaps?). I have a lot to look forward to in the coming months, and I can’t wait to get started!
This recipe makes five servings.
Ingredients:
- 18oz frozen stuffed pasta (ravioli or tortellini)
- 26oz pasta sauce (1 jar)
- 40oz vegetable broth (1.5 sauce jar)
- 2 sausage links, vegan
- 2 onions
- 2 zucchini
- 4 cloves garlic, minced
- 4 whole tomatoes
- 2 bell peppers
- 2 cups spinach
- 2 cups arugula
- 1 cup crimini mushrooms
- 2 tbsp Italian seasoning (see my recipe here)
- 1 tbsp olive oil
- 1 tbsp salt
- 1 tbsp pesto (per bowl)
- 1 tbsp ricotta, vegan (per bowl)
Directions:
- Chop all vegetables (tomatoes, zucchini, mushrooms, peppers) into large 1.5-2 inch chunks (zucchini works best when cut into wedges, not rounds; mushrooms work best when quartered). Slice sausage into 1-inch rounds. Separate onions and sausage, and set the rest aside.
- In a large stock pot, add sausage rounds, garlic, onions, olive oil, and salt. Heat on medium-high and let onions cook for 5-7 minutes, or until onions are fragrant and somewhat softened and the sausage has begun to brown lightly.
- Add remaining chopped vegetables, pasta sauce, water/broth, and Italian seasoning. Bring to a boil on high heat (about 5 minutes), then reduce to a simmer on medium heat. Let simmer for at least 30 minutes, or until stew has reduced by about 1 inch in the pot.
- Add frozen pasta, spinach, and arugula. Stir to ensure all frozen pasta is submerged. Cover and return to a boil for 10 minutes.
- Remove from heat and serve immediately with pesto and ricotta in each bowl.
This vegetable stew is delicious both piping hot and room temperature, but I recommend the former for a truly “hearty fall stew” experience. It keeps wonderfully in the fridge overnight, but I would be wary of letting it sit for too long lest your poor raviolis begin to disintegrate (still delicious, though). As always, we ate leftovers for lunch later in the week, and it was just as good if not better than when we made this ravioli stew for dinner.

Sausage & Ravioli Vegetable Stew
Ingredients
- 18 oz frozen stuffed pasta
- 26 oz pasta sauce 1 jar
- 40 oz vegetable broth 1.5 sauce jar
- 2 sausage links (vegan)
- 2 onions
- 2 zucchini
- 4 cloves garlic minced
- 4 whole tomatoes
- 2 bell peppers
- 2 cups spinach
- 2 cups arugula
- 1 cup crimini mushrooms
- 2 tbsp Italian seasoning
- 1 tbsp olive oil
- 1 tbsp salt
- 1 tbsp pesto vegan (per bowl)
- 1 tbsp ricotta vegan (per bowl)
Instructions
- Chop all vegetables (tomatoes, zucchini, mushrooms, peppers) into large 1.5-2 inch chunks (zucchini works best when cut into wedges, not rounds; mushrooms work best when quartered). Slice sausage into 1-inch rounds. Separate onions and sausage, and set the rest aside.
- In a large stock pot, add sausage rounds, garlic, onions, olive oil, and salt. Heat on medium-high and let onions cook for 5-7 minutes, or until onions are fragrant and somewhat softened and the sausage has begun to brown lightly.
- Add remaining chopped vegetables, pasta sauce, water/broth, and Italian seasoning. Bring to a boil on high heat (about 5 minutes), then reduce to a simmer on medium heat. Let simmer for at least 30 minutes, or until stew has reduced by about 1 inch in the pot.
- Add frozen pasta, spinach, and arugula. Stir to ensure all frozen pasta is submerged. Cover and return to a boil for 10 minutes.
- Remove from heat and serve immediately with pesto and ricotta in each bowl.

The post Sausage + Ravioli Vegetable Stew appeared first on I Forgot Salt!.
]]>The post Tofu + Black Bean Chipotle Sofritas appeared first on I Forgot Salt!.
]]>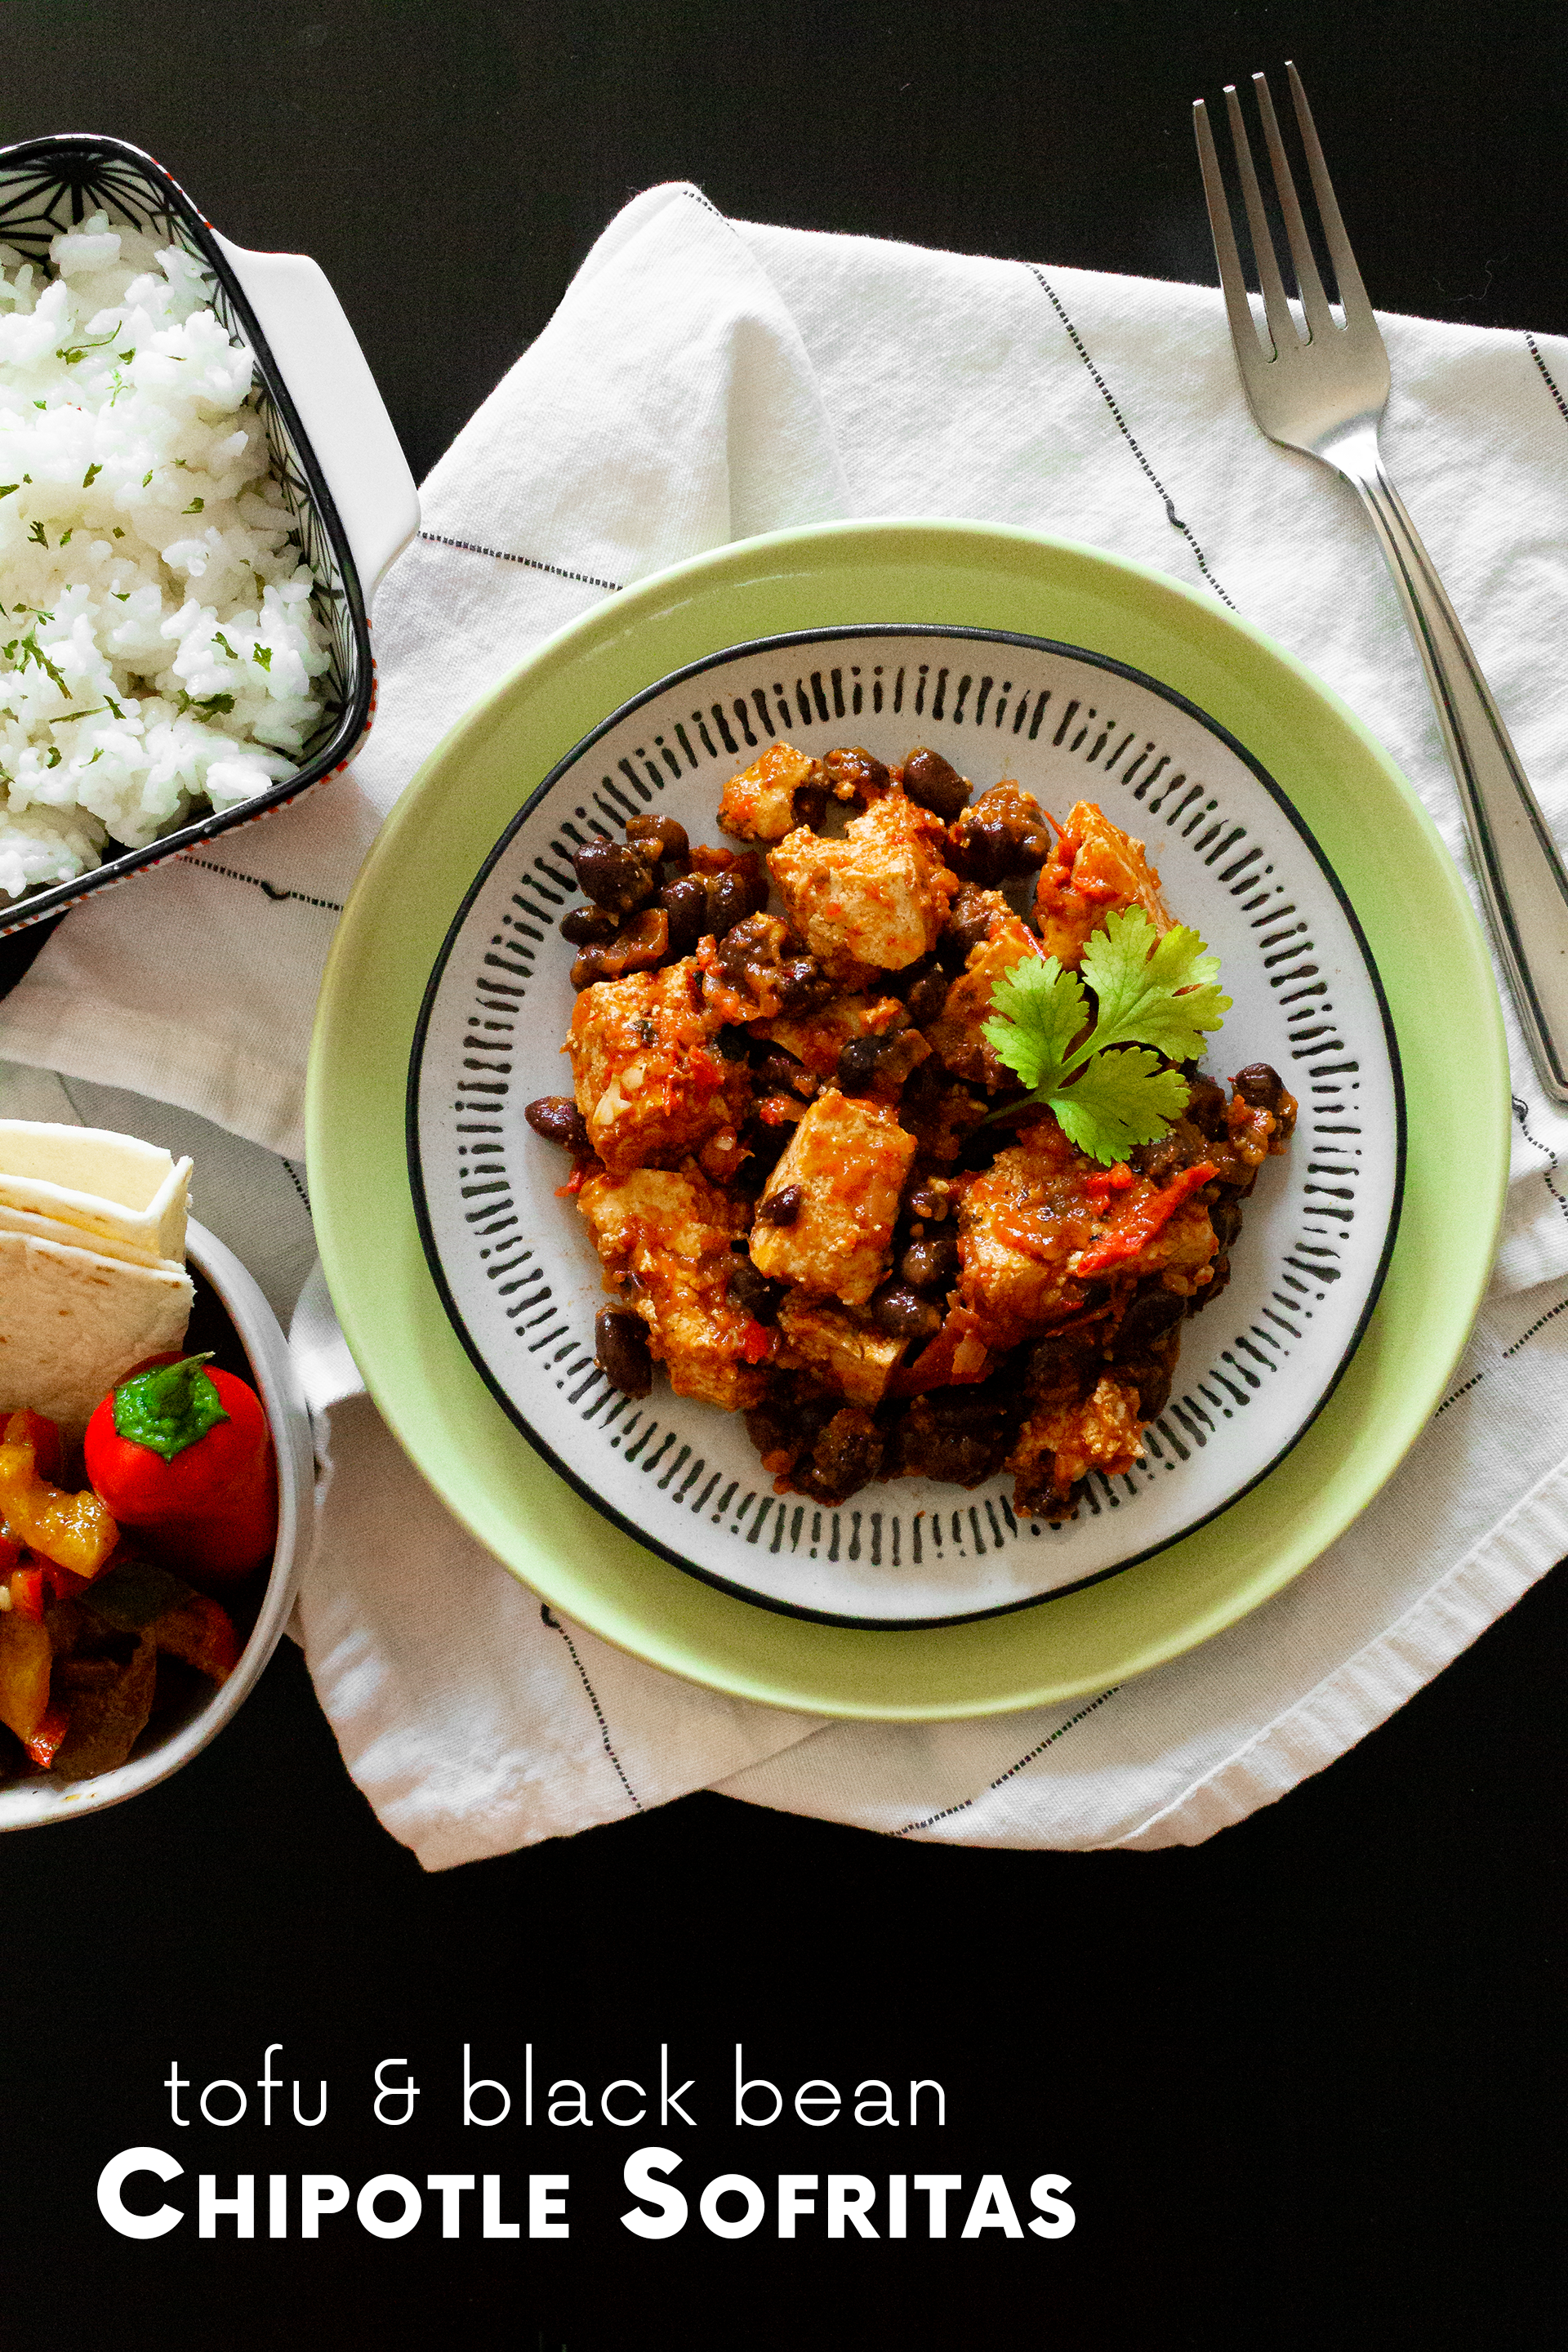
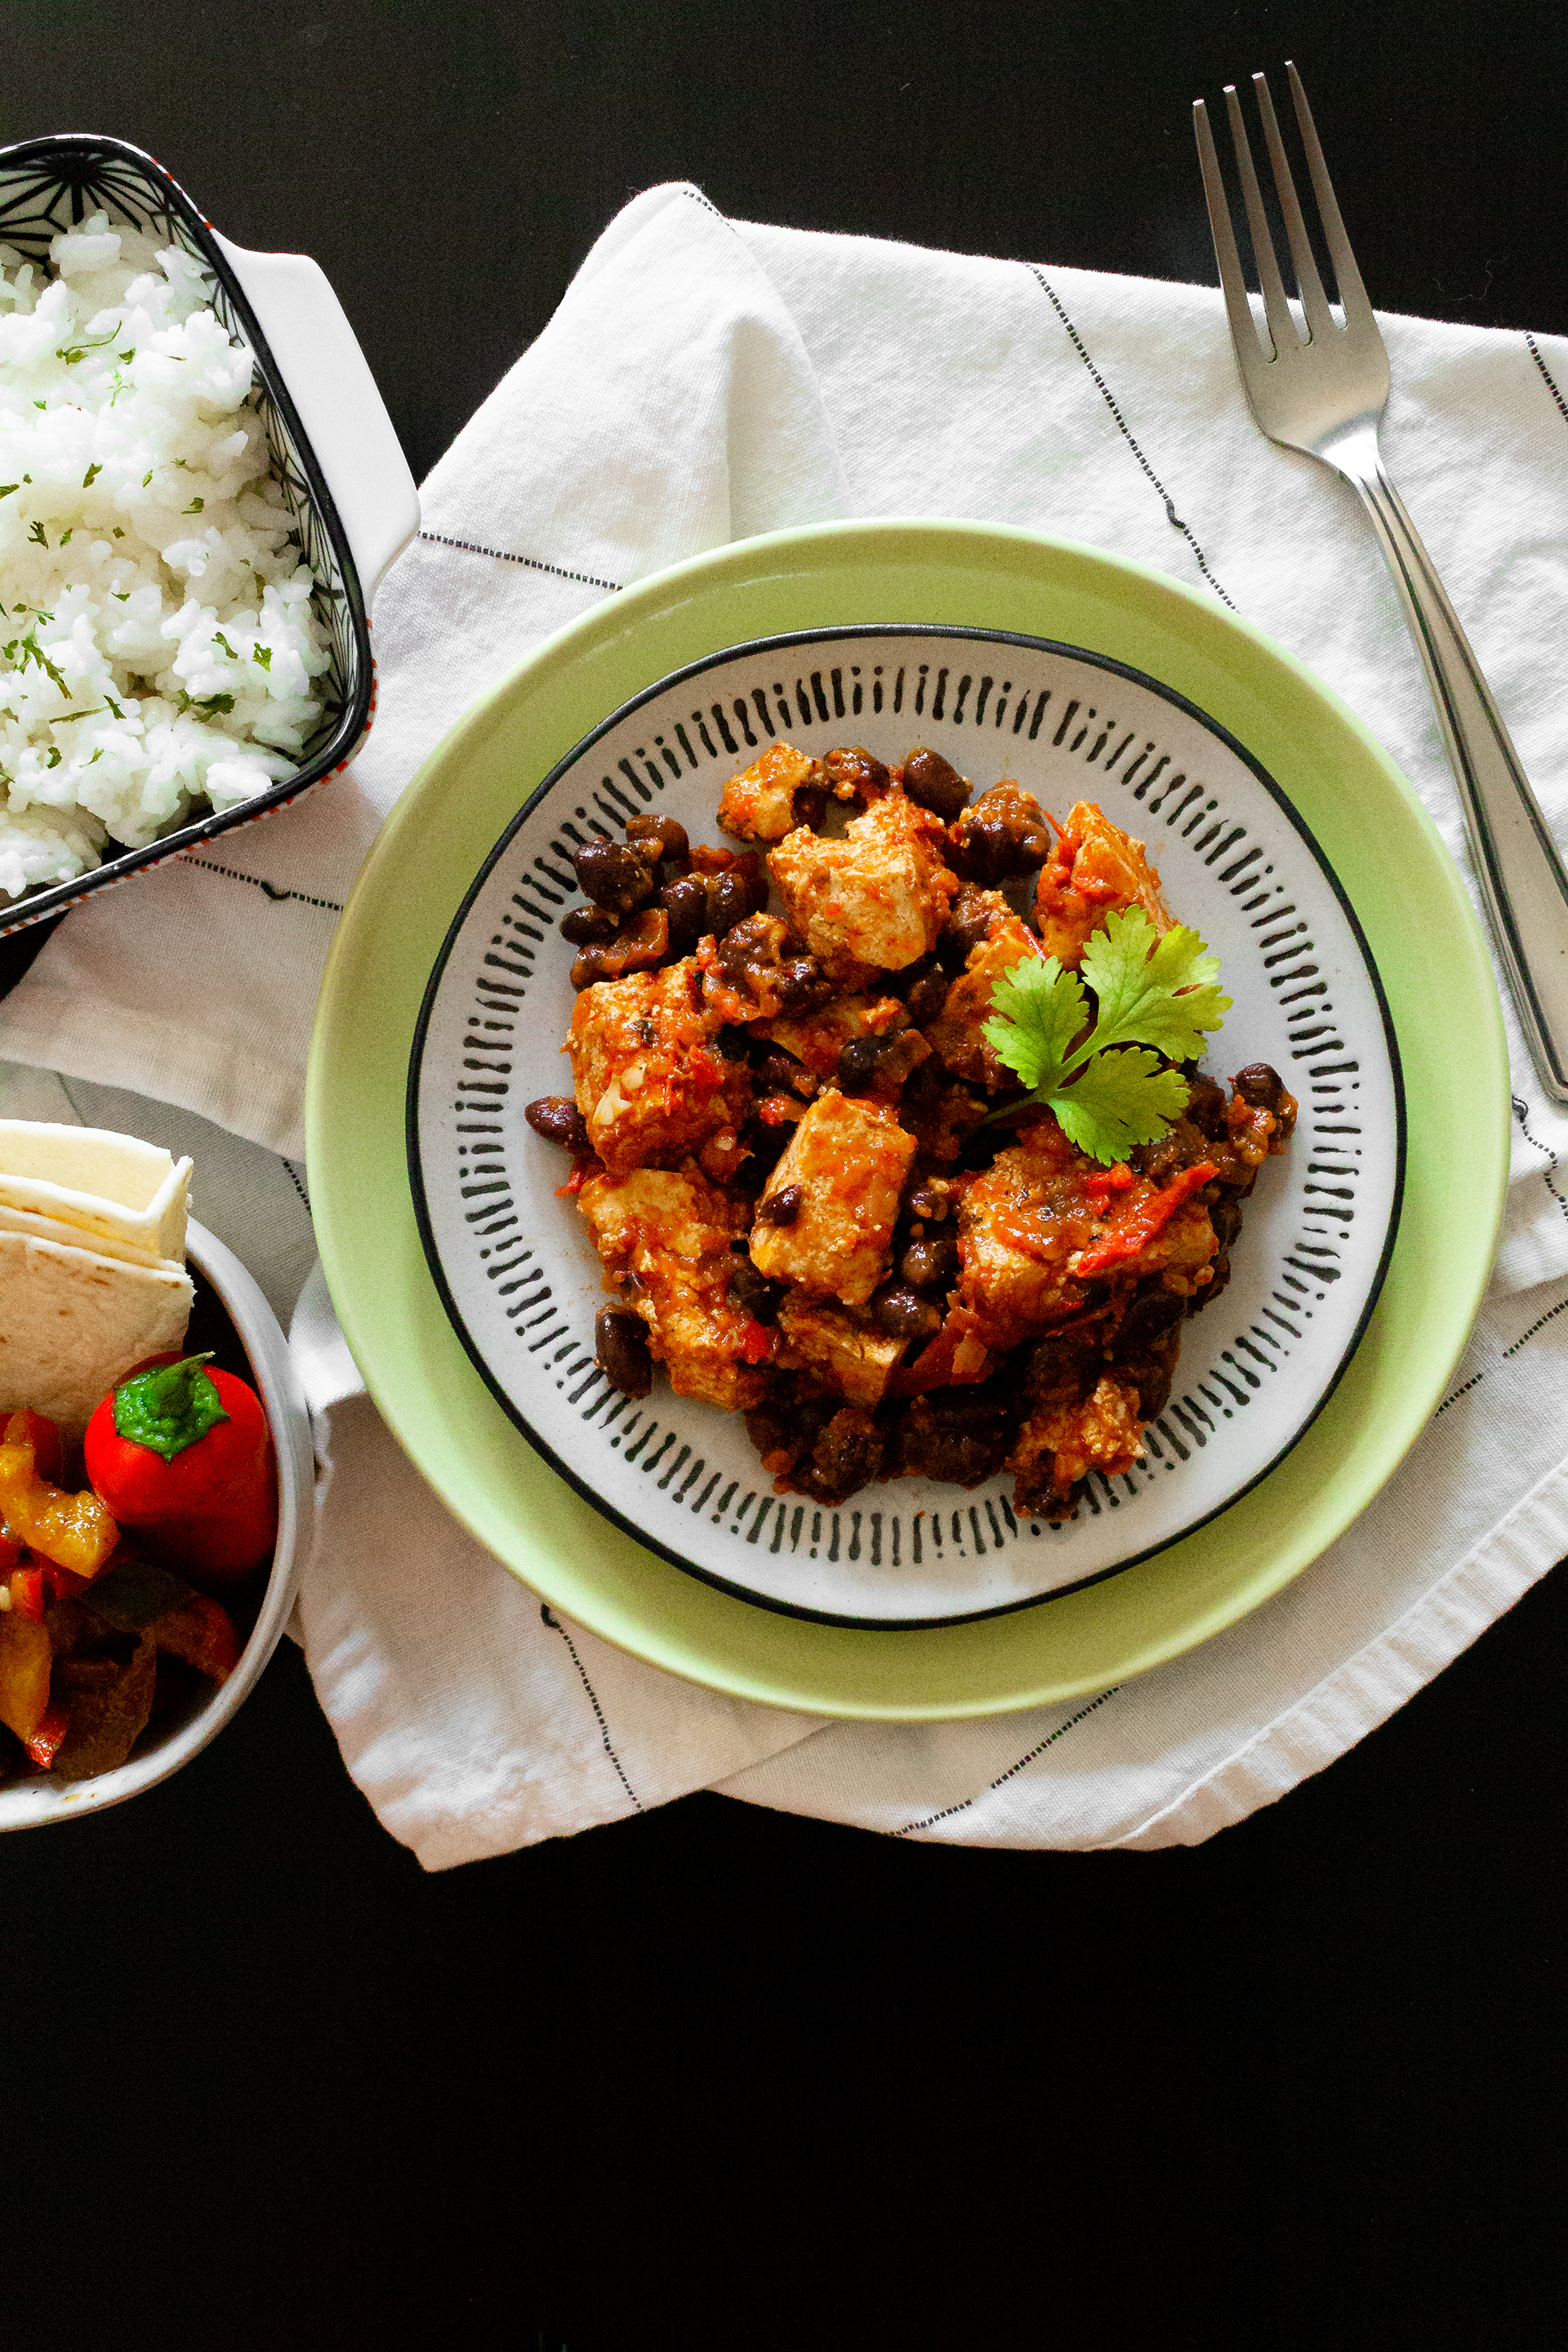
As the countdown to the beginning of my fall semester comes to a close, I am continuing to grow and expand my repertoire of new recipes–including this (much improved) Chipotle sofritas copycat. Before we moved, Alex and I lived within walking distance of a Chipotle, making it an easy option for takeout on evenings I didn’t feel like throwing something together. Now, however, the closest Chipotle (and those sweet, sweet sofritas) is all the way across town, and I have such easy access to fresh, local ingredients that I’ve found myself wanting to cook at home almost every night. That hasn’t stopped me from craving those delicious burrito bowls, though! So, the only solution was the obvious one–recreate something similar (but better) at home.
A full taco spread–him with (local) ground beef and me with these Chipotle sofritas–was actually the first “sit-down” dinner Alex and I had at our new place after several hectic days of unpacking and putting together furniture. That was also the first time I made my creamy avocado salsa verde, too, which honestly was a dream come true with this sweet and savory bean and tofu combo. Wrapped up in a tortilla with warm pan-seared veggies, salsa verde, and some (vegan) sour cream, this recipe easily outshines anything Chipotle has to offer (in my opinion, at least). I’ve made it twice since we moved in and eaten it a variety of ways–from salads to a full-scale burrito bowl in addition to the aforementioned tacos–and every time I chow down I can’t help but wonder why it took me so long to make my own Chipotle sofritas copycat instead of spending $10 a pop. So good!

One of the most fun parts about this recipe, too, is that I get to my brand new mini Instant Pot if I’m cooking with dried black beans. One of the best things our local food co-op has to offer is a bulk section where we can buy dried beans, lentils, grains, and even coffee by the self-bagged pound. It’s a much cheaper, less wasteful, and more space-efficient way to stock up on non-perishables, and I’ve completely bought in to the idea of having a pantry full of 64oz mason jars and glass Ikea storage containers. We’ve been buying our coffee in bulk since we moved, but I’ve only recently started buying dried beans, etc, after finishing off the last of the cans we traveled with. My mini Instant pot (a 3qt Duo Mini we found on sale at Walmart) has been amazing for whipping up batches of dried beans in a fraction of the time it would take to soak them overnight or even boil them on the stove. My next goal is to try making lentils in it! Very exciting.
This recipe makes 6 servings.
Ingredients
- 1 block (16oz) firm tofu
- 1.5 cups black beans, cooked
- 2 tomatoes, whole
- 2 jalapenos
- 1 onion
- 3 cloves garlic
- 1 cup vegetable broth
- 1/4 cup chipotle peppers in adobo (from can)
- 1/4 cup fresh cilantro
- 2 tbsp lime juice
- 2 tbsp red wine vinegar
- 1 tbsp nutritional yeast
- 1 tbsp olive oil + 1/4 tsp olive oil, divided
- 1/4 tsp chili powder
- 1/4 tsp oregano
- 1/4 tsp cumin
- 1/4 tsp paprika
- 1/4 tsp coriander
- 1/4 tsp salt + 1 tsp salt, divided
- black pepper (pinch)
Directions:
- Boil/pressure cook black beans as needed if not using canned beans.
- Wrap tofu block in dish towels and press with a heavy object for at least one hour.
- Preheat oven to 425F.
- Wrap garlic cloves, 1/4 tsp olive oil, and black pepper in a small piece of parchment paper to create a garlic roasting pouch. Slice jalapenos in half and discard seeds if desired. Slice tomatoes in half. Slice onion into quarters.
- Spread vegetables onto a baking sheet with 1 tsp salt and 1 tbsp olive oil, add garlic roasting pouch. Bake for 20 minutes.
- While vegetables are roasting, slice pressed tofu into 2-3 thin slabs. Dry fry on a nonstick skillet until each side is golden brown and the slabs hold their shape moderately well/do not easily crumble. Rip or tear each slab into bite-sized chunks with your hands. Set aside.
- In a food processor or blender, add roasted vegetables/garlic, red wine vinegar, nutritional yeast, spices, lime juice, chipotle peppers in adobo, cilantro, and vegetable broth. Blend until a sauce has formed.
- Add tofu, black beans, and sauce to a large nonstick skillet and heat on medium-high, stirring to ensure that everything is coated with the sauce. Heat through and reduce sauce/tofu/bean mixture to your desired consistency. (For my preferred less-saucy version pictured above, I bring everything to a boil and reduce for 10-12 minutes.)
- Top with additional lime juice and cilantro, and serve with on tortillas with your favorite toppings for taco night, or with cilantro-lime rice and all of the fixings for the Chipotle burrito bowl experience.
This recipe keeps wonderfully in the fridge overnight, and lasts for up to a week after cooking. I’ve found that the flavors only meld and improve in their new lives as leftovers, and some of my favorite ways to enjoy these Chipotle sofritas are as lunch the next day with whatever I can find in the fridge. They can be eaten hot, room-temperature, or cold, and taste great either way. Enjoy!
Tofu & Black Bean Chipotle Sofritas
Ingredients
- 1 block firm tofu (16oz)
- 1.5 cups black beans cooked
- 2 tomatoes whole
- 2 jalapenos
- 1 onion
- 3 cloves garlic
- 1 cup vegetable broth
- 1/4 cup chipotle peppers in adobo from can
- 1/4 cup fresh cilantro
- 2 tbsp lime juice
- 2 tbsp red wine vinegar
- 1 tbsp nutritional yeast
- 1 tbsp olive oil + 1/4 tsp olive oil divided
- 1/4 tsp chili powder
- 1/4 tsp oregano
- 1/4 tsp cumin
- 1/4 tsp paprika
- 1/4 tsp coriander
- 1/4 tsp salt + 1 tsp salt divided
- black pepper pinch
Instructions
- Boil/pressure cook black beans as needed if not using canned beans.
- Wrap tofu block in dish towels and press with a heavy object for at least one hour.
- Preheat oven to 425F.
- Wrap garlic cloves, 1/4 tsp olive oil, and black pepper in a small piece of parchment paper to create a garlic roasting pouch. Slice jalapenos in half and discard seeds if desired. Slice tomatoes in half. Slice onion into quarters.
- Spread vegetables onto a baking sheet with 1 tsp salt and 1 tbsp olive oil, add garlic roasting pouch. Bake for 20 minutes.
- While vegetables are roasting, slice pressed tofu into 2-3 thin slabs. Dry fry on a nonstick skillet until each side is golden brown and the slabs hold their shape moderately well/do not easily crumble. Rip or tear each slab into bite-sized chunks with your hands. Set aside.
- In a food processor or blender, add roasted vegetables/garlic, red wine vinegar, nutritional yeast, spices, lime juice, chipotle peppers in adobo, cilantro, and vegetable broth. Blend until a sauce has formed.
- Add tofu, black beans, and sauce to a large nonstick skillet and heat on medium-high, stirring to ensure that everything is coated with the sauce. Heat through and reduce sauce/tofu/bean mixture to your desired consistency. (For my preferred less-saucy version pictured above, I bring everything to a boil and reduce for 10-12 minutes.)
- Top with additional lime juice and cilantro, and serve with on tortillas with your favorite toppings for taco night, or with cilantro-lime rice and all of the fixings for the Chipotle burrito bowl experience.

The post Tofu + Black Bean Chipotle Sofritas appeared first on I Forgot Salt!.
]]>The post Eight-Vegetable Quinoa Salad with Red Pepper Vinaigrette appeared first on I Forgot Salt!.
]]>
Have I mentioned lately that I’m obsessed with our new local farmer’s market? Yes? Well, too bad–you’re going to hear it again. I am obsessed with that place! This quinoa salad is literally just the result of me throwing every kind of vegetable we picked up during our first official trip to fresh produce heaven into the oven and mixing it with quinoa. Seriously. The first time I made it, every flavor element came right from the veggies themselves. In the half-dozen times I’ve whipped up this recipe since then, I’ve made some minor adjustments (and added a dressing to round it out!) but the core of this dish remains the same. Also, yes–our local farmer’s market has shiitake mushrooms. Incredible.
The red pepper dressing was hugely inspired by a Wegman’s red pepper vinaigrette that I adored… before realizing it wasn’t actually vegan. It still holds a special place in my heart, but once I tried my hand at putting together my own version there is definitely no going back! Everything I loved about the original store-bought version has been completely enhanced in my homemade vegan version, and it’s so simple to throw together in this dish that it takes barely any extra effort at all! I simply roast what needs to be roasted on the same pan as all of my other vegetables, and separate them out to be blended when the timer goes off. Tahini proved to be a great substitute for the cream used to thicken the original dressing, too, and I made a few additional swaps for taste like using red wine vinegar instead of white vinegar. Overall, I’m extremely happy with how it turned out, and I’ll definitely be keeping a jar of it on hand in the fridge for any mid-week lunchtime quinoa salad cravings!
One of the most interesting parts about moving toward a fully plant-based diet (which I spoke a bit about in my shrimp crostini post) has been learning more about nutrition as a whole. Rather than just keeping a rough tally of how many calories I’ve eaten on a given day, I’ve found myself focusing more on things like vitamins, minerals, and basic food categories instead. Doing so has helped to improve my relationship with food as a whole, in addition to making me feel healthier and happier with my overall choices. This dish specifically hits every major checkbox for what I’d consider a satisfying, filling, and nutritious meal. Fiber and carbs from the quinoa, vitamin D from the spinach and mushrooms, vitamin C from the tomatoes and peppers, iron from the onions, protein from the sweet potato and chickpeas, and healthy fats from the olive oil and tahini. Not only does this quinoa salad taste great, but it’s great for your body, too!
This recipe makes four servings.
Salad Ingredients:
- 1/2 cup quinoa, dried
- 1 cup vegetable broth
- 2 medium onions
- 1 medium sweet potato
- 10-12 cherry tomatoes
- 2 large bell peppers
- 1 jalapeno
- 15 oz chickpeas (about 1 can)
- 2 cups spinach, fresh
- 1/2 cup shiitake mushrooms
- 2 tbsp olive oil
- 2 tbsp soy sauce
- 1 tsp chipotle powder
- 1 tsp garlic powder
- 1 tsp salt
Dressing Ingredients:
- 3-4 roasted red peppers (from jar)
- 1 medium onion
- 2 cloves garlic
- 1/4 cup red wine vinegar
- 1/4 cup olive oil + 1/2 tsp divided
- 2 tbsp tahini
- 1 tbsp honey/maple syrup
- 1 tsp rosemary
- 1/4 tsp black pepper
- 1/2 tsp salt + 1/4 tsp divided
Directions:
- Add quinoa and vegetable broth to a rice cooker and begin cycle, or use the stovetop method.
- Preheat oven to 425F.
- Chop sweet potato, bell peppers, and jalapeno into bite-sized (about 1-inch) chunks. Chop onions (all three) into quarters. Slice grape tomatoes in half.
- Toss vegetables from step 2 and rinsed/drained chickpeas in garlic powder, chipotle powder, salt, and 2 tbsp olive oil. Spread evenly on baking sheet.
- Wrap garlic cloves, black pepper, 1/2 tsp olive oil, and 1/4 tsp salt in a small piece of parchment paper to make a garlic roasting packet. Place seam-side down on the baking sheet with the vegetables.
- Roast vegetables and garlic for 20 mins at 425F.
- Meanwhile, heat a nonstick skillet on medium-high heat. Tear shiitake mushrooms into bite-sized pieces and add to the skillet with soy sauce. Saute for 5-7 minutes, or until the mushrooms have absorbed most of the soy sauce and become lightly toasted.
- Remove mushrooms to the side and add spinach to the still-hot skillet. Saute until wilted, about 2-3 minutes. Remove and set aside.
- When the vegetables have finished roasting, add all dressing ingredients (including the now-roasted onion and garlic) to a food processor and blend until smooth. Add salt to taste if necessary.
- In a large bowl, combine quinoa, roasted vegetables and chickpeas, sauteed mushrooms and spinach, and about 1/2 dressing. Toss to coat. Enjoy.
This recipe can be eaten warm, room temperature, or cold, and keeps great in the refrigerator for several days. I’ve used it as a meal prep for myself more than once, and eaten lunch leftovers for dinner on days I don’t feel like cooking. Whether reheated or not, it still taste great. The dressing keeps wonderfully in a sealed mason jar in the fridge, as well, and can be used on more than just this quinoa salad! Alex has been eating it on mixed green salads with rotisserie chicken over the past couple of days, and has really enjoyed having something different on-hand for lunch!


Quinoa Salad with Roasted Red Pepper Vinaigrette
Ingredients
Salad Ingredients
- 1/2 cup quinoa dried
- 1 cup vegetable broth
- 2 onions medium
- 1 sweet potato medium
- 10-12 cherry tomatoes
- 2 bell peppers large
- 1 jalapeno
- 15 oz chickpeas (about 1 can), rinsed and drained
- 2 cups spinach fresh
- 1/2 cup shiitake mushrooms
- 2 tbsp olive oil
- 2 tbsp soy sauce
- 1 tsp chipotle powder
- 1 tsp garlic powder
- 1 tsp salt
Dressing Ingredients
- 3-4 roasted red peppers from jar
- 1 medium onion
- 2 cloves garlic
- 1/4 cup red wine vinegar
- 1/4 cup olive oil + 1/2 tsp divided
- 2 tbsp tahini
- 1 tbsp honey/maple syrup
- 1 tsp rosemary
- 1/2 tsp salt + 1/4 tsp divided
- 1/4 tsp black pepper
Instructions
- Add quinoa and vegetable broth to a rice cooker and begin cycle, or use the stovetop method.
- Preheat oven to 425F.
- Chop sweet potato, bell peppers, and jalapeno into bite-sized (about 1-inch) chunks. Chop onions (all three) into quarters. Slice grape tomatoes in half.
- Toss vegetables from step 2 and rinsed/drained chickpeas in garlic powder, chipotle powder, salt, and 2 tbsp olive oil. Spread evenly on baking sheet.
- Wrap garlic cloves, black pepper, 1/2 tsp olive oil, and 1/4 tsp salt in a small piece of parchment paper to make a garlic roasting packet. Place seam-side down on the baking sheet with the vegetables.
- Roast vegetables and garlic for 20 mins at 425F.
- Meanwhile, heat a nonstick skillet on medium-high heat. Tear shiitake mushrooms into bite-sized pieces and add to the skillet with soy sauce. Saute for 5-7 minutes, or until the mushrooms have absorbed most of the soy sauce and become lightly toasted.
- Remove mushrooms to the side and add spinach to the still-hot skillet. Saute until wilted, about 2-3 minutes. Remove and set aside.
- When the vegetables have finished roasting, add all dressing ingredients (including the now-roasted onion and garlic) to a food processor and blend until smooth. Add salt to taste if necessary.
- In a large bowl, combine quinoa, roasted vegetables and chickpeas, sauteed mushrooms and spinach, and about 1/2 dressing. Toss to coat. Enjoy.

The post Eight-Vegetable Quinoa Salad with Red Pepper Vinaigrette appeared first on I Forgot Salt!.
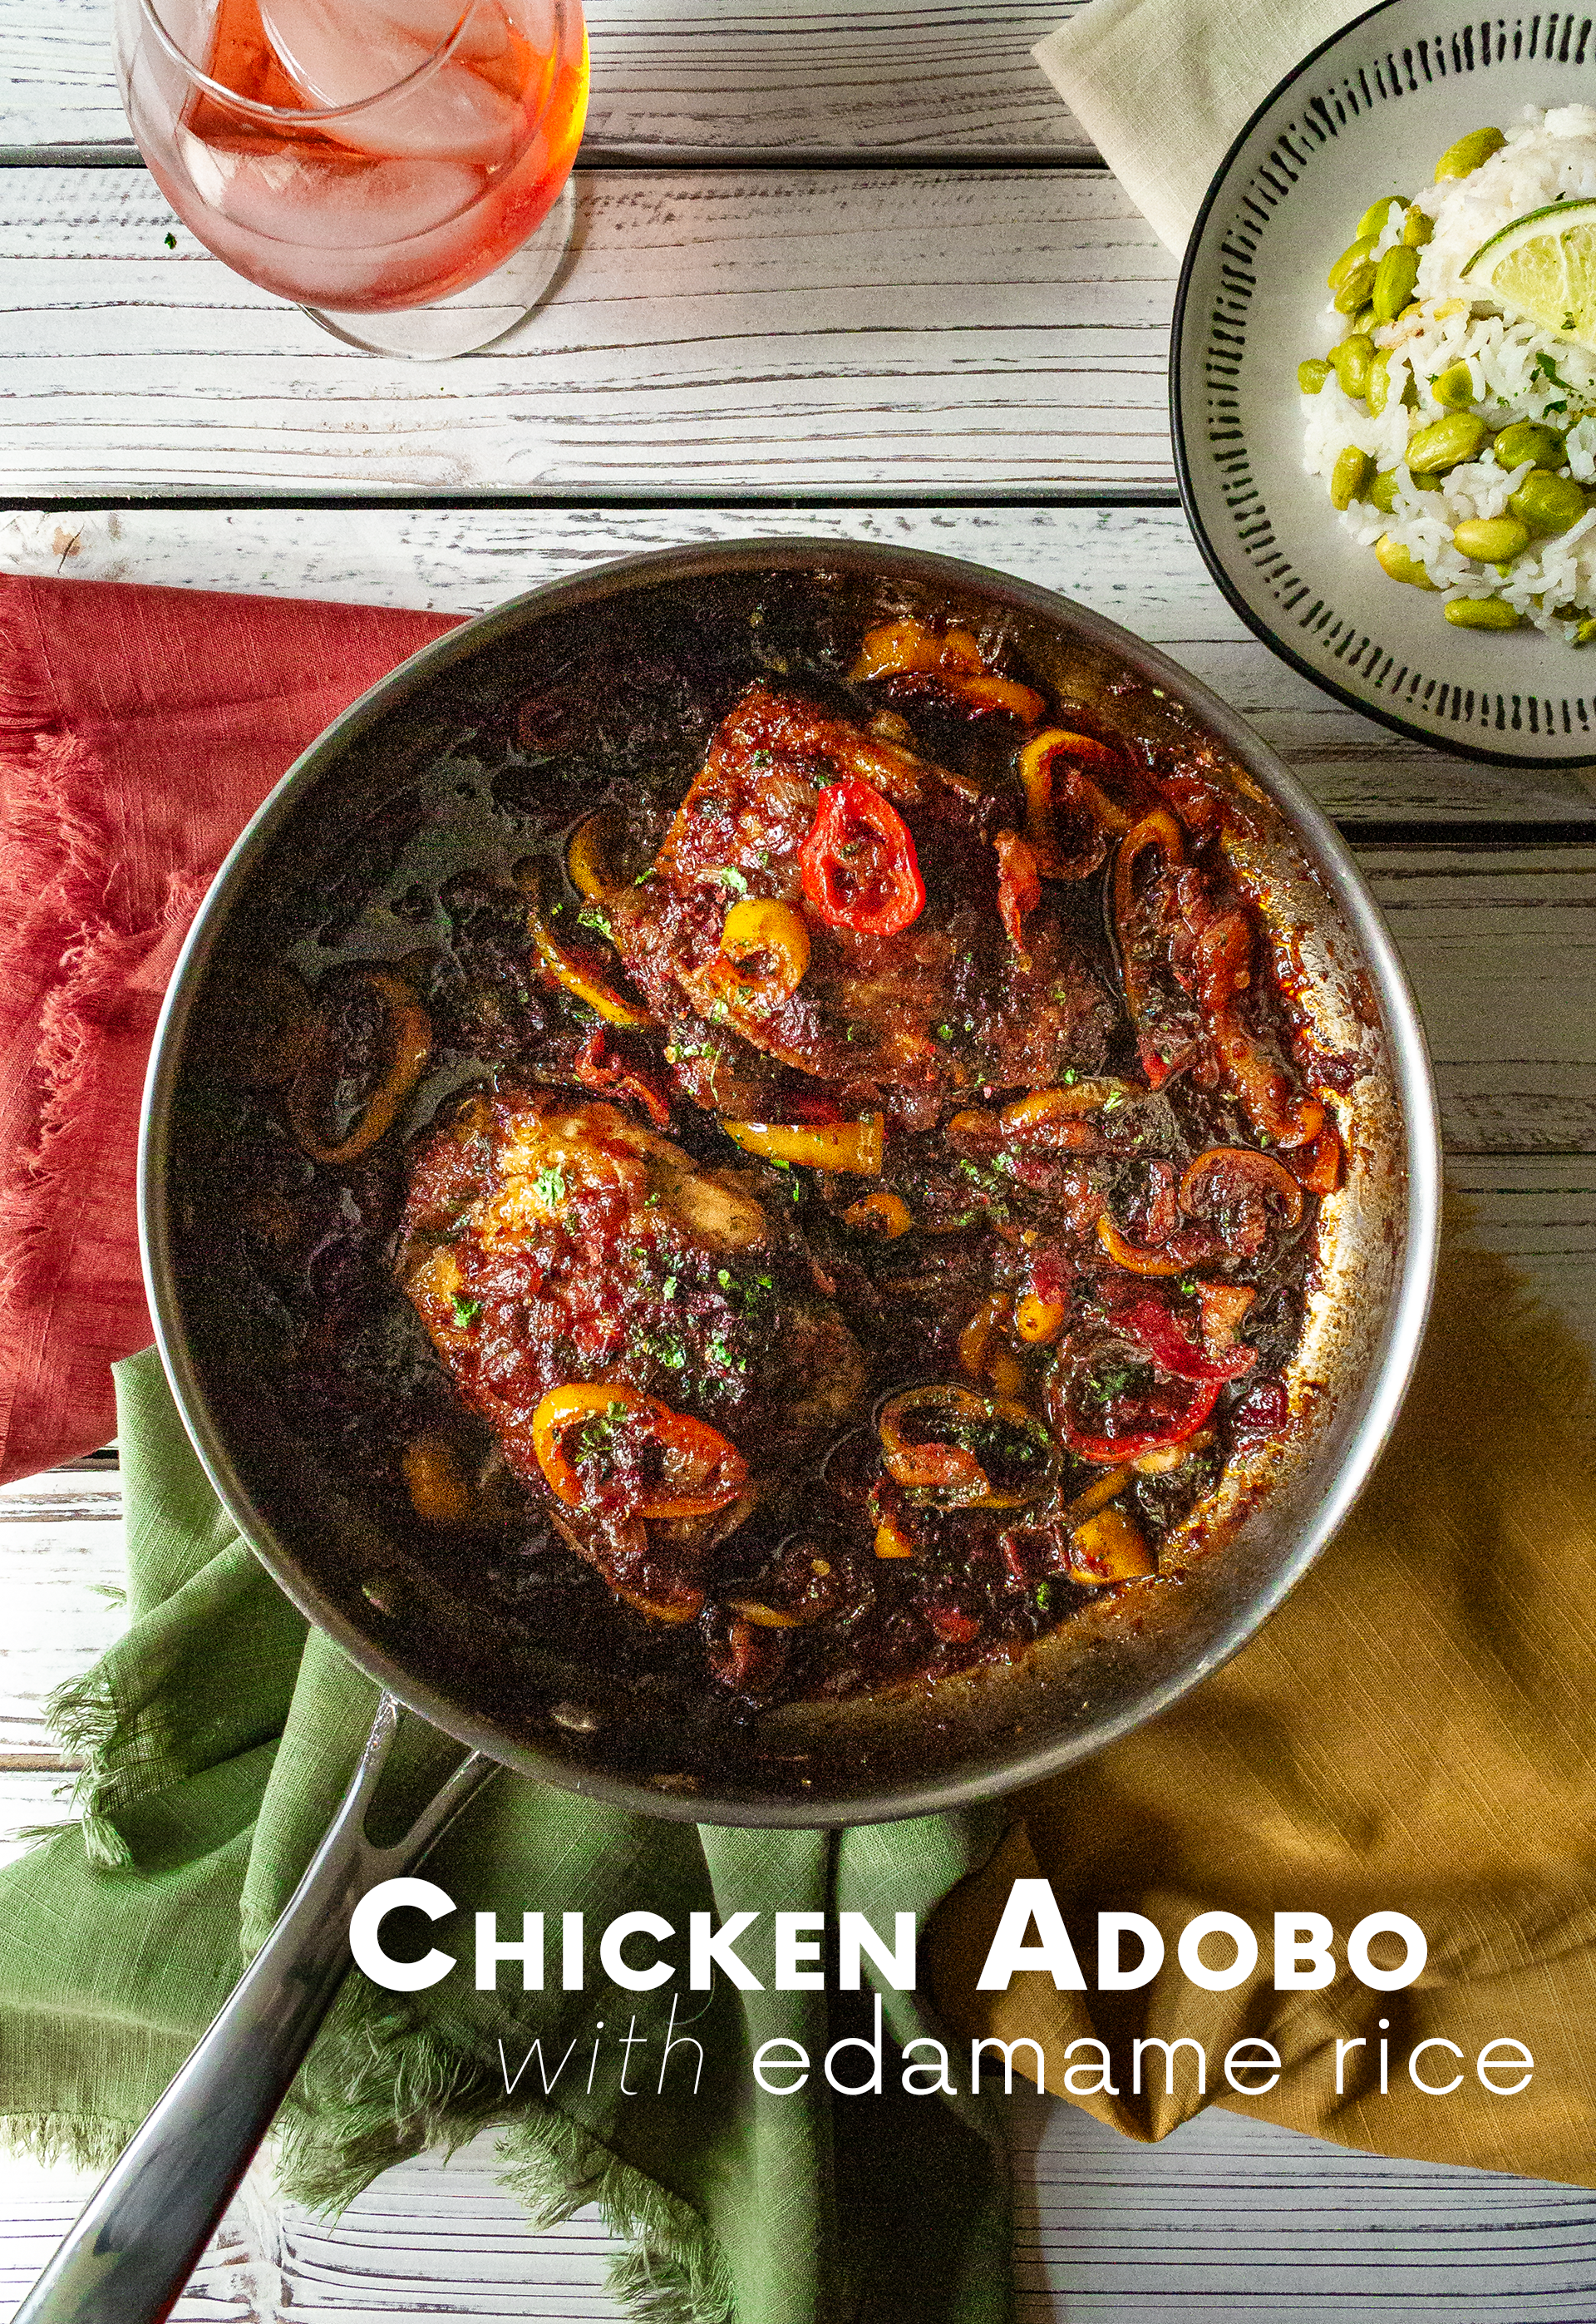
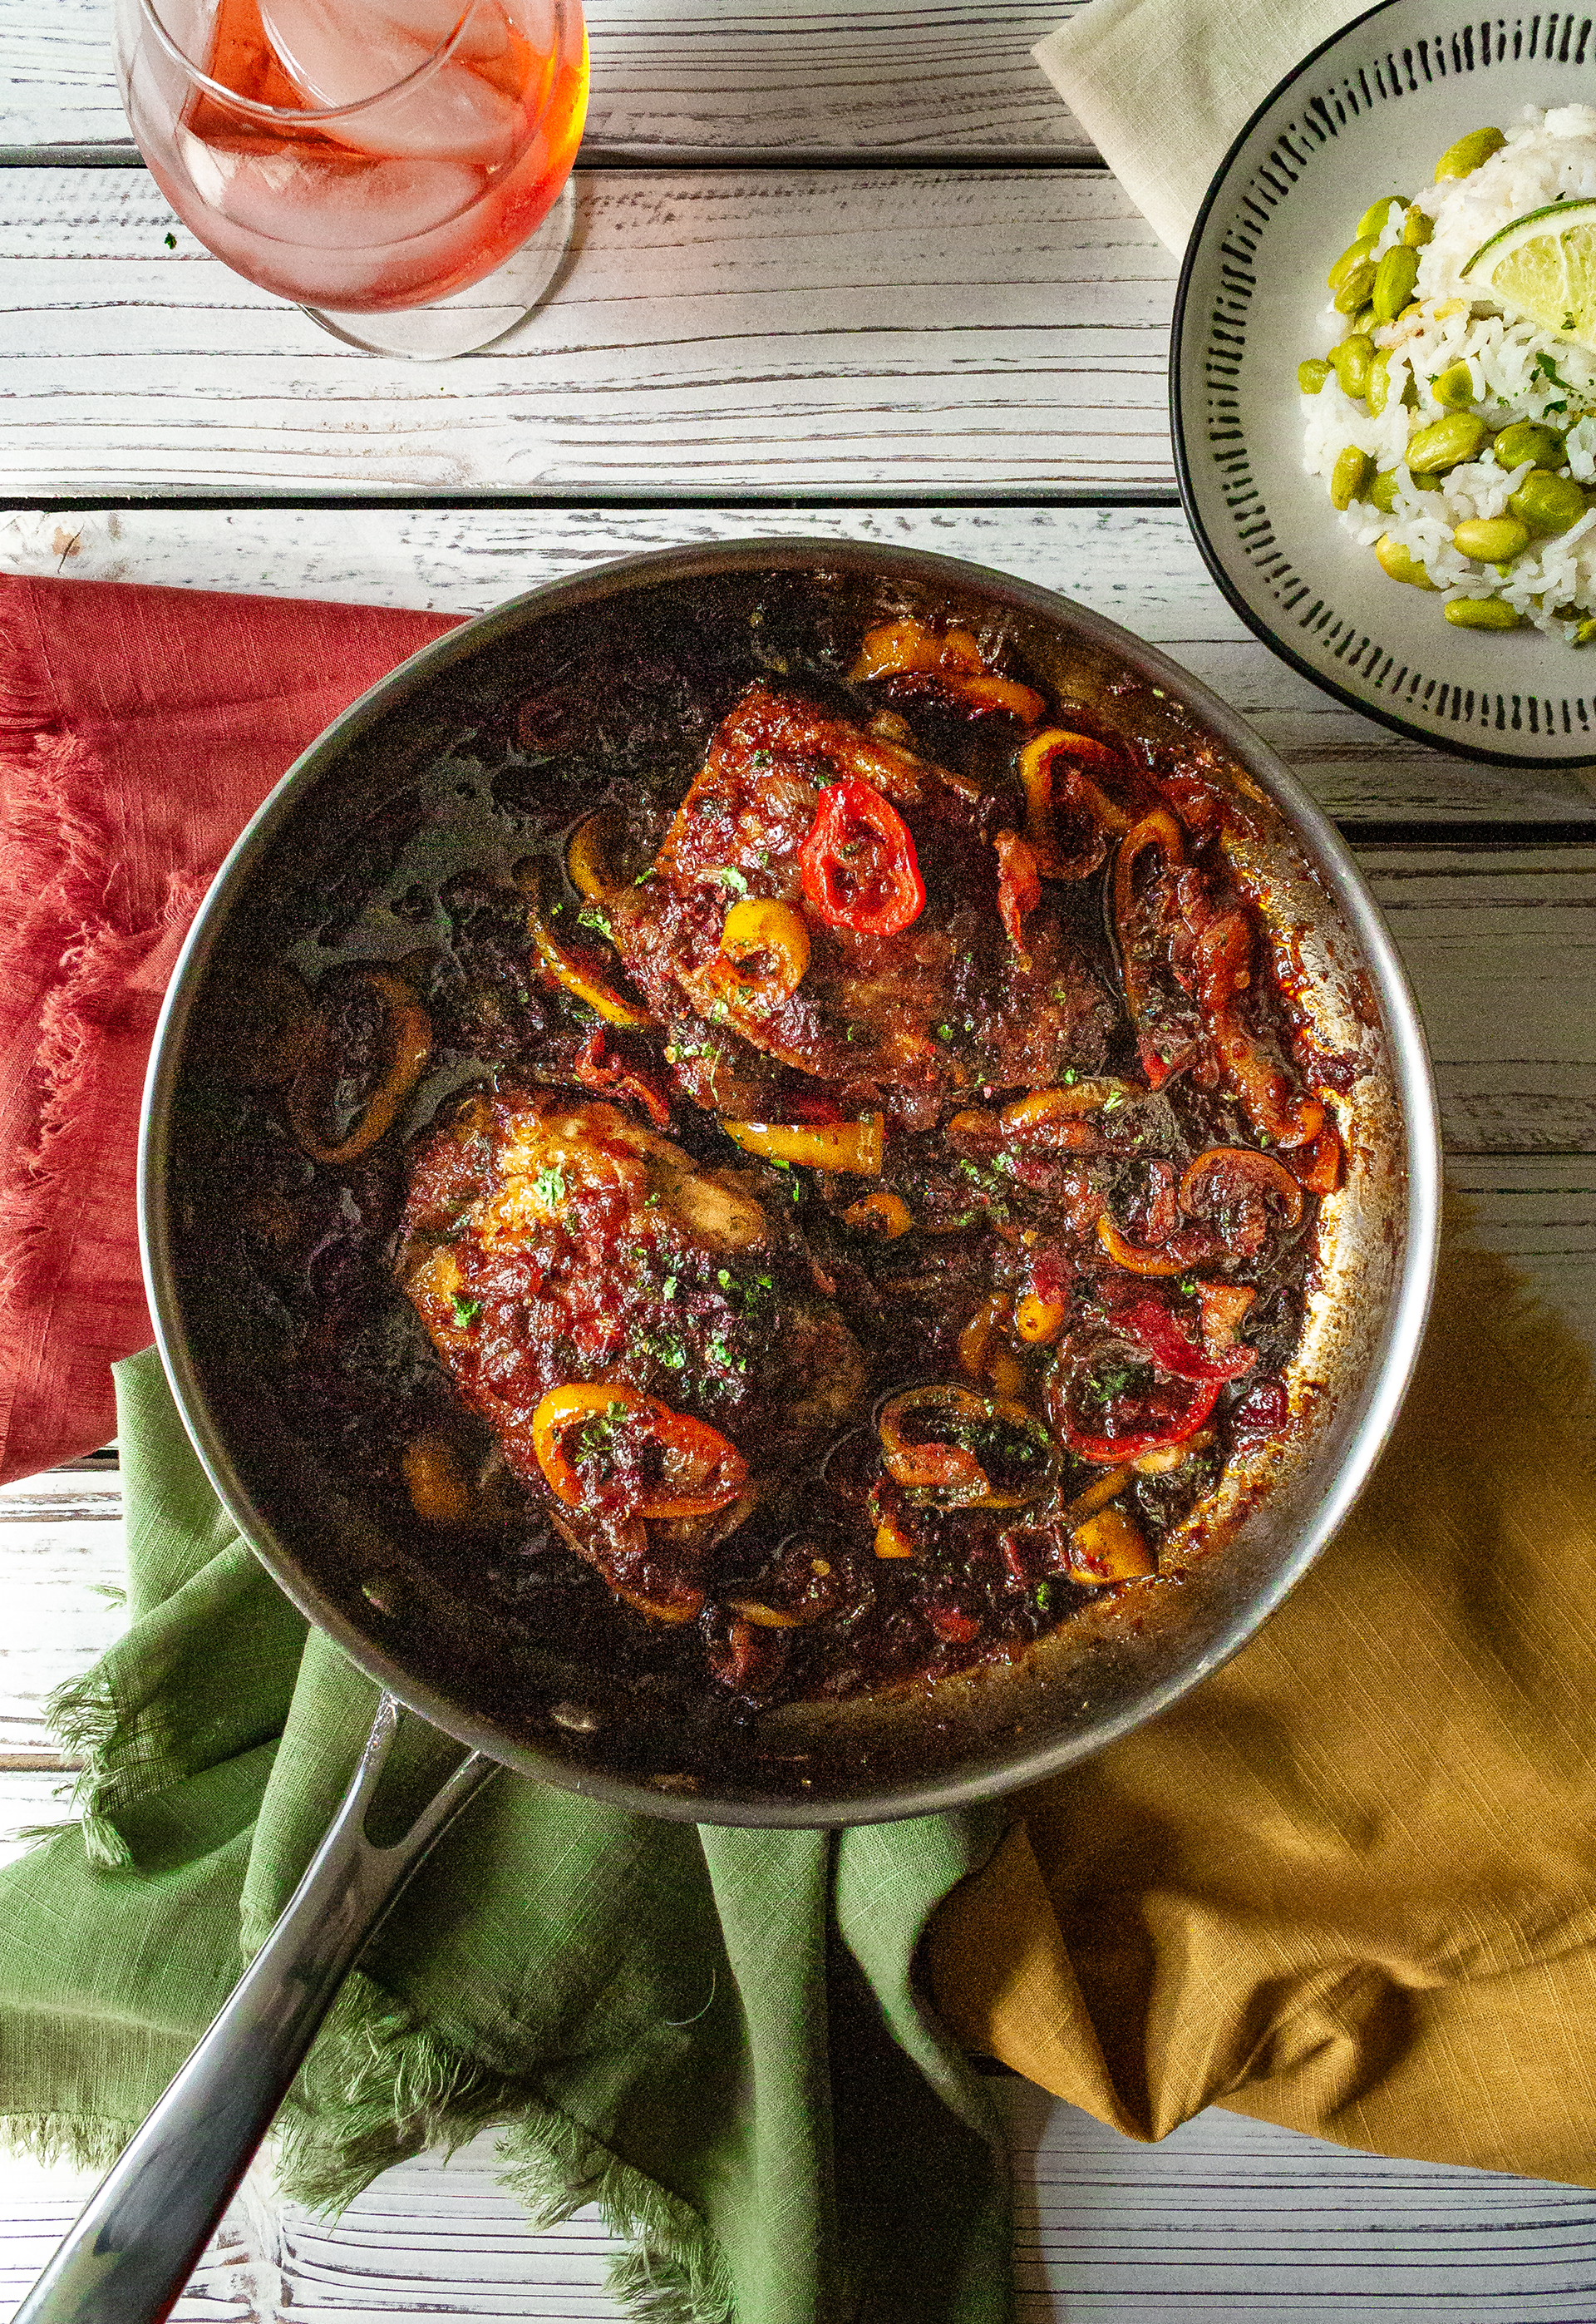
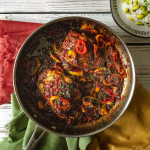
]]>The post Chicken Adobo + Edamame Rice appeared first on I Forgot Salt!.
]]>
Back in March, I made this chicken adobo recipe twice in two weeks, with several lunches of leftovers in-between. I’ve had the recipe and photos sitting in my drafts since then, half-forgotten as everyday life began taking over more and more of my time. Quite a lot has happened in the past two and a half months! As a start, I received my acceptance letter to JMU (!!!) here in Virginia, finished up my final semester of community college, and began my first JMU summer term online. Alex is in the process of changing jobs, and we’re both in the process looking for new apartments as it seems we’ll need to be in two different places for the time being.
In the meantime, too, I’ve done quite a bit of cooking! Although taking the time to photograph and blog about my kitchen adventures definitely fell by the wayside with the stress of school and life changes, I never stopped exploring new culinary delights. From veggie burgers to lemon shrimp pesto crostini, vegan buffalo chickpea wraps to vegetable fritters, tofu peanut quoina salad to a huevos rancheros-adjacent breakfast skillet we’ve affectionately named “hot with beans” (and more), I have continued to play with my food while in social isolation. I will definitely be recreating the most successful of my experiments to post in the coming weeks!
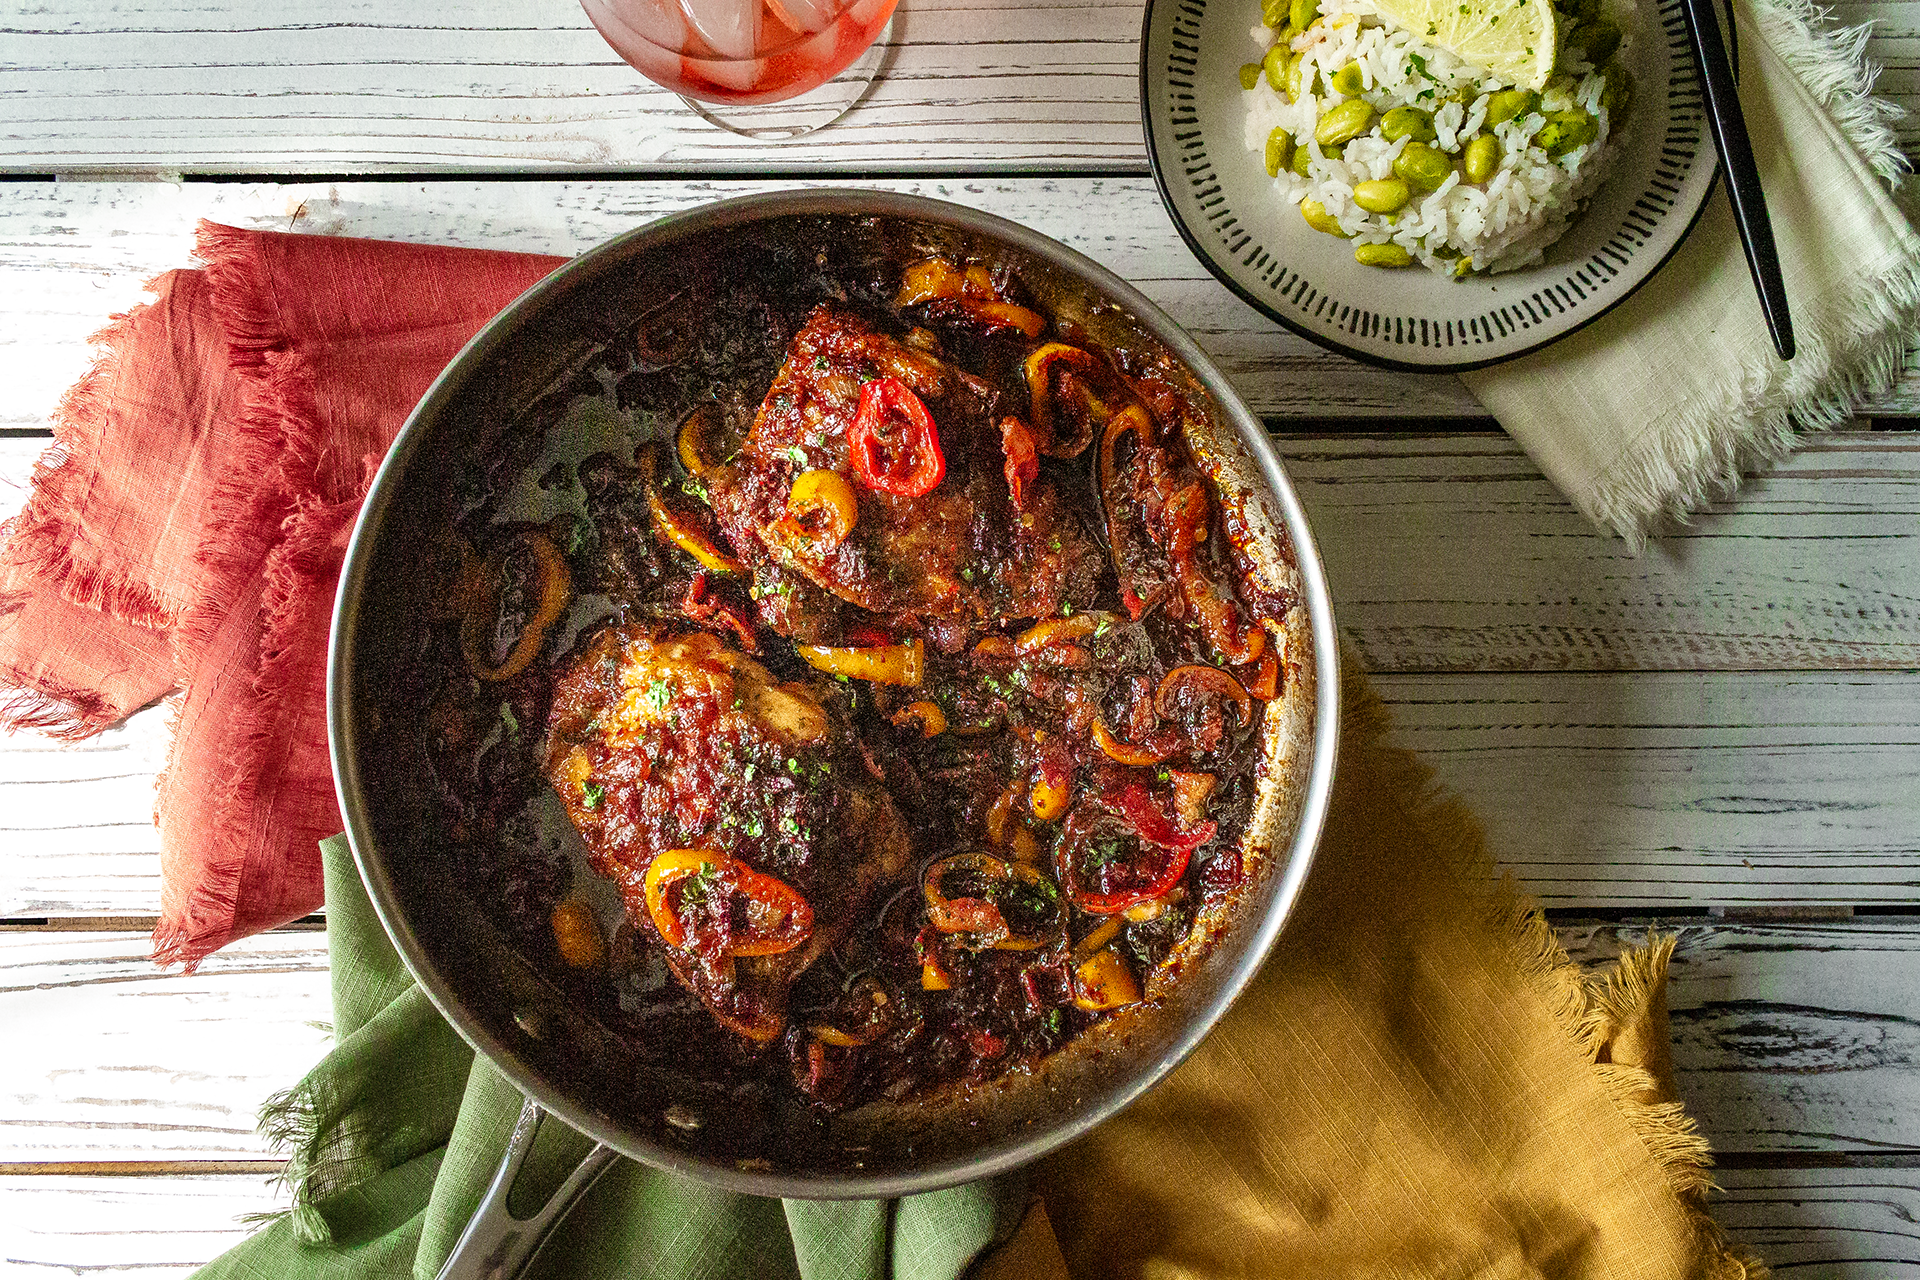
This (wildly inauthentic) chicken adobo recipe was something I decided to delve into completely on a whim after getting tired of eating the same five things over and over again in the first few weeks of self-isolation. To my surprise, Alex adored it to the point of requesting I cook it again for our anniversary dinner (a meal usually reserved for the likes of a juicy ribeye or a visit to our favorite sushi restaurant). It was spicy, tangy, and savory in a way that hit every craving I didn’t even know I had, and I seriously considered trying to bottle the sauce so we had it on-hand as a condiment for other meals. Just thinking about it makes me want to cook it again!
This recipe makes 3 servings.
(note: the pictures above show only two chicken thighs because this was my second attempt at taking photos and I had run out of chicken; I used three thighs the first time I cooked this chicken adobo recipe, hence three servings.)
Indregients:
- 3 chicken thighs, skin-on bone-in
- 12 oz edamame, shelled, frozen
- 15-20 sweet mini peppers
- 4-5 strips bacon
- 2 chipotle peppers in adobo, minced
- 2 cups + 3/4 cups water, divided
- 1 cup rice, uncooked
- 1 cup onion, diced
- 1/3 cup soy sauce
- 3 tbsp honey
- 2 tbsp sake
- 2 tbsp fish sauce
- 2 tbsp gochugaru/red pepper flakes
- 2 tbsp lime juice
- 1 tbsp dark soy sauce
- 1 tbsp sesame oil
- 1 tbsp rice vinegar
- 1 tbsp garlic, minced
- 1 tbsp ginger, minced
- 2 tsp light oil
- 1 tsp +1/2 tsp salt, divided
- 1 tsp oregano
- 1 tsp thyme
- 1 tsp white pepper
- 1/2 tsp mustard powder
- handful cilantro leaves, to finish
Directions:
- Into a rice cooker or pot, add uncooked rice, 2 cups water, frozen shelled edamame, and 1/2 tsp salt (note: follow water/rice instructions per rice cooker if using that method; edamame requires no additional water). Cover and cook for 15-20 minutes, or until rice is fluffy and edamame has steamed through. Set aside.
- Dice onion, slice sweet peppers into 1/4 inch thick rounds (as pictured). Set aside.
- In a small mixing bowl, combine soy sauce, dark soy sauce, sake, rice vinegar, honey, fish sauce, garlic, ginger, sesame oil, oregano, thyme, gochugaru/red pepper flakes, minced chipotles in adobo sauce, and white pepper. Stir to incorporate and set aside.
- Heat a large skillet on medium/medium-high, and fry 4-5 strips of bacon until crispy. Remove, roughly chop, and set aside.
- Dab a majority of the excess oil from the still-hot pan so that only a tablespoon or two is left, then add diced onion, salt, 1 tsp light oil, and 1/4 cup water. Cover and let cook until water has evaporated and a fond has begun forming on the bottom of the pan. Repeat 2-3 times until onions have softened and caramelized, deglazing pan with 1/4 cup water, incorporating fond, repeat. This takes about 7-10 minutes in total (be vigilant!)
- When onions have begin caramelizing, clear spots on the pan per each chicken thigh and add chicken thighs skin-side down. Let cook 5-7 minutes or until skin has begun to crisp.
- Flip chicken thighs and add sliced sweet peppers, chopped bacon, and sauce (see step 3). Bring sauce to a boil then reduce heat to a simmer. Let cook for about 15-20 minutes, occasionally spooning the sauce over top of the chicken thighs, or until chicken has cooked through to 165F.
- (Optional: Remove chicken thighs to a place and continue reducing sauce on a simmer until you have reached your desired thickness.)
- Remove from heat and add lime juice and cilantro. Serve with edamame rice.
This recipe keeps well overnight in the fridge, especially when leftover rice is incorporated with extra sauce to keep it moist when reheated. I would suggest removing the chicken bones before reheating in the microwave, but there is a good chance that my fears of bones exploding when nuked is the product of just an old wives’ tale. Enjoy!

Chicken Adobo with Edamame Rice
Ingredients
- 3 chicken thighs skin-on bone-in
- 12 oz edamame shelled, frozen
- 15-20 sweet mini peppers
- 4-5 strips bacon
- 2 chipotle peppers in adobo minced
- 2 cups + 3/4 cups water divided
- 1 cup rice uncooked
- 1 cup onion diced
- 1/3 cup soy sauce
- 3 tbsp honey
- 2 tbsp sake
- 2 tbsp fish sauce
- 2 tbsp gochugaru/red pepper flakes
- 2 tbsp lime juice
- 1 tbsp dark soy sauce
- 1 tbsp sesame oil
- 1 tbsp rice vinegar
- 1 tbsp garlic minced
- 1 tbsp ginger minced
- 2 tsp light oil
- 1 tsp +1/2 tsp salt divided
- 1 tsp oregano
- 1 tsp thyme
- 1 tsp white pepper
- 1/2 tsp mustard powder
- handful cilantro leaves to finish
Instructions
- Into a rice cooker or pot, add uncooked rice, 2 cups water, frozen shelled edamame, and 1/2 tsp salt*. Cover and cook for 15-20 minutes, or until rice is fluffy and edamame has steamed through. Set aside.
- Dice onion, slice sweet peppers into 1/4 inch thick rounds (as pictured). Set aside.
- In a small mixing bowl, combine soy sauce, dark soy sauce, sake, rice vinegar, honey, fish sauce, garlic, ginger, sesame oil, oregano, thyme, gochugaru/red pepper flakes, minced chipotles in adobo sauce, and white pepper. Stir to incorporate and set aside.
- Heat a large skillet on medium/medium-high, and fry 4-5 strips of bacon until crispy. Remove, roughly chop, and set aside.
- Dab a majority of the excess oil from the still-hot pan so that only a tablespoon or two is left, then add diced onion, salt, 1 tsp light oil, and 1/4 cup water. Cover and let cook until water has evaporated and a fond has begun forming on the bottom of the pan. Repeat 2-3 times until onions have softened and caramelized, deglazing pan with 1/4 cup water, incorporating fond, repeat. This takes about 7-10 minutes in total (be vigilant!)
- When onions have begin caramelizing, clear spots on the pan per each chicken thigh and add chicken thighs skin-side down. Let cook 5-7 minutes or until skin has begun to crisp.
- Flip chicken thighs and add sliced sweet peppers, chopped bacon, and sauce (see step 3). Bring sauce to a boil then reduce heat to a simmer. Let cook for about 15-20 minutes, occasionally spooning the sauce over top of the chicken thighs, or until chicken has cooked through to 165F.
- (Optional: Remove chicken thighs to a place and continue reducing sauce on a simmer until you have reached your desired thickness.)
- Remove from heat and add lime juice and cilantro. Serve with edamame rice.
Notes
The post Chicken Adobo + Edamame Rice appeared first on I Forgot Salt!.
]]>