The post Sweet Potato + Black Bean Enchiladas appeared first on I Forgot Salt!.
]]>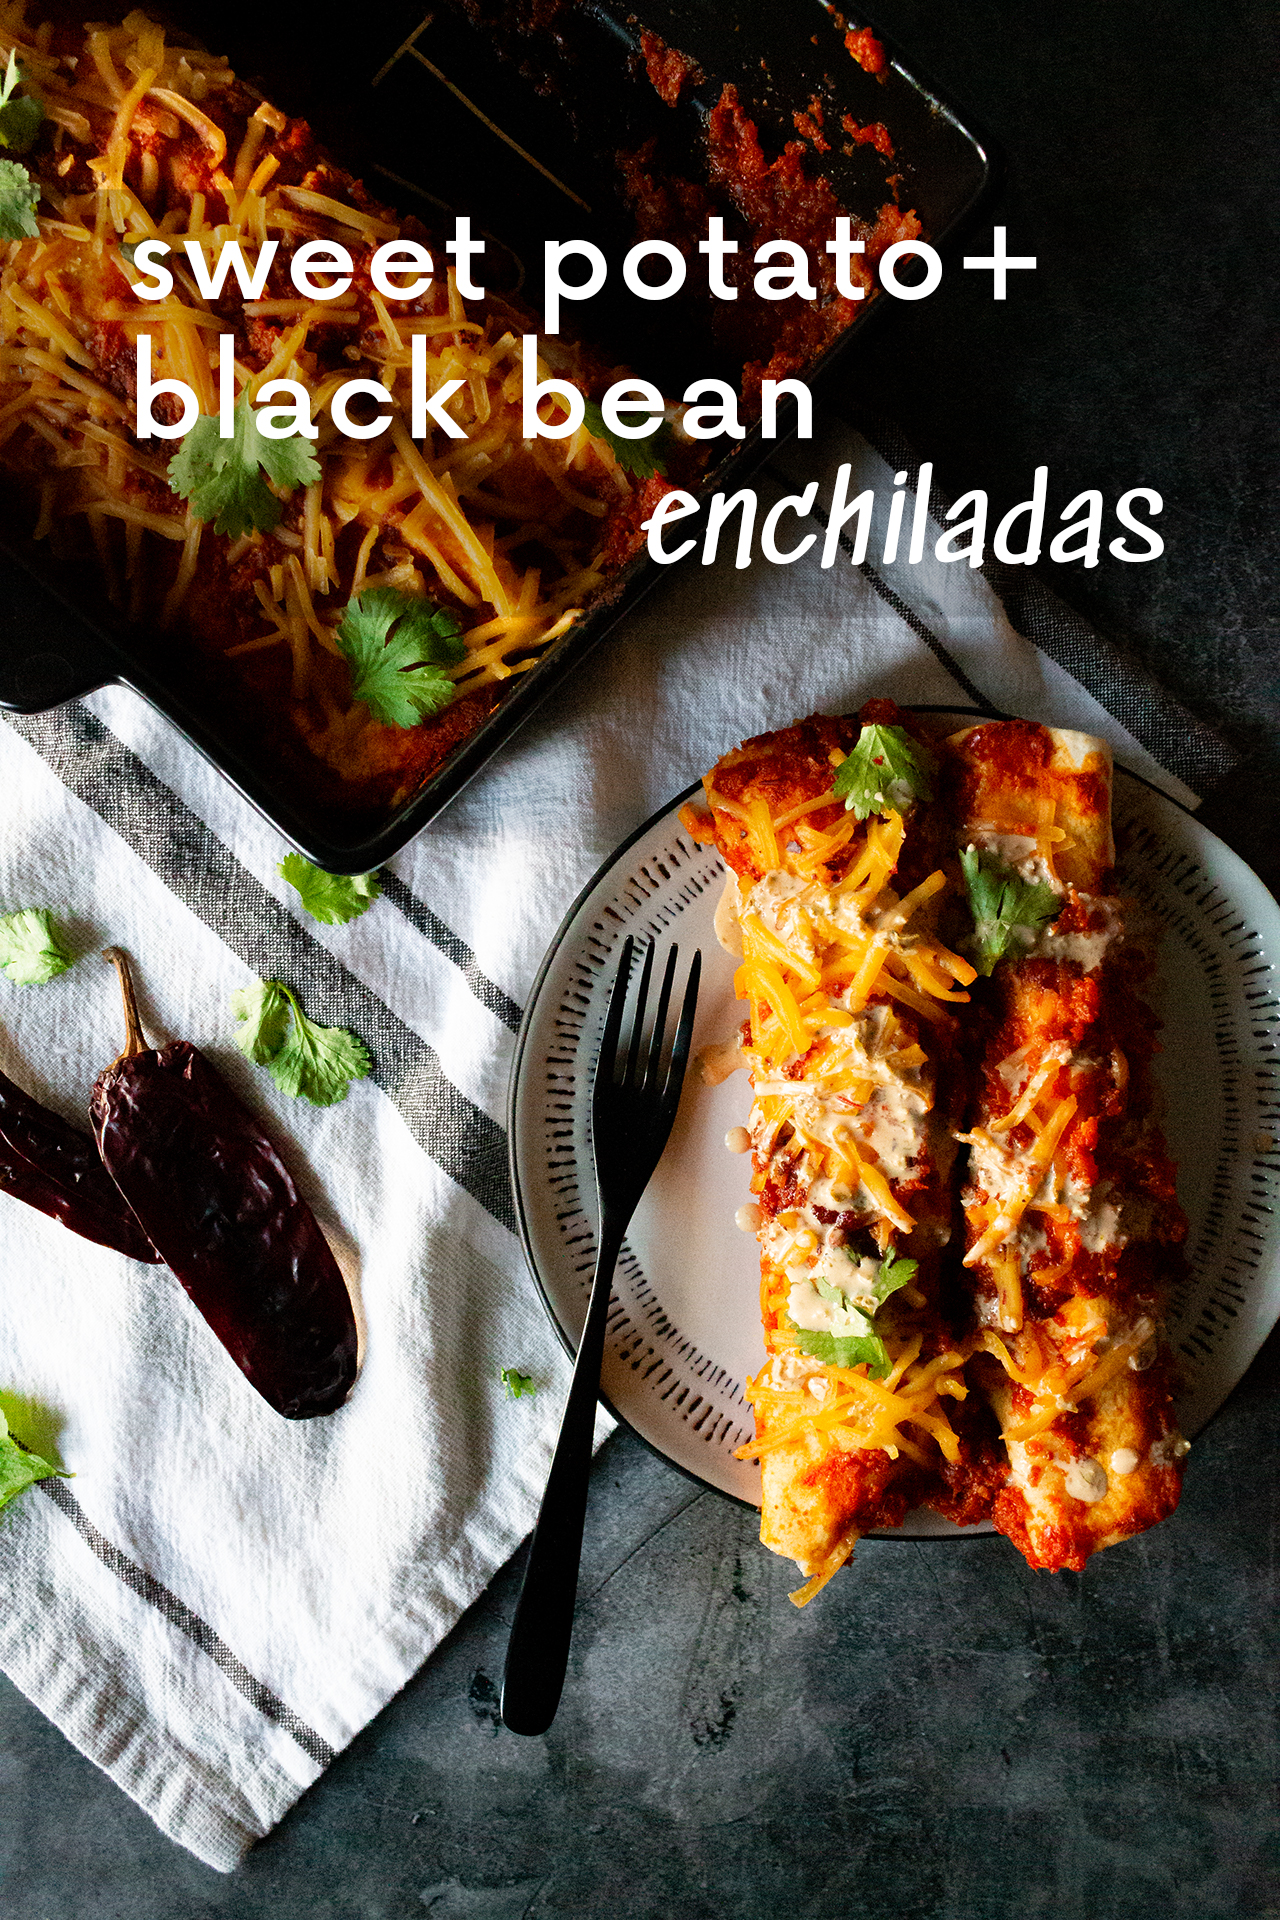
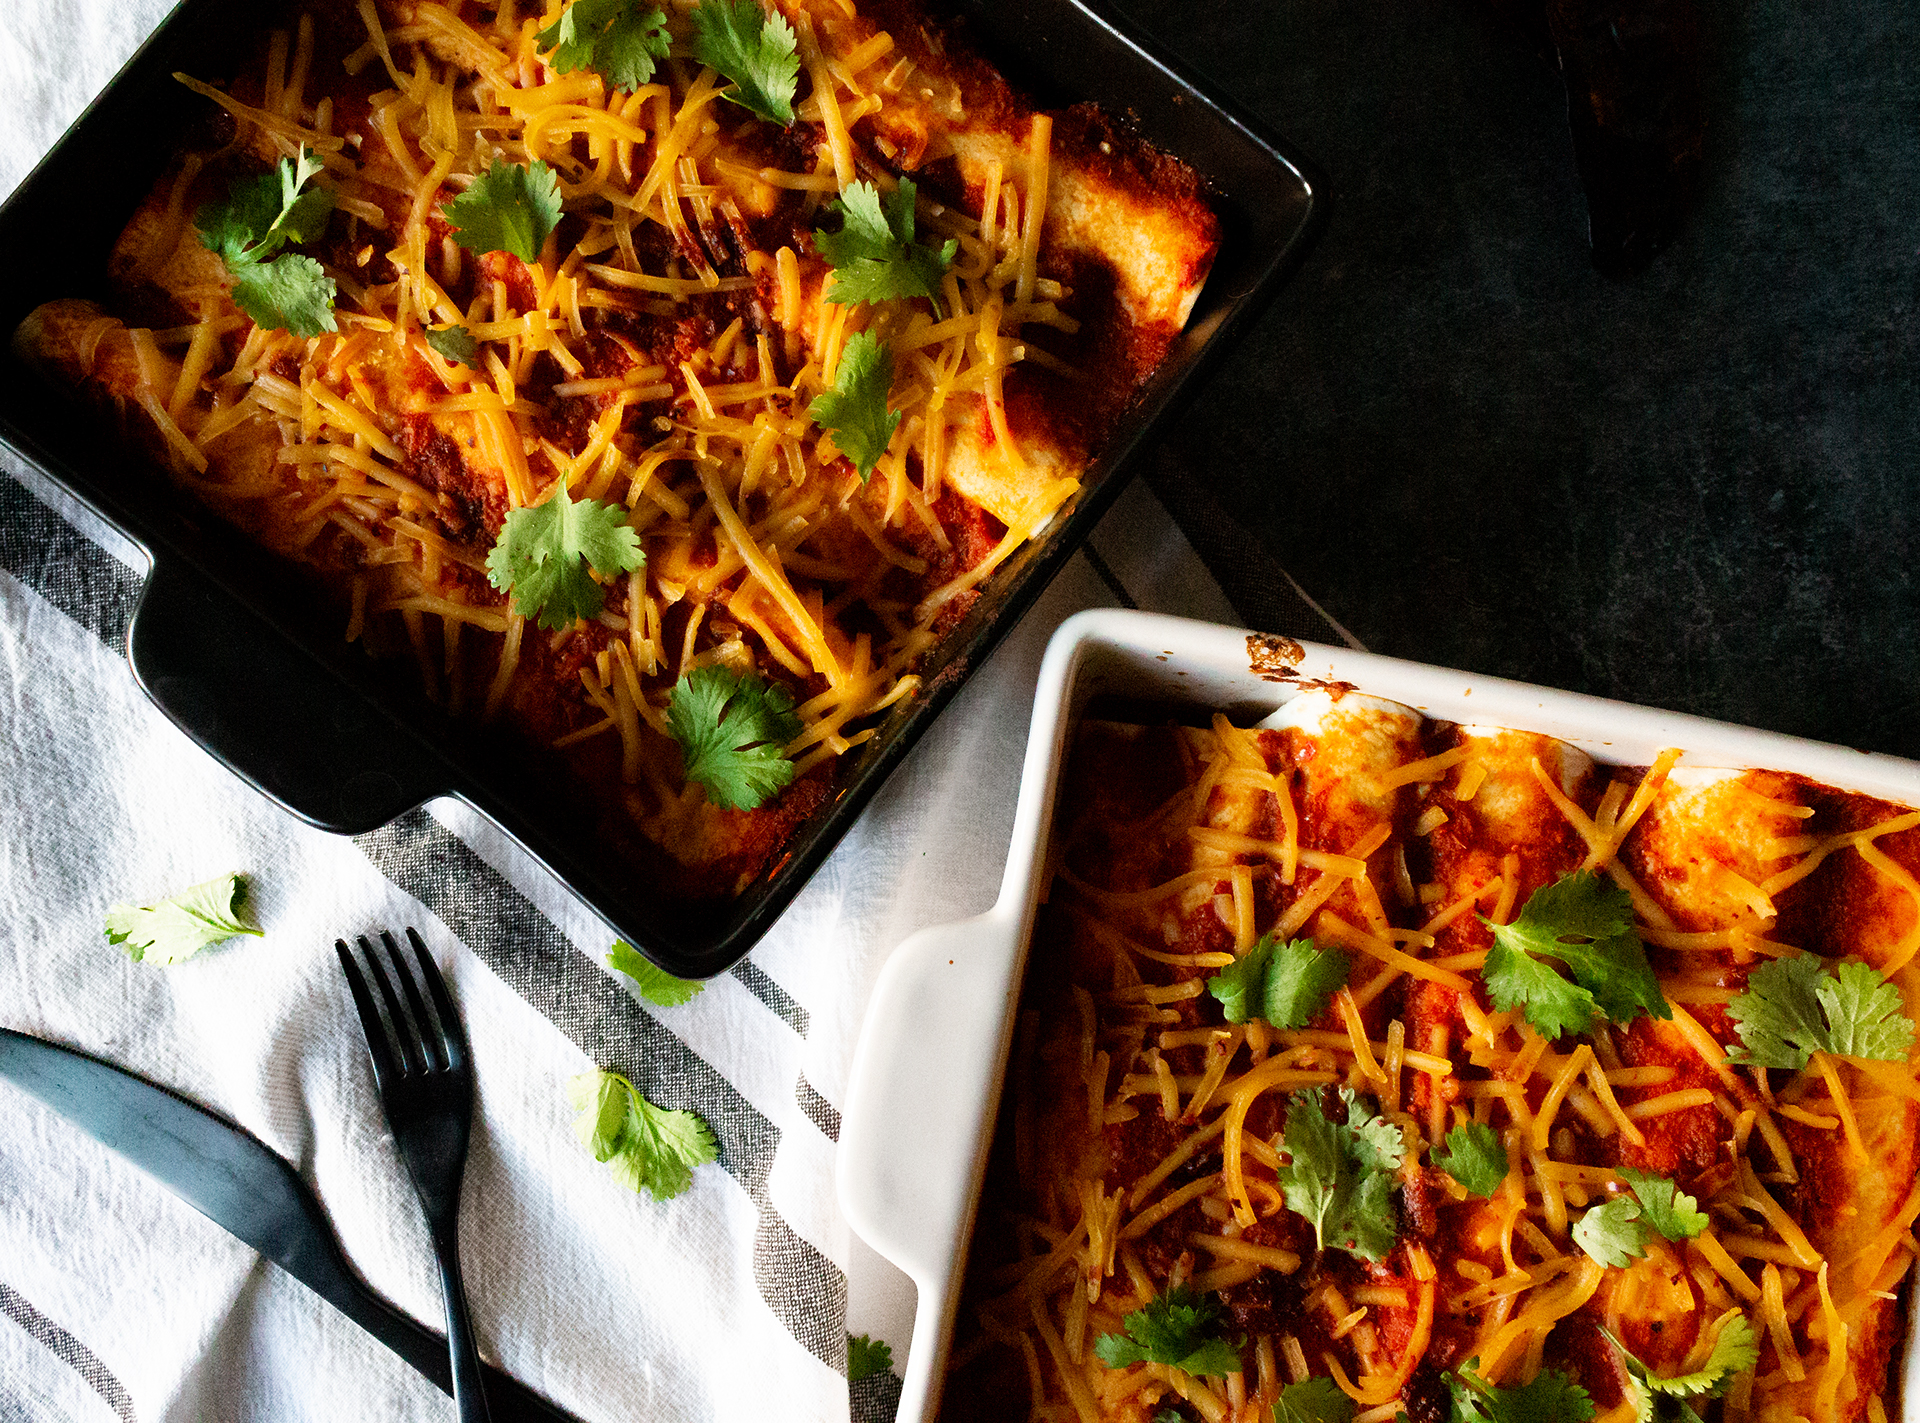
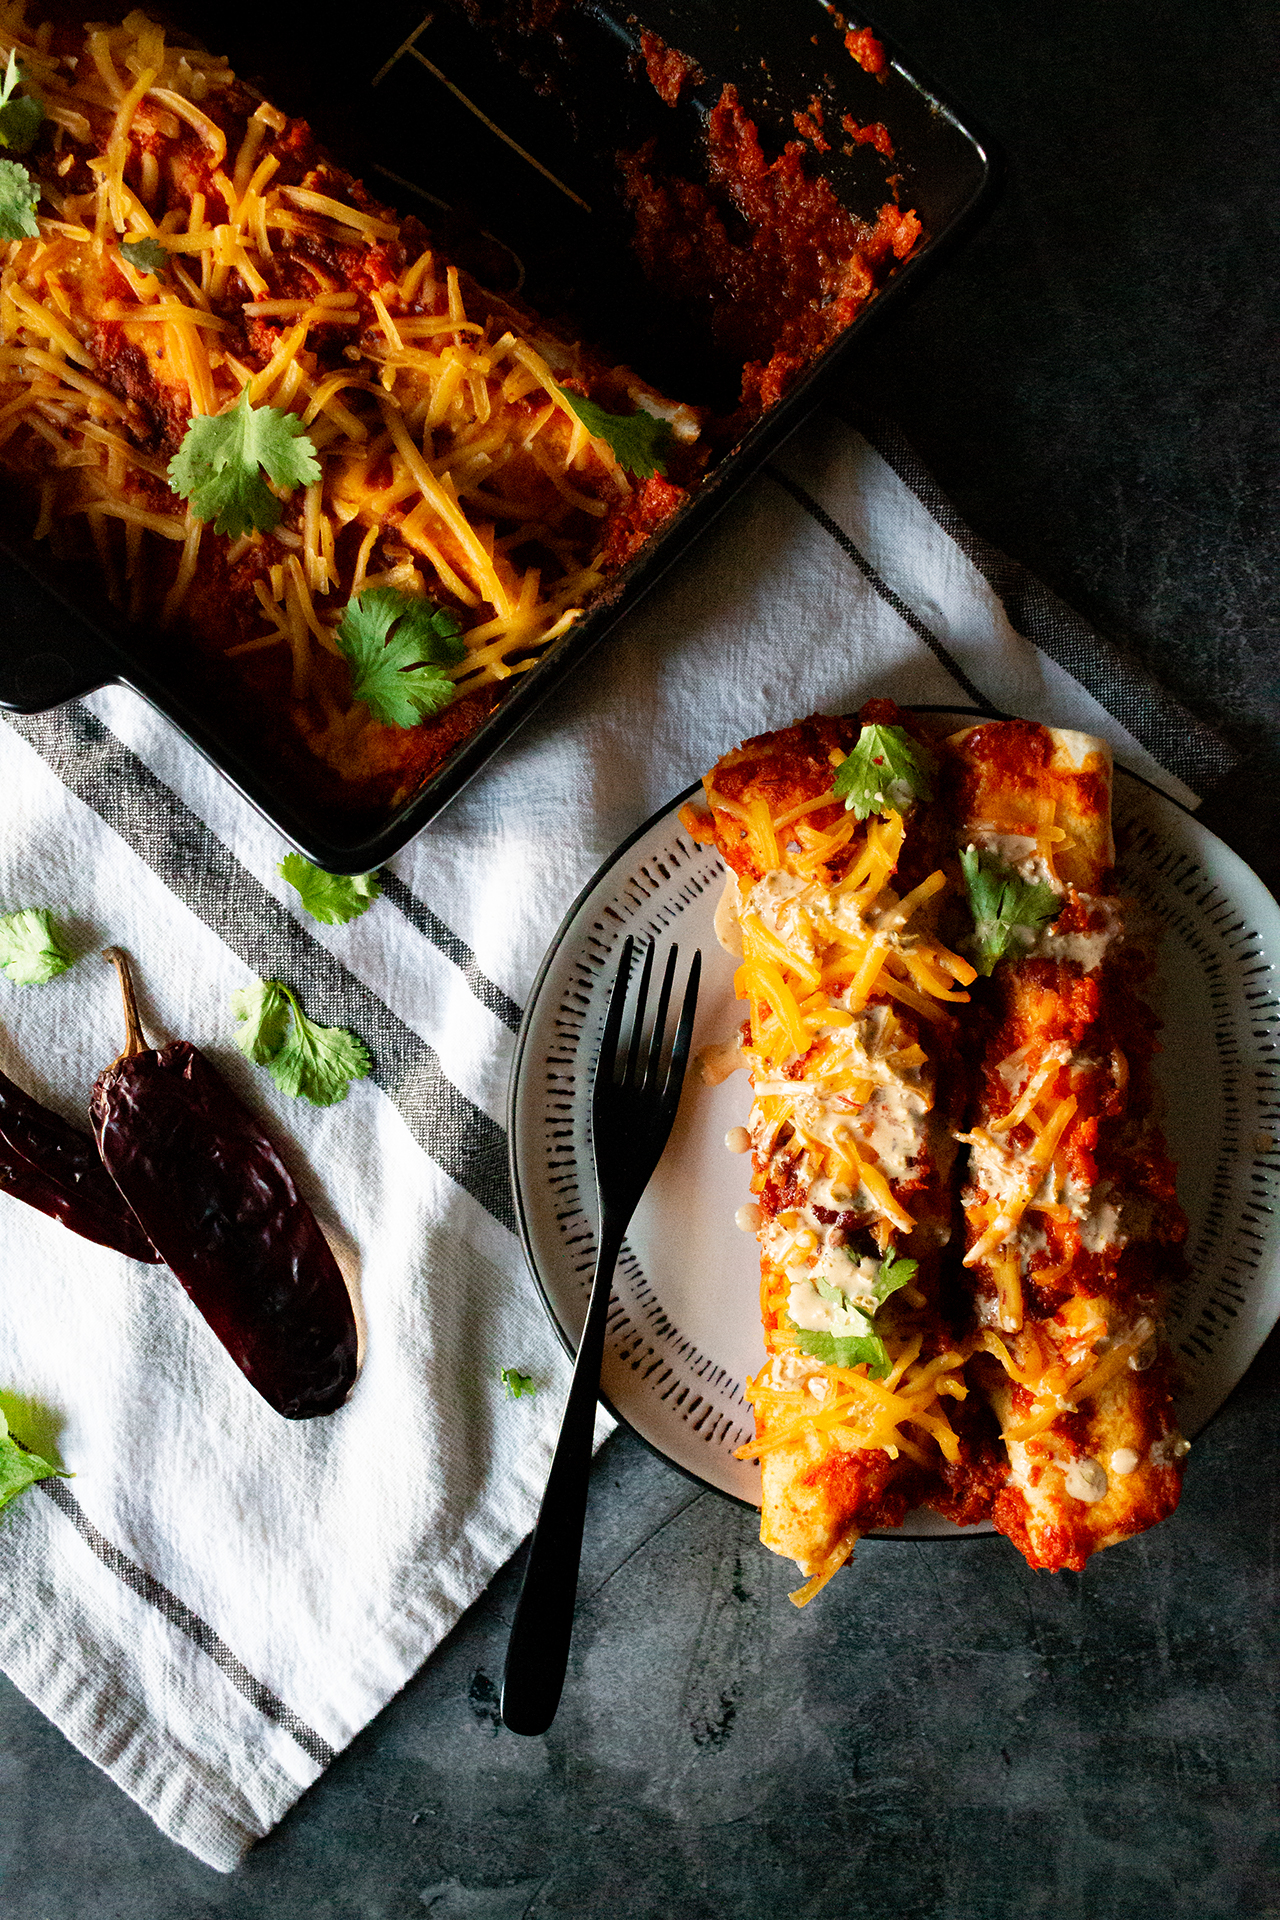
This sweet potato and black bean enchilada recipe took longer to “perfect” than any other recipes I’ve tried to make. If anything, the fact that these turned out so tasty in the end is a testament to the merits of hard work and not giving up even when you think you’re just not cut out for something. With a soft, hearty filling and a rich chipotle sauce, these sweet potato and black bean enchiladas are absolutely to die for–both the soft middle sections, and the gloriously crispy end pieces. Two enchiladas are enough to completely fill me up, and the leftovers taste just as delicious whether you microwave them whole or break them up to sauté.
In addition to these sweet potato and black bean enchiladas, I also have a chorizo and potato (omnivore/meat-eater) recipe that I always make alongside this one for Alex. Those delicious morsels are in the white baking pan (pictured below), but I don’t have any particularly stunning photos of them so that recipe will have to wait until I can break out the camera again.
I hope you decide to make this recipe for your next Taco Tuesday, or on a Friday night when the weather is nice. When eaten hot, they’re great to have on a cooler evening. But don’t let that stop you from enjoying them during the summer, too! I’d also recommend pairing these with my tomatillo salsa verde if you don’t want to add more of the rich enchilada sauce onto your plate. It compliments the flavors of these black bean enchiladas really well!
Ingredients:
Sweet Potato + Black Bean Enchiladas Sauce
- 8-10 dried guajillo chilis
- 2-3 large tomatoes
- 1 onion, yellow
- 1 tbsp cocoa powder
- 4 cloves garlic
- 1 + 1/4 tsp salt
- 1/4 tsp black pepper
- 2 tbsp + 1/2 tsp olive oil
Sweet Potato + Black Bean Enchiladas Filling
- 1/2 onion, red
- 2 tsp lime juice
- 2 cloves garlic
- 1/2 tsp salt
- 1 tbsp olive oil
- 1 tbsp fajita seasoning
- 2 cups black beans
- 1 large sweet potato, peeled
- 1/4 cup + 1/4 cup water
- 5 flour tortillas
- 1/4 cup vegan pepperjack, shredded
Directions:
Sweet Potato + Black Bean Enchiladas Sauce
- Cut the stems and scrape the seeds from the dried chilis. Soak in boiling water for at least 30 minutes, drain, pat dry, and set aside.
- Preheat oven to 425F.
- Make a roasting pouch with all 6 gloves of garlic, 1/4 tsp salt, 1/4 tsp black pepper, and 1/2 tsp olive oil. Slice tops from tomatoes and quarter 1 whole yellow onion.
- Lay vegetables and pouch on a lined baking sheet cut-size up and sprinkle with 2 tbsp olive oil and 1 tsp salt. Roast for 20-25 minutes.
- Add roasted tomatoes, roasted onion, 4 roasted garlic cloves, soaked guajillo chilis, cocoa powder, and lime juice to a blender and blend until relatively smooth.
- Transfer blended enchilada sauce to a small saucepan and bring to boil, then reduce to simmer. Simmer until sauce has thickened slightly, about 5-7 minutes. Set aside.
Sweet Potato + Black Bean Enchiladas Filling
- To make the frijoles con camotes filling, finely dice 1/2 red onion, sweet potato, and the remaining 1 roasted garlic clove.
- Add to a large skillet with black beans, 1/4 cup water, and remaining 1 tbsp fajita seasoning. Cover and cook on medium-high until all water has evaporated and sweet potatoes have steamed, about 3-5 minutes, then stir and add remaining 1/4 cup water.
- Cover until all water has evaporated, then sauté for an additional 2-3 minutes until lightly browned. Set aside.
- Begin assembling enchiladas in one or two casserole dishes, depending on size. Add a layer of 1/2 cup enchilada sauce to the bottom, then wrap roughly 1/4 cup filling of choice into a flour tortilla and add to the dish seam-side down.
- Repeat until dish is filled, then layer on an additional 1 cup enchilada sauce and 1/4 cup cheese.
- Lower oven temperature to 350F and bake for 10-15 minutes, or until cheese is melted and the edges have become browned and crispy. Serve topped with sour cream, avocado, cilantro, and jalapeno cream.


Sweet Potato + Black Bean Enchiladas
Ingredients
Sweet Potato + Black Bean Enchilada Sauce
- 8-10 dried guajillo chilis
- 2-3 large tomatoes
- 1 onion yellow
- 1 tbsp cocoa powder
- 4 cloves garlic
- 1 salt + 1/4 tsp
- 1/4 tsp black pepper
- 2 tbsp olive oil + 1/2 tsp
Black Bean + Sweet Potato Enchilada Filling
- 1/2 onion red
- 2 tsp lime juice
- 2 cloves garlic
- 1/2 tsp salt
- 1 tbsp olive oil
- 1 tbsp fajita seasoning
- 2 cups black beans
- 1 large sweet potato peeled
- 1/4 cup water + 1/4 cup
- 5 flour tortillas
- 1/4 cup vegan pepperjack shredded
Instructions
Sweet Potato + Black Bean Enchilada Sauce
- Cut the stems and scrape the seeds from the dried chilis. Soak in boiling water for at least 30 minutes, drain, pat dry, and set aside.
- Preheat oven to 425F.
- Make a roasting pouch with all 6 gloves of garlic, 1/4 tsp salt, 1/4 tsp black pepper, and 1/2 tsp olive oil. Slice tops from tomatoes and quarter 1 whole yellow onion.
- Lay vegetables and pouch on a lined baking sheet cut-size up and sprinkle with 2 tbsp olive oil and 1 tsp salt. Roast for 20-25 minutes.
- Add roasted tomatoes, roasted onion, 4 roasted garlic cloves, soaked guajillo chilis, cocoa powder, and lime juice to a blender and blend until relatively smooth.
- Transfer blended enchilada sauce to a small saucepan and bring to boil, then reduce to simmer. Simmer until sauce has thickened slightly, about 5-7 minutes. Set aside.
Black Bean + Sweet Potato Enchilada Filling
- To make the frijoles con camotes filling, finely dice 1/2 red onion, sweet potato, and the remaining 1 roasted garlic clove.
- Add to a large skillet with black beans, 1/4 cup water, and remaining 1 tbsp fajita seasoning. Cover and cook on medium-high until all water has evaporated and sweet potatoes have steamed, about 3-5 minutes, then stir and add remaining 1/4 cup water.
- Cover until all water has evaporated, then sauté for an additional 2-3 minutes until lightly browned. Set aside.
- Begin assembling enchiladas in one or two casserole dishes, depending on size. Add a layer of 1/2 cup enchilada sauce to the bottom, then wrap roughly 1/4 cup filling of choice into a flour tortilla and add to the dish seam-side down.
- Repeat until dish is filled, then layer on an additional 1 cup enchilada sauce and 1/4 cup cheese.
- Lower oven temperature to 350F and bake for 10-15 minutes, or until cheese is melted and the edges have become browned and crispy. Serve topped with sour cream, avocado, cilantro, and jalapeno cream.
The post Sweet Potato + Black Bean Enchiladas appeared first on I Forgot Salt!.
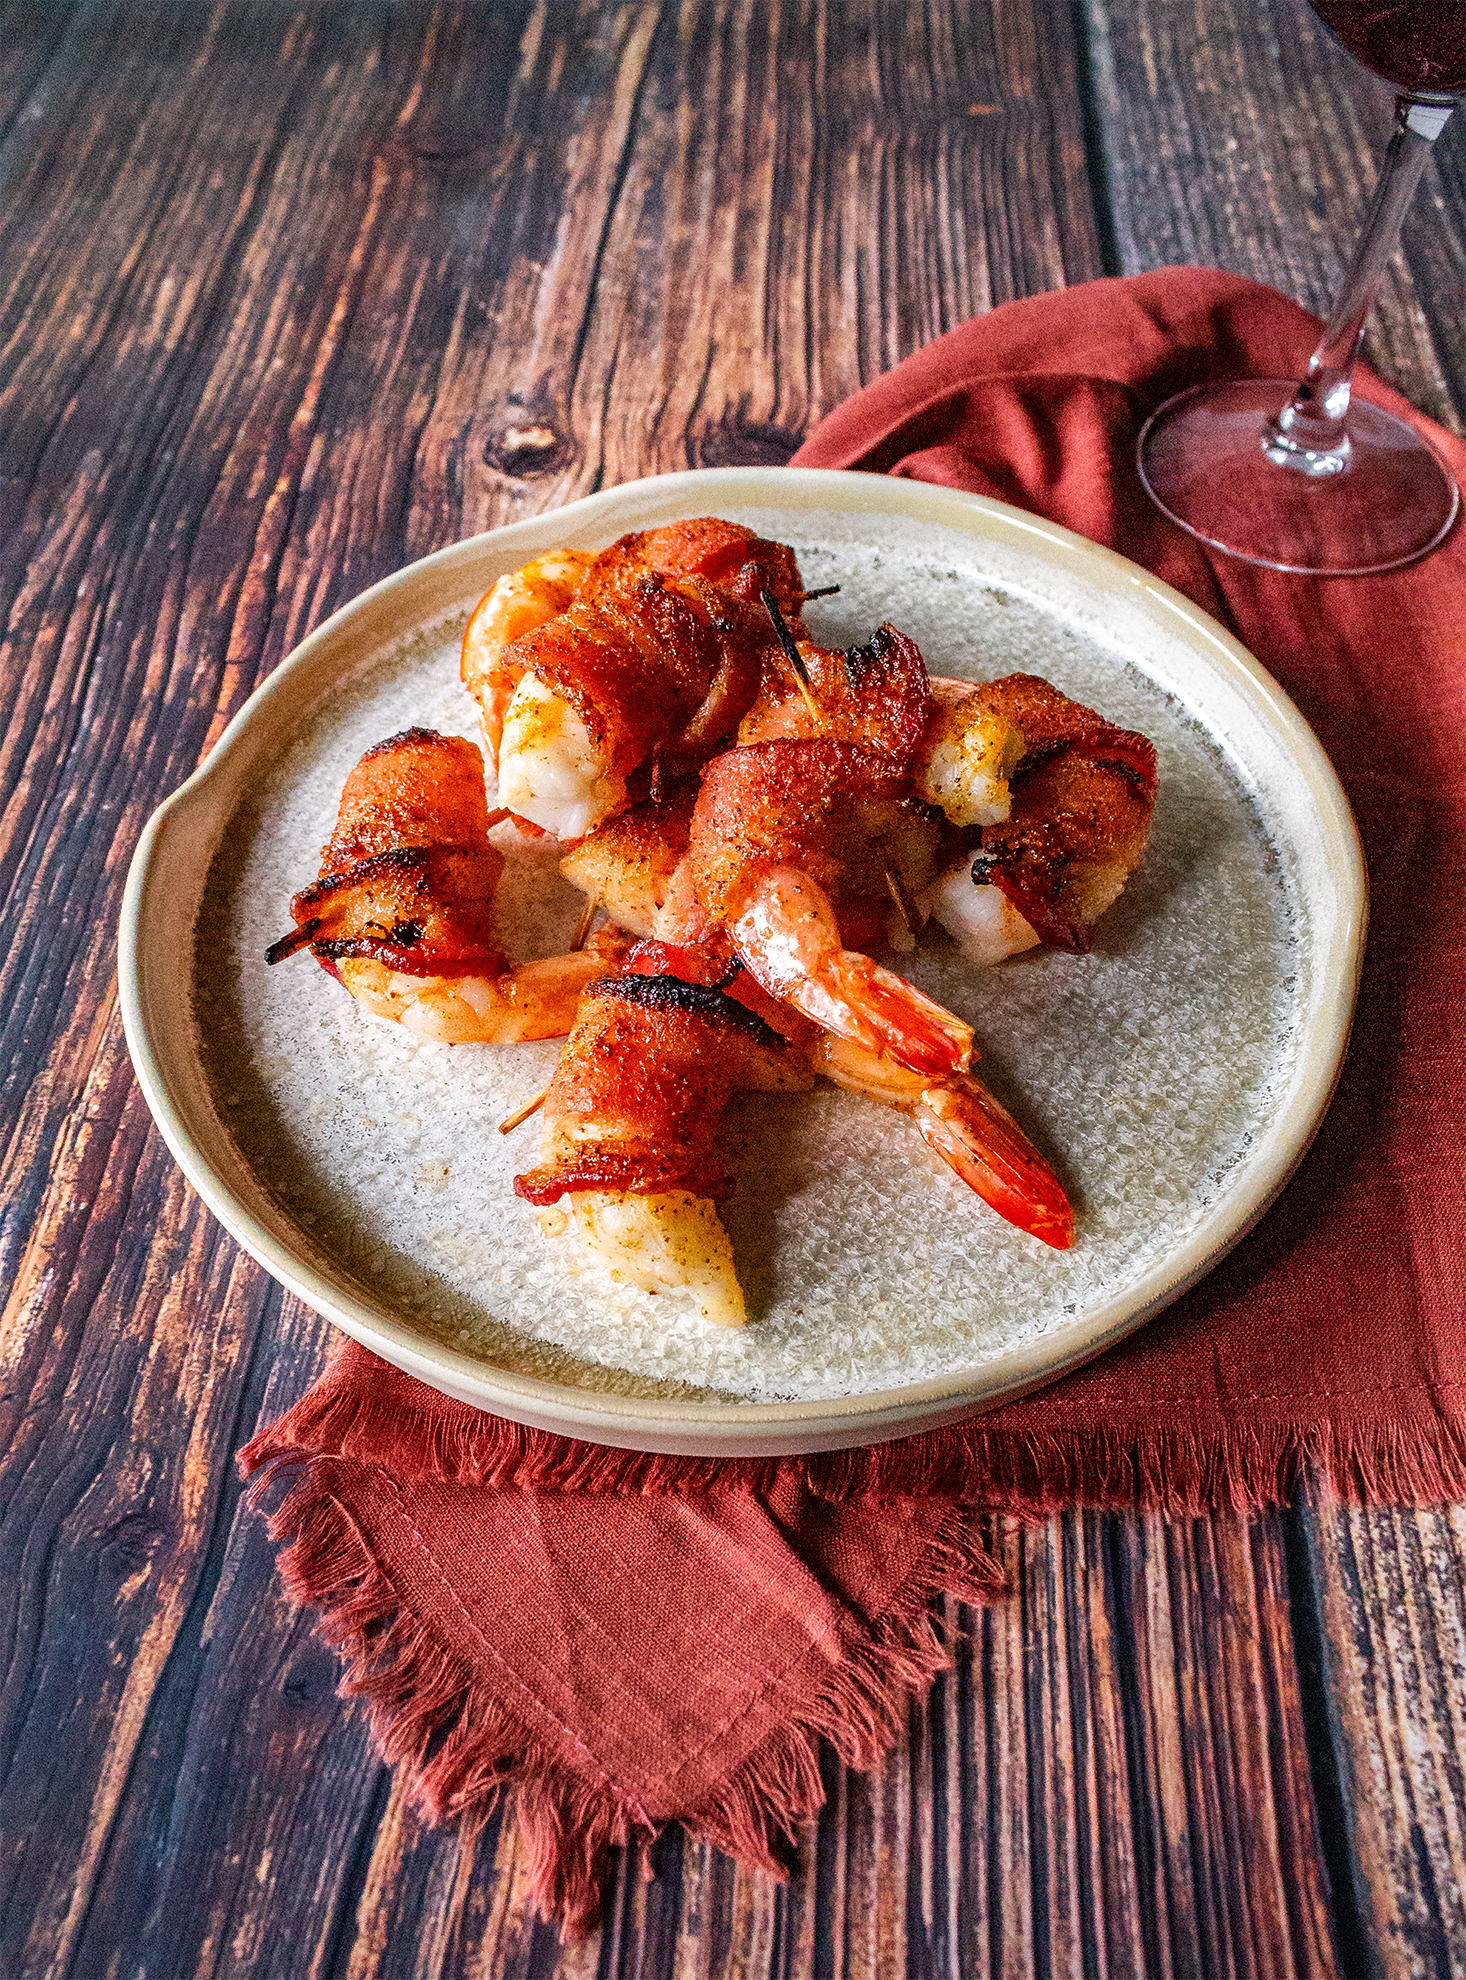
]]>The post Maple BBQ Bacon-Wrapped Shrimp appeared first on I Forgot Salt!.
]]>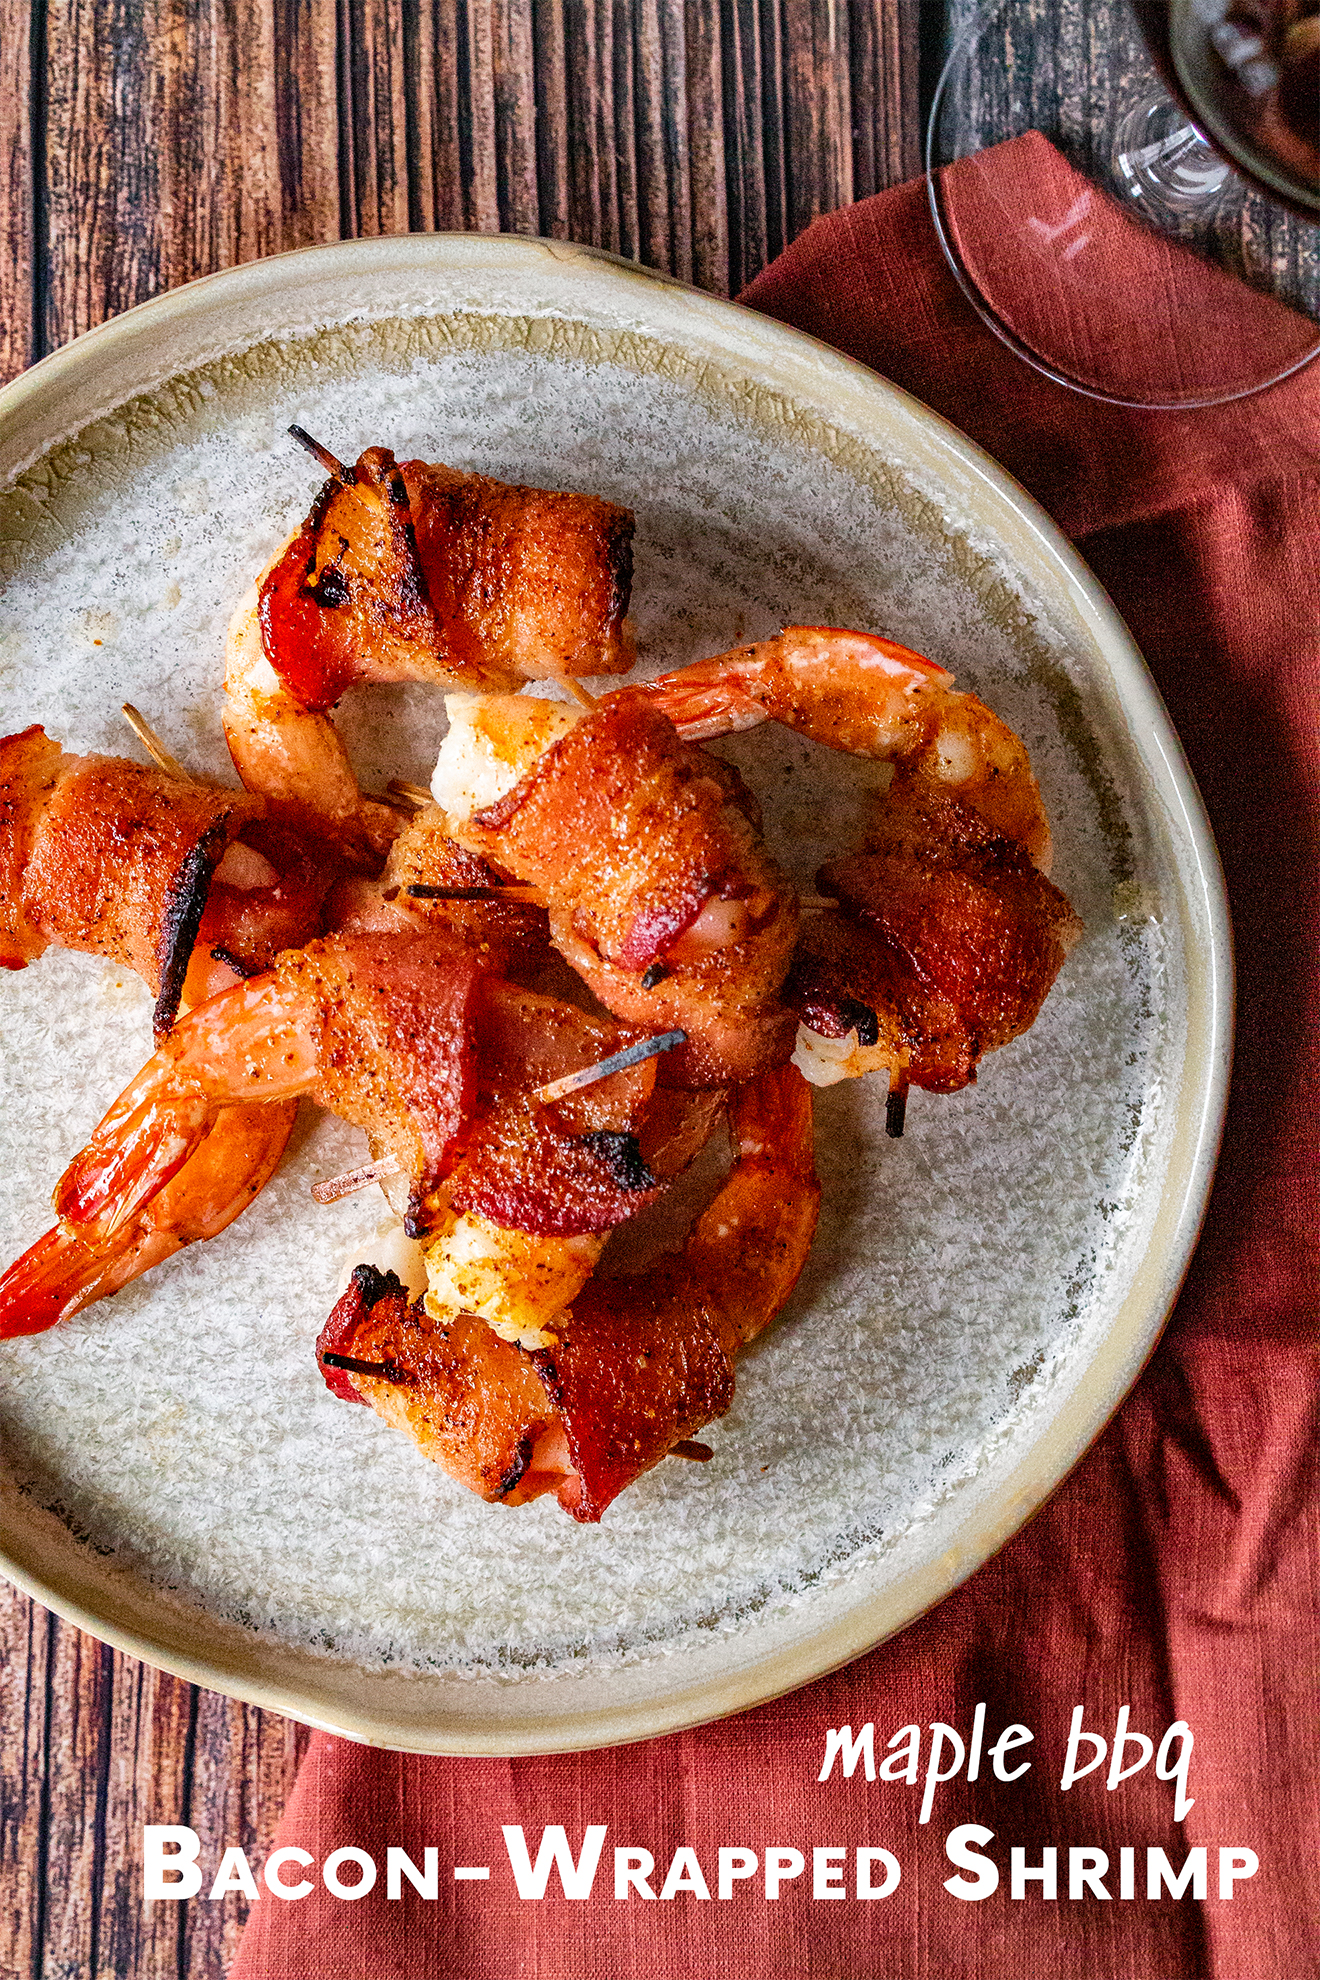
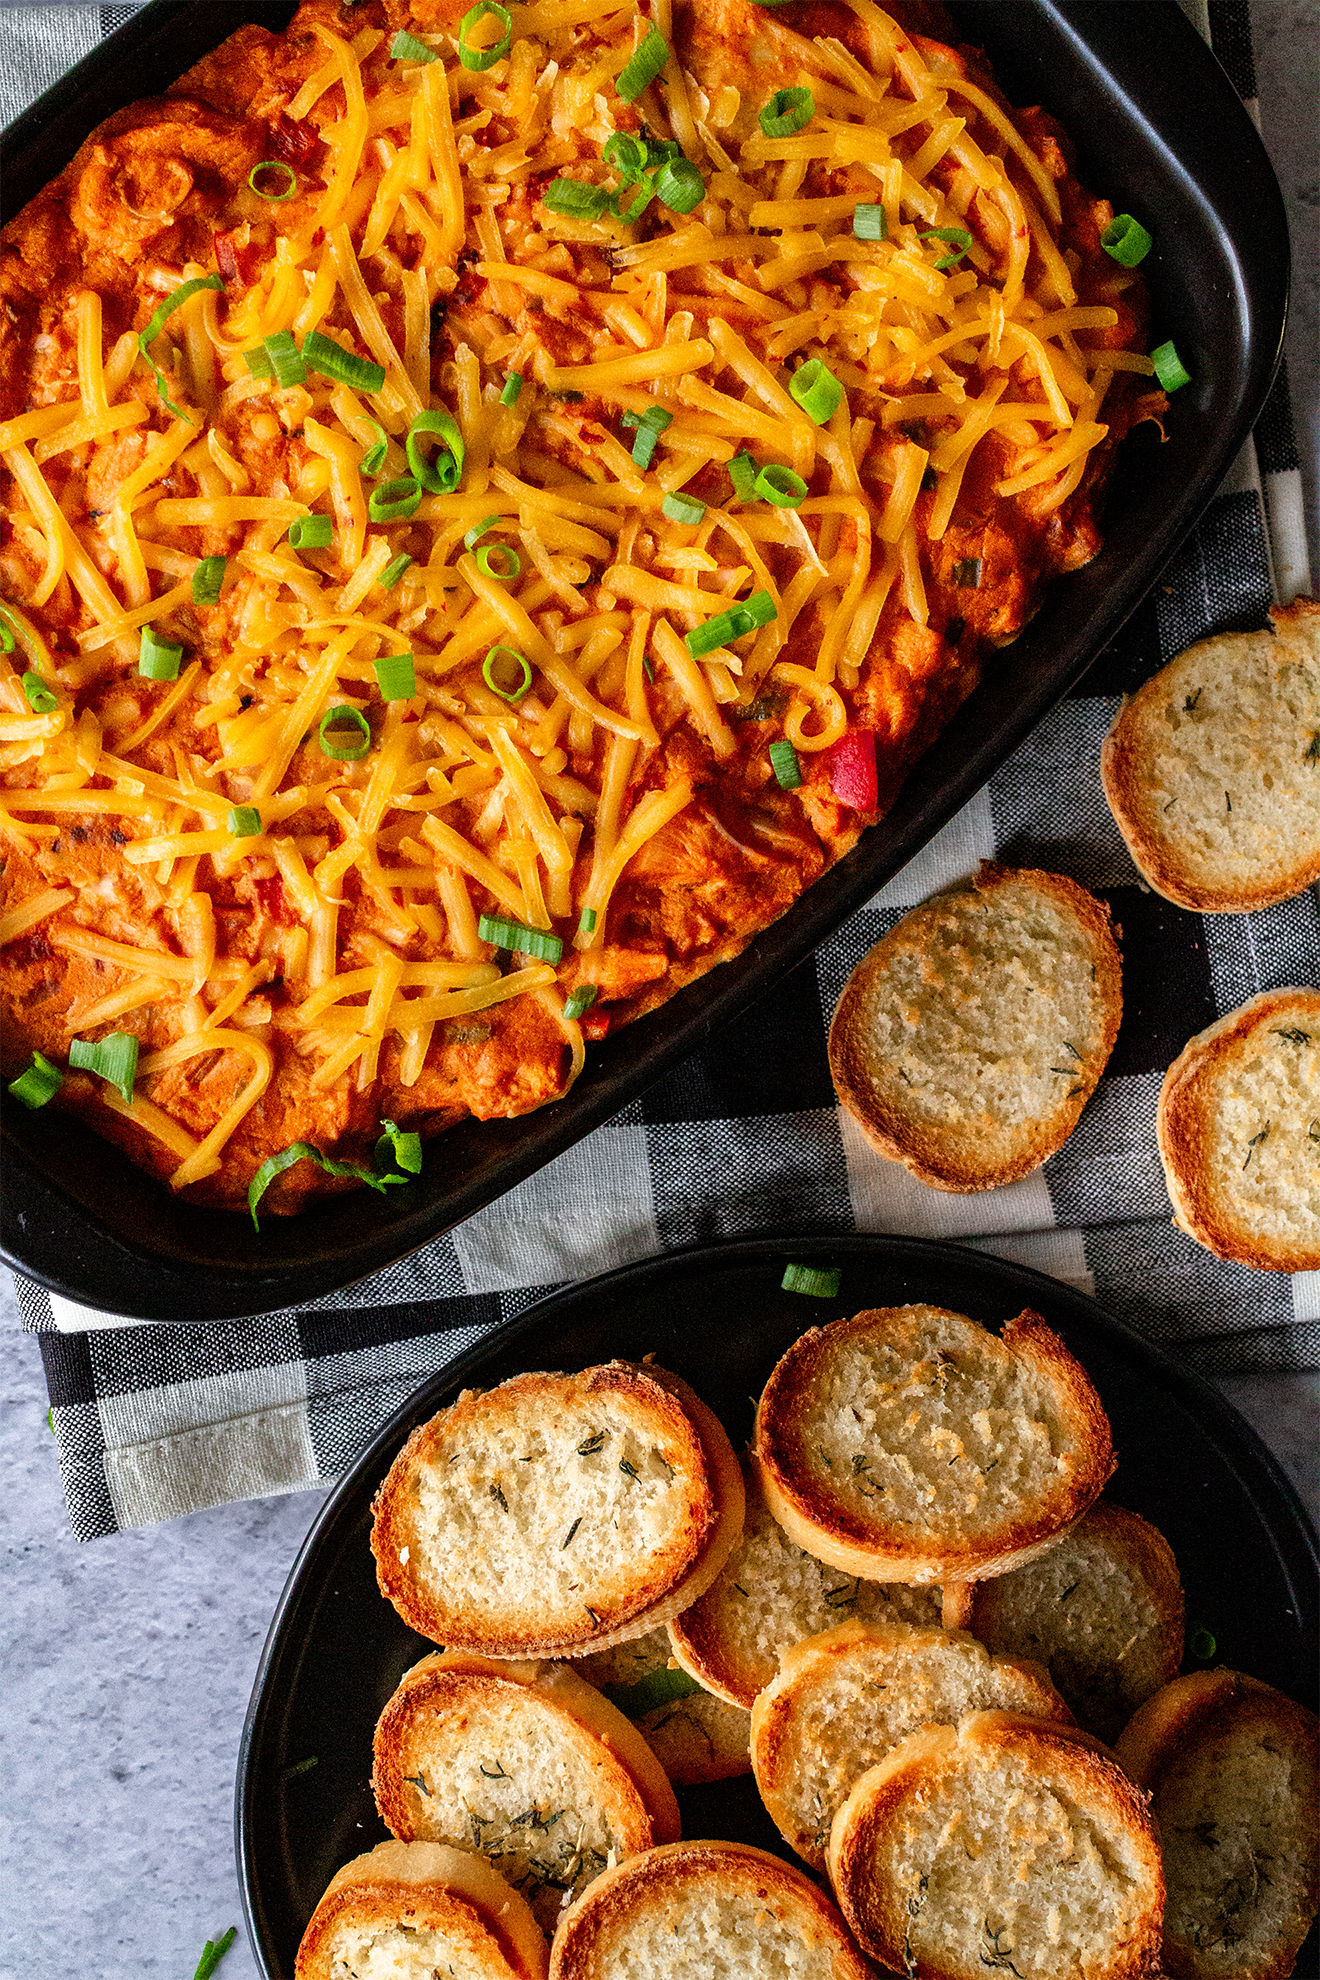
This easy and fun maple BBQ bacon wrapped shrimp appetizer is a quick way to either wow your friends with your creativity or accidentally skewer your mouth on a stray toothpick, depending on how many glasses of wine you’ve had prior to indulging. It’s a great starter for get-togethers and parties, and will please almost any carnivore you meet. Pair with my vegan jackfruit buffalo dip with garlic herb dippers to please everyone in the family, plant-based and meat-eater alike!
I personally recommend a nice thick-cut bacon for this recipe, because that will give you maximum crisp on each and every shrimp and be relatively easy to skewer. And buy the largest jumbo shrimp you can find! In a perfect world, I would love to try throwing these on an outdoor grill, but unfortunately we don’t have one to test that out. If you’re feeling adventurous, though, try skewering a couple of these bacon wrapped shrimp on a larger bamboo stick and grill them up over some hot coals! That would give them a delicious smoky flavor that’s hard to beat.

Ingredients:
- 20-25 jumbo shrimp, tail-on
- 10-15 strips bacon
- 8 tbsp butter
- 1 tbsp BBQ sauce
- 1 tbsp maple syrup
- 1 tsp chili powder
- 1/2 tsp paprika
- 1/2 tsp chipotle powder
- 1/4 tsp garlic powder
- 1/4 tsp onion powder
- 1/4 tsp mustard powder
- toothpicks (to secure)
Directions:
- Preheat oven to 425F
- Cut each strip of bacon in half width-wise.
- Wrap the body of each shrimp in 1/2 strip of bacon and secure with a toothpick.
- Place bacon-wrapped shrimp seam-side down on a wire rack over a tinfoil-lined baking sheet.
- Repeat with remaining shrimp.
- In a small bowl, melt butter. Mix BBQ sauce, maple syrup, chili powder, chipotle powder, garlic powder, onion powder, and mustard powder into the melted butter, and then brush onto each bacon-wrapped shrimp.
- Bake for 5-7 minutes, remove from oven to flip shrimp and baste with the remaining seasoned butter, and then return to the oven for an additional 5-7 minutes, or until the bacon has begun to crisp and the shrimp are fully cooked through.
Maple BBQ Bacon-Wrapped Shrimp
Ingredients
- 20-25 jumbo shrimp tail-on
- 10-15 strips bacon
- 8 tbsp butter
- 1 tbsp BBQ sauce
- 1 tbsp maple syrup
- 1 tsp chili powder
- 1/2 tsp paprika
- 1/2 tsp chipotle powder
- 1/4 tsp garlic powder
- 1/4 tsp onion powder
- 1/4 tsp mustard powder
- toothpicks to secure
Instructions
- Preheat oven to 425F
- Cut each strip of bacon in half width-wise.
- Wrap the body of each shrimp in 1/2 strip of bacon and secure with a toothpick.
- Place bacon-wrapped shrimp seam-side down on a wire rack over a tinfoil-lined baking sheet.
- Repeat with remaining shrimp.
- In a small bowl, melt butter. Mix BBQ sauce, maple syrup, chili powder, chipotle powder, garlic powder, onion powder, and mustard powder into the melted butter, and then brush onto each bacon-wrapped shrimp.
- Bake for 5-7 minutes, remove from oven to flip shrimp and baste with the remaining seasoned butter, and then return to the oven for an additional 5-7 minutes, or until the bacon has begun to crisp and the shrimp are fully cooked through.
The post Maple BBQ Bacon-Wrapped Shrimp appeared first on I Forgot Salt!.
]]>The post Vegan Buffalo Jackfruit Dip + Garlic Herb Dippers appeared first on I Forgot Salt!.
]]>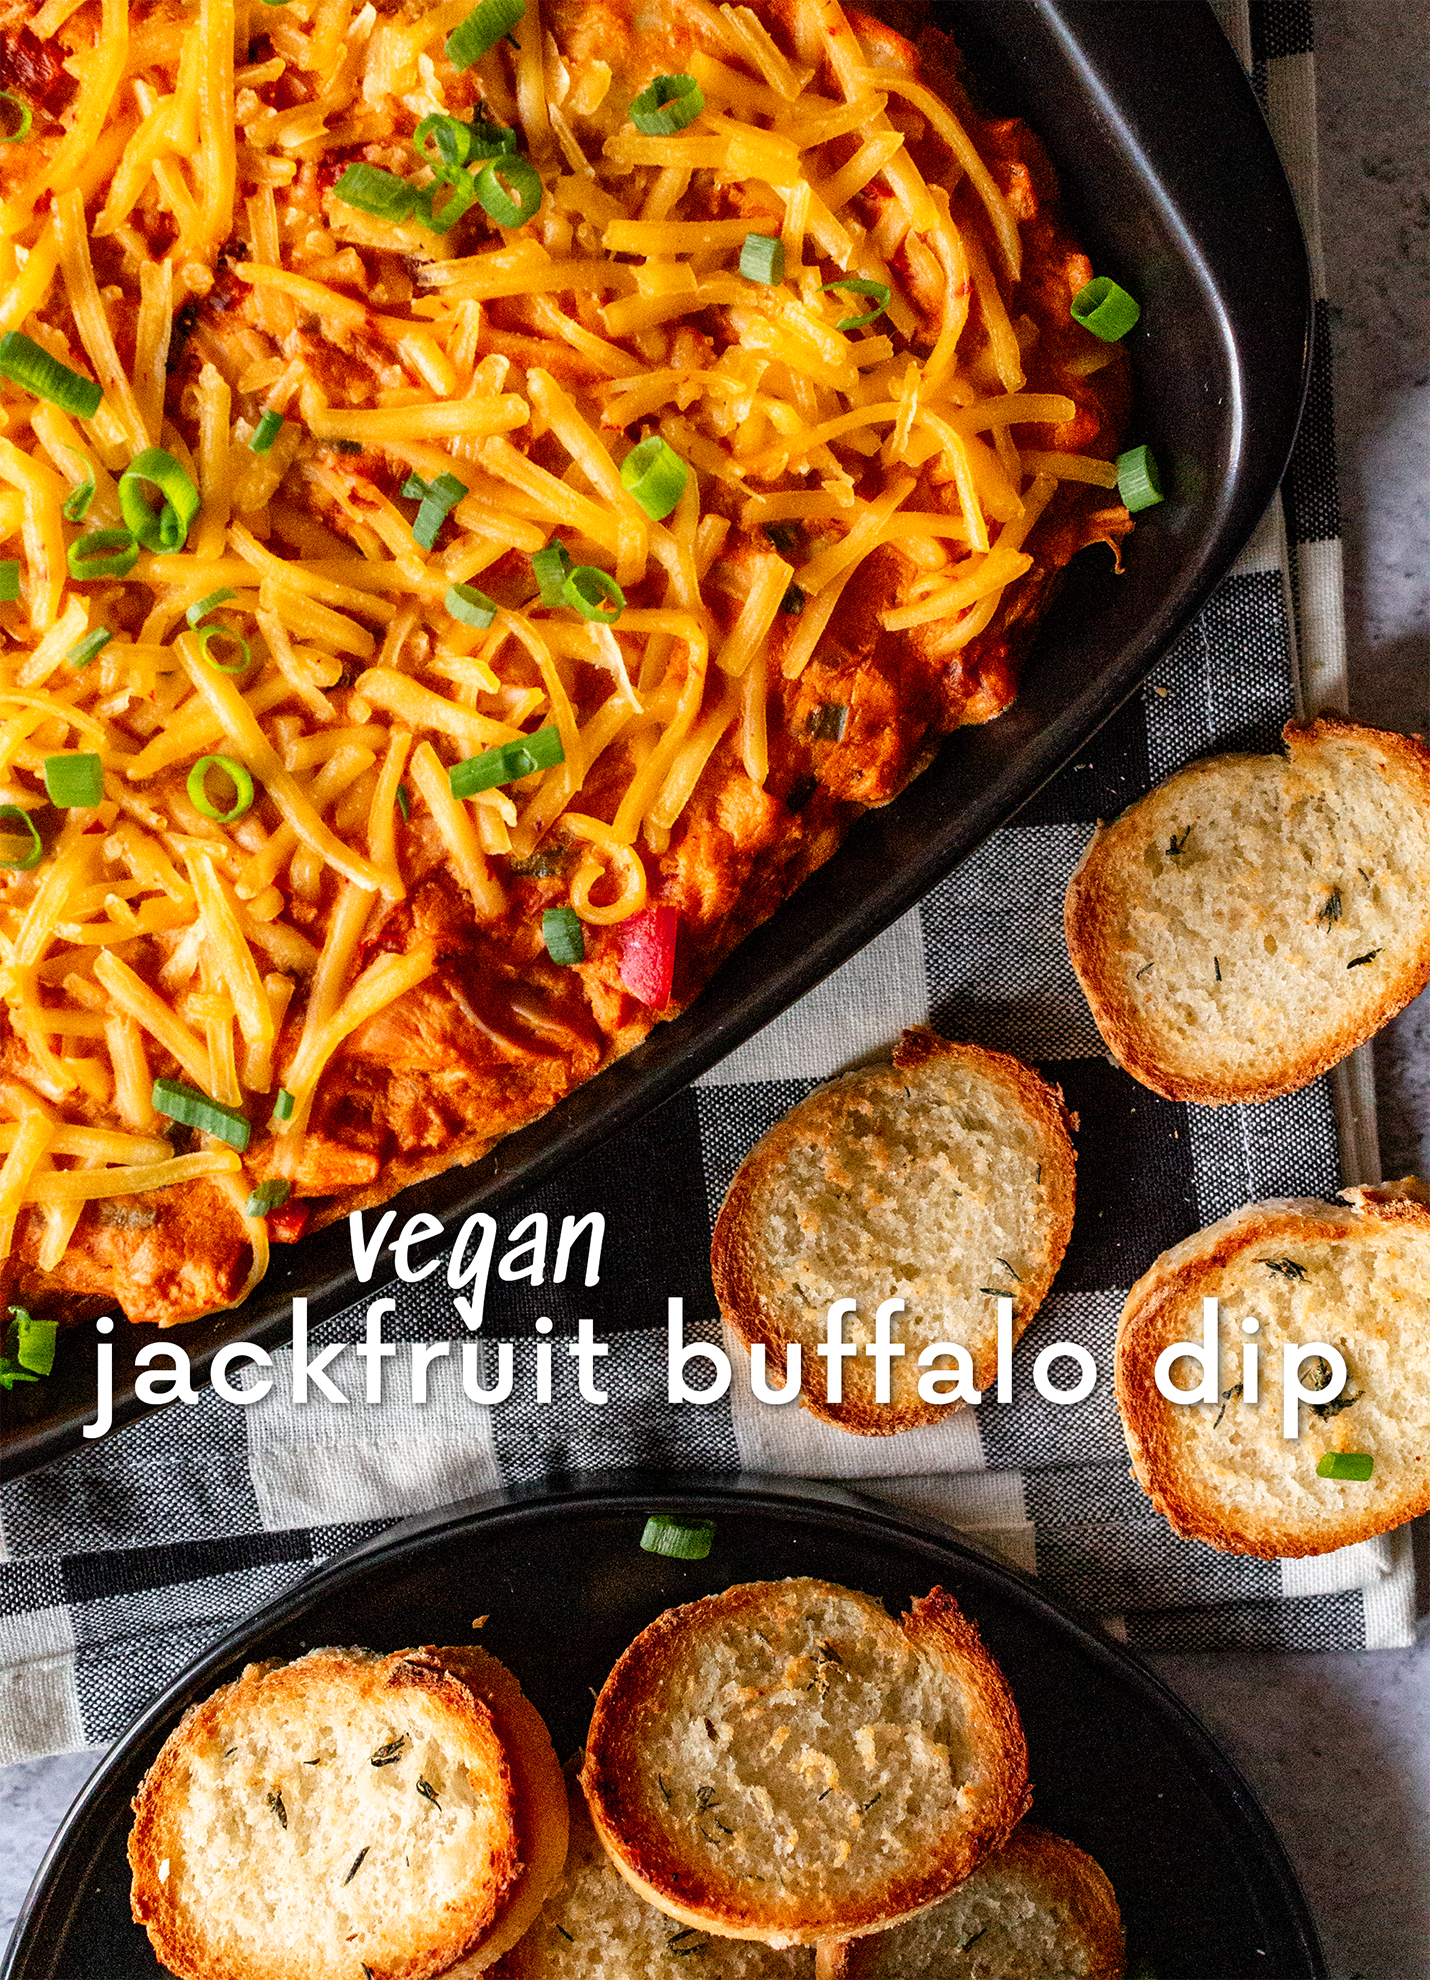
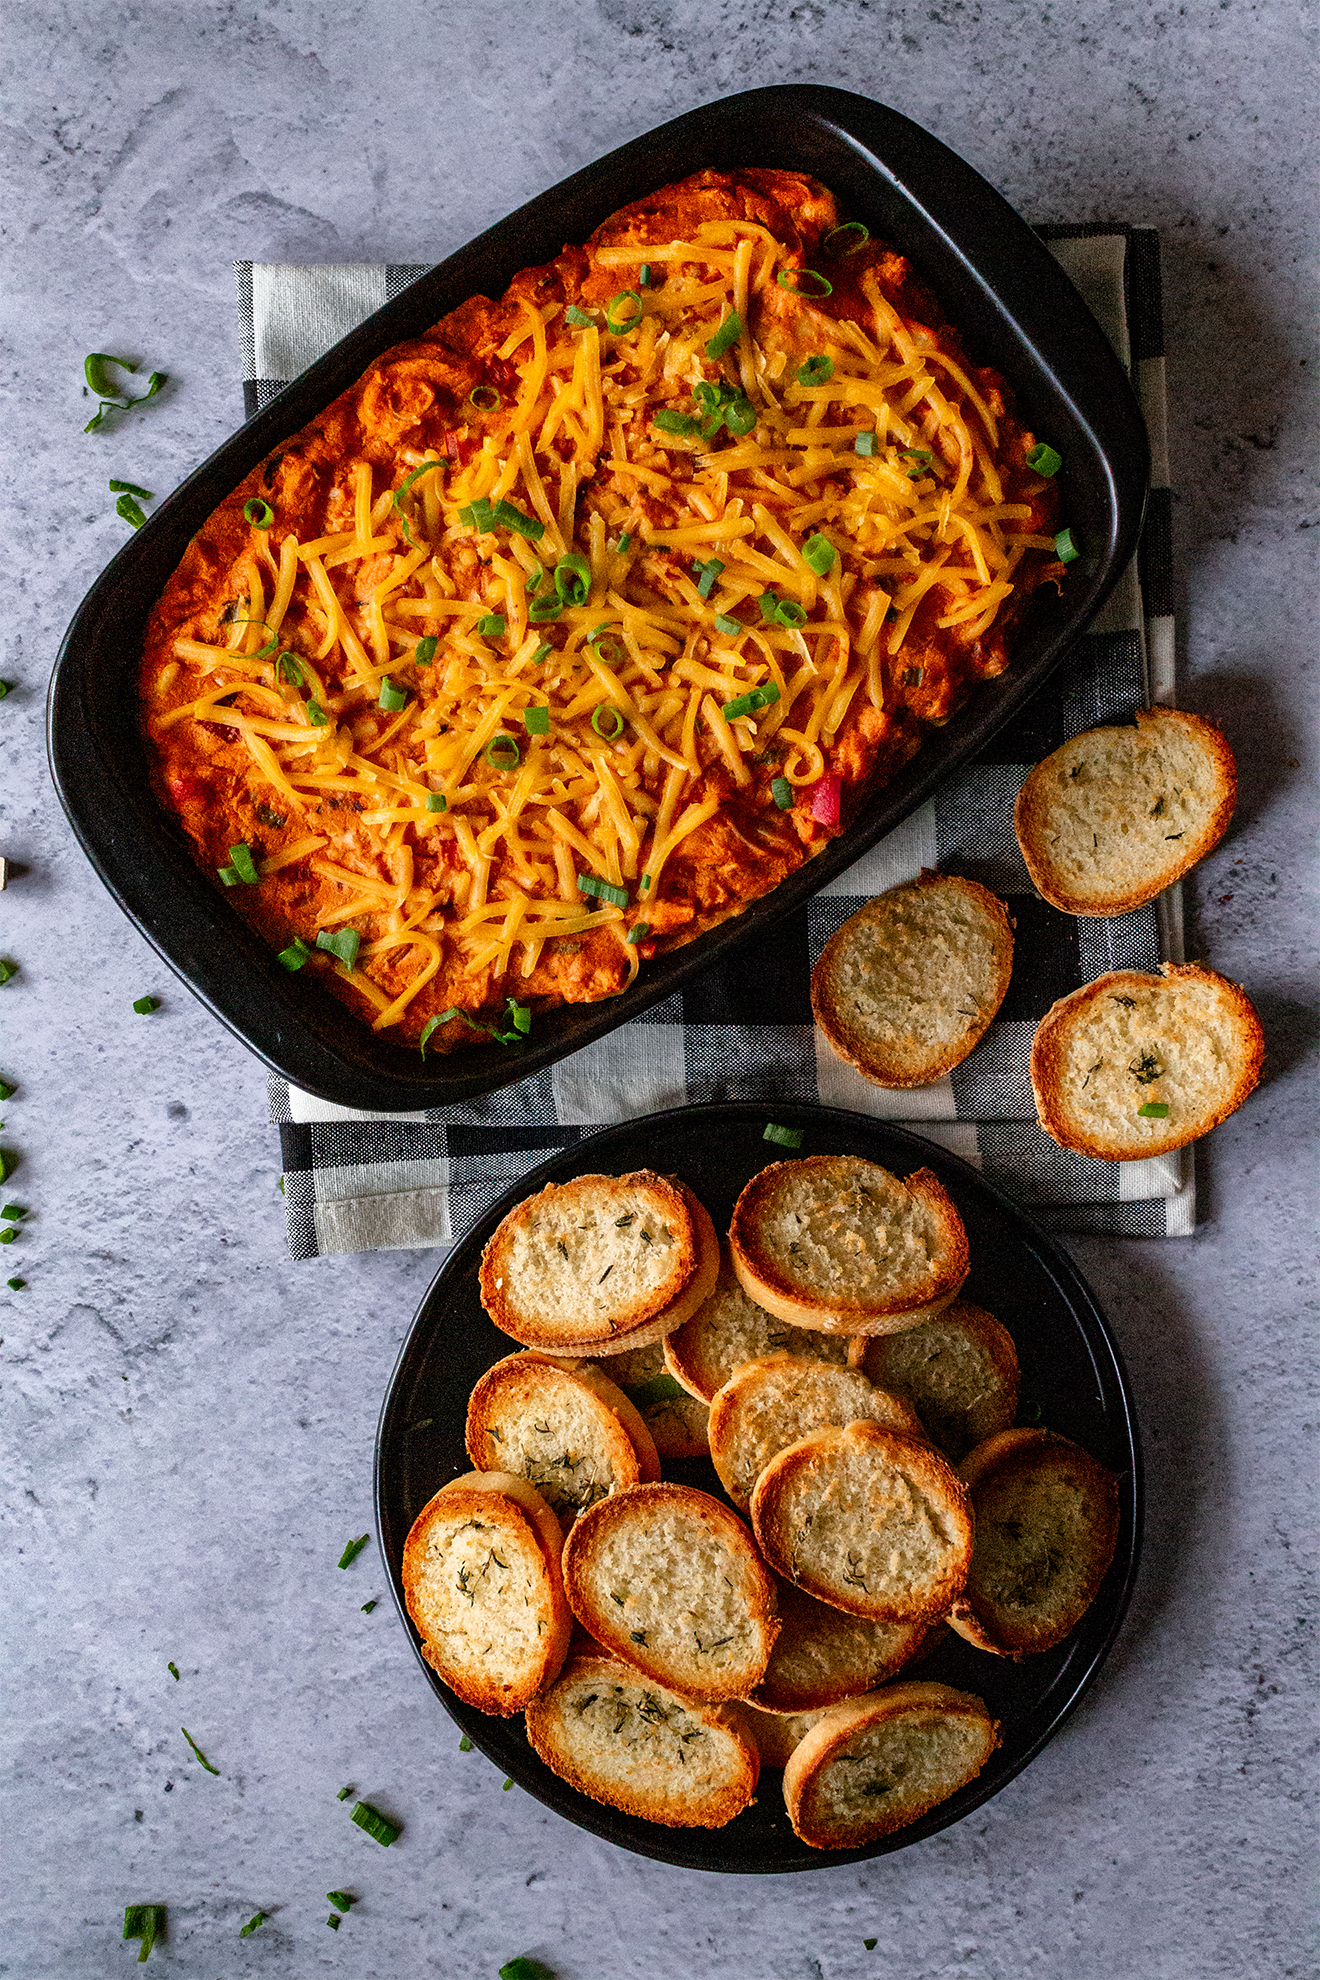
Absolutely obsessed with this vegan buffalo jackfruit dip, a new and improved, vegan-ized version of my bacon buffalo chicken dip from a few years ago. Honestly, jackfruit is one of the best culinary discoveries I’ve made in the last year, and I feel like I’ve started using it in just about everything! Tacos, curries, sandwiches, and dips–you name it, I’ve probably put jackfruit in it. This recipe, however, remains one of my favorites! And it appeals to both meat-eaters and vegans alike with its creamy, rich texture and deliciously spicy taste.
The garlic herb dippers also pair especially well with their crispy tops and soft, buttery bottoms for maximum texture harmony. I hope you try this awesome vegan buffalo jackfruit dip at your next party–or just make it for yourself and spend three days eating it out of a Tupperware container like an animal (speaking from experience, of course).
Ingredients:
Vegan Buffalo Jackfruit Dip
- 14-16oz jackfruit
- 8oz tofu, silken
- 2-3 cups Frank’s buffalo sauce (or your choice)
- 1/2 cup raw cashews
- 1/2 cup onion, diced
- 1 red bell pepper, diced
- 1-2 jalapeños, diced (adjust to desired spice)
- 1/3 cup vegan cheddar, shredded
- 1/3 cup vegan mozzarella, cubed
- 3 tbsp nutritional yeast
- 2 tbsp butter
- 1 tbsp olive oil
- 1 tsp garlic powder
- 1/2 tsp paprika
- 1/2 tsp chipotle powder
- 1/2 tsp cayenne pepper
- 1/2 tsp salt
- 1/4 tsp mustard powder
Garlic Herb Dippers
- 2 tsp garlic powder
- 6 tbsp butter
- 2 tbsp thyme, fresh
- 1 large baguette
Directions:
Vegan Buffalo Jackfruit Dip
- Boil cashews in water for 1 hour. Drain cashews and add to a blender with silken tofu and nutritional yeast. Blend until smooth and set aside.
- Heat a small sauce pot on medium/medium-low, and add buffalo sauce, 2 tbsp butter, 1 tsp garlic powder, paprika, chipotle powder, cayenne pepper, and mustard powder. Simmer for 2-3 minutes, stirring consistently, until butter has melted and spices have become fully incorporated. Reduce to low/remove from heat and set aside.
- Heat olive oil in a large skillet on medium/medium-high, and add diced onion, bell pepper, jalapeño, and salt. Sauté for 3-5 minutes or until vegetables have become browned and fragrant.
- Add jackfruit, rinsed and drained if necessary, and sauté with vegetables for an additional 3-5 minutes or until cooked through. Then, reduce heat to low, and add buffalo sauce mixture to the pan. Stir until everything is incorporated, about 1-2 minutes, and remove from heat.
- To a large mixing bowl, add buffalo vegetable sauté, tofu cashew cream, cheddar shreds, and cubed mozzarella. Fold gently with a spatula to ensure everything is incorporated, then transfer to a casserole or baking dish.
- Top with additional cheddar shreds and bake at 350F for 15 minutes. Remove from oven and set aside to cool for 5-10 minutes before serving warm from the dish.
Garlic Herb Dippers
- To make the crostini, slice a baguette into thin rounds. Layer on a parchment paper-lined baking sheet.
- In a small bowl, melt 6 tbsp butter and combine with 2 tsp garlic powder and fresh thyme. Brush over baguette rounds.
- Broil rounds on high (or bake at 525F) for 3-4 minutes, or until the tops have become browned and crisp while the undersides are still warm and soft.

Vegan Buffalo Jackfruit Dip with Garlic Herb Dippers
Ingredients
Vegan Buffalo Jackfruit Dip
- 14-16 oz jackfruit
- 8 oz tofu silken
- 2-3 cups Frank’s buffalo sauce or your choice
- 1/2 cup raw cashews
- 1/2 cup onion diced
- 1 red bell pepper diced
- 1-2 jalapeños diced (adjust to desired spice)
- 1/3 cup vegan cheddar shredded
- 1/3 cup vegan mozzarella cubed
- 3 tbsp nutritional yeast
- 2 tbsp butter
- 1 tbsp olive oil
- 1 tsp garlic powder
- 1/2 tsp paprika
- 1/2 tsp chipotle powder
- 1/2 tsp cayenne pepper
- 1/2 tsp salt
- 1/4 tsp mustard powder
Garlic Herb Dippers
- 2 tsp garlic powder
- 6 tbsp butter
- 2 tbsp thyme fresh
- 1 large baguette
Instructions
Vegan Buffalo Jackfruit Dip
- Boil cashews in water for 1 hour. Drain cashews and add to a blender with silken tofu and nutritional yeast. Blend until smooth and set aside.
- Heat a small sauce pot on medium/medium-low, and add buffalo sauce, 2 tbsp butter, 1 tsp garlic powder, paprika, chipotle powder, cayenne pepper, and mustard powder. Simmer for 2-3 minutes, stirring consistently, until butter has melted and spices have become fully incorporated. Reduce to low/remove from heat and set aside.
- Heat olive oil in a large skillet on medium/medium-high, and add diced onion, bell pepper, jalapeño, and salt. Sauté for 3-5 minutes or until vegetables have become browned and fragrant.
- Add jackfruit, rinsed and drained if necessary, and sauté with vegetables for an additional 3-5 minutes or until cooked through. Then, reduce heat to low, and add buffalo sauce mixture to the pan. Stir until everything is incorporated, about 1-2 minutes, and remove from heat.
- To a large mixing bowl, add buffalo vegetable sauté, tofu cashew cream, cheddar shreds, and cubed mozzarella. Fold gently with a spatula to ensure everything is incorporated, then transfer to a casserole or baking dish.
- Top with additional cheddar shreds and bake at 350F for 15 minutes. Remove from oven and set aside to cool for 5-10 minutes before serving warm from the dish.
Garlic Herb Dippers
- To make the crostini, slice a baguette into thin rounds. Layer on a parchment paper-lined baking sheet.
- In a small bowl, melt 6 tbsp butter and combine with 2 tsp garlic powder and fresh thyme. Brush over baguette rounds.
- Broil rounds on high (or bake at 525F) for 3-4 minutes, or until the tops have become browned and crisp while the undersides are still warm and soft.
The post Vegan Buffalo Jackfruit Dip + Garlic Herb Dippers appeared first on I Forgot Salt!.
]]>The post Chickpea No-Tuna Salad Sandwich appeared first on I Forgot Salt!.
]]>
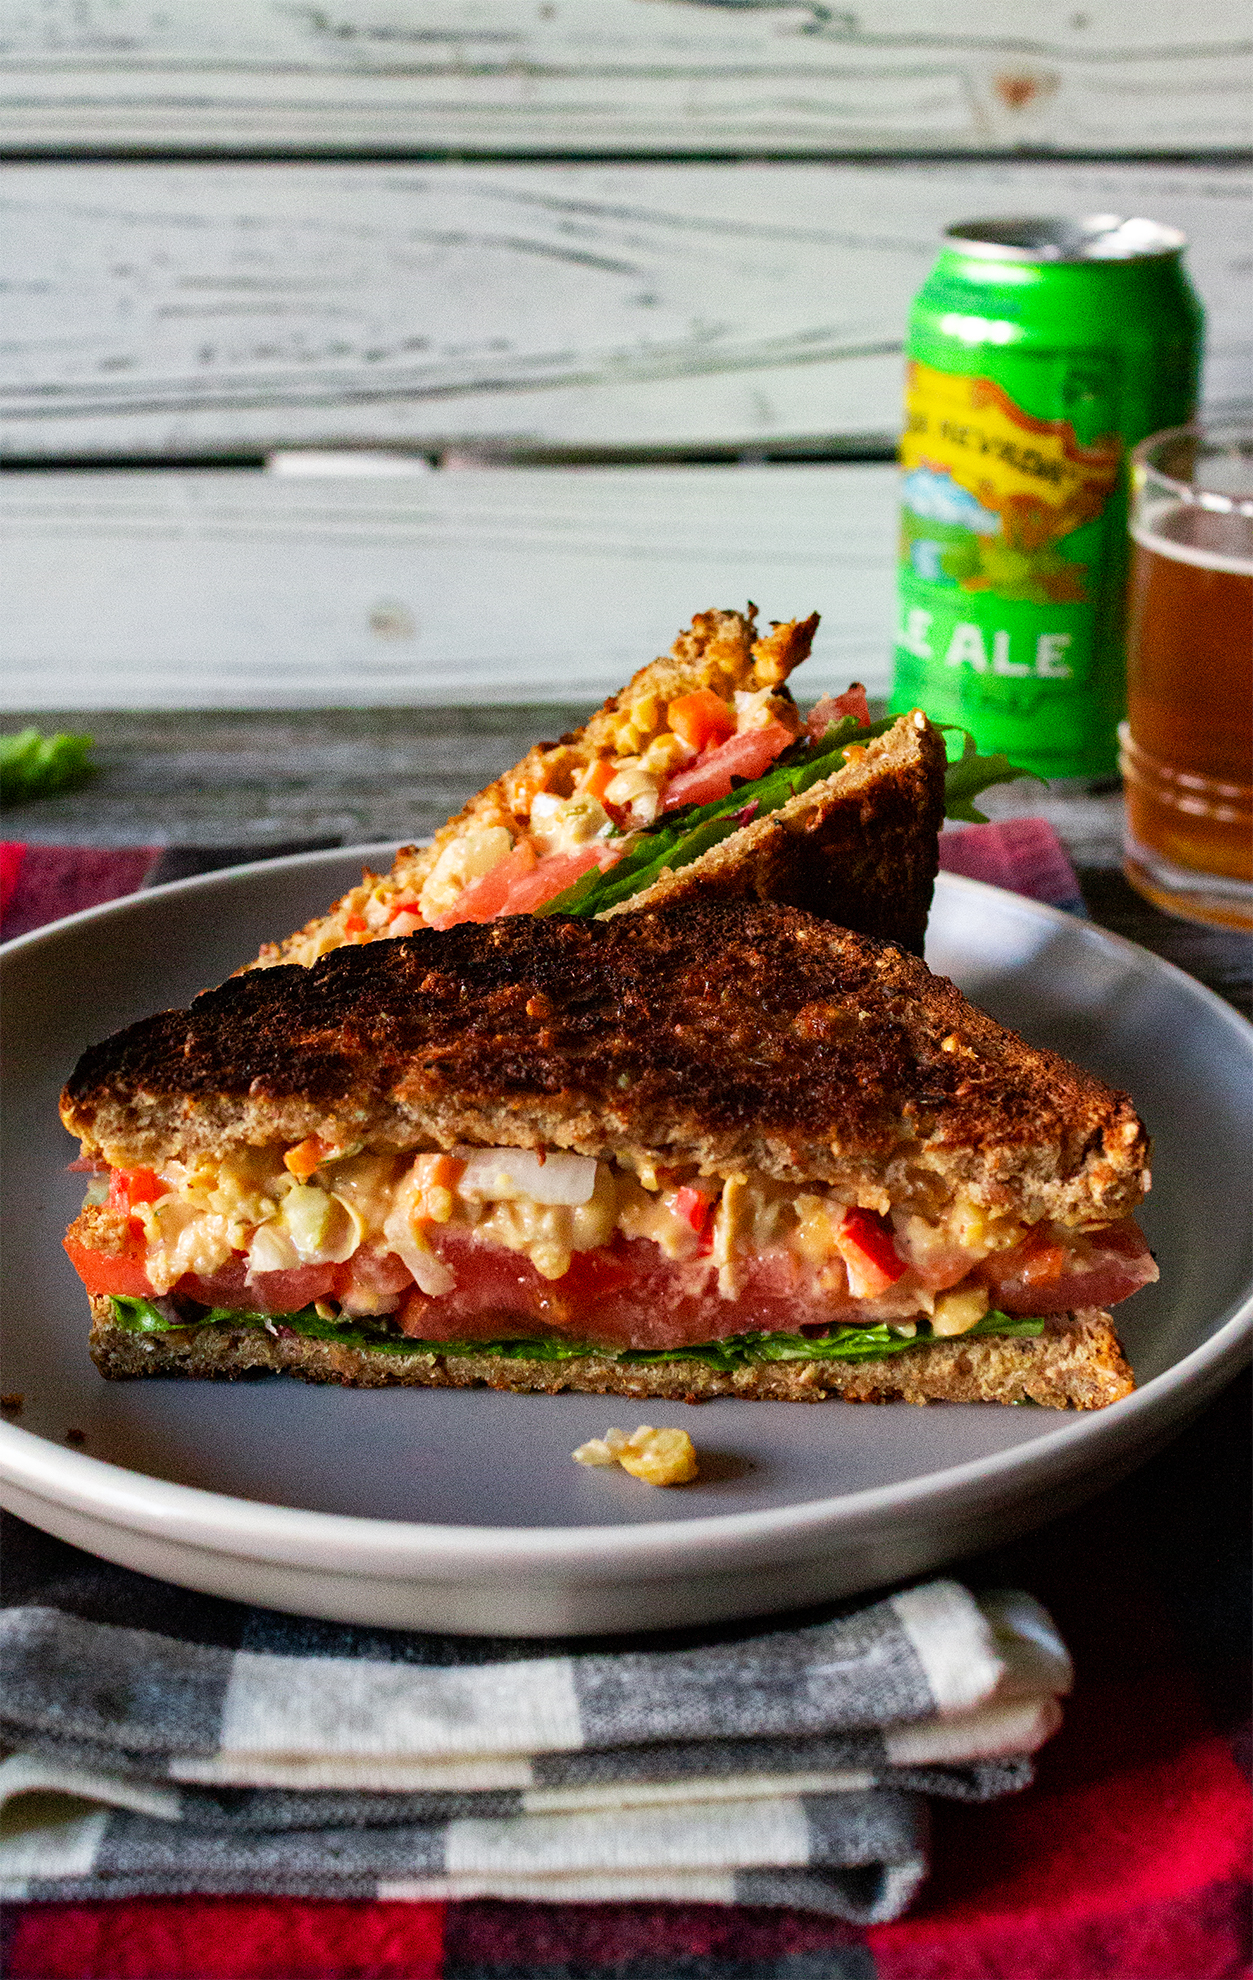
This chickpea salad sandwich filling is great to make ahead and eat throughout the week with fresh toast, and even works well as a car food! This past Halloween, Alex and went on an impromptu road trip down the Blue Ridge Parkway, and I threw a Tupperware of this and a loaf of bread into our cooler before we set off. It made for a delicious post-hike picnic lunch even without the fixings, and having a homemade meal on-hand helped the already awesome day feel even more special.
The creamy, crunchy texture of this chickpea salad sandwich the perfect cool lunch for a hot day, whether that be picnicking in the park or going on a hike . It’s one of my favorite summer foods, packing a crisp protein punch to fuel you through the afternoon. Chickpea salad sandwiches also pair great with your favorite cold beer or a glass of chilled ice tea. Yum!
For another picnic-friendly recipe, check out my onigiri rice balls snack, which I will be updating soon with a sautéed tahini shiitake mushroom filling!
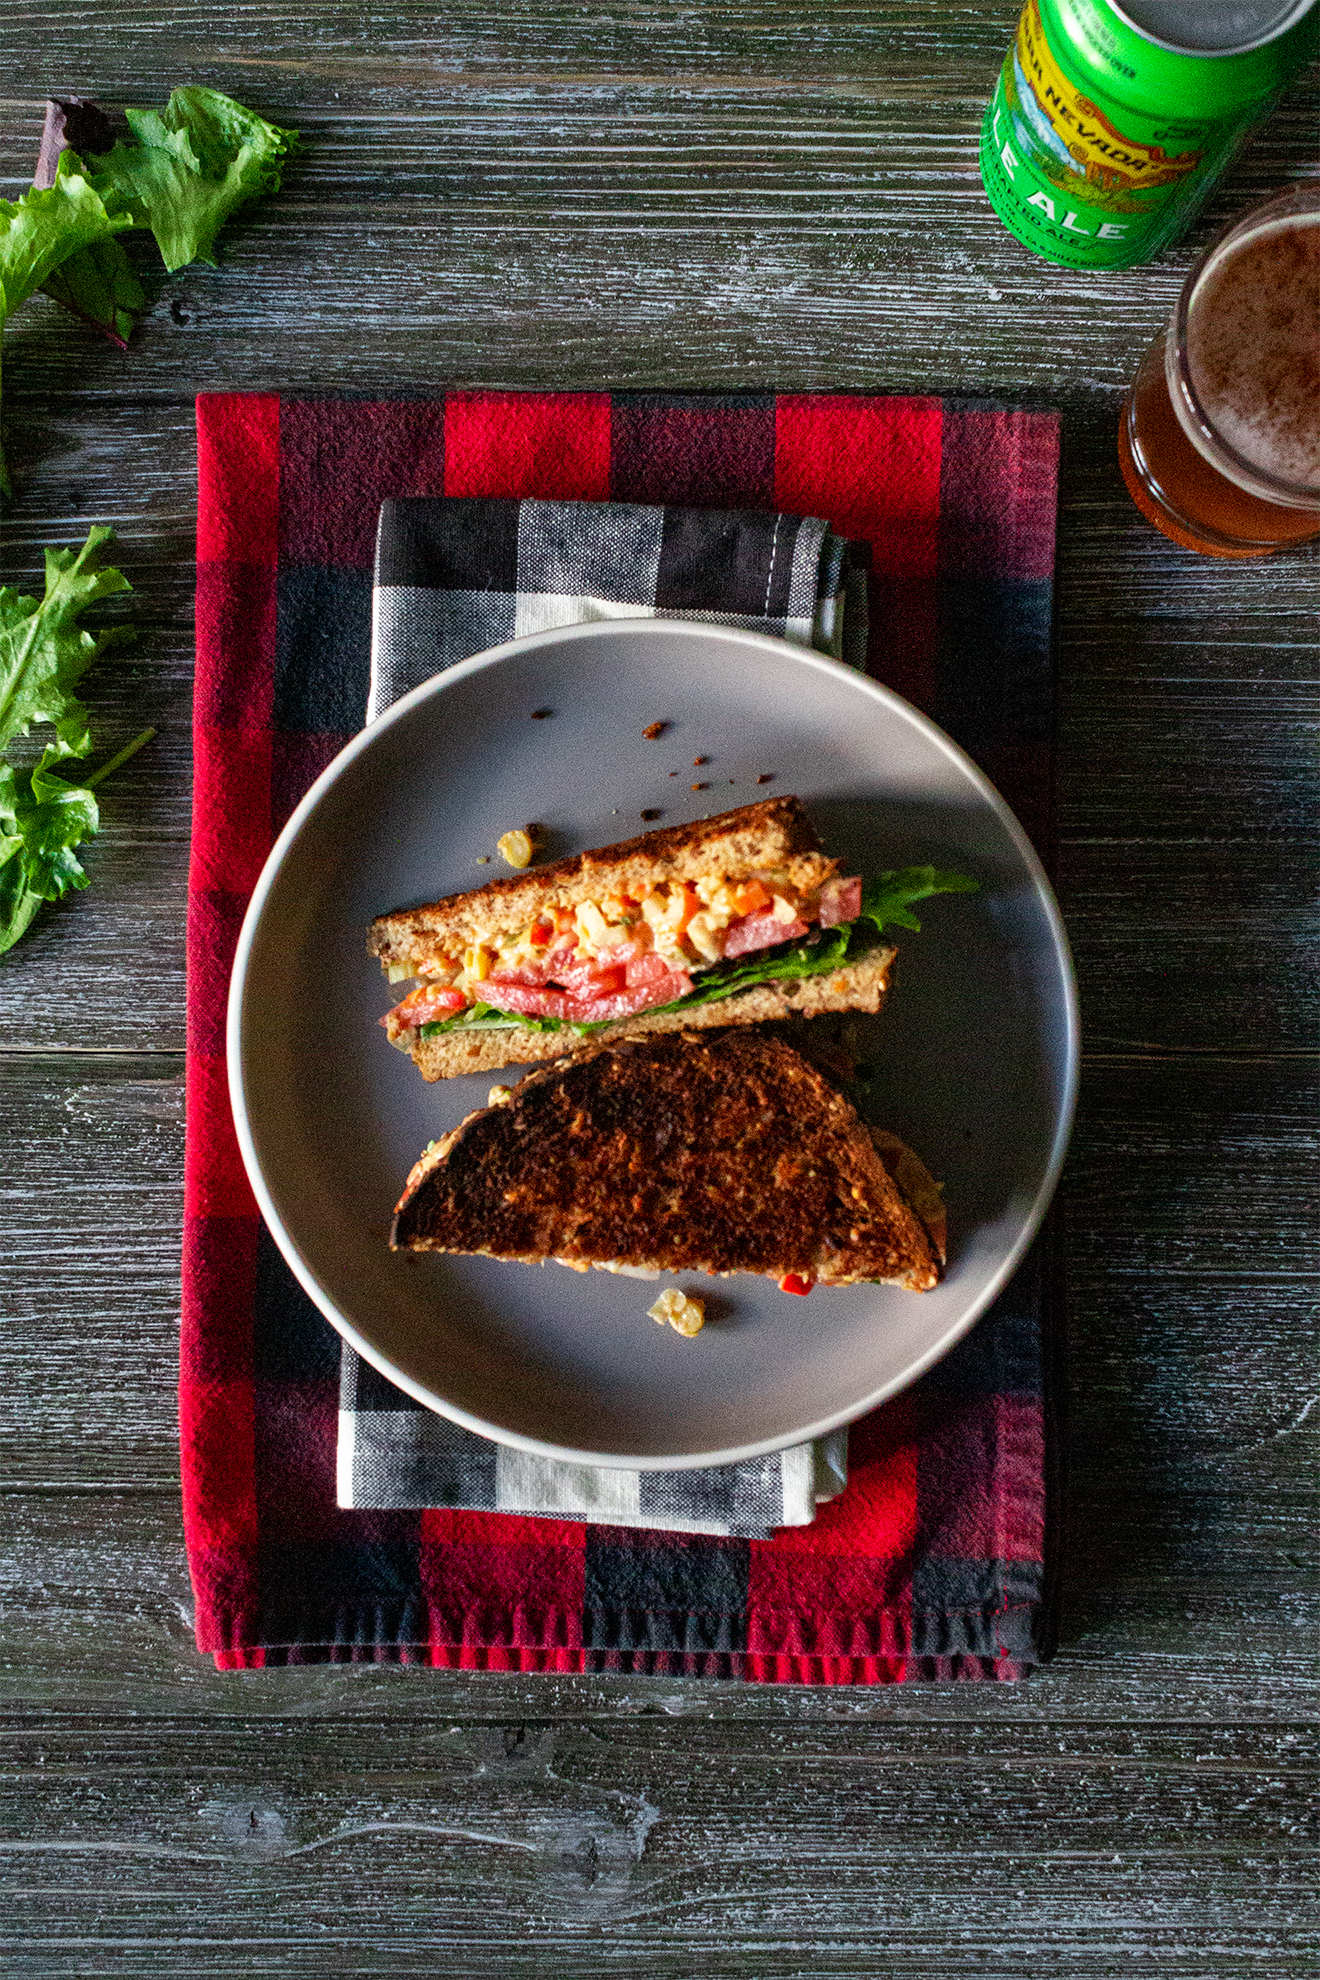
This recipe makes 4 sandwiches.
Ingredients:
- 2 cups chickpeas
- 1/2 cup mayonnaise
- 1/3 cup celery, diced
- 1/3 cup carrot, diced
- 1/3 cup bell pepper, diced
- 1/4 cup red onion, diced
- 2 tbsp spicy mustard
- 1 tbsp Frank’s buffalo sauce (or hot sauce of your choice)
- 1 tsp lemon juice
- 1/2 tsp dill
- 1/4 tsp garlic powder
- 1/4 tsp + 1/4 tsp salt
- 1/4 tsp black pepper
- 1/4 tsp cayenne pepper
- 1/2 cup lettuce
- 1/2 cup tomato, sliced
- 8 slices bread, toasted with butter
Directions:
- Smash chickpeas with a fork or potato masher until largely broken up with some whole or “chunky” chickpeas remaining for texture.
- Finely dice celery, carrot, bell pepper, and red onion.
- Add chickpeas, mayonnaise, celery, carrot, onion, bell pepper, mustard, lemon juice, buffalo sauce, and spices (dill, garlic powder, salt, black pepper, and cayenne pepper). Mix thoroughly until everything is incorporated. Store covered in the fridge until ready to serve.
- Toast bread with butter. Slice tomatoes and sprinkle with remaining 1/4 tsp salt. Assemble sandwiches with “tuna” salad, lettuce, and salted tomatoes.

Chickpea No-Tuna Salad Sandwiches
Ingredients
- 2 cups chickpeas
- 1/2 cup mayonnaise
- 1/3 cup celery diced
- 1/3 cup carrot diced
- 1/3 cup bell pepper diced
- 1/4 cup red onion diced
- 2 tbsp spicy mustard
- 1 tbsp Frank’s buffalo sauce or hot sauce of your choice
- 1 tsp lemon juice
- 1/2 tsp dill
- 1/4 tsp garlic powder
- 1/4 tsp salt + 1/4 tsp reserved
- 1/4 tsp black pepper
- 1/4 tsp cayenne pepper
- 1/2 cup lettuce
- 1/2 cup tomato sliced
- 8 slices bread toasted with butter
Instructions
- Smash chickpeas with a fork or potato masher until largely broken up with some whole or “chunky” chickpeas remaining for texture.
- Finely dice celery, carrot, bell pepper, and red onion.
- Add chickpeas, mayonnaise, celery, carrot, onion, bell pepper, mustard, lemon juice, buffalo sauce, and spices (dill, garlic powder, salt, black pepper, and cayenne pepper). Mix thoroughly until everything is incorporated. Store covered in the fridge until ready to serve.
- Toast bread with butter. Slice tomatoes and sprinkle with remaining 1/4 tsp salt. Assemble sandwiches with “tuna” salad, lettuce, and salted tomatoes.
The post Chickpea No-Tuna Salad Sandwich appeared first on I Forgot Salt!.
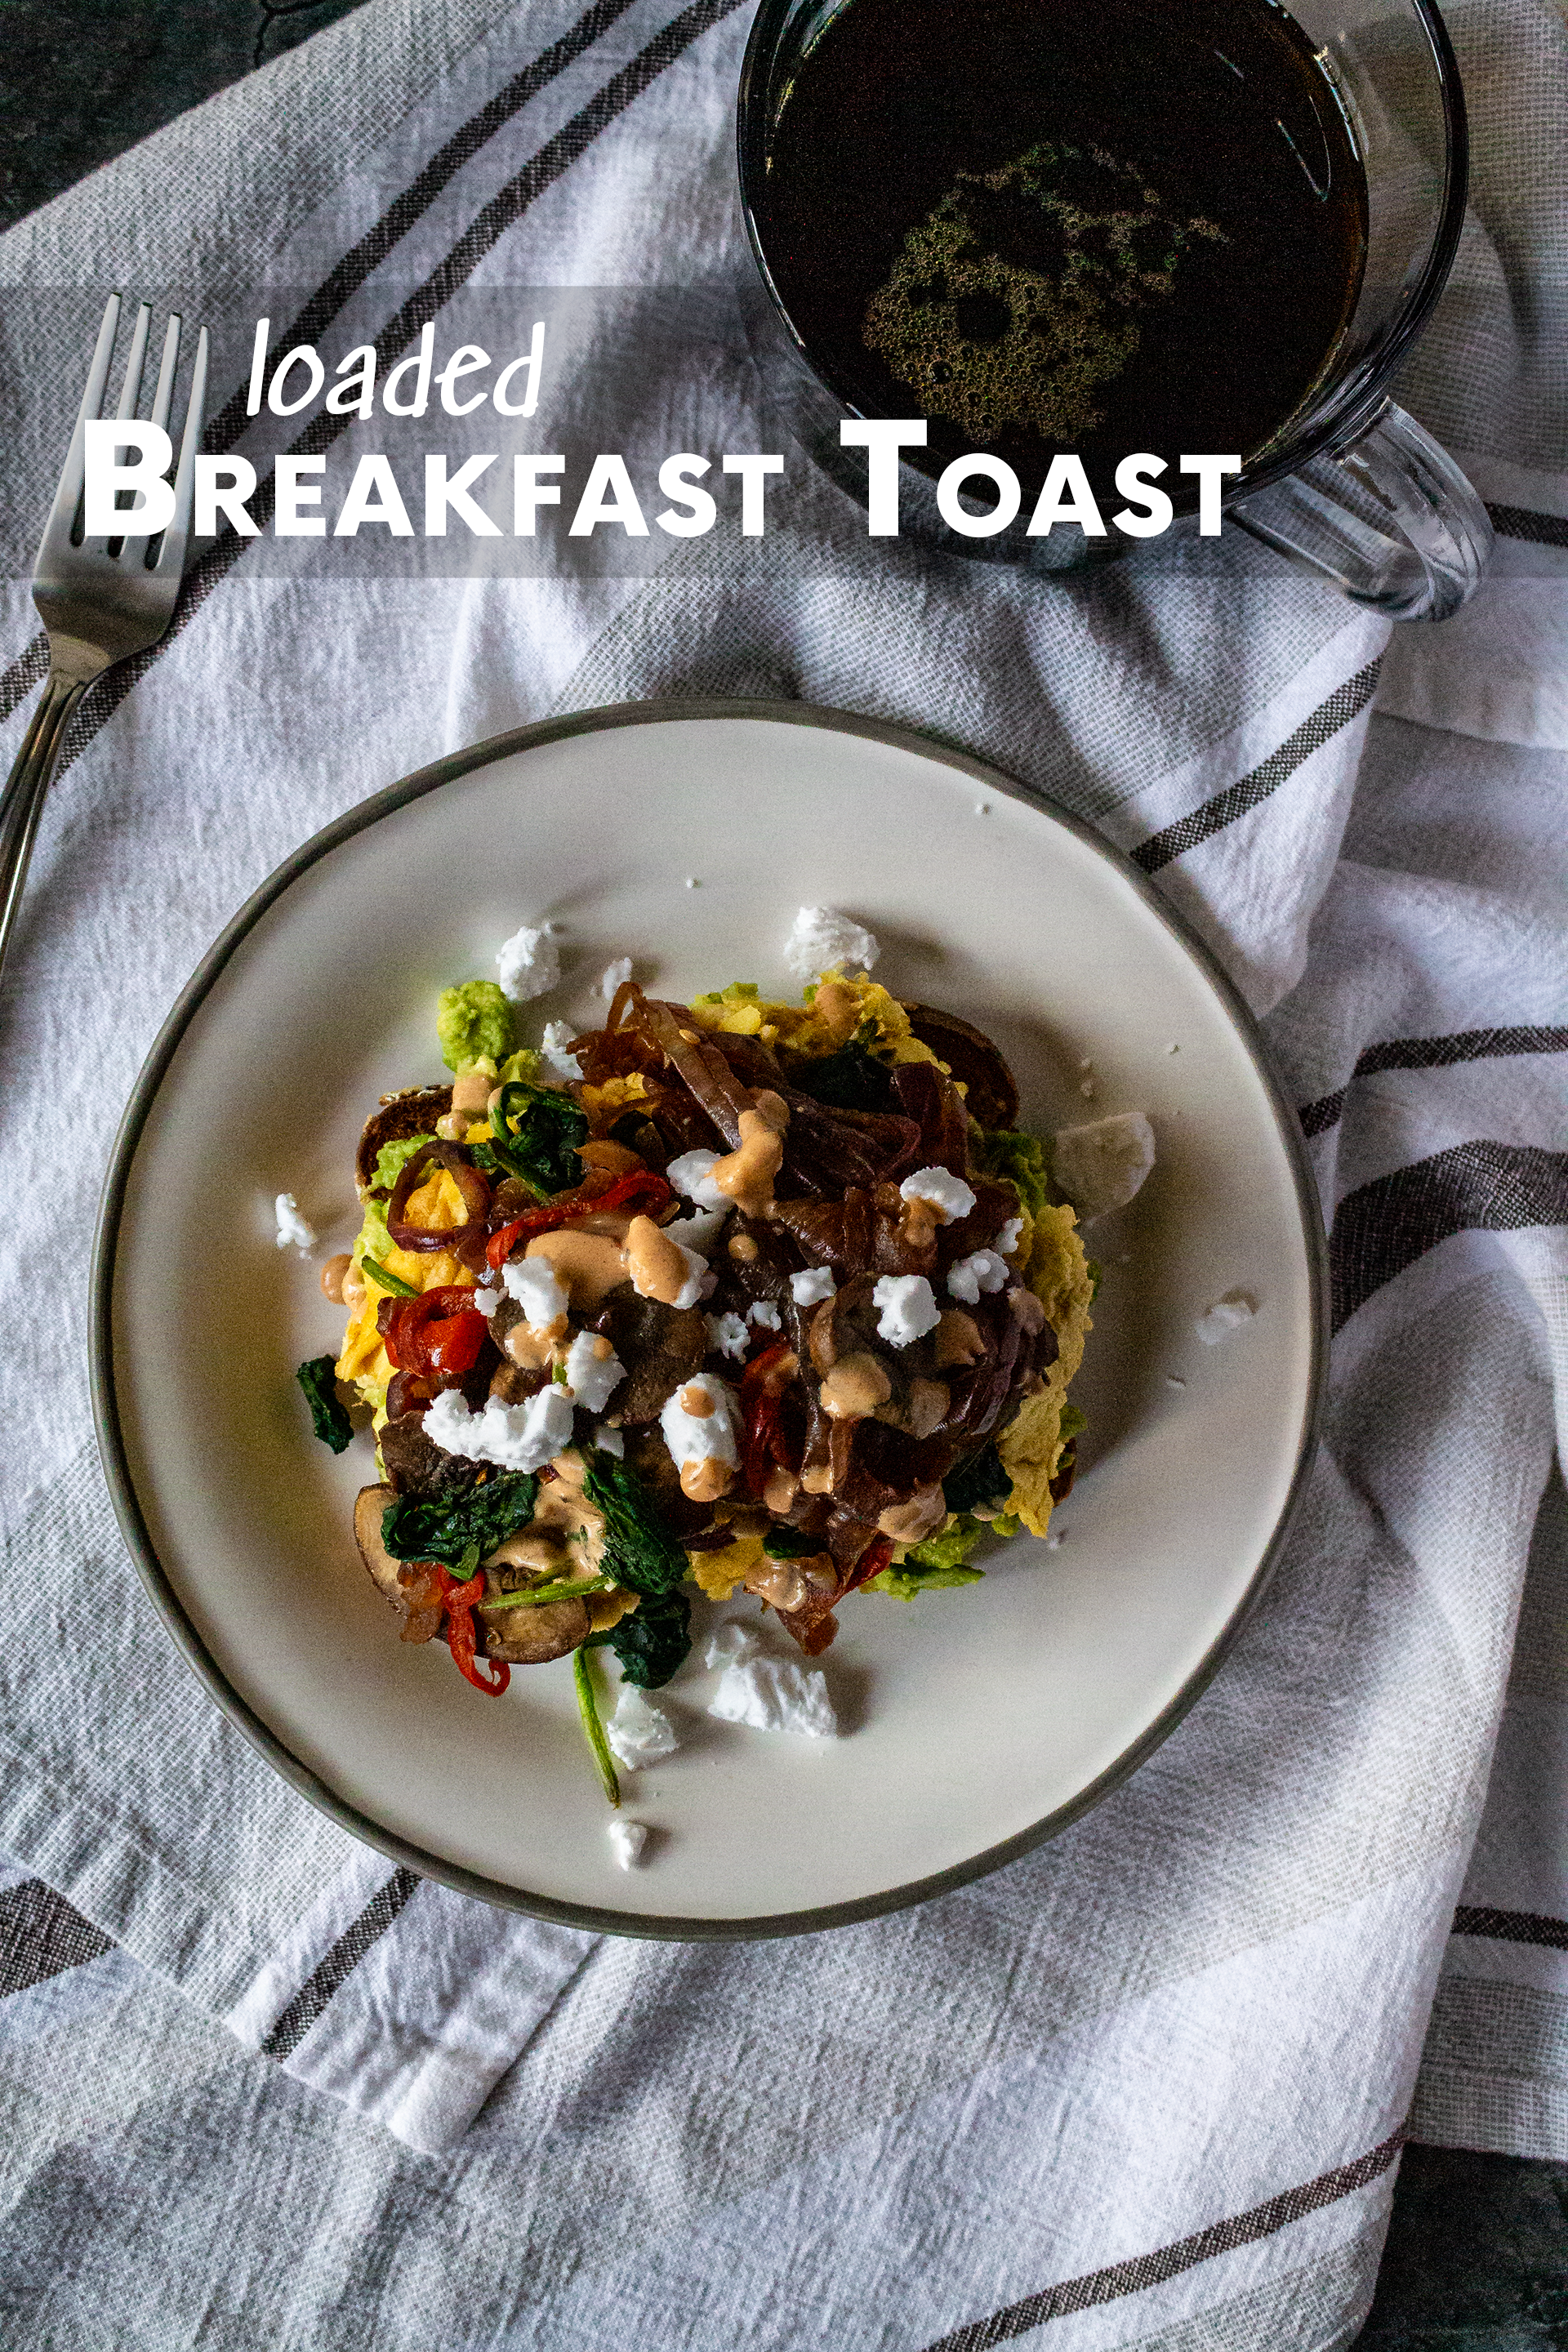
]]>The post Loaded Breakfast Toast appeared first on I Forgot Salt!.
]]>
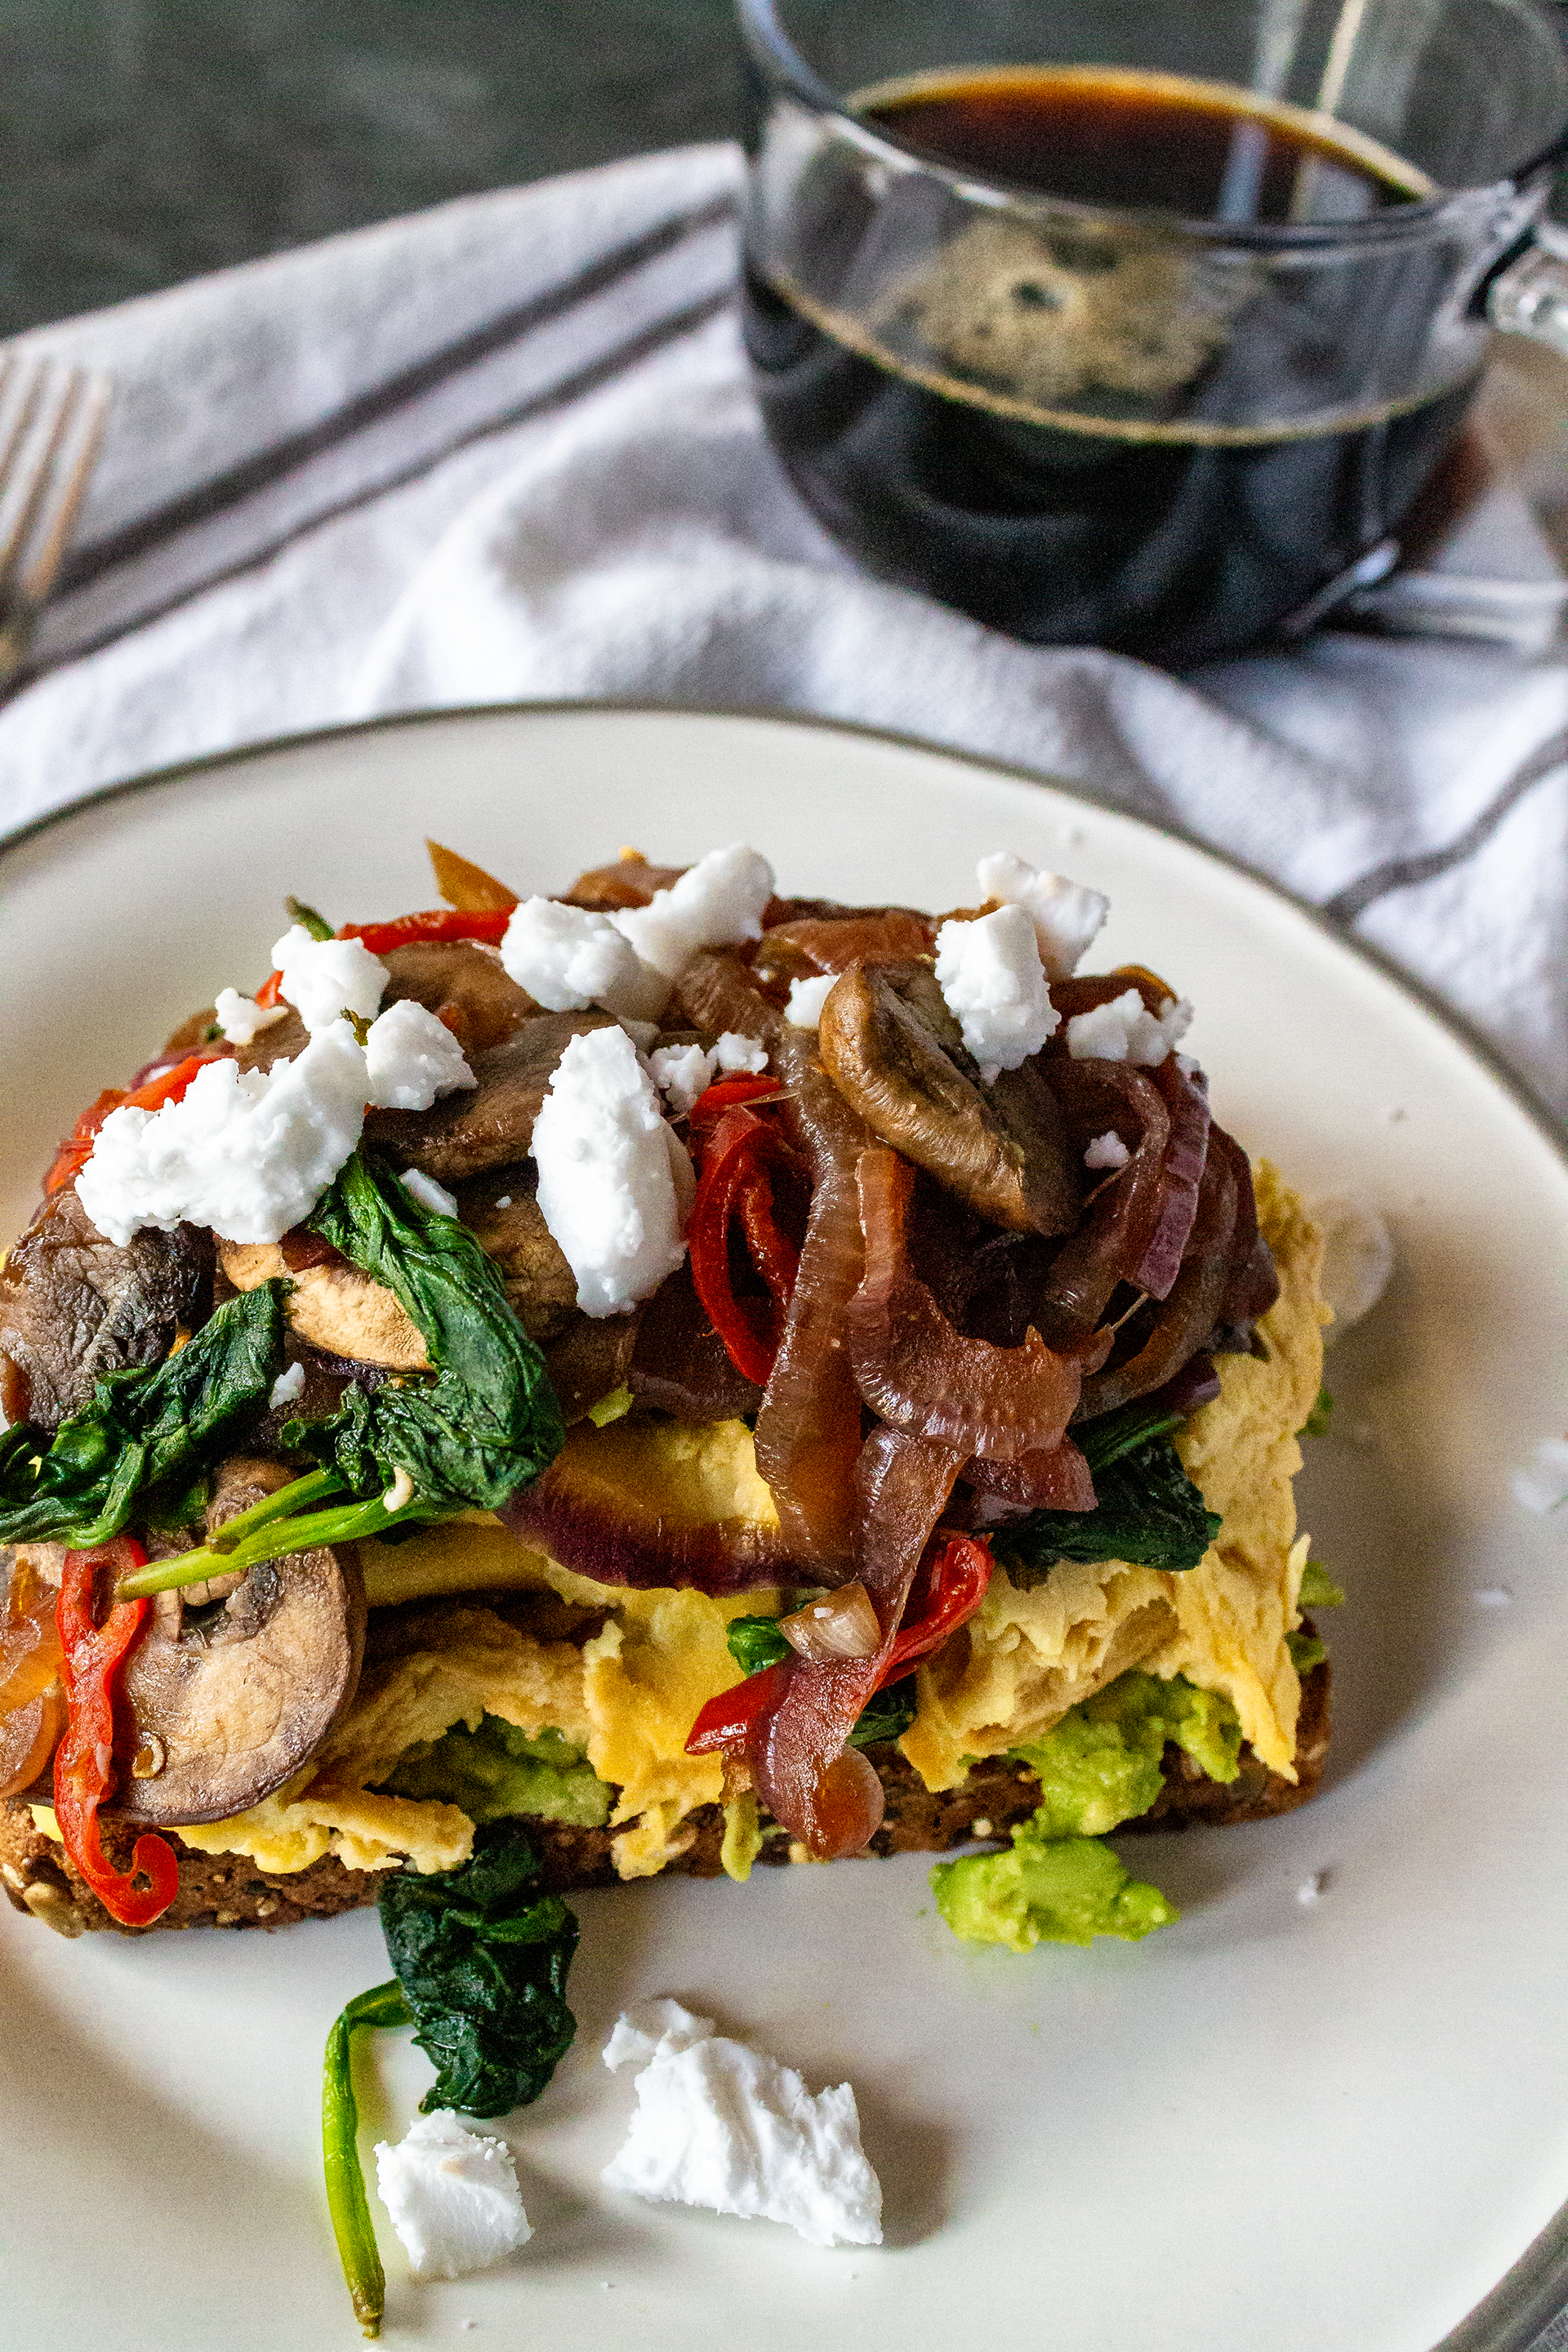
Although I’ve posted some avocado toast recipes before, this absolute monster of a breakfast toast carried me through my last semester of 2020. What a year–I can’t believe it’s almost over. We’re nearly free from this absolute catastrophe! It’s hard to fathom that another year has come and gone, while at the same time I feel like I’ve aged a decade since January. I’m sure the feeling is mutual. Despite the chaos, however, I feel like 2020 has been one of my most productive and accomplished years in quite a while, even with what seems like the end of the world constantly looming on the horizon.
As I’ve mentioned in previous posts, Alex and I made some very radical changes in our lives, from larger things changing jobs (him) to entering university (me) to moving even farther south (both of us) to smaller, more individual improvements like switching to a plant-based diet (me), taking up running (him), and making a conscious effort to read more books (both of us). In the grand scheme of things–even our lowest points–I think we have come out of 2020 as better, stronger people.
That doesn’t mean this year wasn’t difficult, however. Our lowest points were indeed low, but I think we’re lucky enough to be able to dwell on not on the negatives but on the positives of 2020 in retrospective. While we will be looking back on this year as a true dumpster fire, I want to try not to forget about the good things that happened in spite of so much strife. I am tentatively putting some of my hopes in 2021, but will be satisfied as long as we make it through intact.
Now, onto a lighter note and the actual breakfast toast recipe…

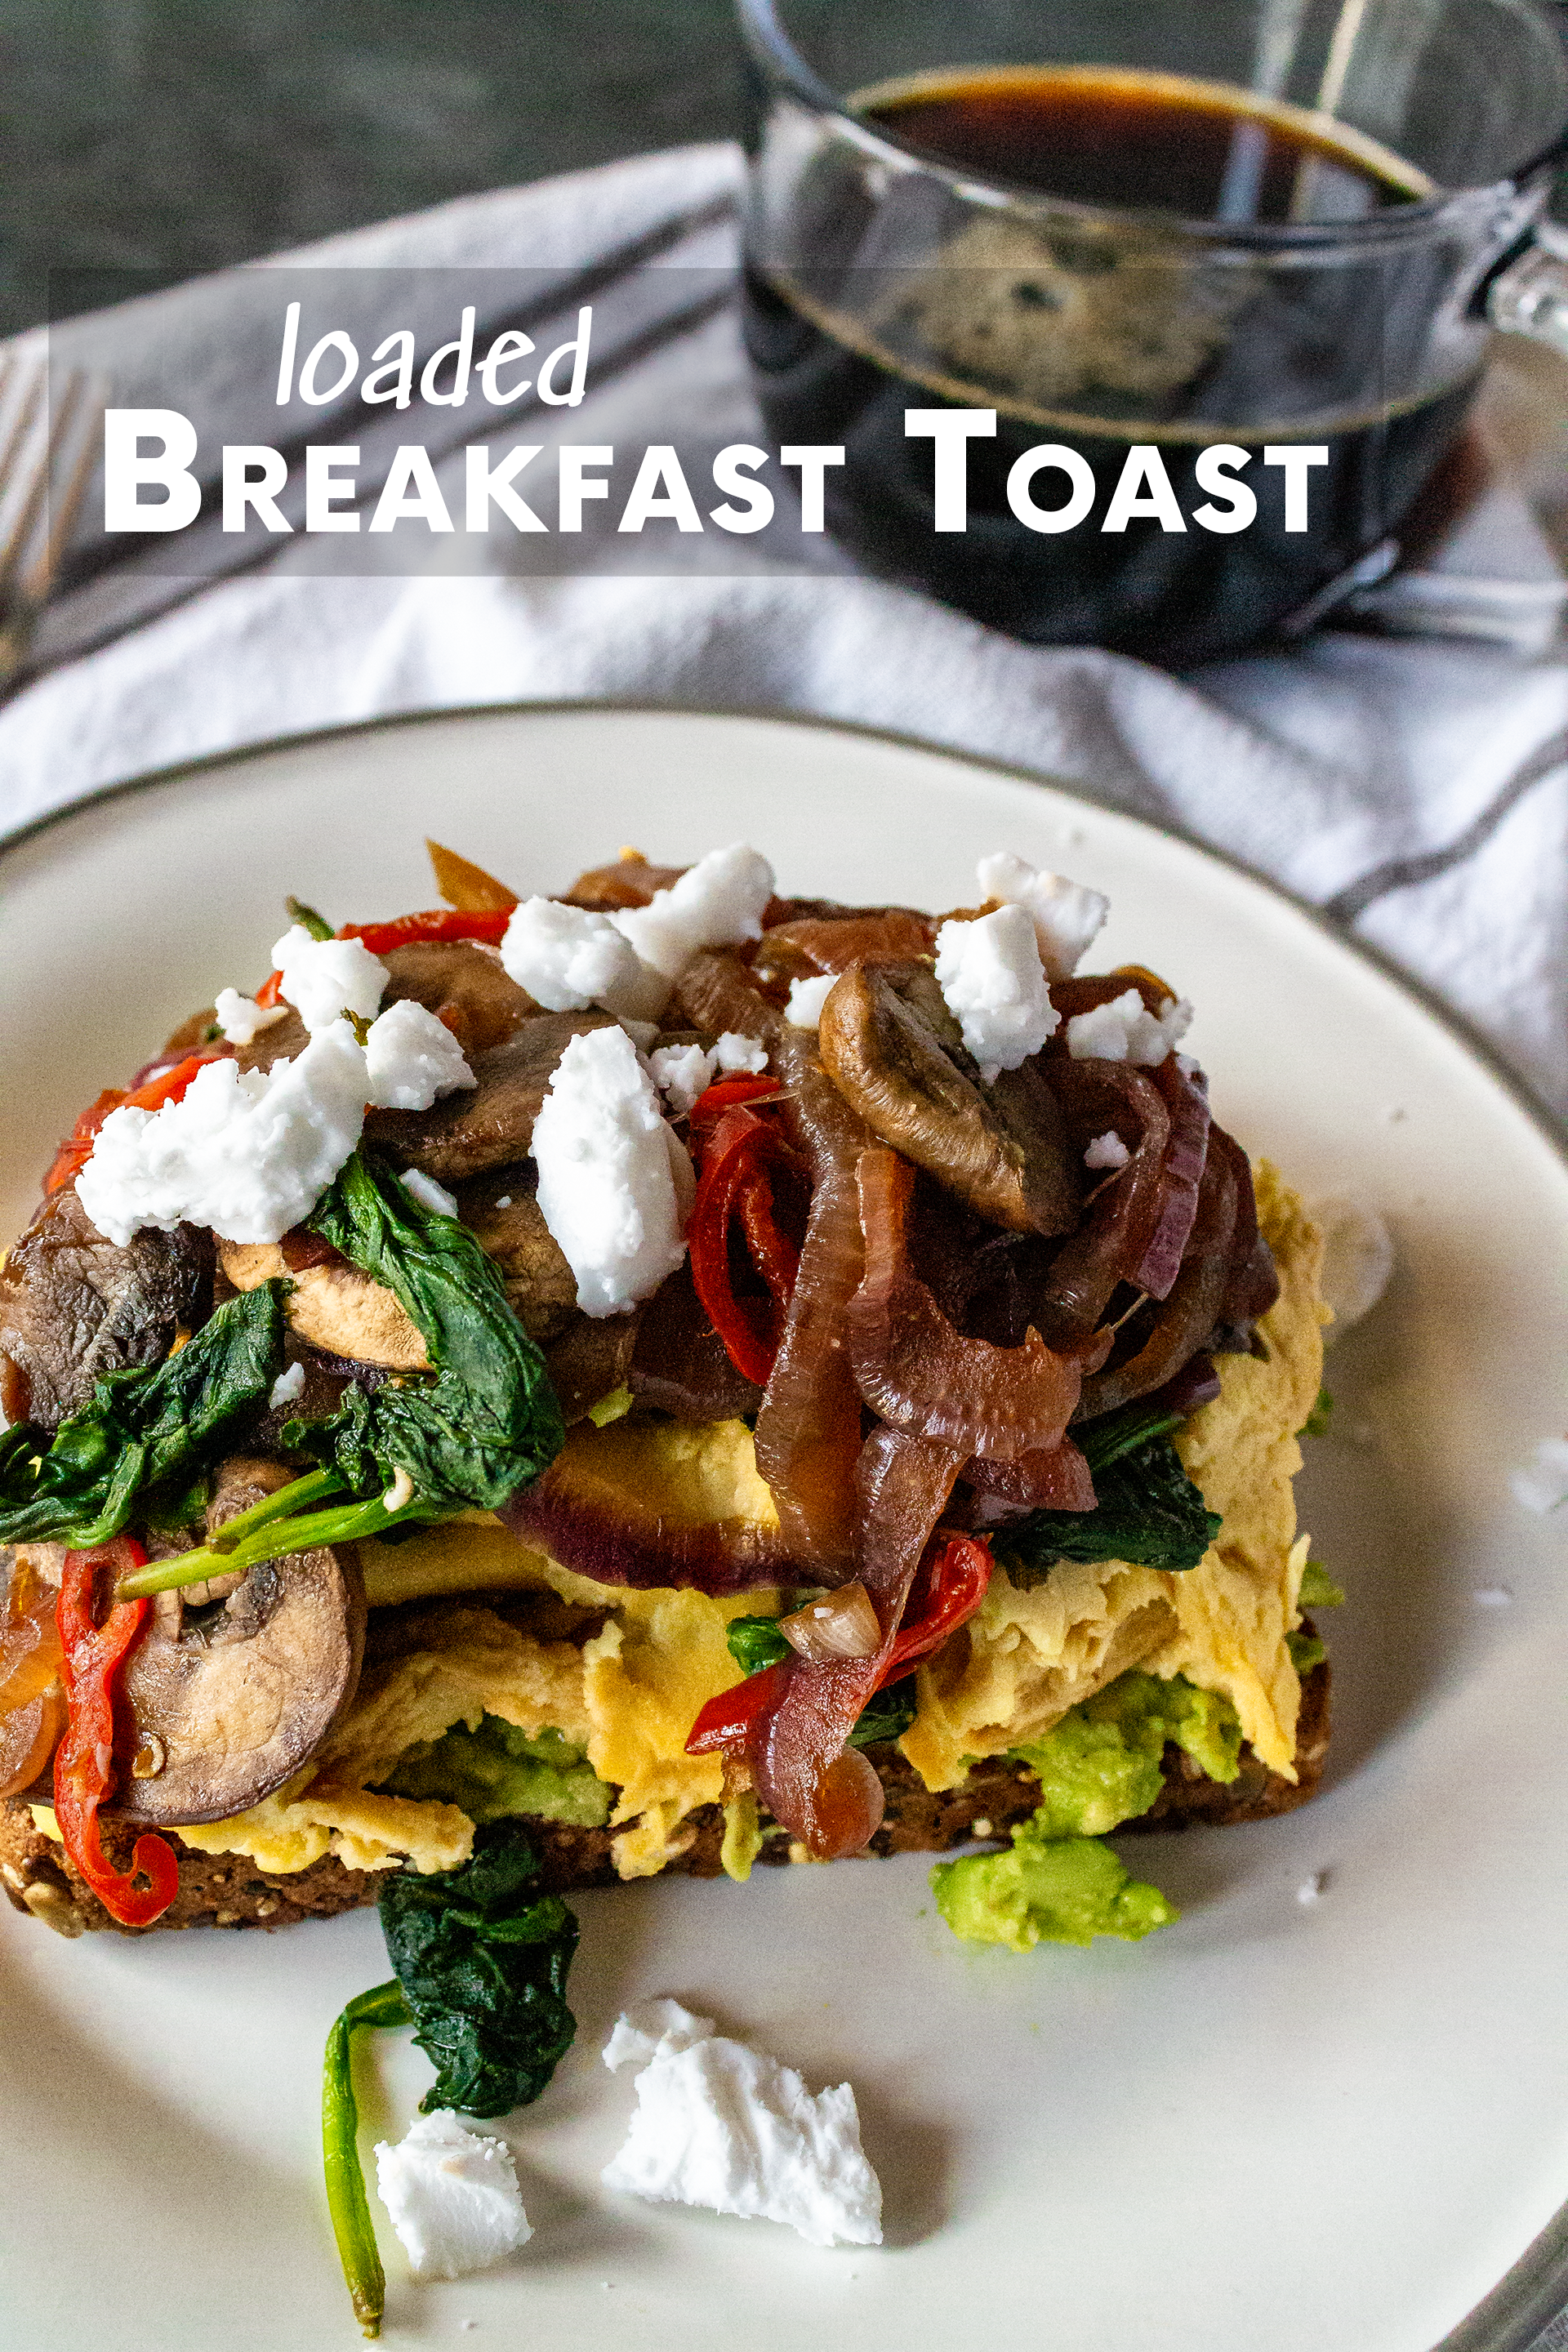
It is absolutely no secret that I love avocado toast, and this loaded “breakfast toast” version has become my go-to for a late morning meal or brunch if I need something to get me through an afternoon of online classes. The salty-sourness of the soy sauce and balsamic vinegar compliments the relatively sweet feta cheese so well. All of that veggie goodness layered atop protein-packed eggs/egg substitute (like JUST Egg or my tofu scramble) and an avocado chock full of healthy fats makes for a wonderfully nourishing start to the day. Structurally, I’ve found that whole grain or hearty sourdough bread holds up best under all of the weight, but white bread makes for an indulgent and delicious alternative as well. This recipe is so versatile, you can change almost any element and it will still taste great! Also, as an aside–yes, this can be made completely vegan. I’ve recently discovered Violife’s feta alternative (pictured) and I’m obsessed.
Ingredients:
- 2 slices toast, buttered
- 1 cup scrambled eggs, egg substitute, or tofu scramble
- 1/4 cup feta cheese
- 1 avocado
- 1/2 cup baby bella mushrooms, sliced
- 1/2 cup onion, sliced
- 1/4 cup mini sweet peppers, sliced
- 1 cup spinach
- 2 tsp soy sauce
- 1 tsp balsamic vinegar
- 1/2 tsp lemon juice
- 1/4 tsp salt
- 1/4 tsp black pepper
Directions:
- Toast two slices of bread in a pan with butter, under the broiler, or in a toaster. Set aside.
- Mash 1 fresh avocado in a small bowl with salt, pepper, and lemon juice. Set aside.
- Prep and cook scrambled eggs, egg substitute, or tofu scramble as desired. Set aside.
- Heat a nonstick pan on medium-high heat. Add peppers and sauté for 1-2 minutes, or until softened and fragrant.
- Add mushrooms, onion, soy sauce, and balsamic vinegar and cook for an additional 3-5 minutes, or until vegetables have browned and most liquid has evaporated.
- Add spinach and sauté for about 1 minute, or until wilted. Set aside to assemble.
- Layer toast with avocado, egg/egg substitute, vegetable sauté, feta cheese, and your favorite hot sauce or crema.
Although I wouldn’t recommend storing an assembled toast in the fridge for fear of the bread becoming irreparably soggy, the individual components keep really well on their own. The lemon juice keeps the avocado from becoming brown, and the vegetable sauté can last several days and still taste great. More than once I’ve overestimated how much I want to eat in a single sitting and saved the toppings for another day.

Loaded Breakfast Toast
Ingredients
- 2 slices toast buttered
- 1 cup scrambled eggs egg substitute, or tofu scramble
- 1/4 cup feta cheese
- 1 avocado
- 1/2 cup baby bella mushrooms sliced
- 1/2 cup onion sliced
- 1/4 cup mini sweet peppers sliced
- 1 cup spinach
- 2 tsp soy sauce
- 1 tsp balsamic vinegar
- 1/2 tsp lemon juice
- 1/4 tsp salt
- 1/4 tsp black pepper
Instructions
- Toast two slices of bread in a pan with butter, under the broiler, or in a toaster. Set aside.
- Mash 1 fresh avocado in a small bowl with salt, pepper, and lemon juice. Set aside.
- Prep and cook scrambled eggs, egg substitute, or tofu scramble as desired. Set aside.
- Heat a nonstick pan on medium-high heat. Add peppers and sauté for 1-2 minutes, or until softened and fragrant.
- Add mushrooms, onion, soy sauce, and balsamic vinegar and cook for an additional 3-5 minutes, or until vegetables have browned and most liquid has evaporated.
- Add spinach and sauté for about 1 minute, or until wilted. Set aside to assemble
- .Layer toast with avocado, egg/egg substitute, vegetable sauté, feta cheese, and your favorite hot sauce or crema.

The post Loaded Breakfast Toast appeared first on I Forgot Salt!.
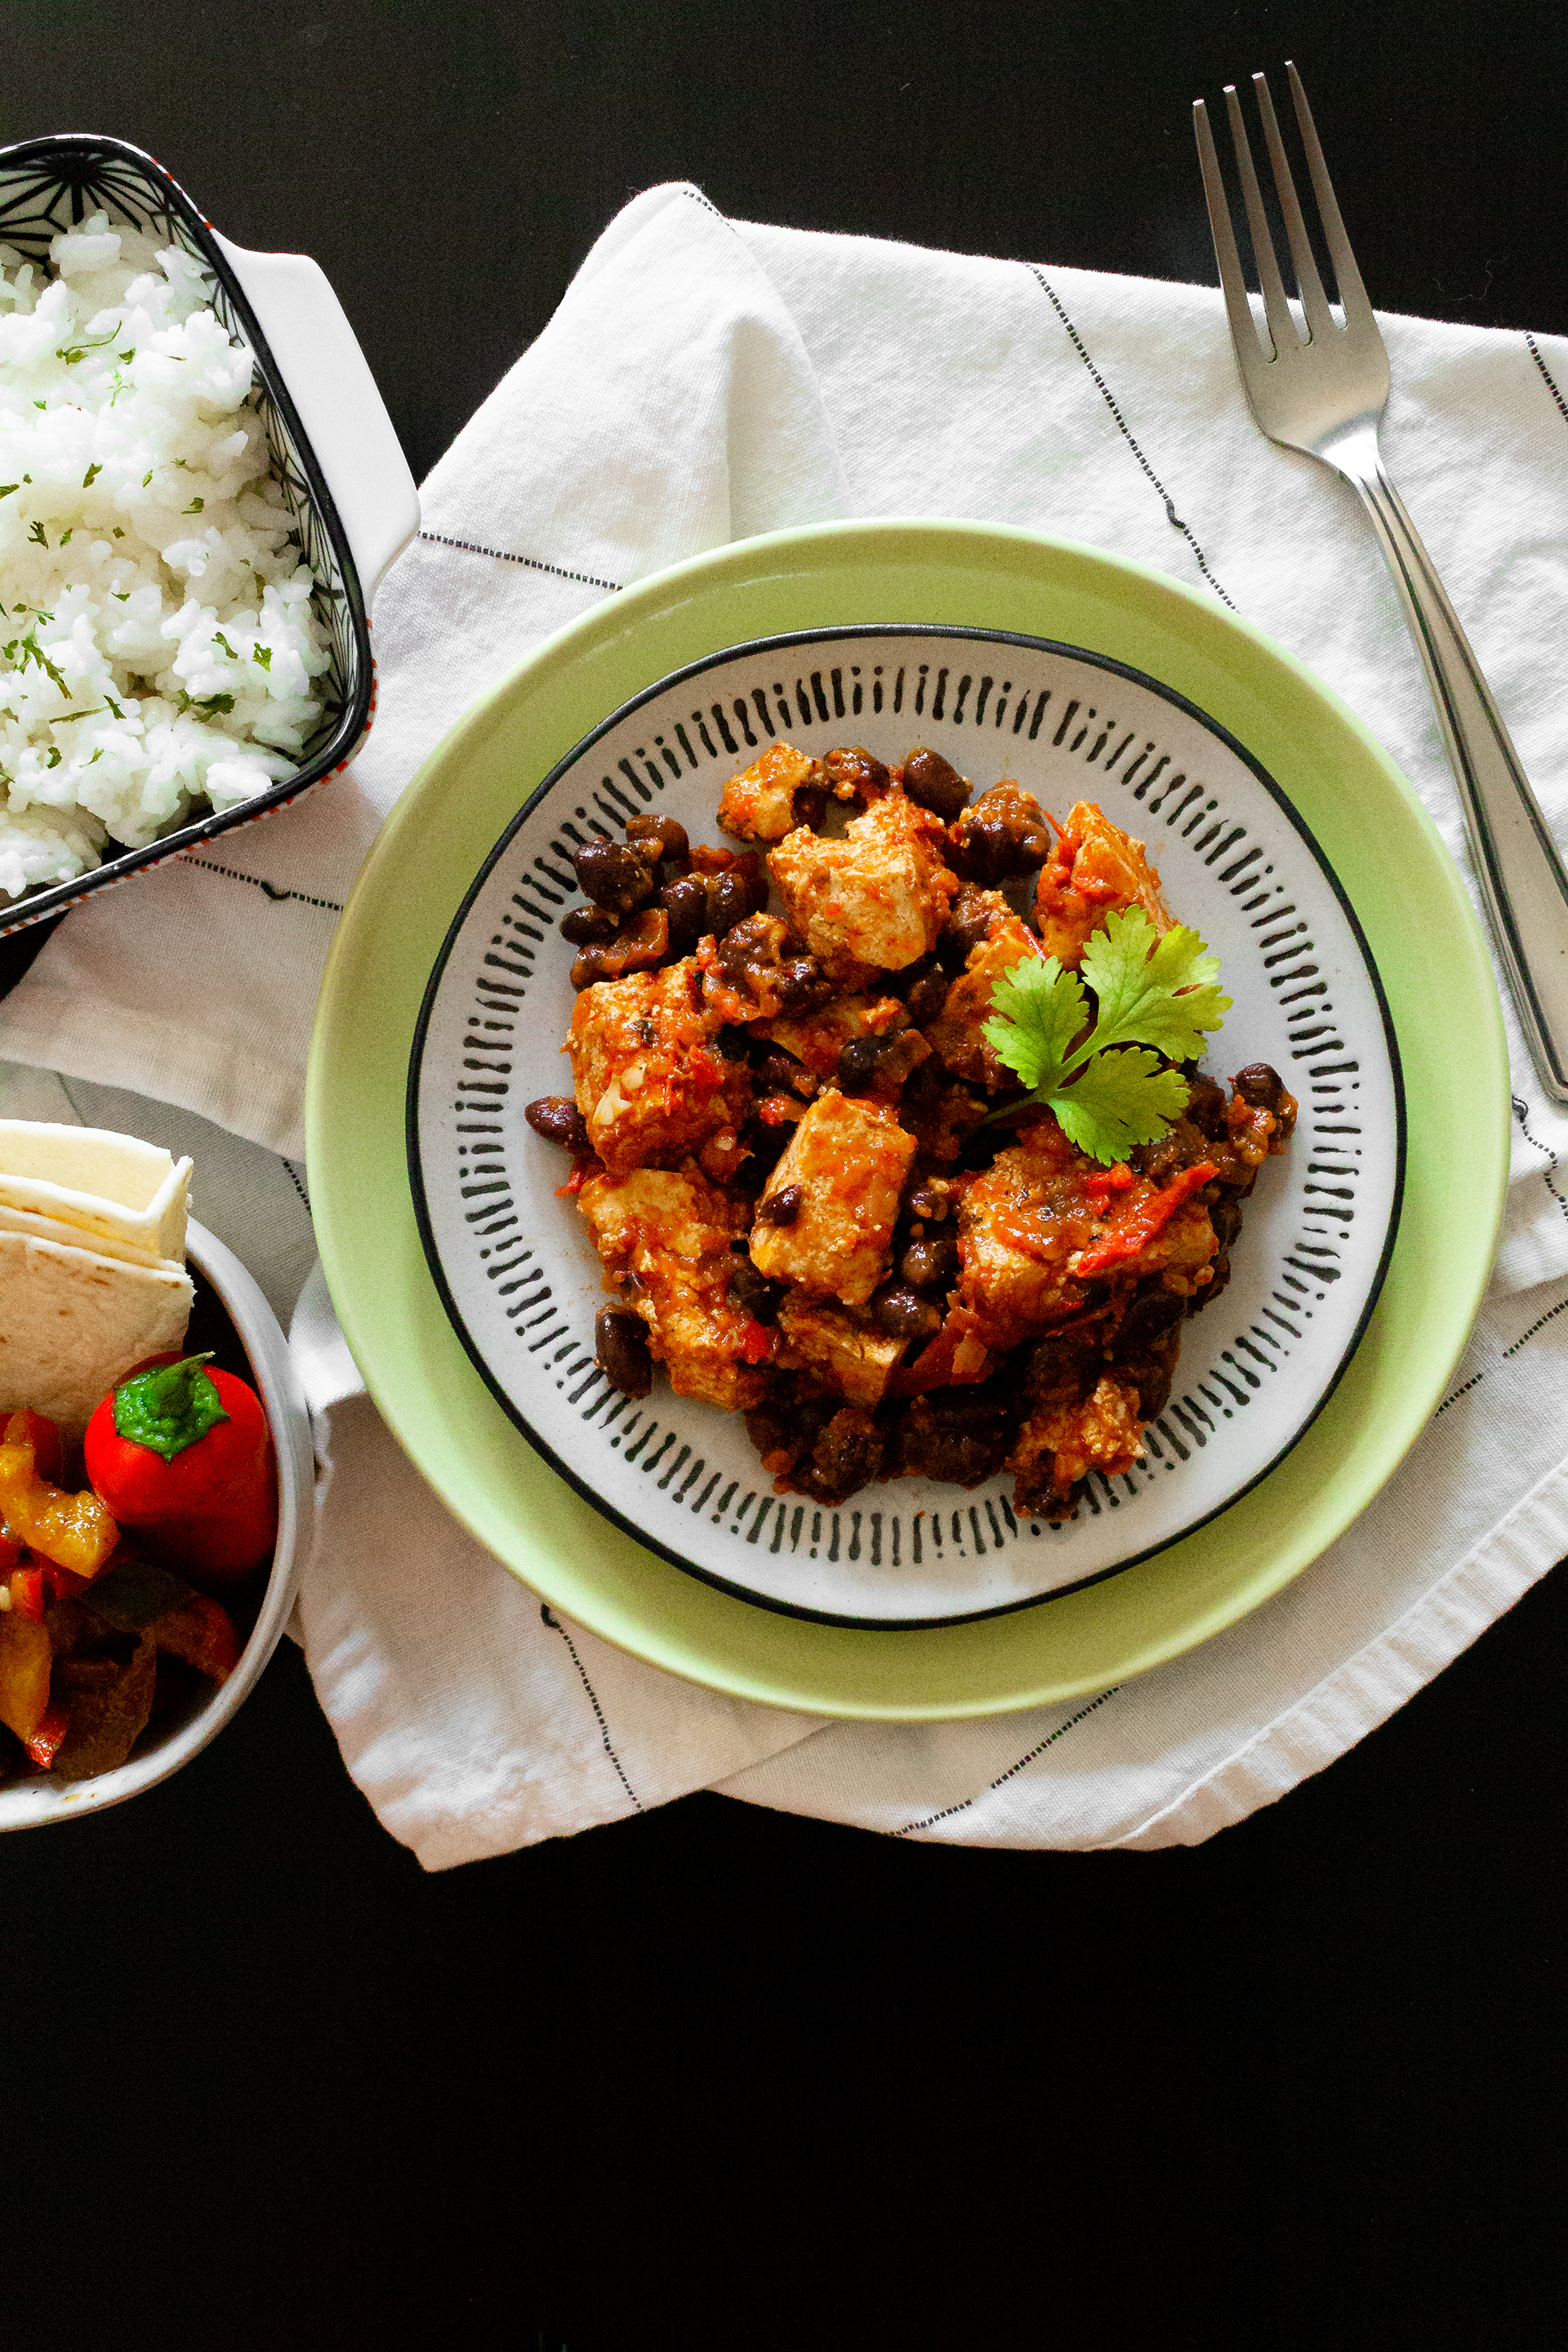
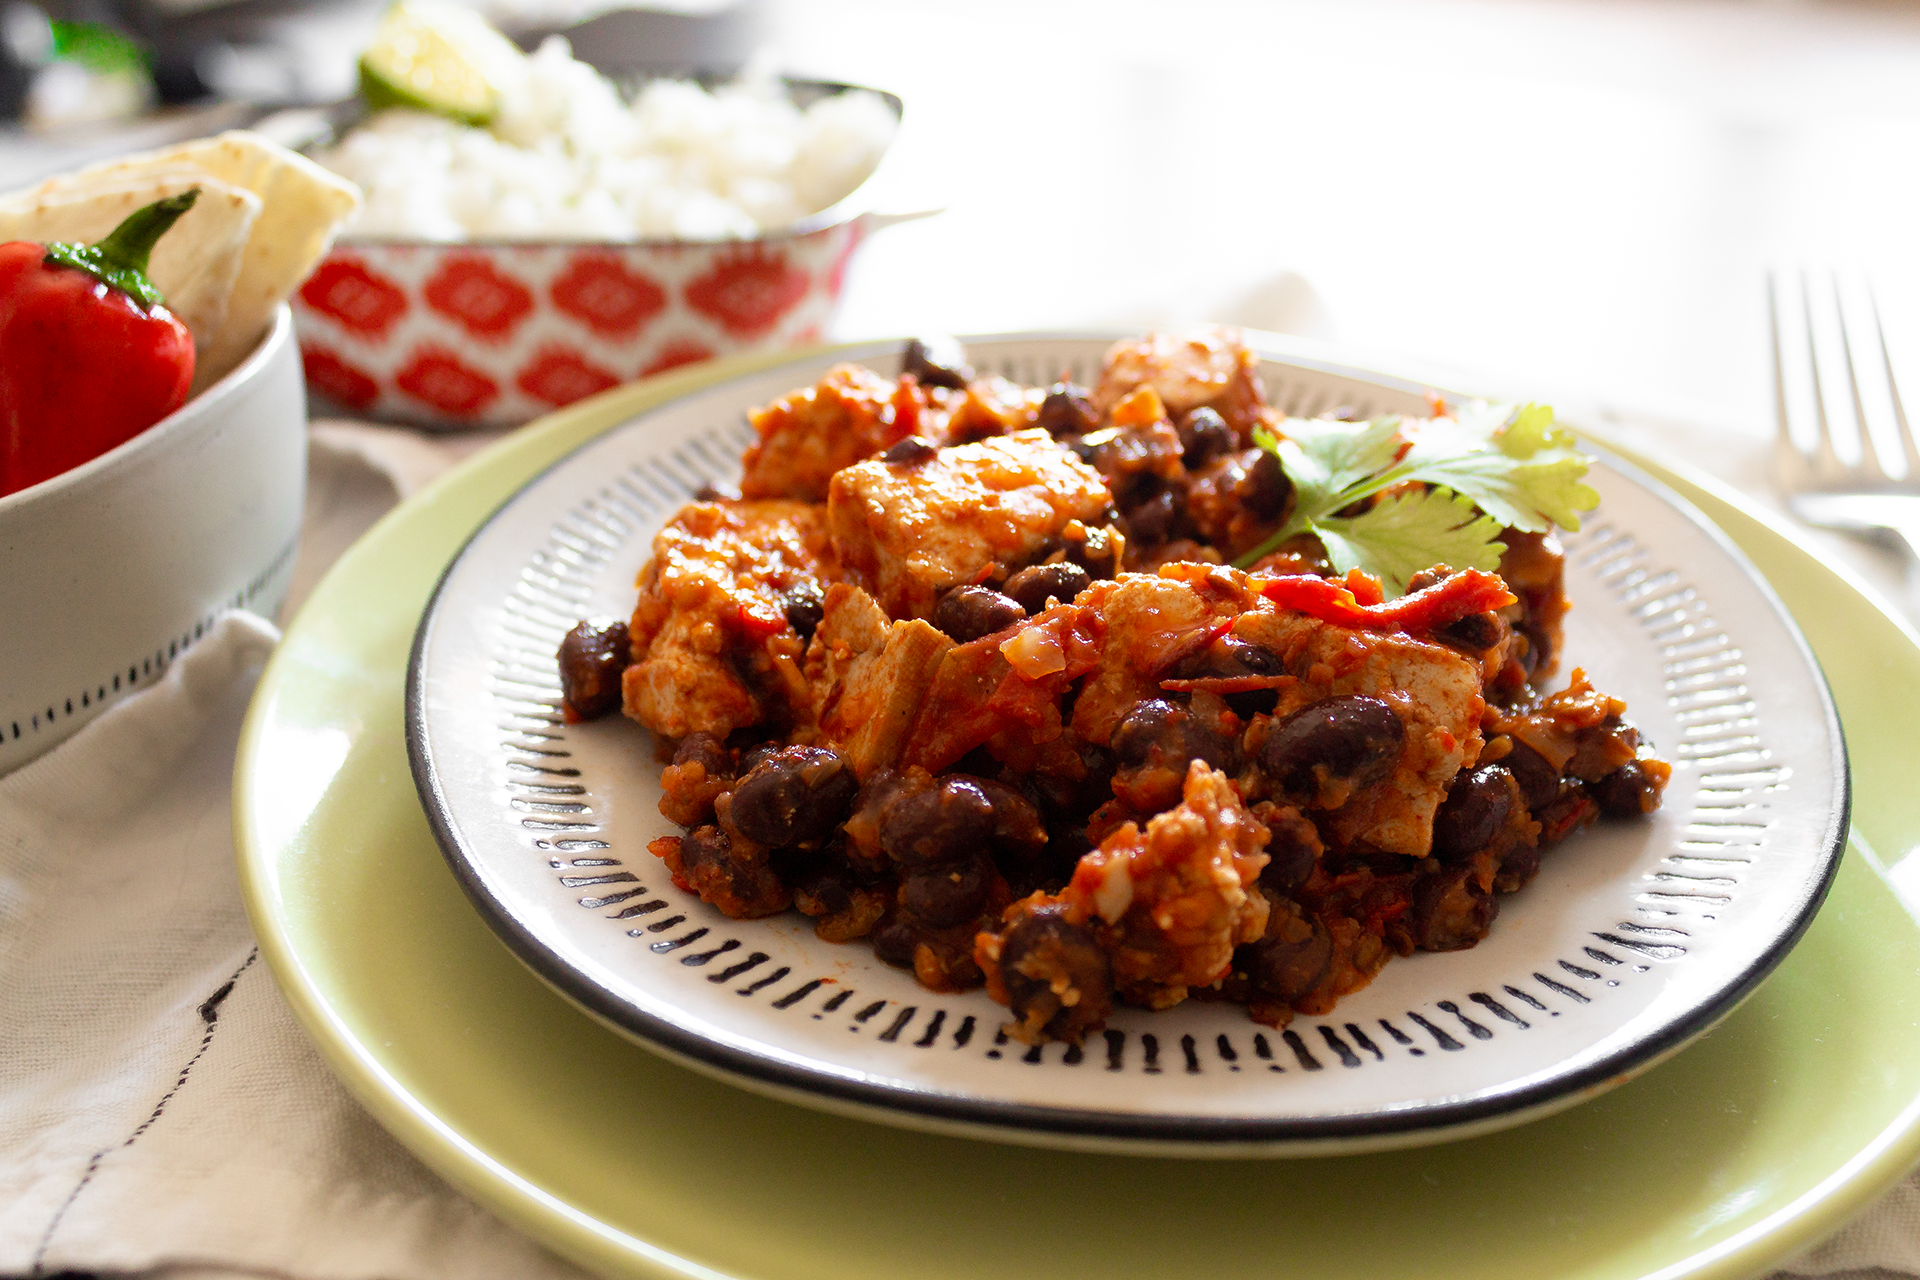
]]>The post Tofu + Black Bean Chipotle Sofritas appeared first on I Forgot Salt!.
]]>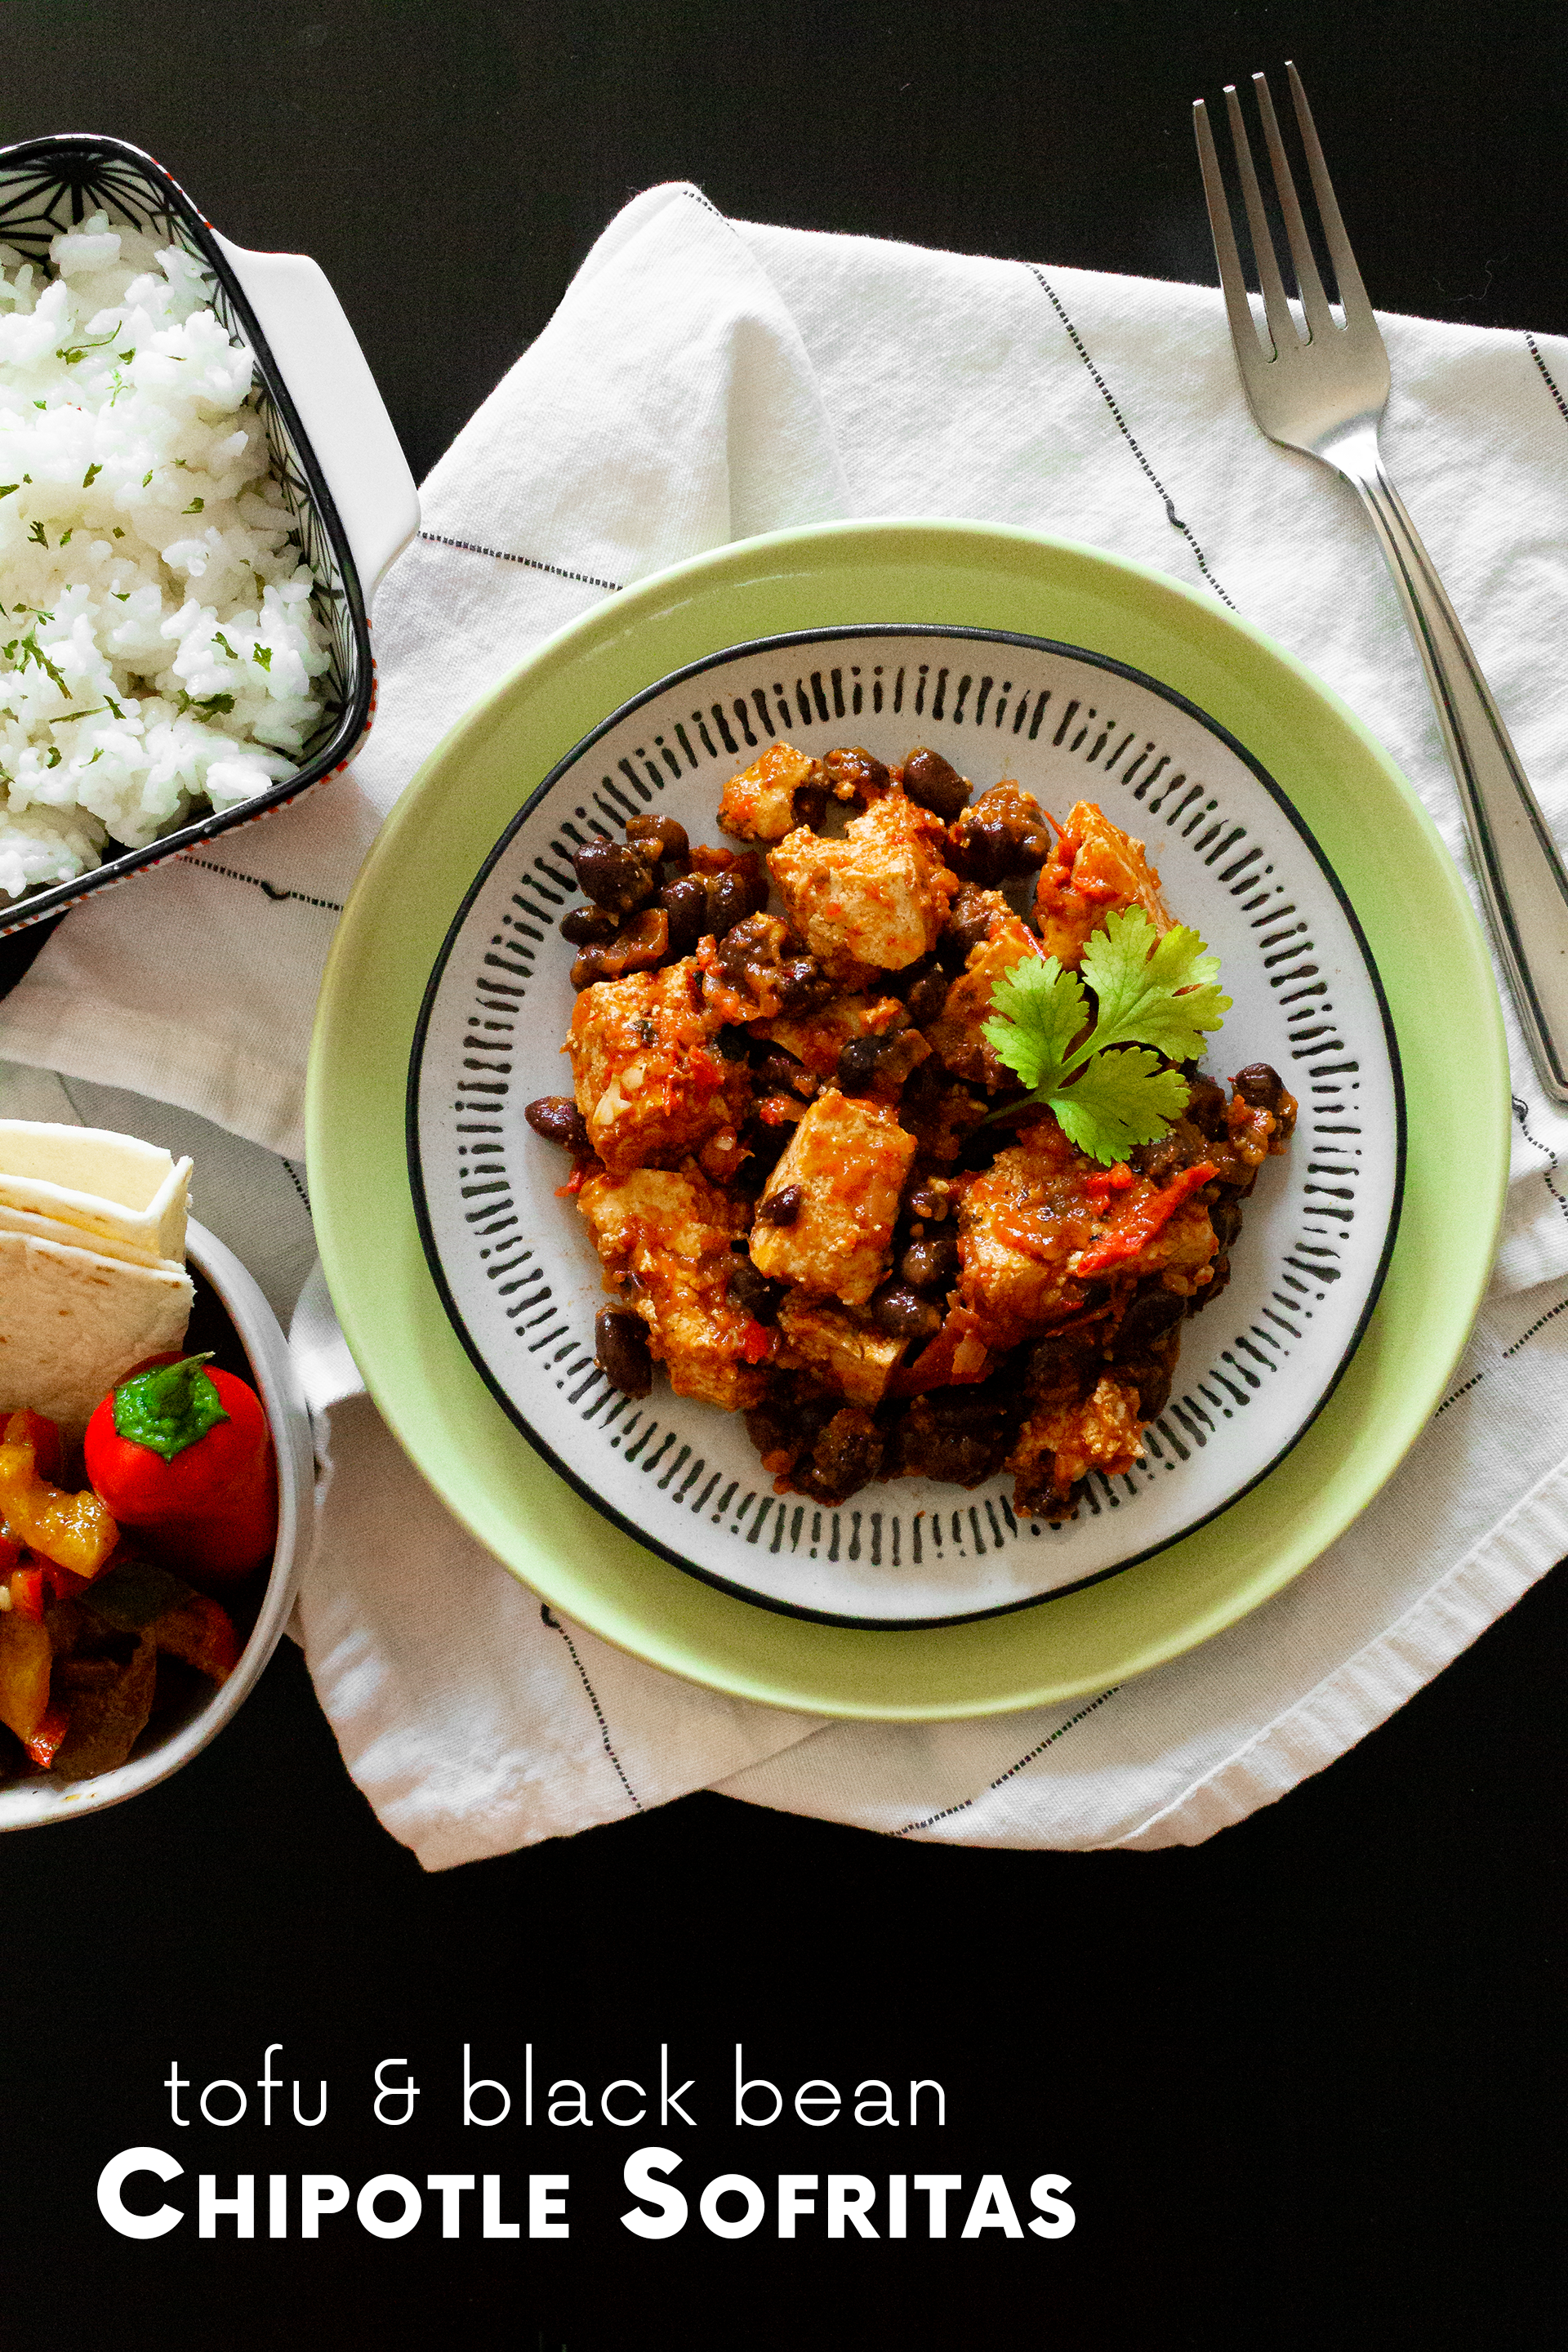
As the countdown to the beginning of my fall semester comes to a close, I am continuing to grow and expand my repertoire of new recipes–including this (much improved) Chipotle sofritas copycat. Before we moved, Alex and I lived within walking distance of a Chipotle, making it an easy option for takeout on evenings I didn’t feel like throwing something together. Now, however, the closest Chipotle (and those sweet, sweet sofritas) is all the way across town, and I have such easy access to fresh, local ingredients that I’ve found myself wanting to cook at home almost every night. That hasn’t stopped me from craving those delicious burrito bowls, though! So, the only solution was the obvious one–recreate something similar (but better) at home.
A full taco spread–him with (local) ground beef and me with these Chipotle sofritas–was actually the first “sit-down” dinner Alex and I had at our new place after several hectic days of unpacking and putting together furniture. That was also the first time I made my creamy avocado salsa verde, too, which honestly was a dream come true with this sweet and savory bean and tofu combo. Wrapped up in a tortilla with warm pan-seared veggies, salsa verde, and some (vegan) sour cream, this recipe easily outshines anything Chipotle has to offer (in my opinion, at least). I’ve made it twice since we moved in and eaten it a variety of ways–from salads to a full-scale burrito bowl in addition to the aforementioned tacos–and every time I chow down I can’t help but wonder why it took me so long to make my own Chipotle sofritas copycat instead of spending $10 a pop. So good!

One of the most fun parts about this recipe, too, is that I get to my brand new mini Instant Pot if I’m cooking with dried black beans. One of the best things our local food co-op has to offer is a bulk section where we can buy dried beans, lentils, grains, and even coffee by the self-bagged pound. It’s a much cheaper, less wasteful, and more space-efficient way to stock up on non-perishables, and I’ve completely bought in to the idea of having a pantry full of 64oz mason jars and glass Ikea storage containers. We’ve been buying our coffee in bulk since we moved, but I’ve only recently started buying dried beans, etc, after finishing off the last of the cans we traveled with. My mini Instant pot (a 3qt Duo Mini we found on sale at Walmart) has been amazing for whipping up batches of dried beans in a fraction of the time it would take to soak them overnight or even boil them on the stove. My next goal is to try making lentils in it! Very exciting.
This recipe makes 6 servings.
Ingredients
- 1 block (16oz) firm tofu
- 1.5 cups black beans, cooked
- 2 tomatoes, whole
- 2 jalapenos
- 1 onion
- 3 cloves garlic
- 1 cup vegetable broth
- 1/4 cup chipotle peppers in adobo (from can)
- 1/4 cup fresh cilantro
- 2 tbsp lime juice
- 2 tbsp red wine vinegar
- 1 tbsp nutritional yeast
- 1 tbsp olive oil + 1/4 tsp olive oil, divided
- 1/4 tsp chili powder
- 1/4 tsp oregano
- 1/4 tsp cumin
- 1/4 tsp paprika
- 1/4 tsp coriander
- 1/4 tsp salt + 1 tsp salt, divided
- black pepper (pinch)
Directions:
- Boil/pressure cook black beans as needed if not using canned beans.
- Wrap tofu block in dish towels and press with a heavy object for at least one hour.
- Preheat oven to 425F.
- Wrap garlic cloves, 1/4 tsp olive oil, and black pepper in a small piece of parchment paper to create a garlic roasting pouch. Slice jalapenos in half and discard seeds if desired. Slice tomatoes in half. Slice onion into quarters.
- Spread vegetables onto a baking sheet with 1 tsp salt and 1 tbsp olive oil, add garlic roasting pouch. Bake for 20 minutes.
- While vegetables are roasting, slice pressed tofu into 2-3 thin slabs. Dry fry on a nonstick skillet until each side is golden brown and the slabs hold their shape moderately well/do not easily crumble. Rip or tear each slab into bite-sized chunks with your hands. Set aside.
- In a food processor or blender, add roasted vegetables/garlic, red wine vinegar, nutritional yeast, spices, lime juice, chipotle peppers in adobo, cilantro, and vegetable broth. Blend until a sauce has formed.
- Add tofu, black beans, and sauce to a large nonstick skillet and heat on medium-high, stirring to ensure that everything is coated with the sauce. Heat through and reduce sauce/tofu/bean mixture to your desired consistency. (For my preferred less-saucy version pictured above, I bring everything to a boil and reduce for 10-12 minutes.)
- Top with additional lime juice and cilantro, and serve with on tortillas with your favorite toppings for taco night, or with cilantro-lime rice and all of the fixings for the Chipotle burrito bowl experience.
This recipe keeps wonderfully in the fridge overnight, and lasts for up to a week after cooking. I’ve found that the flavors only meld and improve in their new lives as leftovers, and some of my favorite ways to enjoy these Chipotle sofritas are as lunch the next day with whatever I can find in the fridge. They can be eaten hot, room-temperature, or cold, and taste great either way. Enjoy!
Tofu & Black Bean Chipotle Sofritas
Ingredients
- 1 block firm tofu (16oz)
- 1.5 cups black beans cooked
- 2 tomatoes whole
- 2 jalapenos
- 1 onion
- 3 cloves garlic
- 1 cup vegetable broth
- 1/4 cup chipotle peppers in adobo from can
- 1/4 cup fresh cilantro
- 2 tbsp lime juice
- 2 tbsp red wine vinegar
- 1 tbsp nutritional yeast
- 1 tbsp olive oil + 1/4 tsp olive oil divided
- 1/4 tsp chili powder
- 1/4 tsp oregano
- 1/4 tsp cumin
- 1/4 tsp paprika
- 1/4 tsp coriander
- 1/4 tsp salt + 1 tsp salt divided
- black pepper pinch
Instructions
- Boil/pressure cook black beans as needed if not using canned beans.
- Wrap tofu block in dish towels and press with a heavy object for at least one hour.
- Preheat oven to 425F.
- Wrap garlic cloves, 1/4 tsp olive oil, and black pepper in a small piece of parchment paper to create a garlic roasting pouch. Slice jalapenos in half and discard seeds if desired. Slice tomatoes in half. Slice onion into quarters.
- Spread vegetables onto a baking sheet with 1 tsp salt and 1 tbsp olive oil, add garlic roasting pouch. Bake for 20 minutes.
- While vegetables are roasting, slice pressed tofu into 2-3 thin slabs. Dry fry on a nonstick skillet until each side is golden brown and the slabs hold their shape moderately well/do not easily crumble. Rip or tear each slab into bite-sized chunks with your hands. Set aside.
- In a food processor or blender, add roasted vegetables/garlic, red wine vinegar, nutritional yeast, spices, lime juice, chipotle peppers in adobo, cilantro, and vegetable broth. Blend until a sauce has formed.
- Add tofu, black beans, and sauce to a large nonstick skillet and heat on medium-high, stirring to ensure that everything is coated with the sauce. Heat through and reduce sauce/tofu/bean mixture to your desired consistency. (For my preferred less-saucy version pictured above, I bring everything to a boil and reduce for 10-12 minutes.)
- Top with additional lime juice and cilantro, and serve with on tortillas with your favorite toppings for taco night, or with cilantro-lime rice and all of the fixings for the Chipotle burrito bowl experience.

The post Tofu + Black Bean Chipotle Sofritas appeared first on I Forgot Salt!.
]]>The post Eight-Vegetable Quinoa Salad with Red Pepper Vinaigrette appeared first on I Forgot Salt!.
]]>
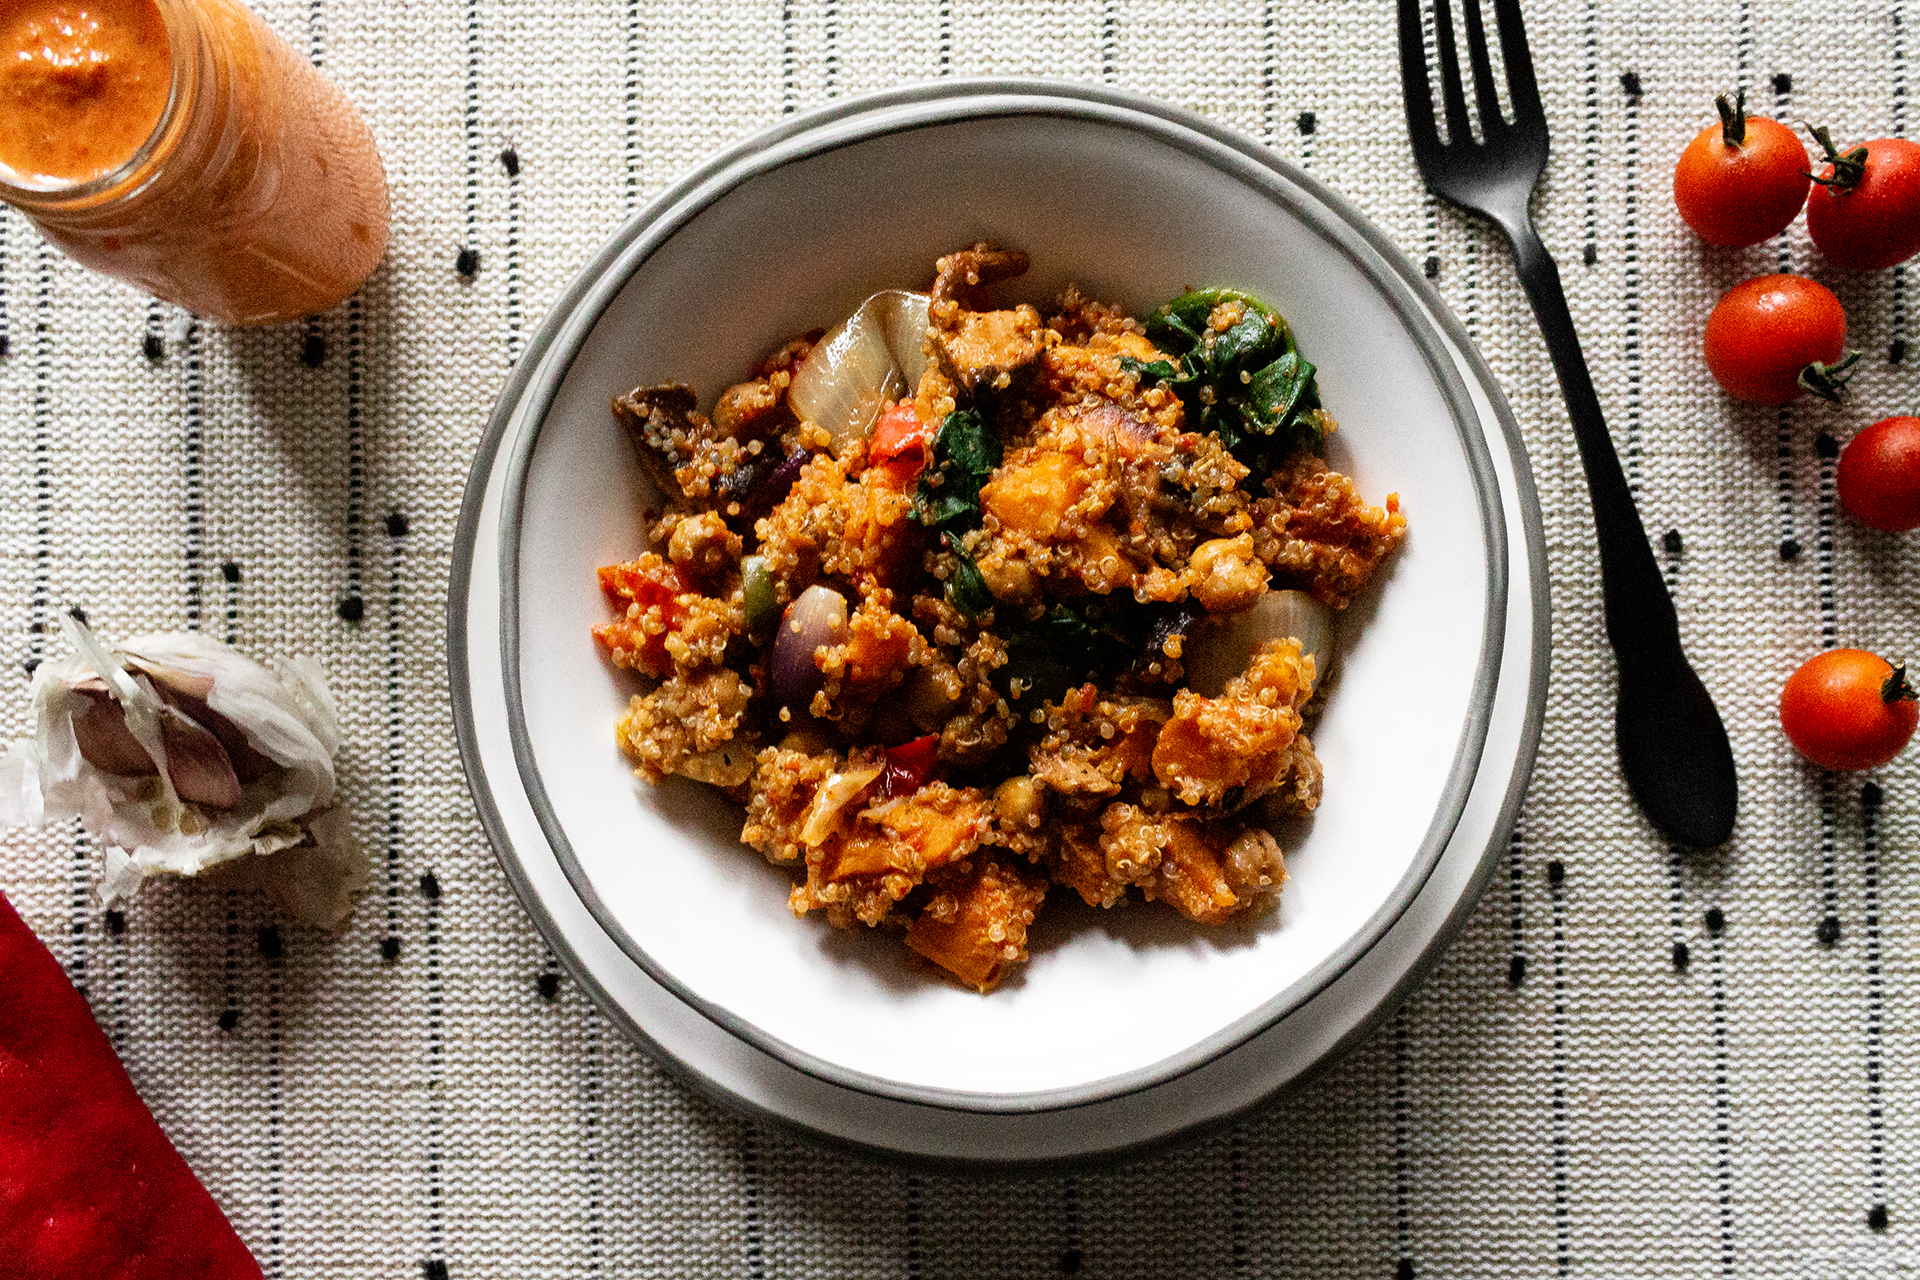
Have I mentioned lately that I’m obsessed with our new local farmer’s market? Yes? Well, too bad–you’re going to hear it again. I am obsessed with that place! This quinoa salad is literally just the result of me throwing every kind of vegetable we picked up during our first official trip to fresh produce heaven into the oven and mixing it with quinoa. Seriously. The first time I made it, every flavor element came right from the veggies themselves. In the half-dozen times I’ve whipped up this recipe since then, I’ve made some minor adjustments (and added a dressing to round it out!) but the core of this dish remains the same. Also, yes–our local farmer’s market has shiitake mushrooms. Incredible.
The red pepper dressing was hugely inspired by a Wegman’s red pepper vinaigrette that I adored… before realizing it wasn’t actually vegan. It still holds a special place in my heart, but once I tried my hand at putting together my own version there is definitely no going back! Everything I loved about the original store-bought version has been completely enhanced in my homemade vegan version, and it’s so simple to throw together in this dish that it takes barely any extra effort at all! I simply roast what needs to be roasted on the same pan as all of my other vegetables, and separate them out to be blended when the timer goes off. Tahini proved to be a great substitute for the cream used to thicken the original dressing, too, and I made a few additional swaps for taste like using red wine vinegar instead of white vinegar. Overall, I’m extremely happy with how it turned out, and I’ll definitely be keeping a jar of it on hand in the fridge for any mid-week lunchtime quinoa salad cravings!
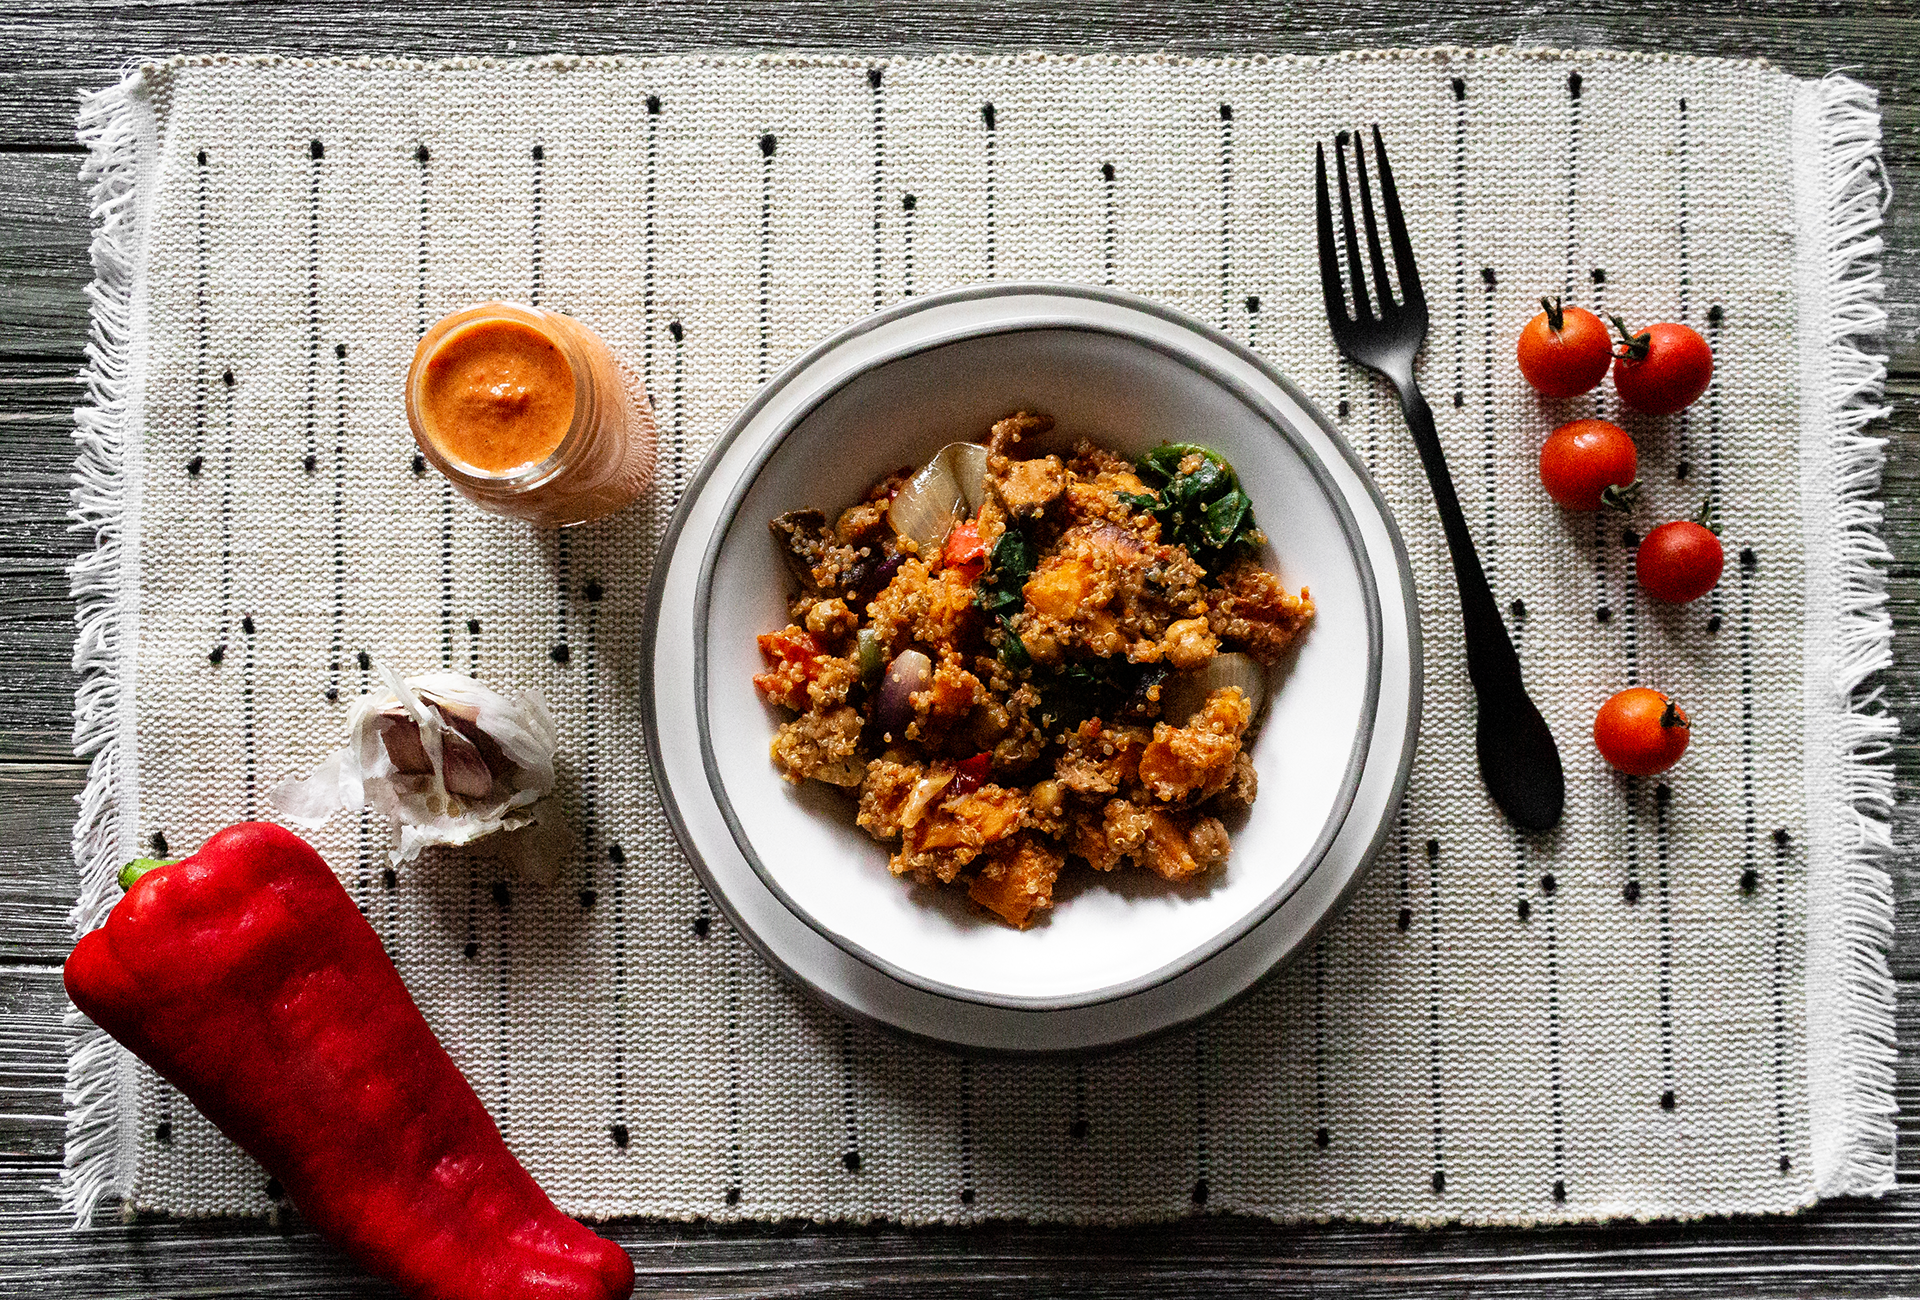
One of the most interesting parts about moving toward a fully plant-based diet (which I spoke a bit about in my shrimp crostini post) has been learning more about nutrition as a whole. Rather than just keeping a rough tally of how many calories I’ve eaten on a given day, I’ve found myself focusing more on things like vitamins, minerals, and basic food categories instead. Doing so has helped to improve my relationship with food as a whole, in addition to making me feel healthier and happier with my overall choices. This dish specifically hits every major checkbox for what I’d consider a satisfying, filling, and nutritious meal. Fiber and carbs from the quinoa, vitamin D from the spinach and mushrooms, vitamin C from the tomatoes and peppers, iron from the onions, protein from the sweet potato and chickpeas, and healthy fats from the olive oil and tahini. Not only does this quinoa salad taste great, but it’s great for your body, too!
This recipe makes four servings.
Salad Ingredients:
- 1/2 cup quinoa, dried
- 1 cup vegetable broth
- 2 medium onions
- 1 medium sweet potato
- 10-12 cherry tomatoes
- 2 large bell peppers
- 1 jalapeno
- 15 oz chickpeas (about 1 can)
- 2 cups spinach, fresh
- 1/2 cup shiitake mushrooms
- 2 tbsp olive oil
- 2 tbsp soy sauce
- 1 tsp chipotle powder
- 1 tsp garlic powder
- 1 tsp salt
Dressing Ingredients:
- 3-4 roasted red peppers (from jar)
- 1 medium onion
- 2 cloves garlic
- 1/4 cup red wine vinegar
- 1/4 cup olive oil + 1/2 tsp divided
- 2 tbsp tahini
- 1 tbsp honey/maple syrup
- 1 tsp rosemary
- 1/4 tsp black pepper
- 1/2 tsp salt + 1/4 tsp divided
Directions:
- Add quinoa and vegetable broth to a rice cooker and begin cycle, or use the stovetop method.
- Preheat oven to 425F.
- Chop sweet potato, bell peppers, and jalapeno into bite-sized (about 1-inch) chunks. Chop onions (all three) into quarters. Slice grape tomatoes in half.
- Toss vegetables from step 2 and rinsed/drained chickpeas in garlic powder, chipotle powder, salt, and 2 tbsp olive oil. Spread evenly on baking sheet.
- Wrap garlic cloves, black pepper, 1/2 tsp olive oil, and 1/4 tsp salt in a small piece of parchment paper to make a garlic roasting packet. Place seam-side down on the baking sheet with the vegetables.
- Roast vegetables and garlic for 20 mins at 425F.
- Meanwhile, heat a nonstick skillet on medium-high heat. Tear shiitake mushrooms into bite-sized pieces and add to the skillet with soy sauce. Saute for 5-7 minutes, or until the mushrooms have absorbed most of the soy sauce and become lightly toasted.
- Remove mushrooms to the side and add spinach to the still-hot skillet. Saute until wilted, about 2-3 minutes. Remove and set aside.
- When the vegetables have finished roasting, add all dressing ingredients (including the now-roasted onion and garlic) to a food processor and blend until smooth. Add salt to taste if necessary.
- In a large bowl, combine quinoa, roasted vegetables and chickpeas, sauteed mushrooms and spinach, and about 1/2 dressing. Toss to coat. Enjoy.
This recipe can be eaten warm, room temperature, or cold, and keeps great in the refrigerator for several days. I’ve used it as a meal prep for myself more than once, and eaten lunch leftovers for dinner on days I don’t feel like cooking. Whether reheated or not, it still taste great. The dressing keeps wonderfully in a sealed mason jar in the fridge, as well, and can be used on more than just this quinoa salad! Alex has been eating it on mixed green salads with rotisserie chicken over the past couple of days, and has really enjoyed having something different on-hand for lunch!


Quinoa Salad with Roasted Red Pepper Vinaigrette
Ingredients
Salad Ingredients
- 1/2 cup quinoa dried
- 1 cup vegetable broth
- 2 onions medium
- 1 sweet potato medium
- 10-12 cherry tomatoes
- 2 bell peppers large
- 1 jalapeno
- 15 oz chickpeas (about 1 can), rinsed and drained
- 2 cups spinach fresh
- 1/2 cup shiitake mushrooms
- 2 tbsp olive oil
- 2 tbsp soy sauce
- 1 tsp chipotle powder
- 1 tsp garlic powder
- 1 tsp salt
Dressing Ingredients
- 3-4 roasted red peppers from jar
- 1 medium onion
- 2 cloves garlic
- 1/4 cup red wine vinegar
- 1/4 cup olive oil + 1/2 tsp divided
- 2 tbsp tahini
- 1 tbsp honey/maple syrup
- 1 tsp rosemary
- 1/2 tsp salt + 1/4 tsp divided
- 1/4 tsp black pepper
Instructions
- Add quinoa and vegetable broth to a rice cooker and begin cycle, or use the stovetop method.
- Preheat oven to 425F.
- Chop sweet potato, bell peppers, and jalapeno into bite-sized (about 1-inch) chunks. Chop onions (all three) into quarters. Slice grape tomatoes in half.
- Toss vegetables from step 2 and rinsed/drained chickpeas in garlic powder, chipotle powder, salt, and 2 tbsp olive oil. Spread evenly on baking sheet.
- Wrap garlic cloves, black pepper, 1/2 tsp olive oil, and 1/4 tsp salt in a small piece of parchment paper to make a garlic roasting packet. Place seam-side down on the baking sheet with the vegetables.
- Roast vegetables and garlic for 20 mins at 425F.
- Meanwhile, heat a nonstick skillet on medium-high heat. Tear shiitake mushrooms into bite-sized pieces and add to the skillet with soy sauce. Saute for 5-7 minutes, or until the mushrooms have absorbed most of the soy sauce and become lightly toasted.
- Remove mushrooms to the side and add spinach to the still-hot skillet. Saute until wilted, about 2-3 minutes. Remove and set aside.
- When the vegetables have finished roasting, add all dressing ingredients (including the now-roasted onion and garlic) to a food processor and blend until smooth. Add salt to taste if necessary.
- In a large bowl, combine quinoa, roasted vegetables and chickpeas, sauteed mushrooms and spinach, and about 1/2 dressing. Toss to coat. Enjoy.

The post Eight-Vegetable Quinoa Salad with Red Pepper Vinaigrette appeared first on I Forgot Salt!.
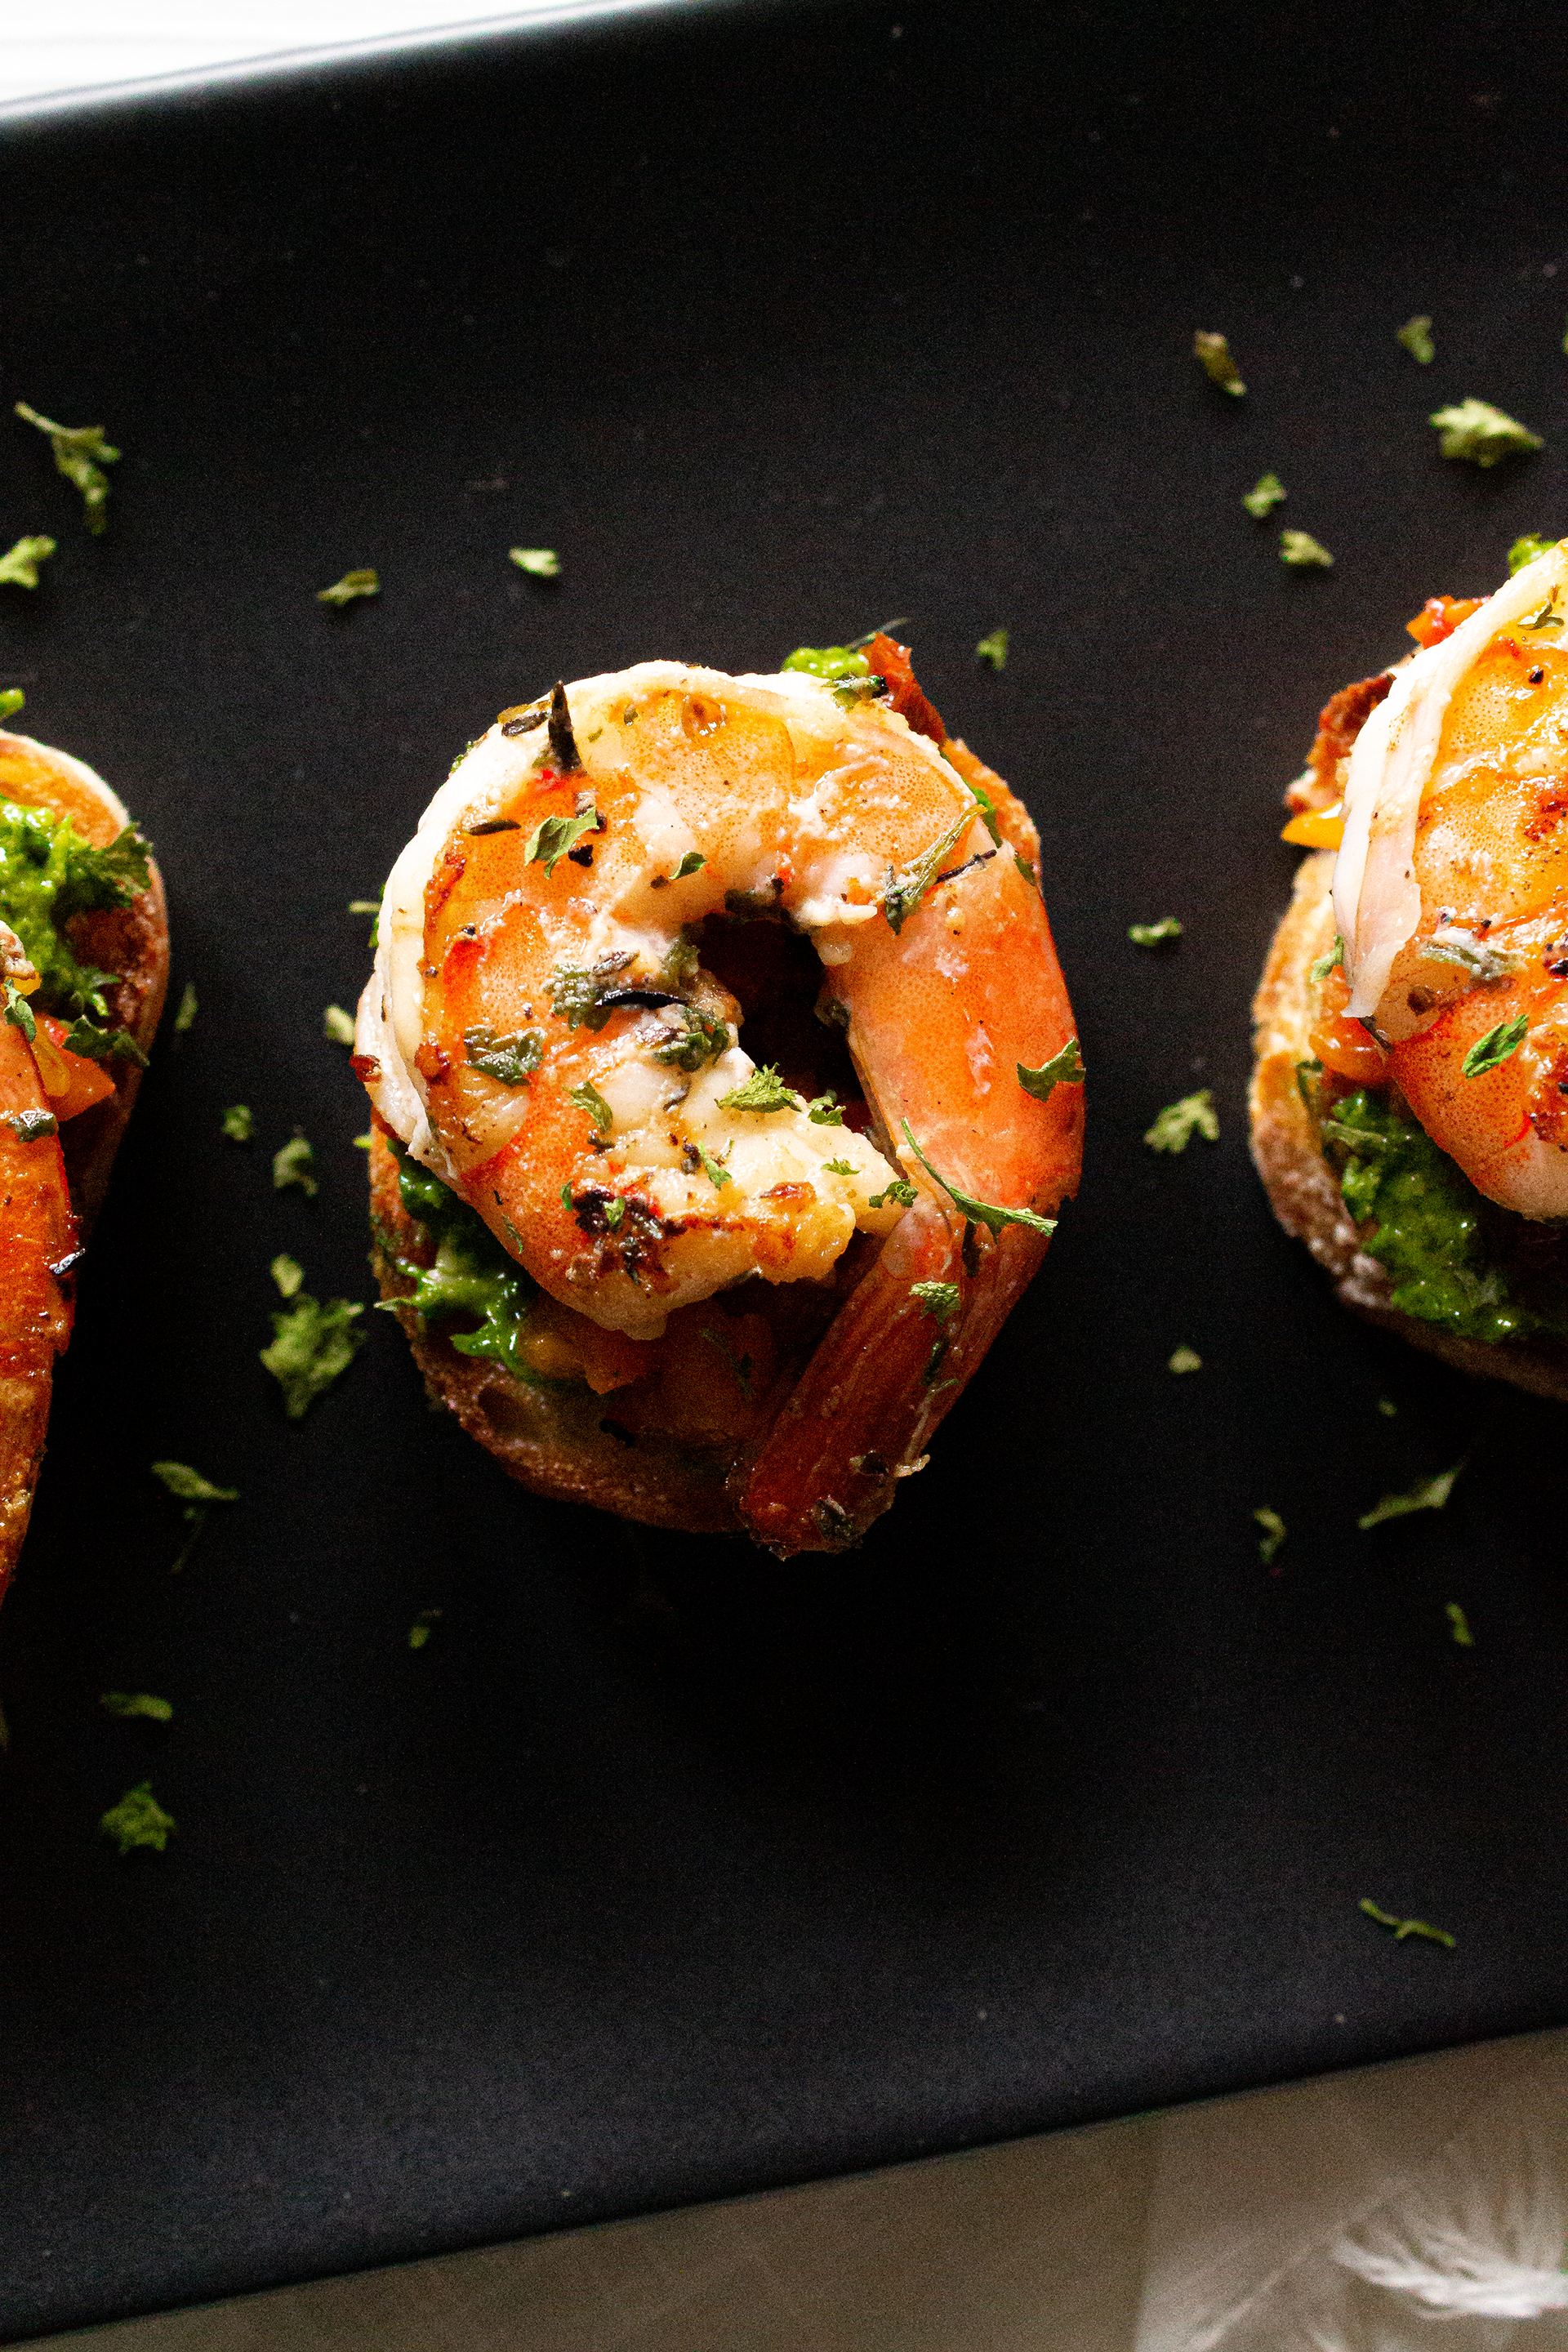
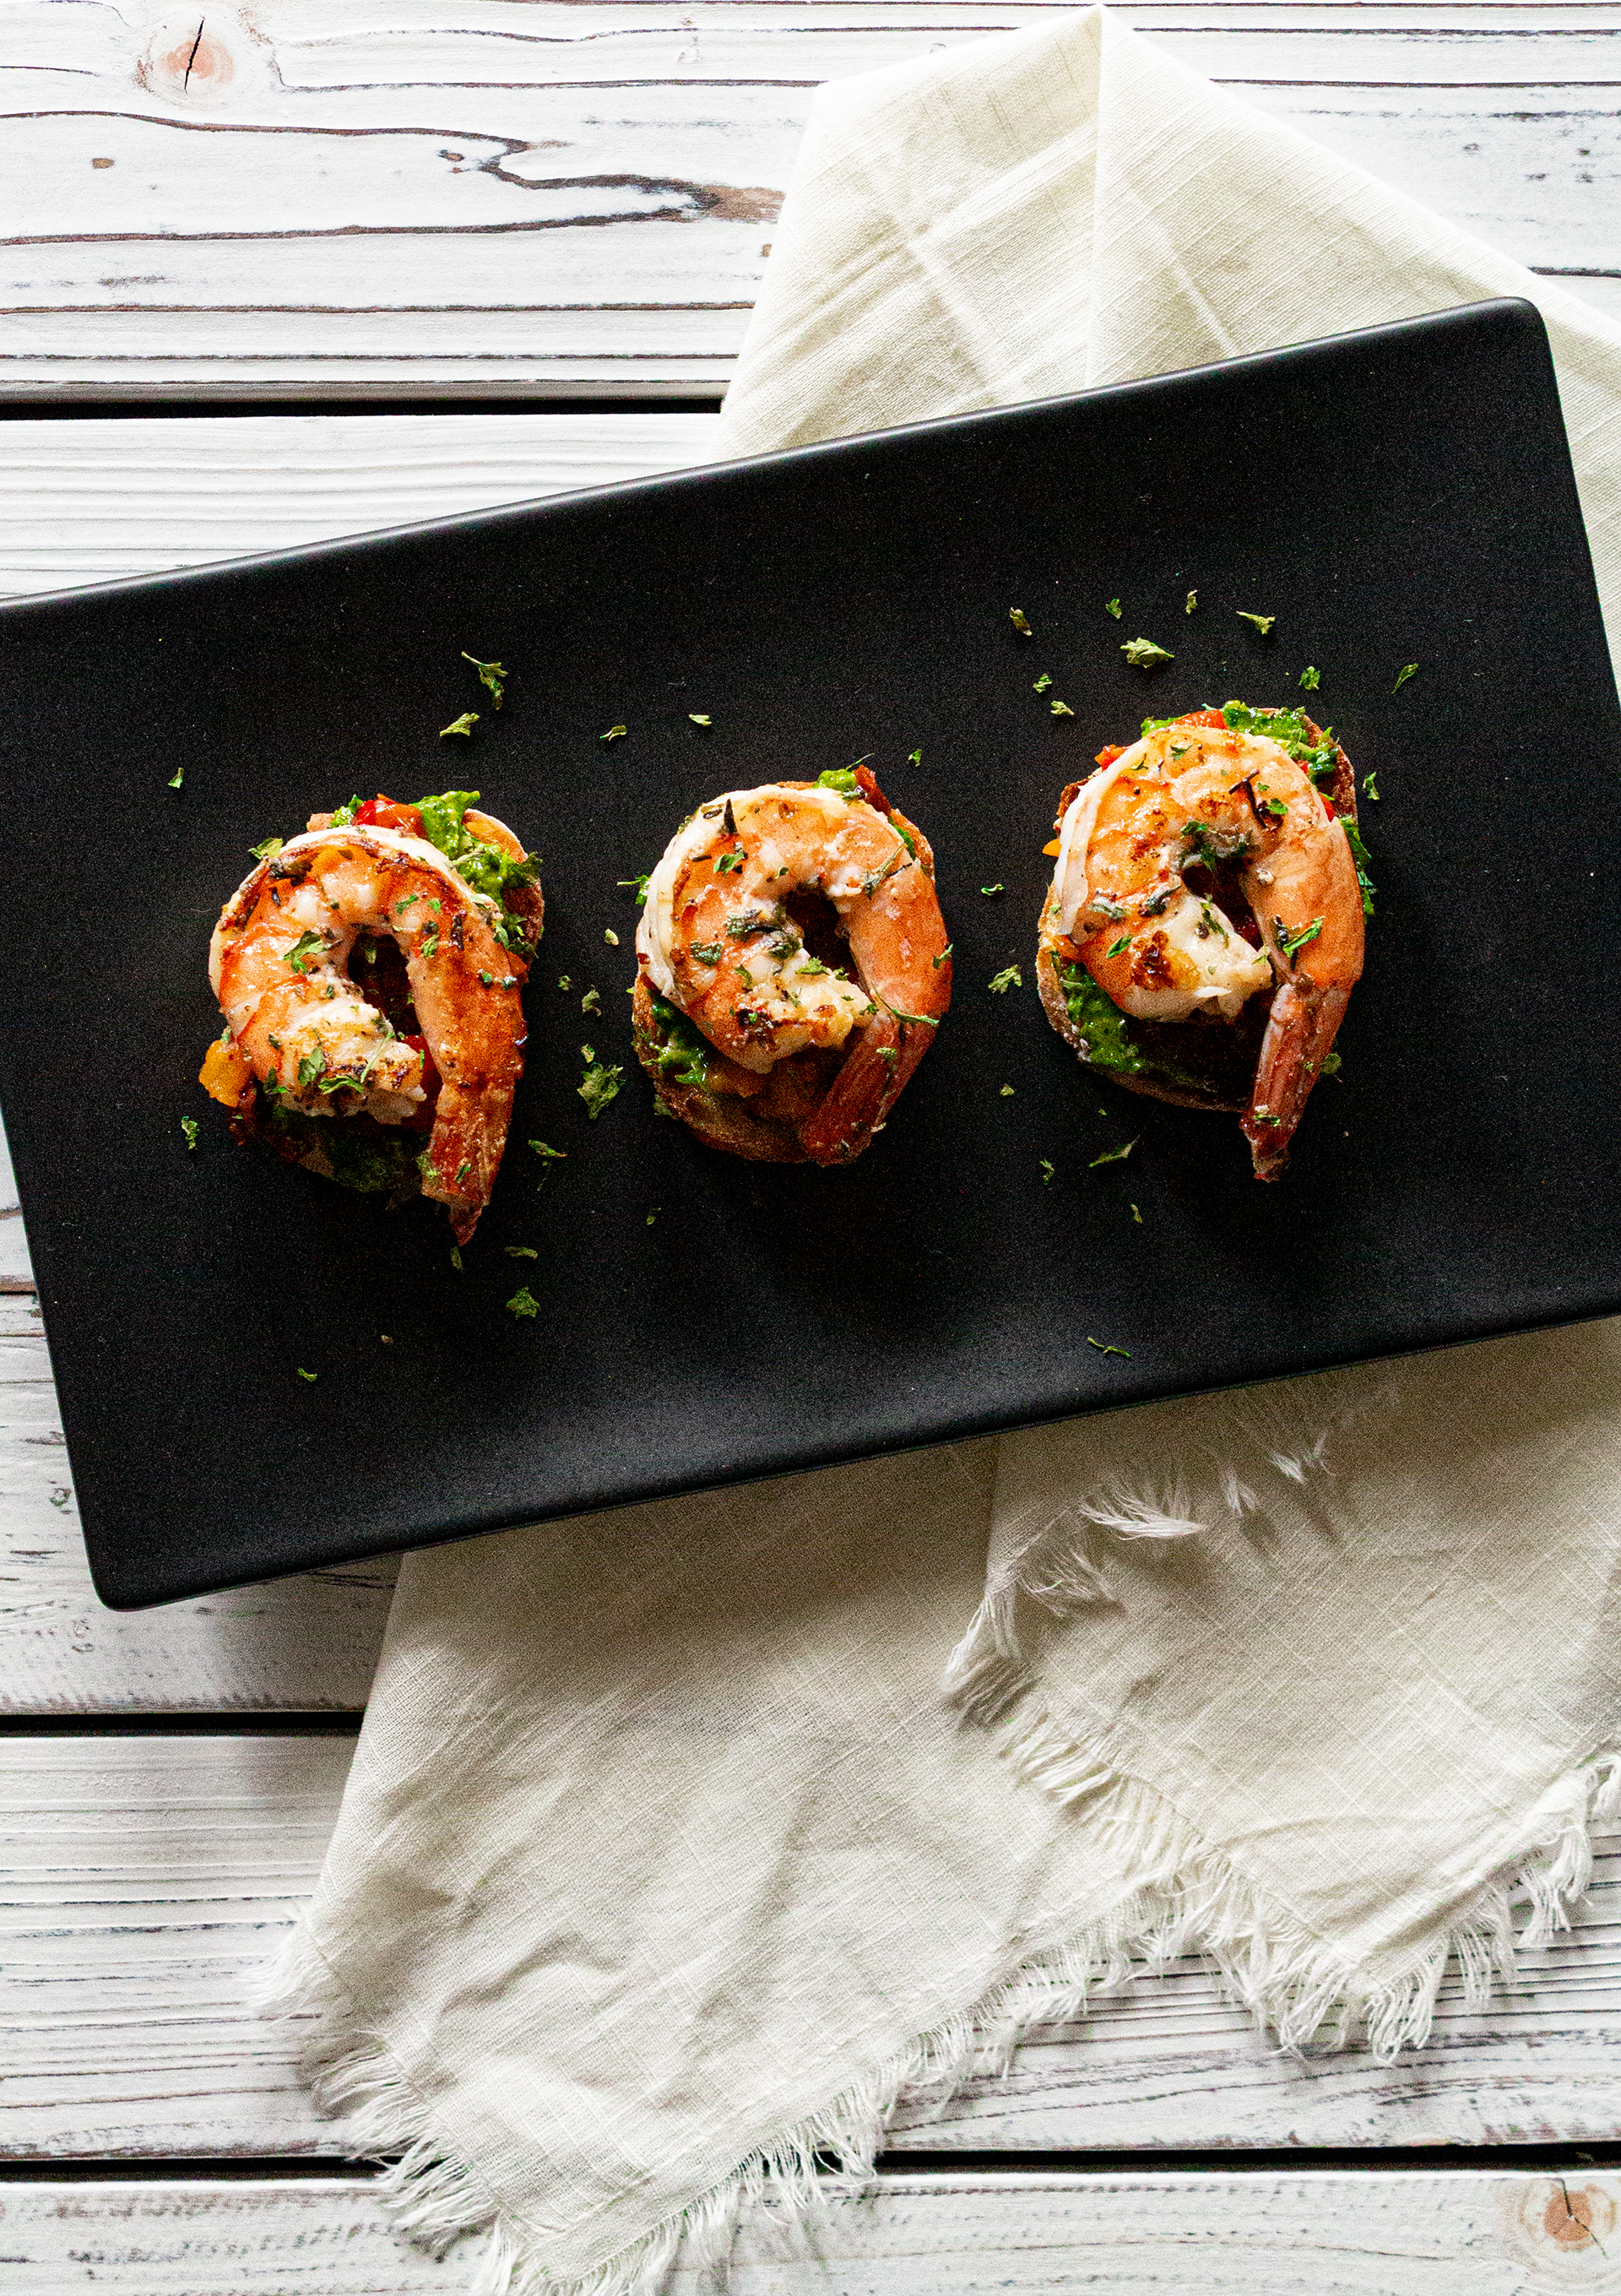
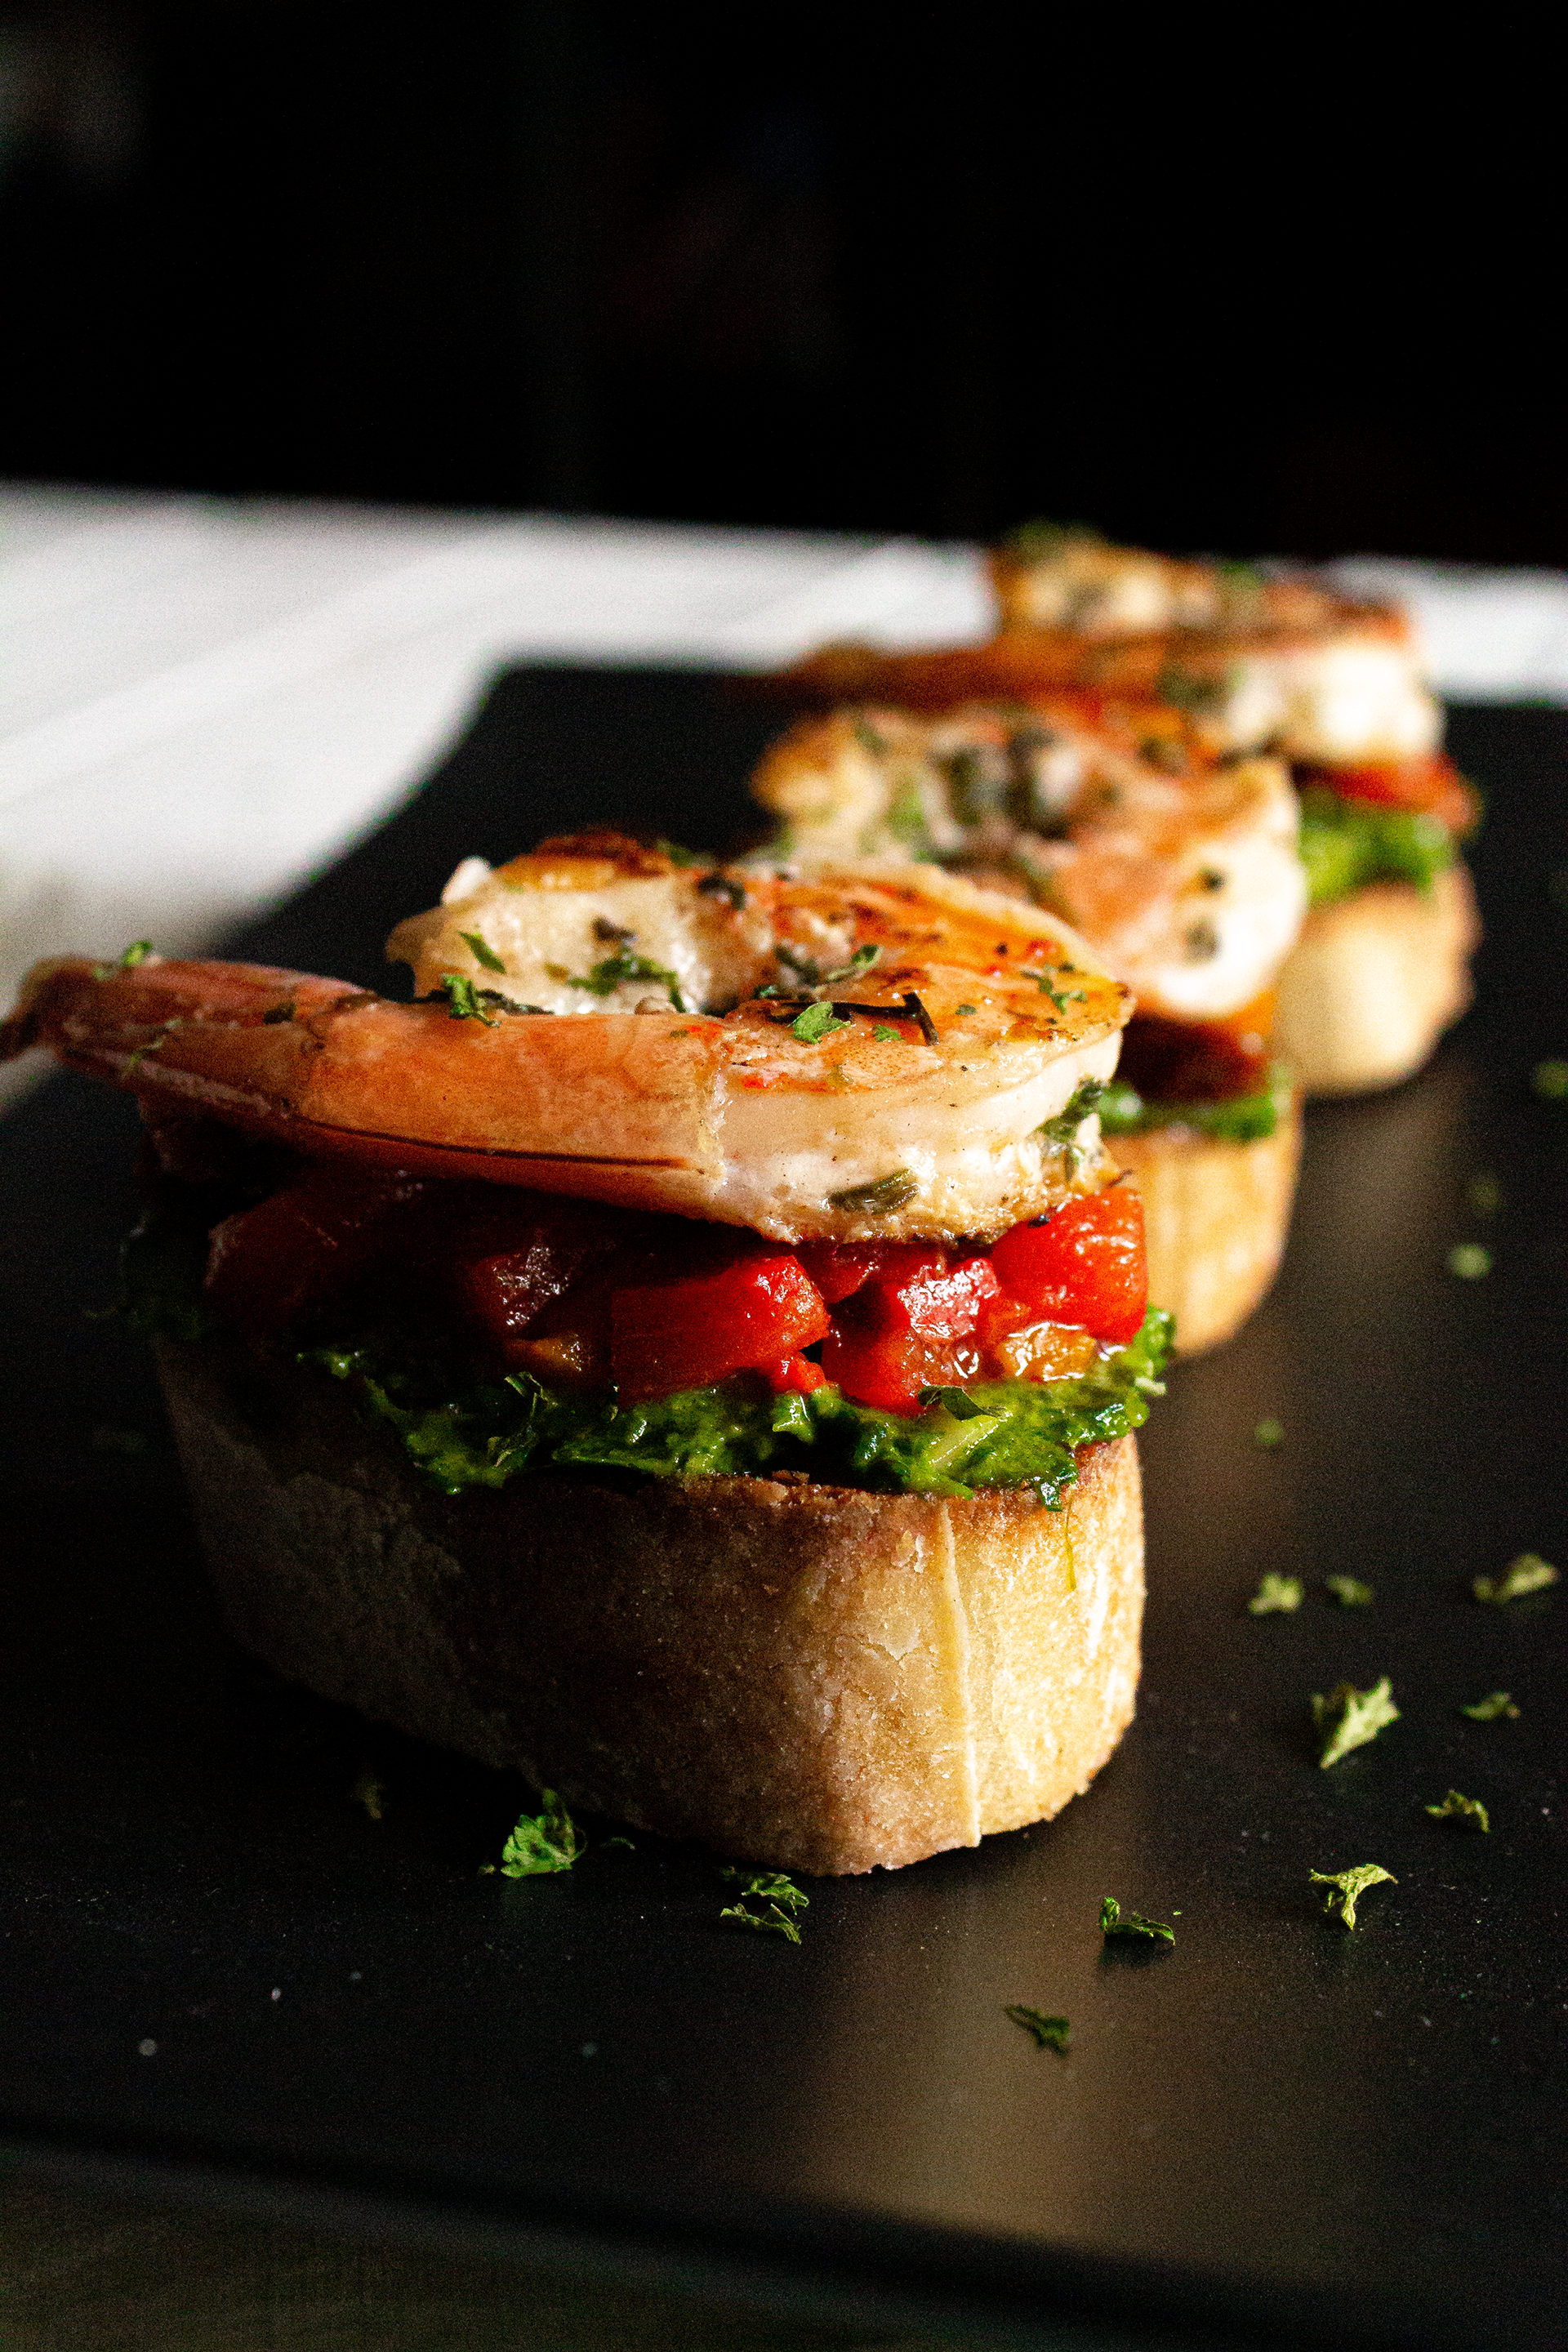
]]>The post Lemon + Pesto Shrimp Crostini appeared first on I Forgot Salt!.
]]>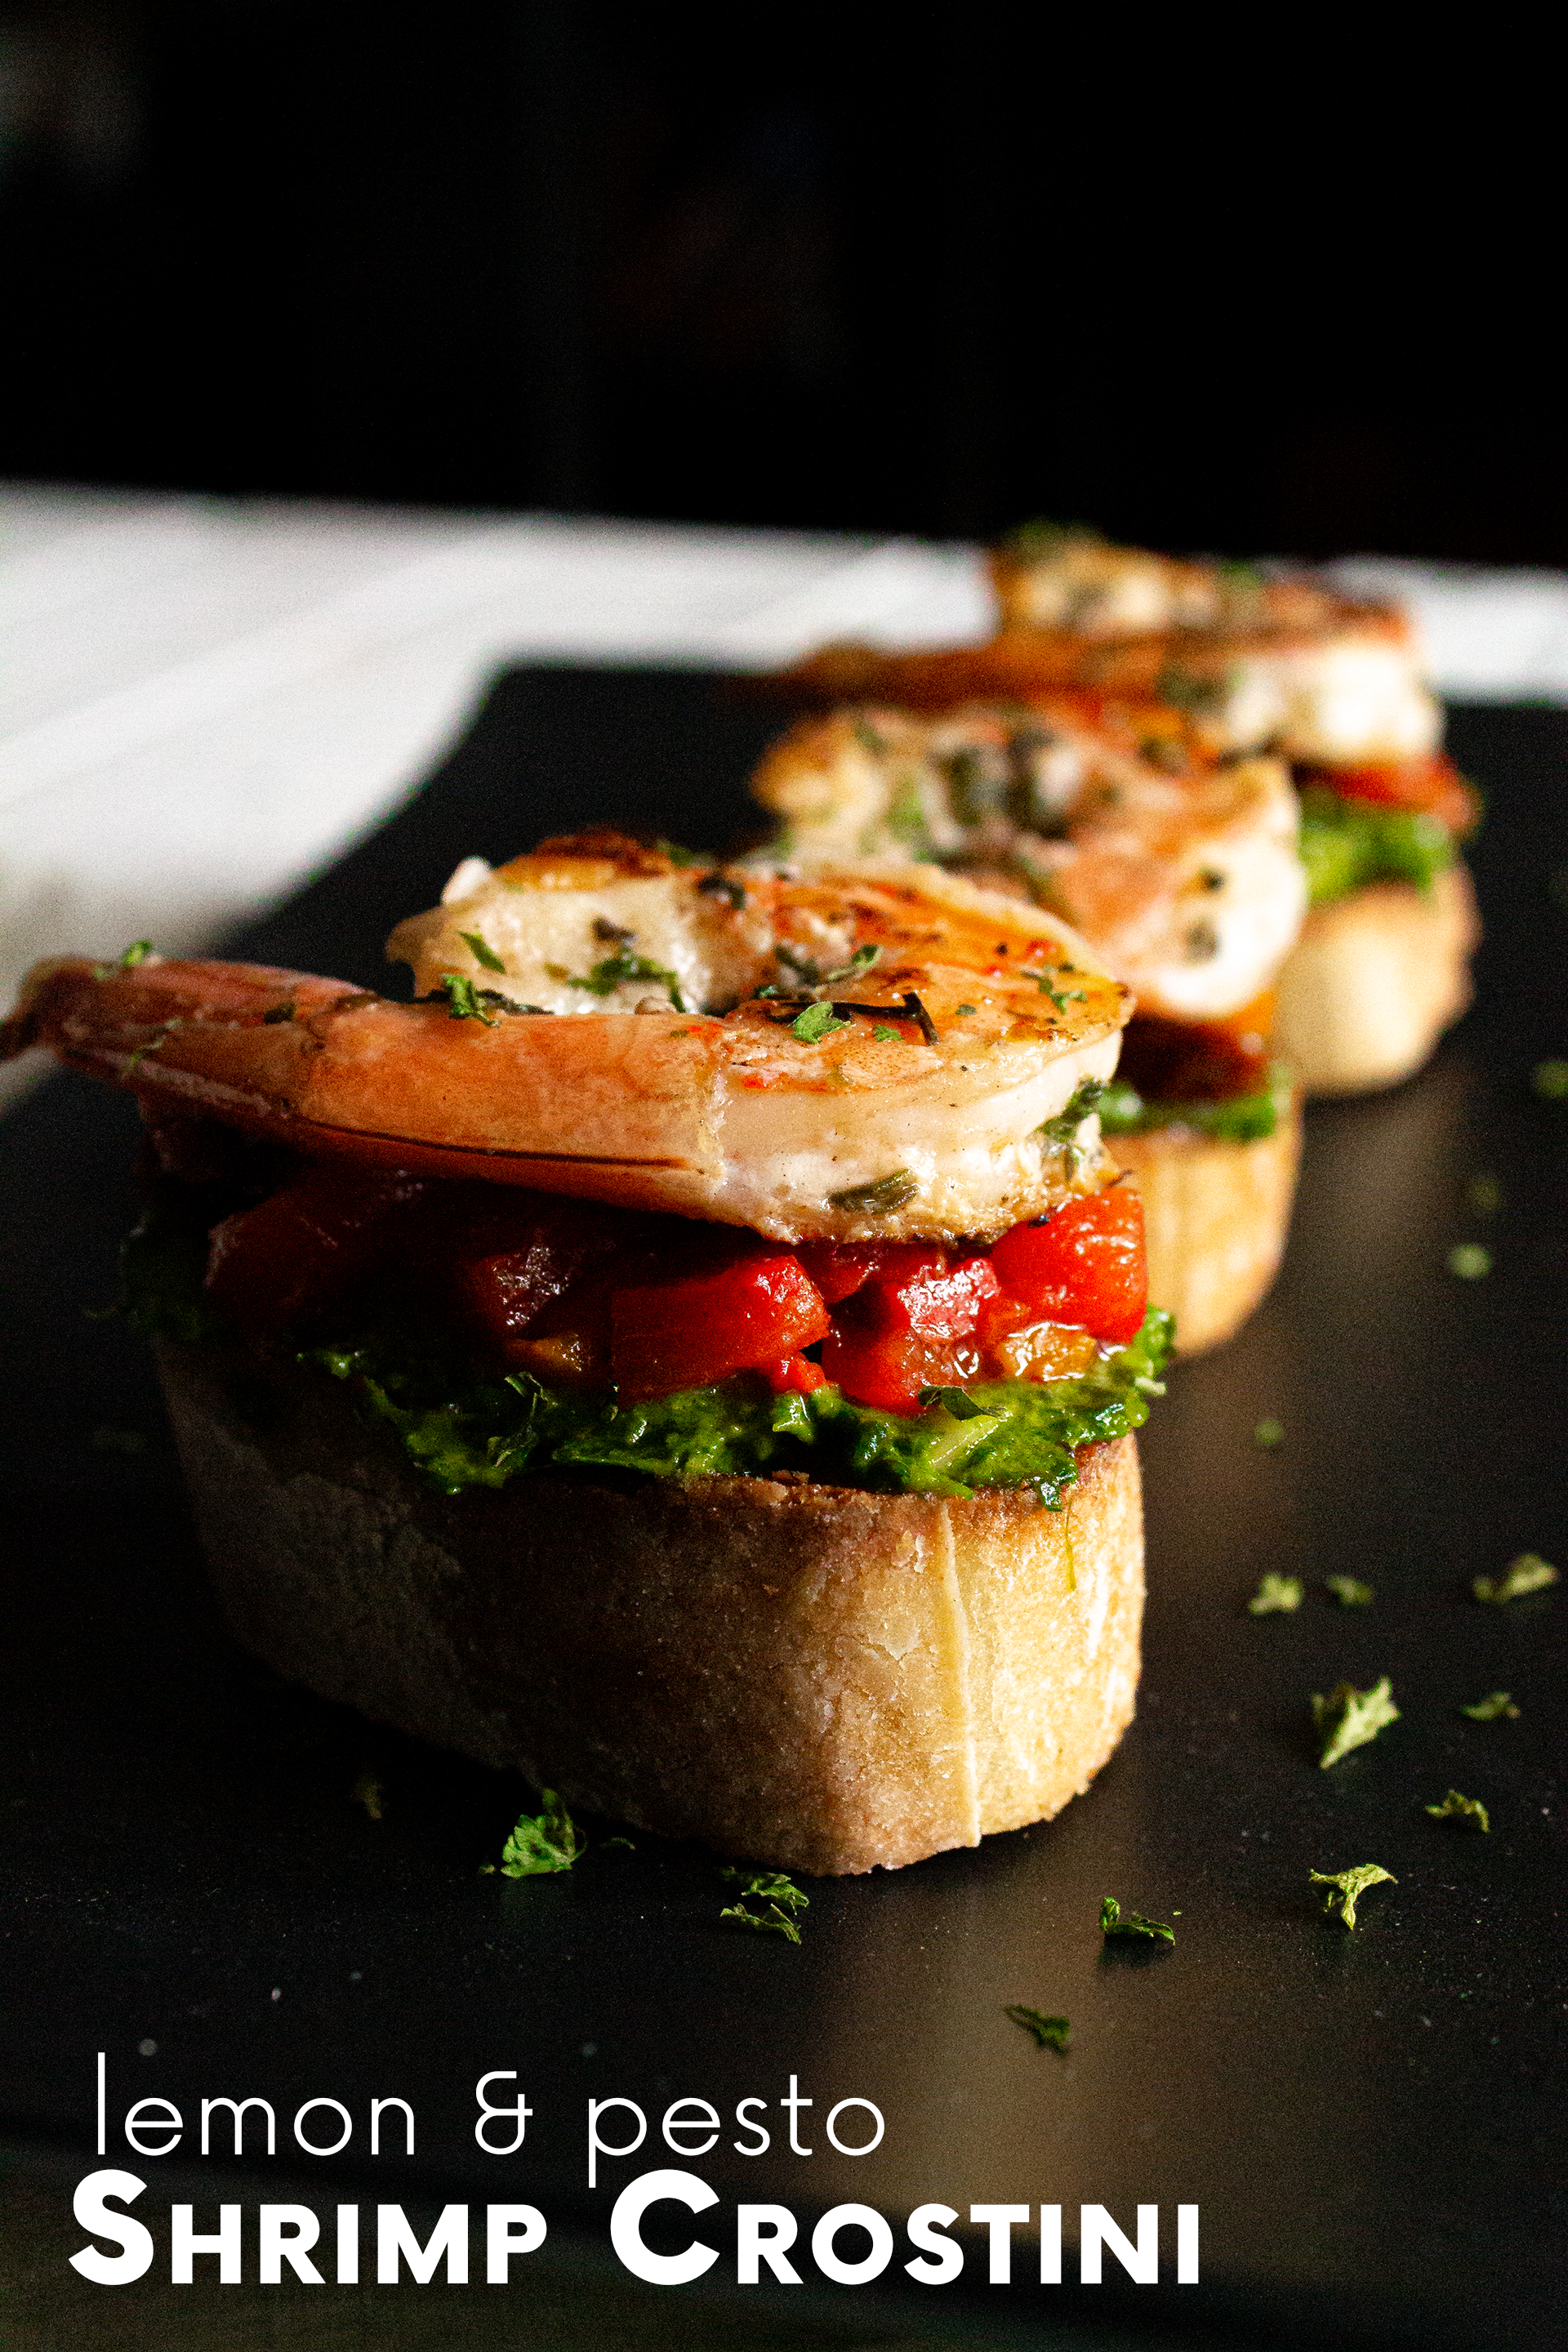
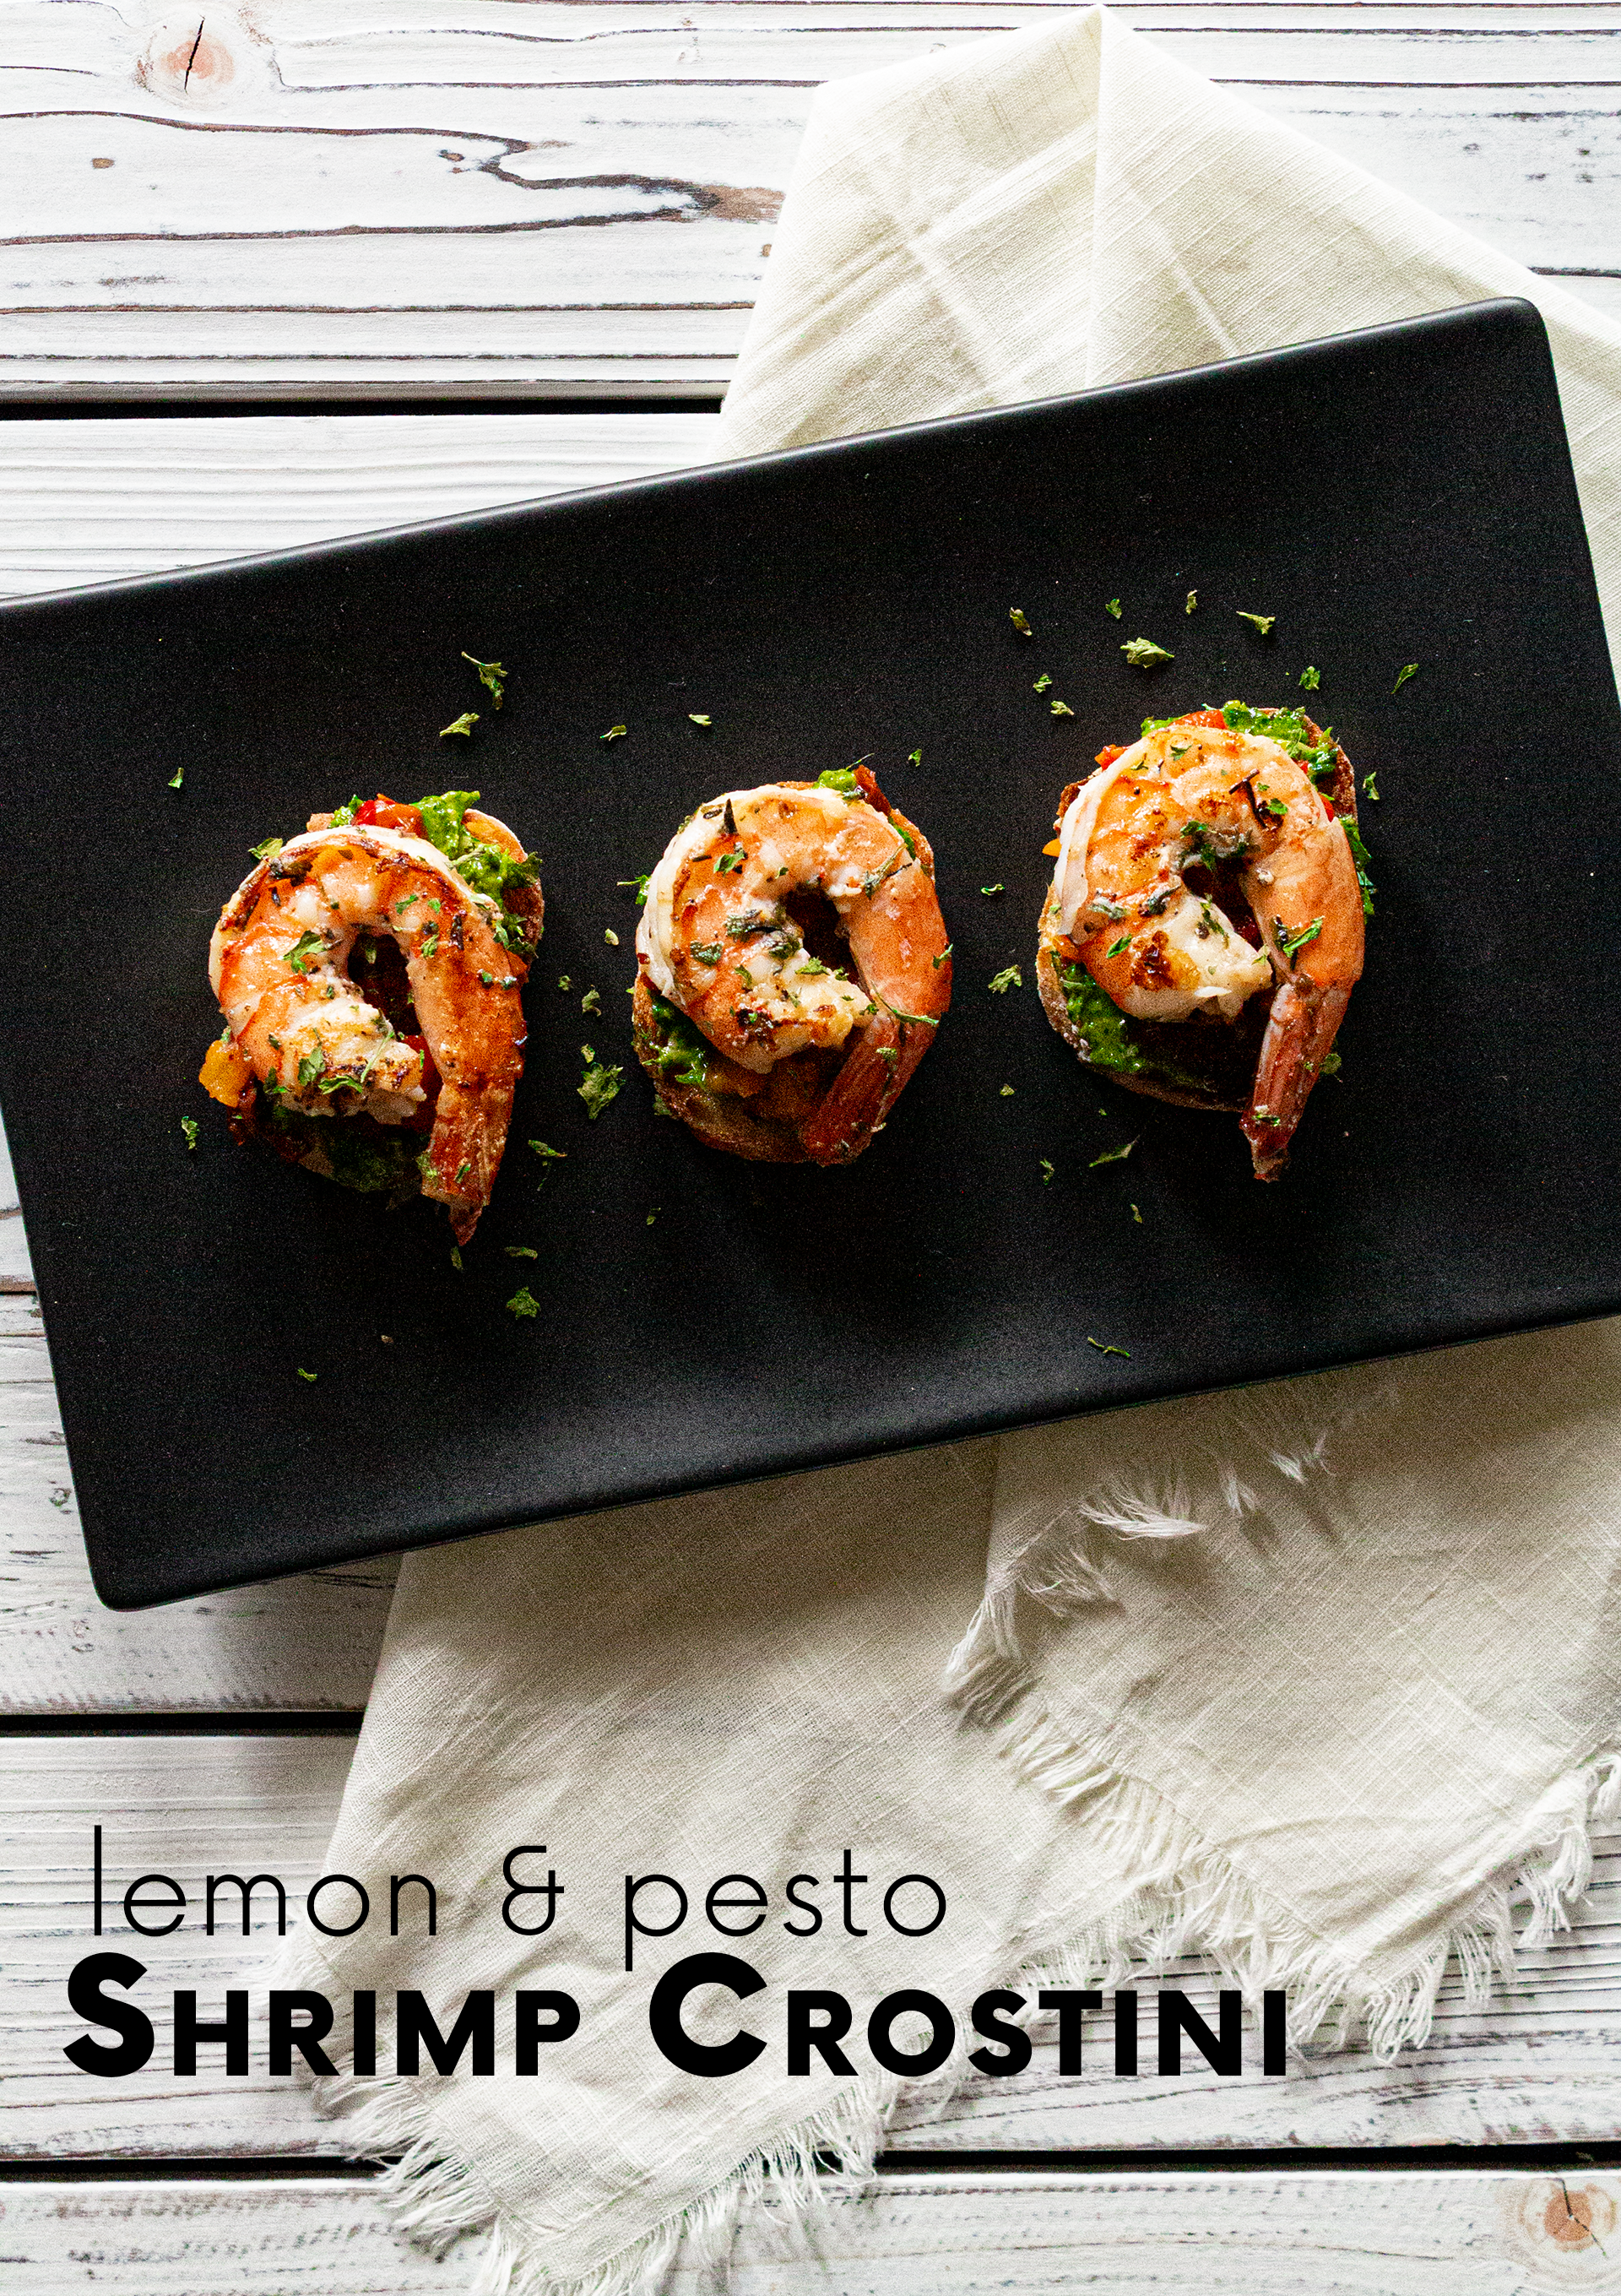
This shrimp crostini recipe was mentioned briefly in my chicken adobo post from June as part of a list of my various lockdown meal experiments. It originally came about after I made the mistake of purchasing pesto in bulk from Costco without any real plans for the massive jar, and everything just sort of spiraled from there. Pesto shrimp, pesto chicken, pesto avocado toast, and so, so many pesto noodles! This crostini, however, was the best of the bunch. Now, many months later and after we’ve settled into our new place, I’ve decided to tackle some of those dishes created in the haze of social isolation, improving upon them with fresh, organic ingredients from our local farmer’s market and co-op.
One of my favorite parts about living in Harrisonburg, VA is our local Friendly City Food Co-Op, a place that has quickly become our go-to grocery store for anything we can’t get directly from the source every Saturday morning. They have such an awesome selection of products that meet almost every possible food and household need, including fresh-baked breads and a prepared food section. I purchased every element of this dish (shrimp excluded–I’ll always be a Costco frozen section lover deep down) warm the same day I made it for dinner, and that helped take this shrimp crostini to a whole new level.
In the spirit of total honesty, I didn’t actually eat any of the shrimp this go-around. As I mentioned briefly in my last post, I’ve been eating almost fully plant-based (vegan, basically) since mid-May, so I left the seafood off my portion of crostini for this dish. Even with just the pesto, roasted peppers, sundried tomatoes, and garlic as the main flavor elements, I demolished half a platter in minutes–it was that delicious. It’s been incredibly fun finding vegan alternatives to things Alex enjoys eating so that we can we can still sit down to dinner together, and I feel like I’m learning more about nutrition and sustainability with every new deep-dive into the world of plant-based lifestyles.
I’ve been a vegetarian on and off throughout the years, and this feels like the logical culmination of both my lifelong dislike for how meat tastes (seriously, ask my parents) and my genuine interest in living and ethical and sustainable lifestyle. I won’t stop posting omnivore recipes on this blog, just as I won’t stop cooking them for Alex and anyone else who happens to visit. There will be a noticeable uptick in vegan and vegetarian meals, however, as I continue to learn and grow as a more plant-forward home cook.
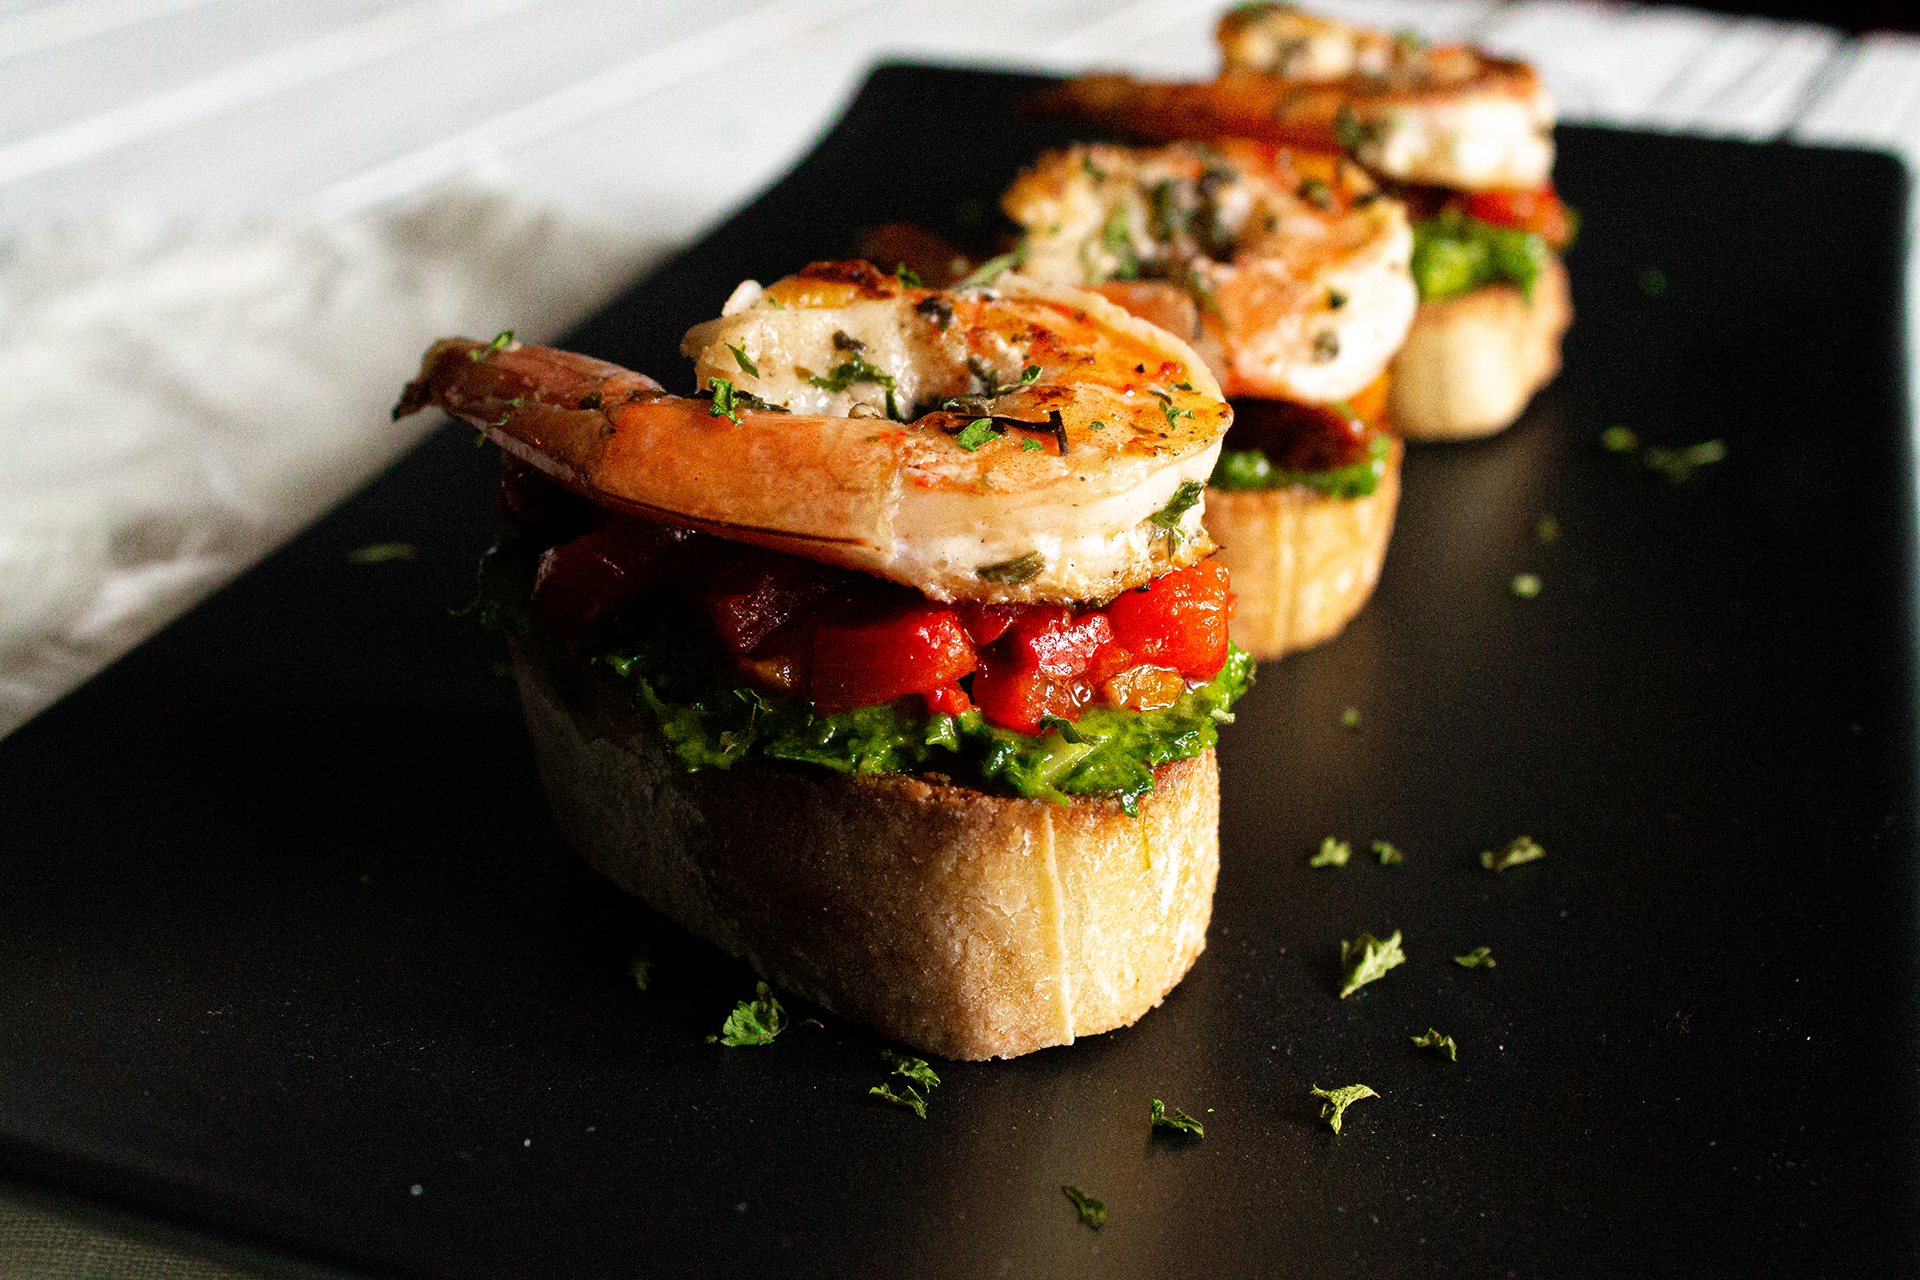
This recipe makes 12 crostini.
Ingredients:
- 12 shrimp, peeled and de-veined
- 1/2 large baguette
- 3-4 whole roasted red peppers (from jar)
- 6-8 sun-dried tomatoes (from jar)
- 1/2 cup pesto
- 1/4 cup olive oil + 1 tbsp divided
- 2 tbsp garlic, minced
- 2 tbsp italian seasoning (see my recipe here)
- 1 tbsp lemon juice
- 1 tsp lemon zest
Directions:
- In a medium-sized mixing bowl, combing shrimp, 1 tbsp olive oil, italian seasoning, lemon juice, and lemon zest. Toss to coat and set aside to marinate for 10-15 minutes.
- Roughly chop roasted red peppers and sundried tomatoes, combine, and set aside.
- Slice baguette into rounds approximately 1/2 inch thick. Combine remaining 1/4 cup olive oil and minced garlic in a small bowl. On a large baking sheet, lay out baguette rounds evenly and brush both sizes with the garlic/oil mixture.
- Place baking sheet in the oven and set to BROIL (or preheat oven to 525F). Let roast for 5-7 minutes or until crisp and lightly browned around the edges. Remove, flip baguette rounds, and return to the oven for an additional 2-3 minutes. Remove and set aside.
- Heat a large dry pan on medium-high. When hot, add marinated shrimp, ensuring that they are evenly spaced and do not overlap. Sear for 2-3 minutes, then flip. Sear for an additional 2-3 minutes, then remove.
- Lower heat to medium-low. Add roasted red pepper and sundried tomato mixture to the still-hot pan, and warm through for about 5-7 minutes or until fragrant and lightly toasted. Remove.
- Assemble crostini by layering a toasted garlic oil baguette round with 1-2 tsp pesto, 1-2 tsp hot pepper/tomato mixture, and 1 shrimp.
This recipe can be served warm, room-temperature, or cold. We ate our crostini at room-temperature while sitting outside on the porch in fairly hot Virginia August weather, and it was both delicious and refreshing. All of the elements for this shrimp crostini can be made ahead of time if you plan to use this recipe as an appetizer for a party, but I would recommend storing them separately and assembling the day-of to prevent the baguette rounds from becoming soggy. As always, I do not really recommend reheating shrimp in the microwave, but the vegan (no-shrimp) version can definitely be warmed up if you want to eat these hot–just be aware that the bread will likely soften a bit.

Lemon & Pesto Shrimp Crostini
Ingredients
- 12 shrimp peeled and de-veined
- 1/2 large baguette
- 3-4 whole roasted red peppers from jar
- 6-8 sun-dried tomatoes from jar
- 1/2 cup pesto
- 1/4 cup olive oil + 1 tbsp divided
- 2 tbsp garlic minced
- 2 tbsp Italian seasoning
- 1 tbsp lemon juice
- 1 tsp lemon zest
Instructions
- In a medium-sized mixing bowl, combing shrimp, 1 tbsp olive oil, italian seasoning, lemon juice, and lemon zest. Toss to coat and set aside to marinate for 10-15 minutes.
- Roughly chop roasted red peppers and sundried tomatoes, combine, and set aside.
- Slice baguette into rounds approximately 1/2 inch thick. Combine remaining 1/4 cup olive oil and minced garlic in a small bowl. On a large baking sheet, lay out baguette rounds evenly and brush both sizes with the garlic/oil mixture.
- Place baking sheet in the oven and set to BROIL (or preheat oven to 525F). Let roast for 5-7 minutes or until crisp and lightly browned around the edges. Remove, flip baguette rounds, and return to the oven for an additional 2-3 minutes. Remove and set aside.
- Heat a large dry pan on medium-high. When hot, add marinated shrimp, ensuring that they are evenly spaced and not overlapping. Sear for 2-3 minutes, then flip. Sear for an additional 2-3 minutes, then remove.
- Lower heat to medium-low. Add roasted red pepper and sundried tomato mixture to the still-hot pan, and warm through for about 5-7 minutes or until fragrant and lightly toasted. Remove.
- Assemble crostini by layering a toasted garlic oil baguette round with 1-2 tsp pesto, 1-2 tsp hot pepper/tomato mixture, and 1 shrimp.

The post Lemon + Pesto Shrimp Crostini appeared first on I Forgot Salt!.
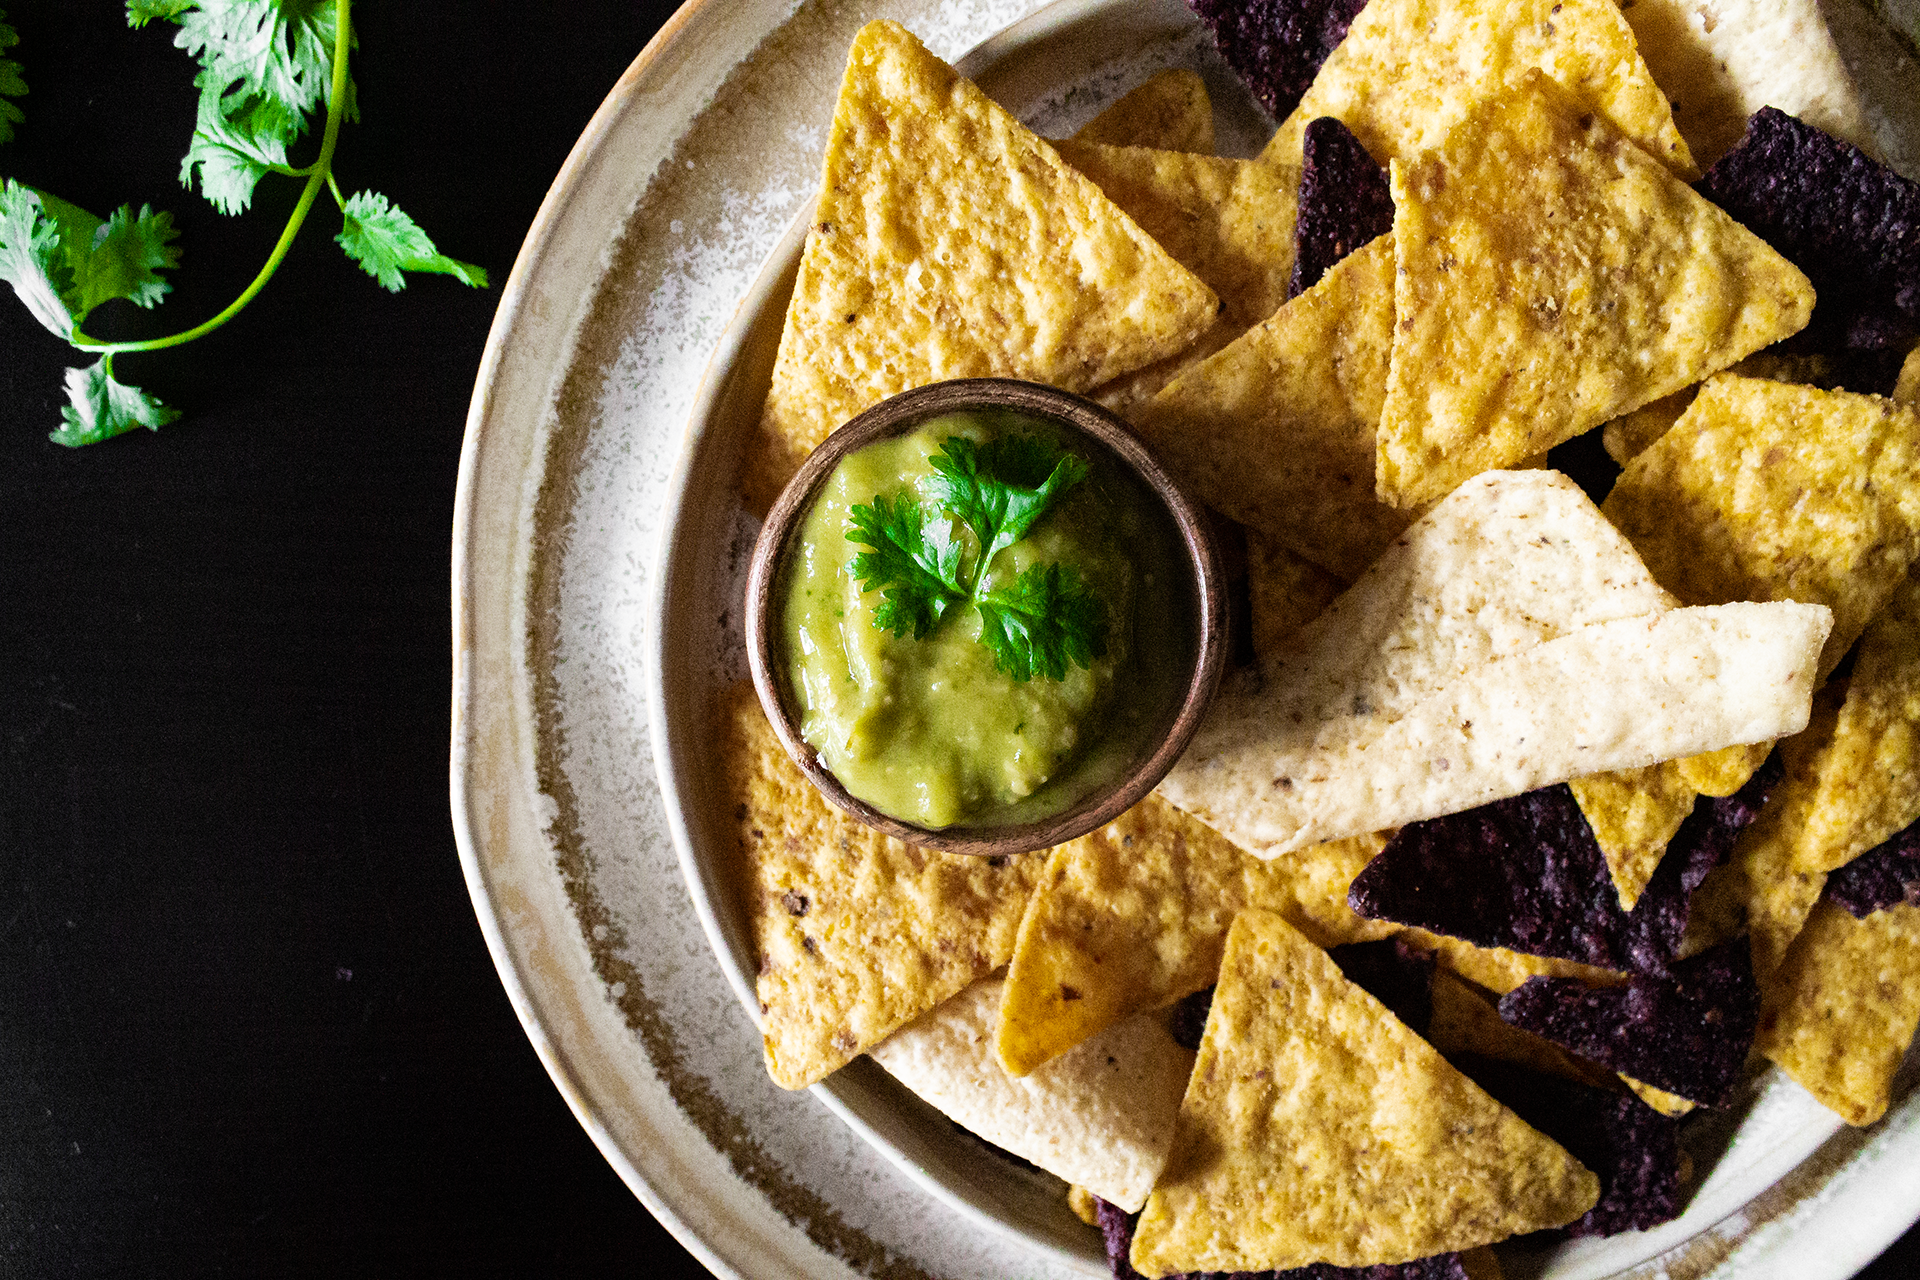
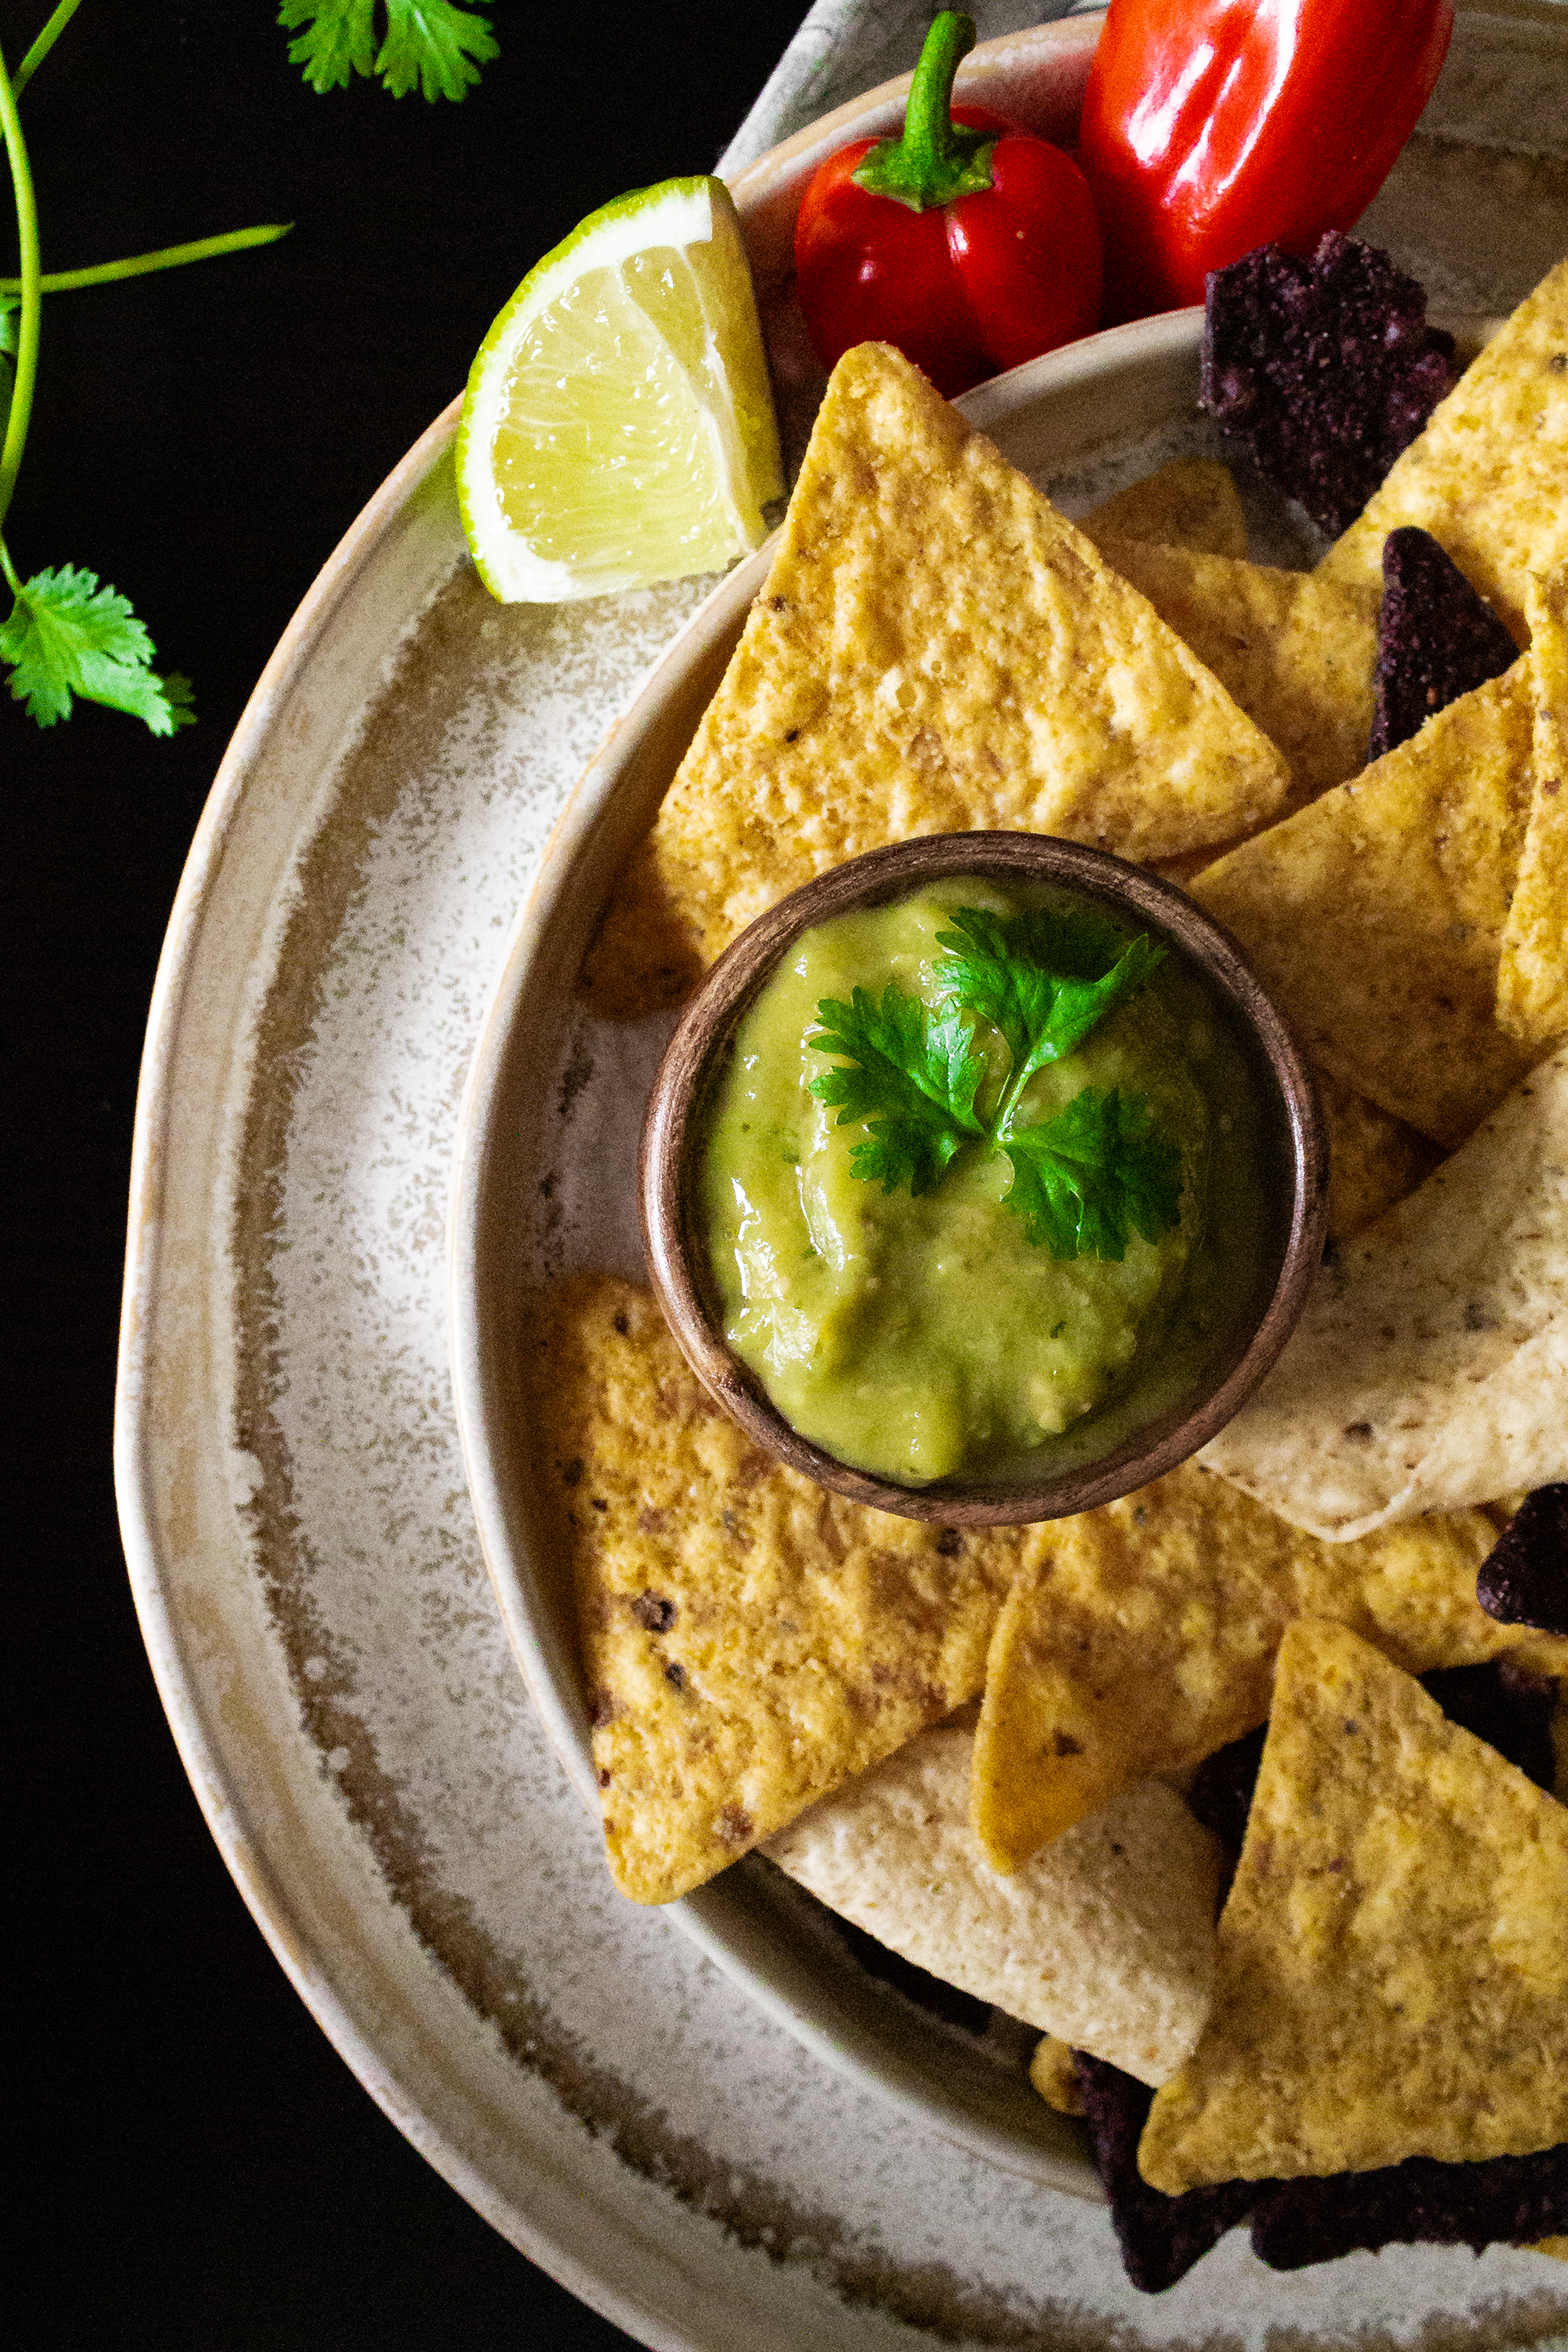
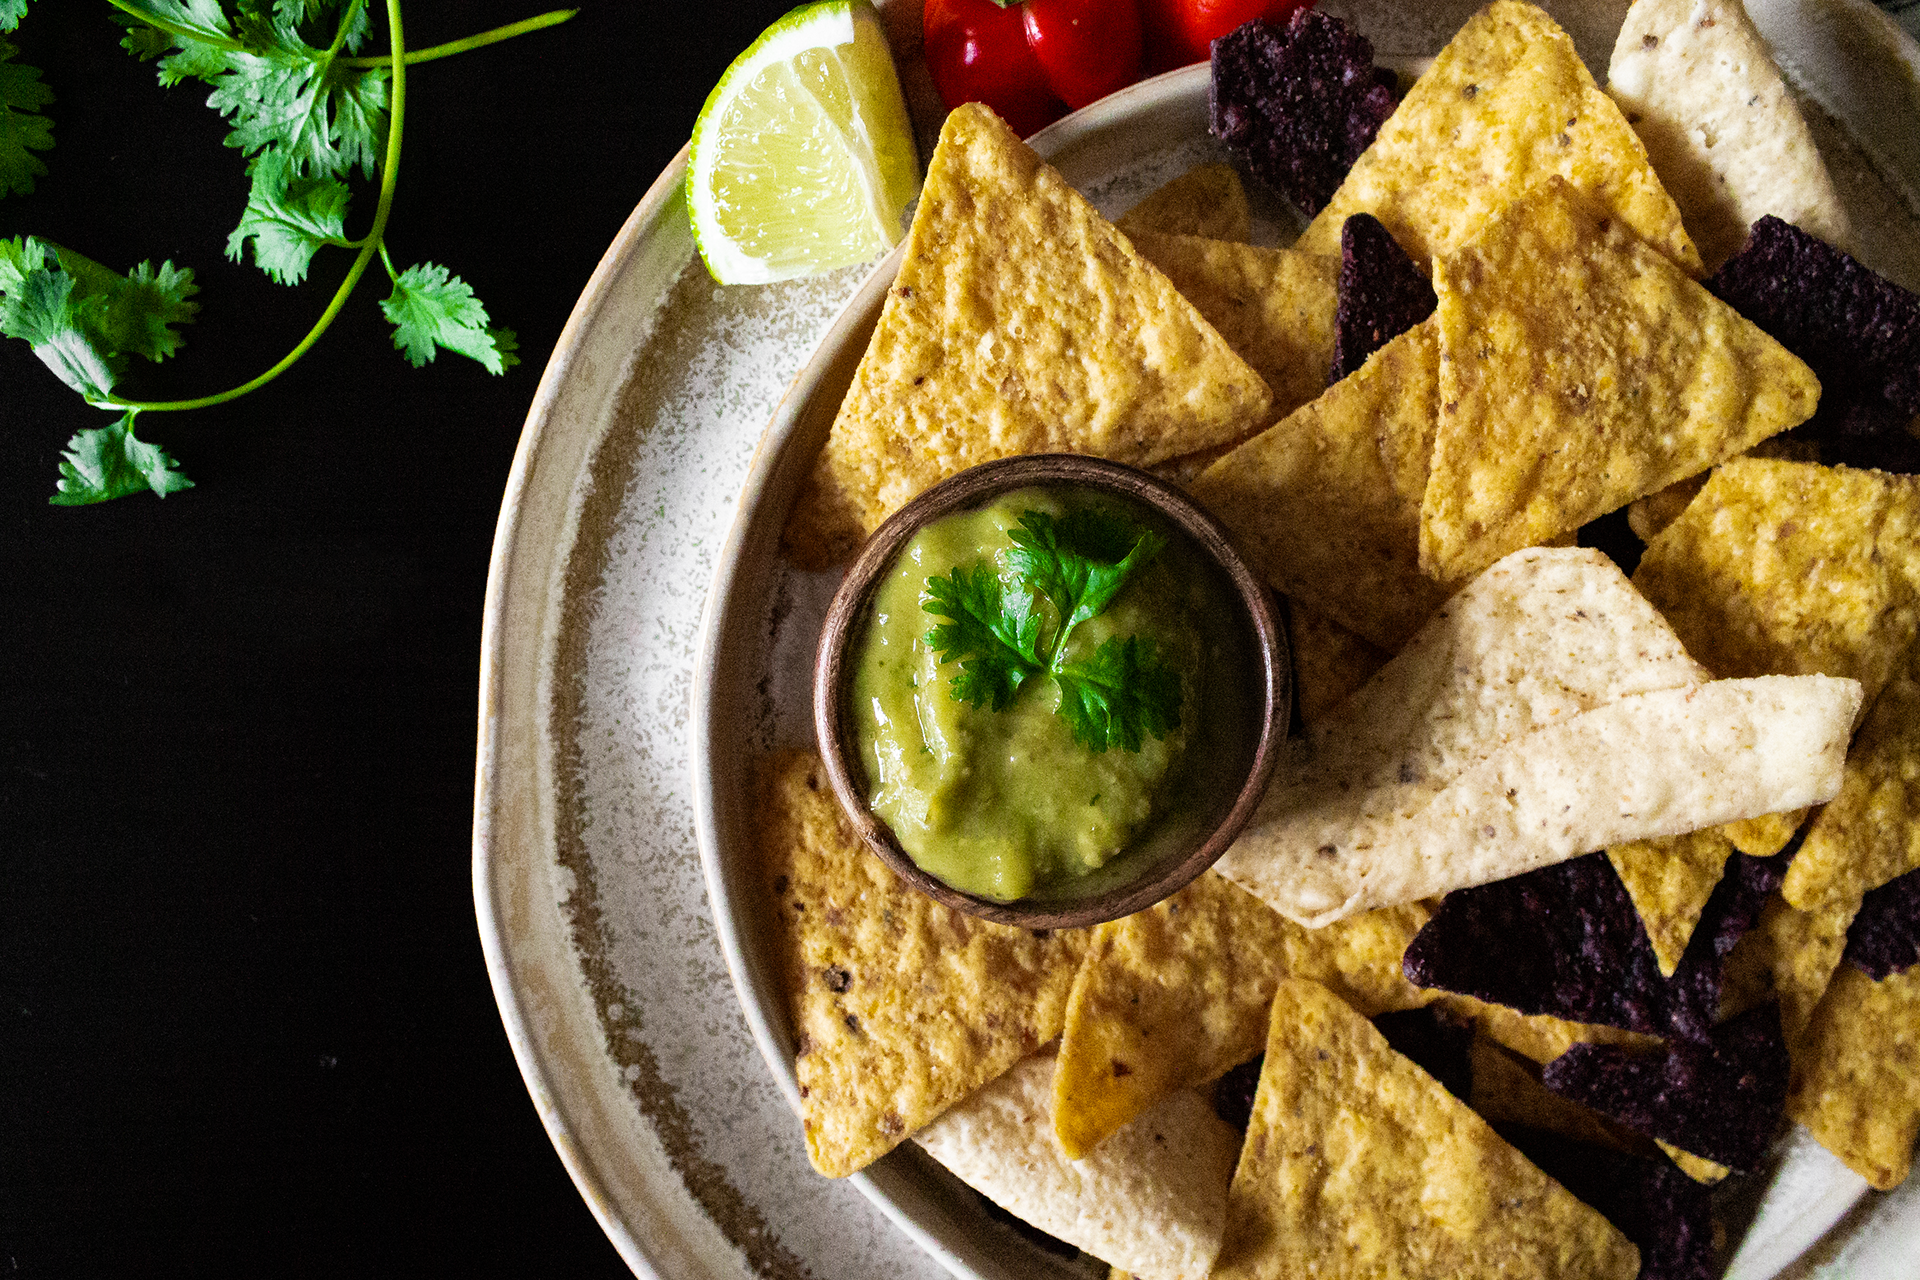
]]>The post Roasted Tomatillo + Avocado Creamy Salsa Verde appeared first on I Forgot Salt!.
]]>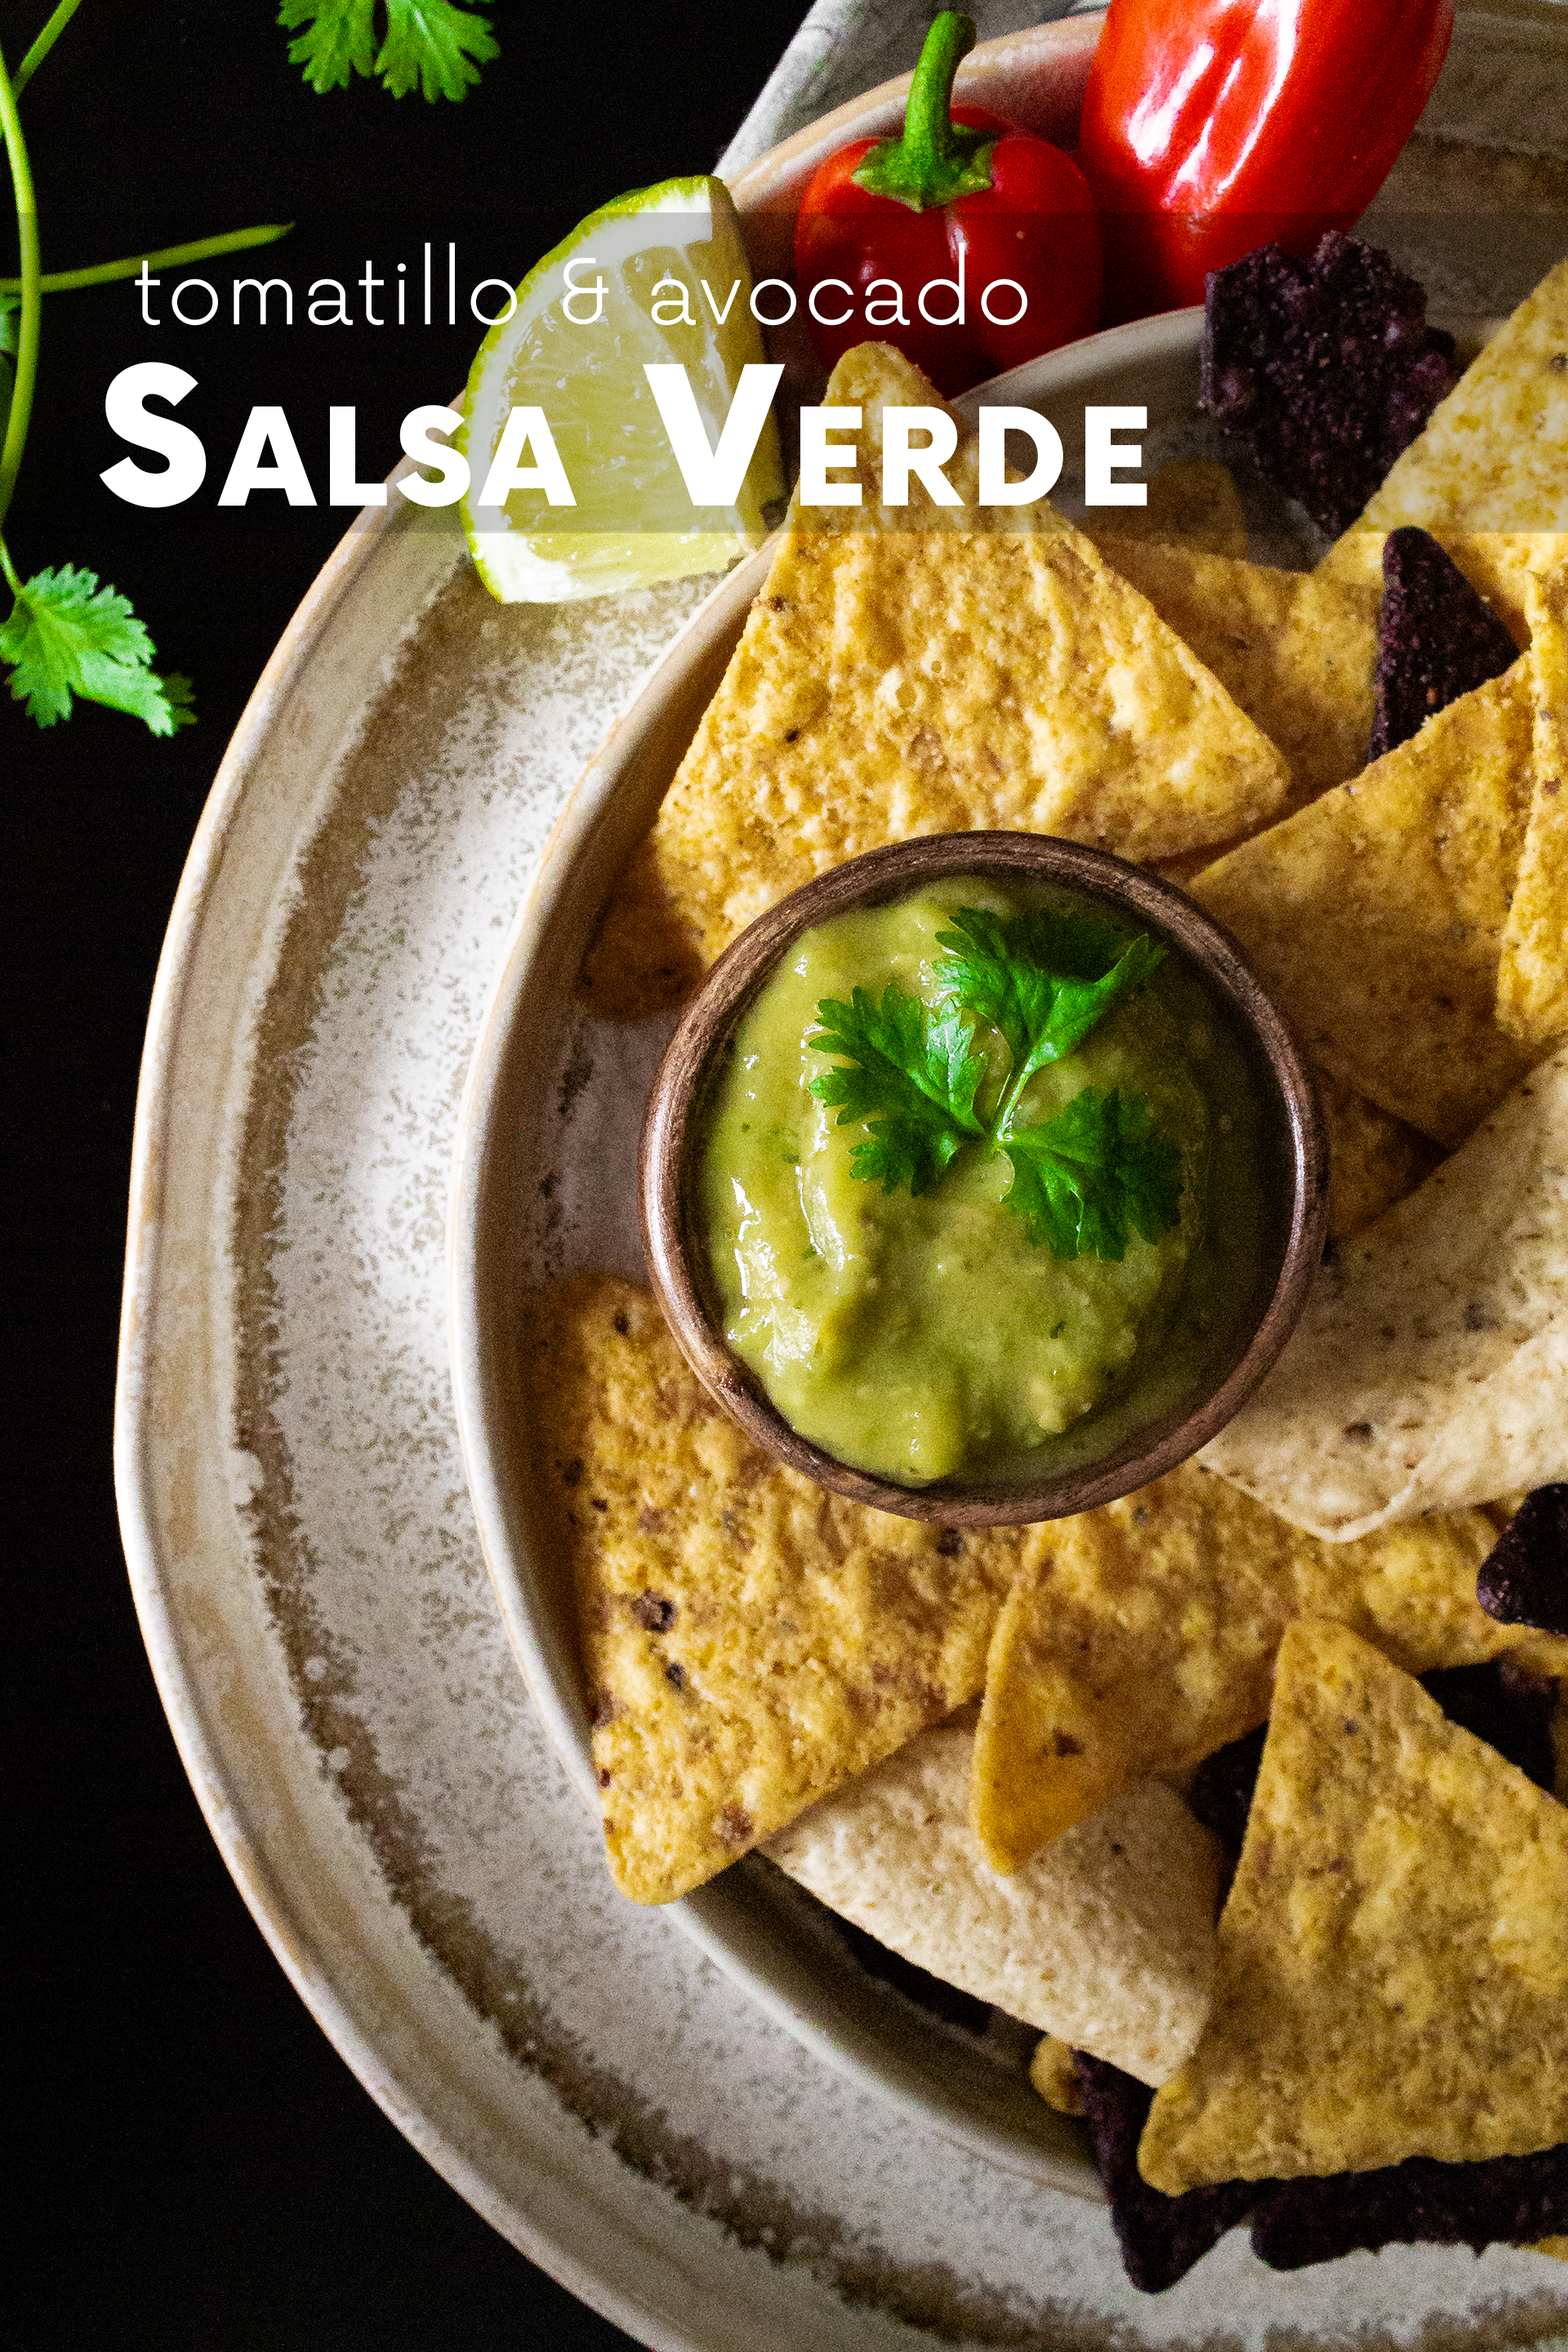
Coming to you live with a salsa verde recipe after three months of silence! Since my last post, so much has happened it’s practically unbelievable. Alex has found and begun a new (fully-remote) job, I have finished my first semester at JMU as an English major (3.6 GPA, baby!), and we have both moved into a massive two-bedroom apartment in Harrisonburg, VA. Settling into our new lifestyle has been a rush, and some of the best parts of living in our new place have been the huge kitchen and the close proximity to some ridiculously fresh produce. Instead of driving half an hour to Wegman’s for a decent selection of reasonably-priced groceries, we are now able to crawl out of bed on Saturday mornings and head directly to the local farmer’s market for inexpensive, local, organic fruits and vegetables. I feel like a kid walking through GameStop in 2007 with $20 to burn every time we roll into the parking lot, hippie canvas grocery bags in hand. And don’t even get me started on the local food co-op!
On one of those trips to the farmer’s market, we came across a stall selling fresh tomatillos, and without having any clue what to use them for I grabbed four. Thus, this creamy salsa verde was born. It was one of the first things I made in our new kitchen, so it seemed fitting to photograph and post this salsa verde as a means of getting my butt back in gear with blogging. I’m hoping to recreate and document many of the new dishes I mentioned in my chicken adobo post in the coming weeks (the photos for which were actually taken in March, not June–whoops), as well as a few new recipes I’ve been testing out since we arrived in the new place. We even tried deep-frying for the first time last night! Overall, it’s been an exciting couple of months, and I can’t wait to get back into the habit of posting new recipes on a regular basis.

While we managed to eat most of this creamy tomatillo and avocado salsa verde with chips before it ever made it into an actual meal, I originally whipped this up to go with a taco spread to celebrate the completion of our dining table. I’ve been eating fully plant-based (vegan, basically) since mid-May, and it was great to finally have the space to whip up some black bean tofu “sofritas” for me and ground beef for Alex without taking over half of the apartment with dishes. This recipe paired deliciously with both, and its sharp spice complimented the mild sweetness of the “sofritas” particularly well. This salsa verde works wonderfully as both a stand-alone snack and an element of a larger meal, making it one of my most versatile recipes yet!
This recipe makes about 1 1/4 cups salsa.
Ingredients:
- 4 tomatillos
- 1 avocado
- 1 white onion
- 2 cloves garlic
- 2 jalapenos
- 1/2 cup cilantro
- 2 tbsp lime juice
- 1 tbsp light oil
- 1 tsp lime zest
- 1 tsp cumin
- 1 tsp salt
- 1/2 tsp white pepper
- 1/4 tsp black pepper
Directions:
- Preheat oven to 425F.
- Peel and wash tomatillos, slice onion into large quarters, slice jalapenos down the middle to form four total halves. Wrap whole garlic cloves in parchment paper with black pepper and 1/4 tsp oil to form a small roasting pouch.
- Lay vegetables on a large baking sheet and cover with salt, white pepper, and remaining oil. Add garlic roasting pouch seam-side down to ensure it does not open while roasting. Roast for 10-15 minutes, or until vegetables have begun to brown.
- Combine roasted vegetables, avocado, cilantro, lime juice, lime zest, and cumin to a food processor and blend until smooth. Add additional salt to taste if necessary.
Tomatillo & Avocado Salsa Verde
Ingredients
- 4 tomatillos
- 1 avocado
- 1 white onion
- 2 cloves garlic
- 2 jalapenos
- ½ cup cilantro
- 2 tbsp lime juice
- 1 tbsp light oil
- 1 tsp lime zest
- 1 tsp cumin
- 1 tsp salt
- ½ tsp white pepper
- ¼ tsp black pepper
Instructions
- Preheat oven to 425F.
- Peel and wash tomatillos, slice onion into large quarters, slice jalapenos down the middle to form four total halves. Wrap whole garlic cloves in parchment paper with black pepper and 1/4 tsp oil to form a small roasting pouch.
- Lay vegetables on a large baking sheet and cover with salt, white pepper, and remaining oil. Add garlic roasting pouch seam-side down to ensure it does not open while roasting. Roast for 10-15 minutes, or until vegetables have begun to brown.
- Combine roasted vegetables, avocado, cilantro, lime juice, lime zest, and cumin to a food processor and blend until smooth. Add additional salt to taste if necessary.
Notes

The post Roasted Tomatillo + Avocado Creamy Salsa Verde appeared first on I Forgot Salt!.
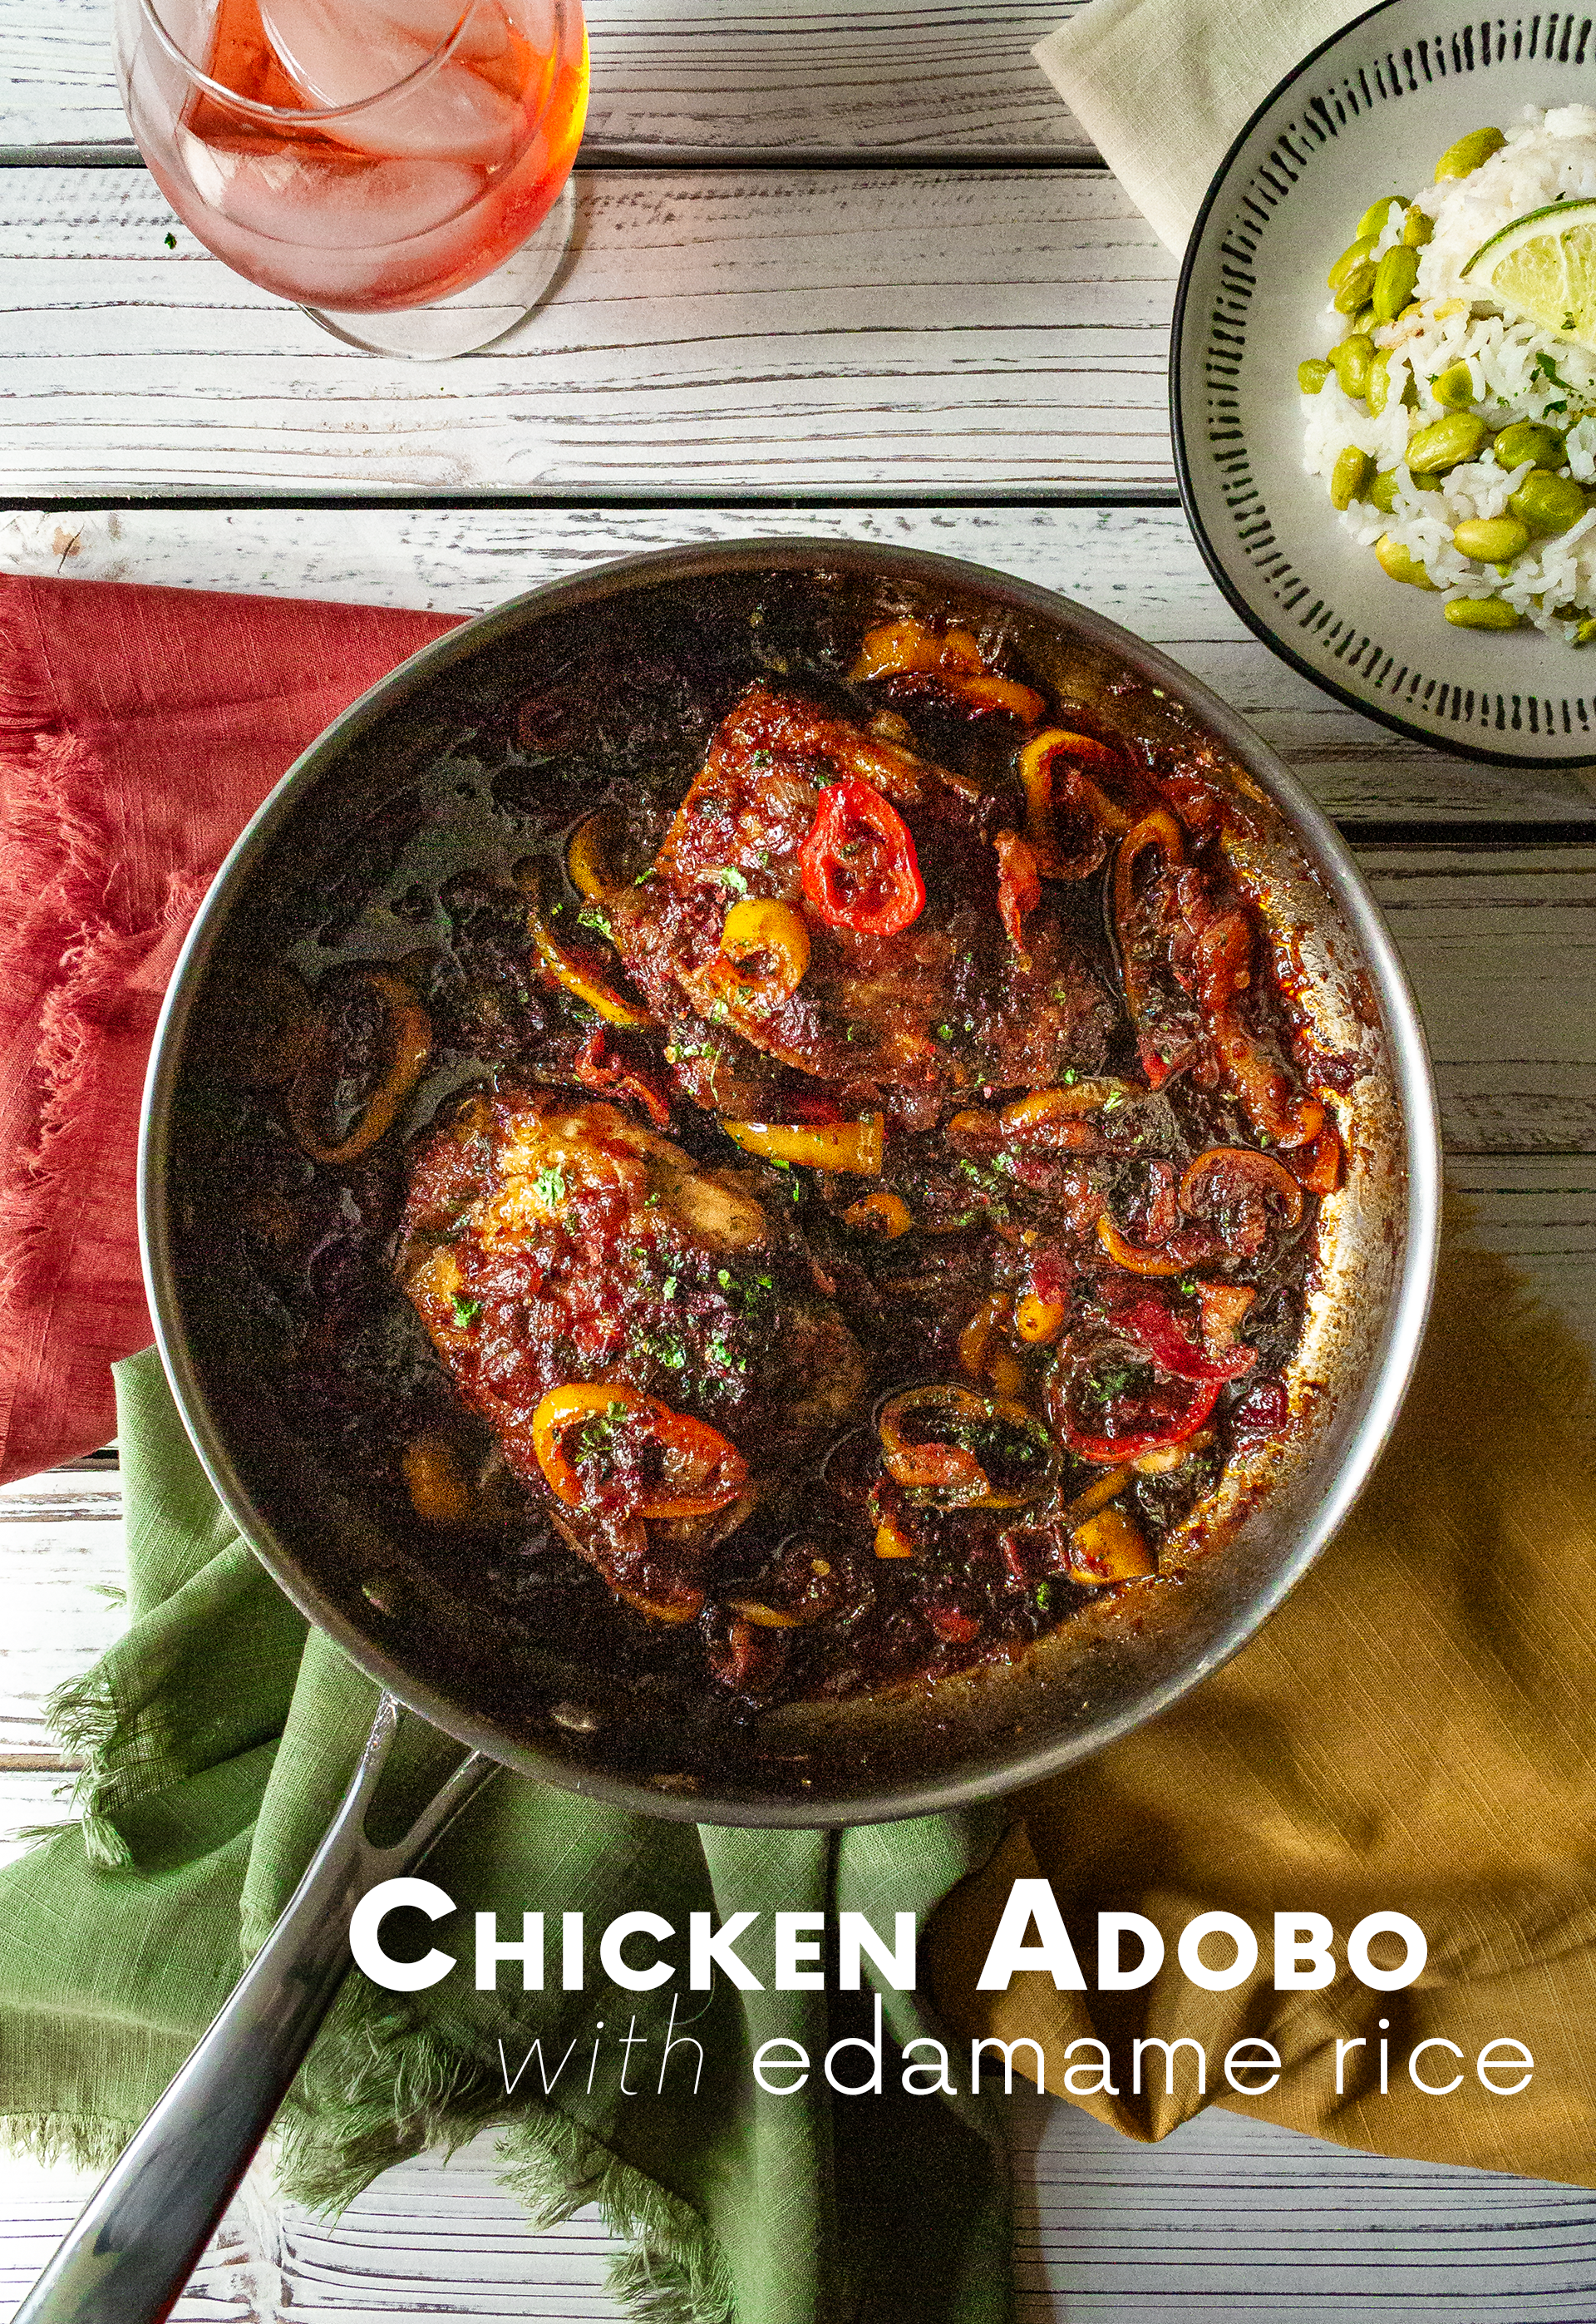
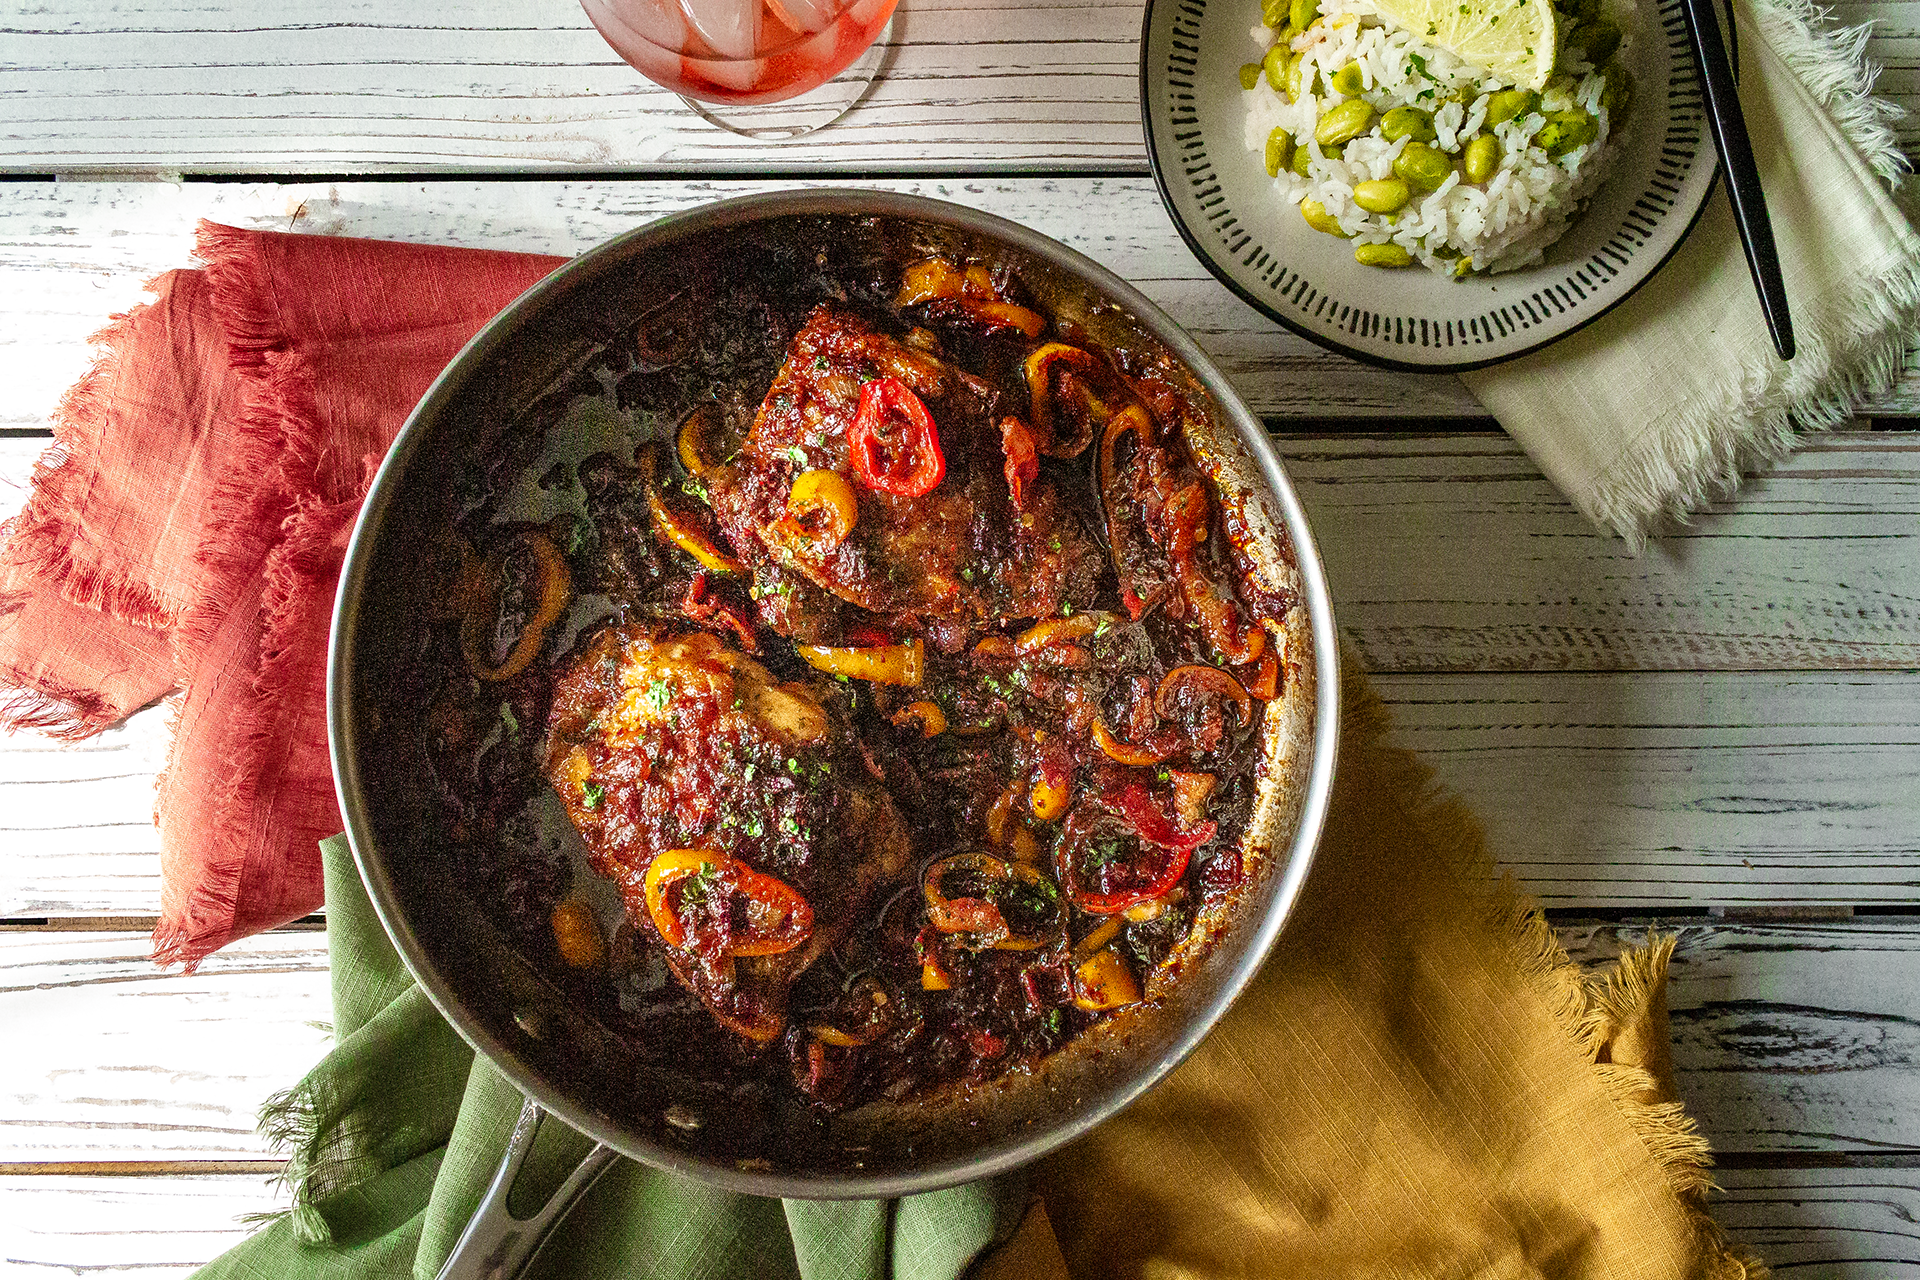
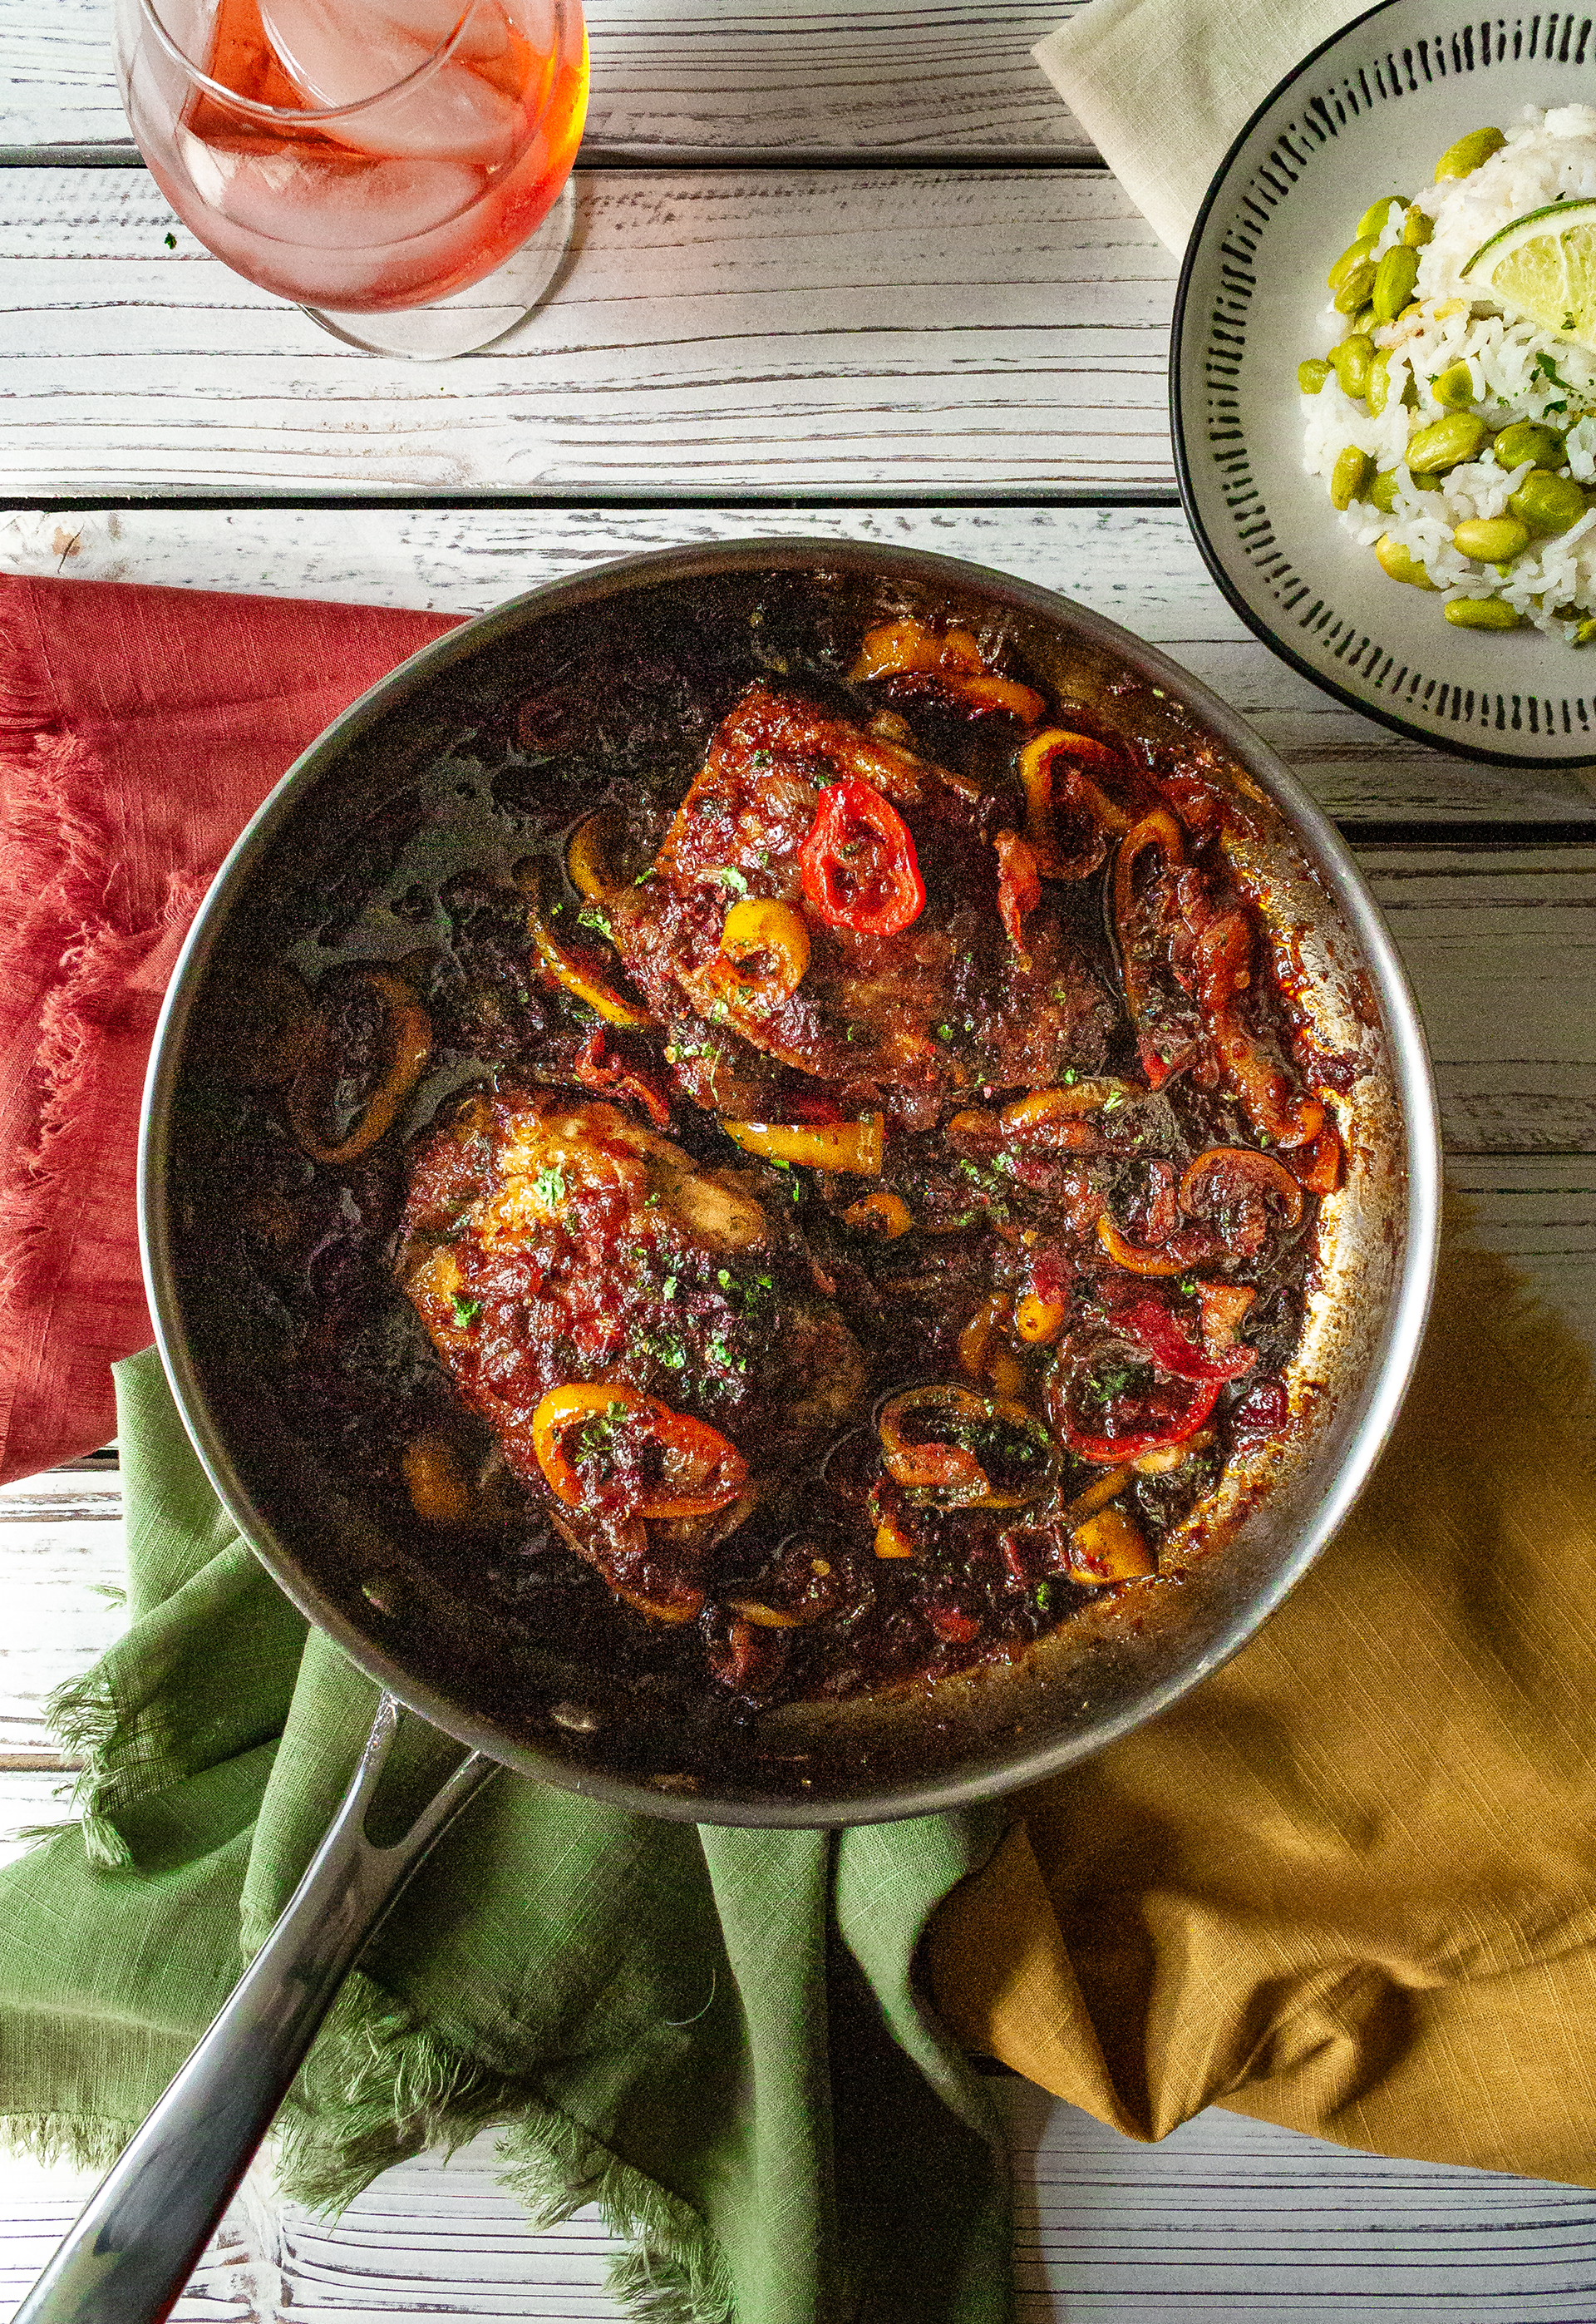
]]>The post Chicken Adobo + Edamame Rice appeared first on I Forgot Salt!.
]]>
Back in March, I made this chicken adobo recipe twice in two weeks, with several lunches of leftovers in-between. I’ve had the recipe and photos sitting in my drafts since then, half-forgotten as everyday life began taking over more and more of my time. Quite a lot has happened in the past two and a half months! As a start, I received my acceptance letter to JMU (!!!) here in Virginia, finished up my final semester of community college, and began my first JMU summer term online. Alex is in the process of changing jobs, and we’re both in the process looking for new apartments as it seems we’ll need to be in two different places for the time being.
In the meantime, too, I’ve done quite a bit of cooking! Although taking the time to photograph and blog about my kitchen adventures definitely fell by the wayside with the stress of school and life changes, I never stopped exploring new culinary delights. From veggie burgers to lemon shrimp pesto crostini, vegan buffalo chickpea wraps to vegetable fritters, tofu peanut quoina salad to a huevos rancheros-adjacent breakfast skillet we’ve affectionately named “hot with beans” (and more), I have continued to play with my food while in social isolation. I will definitely be recreating the most successful of my experiments to post in the coming weeks!
This (wildly inauthentic) chicken adobo recipe was something I decided to delve into completely on a whim after getting tired of eating the same five things over and over again in the first few weeks of self-isolation. To my surprise, Alex adored it to the point of requesting I cook it again for our anniversary dinner (a meal usually reserved for the likes of a juicy ribeye or a visit to our favorite sushi restaurant). It was spicy, tangy, and savory in a way that hit every craving I didn’t even know I had, and I seriously considered trying to bottle the sauce so we had it on-hand as a condiment for other meals. Just thinking about it makes me want to cook it again!
This recipe makes 3 servings.
(note: the pictures above show only two chicken thighs because this was my second attempt at taking photos and I had run out of chicken; I used three thighs the first time I cooked this chicken adobo recipe, hence three servings.)
Indregients:
- 3 chicken thighs, skin-on bone-in
- 12 oz edamame, shelled, frozen
- 15-20 sweet mini peppers
- 4-5 strips bacon
- 2 chipotle peppers in adobo, minced
- 2 cups + 3/4 cups water, divided
- 1 cup rice, uncooked
- 1 cup onion, diced
- 1/3 cup soy sauce
- 3 tbsp honey
- 2 tbsp sake
- 2 tbsp fish sauce
- 2 tbsp gochugaru/red pepper flakes
- 2 tbsp lime juice
- 1 tbsp dark soy sauce
- 1 tbsp sesame oil
- 1 tbsp rice vinegar
- 1 tbsp garlic, minced
- 1 tbsp ginger, minced
- 2 tsp light oil
- 1 tsp +1/2 tsp salt, divided
- 1 tsp oregano
- 1 tsp thyme
- 1 tsp white pepper
- 1/2 tsp mustard powder
- handful cilantro leaves, to finish
Directions:
- Into a rice cooker or pot, add uncooked rice, 2 cups water, frozen shelled edamame, and 1/2 tsp salt (note: follow water/rice instructions per rice cooker if using that method; edamame requires no additional water). Cover and cook for 15-20 minutes, or until rice is fluffy and edamame has steamed through. Set aside.
- Dice onion, slice sweet peppers into 1/4 inch thick rounds (as pictured). Set aside.
- In a small mixing bowl, combine soy sauce, dark soy sauce, sake, rice vinegar, honey, fish sauce, garlic, ginger, sesame oil, oregano, thyme, gochugaru/red pepper flakes, minced chipotles in adobo sauce, and white pepper. Stir to incorporate and set aside.
- Heat a large skillet on medium/medium-high, and fry 4-5 strips of bacon until crispy. Remove, roughly chop, and set aside.
- Dab a majority of the excess oil from the still-hot pan so that only a tablespoon or two is left, then add diced onion, salt, 1 tsp light oil, and 1/4 cup water. Cover and let cook until water has evaporated and a fond has begun forming on the bottom of the pan. Repeat 2-3 times until onions have softened and caramelized, deglazing pan with 1/4 cup water, incorporating fond, repeat. This takes about 7-10 minutes in total (be vigilant!)
- When onions have begin caramelizing, clear spots on the pan per each chicken thigh and add chicken thighs skin-side down. Let cook 5-7 minutes or until skin has begun to crisp.
- Flip chicken thighs and add sliced sweet peppers, chopped bacon, and sauce (see step 3). Bring sauce to a boil then reduce heat to a simmer. Let cook for about 15-20 minutes, occasionally spooning the sauce over top of the chicken thighs, or until chicken has cooked through to 165F.
- (Optional: Remove chicken thighs to a place and continue reducing sauce on a simmer until you have reached your desired thickness.)
- Remove from heat and add lime juice and cilantro. Serve with edamame rice.
This recipe keeps well overnight in the fridge, especially when leftover rice is incorporated with extra sauce to keep it moist when reheated. I would suggest removing the chicken bones before reheating in the microwave, but there is a good chance that my fears of bones exploding when nuked is the product of just an old wives’ tale. Enjoy!

Chicken Adobo with Edamame Rice
Ingredients
- 3 chicken thighs skin-on bone-in
- 12 oz edamame shelled, frozen
- 15-20 sweet mini peppers
- 4-5 strips bacon
- 2 chipotle peppers in adobo minced
- 2 cups + 3/4 cups water divided
- 1 cup rice uncooked
- 1 cup onion diced
- 1/3 cup soy sauce
- 3 tbsp honey
- 2 tbsp sake
- 2 tbsp fish sauce
- 2 tbsp gochugaru/red pepper flakes
- 2 tbsp lime juice
- 1 tbsp dark soy sauce
- 1 tbsp sesame oil
- 1 tbsp rice vinegar
- 1 tbsp garlic minced
- 1 tbsp ginger minced
- 2 tsp light oil
- 1 tsp +1/2 tsp salt divided
- 1 tsp oregano
- 1 tsp thyme
- 1 tsp white pepper
- 1/2 tsp mustard powder
- handful cilantro leaves to finish
Instructions
- Into a rice cooker or pot, add uncooked rice, 2 cups water, frozen shelled edamame, and 1/2 tsp salt*. Cover and cook for 15-20 minutes, or until rice is fluffy and edamame has steamed through. Set aside.
- Dice onion, slice sweet peppers into 1/4 inch thick rounds (as pictured). Set aside.
- In a small mixing bowl, combine soy sauce, dark soy sauce, sake, rice vinegar, honey, fish sauce, garlic, ginger, sesame oil, oregano, thyme, gochugaru/red pepper flakes, minced chipotles in adobo sauce, and white pepper. Stir to incorporate and set aside.
- Heat a large skillet on medium/medium-high, and fry 4-5 strips of bacon until crispy. Remove, roughly chop, and set aside.
- Dab a majority of the excess oil from the still-hot pan so that only a tablespoon or two is left, then add diced onion, salt, 1 tsp light oil, and 1/4 cup water. Cover and let cook until water has evaporated and a fond has begun forming on the bottom of the pan. Repeat 2-3 times until onions have softened and caramelized, deglazing pan with 1/4 cup water, incorporating fond, repeat. This takes about 7-10 minutes in total (be vigilant!)
- When onions have begin caramelizing, clear spots on the pan per each chicken thigh and add chicken thighs skin-side down. Let cook 5-7 minutes or until skin has begun to crisp.
- Flip chicken thighs and add sliced sweet peppers, chopped bacon, and sauce (see step 3). Bring sauce to a boil then reduce heat to a simmer. Let cook for about 15-20 minutes, occasionally spooning the sauce over top of the chicken thighs, or until chicken has cooked through to 165F.
- (Optional: Remove chicken thighs to a place and continue reducing sauce on a simmer until you have reached your desired thickness.)
- Remove from heat and add lime juice and cilantro. Serve with edamame rice.
Notes
The post Chicken Adobo + Edamame Rice appeared first on I Forgot Salt!.
]]>