The post Sweet Potato + Black Bean Enchiladas appeared first on I Forgot Salt!.
]]>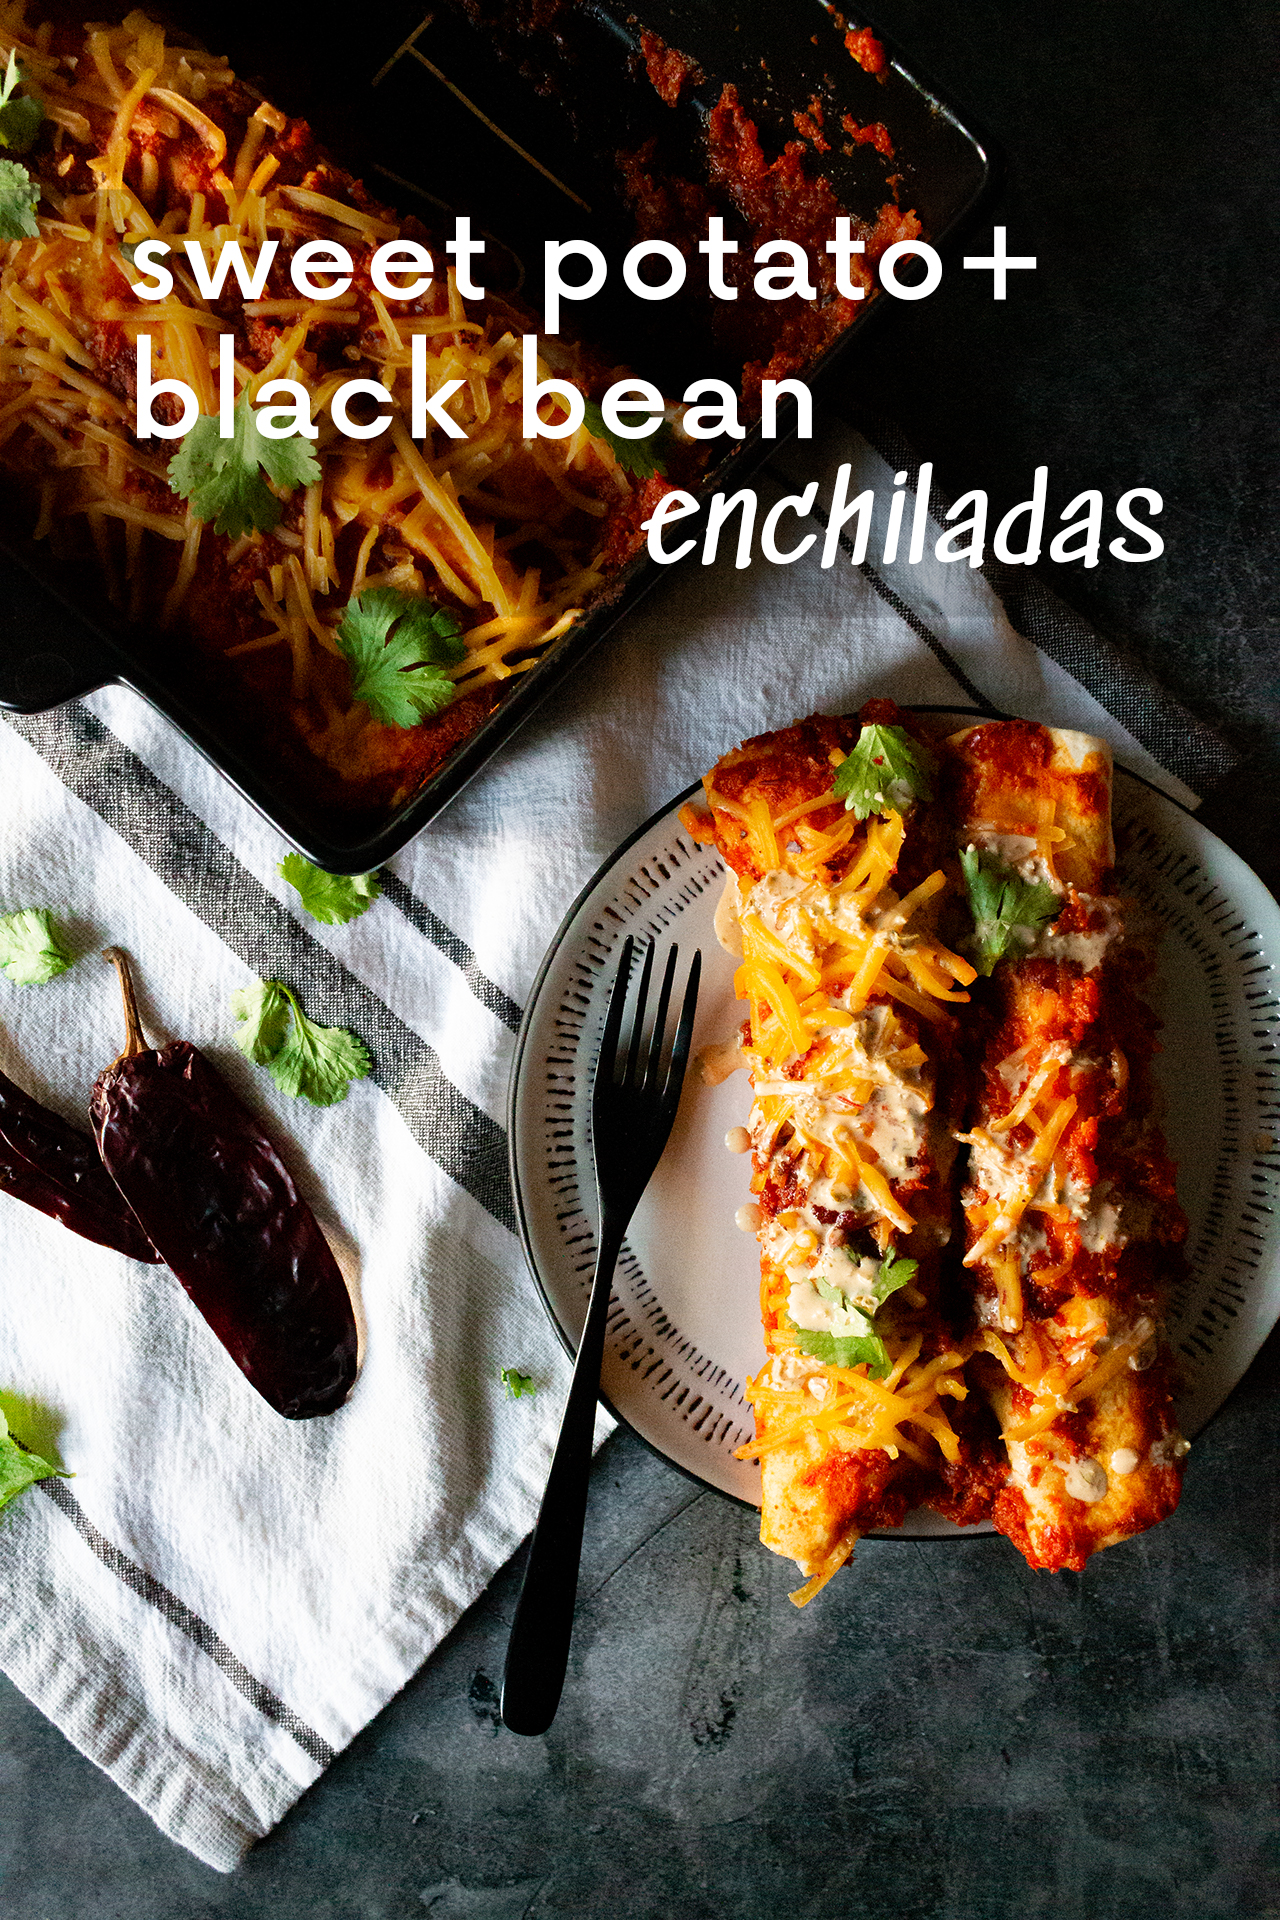
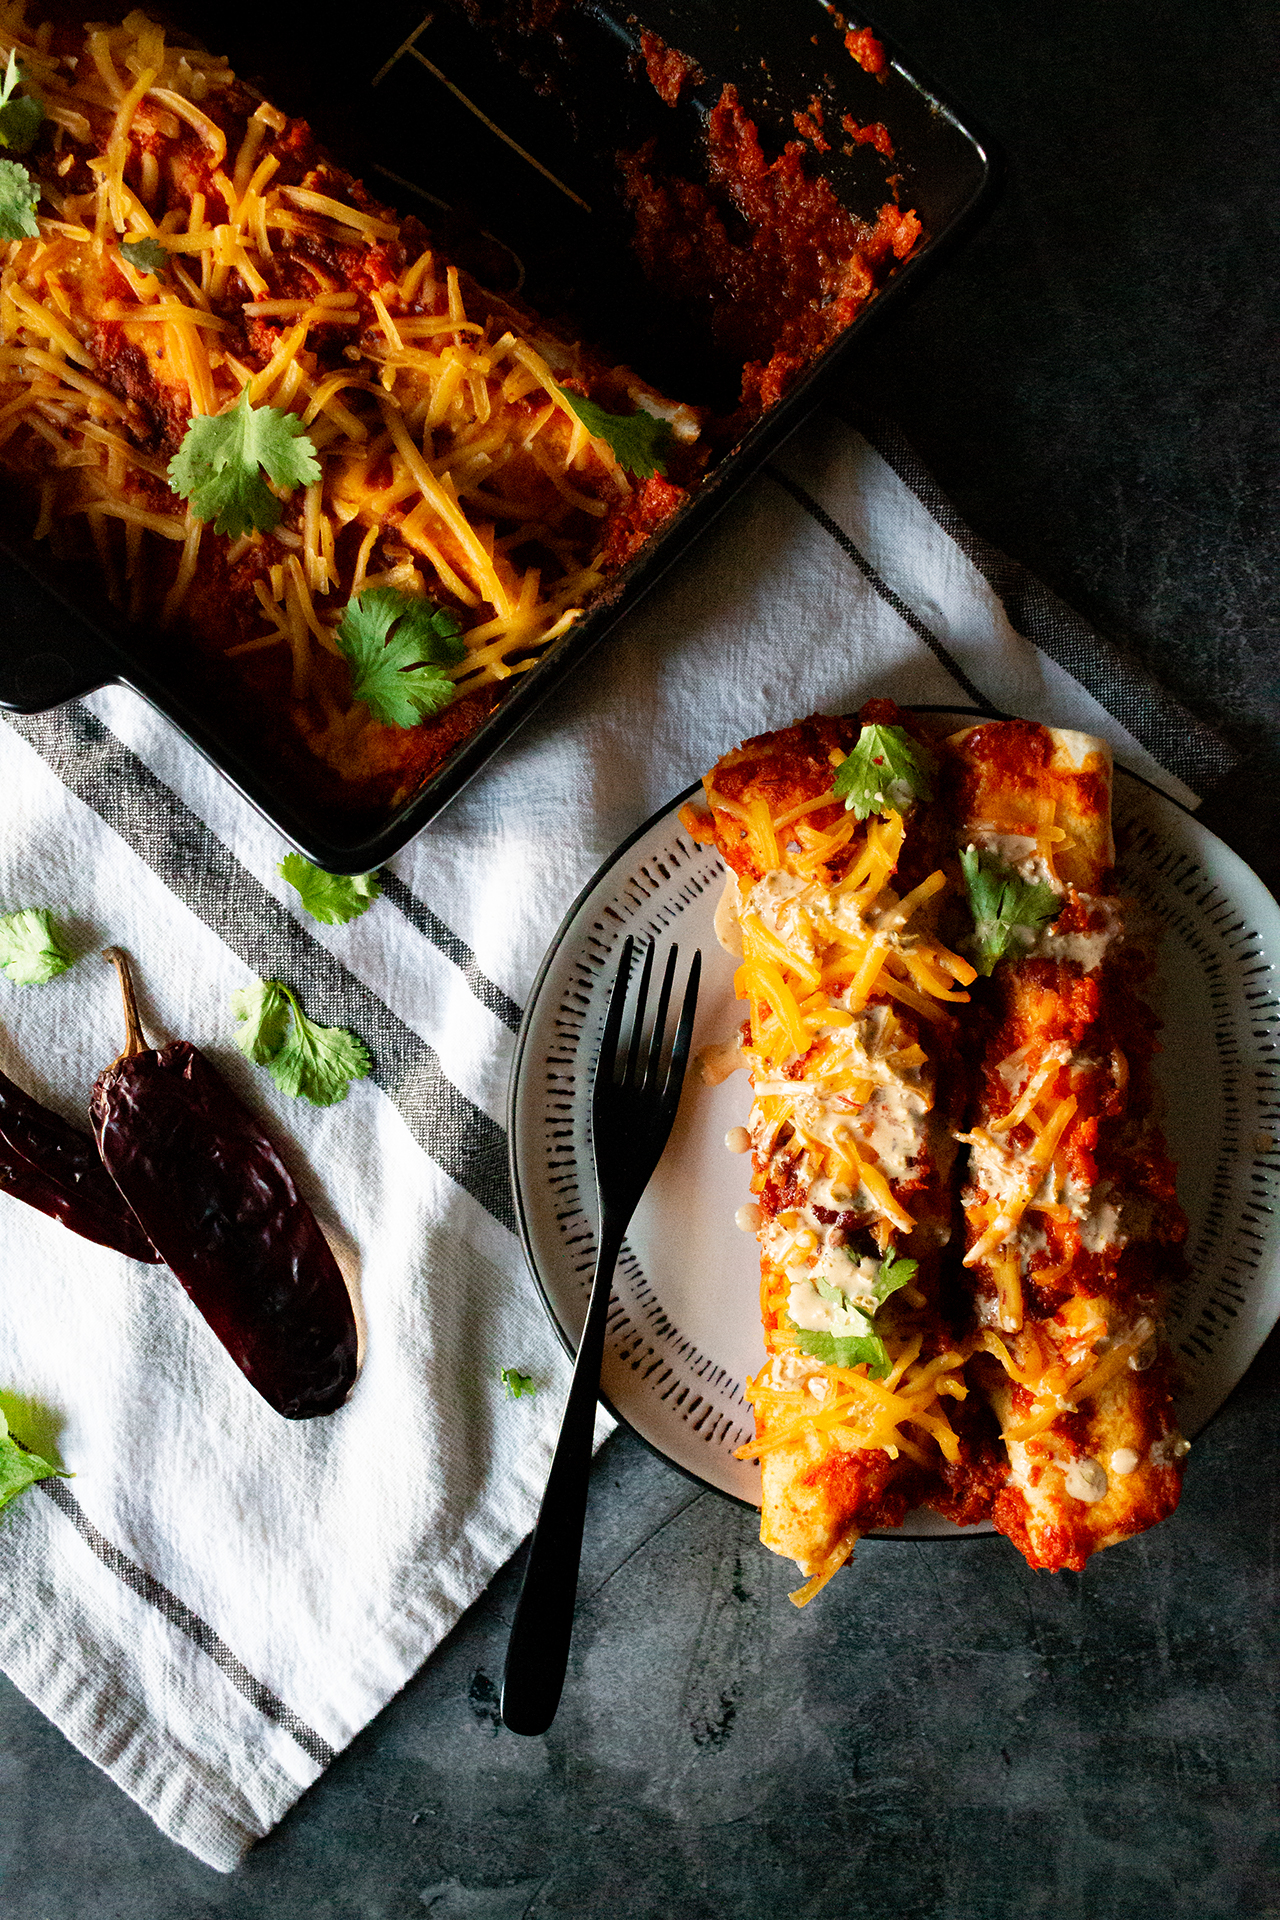
This sweet potato and black bean enchilada recipe took longer to “perfect” than any other recipes I’ve tried to make. If anything, the fact that these turned out so tasty in the end is a testament to the merits of hard work and not giving up even when you think you’re just not cut out for something. With a soft, hearty filling and a rich chipotle sauce, these sweet potato and black bean enchiladas are absolutely to die for–both the soft middle sections, and the gloriously crispy end pieces. Two enchiladas are enough to completely fill me up, and the leftovers taste just as delicious whether you microwave them whole or break them up to sauté.
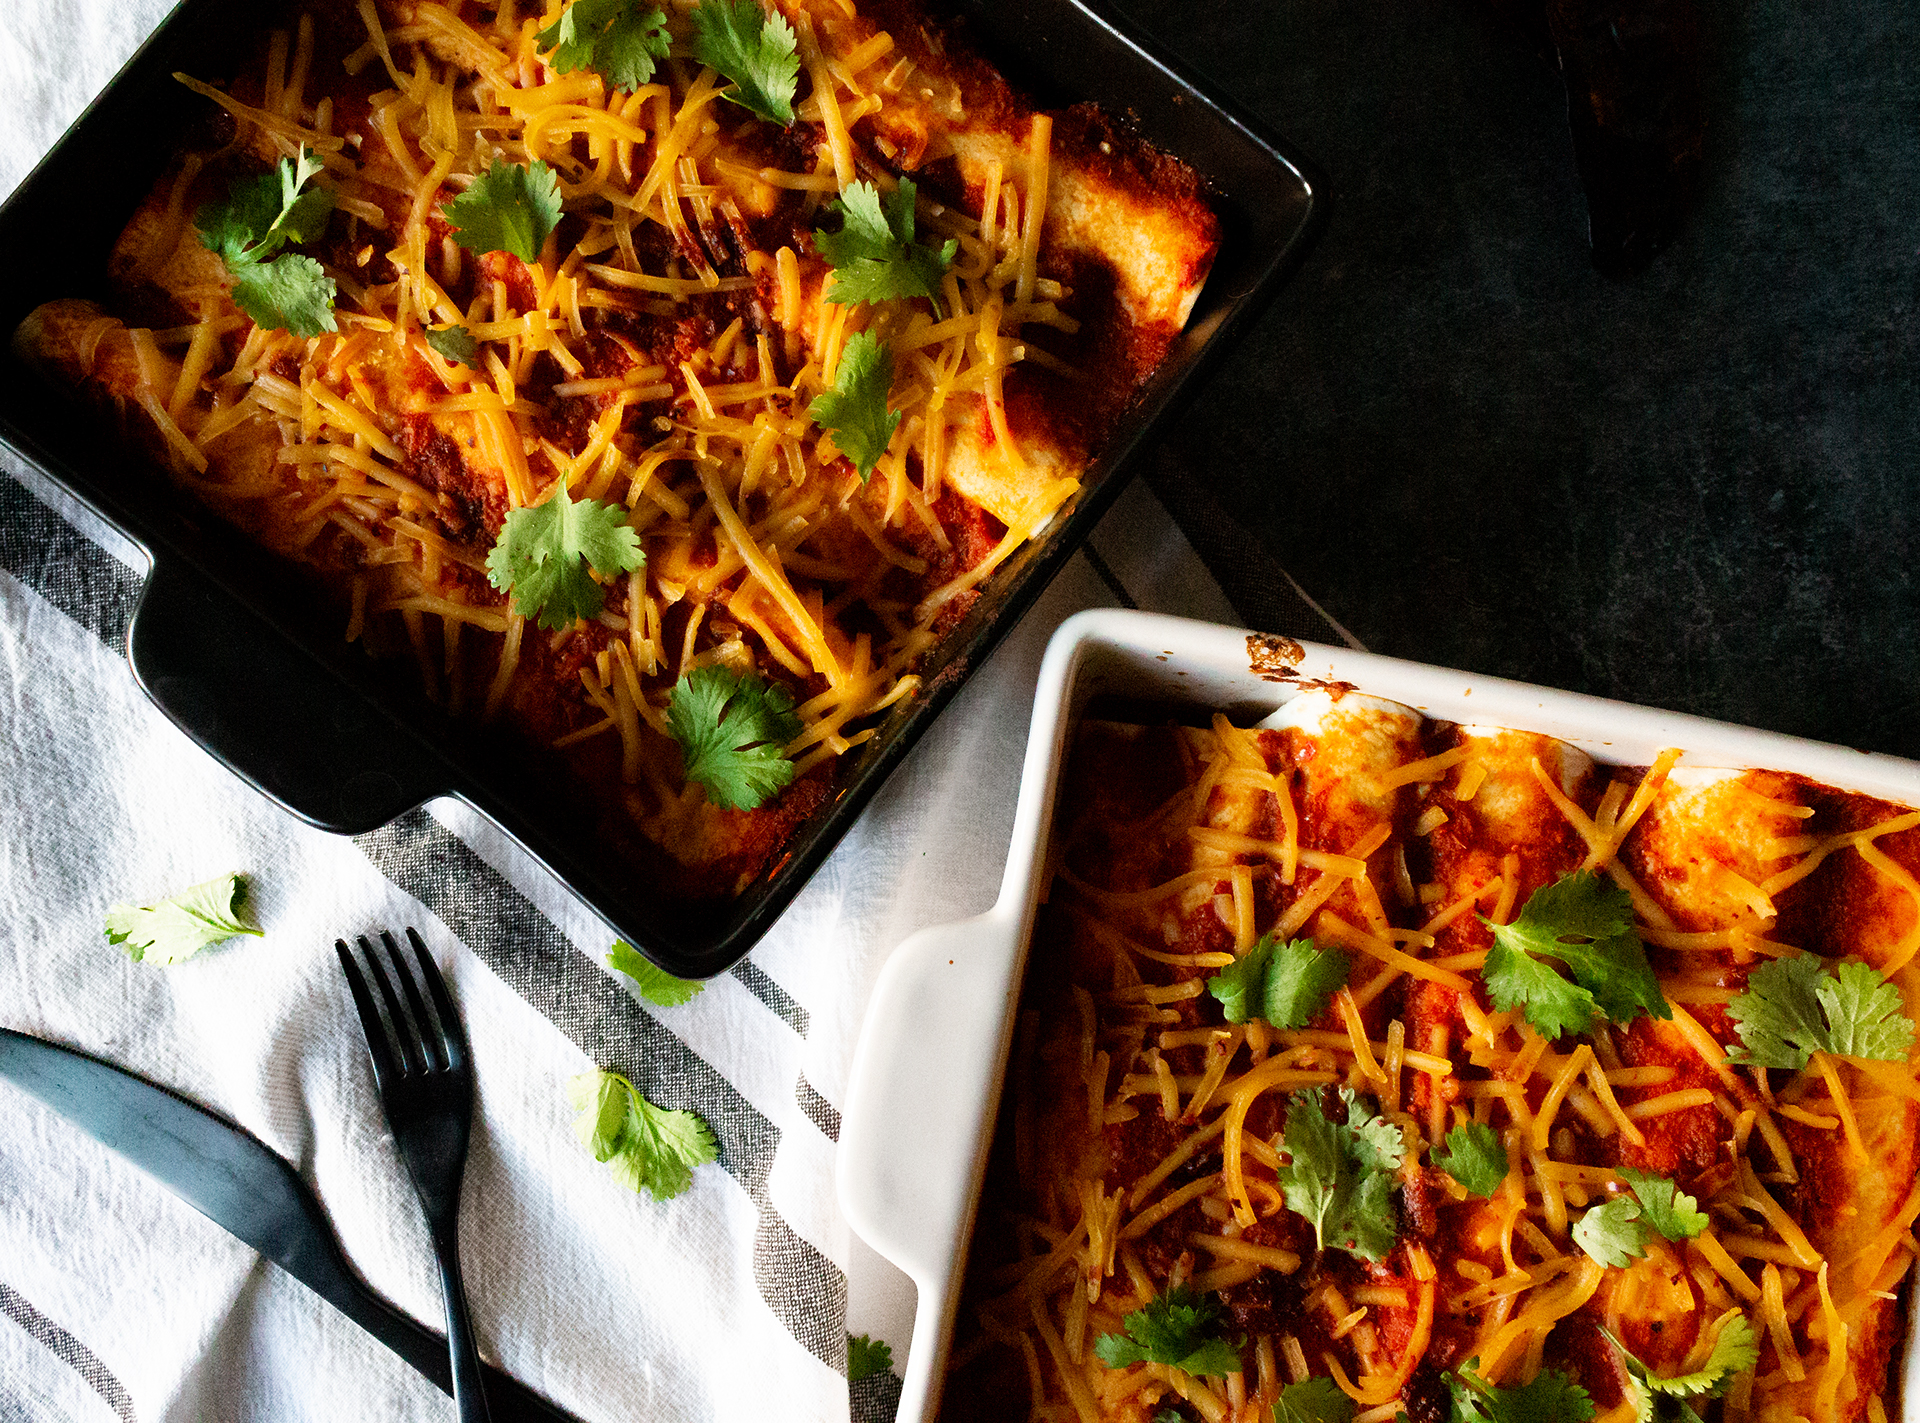
In addition to these sweet potato and black bean enchiladas, I also have a chorizo and potato (omnivore/meat-eater) recipe that I always make alongside this one for Alex. Those delicious morsels are in the white baking pan (pictured below), but I don’t have any particularly stunning photos of them so that recipe will have to wait until I can break out the camera again.
I hope you decide to make this recipe for your next Taco Tuesday, or on a Friday night when the weather is nice. When eaten hot, they’re great to have on a cooler evening. But don’t let that stop you from enjoying them during the summer, too! I’d also recommend pairing these with my tomatillo salsa verde if you don’t want to add more of the rich enchilada sauce onto your plate. It compliments the flavors of these black bean enchiladas really well!
Ingredients:
Sweet Potato + Black Bean Enchiladas Sauce
- 8-10 dried guajillo chilis
- 2-3 large tomatoes
- 1 onion, yellow
- 1 tbsp cocoa powder
- 4 cloves garlic
- 1 + 1/4 tsp salt
- 1/4 tsp black pepper
- 2 tbsp + 1/2 tsp olive oil
Sweet Potato + Black Bean Enchiladas Filling
- 1/2 onion, red
- 2 tsp lime juice
- 2 cloves garlic
- 1/2 tsp salt
- 1 tbsp olive oil
- 1 tbsp fajita seasoning
- 2 cups black beans
- 1 large sweet potato, peeled
- 1/4 cup + 1/4 cup water
- 5 flour tortillas
- 1/4 cup vegan pepperjack, shredded
Directions:
Sweet Potato + Black Bean Enchiladas Sauce
- Cut the stems and scrape the seeds from the dried chilis. Soak in boiling water for at least 30 minutes, drain, pat dry, and set aside.
- Preheat oven to 425F.
- Make a roasting pouch with all 6 gloves of garlic, 1/4 tsp salt, 1/4 tsp black pepper, and 1/2 tsp olive oil. Slice tops from tomatoes and quarter 1 whole yellow onion.
- Lay vegetables and pouch on a lined baking sheet cut-size up and sprinkle with 2 tbsp olive oil and 1 tsp salt. Roast for 20-25 minutes.
- Add roasted tomatoes, roasted onion, 4 roasted garlic cloves, soaked guajillo chilis, cocoa powder, and lime juice to a blender and blend until relatively smooth.
- Transfer blended enchilada sauce to a small saucepan and bring to boil, then reduce to simmer. Simmer until sauce has thickened slightly, about 5-7 minutes. Set aside.
Sweet Potato + Black Bean Enchiladas Filling
- To make the frijoles con camotes filling, finely dice 1/2 red onion, sweet potato, and the remaining 1 roasted garlic clove.
- Add to a large skillet with black beans, 1/4 cup water, and remaining 1 tbsp fajita seasoning. Cover and cook on medium-high until all water has evaporated and sweet potatoes have steamed, about 3-5 minutes, then stir and add remaining 1/4 cup water.
- Cover until all water has evaporated, then sauté for an additional 2-3 minutes until lightly browned. Set aside.
- Begin assembling enchiladas in one or two casserole dishes, depending on size. Add a layer of 1/2 cup enchilada sauce to the bottom, then wrap roughly 1/4 cup filling of choice into a flour tortilla and add to the dish seam-side down.
- Repeat until dish is filled, then layer on an additional 1 cup enchilada sauce and 1/4 cup cheese.
- Lower oven temperature to 350F and bake for 10-15 minutes, or until cheese is melted and the edges have become browned and crispy. Serve topped with sour cream, avocado, cilantro, and jalapeno cream.


Sweet Potato + Black Bean Enchiladas
Ingredients
Sweet Potato + Black Bean Enchilada Sauce
- 8-10 dried guajillo chilis
- 2-3 large tomatoes
- 1 onion yellow
- 1 tbsp cocoa powder
- 4 cloves garlic
- 1 salt + 1/4 tsp
- 1/4 tsp black pepper
- 2 tbsp olive oil + 1/2 tsp
Black Bean + Sweet Potato Enchilada Filling
- 1/2 onion red
- 2 tsp lime juice
- 2 cloves garlic
- 1/2 tsp salt
- 1 tbsp olive oil
- 1 tbsp fajita seasoning
- 2 cups black beans
- 1 large sweet potato peeled
- 1/4 cup water + 1/4 cup
- 5 flour tortillas
- 1/4 cup vegan pepperjack shredded
Instructions
Sweet Potato + Black Bean Enchilada Sauce
- Cut the stems and scrape the seeds from the dried chilis. Soak in boiling water for at least 30 minutes, drain, pat dry, and set aside.
- Preheat oven to 425F.
- Make a roasting pouch with all 6 gloves of garlic, 1/4 tsp salt, 1/4 tsp black pepper, and 1/2 tsp olive oil. Slice tops from tomatoes and quarter 1 whole yellow onion.
- Lay vegetables and pouch on a lined baking sheet cut-size up and sprinkle with 2 tbsp olive oil and 1 tsp salt. Roast for 20-25 minutes.
- Add roasted tomatoes, roasted onion, 4 roasted garlic cloves, soaked guajillo chilis, cocoa powder, and lime juice to a blender and blend until relatively smooth.
- Transfer blended enchilada sauce to a small saucepan and bring to boil, then reduce to simmer. Simmer until sauce has thickened slightly, about 5-7 minutes. Set aside.
Black Bean + Sweet Potato Enchilada Filling
- To make the frijoles con camotes filling, finely dice 1/2 red onion, sweet potato, and the remaining 1 roasted garlic clove.
- Add to a large skillet with black beans, 1/4 cup water, and remaining 1 tbsp fajita seasoning. Cover and cook on medium-high until all water has evaporated and sweet potatoes have steamed, about 3-5 minutes, then stir and add remaining 1/4 cup water.
- Cover until all water has evaporated, then sauté for an additional 2-3 minutes until lightly browned. Set aside.
- Begin assembling enchiladas in one or two casserole dishes, depending on size. Add a layer of 1/2 cup enchilada sauce to the bottom, then wrap roughly 1/4 cup filling of choice into a flour tortilla and add to the dish seam-side down.
- Repeat until dish is filled, then layer on an additional 1 cup enchilada sauce and 1/4 cup cheese.
- Lower oven temperature to 350F and bake for 10-15 minutes, or until cheese is melted and the edges have become browned and crispy. Serve topped with sour cream, avocado, cilantro, and jalapeno cream.
The post Sweet Potato + Black Bean Enchiladas appeared first on I Forgot Salt!.
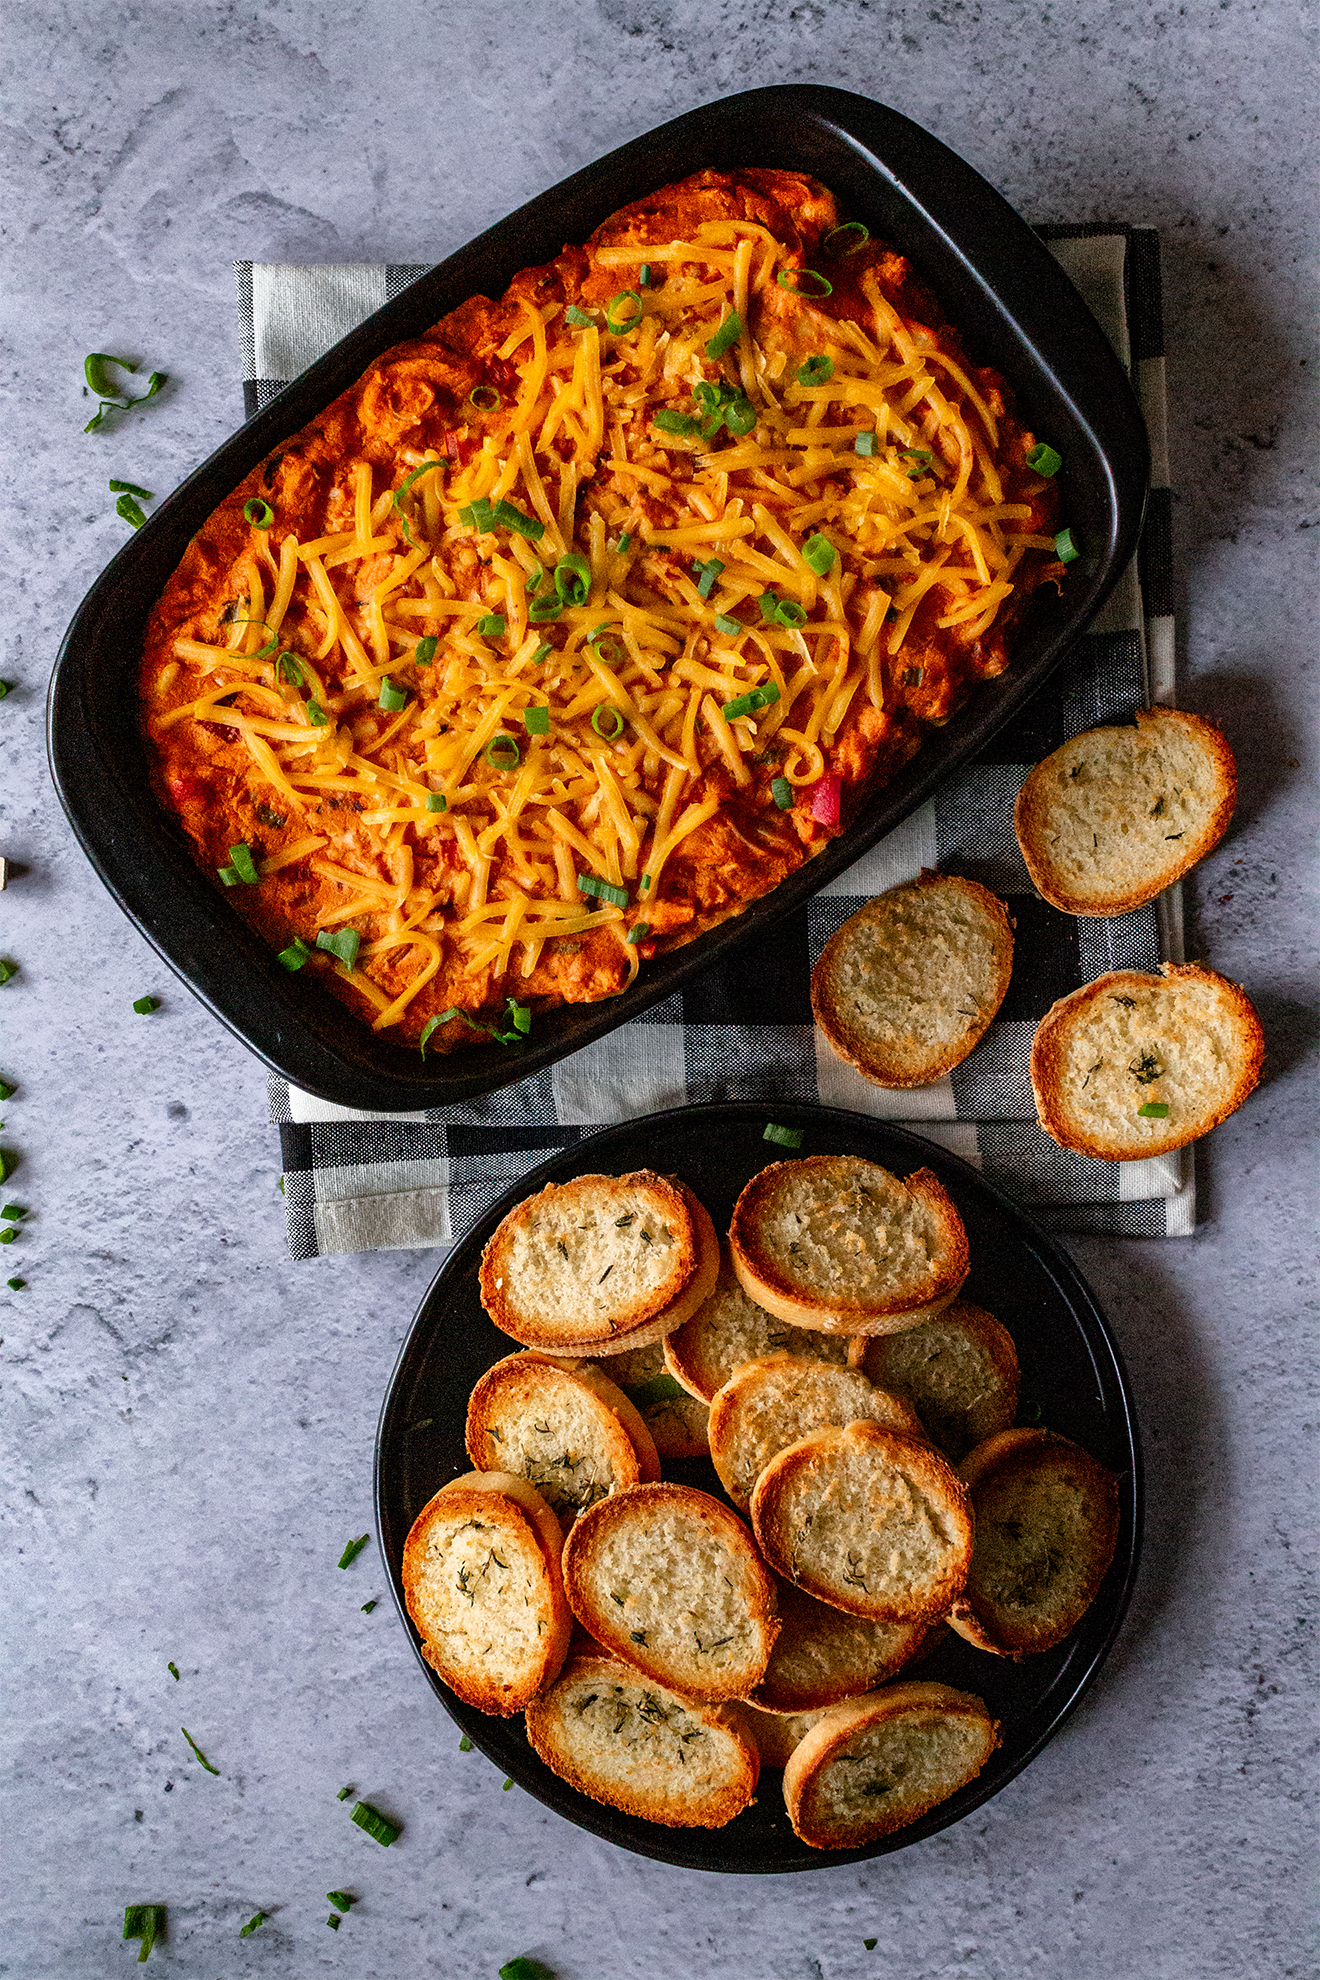
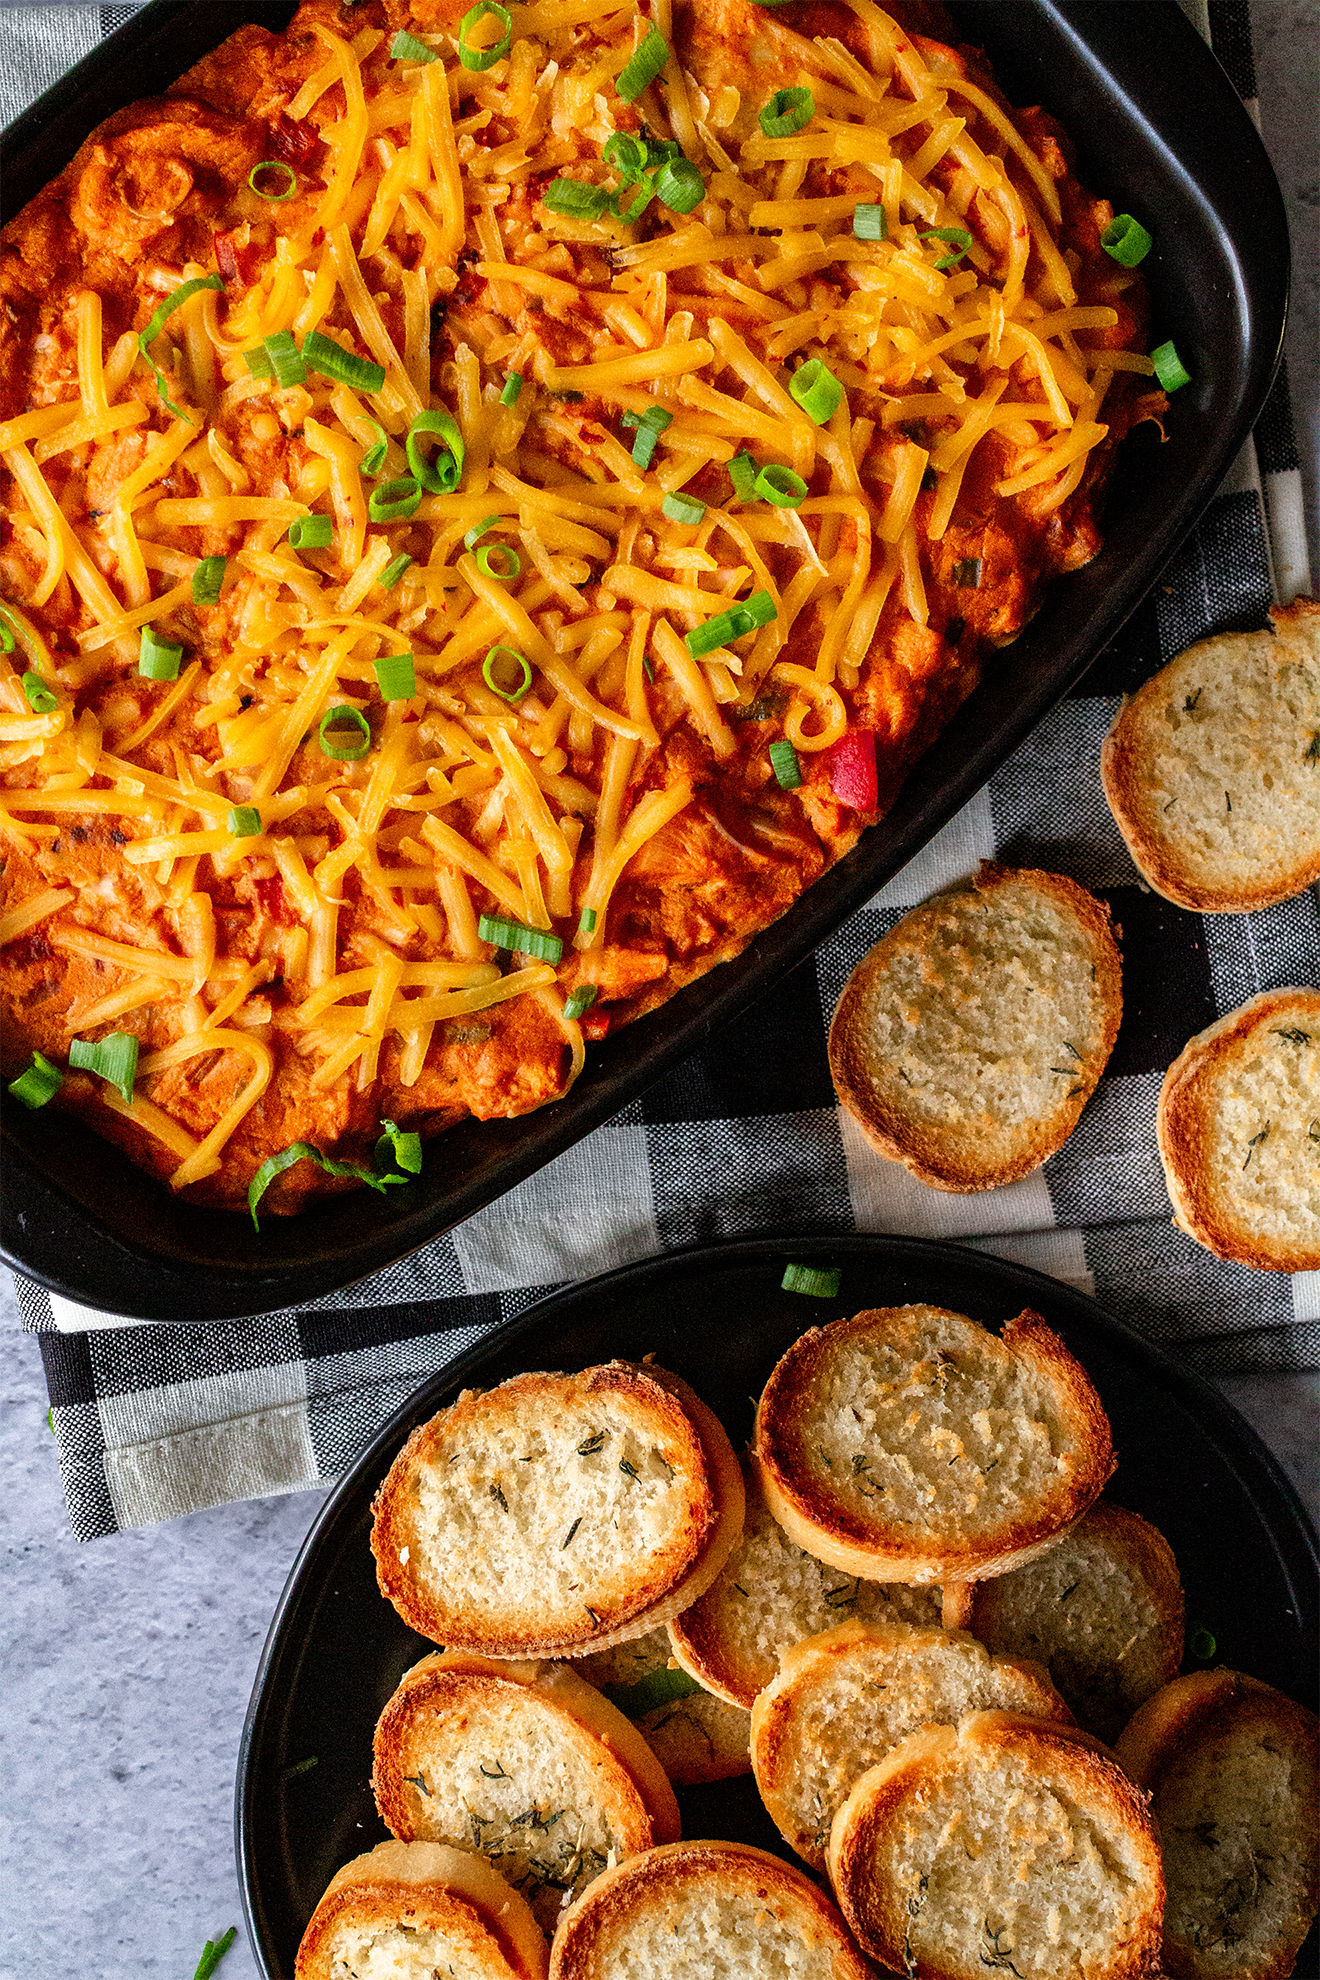
]]>The post Vegan Buffalo Jackfruit Dip + Garlic Herb Dippers appeared first on I Forgot Salt!.
]]>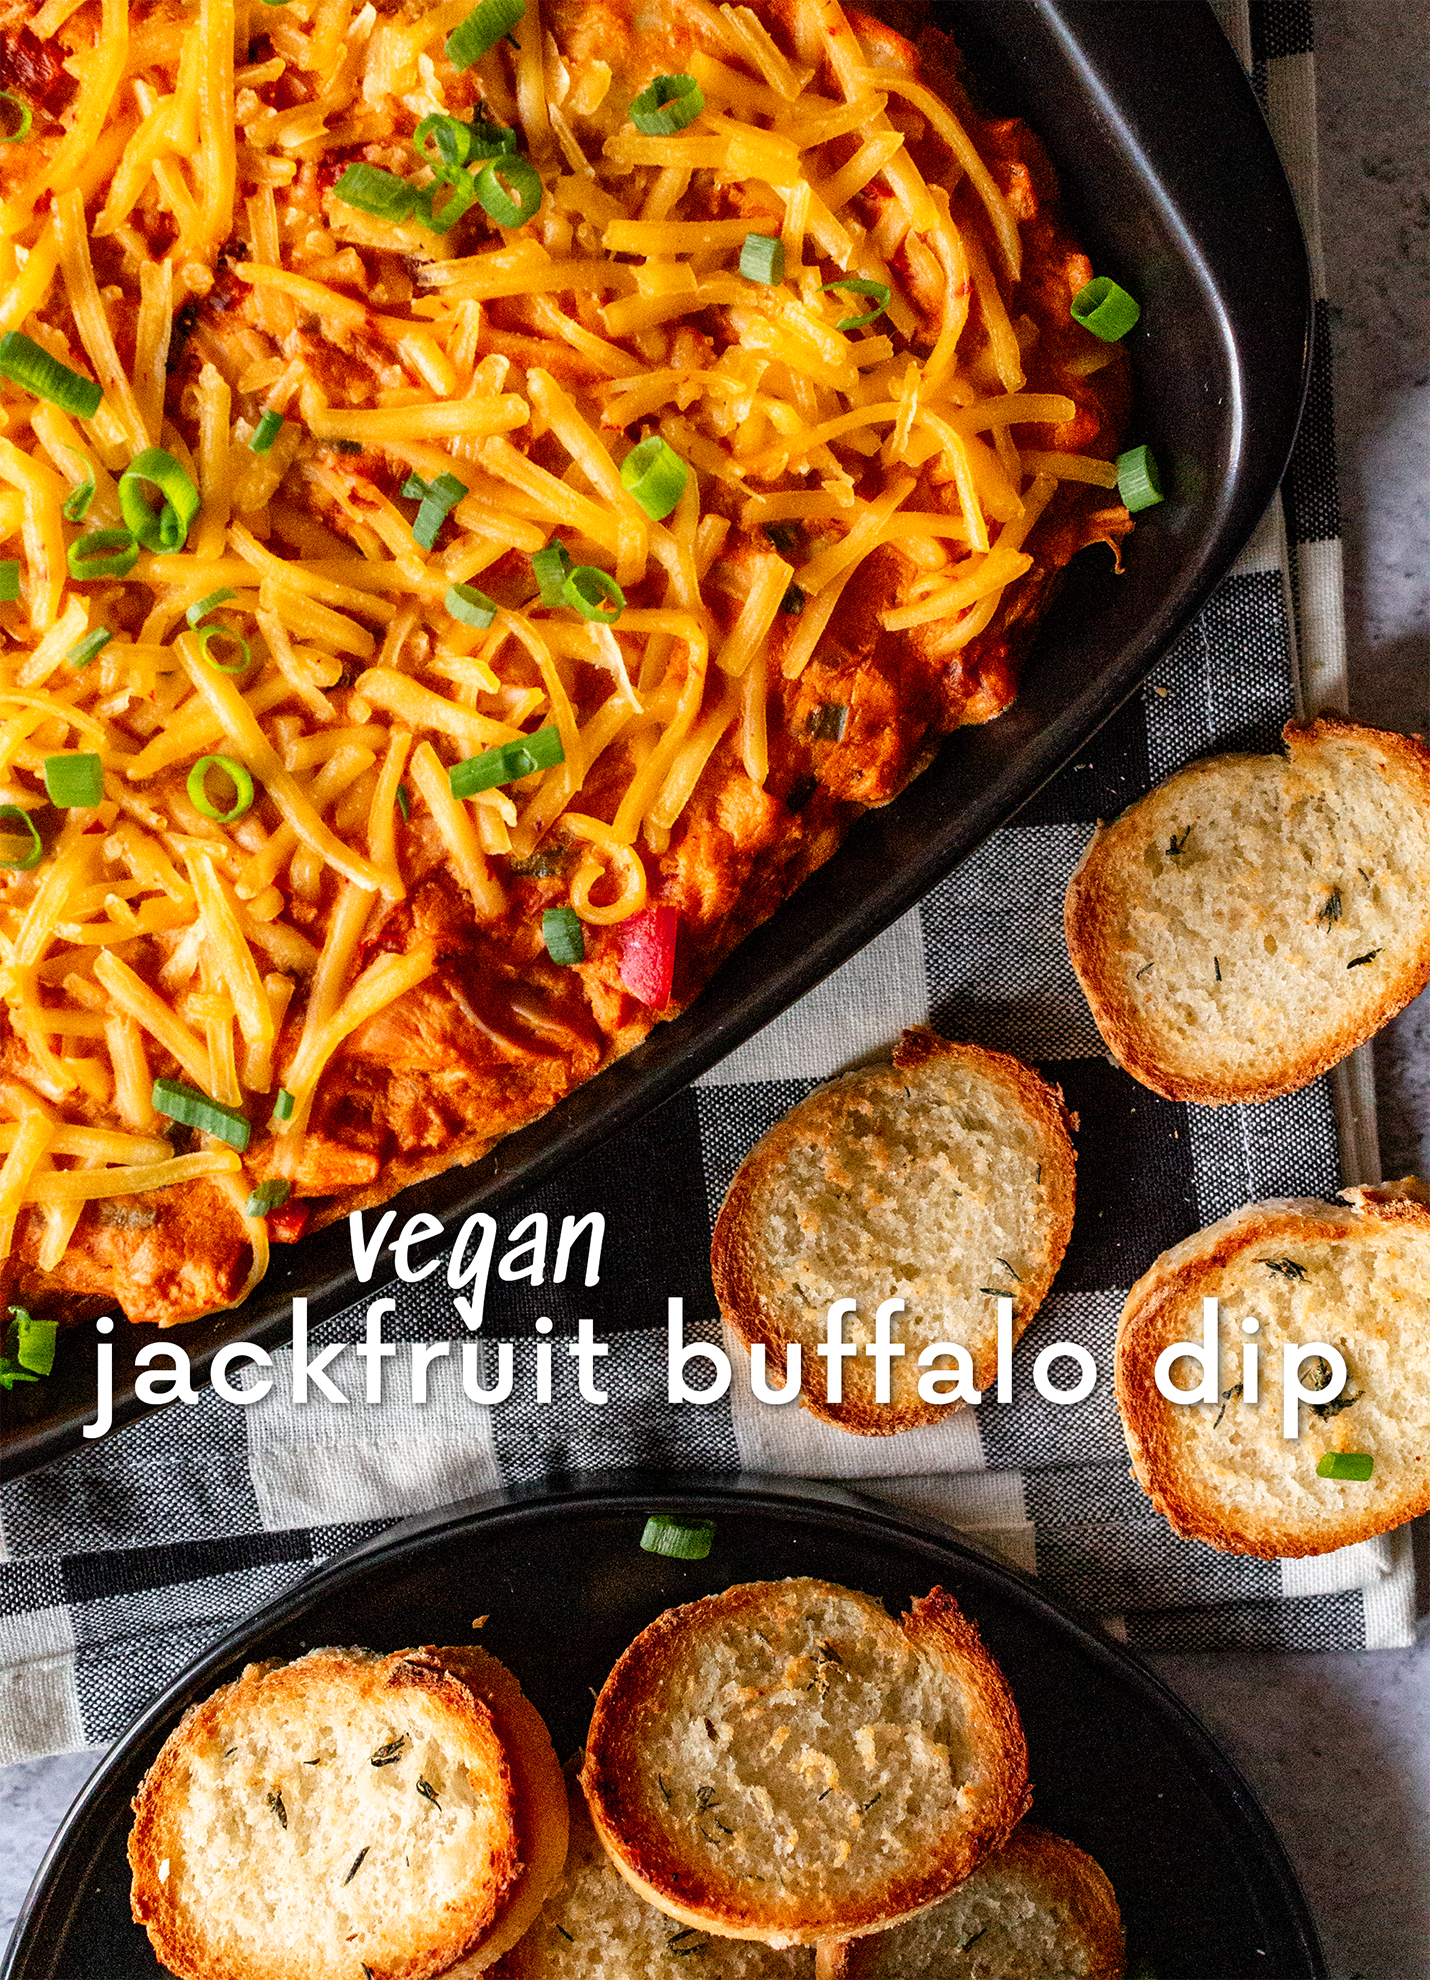
Absolutely obsessed with this vegan buffalo jackfruit dip, a new and improved, vegan-ized version of my bacon buffalo chicken dip from a few years ago. Honestly, jackfruit is one of the best culinary discoveries I’ve made in the last year, and I feel like I’ve started using it in just about everything! Tacos, curries, sandwiches, and dips–you name it, I’ve probably put jackfruit in it. This recipe, however, remains one of my favorites! And it appeals to both meat-eaters and vegans alike with its creamy, rich texture and deliciously spicy taste.
The garlic herb dippers also pair especially well with their crispy tops and soft, buttery bottoms for maximum texture harmony. I hope you try this awesome vegan buffalo jackfruit dip at your next party–or just make it for yourself and spend three days eating it out of a Tupperware container like an animal (speaking from experience, of course).
Ingredients:
Vegan Buffalo Jackfruit Dip
- 14-16oz jackfruit
- 8oz tofu, silken
- 2-3 cups Frank’s buffalo sauce (or your choice)
- 1/2 cup raw cashews
- 1/2 cup onion, diced
- 1 red bell pepper, diced
- 1-2 jalapeños, diced (adjust to desired spice)
- 1/3 cup vegan cheddar, shredded
- 1/3 cup vegan mozzarella, cubed
- 3 tbsp nutritional yeast
- 2 tbsp butter
- 1 tbsp olive oil
- 1 tsp garlic powder
- 1/2 tsp paprika
- 1/2 tsp chipotle powder
- 1/2 tsp cayenne pepper
- 1/2 tsp salt
- 1/4 tsp mustard powder
Garlic Herb Dippers
- 2 tsp garlic powder
- 6 tbsp butter
- 2 tbsp thyme, fresh
- 1 large baguette
Directions:
Vegan Buffalo Jackfruit Dip
- Boil cashews in water for 1 hour. Drain cashews and add to a blender with silken tofu and nutritional yeast. Blend until smooth and set aside.
- Heat a small sauce pot on medium/medium-low, and add buffalo sauce, 2 tbsp butter, 1 tsp garlic powder, paprika, chipotle powder, cayenne pepper, and mustard powder. Simmer for 2-3 minutes, stirring consistently, until butter has melted and spices have become fully incorporated. Reduce to low/remove from heat and set aside.
- Heat olive oil in a large skillet on medium/medium-high, and add diced onion, bell pepper, jalapeño, and salt. Sauté for 3-5 minutes or until vegetables have become browned and fragrant.
- Add jackfruit, rinsed and drained if necessary, and sauté with vegetables for an additional 3-5 minutes or until cooked through. Then, reduce heat to low, and add buffalo sauce mixture to the pan. Stir until everything is incorporated, about 1-2 minutes, and remove from heat.
- To a large mixing bowl, add buffalo vegetable sauté, tofu cashew cream, cheddar shreds, and cubed mozzarella. Fold gently with a spatula to ensure everything is incorporated, then transfer to a casserole or baking dish.
- Top with additional cheddar shreds and bake at 350F for 15 minutes. Remove from oven and set aside to cool for 5-10 minutes before serving warm from the dish.
Garlic Herb Dippers
- To make the crostini, slice a baguette into thin rounds. Layer on a parchment paper-lined baking sheet.
- In a small bowl, melt 6 tbsp butter and combine with 2 tsp garlic powder and fresh thyme. Brush over baguette rounds.
- Broil rounds on high (or bake at 525F) for 3-4 minutes, or until the tops have become browned and crisp while the undersides are still warm and soft.

Vegan Buffalo Jackfruit Dip with Garlic Herb Dippers
Ingredients
Vegan Buffalo Jackfruit Dip
- 14-16 oz jackfruit
- 8 oz tofu silken
- 2-3 cups Frank’s buffalo sauce or your choice
- 1/2 cup raw cashews
- 1/2 cup onion diced
- 1 red bell pepper diced
- 1-2 jalapeños diced (adjust to desired spice)
- 1/3 cup vegan cheddar shredded
- 1/3 cup vegan mozzarella cubed
- 3 tbsp nutritional yeast
- 2 tbsp butter
- 1 tbsp olive oil
- 1 tsp garlic powder
- 1/2 tsp paprika
- 1/2 tsp chipotle powder
- 1/2 tsp cayenne pepper
- 1/2 tsp salt
- 1/4 tsp mustard powder
Garlic Herb Dippers
- 2 tsp garlic powder
- 6 tbsp butter
- 2 tbsp thyme fresh
- 1 large baguette
Instructions
Vegan Buffalo Jackfruit Dip
- Boil cashews in water for 1 hour. Drain cashews and add to a blender with silken tofu and nutritional yeast. Blend until smooth and set aside.
- Heat a small sauce pot on medium/medium-low, and add buffalo sauce, 2 tbsp butter, 1 tsp garlic powder, paprika, chipotle powder, cayenne pepper, and mustard powder. Simmer for 2-3 minutes, stirring consistently, until butter has melted and spices have become fully incorporated. Reduce to low/remove from heat and set aside.
- Heat olive oil in a large skillet on medium/medium-high, and add diced onion, bell pepper, jalapeño, and salt. Sauté for 3-5 minutes or until vegetables have become browned and fragrant.
- Add jackfruit, rinsed and drained if necessary, and sauté with vegetables for an additional 3-5 minutes or until cooked through. Then, reduce heat to low, and add buffalo sauce mixture to the pan. Stir until everything is incorporated, about 1-2 minutes, and remove from heat.
- To a large mixing bowl, add buffalo vegetable sauté, tofu cashew cream, cheddar shreds, and cubed mozzarella. Fold gently with a spatula to ensure everything is incorporated, then transfer to a casserole or baking dish.
- Top with additional cheddar shreds and bake at 350F for 15 minutes. Remove from oven and set aside to cool for 5-10 minutes before serving warm from the dish.
Garlic Herb Dippers
- To make the crostini, slice a baguette into thin rounds. Layer on a parchment paper-lined baking sheet.
- In a small bowl, melt 6 tbsp butter and combine with 2 tsp garlic powder and fresh thyme. Brush over baguette rounds.
- Broil rounds on high (or bake at 525F) for 3-4 minutes, or until the tops have become browned and crisp while the undersides are still warm and soft.
The post Vegan Buffalo Jackfruit Dip + Garlic Herb Dippers appeared first on I Forgot Salt!.
]]>The post Chickpea No-Tuna Salad Sandwich appeared first on I Forgot Salt!.
]]>
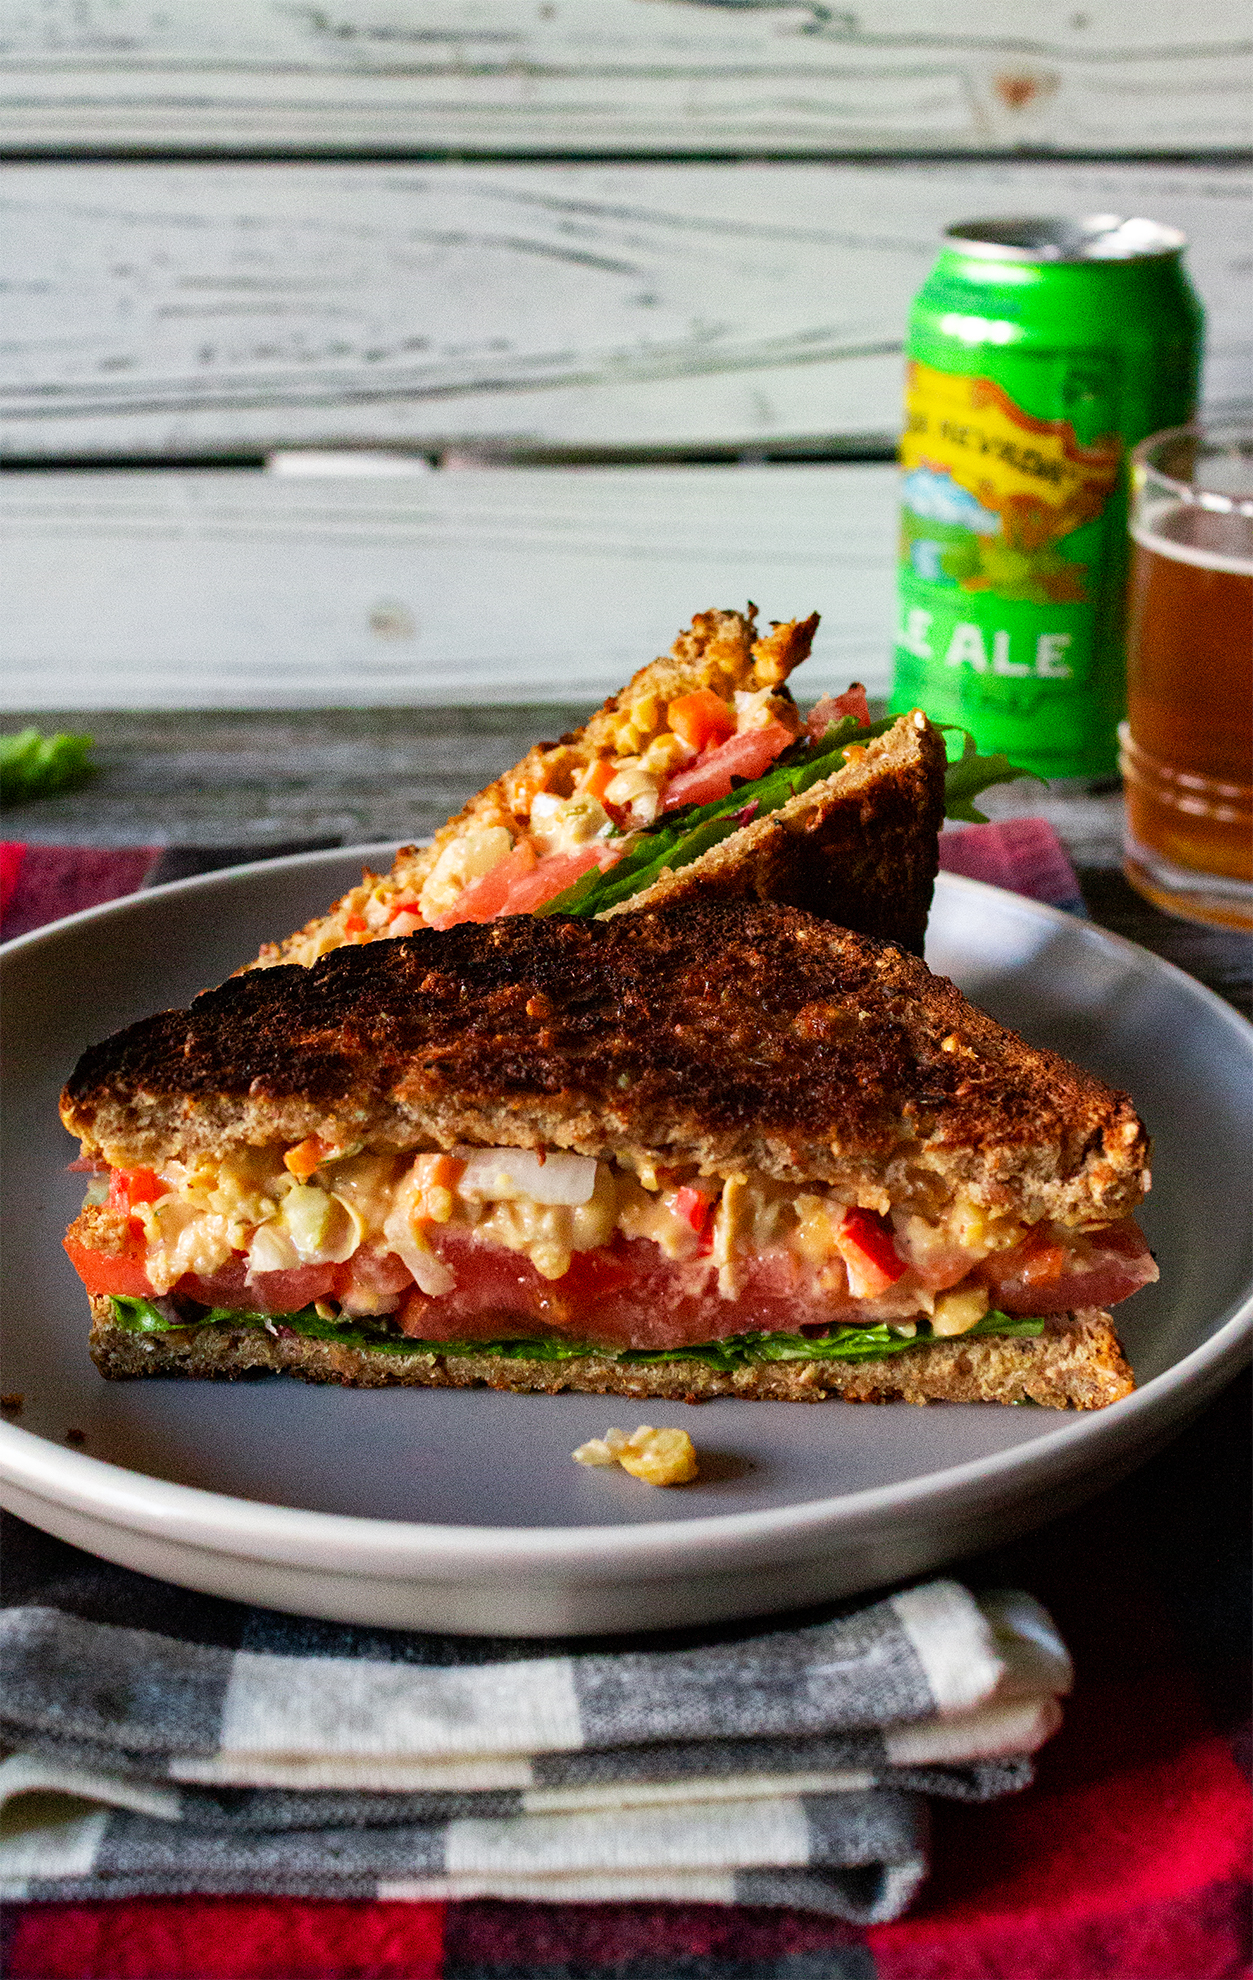
This chickpea salad sandwich filling is great to make ahead and eat throughout the week with fresh toast, and even works well as a car food! This past Halloween, Alex and went on an impromptu road trip down the Blue Ridge Parkway, and I threw a Tupperware of this and a loaf of bread into our cooler before we set off. It made for a delicious post-hike picnic lunch even without the fixings, and having a homemade meal on-hand helped the already awesome day feel even more special.
The creamy, crunchy texture of this chickpea salad sandwich the perfect cool lunch for a hot day, whether that be picnicking in the park or going on a hike . It’s one of my favorite summer foods, packing a crisp protein punch to fuel you through the afternoon. Chickpea salad sandwiches also pair great with your favorite cold beer or a glass of chilled ice tea. Yum!
For another picnic-friendly recipe, check out my onigiri rice balls snack, which I will be updating soon with a sautéed tahini shiitake mushroom filling!
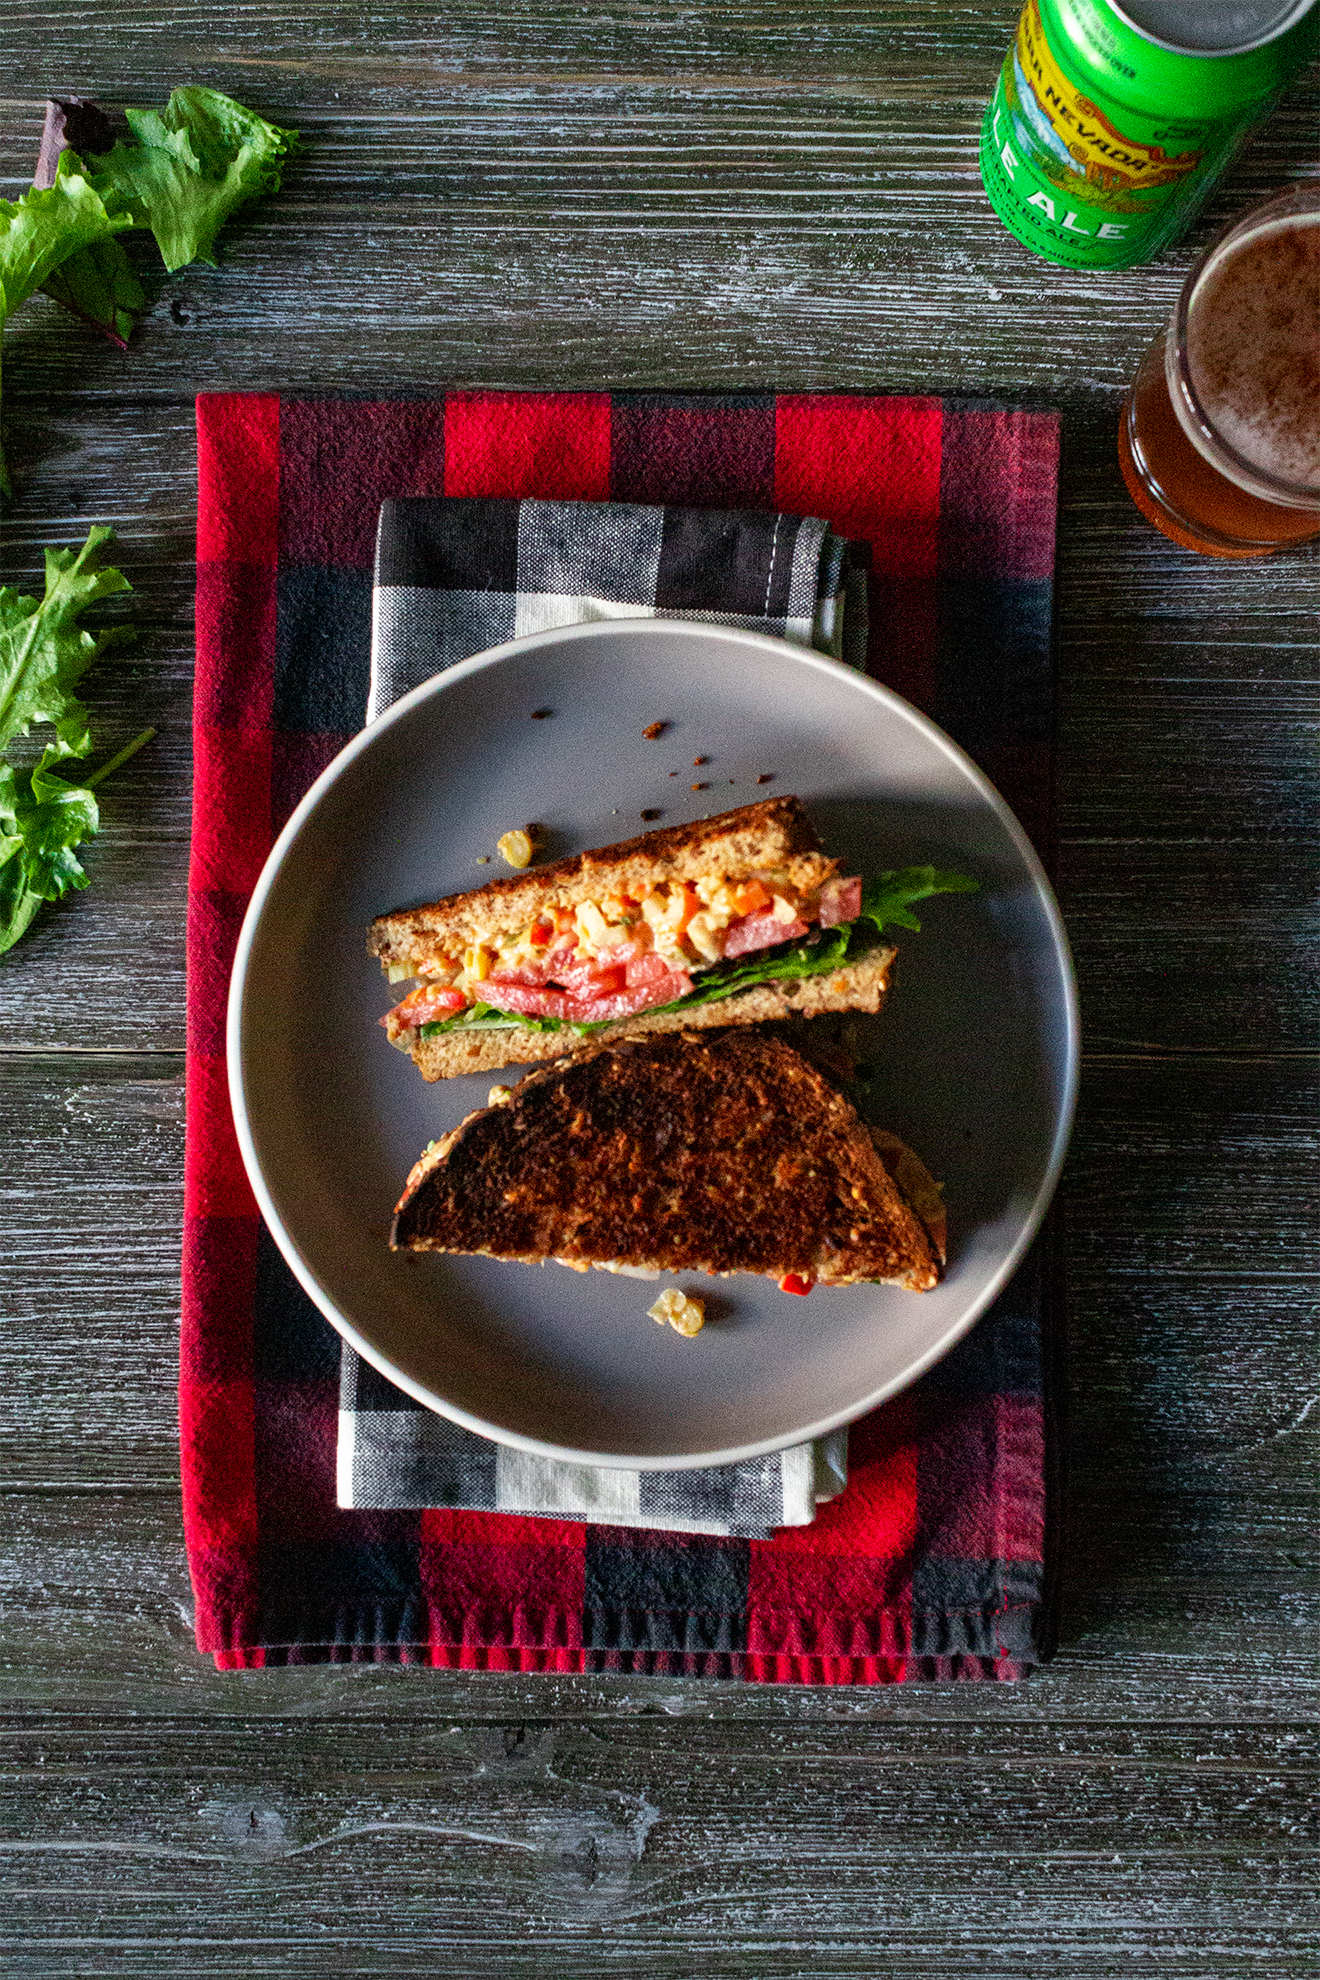
This recipe makes 4 sandwiches.
Ingredients:
- 2 cups chickpeas
- 1/2 cup mayonnaise
- 1/3 cup celery, diced
- 1/3 cup carrot, diced
- 1/3 cup bell pepper, diced
- 1/4 cup red onion, diced
- 2 tbsp spicy mustard
- 1 tbsp Frank’s buffalo sauce (or hot sauce of your choice)
- 1 tsp lemon juice
- 1/2 tsp dill
- 1/4 tsp garlic powder
- 1/4 tsp + 1/4 tsp salt
- 1/4 tsp black pepper
- 1/4 tsp cayenne pepper
- 1/2 cup lettuce
- 1/2 cup tomato, sliced
- 8 slices bread, toasted with butter
Directions:
- Smash chickpeas with a fork or potato masher until largely broken up with some whole or “chunky” chickpeas remaining for texture.
- Finely dice celery, carrot, bell pepper, and red onion.
- Add chickpeas, mayonnaise, celery, carrot, onion, bell pepper, mustard, lemon juice, buffalo sauce, and spices (dill, garlic powder, salt, black pepper, and cayenne pepper). Mix thoroughly until everything is incorporated. Store covered in the fridge until ready to serve.
- Toast bread with butter. Slice tomatoes and sprinkle with remaining 1/4 tsp salt. Assemble sandwiches with “tuna” salad, lettuce, and salted tomatoes.

Chickpea No-Tuna Salad Sandwiches
Ingredients
- 2 cups chickpeas
- 1/2 cup mayonnaise
- 1/3 cup celery diced
- 1/3 cup carrot diced
- 1/3 cup bell pepper diced
- 1/4 cup red onion diced
- 2 tbsp spicy mustard
- 1 tbsp Frank’s buffalo sauce or hot sauce of your choice
- 1 tsp lemon juice
- 1/2 tsp dill
- 1/4 tsp garlic powder
- 1/4 tsp salt + 1/4 tsp reserved
- 1/4 tsp black pepper
- 1/4 tsp cayenne pepper
- 1/2 cup lettuce
- 1/2 cup tomato sliced
- 8 slices bread toasted with butter
Instructions
- Smash chickpeas with a fork or potato masher until largely broken up with some whole or “chunky” chickpeas remaining for texture.
- Finely dice celery, carrot, bell pepper, and red onion.
- Add chickpeas, mayonnaise, celery, carrot, onion, bell pepper, mustard, lemon juice, buffalo sauce, and spices (dill, garlic powder, salt, black pepper, and cayenne pepper). Mix thoroughly until everything is incorporated. Store covered in the fridge until ready to serve.
- Toast bread with butter. Slice tomatoes and sprinkle with remaining 1/4 tsp salt. Assemble sandwiches with “tuna” salad, lettuce, and salted tomatoes.
The post Chickpea No-Tuna Salad Sandwich appeared first on I Forgot Salt!.
]]>The post Loaded Breakfast Toast appeared first on I Forgot Salt!.
]]>
Although I’ve posted some avocado toast recipes before, this absolute monster of a breakfast toast carried me through my last semester of 2020. What a year–I can’t believe it’s almost over. We’re nearly free from this absolute catastrophe! It’s hard to fathom that another year has come and gone, while at the same time I feel like I’ve aged a decade since January. I’m sure the feeling is mutual. Despite the chaos, however, I feel like 2020 has been one of my most productive and accomplished years in quite a while, even with what seems like the end of the world constantly looming on the horizon.
As I’ve mentioned in previous posts, Alex and I made some very radical changes in our lives, from larger things changing jobs (him) to entering university (me) to moving even farther south (both of us) to smaller, more individual improvements like switching to a plant-based diet (me), taking up running (him), and making a conscious effort to read more books (both of us). In the grand scheme of things–even our lowest points–I think we have come out of 2020 as better, stronger people.
That doesn’t mean this year wasn’t difficult, however. Our lowest points were indeed low, but I think we’re lucky enough to be able to dwell on not on the negatives but on the positives of 2020 in retrospective. While we will be looking back on this year as a true dumpster fire, I want to try not to forget about the good things that happened in spite of so much strife. I am tentatively putting some of my hopes in 2021, but will be satisfied as long as we make it through intact.
Now, onto a lighter note and the actual breakfast toast recipe…

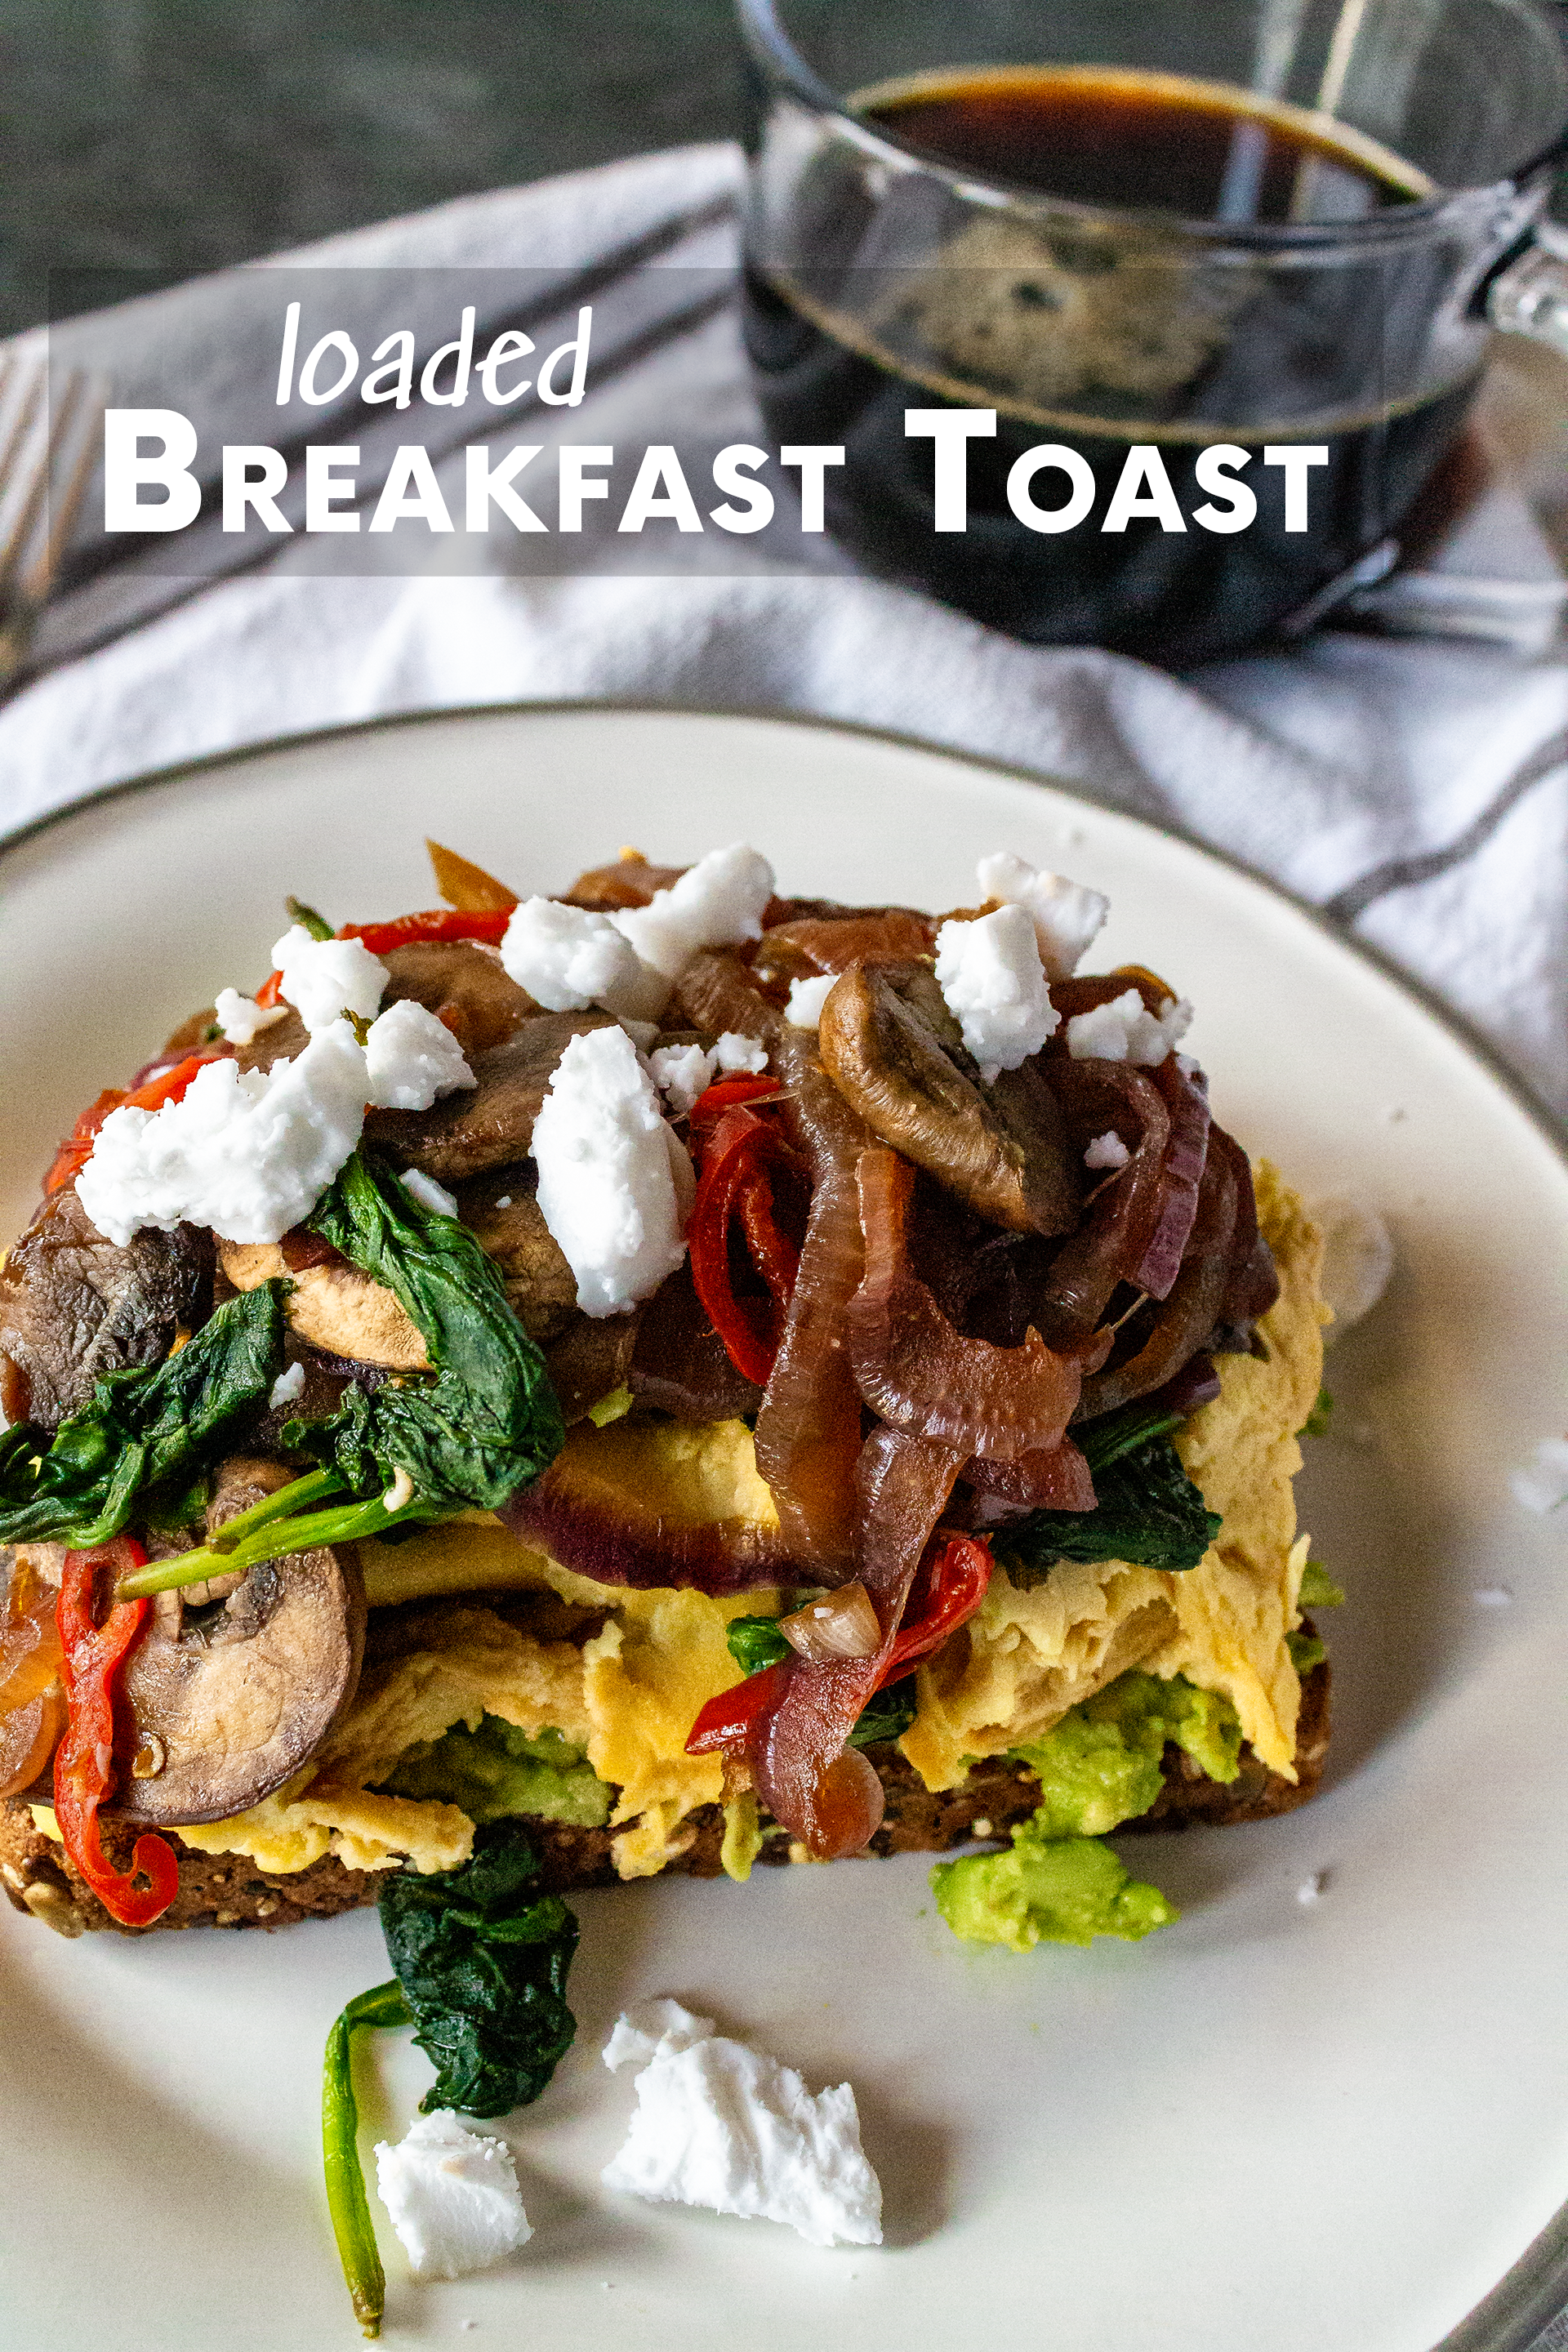
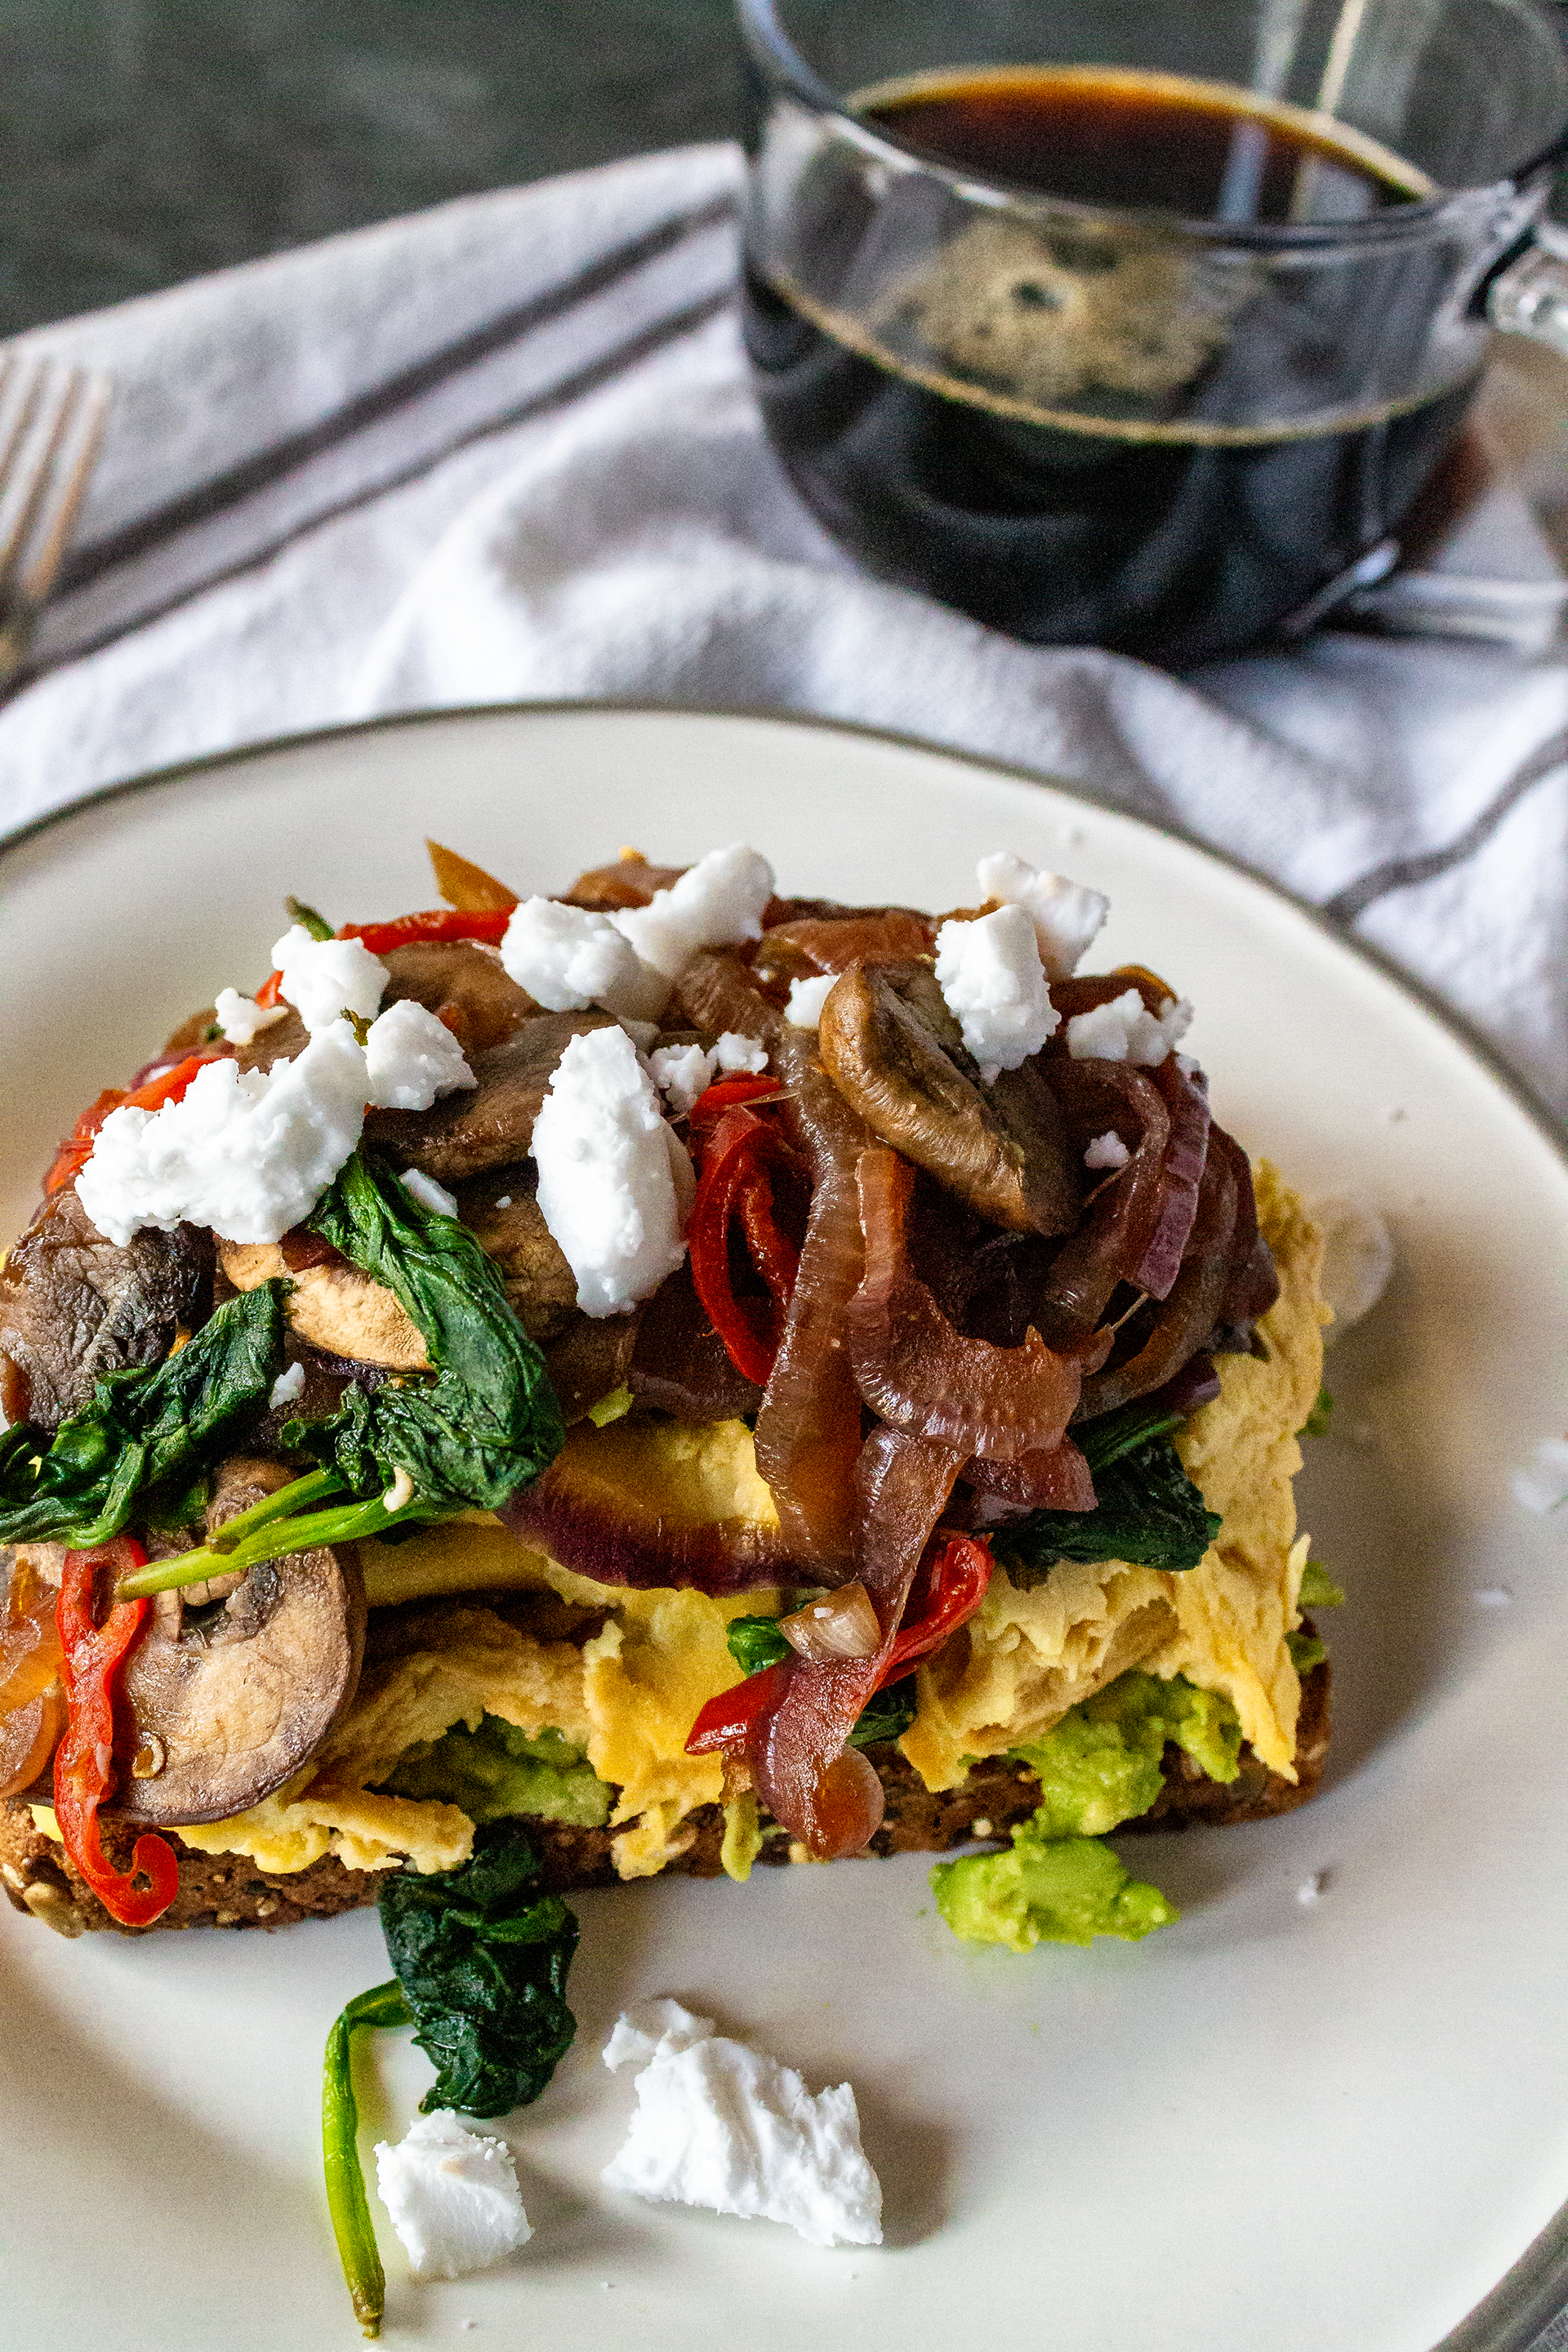
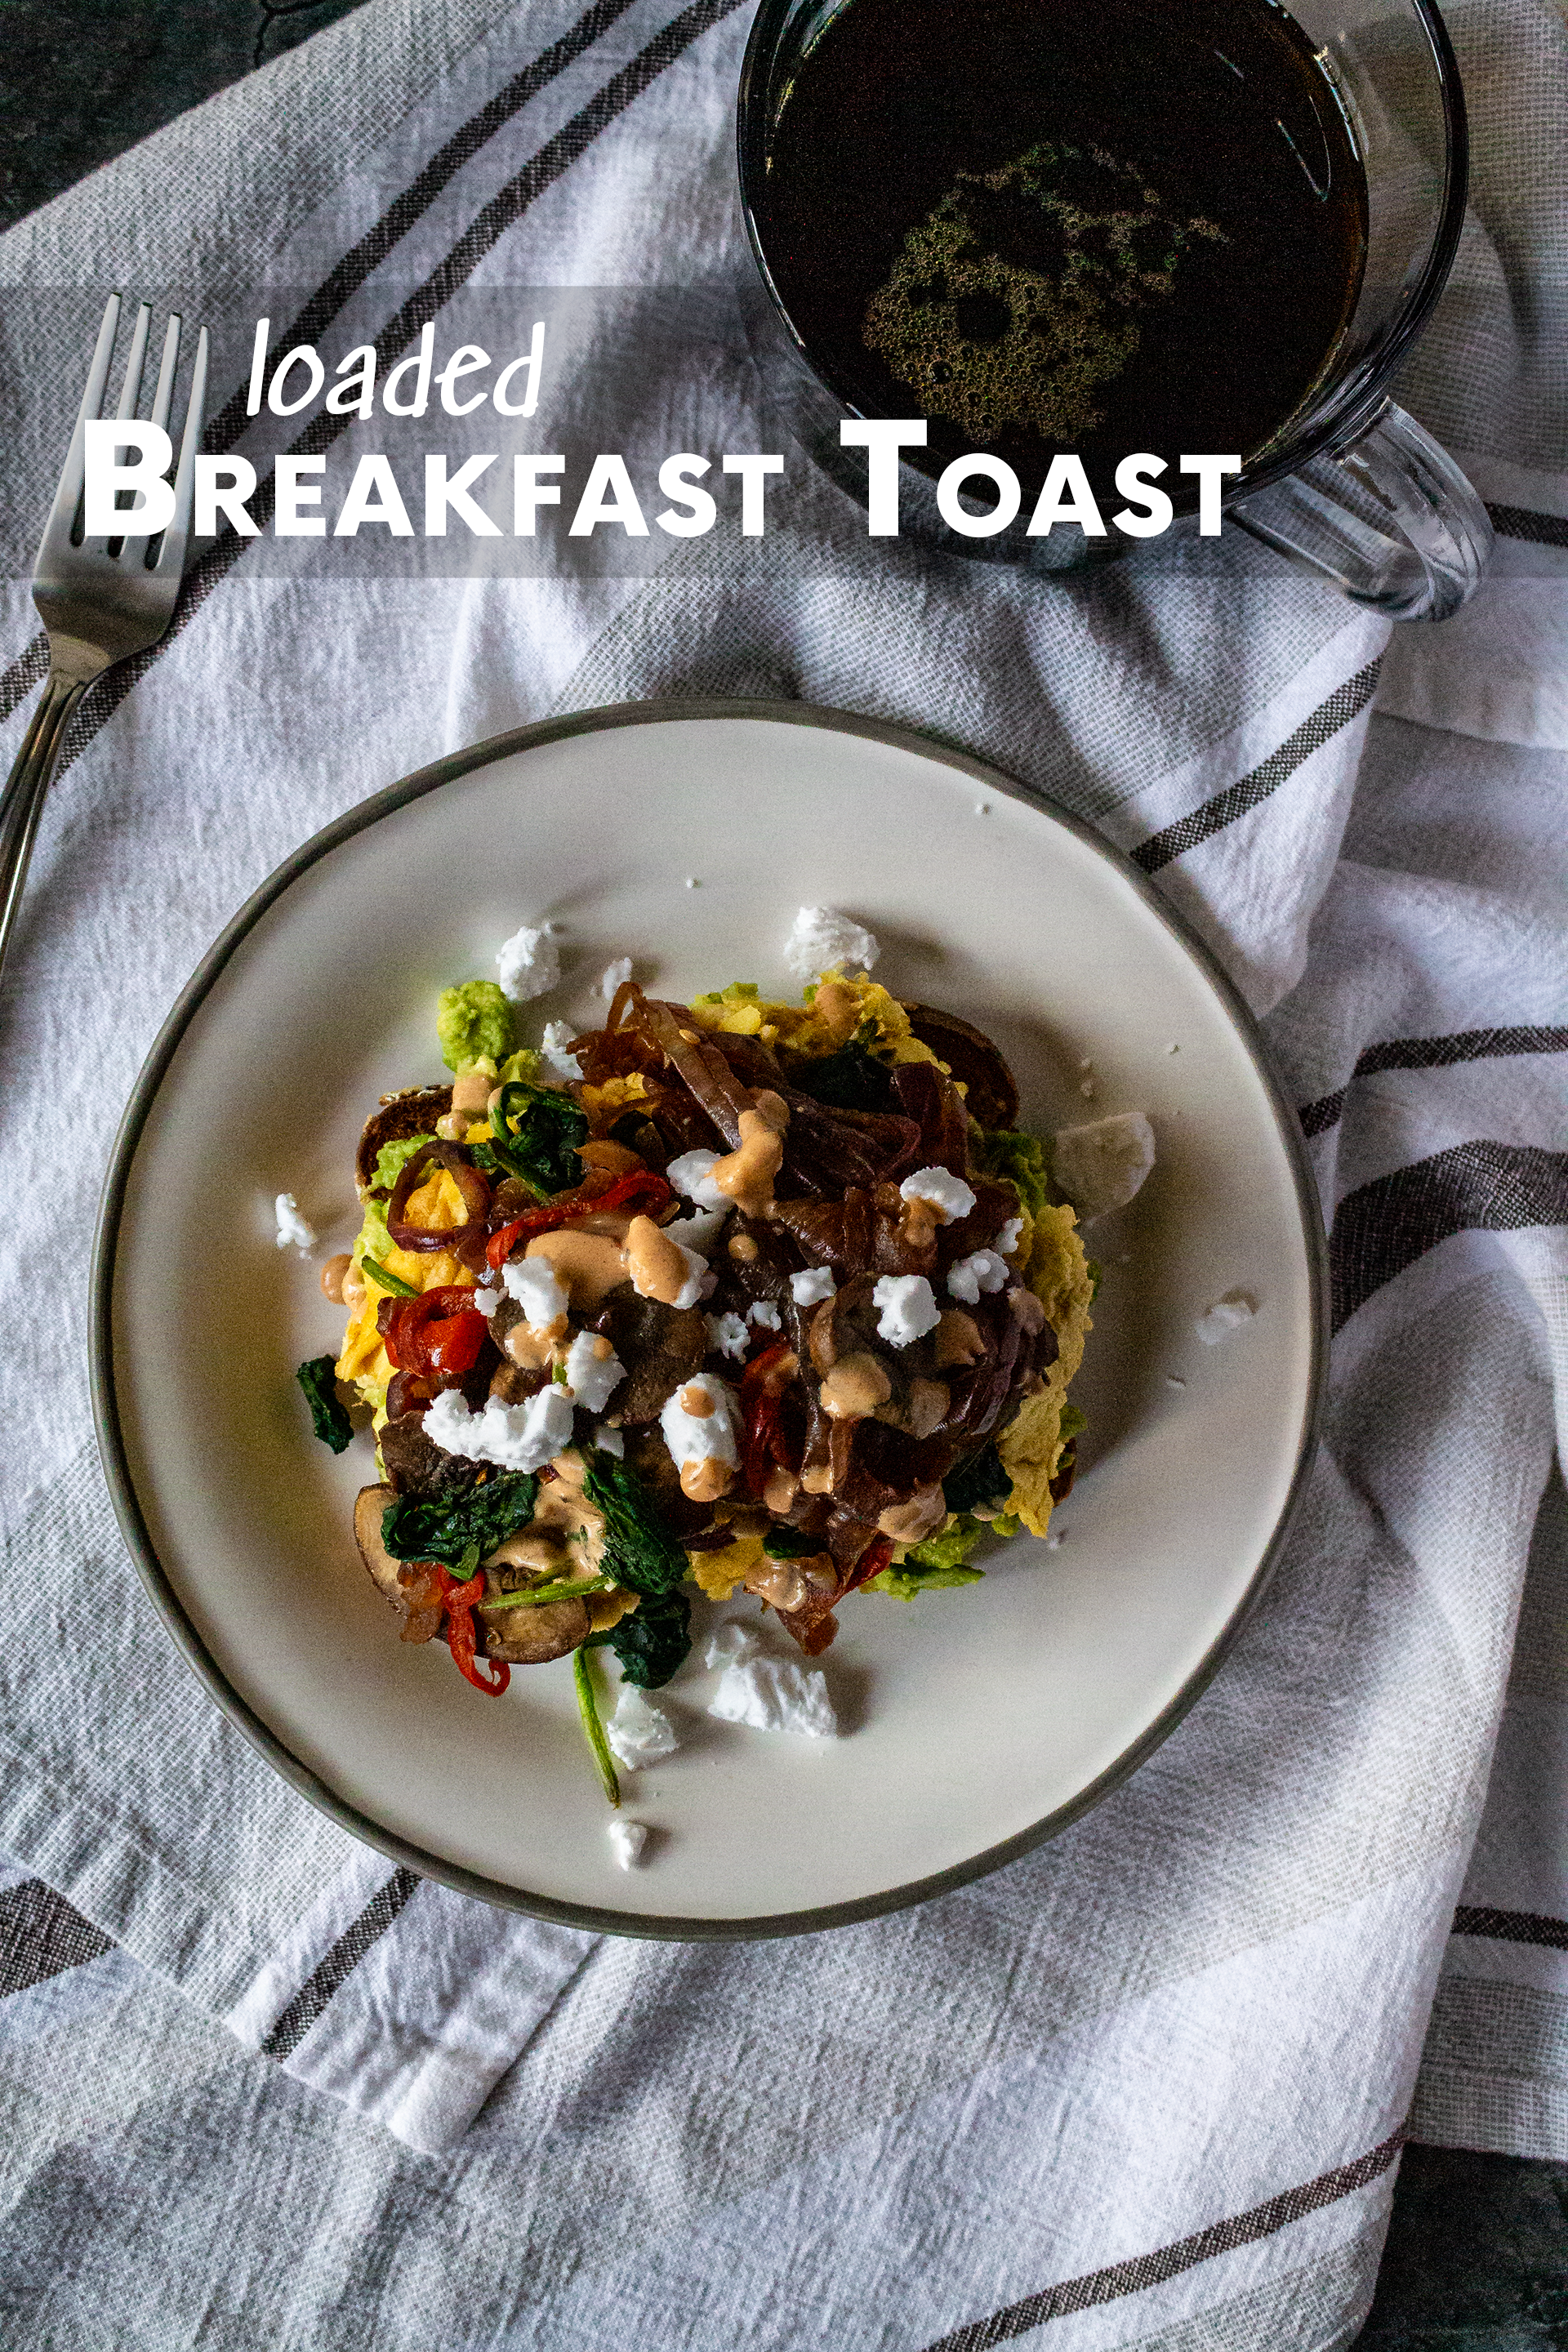
It is absolutely no secret that I love avocado toast, and this loaded “breakfast toast” version has become my go-to for a late morning meal or brunch if I need something to get me through an afternoon of online classes. The salty-sourness of the soy sauce and balsamic vinegar compliments the relatively sweet feta cheese so well. All of that veggie goodness layered atop protein-packed eggs/egg substitute (like JUST Egg or my tofu scramble) and an avocado chock full of healthy fats makes for a wonderfully nourishing start to the day. Structurally, I’ve found that whole grain or hearty sourdough bread holds up best under all of the weight, but white bread makes for an indulgent and delicious alternative as well. This recipe is so versatile, you can change almost any element and it will still taste great! Also, as an aside–yes, this can be made completely vegan. I’ve recently discovered Violife’s feta alternative (pictured) and I’m obsessed.
Ingredients:
- 2 slices toast, buttered
- 1 cup scrambled eggs, egg substitute, or tofu scramble
- 1/4 cup feta cheese
- 1 avocado
- 1/2 cup baby bella mushrooms, sliced
- 1/2 cup onion, sliced
- 1/4 cup mini sweet peppers, sliced
- 1 cup spinach
- 2 tsp soy sauce
- 1 tsp balsamic vinegar
- 1/2 tsp lemon juice
- 1/4 tsp salt
- 1/4 tsp black pepper
Directions:
- Toast two slices of bread in a pan with butter, under the broiler, or in a toaster. Set aside.
- Mash 1 fresh avocado in a small bowl with salt, pepper, and lemon juice. Set aside.
- Prep and cook scrambled eggs, egg substitute, or tofu scramble as desired. Set aside.
- Heat a nonstick pan on medium-high heat. Add peppers and sauté for 1-2 minutes, or until softened and fragrant.
- Add mushrooms, onion, soy sauce, and balsamic vinegar and cook for an additional 3-5 minutes, or until vegetables have browned and most liquid has evaporated.
- Add spinach and sauté for about 1 minute, or until wilted. Set aside to assemble.
- Layer toast with avocado, egg/egg substitute, vegetable sauté, feta cheese, and your favorite hot sauce or crema.
Although I wouldn’t recommend storing an assembled toast in the fridge for fear of the bread becoming irreparably soggy, the individual components keep really well on their own. The lemon juice keeps the avocado from becoming brown, and the vegetable sauté can last several days and still taste great. More than once I’ve overestimated how much I want to eat in a single sitting and saved the toppings for another day.

Loaded Breakfast Toast
Ingredients
- 2 slices toast buttered
- 1 cup scrambled eggs egg substitute, or tofu scramble
- 1/4 cup feta cheese
- 1 avocado
- 1/2 cup baby bella mushrooms sliced
- 1/2 cup onion sliced
- 1/4 cup mini sweet peppers sliced
- 1 cup spinach
- 2 tsp soy sauce
- 1 tsp balsamic vinegar
- 1/2 tsp lemon juice
- 1/4 tsp salt
- 1/4 tsp black pepper
Instructions
- Toast two slices of bread in a pan with butter, under the broiler, or in a toaster. Set aside.
- Mash 1 fresh avocado in a small bowl with salt, pepper, and lemon juice. Set aside.
- Prep and cook scrambled eggs, egg substitute, or tofu scramble as desired. Set aside.
- Heat a nonstick pan on medium-high heat. Add peppers and sauté for 1-2 minutes, or until softened and fragrant.
- Add mushrooms, onion, soy sauce, and balsamic vinegar and cook for an additional 3-5 minutes, or until vegetables have browned and most liquid has evaporated.
- Add spinach and sauté for about 1 minute, or until wilted. Set aside to assemble
- .Layer toast with avocado, egg/egg substitute, vegetable sauté, feta cheese, and your favorite hot sauce or crema.

The post Loaded Breakfast Toast appeared first on I Forgot Salt!.
]]>The post Japanese Curry + Tofu Katsu appeared first on I Forgot Salt!.
]]>
No, I don’t have a problem–even though this tofu katsu curry is the fifth curry recipe I’ve uploaded onto this site, everything is totally fine. If you’ve read my most recent butternut squash and chickpea curry post, I’m sure you’re keenly aware that curry is both my favorite food and the perfect meal for… trying times, and if there’s one thing the past month has been it’s hectic. JMU decided to shut down in-person classes just six days after the start of the semester, and four weeks later have changed their minds again, making this one of the strangest falls I think I’ve ever experienced. Looking back to this time last year, Alex and I spent the majority of August, September, and October travelling back and forth between Virginia and New England (New Hampshire, Connecticut, and Vermont) every other weekend for a slew of family events and wedding planning, and then hosted a visit from his parents in mid-October. Throw in Thanksgiving, Christmas, and some local get-togethers with friends in-between and it’s safe to say that fall is and always has been our busiest season, socially. Honestly, that seems like a lifetime ago.
I like to think that we’ve adapted somewhat over the past few months of “social distancing”, and we’ve kept ourselves busy in as many ways possible. Aside from the obvious major life changes that always seem to get lost in the haze when reminiscing about this year (Alex’s new job, my new academic path, moving to a new town, etc.), we’ve made other adjustments, as well. We’ve both made a conscious effort to be healthier, especially now that we can’t get our exercise from wandering around Target for three hours every Saturday. Alex has started the couch-to-5K running program, I’ve done my best to pick up yoga and go on a four-hour “urban hike” once a week. We’ve also almost entirely eliminated restaurants from our diet, with a goal to only “eat out” (or get take-out) once per month, and that has also made us more conscious of the meals we cook at home. Although we’ve definitely been experimenting more with deep-frying (as evidenced with this tofu katsu curry recipe), we’ve also made a point to broaden the variety of vegetables, grains, and proteins in our respective diets.
Outside of “self-improvement”, though, we’ve also spent the majority of 2020 just thoroughly enjoying our hobbies. I have already surpassed my goal of reading one-hundred books by the end of the year, and I don’t see my pace slowing much between now and December. With three literature-heavy English courses this semester (studies of Shakespearean tragedies, comparative studies of childhood trauma in literature, and twentieth-century queer literature) and a never-ending stream of pre-ordered new releases arriving in the mail, I doubt I’ll run out of things to read anytime soon. We also clocked just under two-hundred hours on the JRPG Persona 5R and one-hundred-fifty hours on Animal Crossing: New Horizons over the course of the summer, and while Alex has moved on to Persona 4 Golden, I have begun a replay of Breath of the Wild in anticipation for the game’s prequel release in November. Our anime consumption skyrocketed, too, with entire weekends spent in a marathon-like haze of rewatching some of my older favorites that Alex hadn’t previously seen.
Admittedly, none of this has anything to do with tofu katsu curry, but it seems like I always get a little bit introspective in my curry posts. Something about the warm, spicy comfort food always puts me in the mood to reflect on things. This year has been one of gradual improvement in all things, and this tofu katsu curry is no exception. The first time I made it, I wasn’t really sure where to begin with the tofu katsu itself, so we ended up with giant chunks of oily, tough-to-chew protein with hardly any breading and even less flavor. On the second iteration, however, I made quite a few changes, and managed to produce something so good that I have now eaten the leftovers three days in a row.
One of my favorite parts about living in our new apartment is the space to experiment in the kitchen, and how that has translated into a willingness to test recipes multiple times before posting–especially more elaborate ones like this tofu katsu curry. In our old apartment, if a recipe wasn’t amazing the first time, more often than not I either abandoned the idea altogether or only attempted to remake it after months of psyching myself up. Now, with the freedom and flexibility of more counter space, a larger dishwasher, and excellent ventilation, cooking methods like deep frying and complex dishes with lots of moving parts have become so much easier to tweak to my liking. Off the top of my head, I can think of three multi-step recipes I have changed and remade at least twice, all of which I plan to reproduce again based on those notes: black bean and sweet potato enchiladas, jackfruit Korean BBQ tacos, and a steamed-egg and bacon breakfast burrito skillet (that can easily be made either entirely vegan or half/half). While my creativity in the kitchen has definitely expanded, the standards to which I hold my own cooking have begun to slowly but steadily raise. My goal for the upcoming fall season is find a balance between continual improvement and self-forgiveness for any mistakes I make, which seems like it could be a good outlook to have just as much in life as on the stove.
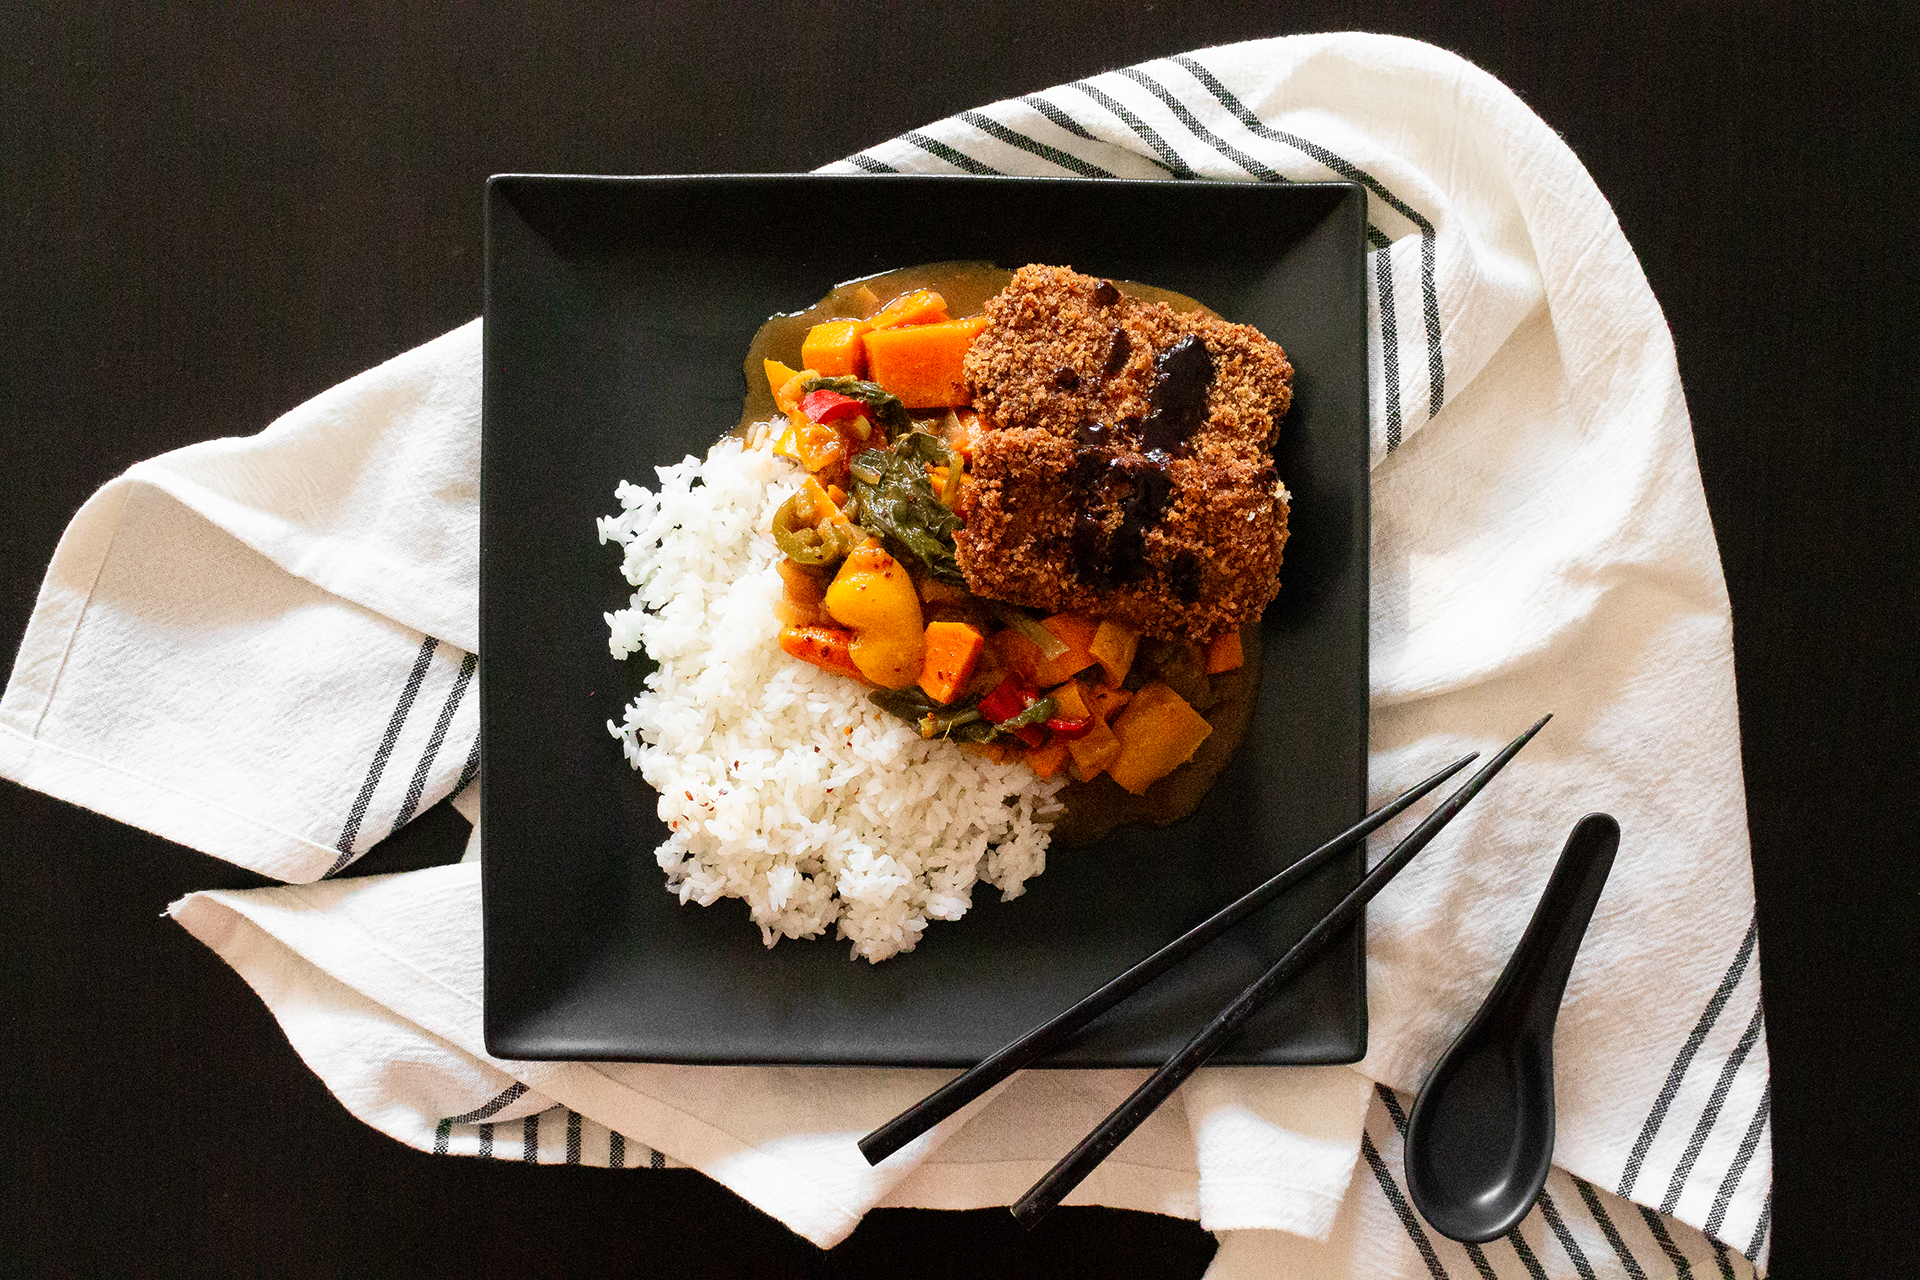
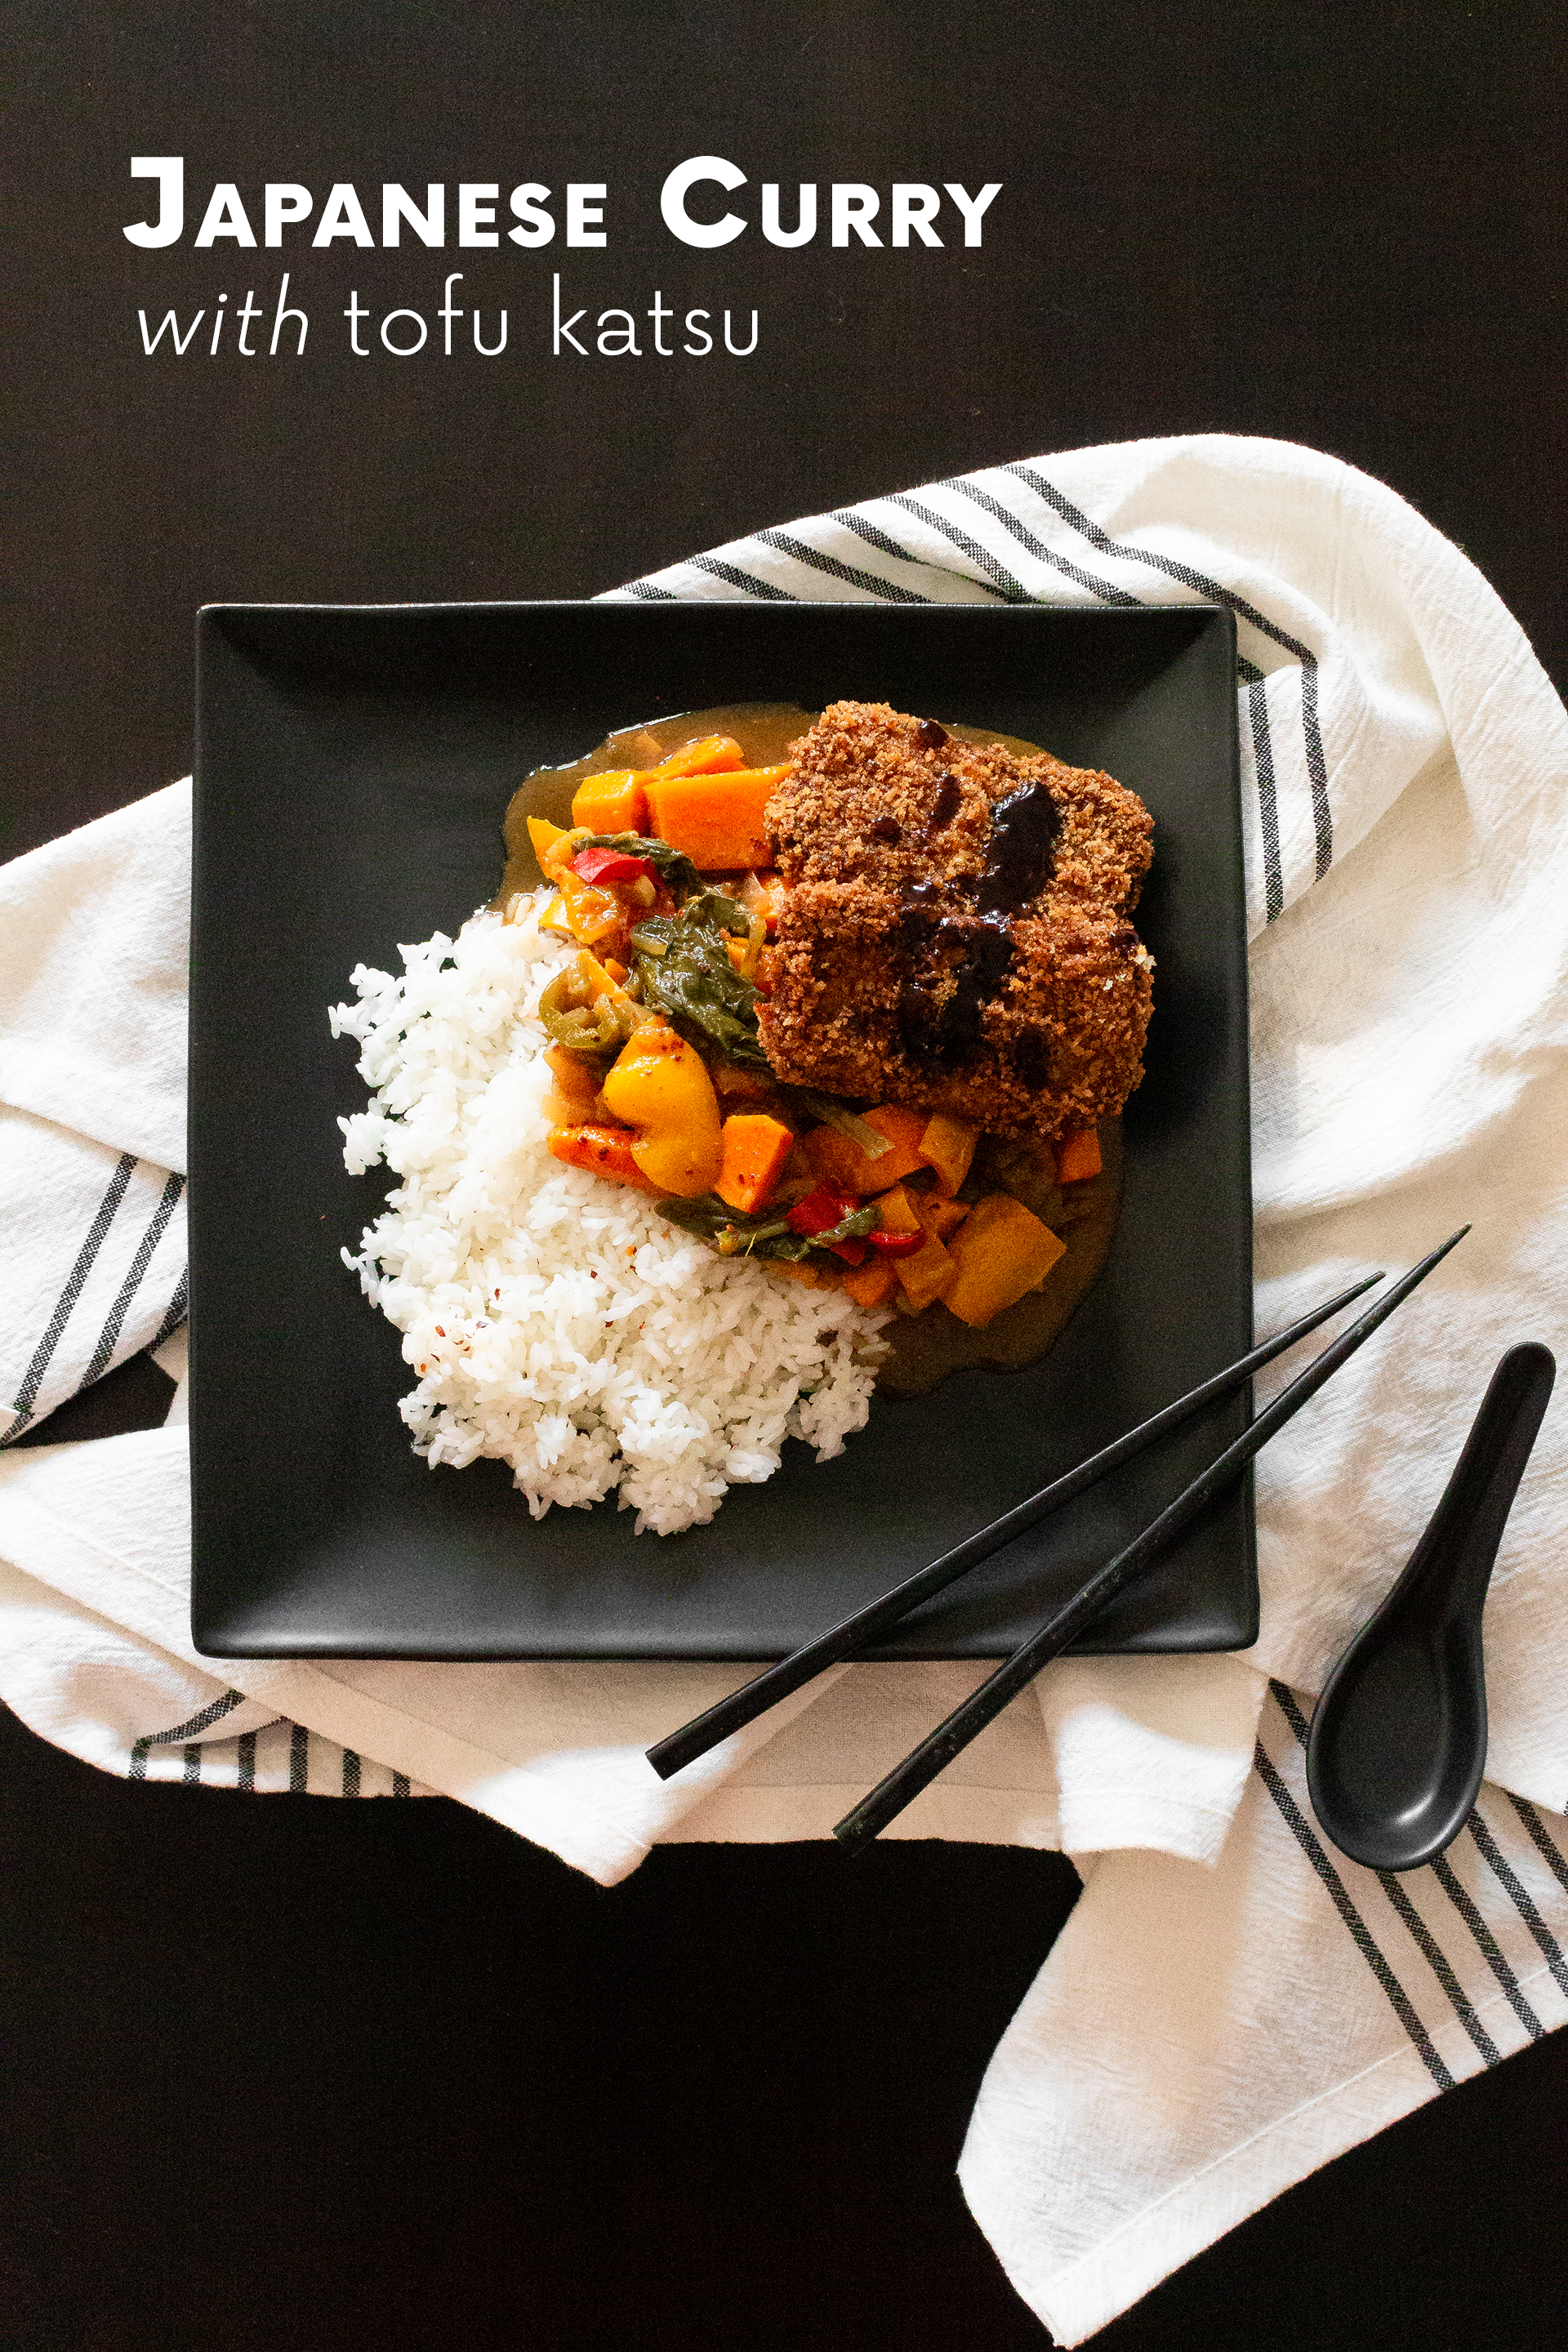
Japanese Curry
This recipe makes six servings.
Ingredients:
- 3 Japanese curry cubes (I used Vermont Curry brand)
- 1-2 large sweet potatoes
- 1-2 large russet potatoes
- 2-3 large carrots
- 2 large onions
- 2-3 bell peppers (red, yellow, or orange)
- 4 cups vegetable broth
- 2 cups spinach
- 1/4 cup applesauce (unsweetened)
- 2 tbsp apple cider vinegar
- 1 tbsp dark soy sauce
- 1 tbsp garlic, minced
- 1 tbsp ginger, minced
- 2 tsp garam masala
- 1 tsp cayenne pepper
- 1 tsp gochugaru/red pepper flakes
- 1 tsp sesame oil
- 1 tsp salt
Directions:
- Roughly chop all vegetables (potatoes, carrots, bell pepper, onion) and mince garlic and ginger as needed.
- In a large stock pot, heat sesame oil on medium-high. Add salt, garlic, ginger, and onion. Sauté until sizzling and fragrant, about 2-3 minutes.
- Add remaining vegetables and spices, sans curry cubes (garam masala, cayenne pepper, gochugaru/red pepper flakes) and sauté for an additional 4-5 minutes, stirring occasionally.
- Add vegetable broth, apple sauce, soy sauce (dark), vinegar, and curry cubes. Bring to a boil, stirring occasionally until curry cubes have completely dissolved, about 10-15 minutes.
- Cover and reduce to medium-low heat to simmer for an additional 25-30 minutes.
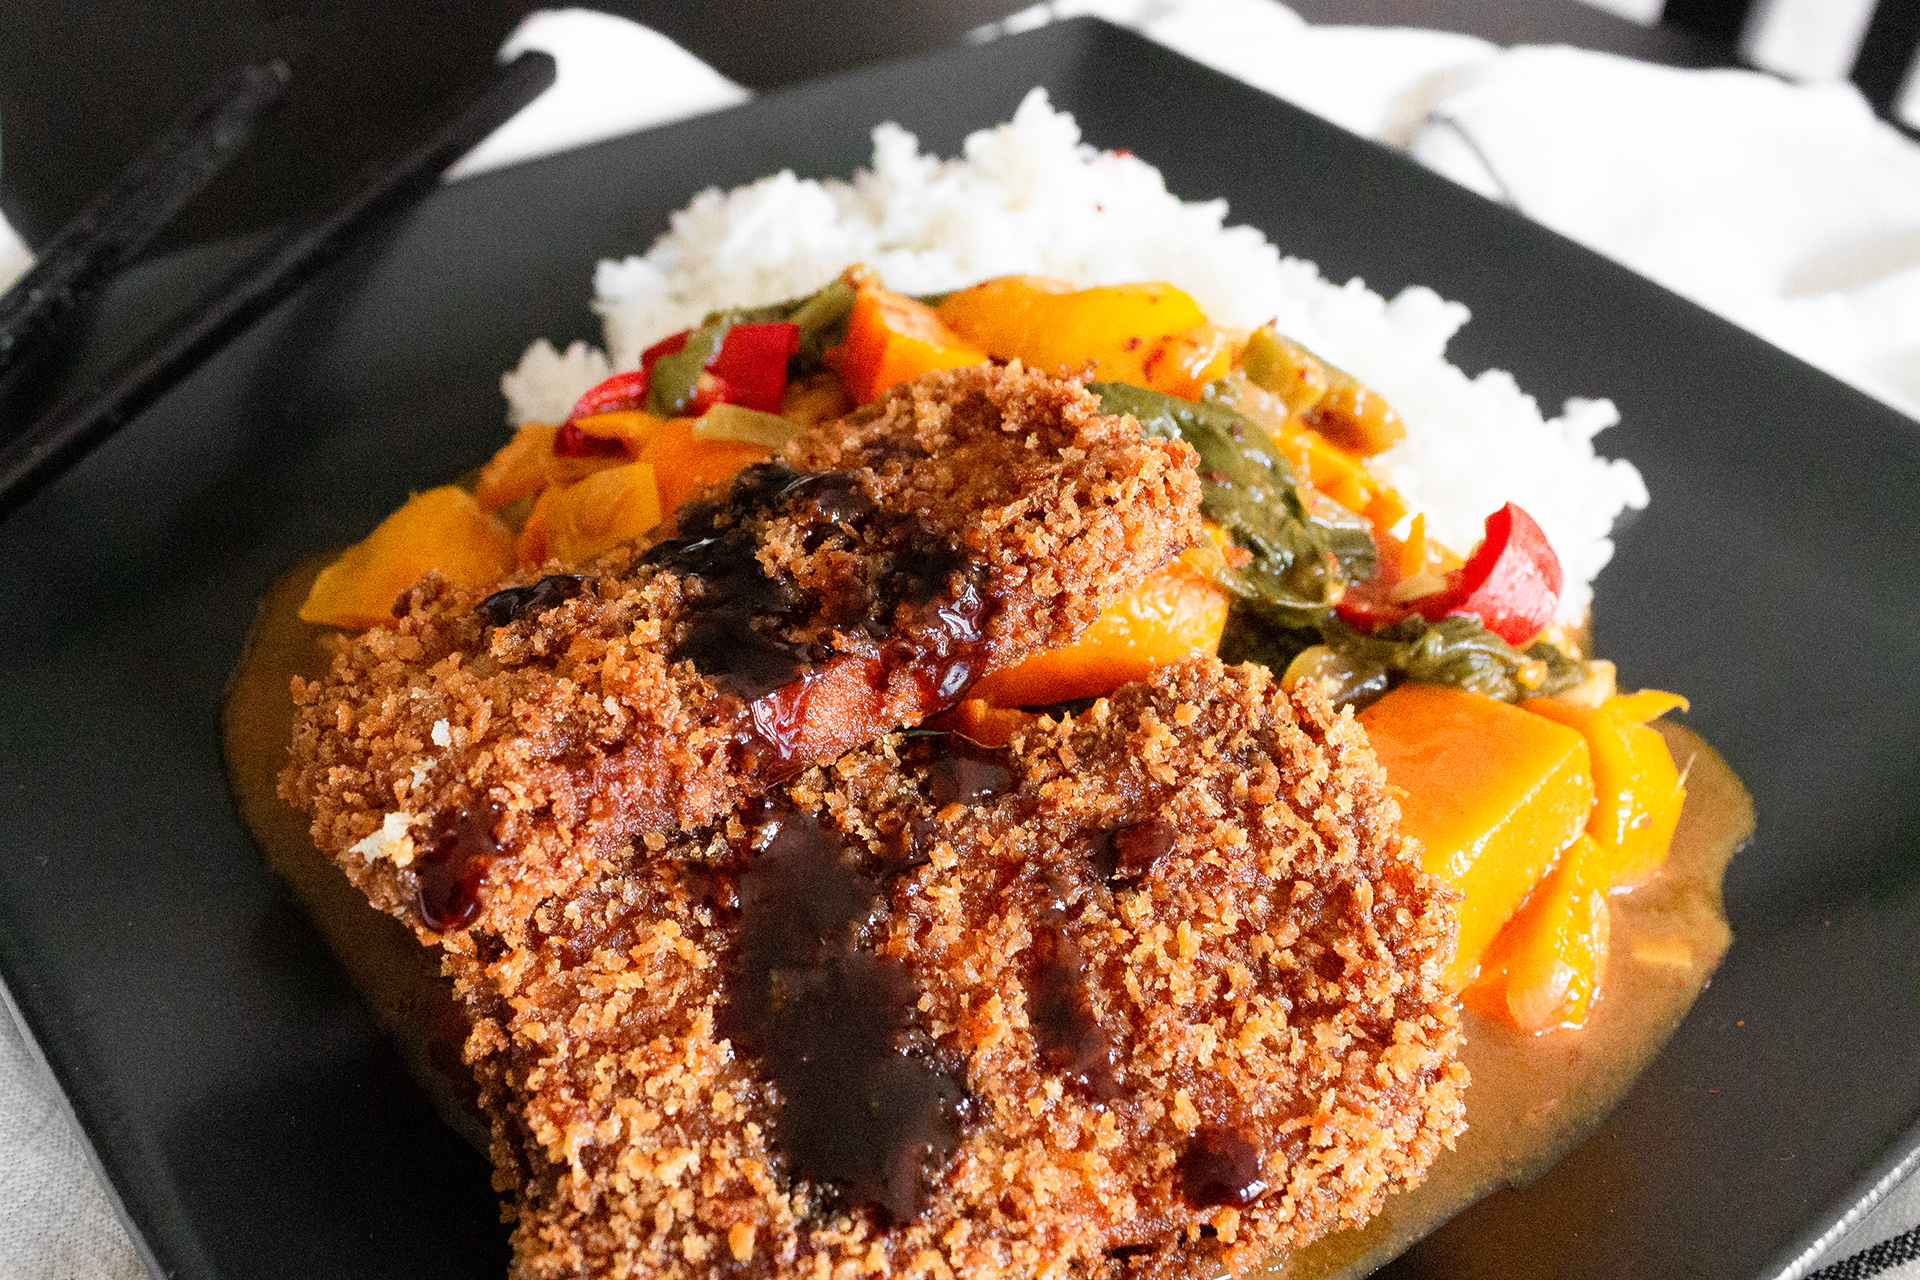
- Reduce heat to low and add spinach. Stir gently until spinach is completely wilted. Serve warm over rice with tofu katsu and tonkatsu sauce (see recipes below).
Tofu Katsu (deep-fried tofu cutlet)
This recipe makes six slices, three total servings.
Ingredients:
- 16oz firm/extra firm tofu
- 1/4 cup light soy sauce
- 2 tbsp sake
- 1 tbsp dark soy sauce
- 1 tbsp rice vinegar
- 1/2 tsp sesame oil
- 1.5 cups panko breadcrumbs
- 2 eggs OR 1/4 cup diluted egg replacer (I used Bob’s Red Mill with 2x water)
- vegetable oil for deep-frying
Directions:
- Press water from tofu for at least 30 minutes.
- Slice tofu width-wise into cutlets about 1/2-inch thick and gently set aside.
- In a small mixing bowl, combine marinade ingredients (light soy sauce, dark soy sauce, sake, rive vinegar, and sesame oil). Stir to combine.
- Place tofu in marinade, cover, and let sit for 6-24 hours. (Note: I have marinated both overnight and early in the morning in prep for dinner. Both work well.)
- When ready to fry, heat vegetable oil in a wide-bottomed, high-walled pot or pan to 350F. (Note: Do not begin frying at a lower heat–your batter/panko will fall off immediately and it will be a mess.)
- Dredge tofu slices in egg/diluted egg replacer, then in panko breadcrumbs until entirely coated. Gently place in hot frying oil.
- Fry for 3-4 minutes on each side, or until dark golden brown (see pictured) then remove to a wire rack or paper towel-lined tray.
- Repeat until all tofu pieces have been fried. Serve with rice, Japanese curry, and tonkatsu sauce (see attached recipes).
Tonkatsu Sauce (deep-fried cutlet sauce)
As most of the ingredients used in this version of a tonkatsu sauce recipe are the same as the tofu katsu marinade, you can use that as a base for this sauce. “Traditionally”, the Americanized version of this sauce is either purchased from a bottle or made with ingredients like ketchup and Worcestershire sauce, but I do not keep either of those in my fridge and do not make katsu often enough to justify buying either a store-bought version or the ketchup/Worcestershire sauce the Americanized version originally calls for. Instead, I tried to recreate something similar with what I already had on-hand. The sauce is supposed to be thick, salty, and sour to contrast the sweet/spicy flavors of the curry and lighten the deep-fried cutlet, and I think I was able to pull that off quite well with more “common” Asian pantry ingredients. Because it is so concentrated, only a little bit (about 1 tbsp, see pictures) is needed to really bring the whole meal together, so it makes more sense to use what I had rather than make a special trip to the store.
This recipe makes about 6floz, which is about 12 servings.
Ingredients:
- 1/4 cup light soy sauce
- 2 tbsp sake
- 2 tbsp oyster/mushroom sauce
- 1 tbsp dark soy sauce
- 2 tbsp lemon juice
- 1 tbsp rice vinegar
- 1 tsp brown sugar
- 1/8 tsp garlic powder
- 1/8 tsp onion powder
- 1/8 tsp mustard powder
- 1 tbsp cornstarch
Directions:
- In a small saucepan, combine light soy sauce and cornstarch and stir until all cornstarch has dissolved.
- Add all other ingredients and stir to combine.
- Bring to a boil and then reduce heat and simmer for 5-7 minutes, or until sauce has thickened considerably.
- Serve in small 1-1 1/2 tsp amounts atop tofu katsu (see attached recipe).
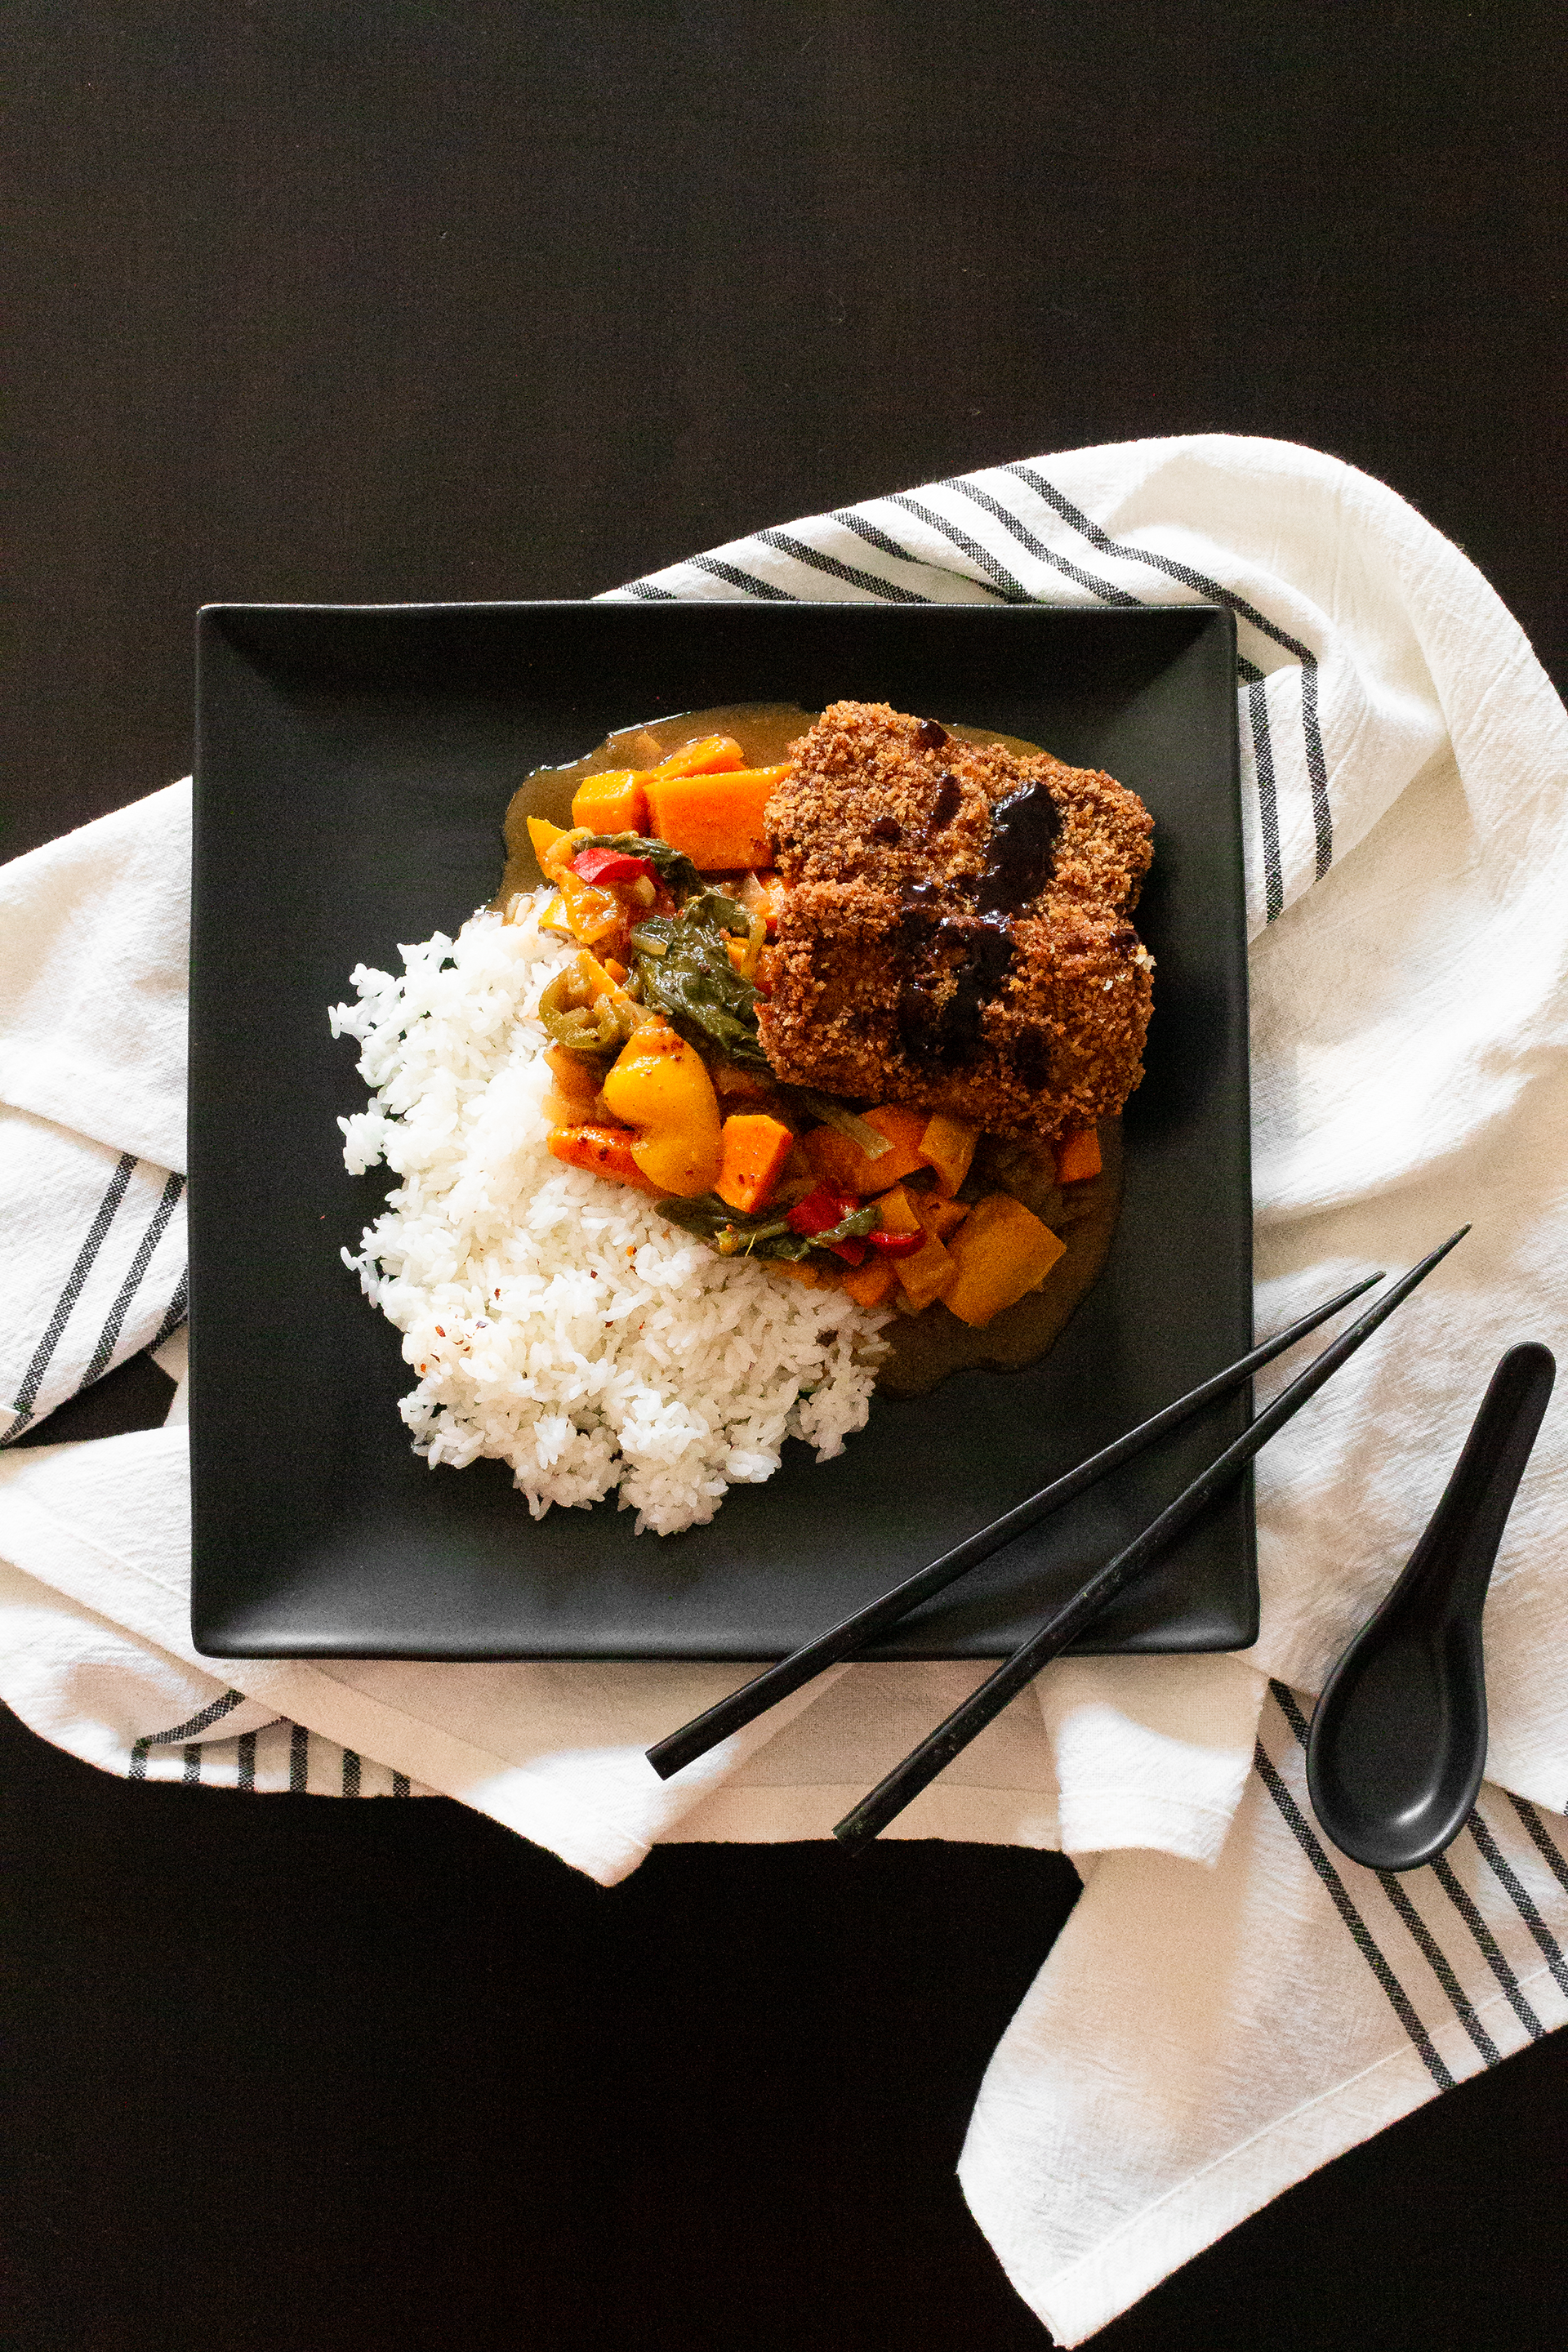
Tofu Katsu Curry
Ingredients
Japanese Curry
- 3 Japanese curry cubes (I used Vermont Curry brand)
- 1-2 large sweet potatoes
- 1-2 large russet potatoes
- 2-3 large carrots
- 2 large onions
- 2-3 bell peppers red, yellow, or orange
- 4 cups vegetable broth
- 2 cups spinach
- 1/4 cup applesauce unsweetened
- 2 tbsp apple cider vinegar
- 1 tbsp dark soy sauce
- 1 tbsp garlic minced
- 1 tbsp ginger minced
- 2 tsp garam masala
- 1 tsp cayenne pepper
- 1 tsp gochugaru/red pepper flakes
- 1 tsp sesame oil
- 1 tsp salt
Tofu Katsu
- 16 oz firm/extra firm tofu
- 1/4 cup light soy sauce
- 2 tbsp sake
- 1 tbsp dark soy sauce
- 1 tbsp rice vinegar
- 1/2 tsp sesame oil
- 1.5 cups panko breadcrumbs
- 2 eggs OR 1/4 cup diluted egg replacer
- vegetable oil for deep-frying
Tonkatsu Sauce
- 1/4 cup light soy sauce
- 2 tbsp sake
- 2 tbsp oyster/mushroom sauce
- 1 tbsp dark soy sauce
- 2 tbsp lemon juice
- 1 tbsp rice vinegar
- 1 tsp brown sugar
- 1/8 tsp garlic powder
- 1/8 tsp onion powder
- 1/8 tsp mustard powder
- 1 tbsp cornstarch
Instructions
Japanese Curry
- Roughly chop all vegetables (potatoes, carrots, bell pepper, onion) and mince garlic and ginger as needed.
- In a large stock pot, heat sesame oil on medium-high. Add salt, garlic, ginger, and onion. Sauté until sizzling and fragrant, about 2-3 minutes.
- Add remaining vegetables and spices, sans curry cubes (garam masala, cayenne pepper, gochugaru/red pepper flakes) and sauté for an additional 4-5 minutes, stirring occasionally.
- Add vegetable broth, apple sauce, soy sauce (dark), vinegar, and curry cubes. Bring to a boil, stirring occasionally until curry cubes have completely dissolved, about 10-15 minutes.
- Cover and reduce to medium-low heat to simmer for an additional 25-30 minutes.
- Reduce heat to low and add spinach. Stir gently until spinach is completely wilted. Serve warm over rice with tofu katsu and tonkatsu sauce (see recipes below).
Tofu Katsu
- Press water from tofu for at least 30 minutes.
- Slice tofu width-wise into cutlets about 1/2-inch thick and gently set aside.
- In a small mixing bowl, combine marinade ingredients (light soy sauce, dark soy sauce, sake, rive vinegar, and sesame oil). Stir to combine.
- Place tofu in marinade, cover, and let sit for 6-24 hours. (Note: I have marinated both overnight and early in the morning in prep for dinner. Both work well.)
- When ready to fry, heat vegetable oil in a wide-bottomed, high-walled pot or pan to 350F. (Note: Do not begin frying at a lower heat–your batter/panko will fall off immediately and it will be a mess.)
- Dredge tofu slices in egg/diluted egg replacer, then in panko breadcrumbs until entirely coated. Gently place in hot frying oil.
- Fry for 3-4 minutes on each side, or until dark golden brown (see pictured) then remove to a wire rack or paper towel-lined tray.
- Repeat until all tofu pieces have been fried. Serve with rice, Japanese curry, and tonkatsu sauce (see attached recipes).
Tonkatsu Sauce
- In a small saucepan, combine light soy sauce and cornstarch and stir until all cornstarch has dissolved.
- Add all other ingredients and stir to combine.
- Bring to a boil and then reduce heat and simmer for 5-7 minutes, or until sauce has thickened considerably.
- Serve in small 1-1 1/2 tsp amounts atop tofu katsu (see attached recipe).
The post Japanese Curry + Tofu Katsu appeared first on I Forgot Salt!.
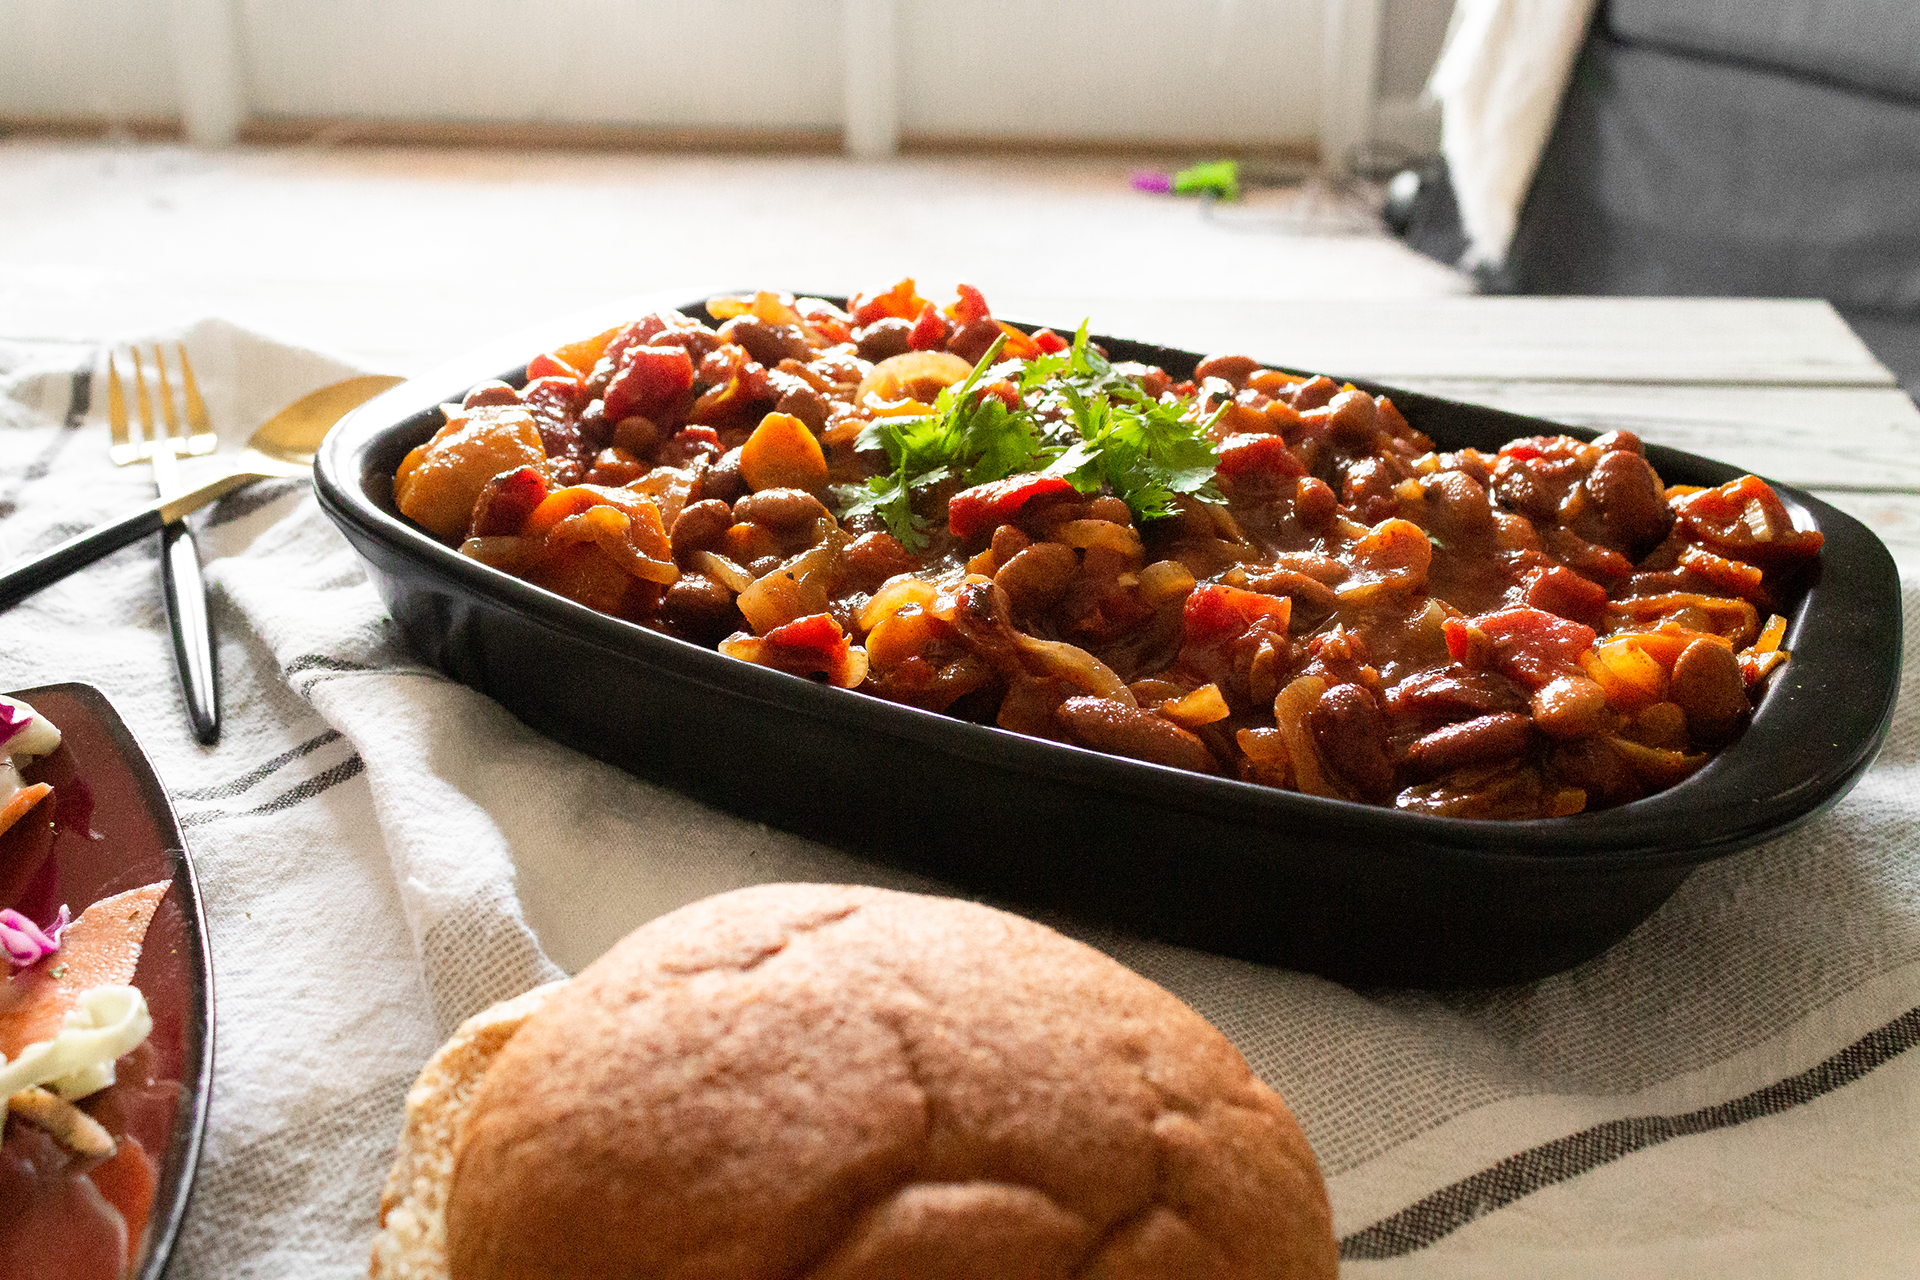
]]>The post Baked Beans + Coleslaw appeared first on I Forgot Salt!.
]]>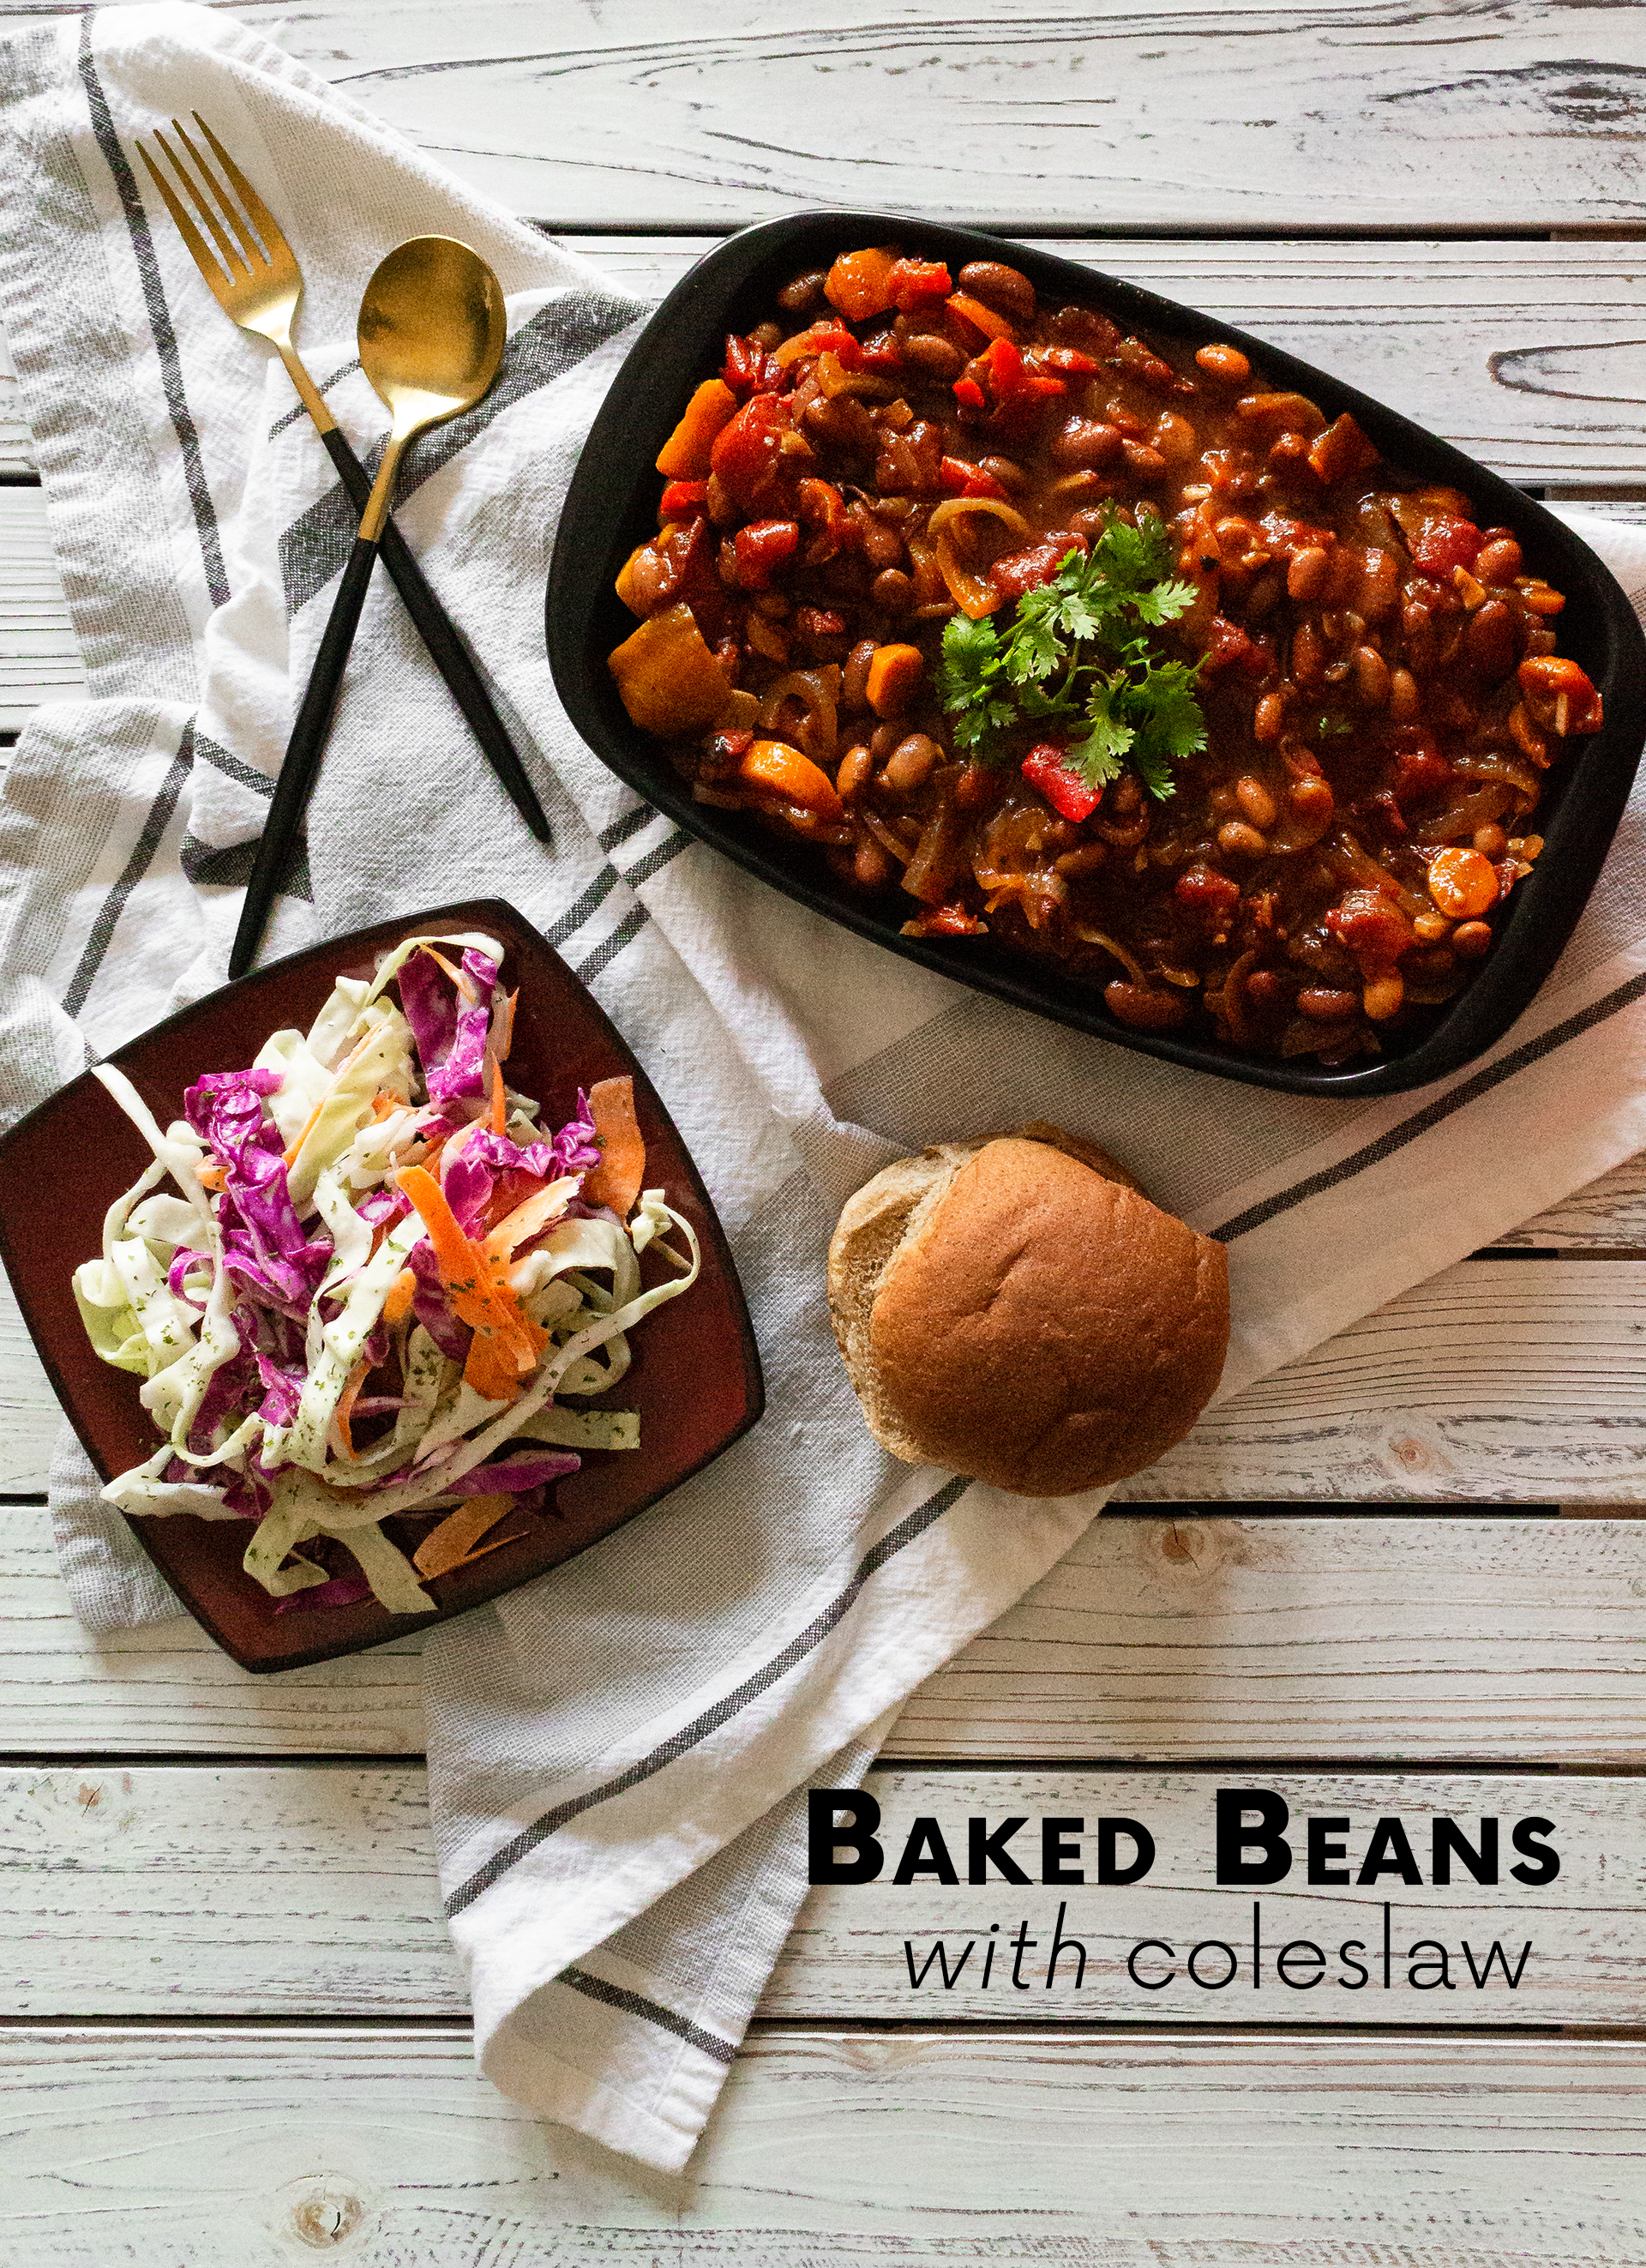
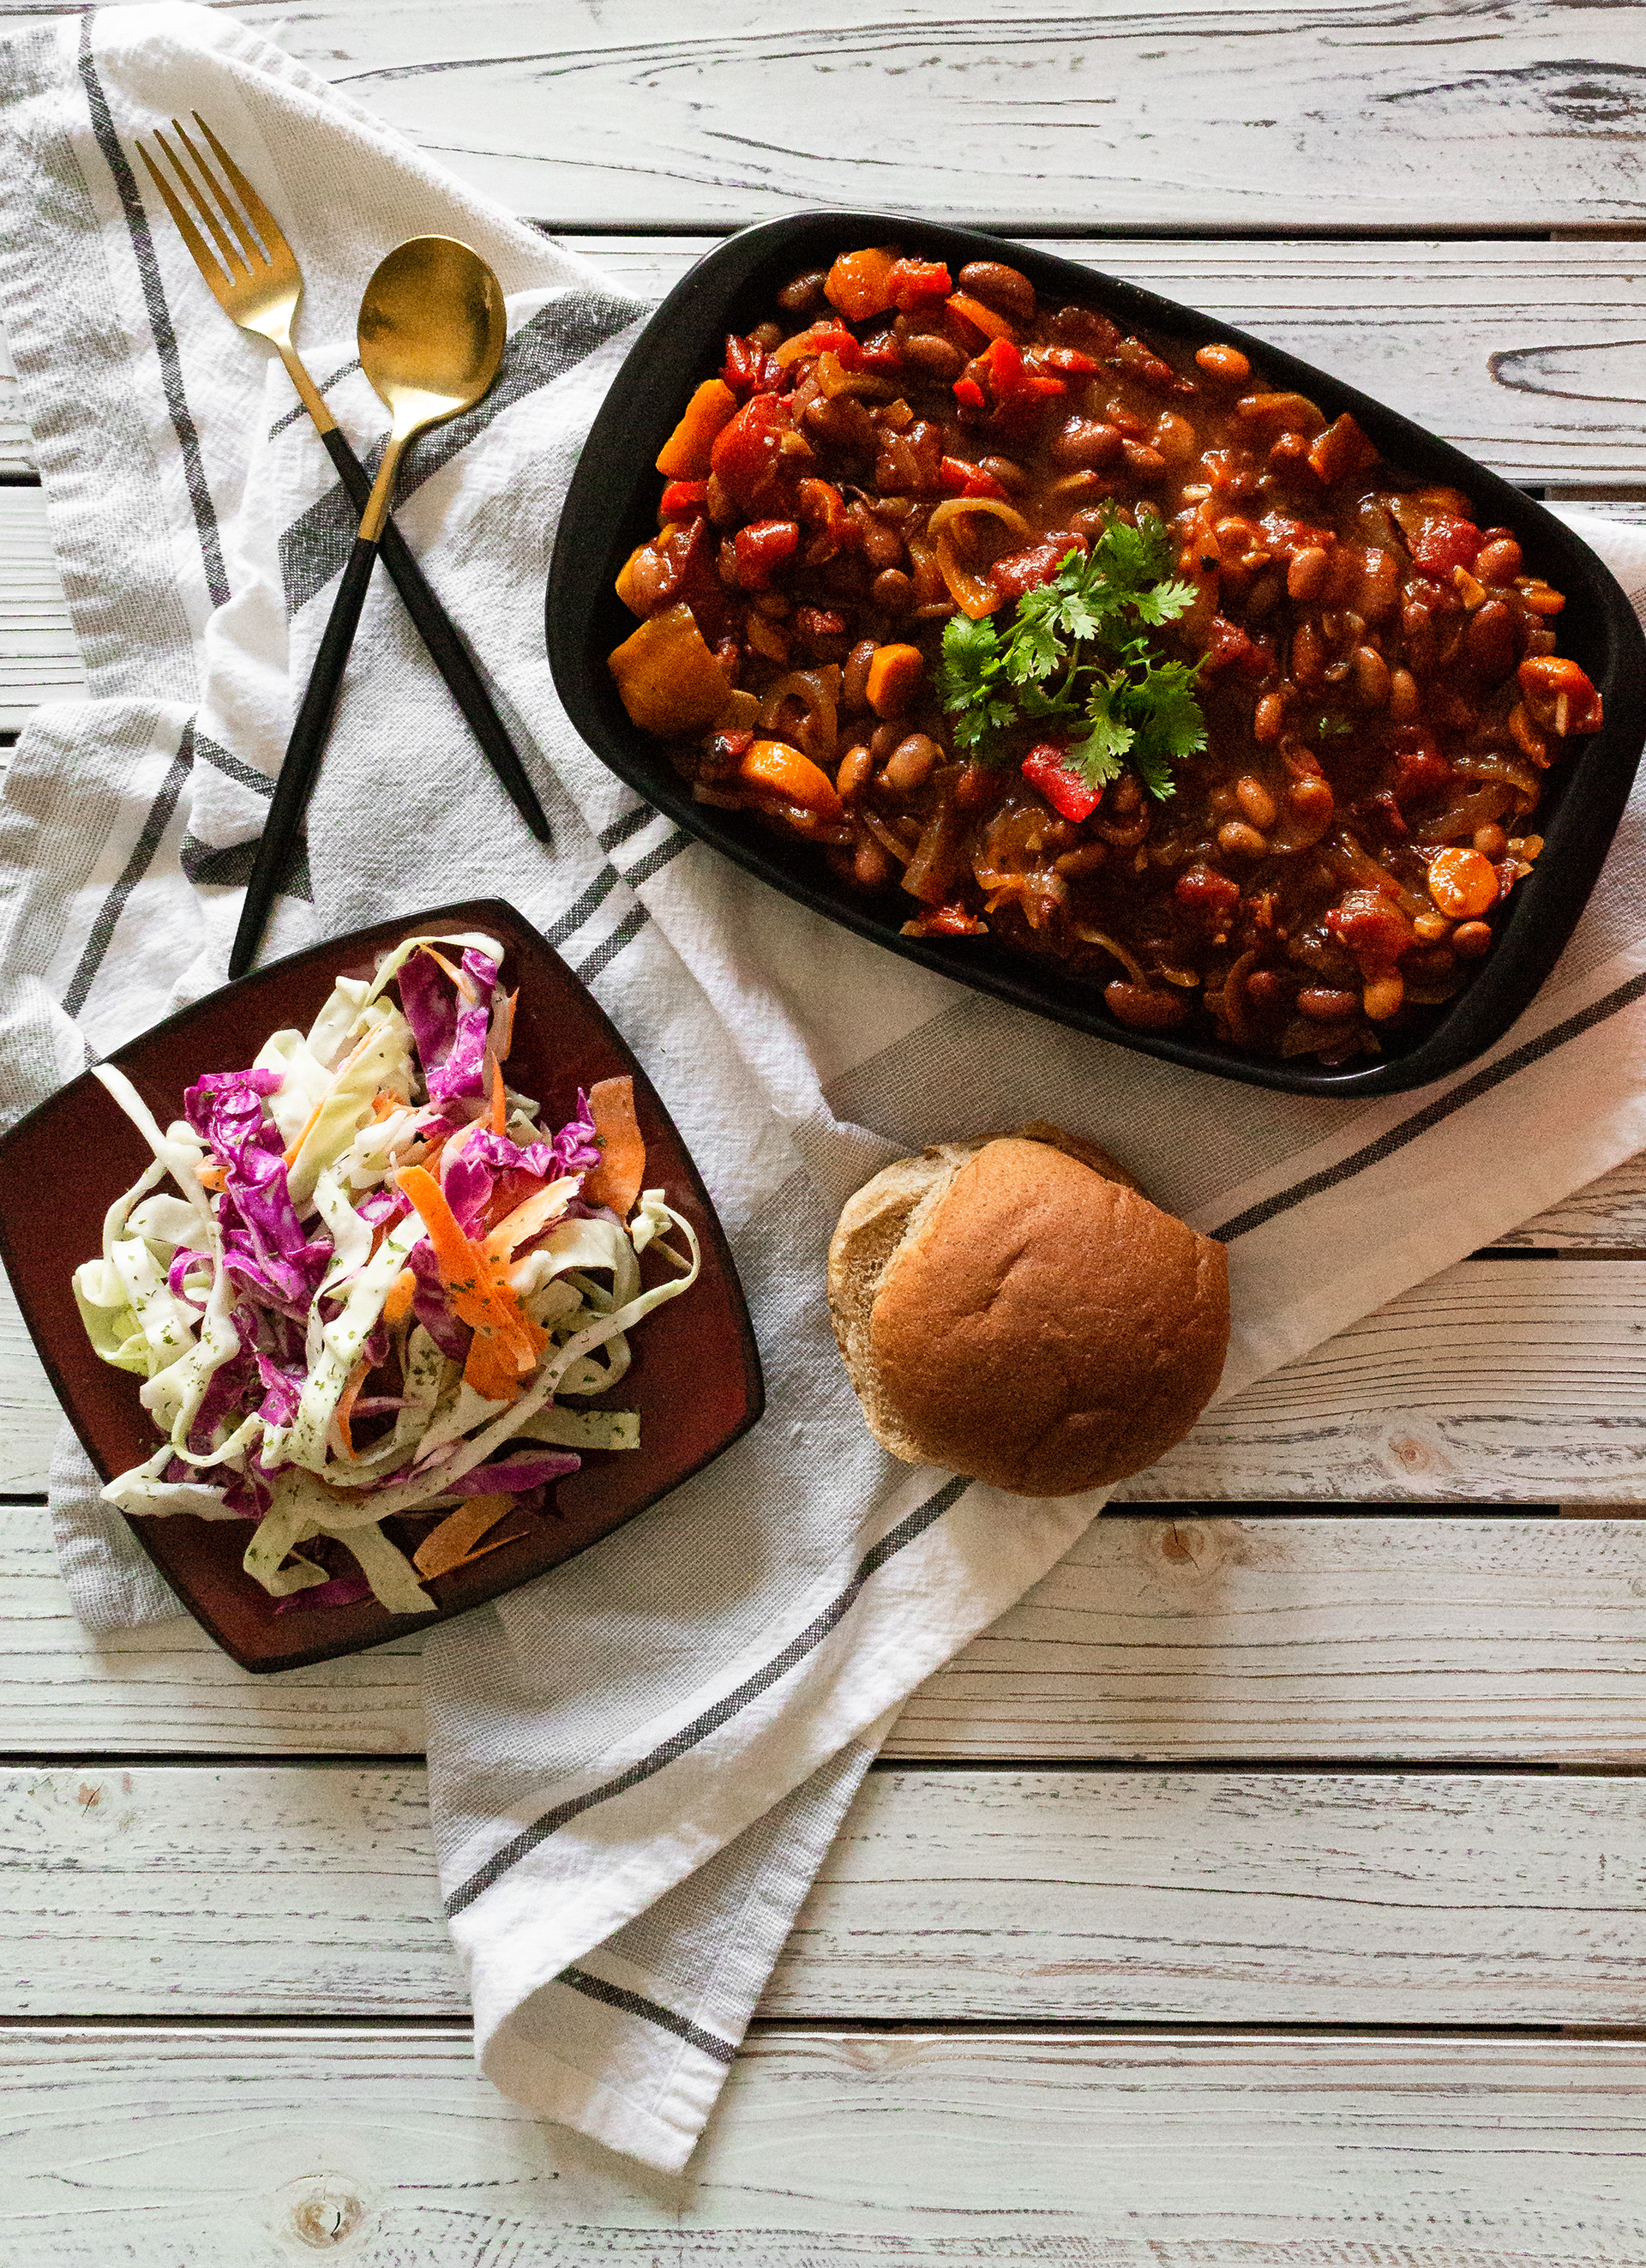
Fall is finally here, but that doesn’t mean I have to abandon the spirit of summer altogether. Unfortunately, we didn’t have many opportunities to visit friends or family for cook-outs, barbeques, or picnics this year, but we still made the most of the season at home. One of my favorite summer quarantine “date nights” involves recreating outdoor favorites inside, and although that means battling it out for control of the burger grill-pan more often than not, we still found time to try some other summer treats. Hot dogs, BBQ sandwiches, and breakfast-for-dinner all made an appearance over the past few months, and one of the few that lasted long enough for pictures (someday I’ll figure out how to stop eating my veggie burgers in under ten minutes) was this vegan baked beans and coleslaw combo. Together, they make a killer Sloppy Joe-style sandwich, complete with messy hands and the need for at least four napkins.
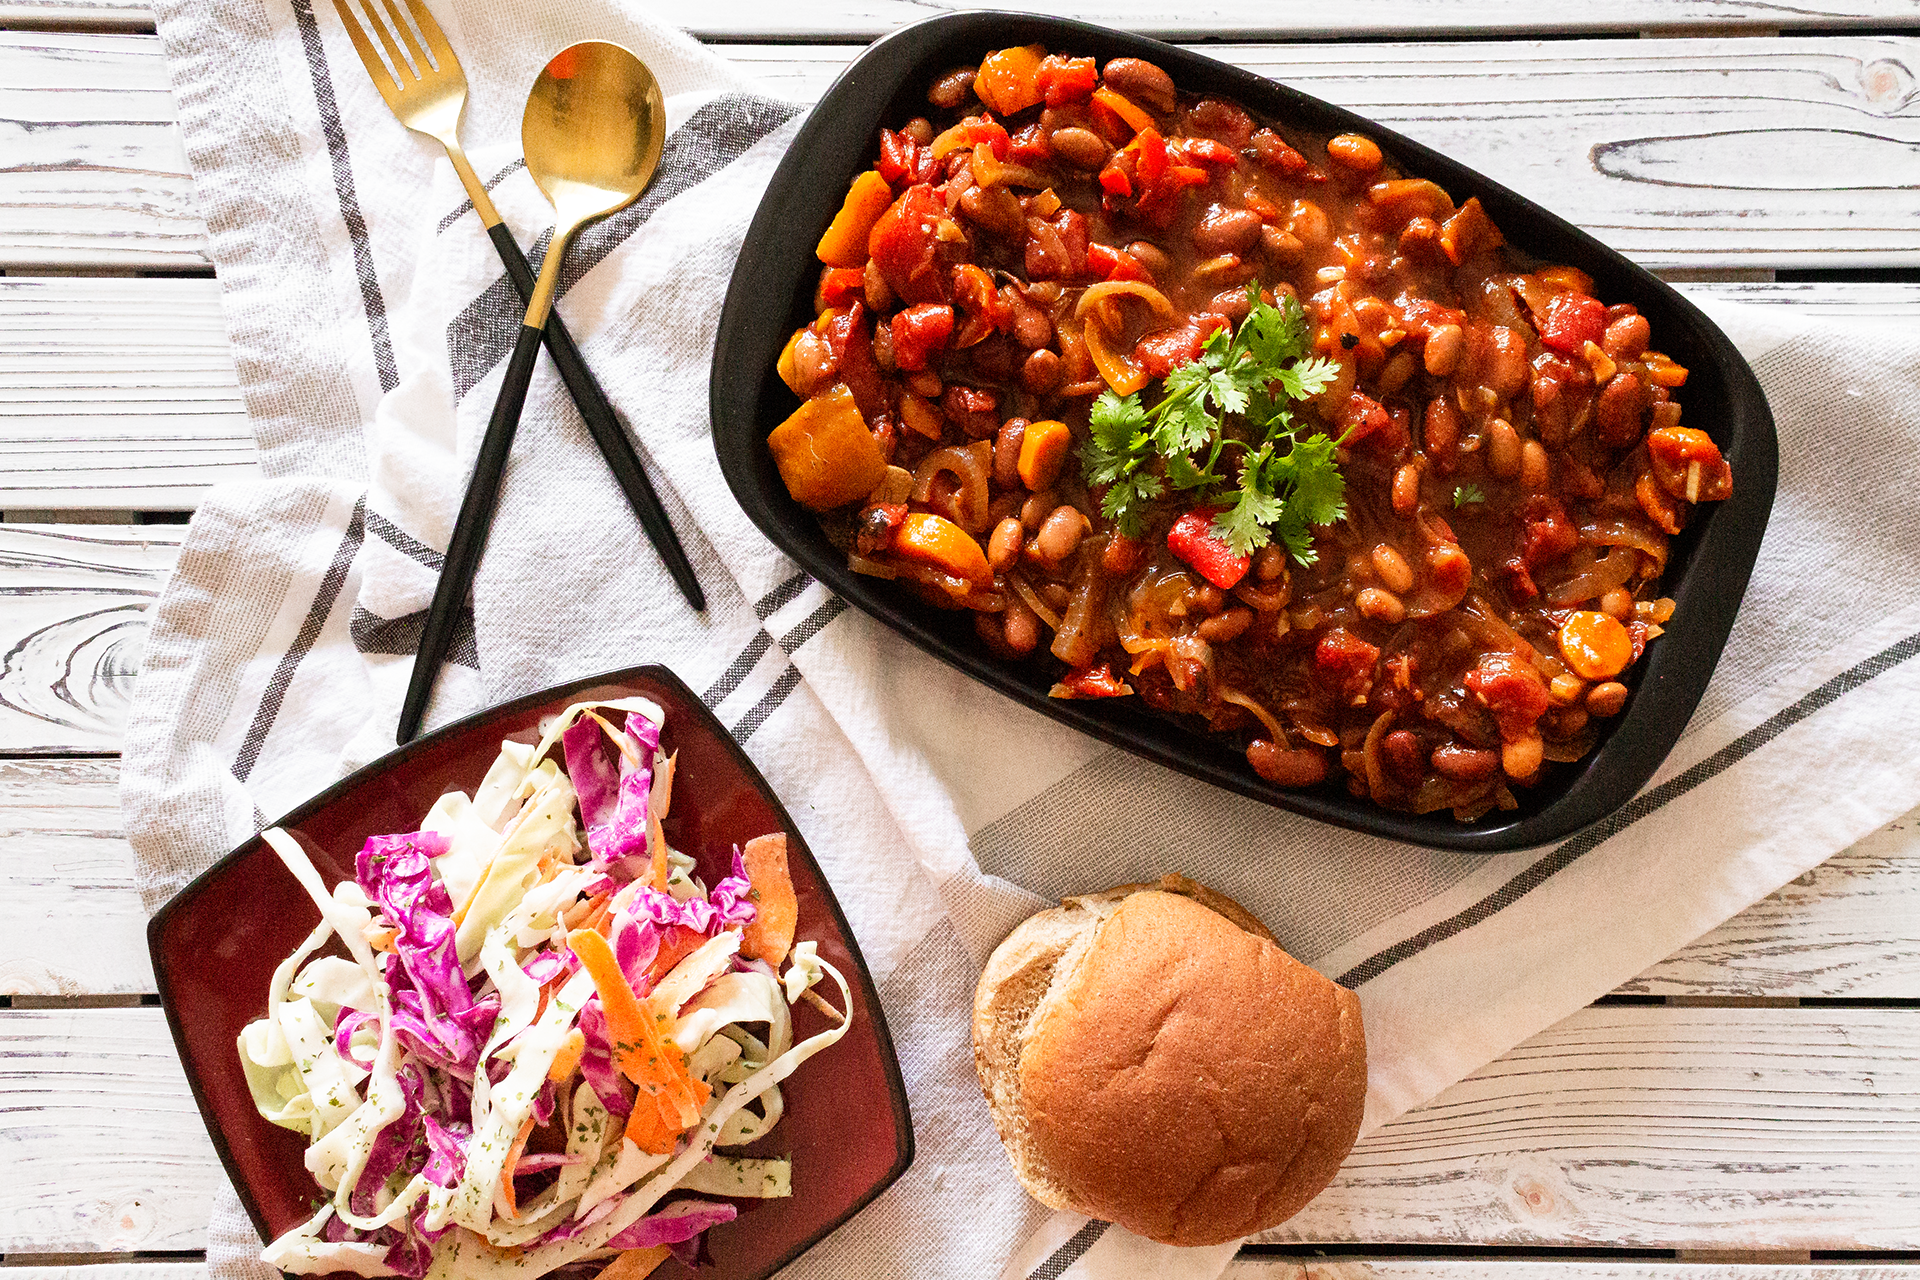
As has now become the norm here (and in my life), this recipe is entirely vegan. It was surprisingly easy (and fun!) to throw together a homemade ranch for the coleslaw portion of this recipe, and it has become a new salad dressing staple in our house alongside the roasted red pepper vinaigrette from my farmer’s market quinoa post. I’ve experimented with various slaws in the past (see the pickled Asian slaw from my miso portobella burger recipe) and I have to say–there’s nothing like a cool, crunchy side dish to really bring a meal together. I have a plan to bring the magic of homemade dressings and fresh cabbage together another day, too, with a peanut tofu salad recipe currently gathering dust in my dinner idea book, but (as with veggie burgers) the leftovers never last long enough to photograph. Maybe next time! For now, enjoy this vegan baked beans and coleslaw sandwich combo.
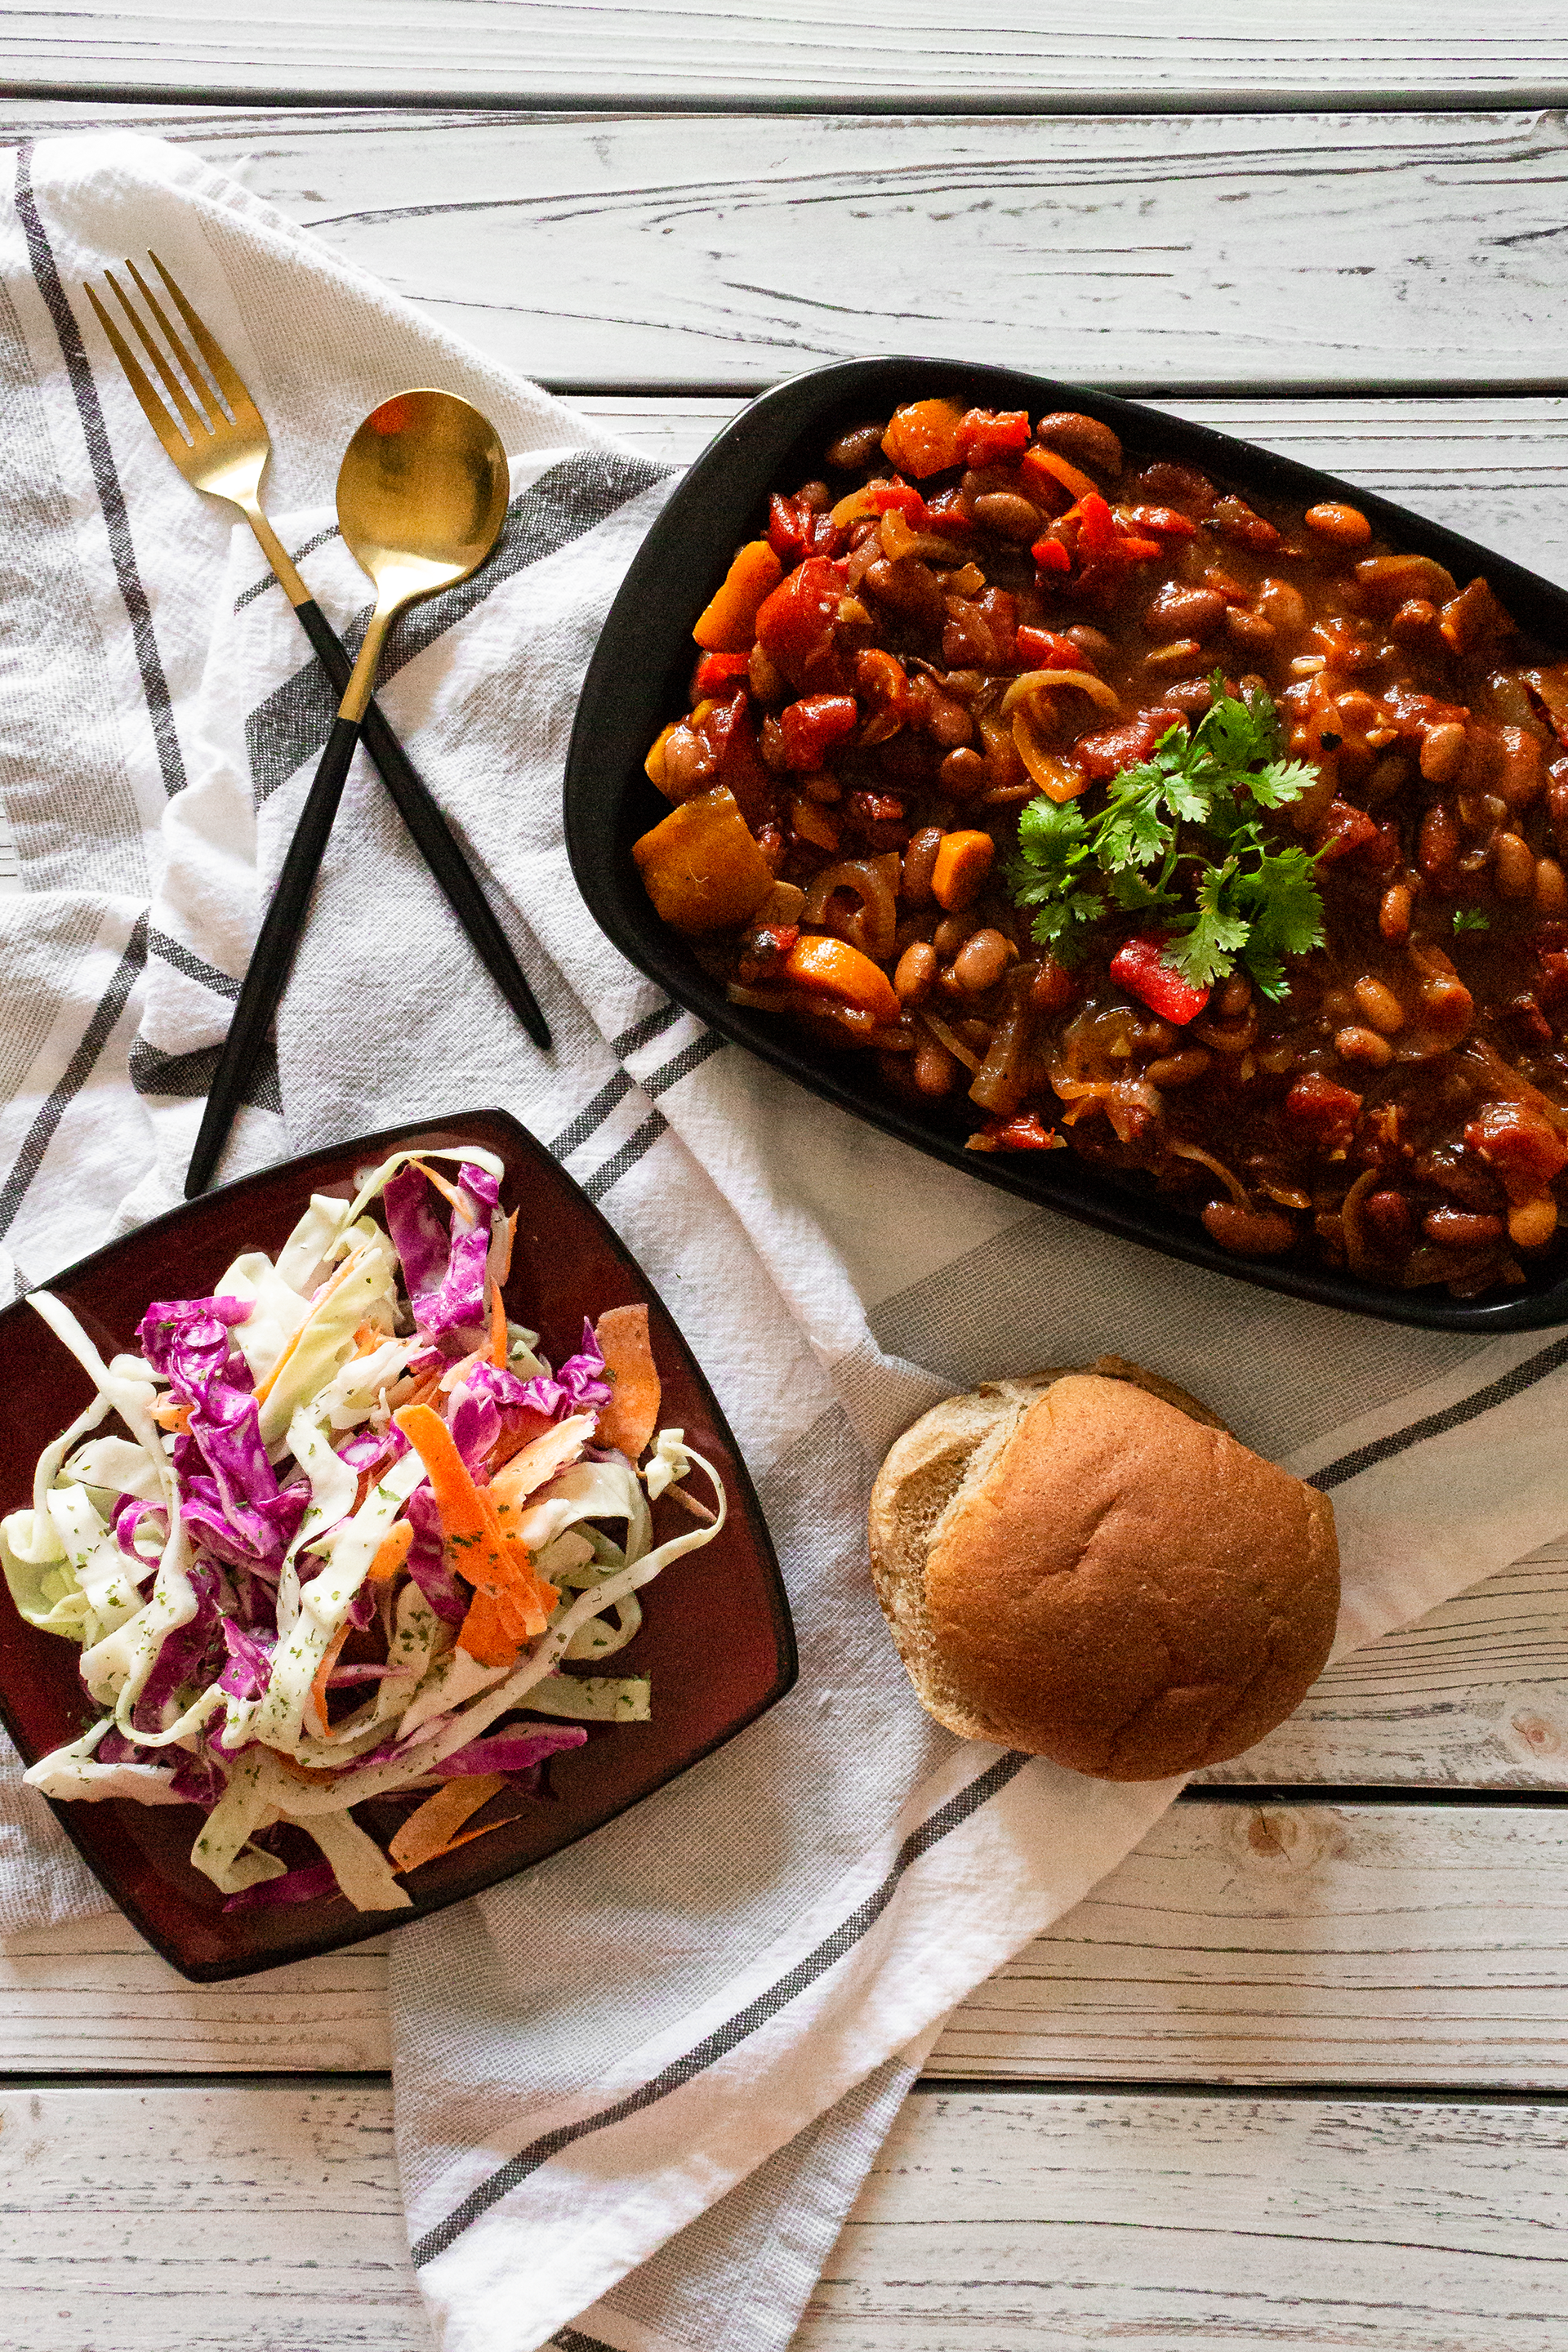
Baked Beans
This recipe makes six servings.
Ingredients:
- 15oz (1 can) pinto beans
- 15oz (1 can) dark red kidney beans
- 15oz (1 can) fire-roasted tomatoes
- 2 large carrots
- 2 medium onions
- 2 bell peppers
- 2 cups BBQ sauce (I used Stubb’s Spicy BBQ)
- 2 tbsp garlic, minced
- 2 tsp chili powder
- 1 tsp mustard powder
- 1 tsp paprika
- 1/2 tsp salt
Directions:
- Preheat oven to 350F.
- Roughly chop onions, carrots, bell peppers; mince garlic.
- Add chopped vegetables, garlic, tomatoes, and spices to a casserole dish. Stir to combine and coat. Bake for 20mins.
- Remove from oven and add beans and BBQ sauce. Stir to combine and coat. Return to oven and bake for an additional 40mins.
Coleslaw
This recipe makes six servings.
Ingredients:
- 2 cups green cabbage, shredded
- 2 cups purple cabbage, shredded
- 1 cup carrot, shredded/matchsticks
- 1/4 cup mayonnaise
- 2 tbsp plain yogurt
- 2 tbsp dill pickle juice
- 1 tbsp cider vinegar
- 1 tsp dill
- 1/2 tsp garlic powder
- 1/2 tsp onion powder
- 1/4 tsp salt
- 1/4 tsp black pepper
- 1/4 tsp mustard powder
Directions:
- Shred vegetables and set aside. Combine remaining ingredients in a small bowl and stir to incorporate.
- Add vegetables and dressing to a large mixing bowl and toss to coat.
Baked Beans with Coleslaw
Ingredients
Baked Beans
- 15 oz pinto beans 1 can
- 15 oz dark red kidney beans 1 can
- 15 oz fire-roasted tomatoes 1 can
- 2 large carrots
- 2 medium onions
- 2 bell peppers
- 2 cups BBQ sauce
- 2 tbsp garlic minced
- 2 tsp chili powder
- 1 tsp mustard powder
- 1 tsp paprika
- 1/2 tsp salt
Coleslaw
- 2 cups green cabbage shredded
- 2 cups purple cabbage shredded
- 1 cup carrot shredded/matchsticks
- 1/4 cup mayonnaise
- 2 tbsp plain yogurt
- 2 tbsp dill pickle juice
- 1 tbsp cider vinegar
- 1 tsp dill
- 1/2 tsp garlic powder
- 1/2 tsp onion powder
- 1/4 tsp salt
- 1/4 tsp black pepper
- 1/4 tsp mustard powder
Instructions
Baked Beans
- Preheat oven to 350F.
- Roughly chop onions, carrots, bell peppers; mince garlic.
- Add chopped vegetables, garlic, tomatoes, and spices to a casserole dish. Stir to combine and coat. Bake for 20mins.
- Remove from oven and add beans and BBQ sauce. Stir to combine and coat. Return to oven and bake for an additional 40mins.
Coleslaw
- Shred vegetables and set aside. Combine remaining ingredients in a small bowl and stir to incorporate.
- Add vegetables and dressing to a large mixing bowl and toss to coat.
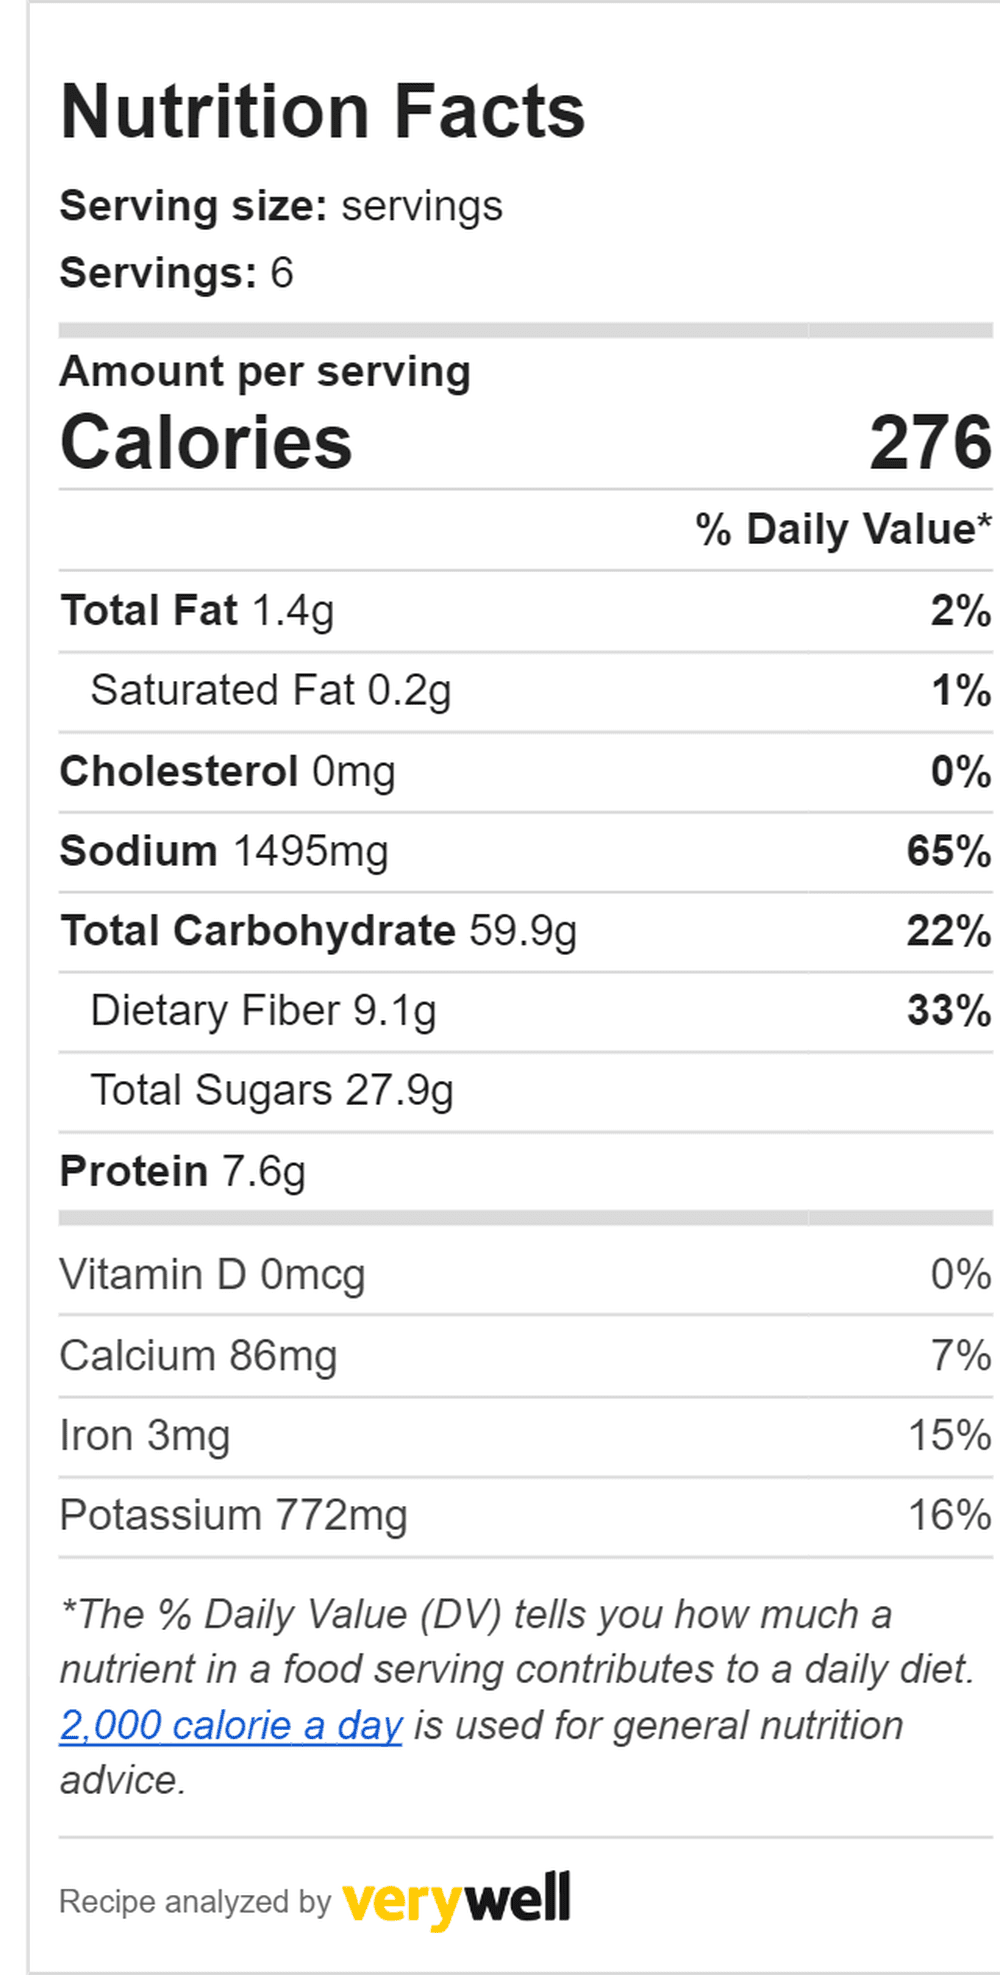
Baked Beans nutritional information. 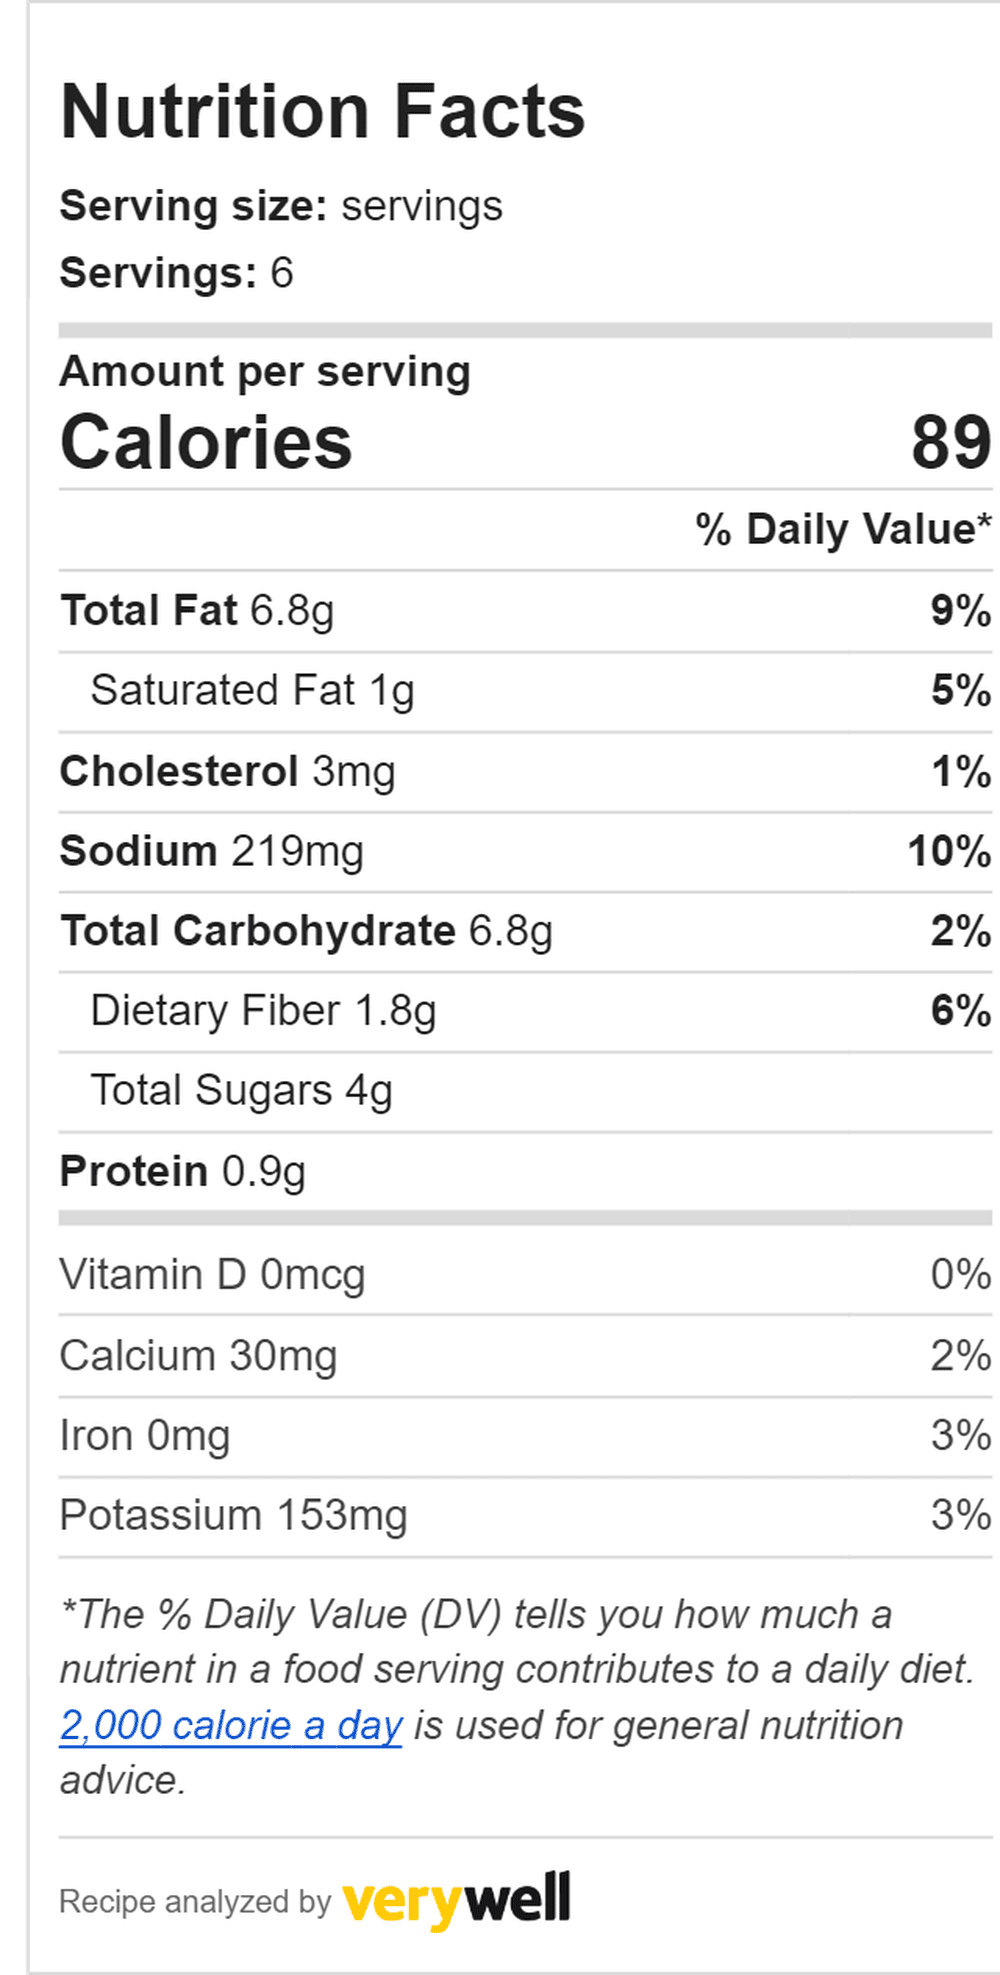
Coleslaw nutritional information.
The post Baked Beans + Coleslaw appeared first on I Forgot Salt!.
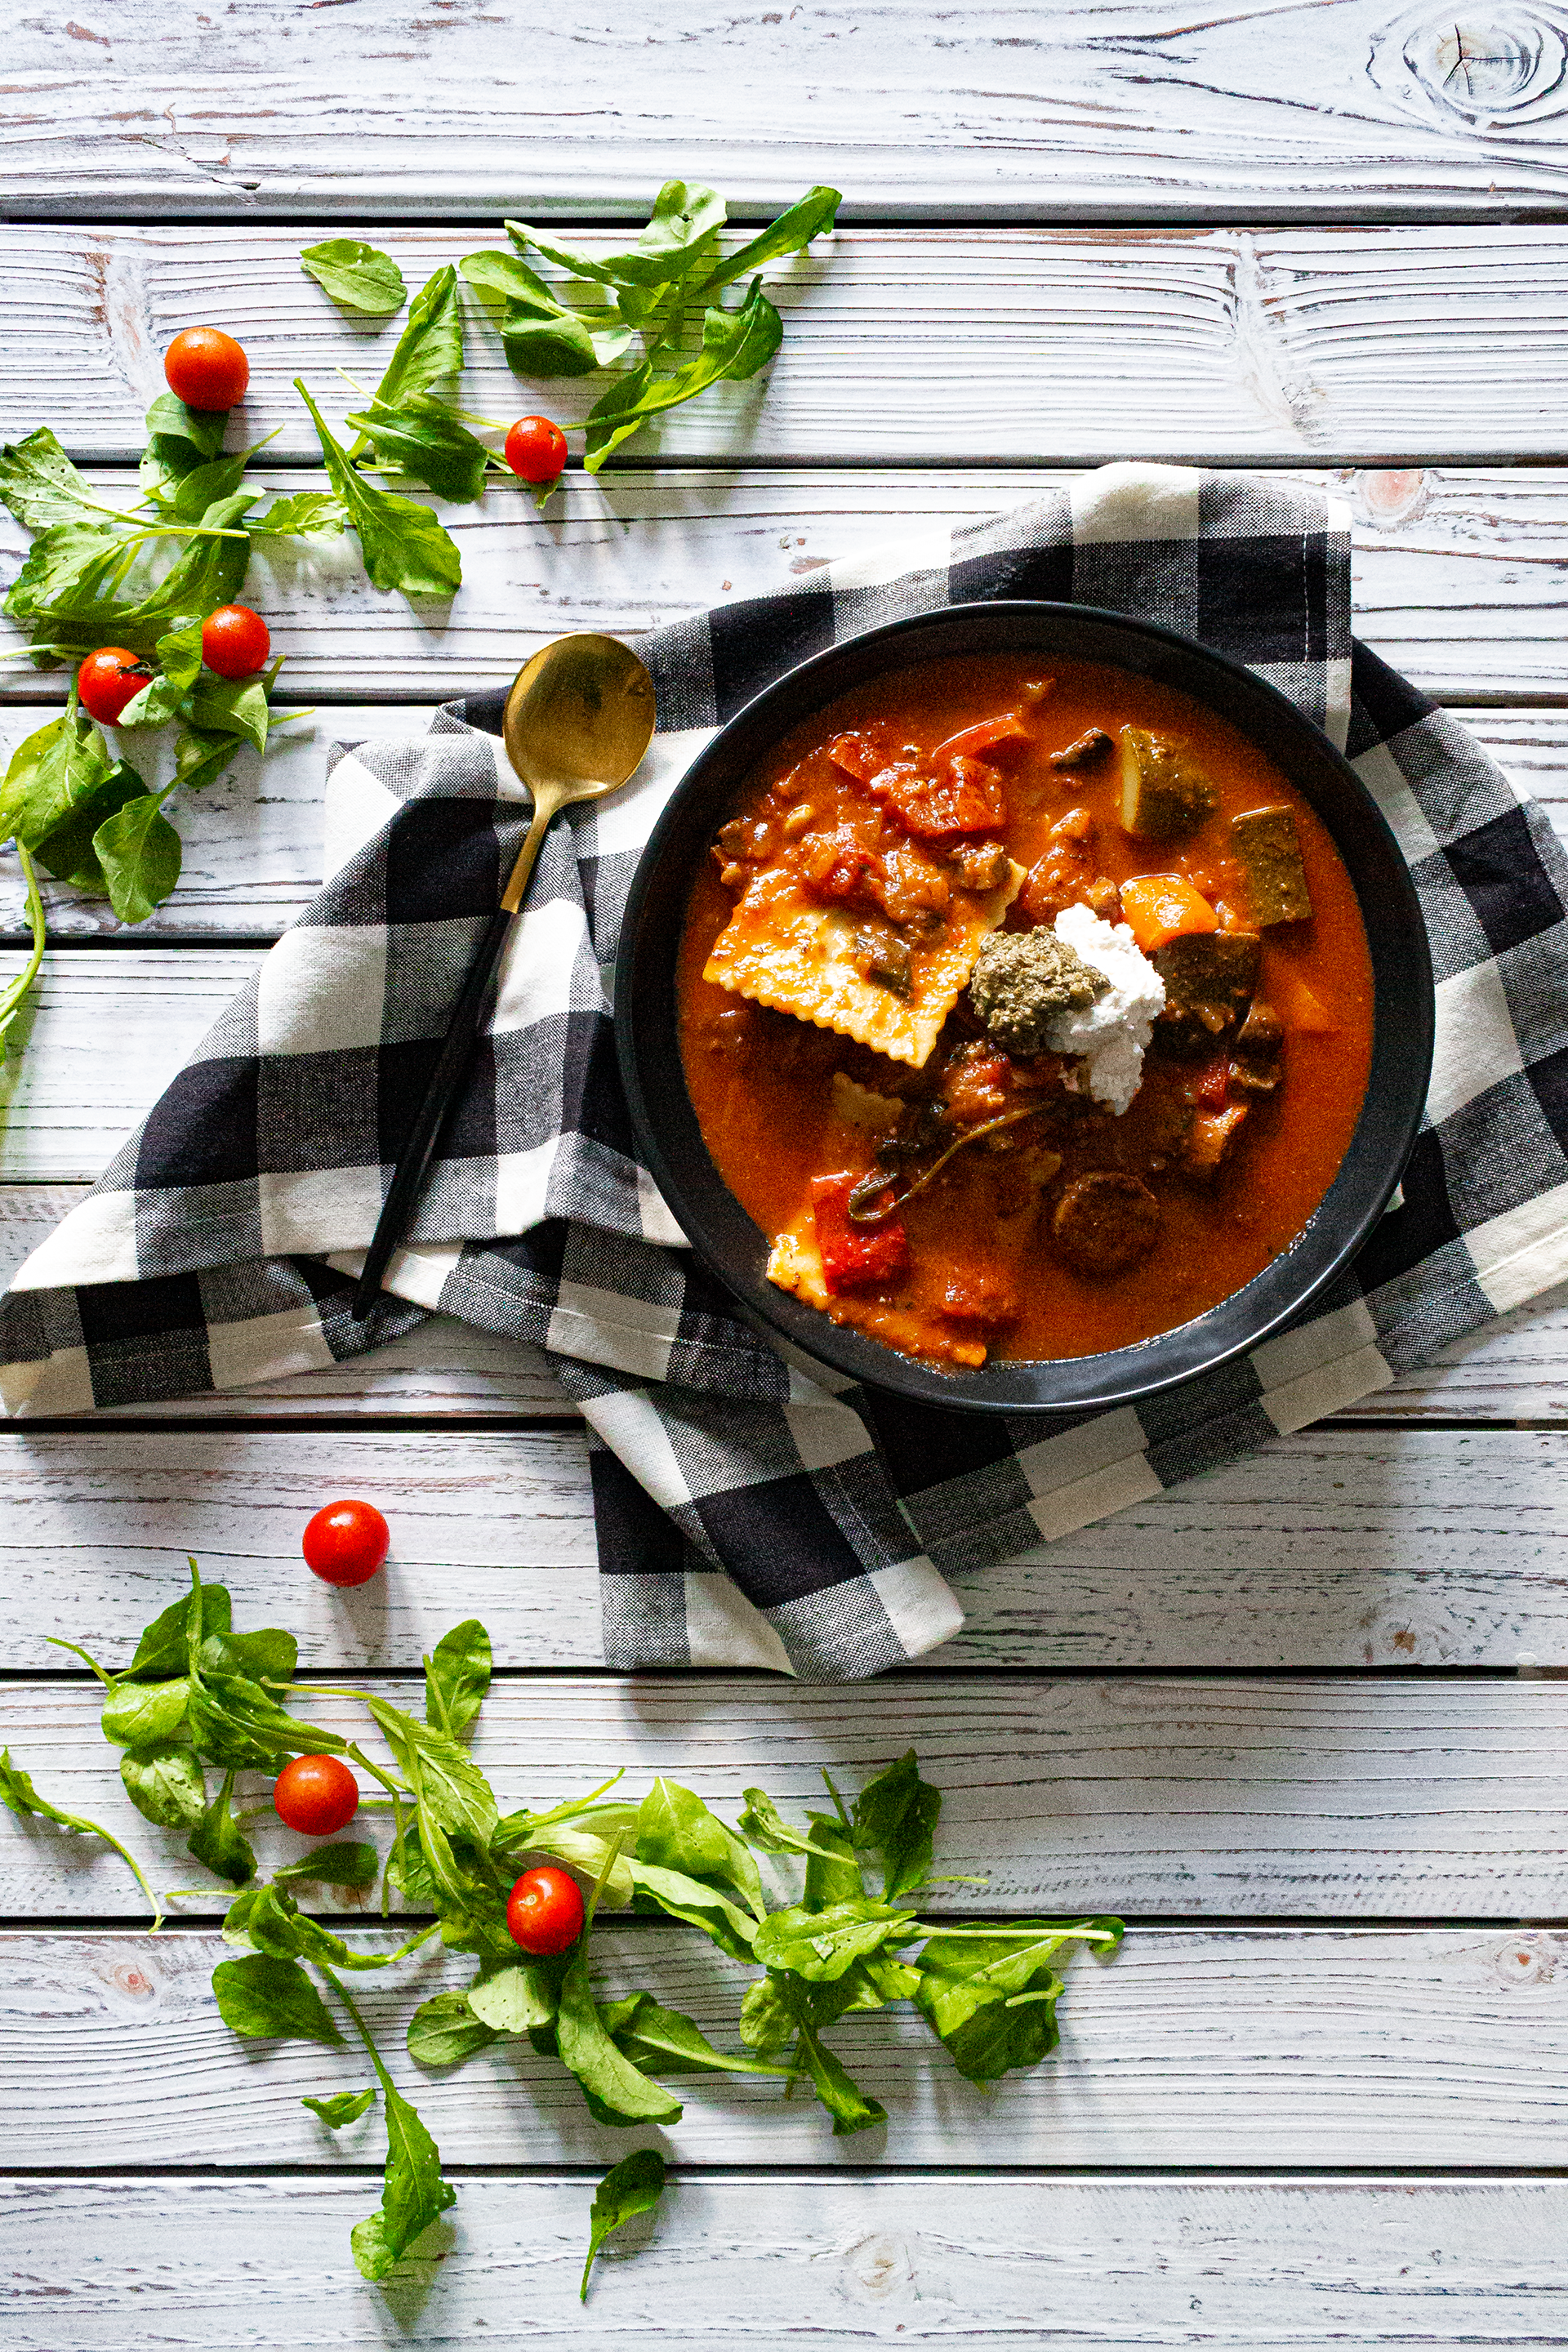
]]>The post Sausage + Ravioli Vegetable Stew appeared first on I Forgot Salt!.
]]>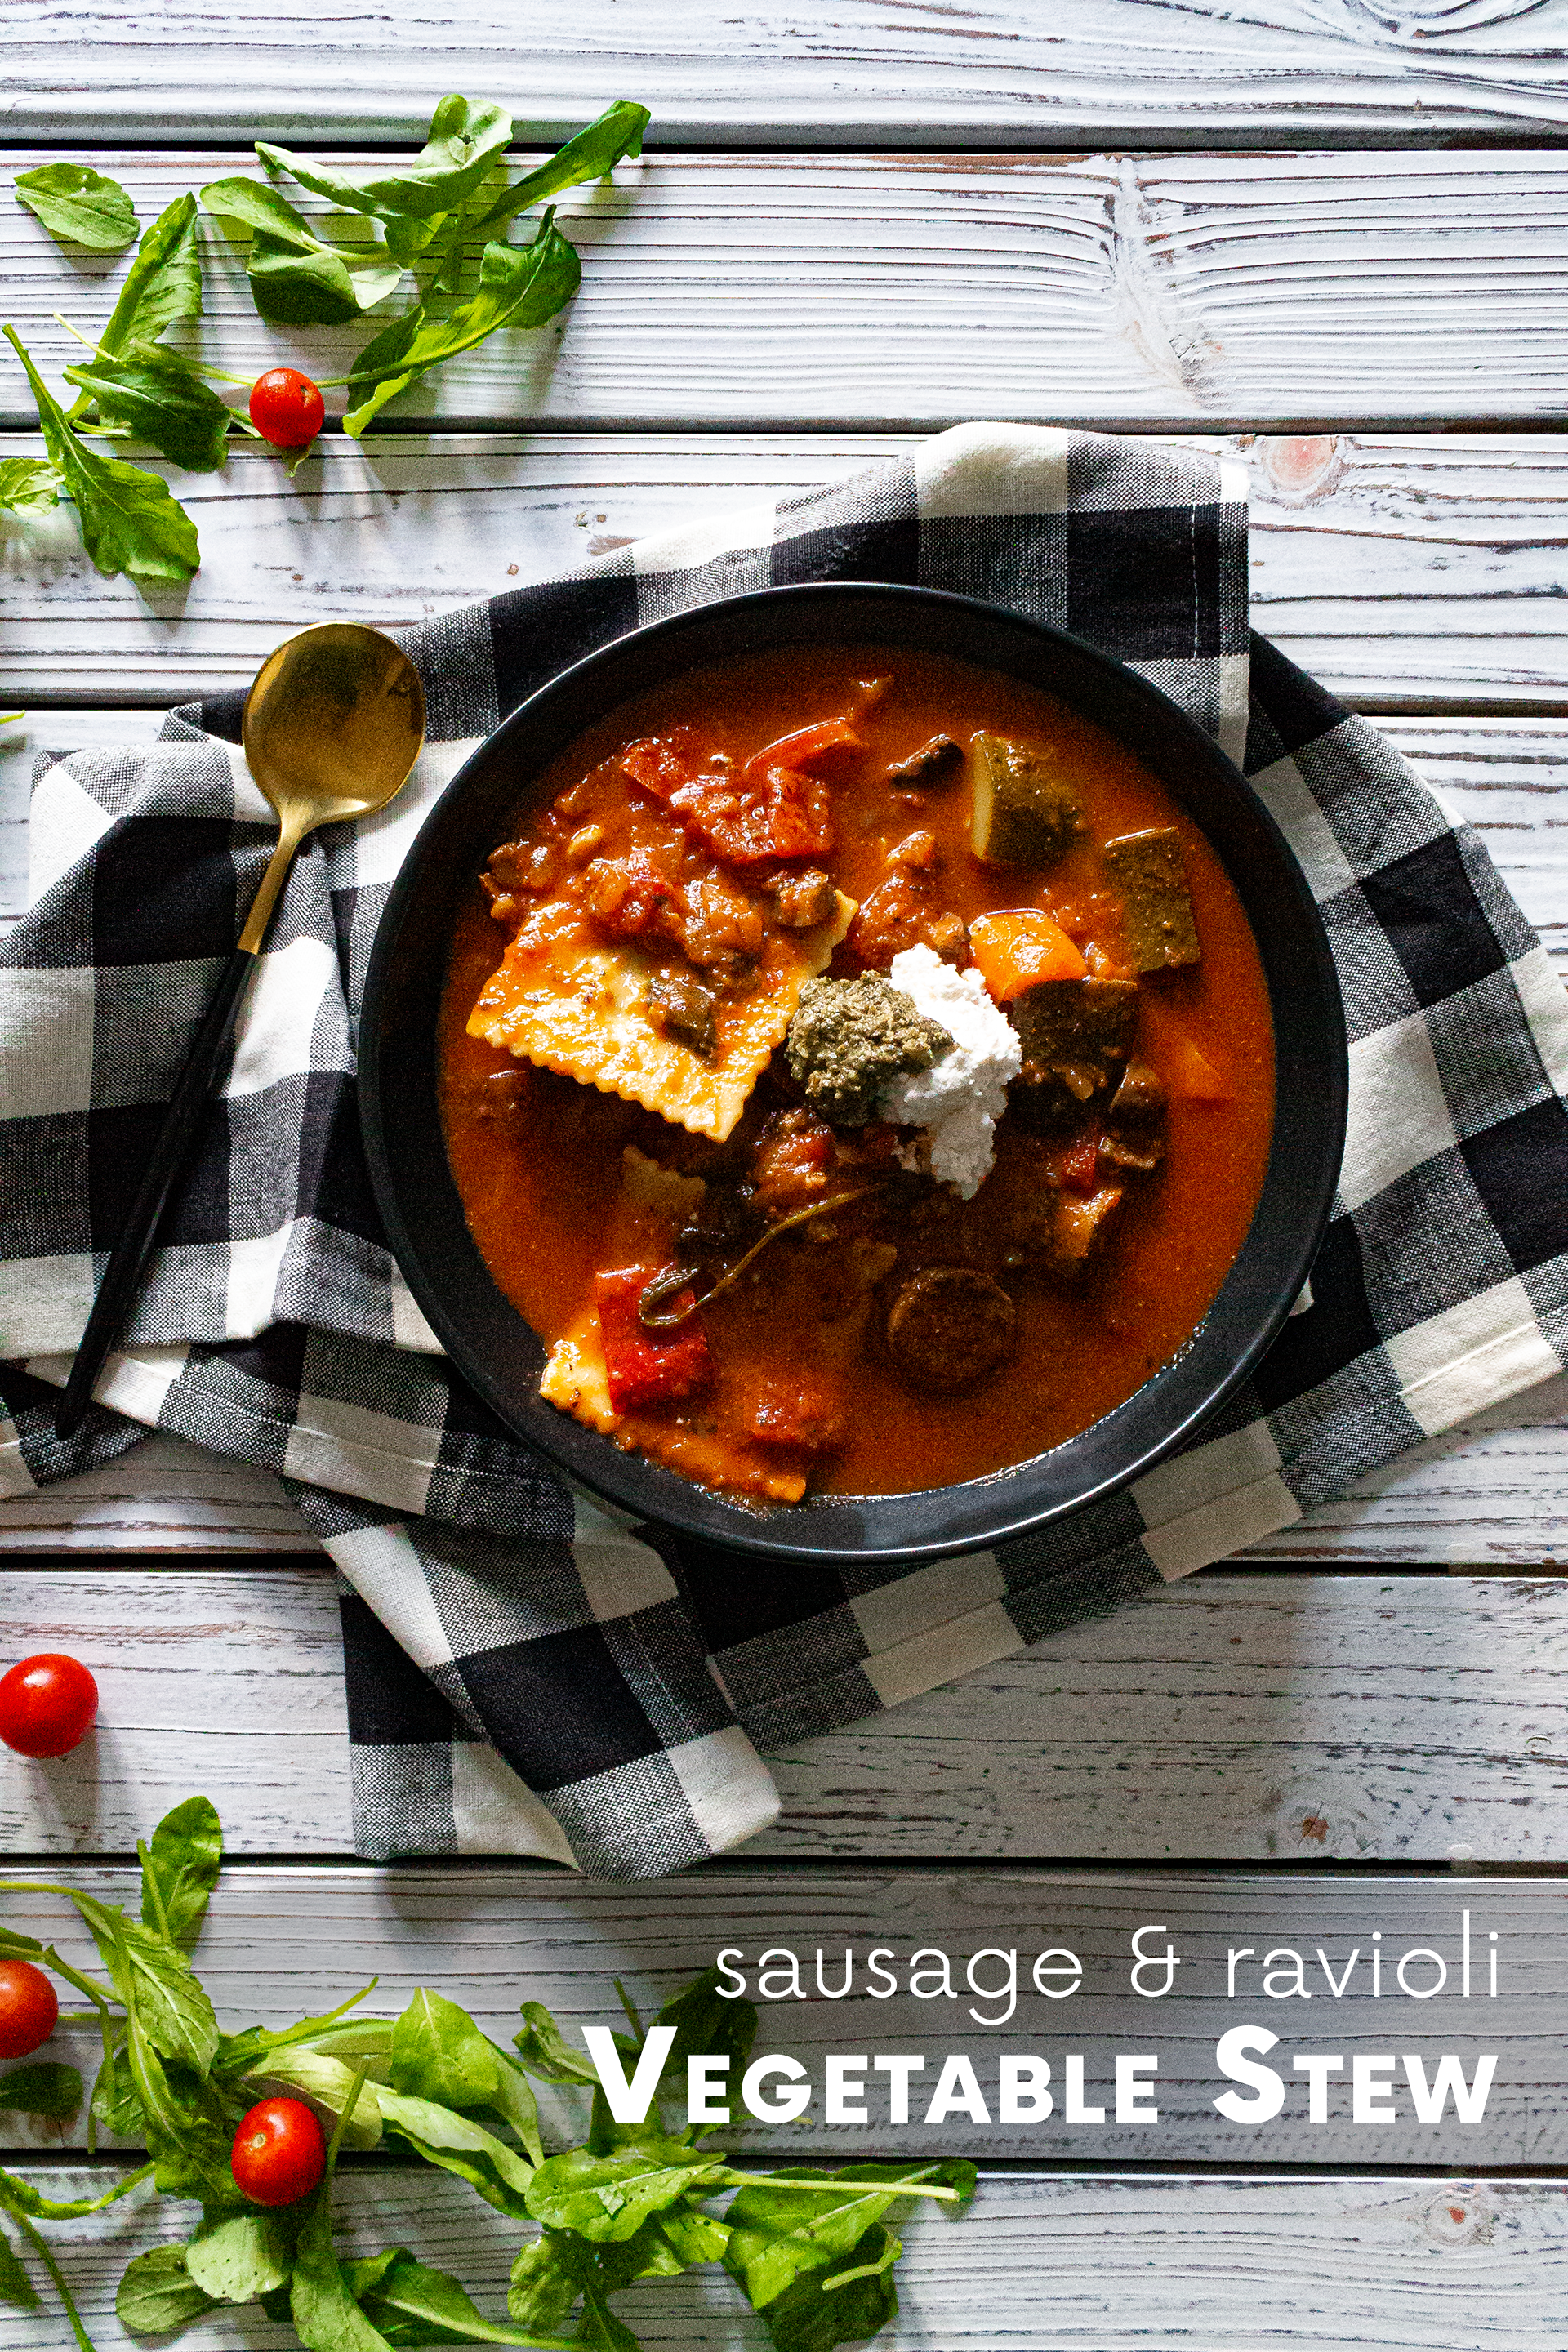
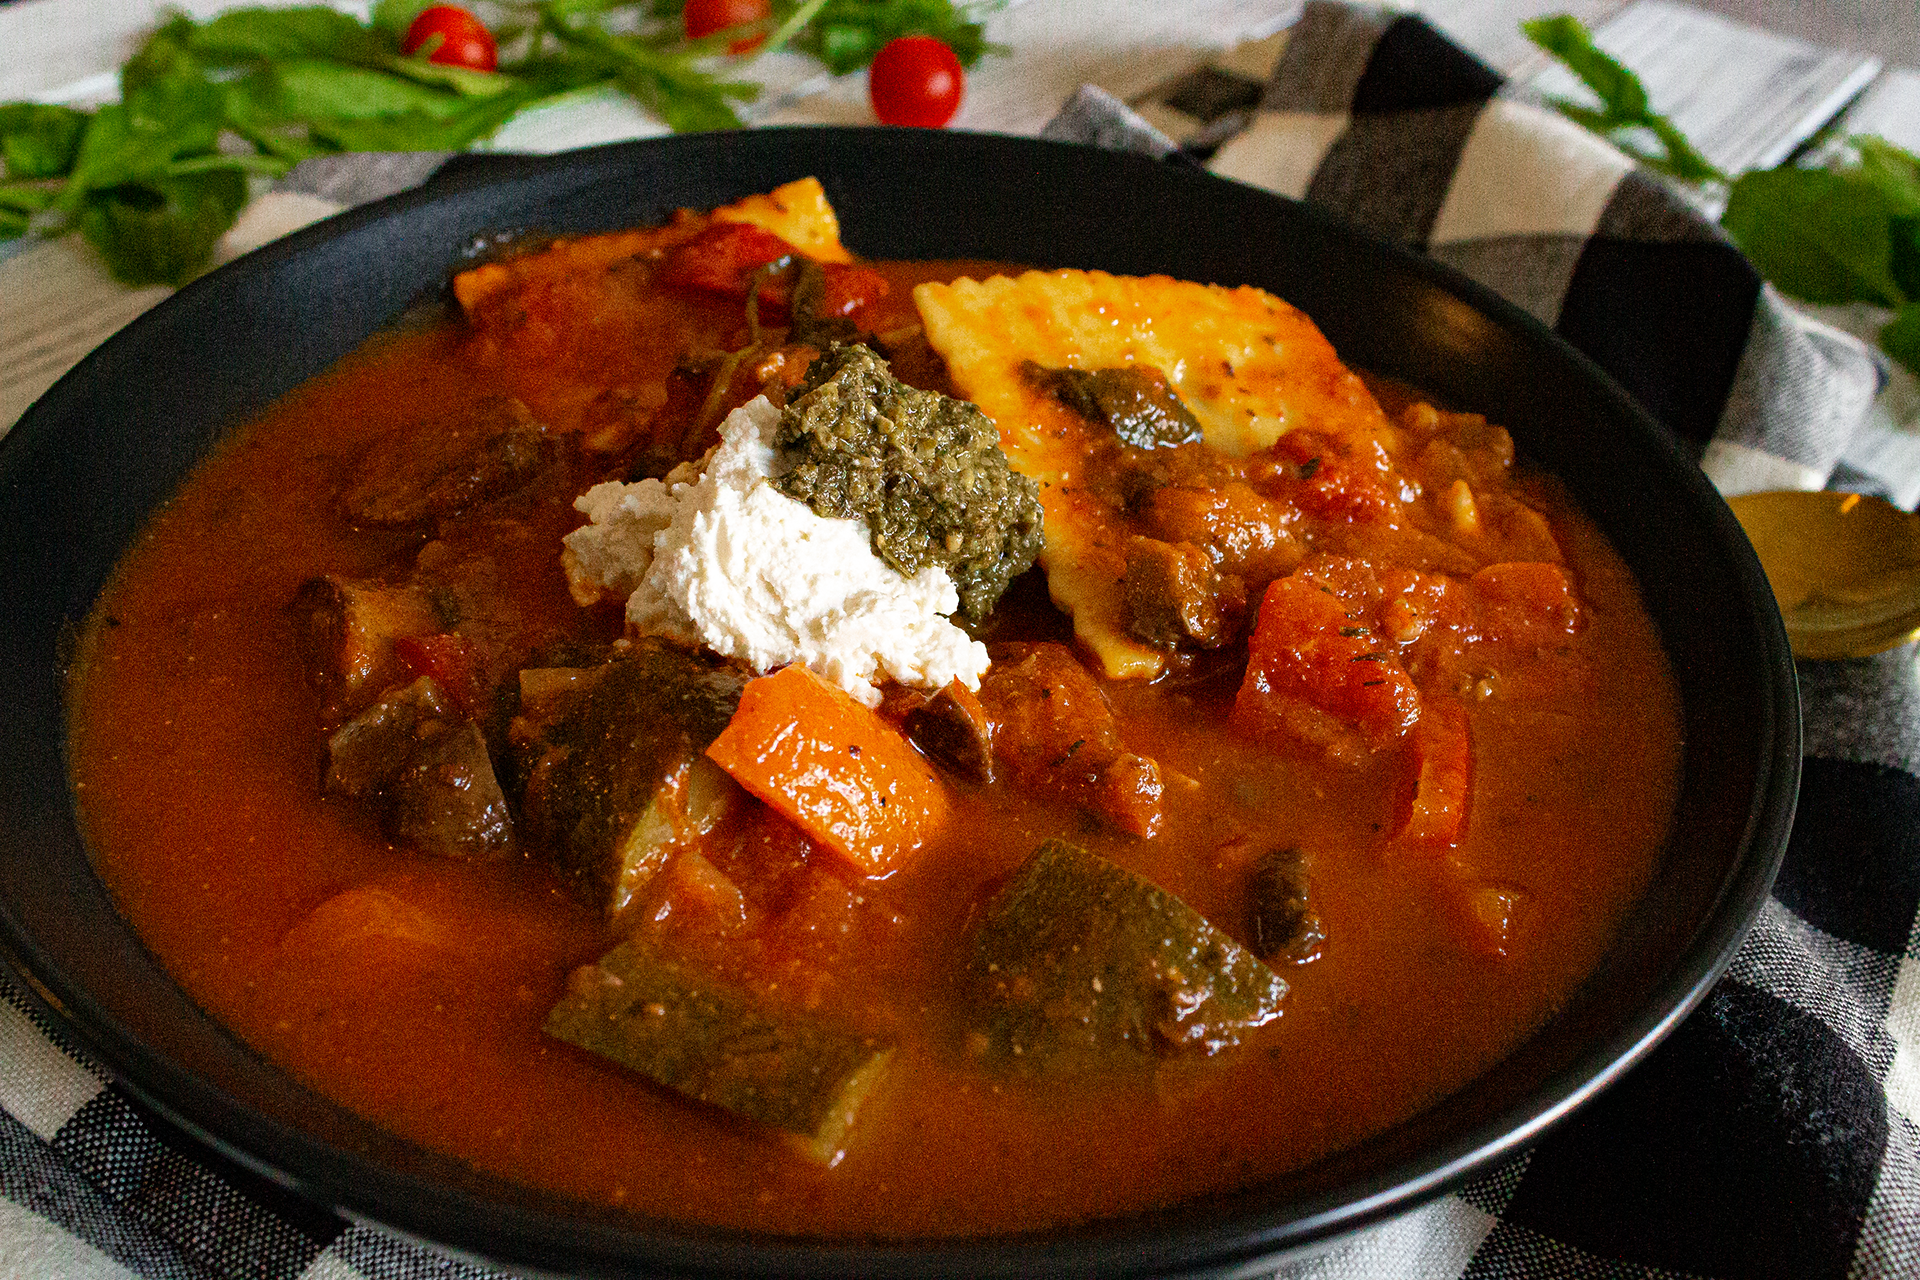
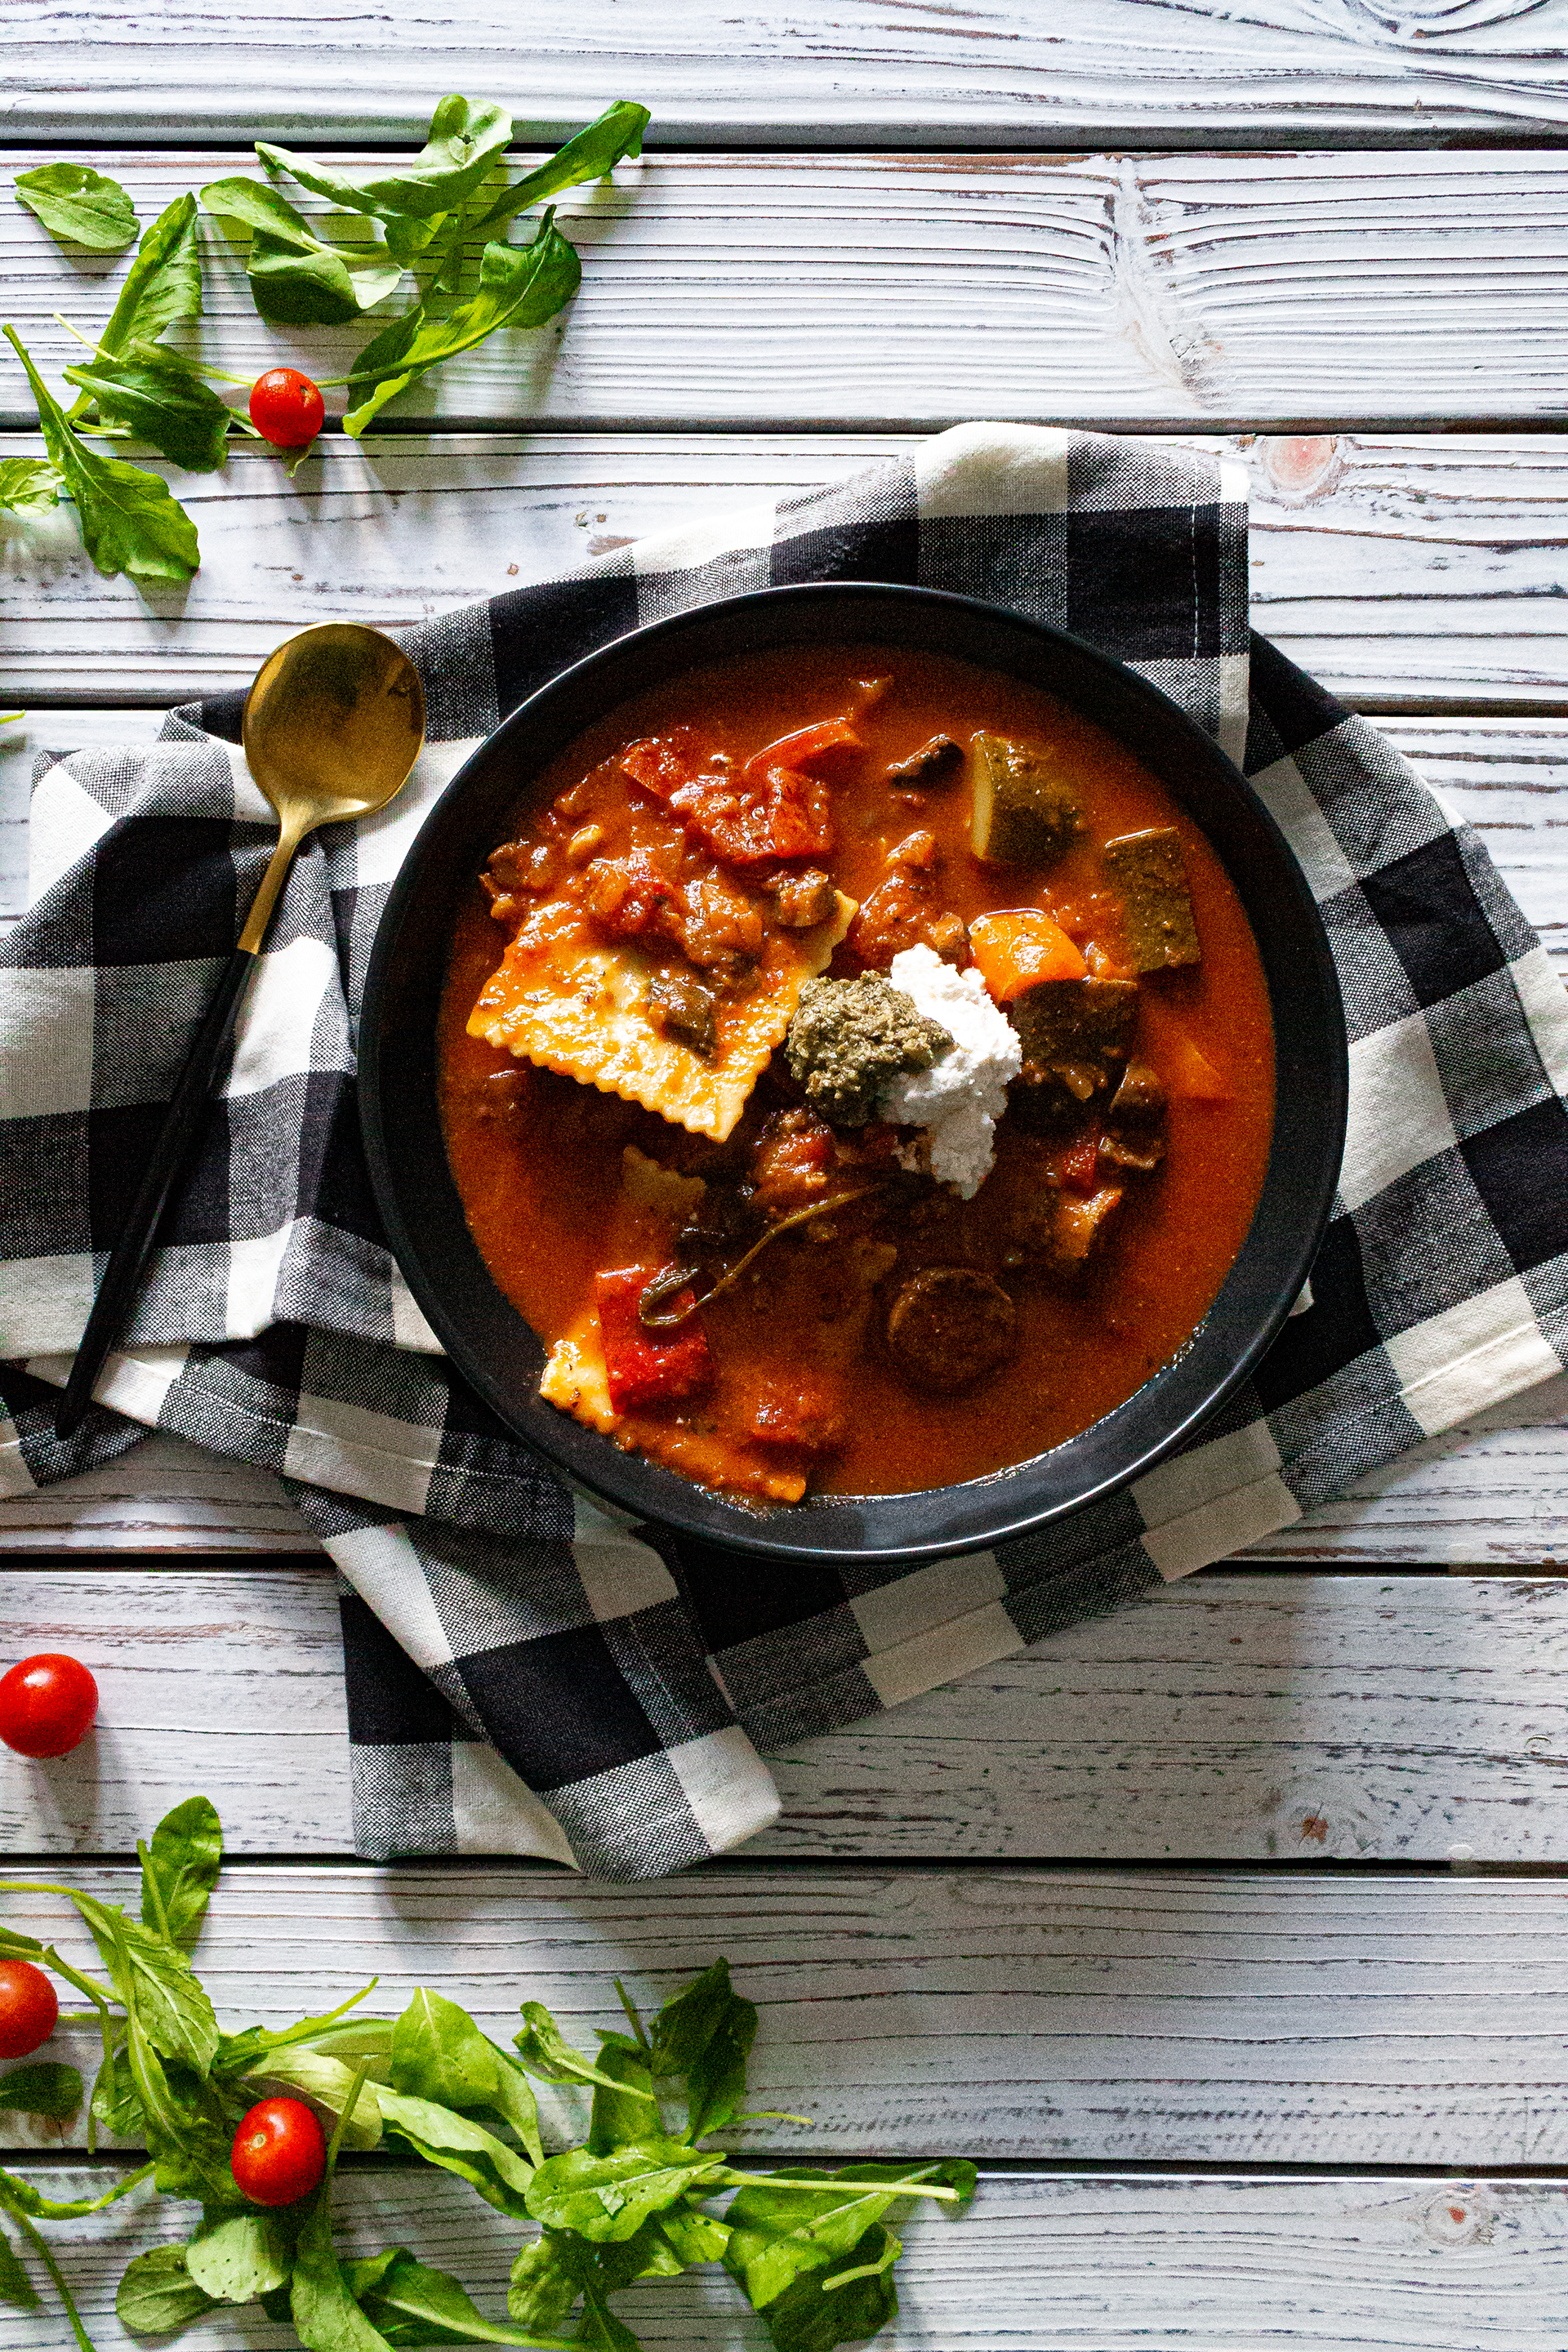
Guess what? This sausage and ravioli stew recipe is completely vegan! Yes, you heard that right–with a few special ingredients, you can make a hearty, meaty, cheesy sausage and ravioli stew that is both satisfying for the carnivores in your house and completely plant-based. I’m incredibly lucky to have access to some great vegan alternatives at my local co-op, and they make all the difference in pulling this meal together. Of course, there are always workarounds for those who prefer to forgo meat and dairy alternatives in favor of a fully whole-foods, plant-based diet, but I’m of the mind to embrace what I can find and cook with it when I can, especially since I live with a self-proclaimed carnivore. If you can’t find the specific vegan alternatives that I mention here, you are more than welcome to substitute whatever you do have access to and this recipe will still taste delicious!
(Disclaimer: I am not affiliated with or sponsored by any of these brands.)
The products I used when making the version of this recipe that’s pictured are:
- Muir Glen Portabella Mushroom Tomato Pasta Sauce
- Tofurky Plant-Based Artisan Spinach Pesto Sausage
- Kite Hill Mushroom Ravioli with Almond Milk Ricotta
- Kite Hill Spinach Ravioli with Almond Milk Ricotta
- Kite Hill Almond Milk Ricotta
Honestly, though, if you can’t find these brands or you just don’t feel like stocking up on a bunch of new ingredients, just use what you have! Got a box of dry pasta sitting in your pantry? Use that! A container of plain yogurt in your fridge? Boom, there’s your creamy “cheese” stir-in. The great thing about stews–especially ones like this, which are honestly supposed to be filled with whatever you can find–is that they’re incredibly versatile. There’s a reason that every cowboy movie, fantasy epic, and adventure novel features stew in some capacity, and I can think of at least three major pieces of media with characters eating it for lunch or dinner right off the top of my head, even. (“Red Dead Redemption II”, “Breath of the Wild”, and “The Secret World of Arrietty”, in case you’re wondering. Actually, I’m pretty sure every Studio Ghibli movie has characters eating stew at some point, but I’m getting way off track.)
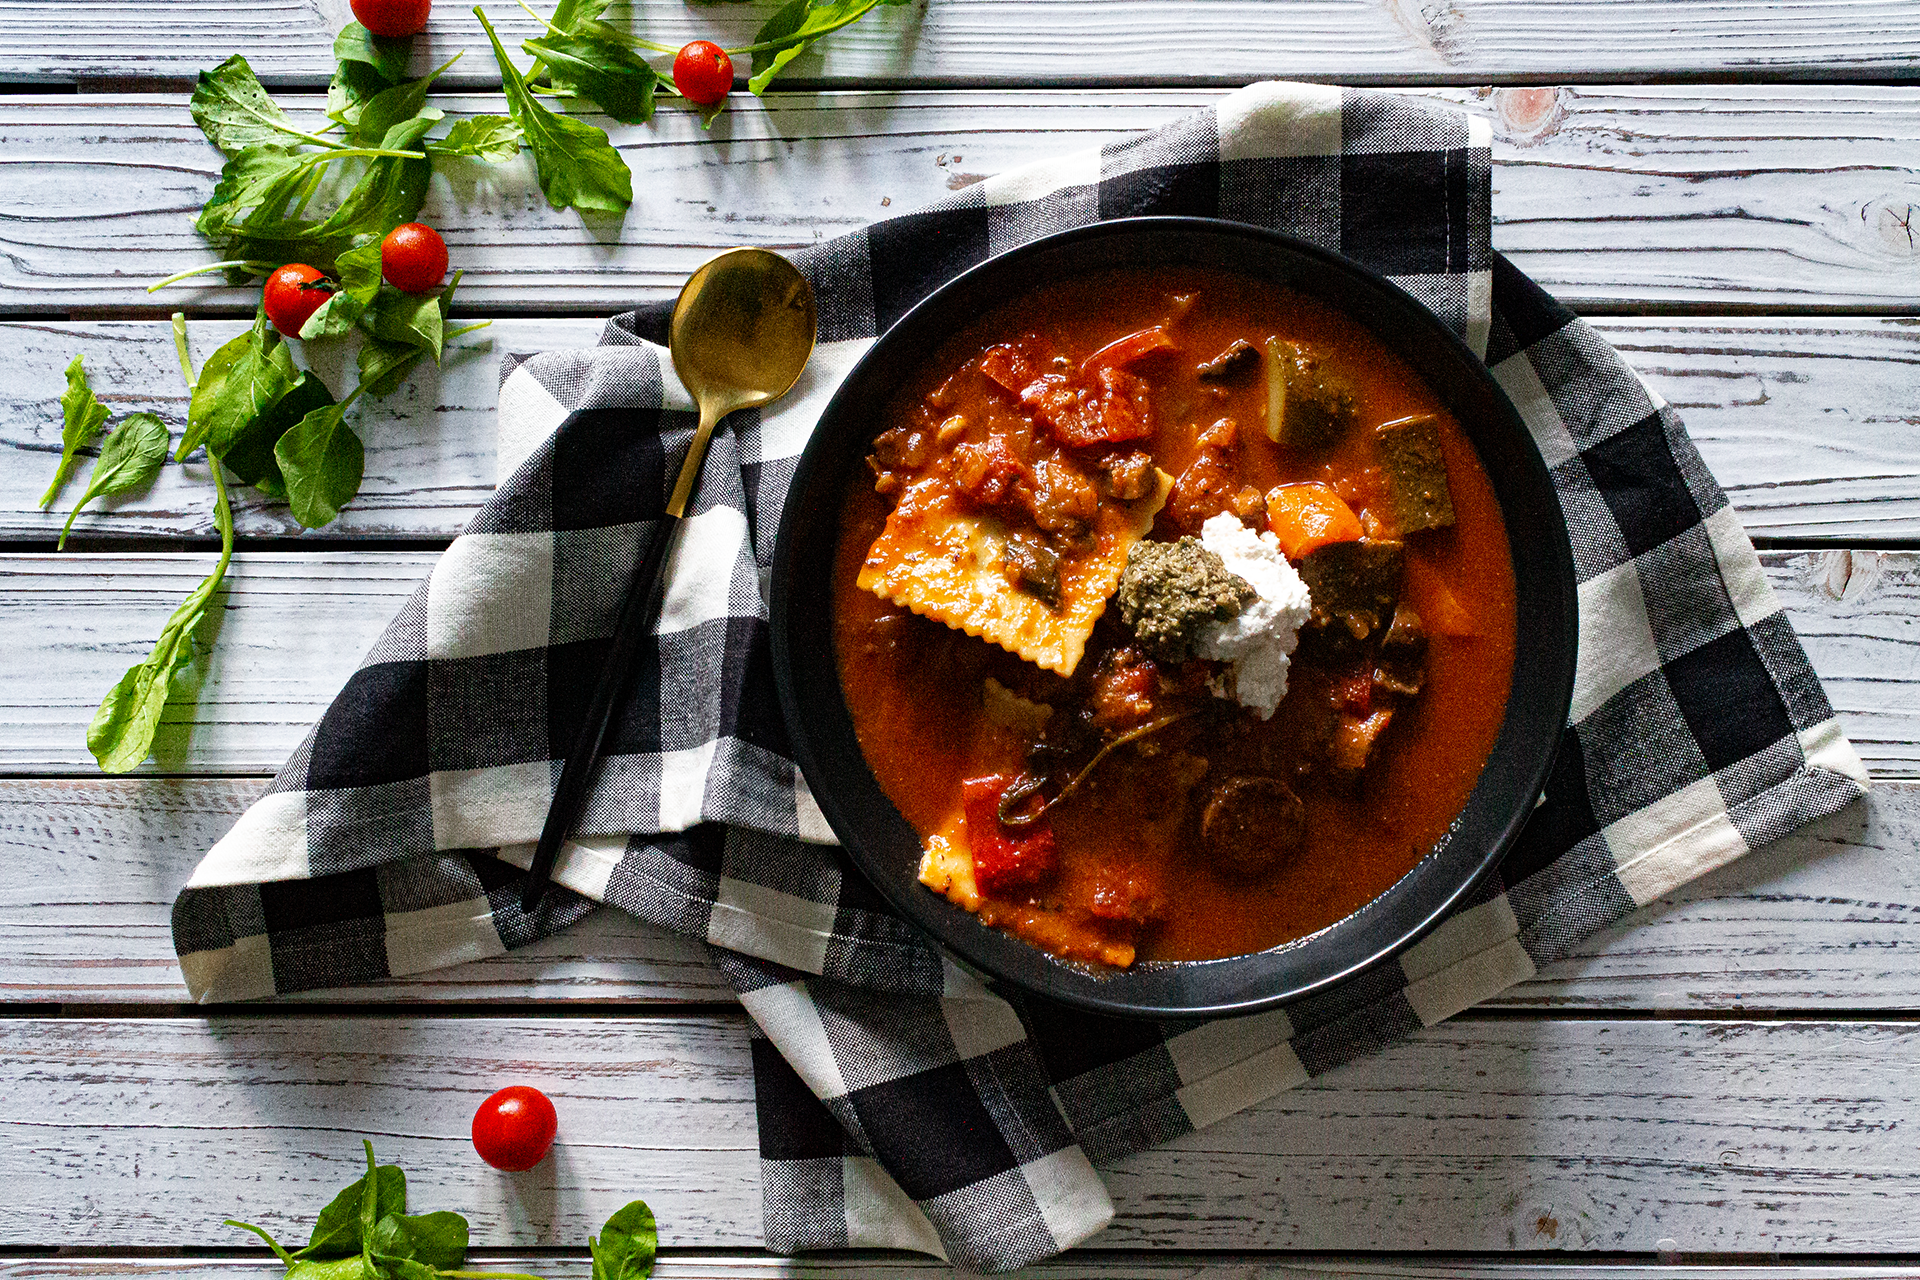
This was such a great meal to eat on during the sporadic cool, rainy weather we’ve been getting up here in the mountains lately. Even now, as I’m typing this out, the temperature is a crisp 67F in spite of the summer season. Fall really is gearing up to take over, meaning vegetable and ravioli stews like this, warm curries of any kind (see my recipes for Thai Red Curry, Butter Chicken, Indian Squash & Chickpea Curry, and Japanese Curry TBP), and rich chilis (see my Vegan Chili recipe) are going to be back in season soon. This is one of my times to cook, because it’s the part of the year when spicy, hot dishes are in abundance–and if there’s one thing I love, it’s spicy food. I’m hoping to really up my game this fall and winter with a revamp of my (very, very) old Pho recipe, a Thai green curry, at least one lentil experiment, and a few more Instant Pot recipes (dirty rice, perhaps?). I have a lot to look forward to in the coming months, and I can’t wait to get started!
This recipe makes five servings.
Ingredients:
- 18oz frozen stuffed pasta (ravioli or tortellini)
- 26oz pasta sauce (1 jar)
- 40oz vegetable broth (1.5 sauce jar)
- 2 sausage links, vegan
- 2 onions
- 2 zucchini
- 4 cloves garlic, minced
- 4 whole tomatoes
- 2 bell peppers
- 2 cups spinach
- 2 cups arugula
- 1 cup crimini mushrooms
- 2 tbsp Italian seasoning (see my recipe here)
- 1 tbsp olive oil
- 1 tbsp salt
- 1 tbsp pesto (per bowl)
- 1 tbsp ricotta, vegan (per bowl)
Directions:
- Chop all vegetables (tomatoes, zucchini, mushrooms, peppers) into large 1.5-2 inch chunks (zucchini works best when cut into wedges, not rounds; mushrooms work best when quartered). Slice sausage into 1-inch rounds. Separate onions and sausage, and set the rest aside.
- In a large stock pot, add sausage rounds, garlic, onions, olive oil, and salt. Heat on medium-high and let onions cook for 5-7 minutes, or until onions are fragrant and somewhat softened and the sausage has begun to brown lightly.
- Add remaining chopped vegetables, pasta sauce, water/broth, and Italian seasoning. Bring to a boil on high heat (about 5 minutes), then reduce to a simmer on medium heat. Let simmer for at least 30 minutes, or until stew has reduced by about 1 inch in the pot.
- Add frozen pasta, spinach, and arugula. Stir to ensure all frozen pasta is submerged. Cover and return to a boil for 10 minutes.
- Remove from heat and serve immediately with pesto and ricotta in each bowl.
This vegetable stew is delicious both piping hot and room temperature, but I recommend the former for a truly “hearty fall stew” experience. It keeps wonderfully in the fridge overnight, but I would be wary of letting it sit for too long lest your poor raviolis begin to disintegrate (still delicious, though). As always, we ate leftovers for lunch later in the week, and it was just as good if not better than when we made this ravioli stew for dinner.

Sausage & Ravioli Vegetable Stew
Ingredients
- 18 oz frozen stuffed pasta
- 26 oz pasta sauce 1 jar
- 40 oz vegetable broth 1.5 sauce jar
- 2 sausage links (vegan)
- 2 onions
- 2 zucchini
- 4 cloves garlic minced
- 4 whole tomatoes
- 2 bell peppers
- 2 cups spinach
- 2 cups arugula
- 1 cup crimini mushrooms
- 2 tbsp Italian seasoning
- 1 tbsp olive oil
- 1 tbsp salt
- 1 tbsp pesto vegan (per bowl)
- 1 tbsp ricotta vegan (per bowl)
Instructions
- Chop all vegetables (tomatoes, zucchini, mushrooms, peppers) into large 1.5-2 inch chunks (zucchini works best when cut into wedges, not rounds; mushrooms work best when quartered). Slice sausage into 1-inch rounds. Separate onions and sausage, and set the rest aside.
- In a large stock pot, add sausage rounds, garlic, onions, olive oil, and salt. Heat on medium-high and let onions cook for 5-7 minutes, or until onions are fragrant and somewhat softened and the sausage has begun to brown lightly.
- Add remaining chopped vegetables, pasta sauce, water/broth, and Italian seasoning. Bring to a boil on high heat (about 5 minutes), then reduce to a simmer on medium heat. Let simmer for at least 30 minutes, or until stew has reduced by about 1 inch in the pot.
- Add frozen pasta, spinach, and arugula. Stir to ensure all frozen pasta is submerged. Cover and return to a boil for 10 minutes.
- Remove from heat and serve immediately with pesto and ricotta in each bowl.

The post Sausage + Ravioli Vegetable Stew appeared first on I Forgot Salt!.
]]>The post Eight-Vegetable Quinoa Salad with Red Pepper Vinaigrette appeared first on I Forgot Salt!.
]]>
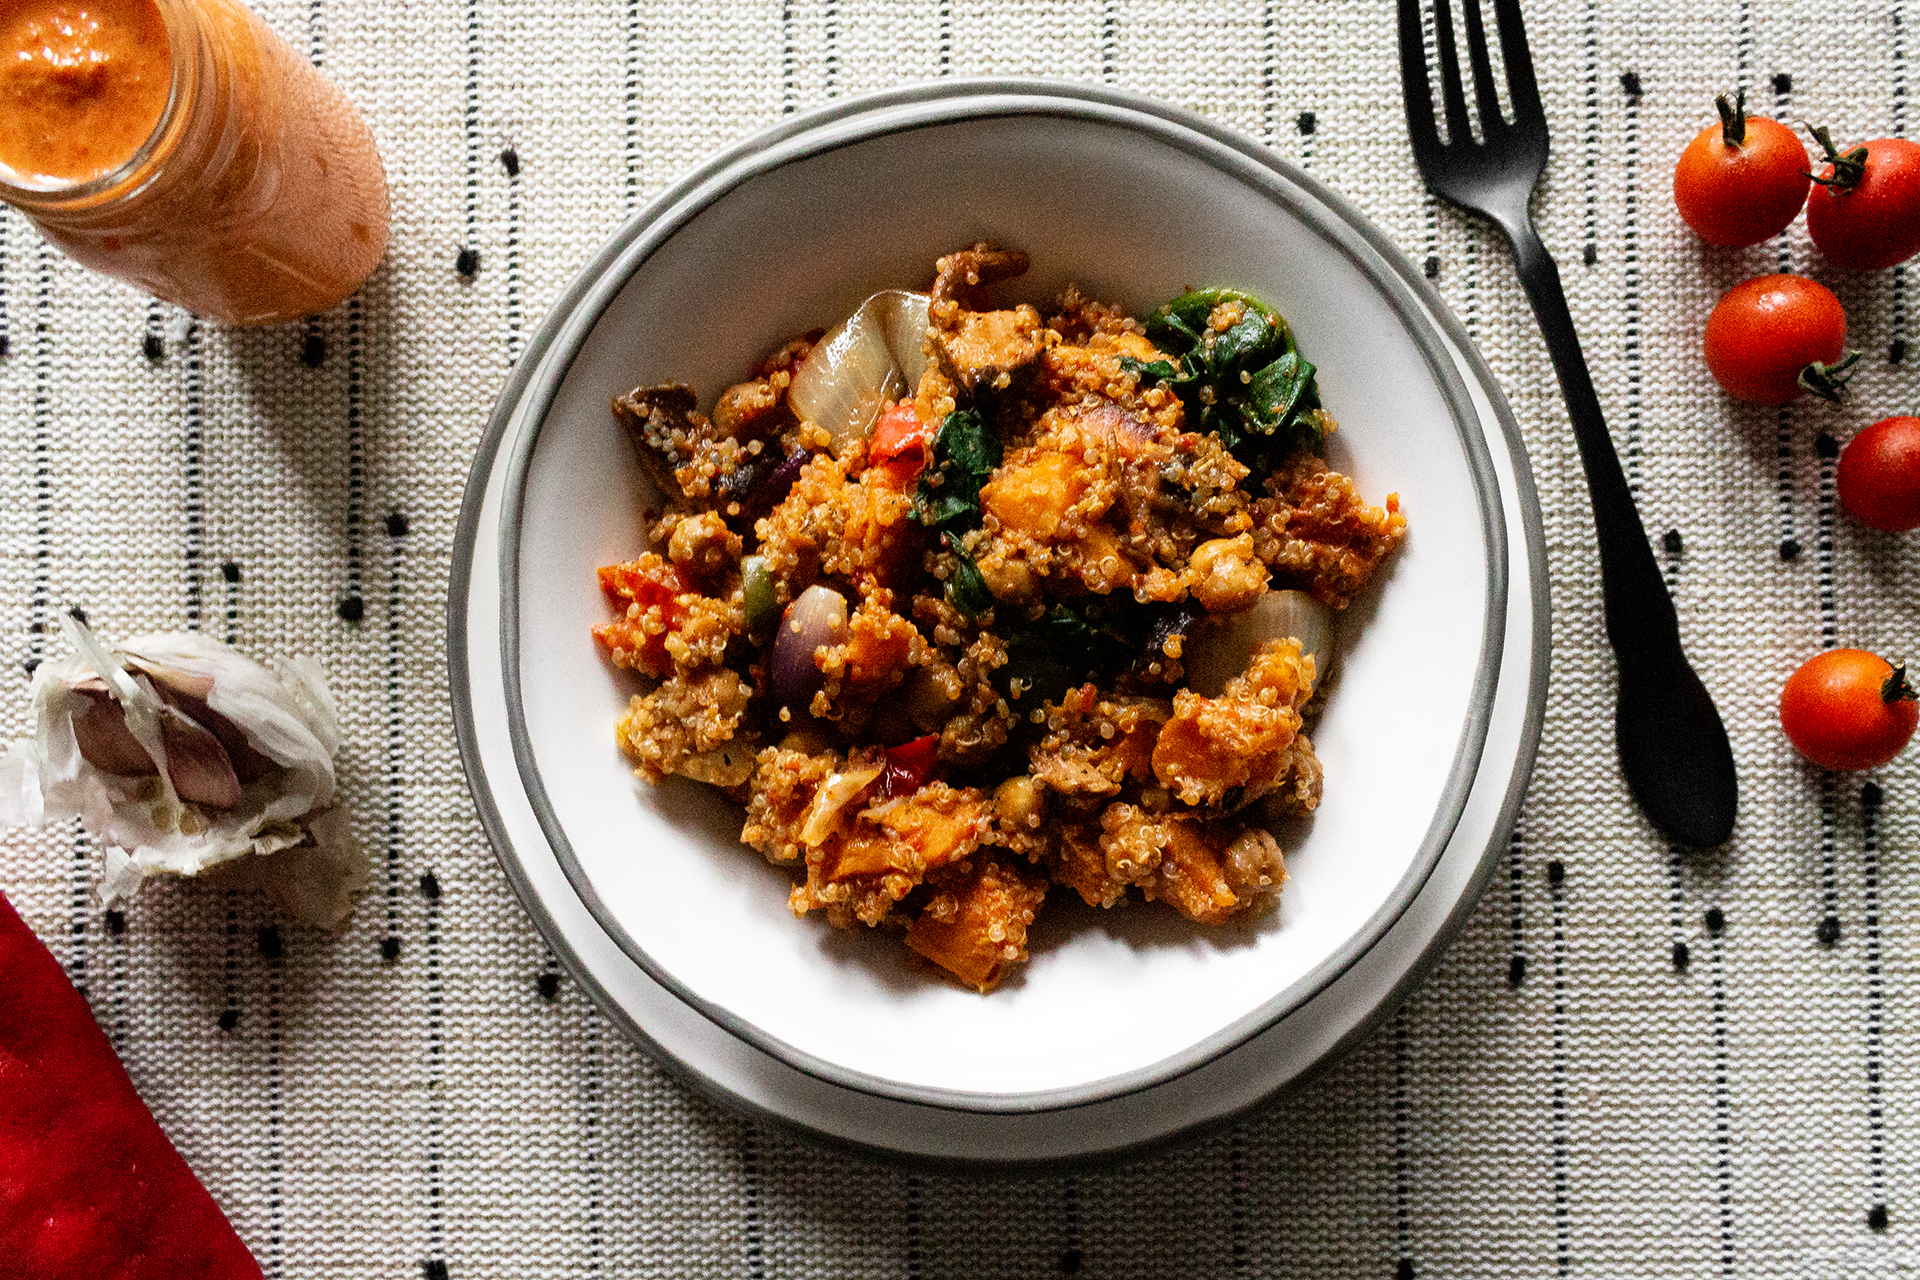
Have I mentioned lately that I’m obsessed with our new local farmer’s market? Yes? Well, too bad–you’re going to hear it again. I am obsessed with that place! This quinoa salad is literally just the result of me throwing every kind of vegetable we picked up during our first official trip to fresh produce heaven into the oven and mixing it with quinoa. Seriously. The first time I made it, every flavor element came right from the veggies themselves. In the half-dozen times I’ve whipped up this recipe since then, I’ve made some minor adjustments (and added a dressing to round it out!) but the core of this dish remains the same. Also, yes–our local farmer’s market has shiitake mushrooms. Incredible.
The red pepper dressing was hugely inspired by a Wegman’s red pepper vinaigrette that I adored… before realizing it wasn’t actually vegan. It still holds a special place in my heart, but once I tried my hand at putting together my own version there is definitely no going back! Everything I loved about the original store-bought version has been completely enhanced in my homemade vegan version, and it’s so simple to throw together in this dish that it takes barely any extra effort at all! I simply roast what needs to be roasted on the same pan as all of my other vegetables, and separate them out to be blended when the timer goes off. Tahini proved to be a great substitute for the cream used to thicken the original dressing, too, and I made a few additional swaps for taste like using red wine vinegar instead of white vinegar. Overall, I’m extremely happy with how it turned out, and I’ll definitely be keeping a jar of it on hand in the fridge for any mid-week lunchtime quinoa salad cravings!
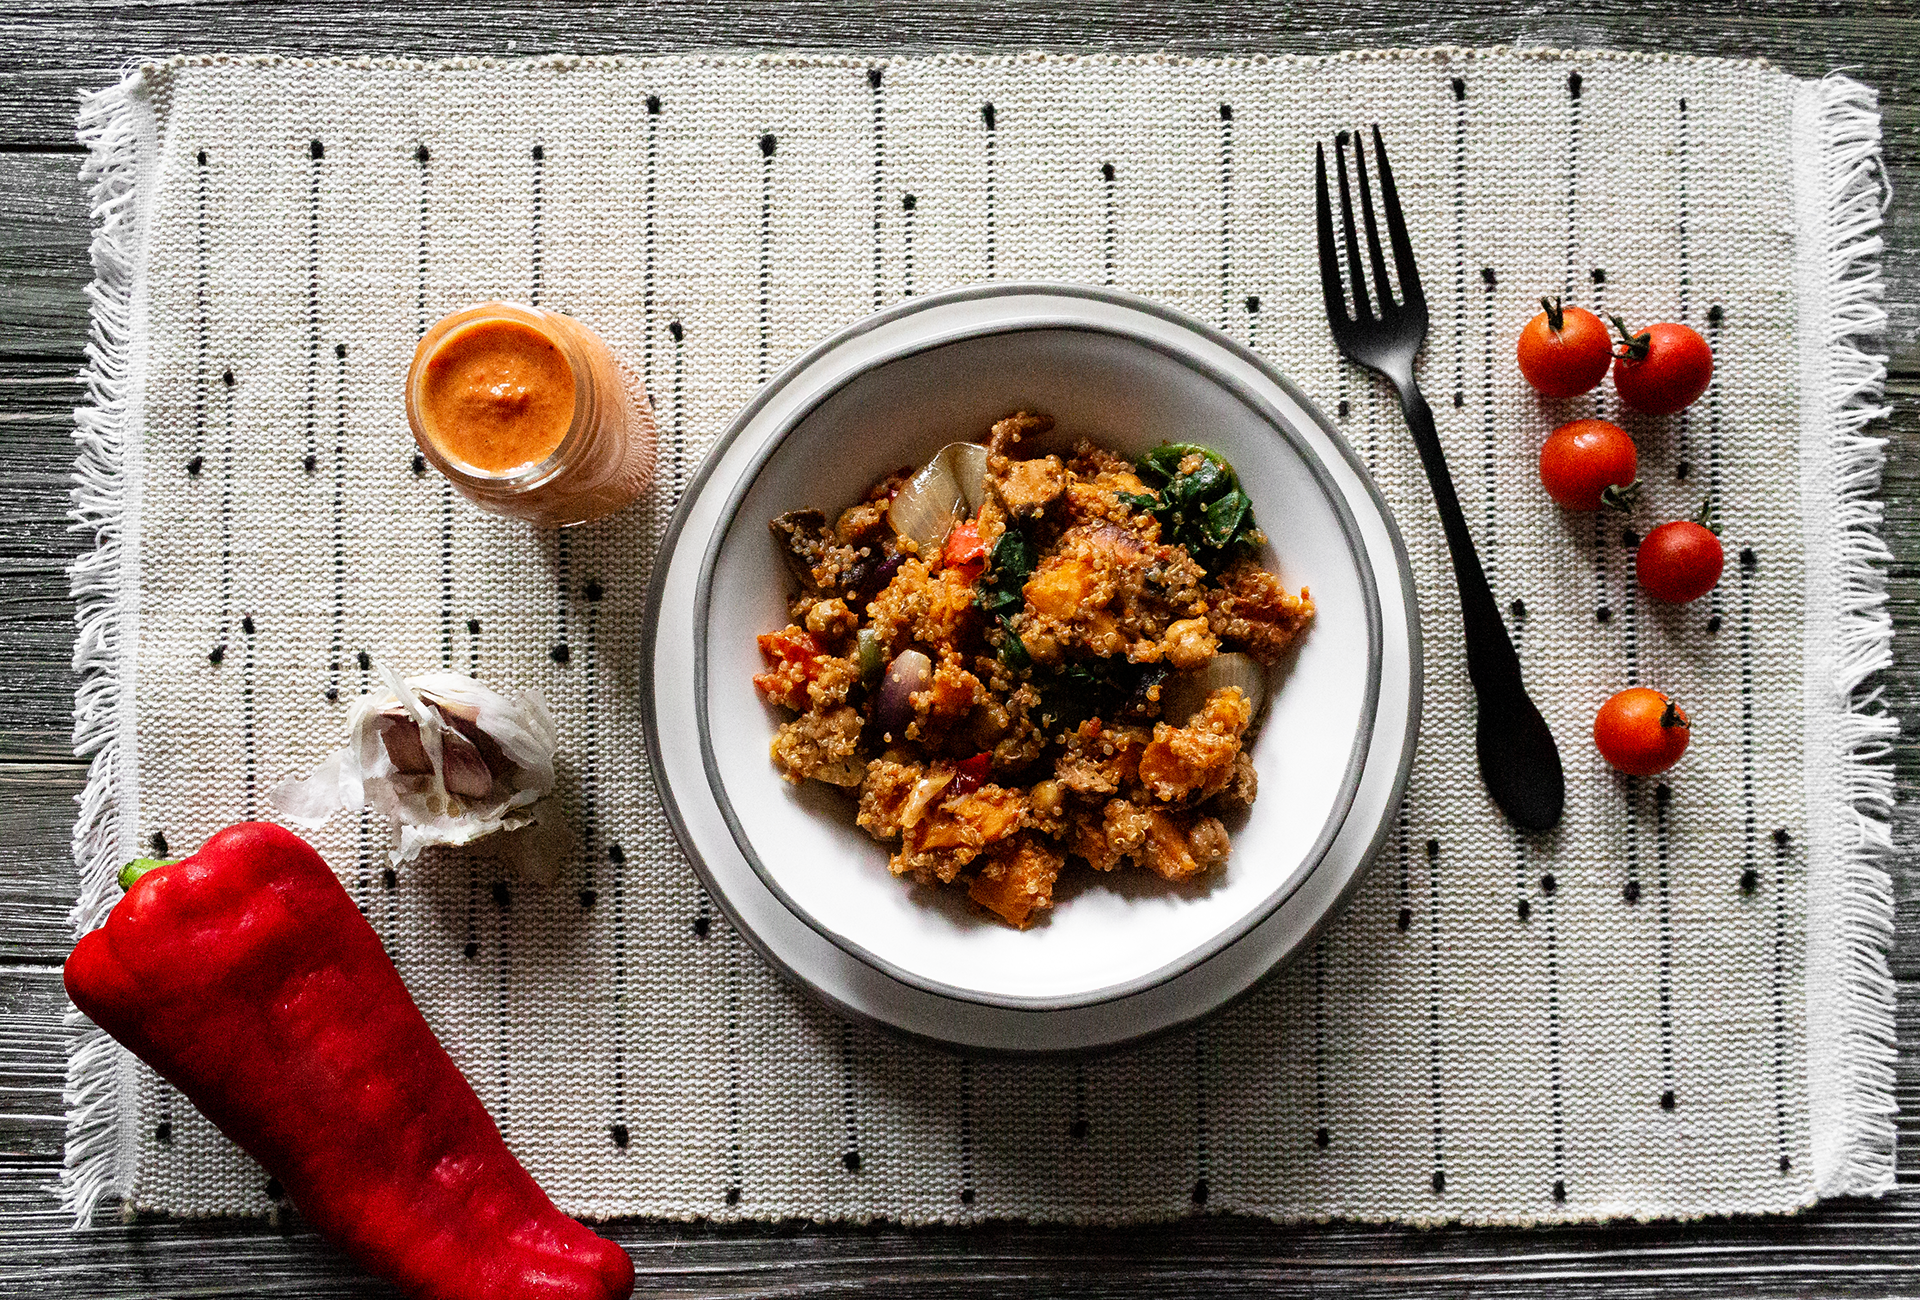
One of the most interesting parts about moving toward a fully plant-based diet (which I spoke a bit about in my shrimp crostini post) has been learning more about nutrition as a whole. Rather than just keeping a rough tally of how many calories I’ve eaten on a given day, I’ve found myself focusing more on things like vitamins, minerals, and basic food categories instead. Doing so has helped to improve my relationship with food as a whole, in addition to making me feel healthier and happier with my overall choices. This dish specifically hits every major checkbox for what I’d consider a satisfying, filling, and nutritious meal. Fiber and carbs from the quinoa, vitamin D from the spinach and mushrooms, vitamin C from the tomatoes and peppers, iron from the onions, protein from the sweet potato and chickpeas, and healthy fats from the olive oil and tahini. Not only does this quinoa salad taste great, but it’s great for your body, too!
This recipe makes four servings.
Salad Ingredients:
- 1/2 cup quinoa, dried
- 1 cup vegetable broth
- 2 medium onions
- 1 medium sweet potato
- 10-12 cherry tomatoes
- 2 large bell peppers
- 1 jalapeno
- 15 oz chickpeas (about 1 can)
- 2 cups spinach, fresh
- 1/2 cup shiitake mushrooms
- 2 tbsp olive oil
- 2 tbsp soy sauce
- 1 tsp chipotle powder
- 1 tsp garlic powder
- 1 tsp salt
Dressing Ingredients:
- 3-4 roasted red peppers (from jar)
- 1 medium onion
- 2 cloves garlic
- 1/4 cup red wine vinegar
- 1/4 cup olive oil + 1/2 tsp divided
- 2 tbsp tahini
- 1 tbsp honey/maple syrup
- 1 tsp rosemary
- 1/4 tsp black pepper
- 1/2 tsp salt + 1/4 tsp divided
Directions:
- Add quinoa and vegetable broth to a rice cooker and begin cycle, or use the stovetop method.
- Preheat oven to 425F.
- Chop sweet potato, bell peppers, and jalapeno into bite-sized (about 1-inch) chunks. Chop onions (all three) into quarters. Slice grape tomatoes in half.
- Toss vegetables from step 2 and rinsed/drained chickpeas in garlic powder, chipotle powder, salt, and 2 tbsp olive oil. Spread evenly on baking sheet.
- Wrap garlic cloves, black pepper, 1/2 tsp olive oil, and 1/4 tsp salt in a small piece of parchment paper to make a garlic roasting packet. Place seam-side down on the baking sheet with the vegetables.
- Roast vegetables and garlic for 20 mins at 425F.
- Meanwhile, heat a nonstick skillet on medium-high heat. Tear shiitake mushrooms into bite-sized pieces and add to the skillet with soy sauce. Saute for 5-7 minutes, or until the mushrooms have absorbed most of the soy sauce and become lightly toasted.
- Remove mushrooms to the side and add spinach to the still-hot skillet. Saute until wilted, about 2-3 minutes. Remove and set aside.
- When the vegetables have finished roasting, add all dressing ingredients (including the now-roasted onion and garlic) to a food processor and blend until smooth. Add salt to taste if necessary.
- In a large bowl, combine quinoa, roasted vegetables and chickpeas, sauteed mushrooms and spinach, and about 1/2 dressing. Toss to coat. Enjoy.
This recipe can be eaten warm, room temperature, or cold, and keeps great in the refrigerator for several days. I’ve used it as a meal prep for myself more than once, and eaten lunch leftovers for dinner on days I don’t feel like cooking. Whether reheated or not, it still taste great. The dressing keeps wonderfully in a sealed mason jar in the fridge, as well, and can be used on more than just this quinoa salad! Alex has been eating it on mixed green salads with rotisserie chicken over the past couple of days, and has really enjoyed having something different on-hand for lunch!


Quinoa Salad with Roasted Red Pepper Vinaigrette
Ingredients
Salad Ingredients
- 1/2 cup quinoa dried
- 1 cup vegetable broth
- 2 onions medium
- 1 sweet potato medium
- 10-12 cherry tomatoes
- 2 bell peppers large
- 1 jalapeno
- 15 oz chickpeas (about 1 can), rinsed and drained
- 2 cups spinach fresh
- 1/2 cup shiitake mushrooms
- 2 tbsp olive oil
- 2 tbsp soy sauce
- 1 tsp chipotle powder
- 1 tsp garlic powder
- 1 tsp salt
Dressing Ingredients
- 3-4 roasted red peppers from jar
- 1 medium onion
- 2 cloves garlic
- 1/4 cup red wine vinegar
- 1/4 cup olive oil + 1/2 tsp divided
- 2 tbsp tahini
- 1 tbsp honey/maple syrup
- 1 tsp rosemary
- 1/2 tsp salt + 1/4 tsp divided
- 1/4 tsp black pepper
Instructions
- Add quinoa and vegetable broth to a rice cooker and begin cycle, or use the stovetop method.
- Preheat oven to 425F.
- Chop sweet potato, bell peppers, and jalapeno into bite-sized (about 1-inch) chunks. Chop onions (all three) into quarters. Slice grape tomatoes in half.
- Toss vegetables from step 2 and rinsed/drained chickpeas in garlic powder, chipotle powder, salt, and 2 tbsp olive oil. Spread evenly on baking sheet.
- Wrap garlic cloves, black pepper, 1/2 tsp olive oil, and 1/4 tsp salt in a small piece of parchment paper to make a garlic roasting packet. Place seam-side down on the baking sheet with the vegetables.
- Roast vegetables and garlic for 20 mins at 425F.
- Meanwhile, heat a nonstick skillet on medium-high heat. Tear shiitake mushrooms into bite-sized pieces and add to the skillet with soy sauce. Saute for 5-7 minutes, or until the mushrooms have absorbed most of the soy sauce and become lightly toasted.
- Remove mushrooms to the side and add spinach to the still-hot skillet. Saute until wilted, about 2-3 minutes. Remove and set aside.
- When the vegetables have finished roasting, add all dressing ingredients (including the now-roasted onion and garlic) to a food processor and blend until smooth. Add salt to taste if necessary.
- In a large bowl, combine quinoa, roasted vegetables and chickpeas, sauteed mushrooms and spinach, and about 1/2 dressing. Toss to coat. Enjoy.

The post Eight-Vegetable Quinoa Salad with Red Pepper Vinaigrette appeared first on I Forgot Salt!.
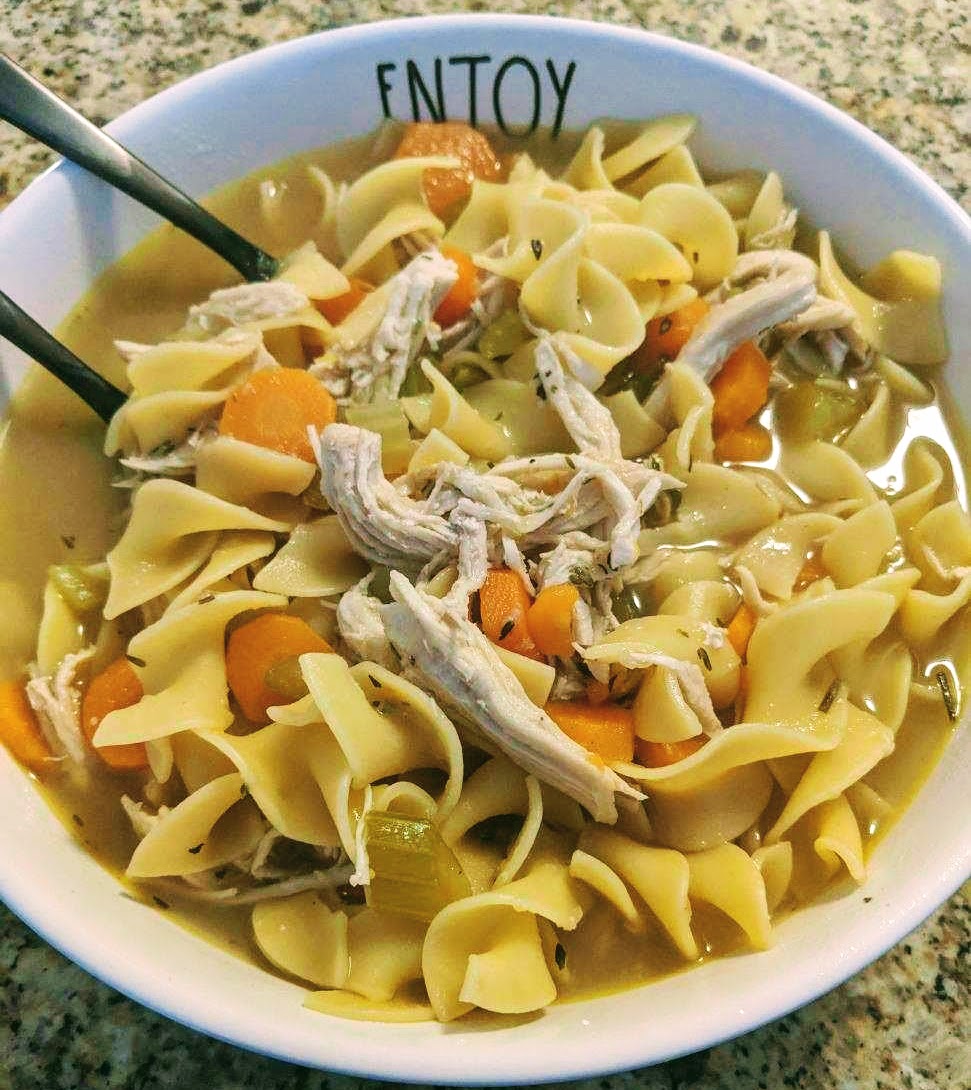
]]>The post Health Bomb Chicken Noodle Soup appeared first on I Forgot Salt!.
]]>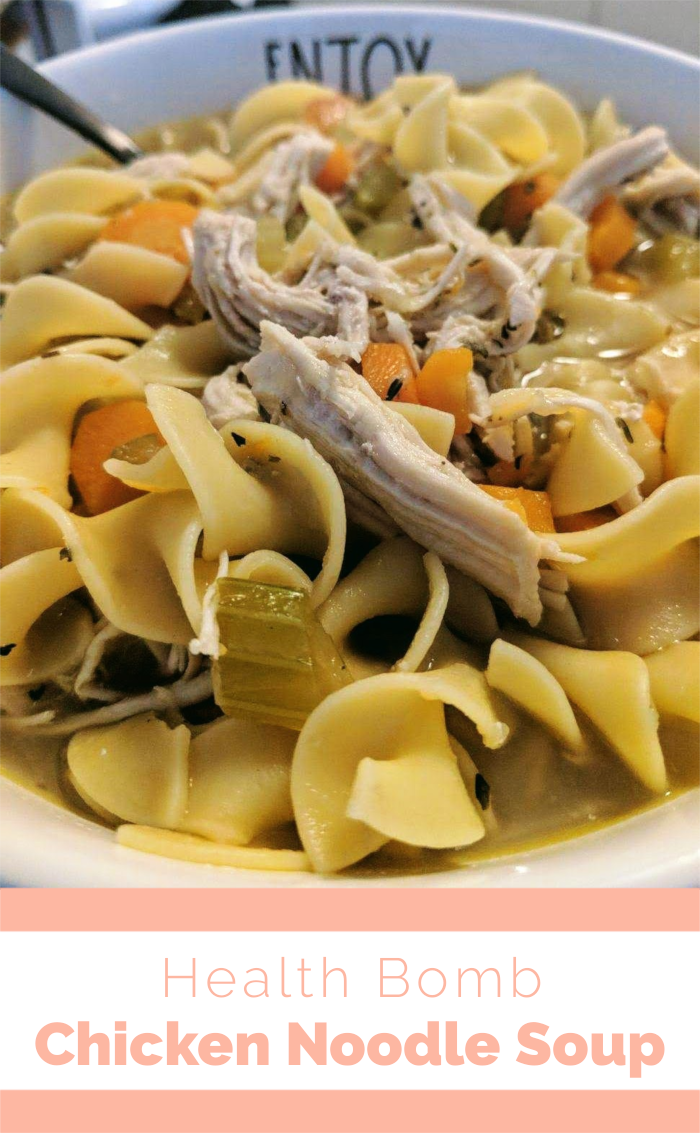
Okay, so–this past week has been less than ideal. I was up late Monday night studying for my psychology midterm, and when I got home from the exam on Tuesday evening (at ten o’clock; you’ve got to love night classes!) Alex had a fever of almost 101F. Yikes! He stayed home on Wednesday and seems to be doing better, but when one of us gets sick the other inevitably follows… so that brings us to today, Friday, and I have called out of work dying, myself. A blight has fallen upon our house and it seems inescapable. The only thing anyone here wants to do is nap, play video games, and eat soup, so that’s exactly what’s happened. At least I had the foresight to make six quarts of chicken noodle stew before Plague rode in on his apocalyptic pony and drop-kicked me in the head.
This recipe makes 10-12 servings.
Ingredients:
- 2 chicken breasts
- 1 package (about 12oz) egg noodles
- 8 cups chicken broth
- 4 cups water
- 1 yellow onion
- 4 large carrots
- 10 large stalks celery
- 1 tbsp minced garlic
- 1 tbsp minced ginger
- 1 ½ tsp thyme
- 1 tsp rosemary
- 1 tsp oregano
- 1 tsp parsley
- 1 tsp basil
- 1 tsp salt
- ½ tsp black pepper
- ½ tsp garlic powder
- 2 tbsp lemon juice
- ½ tsp chili oil (optional)
Directions:
- Peel and dice the yellow onion and add to a large stock pot with minced garlic and minced ginger. Cover and cook on medium heat for 5-10 minutes, or until the onion has softened and become translucent.
- Meanwhile, dice your carrots and celery into small, bite-sized pieces.
- Add diced carrots and celery to the stock pot with thyme, rosemary, oregano, parsley, basil, salt, black pepper, and garlic powder. Mix to distribute spices, cover, and cook for an additional 3-5 minutes, or until the vegetables have brightened in color and the spices have become fragrant.
- Add chicken broth and water to the pot, stirring gently. Add chicken breasts and submerge completely. Raise the heat to medium-high, cover, and boil for 25-30 minutes, depending on the size of your chicken.
- When finished, remove chicken breasts and add dried noodles. Boil noodles for 8 minutes.
- Meanwhile, use two forks to shred the chicken breasts.
- Remove the pot from the heat and add shredded chicken back into the soup. Add lemon juice and stir to combine. Add or serve with chili oil if desired.
This recipe keeps for a week in the fridge, and reheats well either re-boiled with additional water/broth or in the microwave. I called it “health bomb” because apparently garlic is good for the immune system, ginger is good for the stomach, lemon is good for the throat, and chili oil is good for the sinuses… and we need all the help we can get in our house this week.
Health Bomb Chicken Noodle Soup
Ingredients
- 2 chicken breasts
- 1 package egg noodles about 12oz
- 8 cups chicken broth
- 4 cups water
- 1 yellow onion
- 4 large carrots
- 10 large stalks celery
- 1 tbsp garlic minced
- 1 tbsp ginger minced
- 1 ½ tsp thyme
- 1 tsp rosemary
- 1 tsp oregano
- 1 tsp parsley
- 1 tsp basil
- 1 tsp salt
- ½ tsp black pepper
- ½ tsp garlic powder
- 2 tbsp lemon juice
- ½ tsp chili oil optional
Instructions
- Peel and dice the yellow onion and add to a large stock pot with minced garlic and minced ginger. Cover and cook on medium heat for 5-10 minutes, or until the onion has softened and become translucent.
- Meanwhile, dice your carrots and celery into small, bite-sized pieces.
- Add diced carrots and celery to the stock pot with thyme, rosemary, oregano, parsley, basil, salt, black pepper, and garlic powder. Mix to distribute spices, cover, and cook for an additional 3-5 minutes, or until the vegetables have brightened in color and the spices have become fragrant.
- Add chicken broth and water to the pot, stirring gently. Add chicken breasts and submerge completely. Raise the heat to medium-high, cover, and boil for 25-30 minutes, depending on the size of your chicken.
- When finished, remove chicken breasts and add dried noodles. Boil noodles for 8 minutes.
- Meanwhile, use two forks to shred the chicken breasts.
- Remove the pot from the heat and add shredded chicken back into the soup. Add lemon juice and stir to combine. Add or serve with chili oil if desired.
The post Health Bomb Chicken Noodle Soup appeared first on I Forgot Salt!.
]]>The post Easy Stock Spicy Chicken Miso Ramen appeared first on I Forgot Salt!.
]]>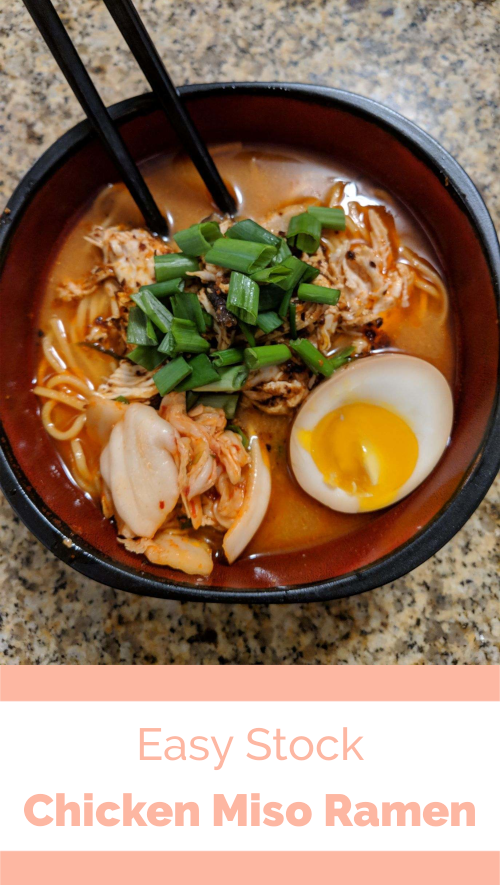
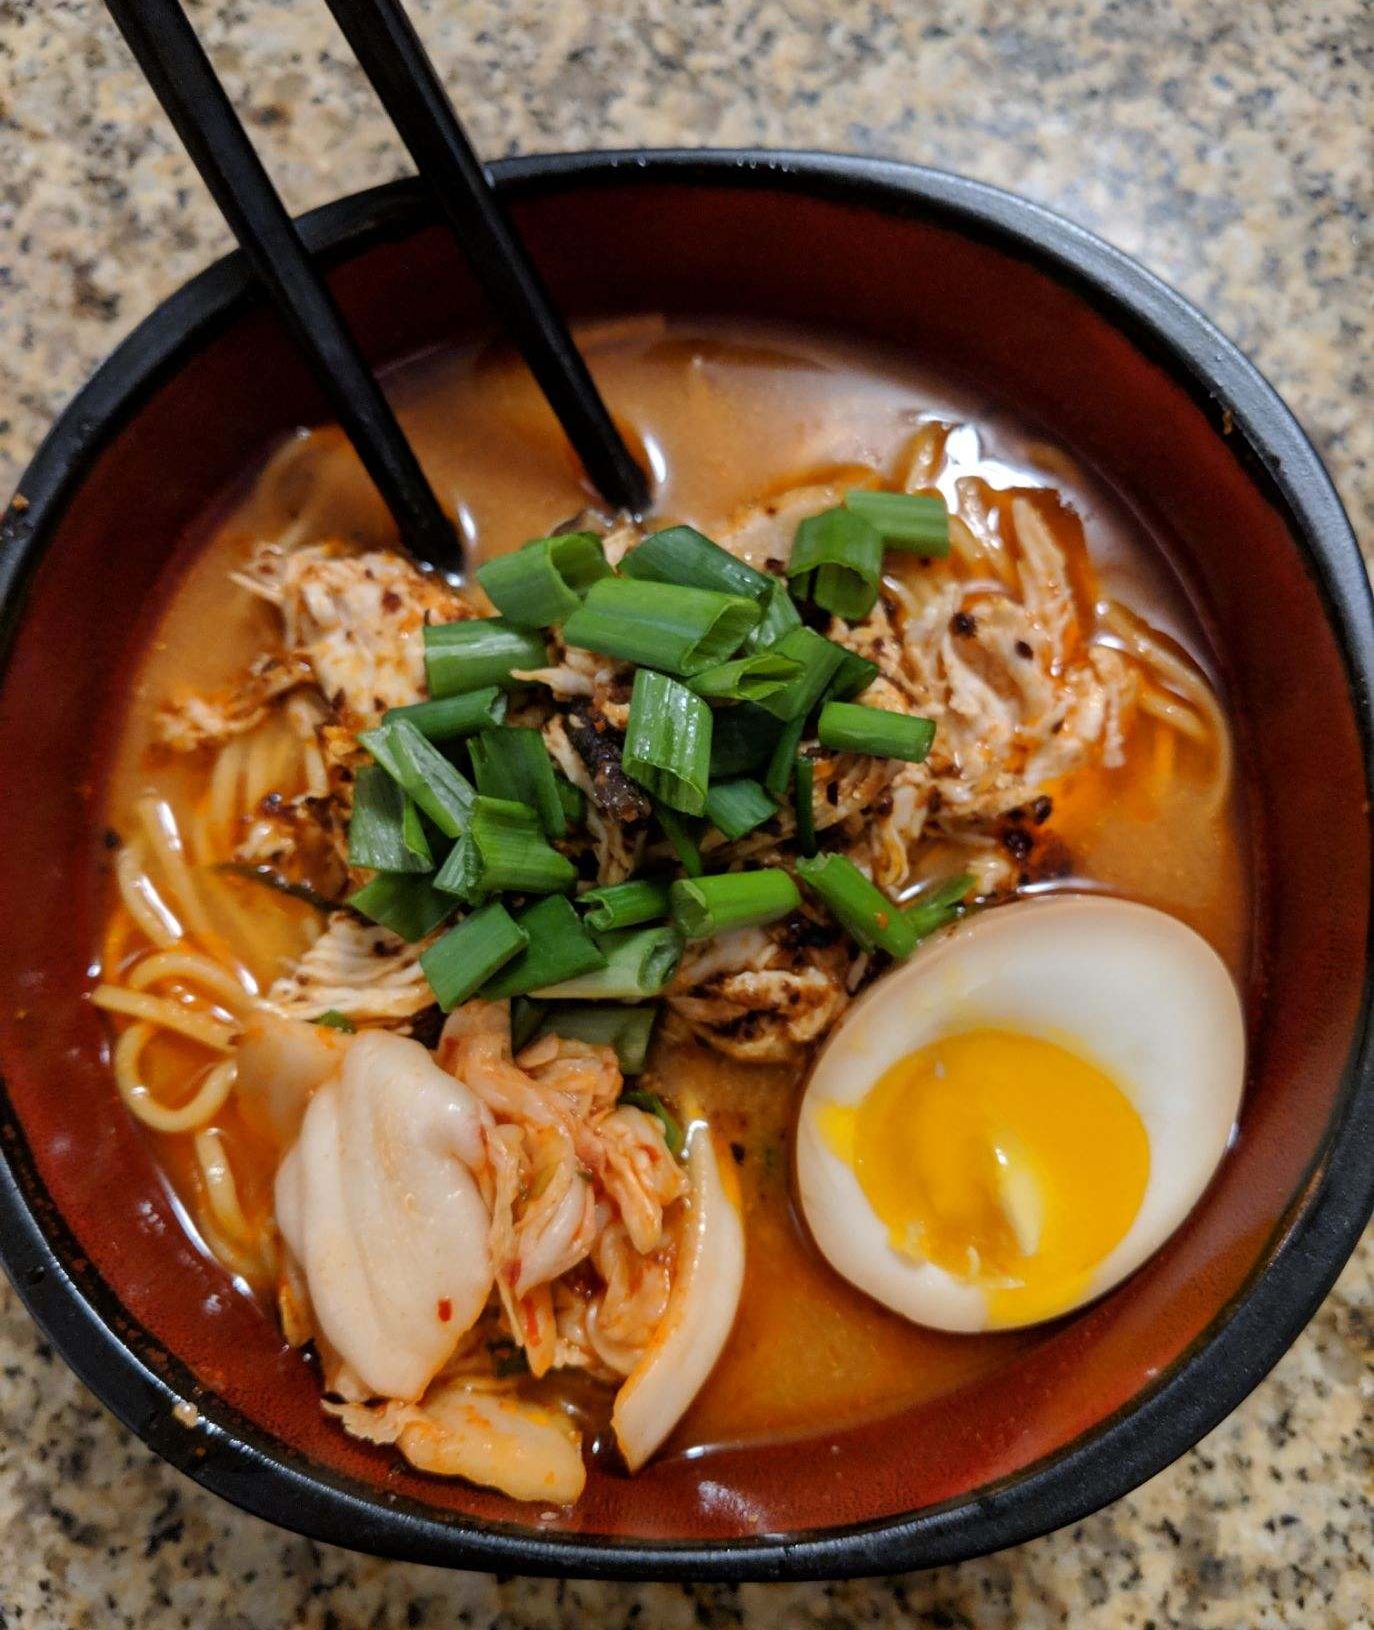
Over the holidays, my brother-in-law made tonkotsu ramen completely from scratch–pork bones and lard chunks and chashu and all–and it was a ten-hour masterpiece made for a meat-lover. I’ll be the first to admit that the broth was delicious, and after returning home I absolutely wanted to try it for myself… with a few adjustments. As many of you may know, I was “officially” a vegetarian from 2008 to 2017 (when I met my boyfriend, a lifelong carnivore), and my parents still tell stories about Baby Em refusing to swallow beef, pork, lamb… any meat other than McDonald’s Chicken Selects even before I could form proper sentences. What can I say? I just think it tastes odd no matter how you dress it up, and that still holds true after twenty-three years. So, my quest to find a somewhat authentic ramen recipe naturally went down the path of a non-bone-based broth, and I eventually settled on miso.
As a bit of a forward, ramen is traditionally made up of three to four parts, depending on the type: broth (or stock), tare (the flavor base at the bottom of the bowl), flavored oil (optional), and noodles/garnish (including meats). I used all four categories to make this recipe, and that required some specialty ingredients. Because I don’t have a proper Japanese grocer anywhere near me, I ordered almost everything non-perishable on Amazon in borderline-obscene quantities for about $40. While that might seem like a huge upfront cost, I now have enough ingredients to make this recipe (and many, many other Asian dishes) a dozen times or more. In many ways, it was an investment in eating something better than haphazard teriyaki stir-fry.
This recipe makes 5-6 servings, depending on the size of your bowl.
Stock Ingredients:
- 2 whole bulbs garlic
- 1 medium white onion
- 1 medium ginger root
- 2 whole carrots
- 1 bunch green onions
- 1/3 cup dried shiitake mushrooms
- 6 strips kombu seaweed
- 5 cups water
- 8 cups chicken stock
- ½ cup dry sake
- 2-3 chicken breasts
Chili Oil Ingredients:
NOTE: You can use store-bought chili oil instead of making your own. I made mine so that I could use the leftover seasoning to flavor my chicken, but it’s totally up to you.
- ½ cup olive oil
- 1 tbsp minced ginger
- 1 tbsp minced garlic
- 2 tbsp gochugaru
- 3 tbsp bonito flakes/katsuobushi
Tare Ingredients:
- ½ cup white miso paste
- 2 tbsp gochujang
- ½ cup dry sake
- ½ cup mirin
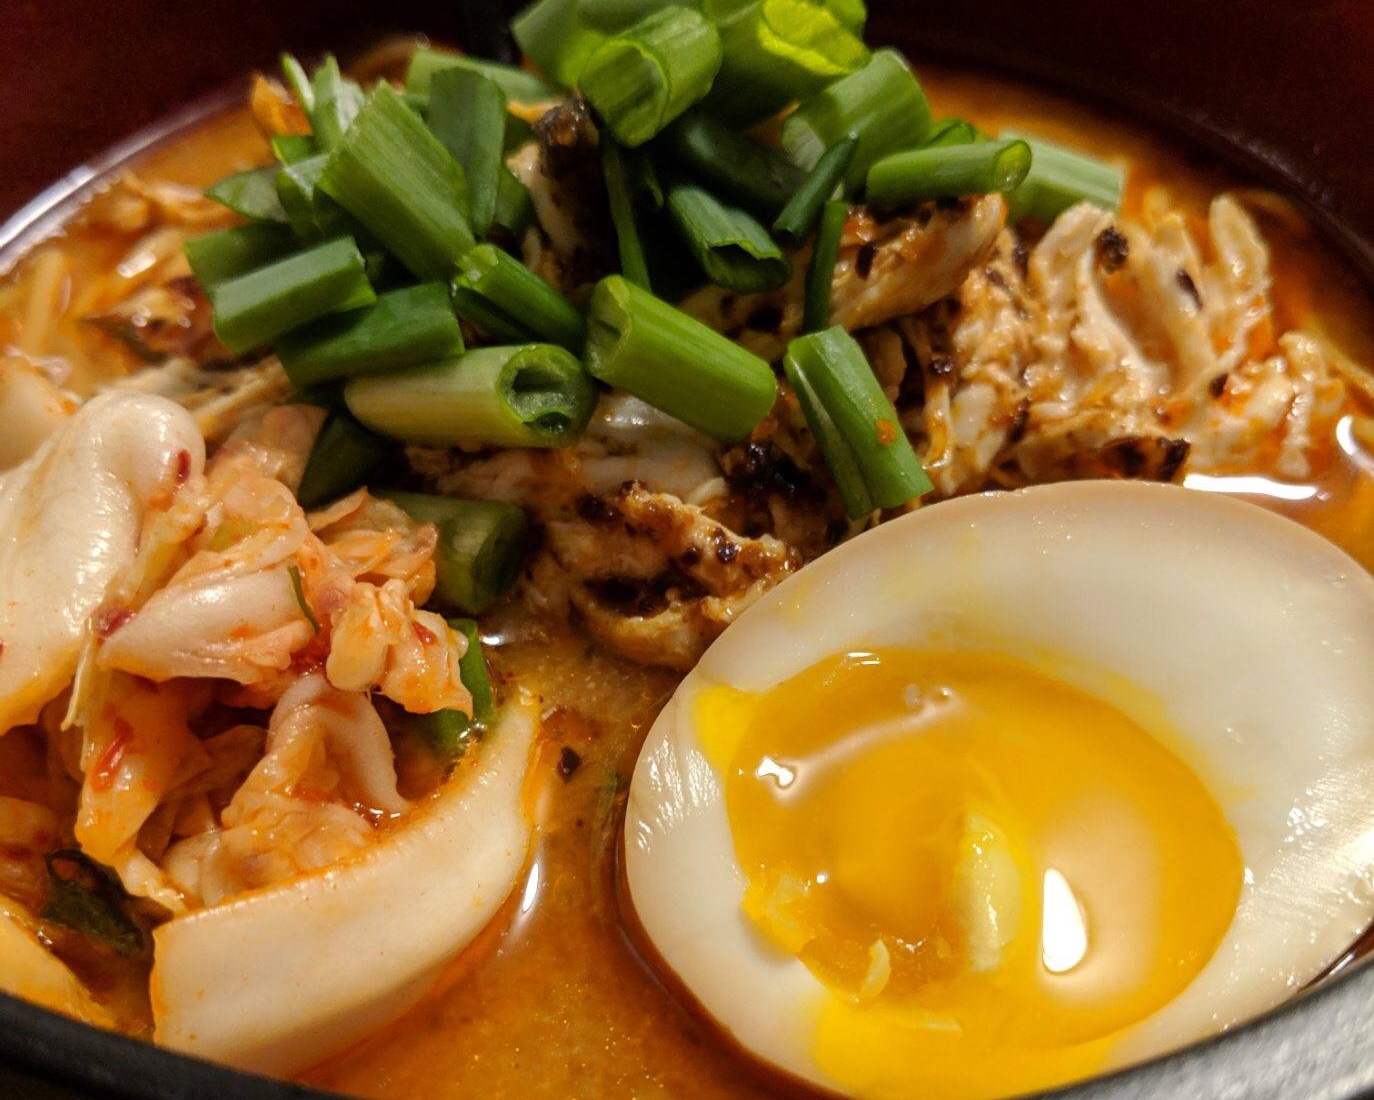
Noodles/Garnishes:
- 2-3 cups ramen noodles
- 1/8 cup chopped green onions (per serving)
- ¼ cup kimchi (per serving)
- 1 soft-boiled ramen egg (per serving)
Directions:
- In the biggest stock pot you own, add water, chicken stock, kombu, shiitake mushrooms, green onions (washed and ripped in half so you have a shorter bunch that will fit in your pot), carrots (washed, peeled, and cut in half so they will fit in your pot), ginger (sliced lengthwise into 3-4 pieces with the flesh showing), garlic bulbs (sliced in half so each individual clove is cut down the middle), and onion (peeled and sliced in half).
- Bring stock to boil, cover, and reduce heat to simmer for 1 hour.
- Add whole chicken breasts and push to the bottom of the pot. Add ½ cup sake (if desired). Cover and continue simmering for an additional 20-25 minutes, depending on the size/quantity of chicken.
- In a small sauce pot combine ½ cup olive oil, 1 tbsp minced ginger, 1 tbsp minced garlic, 2 tbsp gochugaru (or red pepper flakes), and 3 tbsp (or 1 packet) katsuobushi.
- Lightly simmer chili oil on low/medium-low heat for 15 minutes, stirring occasionally. Remove from heat and let sit until it cools.
- In a slightly larger sauce pot, add ½ cup white miso, 2 tbsp gochujang (or sriracha), ½ cup sake (if desired), ½ cup mirin (or sugar/vinegar mixture). Whisk until smooth.
- Bring tare to boil and then reduce to medium-low heat for 5-10 minutes, stirring occasionally to prevent burning. Remove from heat and let sit until it cools.
- Reduce broth to low heat.
- Remove chicken breasts and shiitake mushrooms (Note: only remove if you want to eat them; eating the mushrooms is optional) from the broth and set aside in a separate bowl to cool.
- Remove all other solid ingredients (kombu, carrots, onions, garlic, etc.) and throw away. You may need to use a strainer to remove smaller bits of garlic peel or stray onions rings, but if it doesn’t bother you don’t worry about it. We’re not serving this to paying customers. (Note: if you don’t plan on eating the shiitake mushrooms, toss them in the trash with the other stock ingredients.)
- When the chicken is cool enough to handle, shred the breasts with your hands (or two forks) until you have nice bite-sized strips. (Note: and slice the mushrooms if you’re going to eat them.)
- In a small bowl, strain the chili oil with cheese cloth or mesh strainer to remove all chili flakes/katsuobushi flakes/etc. Squeeze to extract all extra oil. Set aside clear oil to be served and reserve “chunks”.
- Add the strained chili flakes/katsuobusi flakes/etc. “chunks” to your shredded chicken/shiitake and mix until coated.
- Cook noodles according to package directions. (Note: if using fresh ramen noodles, add to boiling water and cook for no more than 2 minutes.)
- When you’re ready to serve, add 1/3 cup tare, 1 – 1 ½ tbsp chili oil, 1 ½ – 2 cups hot broth to a bowl. Stir gently to combine. Add noodles and coat with broth. Garnish with chicken/shiitake, kimchi, chopped green onion, and soft-boiled ramen egg. Eat and enjoy!
When storing leftovers, you can either assemble “bowls” of ramen in Tupperware/mason jar to reheat later, or keep each part separate for future use. If stored together, each “bowl” keeps for 24 hours and must be reheated by bringing to boil in a small pot (like you would for a regular can of soup). We tried microwaving it and that didn’t work well. Just trust me.
If stored separately, the oil will keep for 6 months (covered), the tare will keep for 2 weeks (covered), the stock will keep for 4 days (covered) in the fridge OR 2 months (covered) in the freezer, frozen, and the noodles will keep 3 days (covered).
Disclaimer: This recipe was inspired by Seonkyoung Longest’s “Spicy Chicken Miso Ramen” YouTube video. I changed a few things (amounts, ingredients, and a few additions) and left several other things out (ingredients I either forgot or just didn’t add) both based on what I could/couldn’t find and my own tastes. All of her recipes are awesome! Please go watch her videos!

Easy Stock Spicy Chicken Miso Ramen
Ingredients
Stock Ingredients:
- 2 bulbs garlic whole
- 1 white onion medium
- 1 ginger root medium
- 2 carrots whole
- 1 bunch green onions
- ⅓ cup dried shiitake mushrooms
- 6 strips kombu seaweed
- 5 cups water
- 8 cups chicken stock
- ½ cup dry sake
- 2-3 chicken breasts
Chili Oil Ingredients:
- ½ cup olive oil
- 1 tbsp minced ginger
- 1 tbsp minced garlic
- 2 tbsp gochugaru
- 3 tbsp bonito flakes/katsuobushi
Tare Ingredients:
- ½ cup white miso paste
- 2 tbsp gochujang
- ½ cup dry sake optional
- ½ cup mirin
Noodles/Garnishes:
- 2-3 cups ramen noodles
- 1/8 cup chopped green onions per serving
- ¼ cup kimchi per serving
- 1 soft-boiled ramen egg per serving
Instructions
- In the biggest stock pot you own, add water, chicken stock, kombu, shiitake mushrooms, green onions (washed and ripped in half so you have a shorter bunch that will fit in your pot), carrots (washed, peeled, and cut in half so they will fit in your pot), ginger (sliced lengthwise into 3-4 pieces with the flesh showing), garlic bulbs (sliced in half so each individual clove is cut down the middle), and onion (peeled and sliced in half).
- Bring stock to boil, cover, and reduce heat to simmer for 1 hour.
- Add whole chicken breasts and push to the bottom of the pot. Add ½ cup sake (if desired). Cover and continue simmering for an additional 20-25 minutes, depending on the size/quantity of chicken.
- In a small sauce pot combine ½ cup olive oil, 1 tbsp minced ginger, 1 tbsp minced garlic, 2 tbsp gochugaru (or red pepper flakes), and 3 tbsp (or 1 packet) katsuobushi.
- Lightly simmer chili oil on low/medium-low heat for 15 minutes, stirring occasionally. Remove from heat and let sit until it cools.
- In a slightly larger sauce pot, add ½ cup white miso, 2 tbsp gochujang (or sriracha), ½ cup sake (if desired), ½ cup mirin (or sugar/vinegar mixture). Whisk until smooth.
- Bring tare to boil and then reduce to medium-low heat for 5-10 minutes, stirring occasionally to prevent burning. Remove from heat and let sit until it cools.
- Reduce broth to low heat.
- Remove chicken breasts and shiitake mushrooms* from the broth and set aside in a separate bowl to cool.
- Remove all other solid ingredients (kombu, carrots, onions, garlic, etc.) and throw away. You may need to use a strainer to remove smaller bits of garlic peel or stray onions rings, but if it doesn’t bother you don’t worry about it. We’re not serving this to paying customers.**
- When the chicken is cool enough to handle, shred the breasts with your hands (or two forks) until you have nice bite-sized strips.***
- In a small bowl, strain the chili oil with cheese cloth or mesh strainer to remove all chili flakes/katsuobushi flakes/etc. Squeeze to extract all extra oil. Set aside clear oil to be served and reserve “chunks”.
- Add the strained chili flakes/katsuobusi flakes/etc. “chunks” to your shredded chicken/shiitake and mix until coated.
- Cook noodles according to package directions.****
- When you’re ready to serve, add 1/3 cup tare, 1 – 1 ½ tbsp chili oil, 1 ½ – 2 cups hot broth to a bowl. Stir gently to combine. Add noodles and coat with broth. Garnish with chicken/shiitake, kimchi, chopped green onion, and soft-boiled ramen egg. Eat and enjoy!
Notes
- *Only remove if you want to eat them; eating the mushrooms is optional
- **If you don’t plan on eating the shiitake mushrooms, toss them in the trash with the other stock ingredients.
- ***And slice the mushrooms if you’re going to eat them.
- **** If using fresh ramen noodles, add to boiling water and cook for no more than 2 minutes.
The post Easy Stock Spicy Chicken Miso Ramen appeared first on I Forgot Salt!.
]]>